Freelander 1. Manual - part 191


  Index      Land Rover     Freelander 1 - service manual 2002 year


Search            


Content   ..  189  190  191  192   ..


Freelander 1. Manual - part 191


BRAKES

REPAIRS

70-13

Sensor -  brake pedal position

$% 70.35.44

Remove

1. Release bayonet fitting on brake light switch 

and remove switch.

2. Release sensor from mounting bracket.
3. Disconnect sensor multiplug and remove 

sensor.

4. Remove sensor mounting from bracket.

Refit

1. Position sensor to mounting bracket and 

connect multiplug.

2. Position switch and secure bayonet fitting.
3. Hold brake pedal depressed and push sensor 

fully into bracket, release pedal slowly to set 
sensor position.

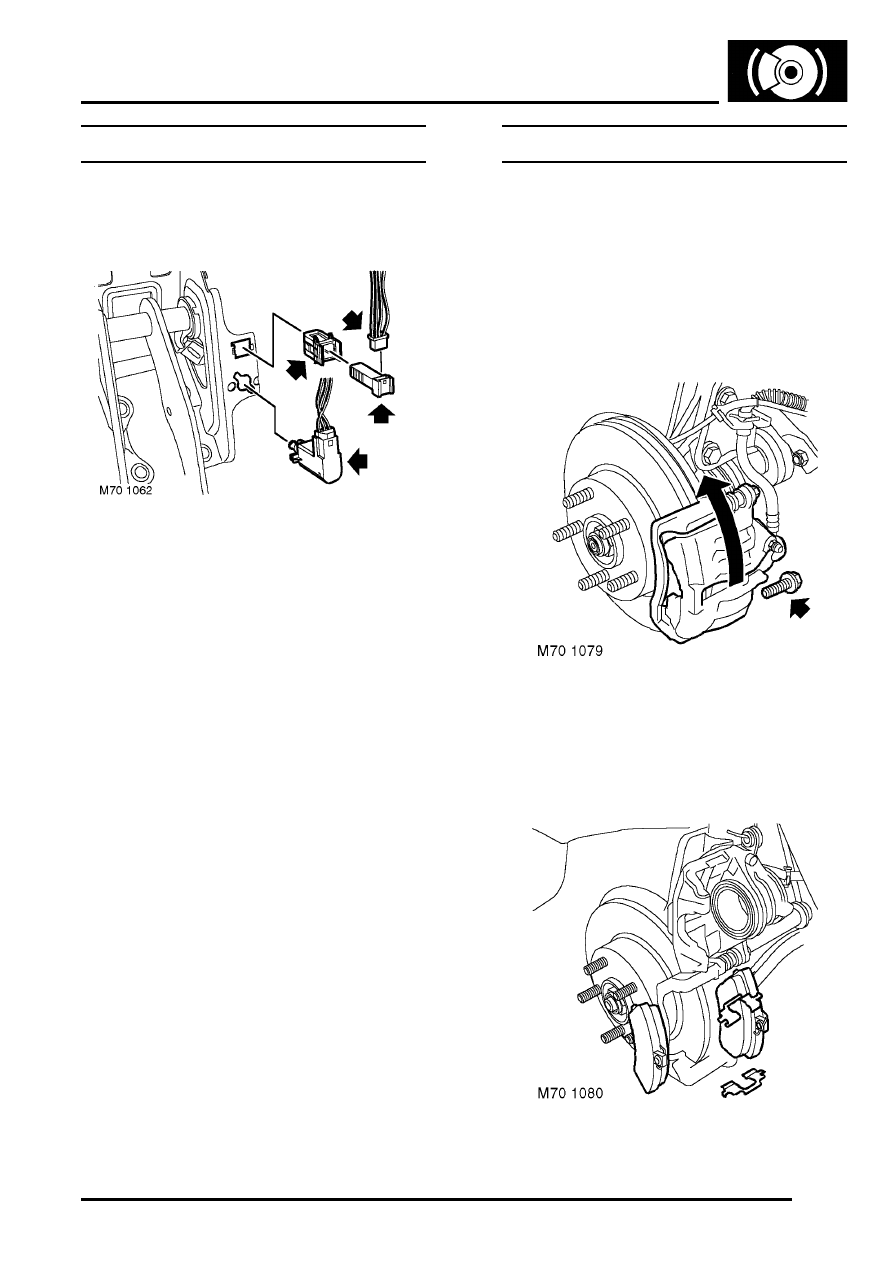
Shoes/pads - front - set

$% 70.40.02

Remove

1. Raise front of vehicle.

WARNING: Do not work on or under a 
vehicle supported only by a jack. Always 
support the vehicle on safety stands.

2. Remove front road wheel.

3. Remove lower guide pin bolt from caliper and 

pivot caliper housing upwards.

WARNING: Brake pads must be renewed in 
axle sets only, otherwise braking efficiency 
may be impaired.

4. Remove brake pads and retainers from caliper 

brackets.

BRAKES

70-14

REPAIRS

Refit

1. Rotate disc by hand and scrape all scale and 

rust from around edge of disc.

2. Scrape rust from pad locating surfaces on 

caliper.

3. Clean dust from calipers using brake cleaning 

fluid.

WARNING: Do not use an air line to blow 
dust from brake assembly. Do not use 
petroleum based fluid as damage will occur 
to rubber components.

4. Position bleed bottle, connect bleed hose to 

bleed screw and loosen screw. 

5. Press piston back into housing and tighten 

bleed screw to 10 Nm (7.5 lbf.ft).

6. Disconnect bleed hose and remove bottle.

7. Fit pad retainers to caliper bracket.

8. Fit pads to caliper bracket.

 The leading edge of the pads have chamfers 
on them, the chamfers are asymmetric. It is 
imperative that the pads are correctly fitted. 
Pad 'A' in illustration must be fitted to the 
inboard side of the caliper. Pad 'B' must be 
fitted to the outboard side of the caliper. 
Illustration shows a LH pair of pads.

9. Lower caliper housing over pads.

10. Ensure flats on guide pins locate with lugs on 

caliper housing. Fit bolts and  tighten to 27 Nm 
(20 lbf.ft).

11. Repeat procedure for other side.
12. Fit road wheel(s) and tighten nuts to 115  Nm 

(85 lbf.ft).

13. Remove stands and lower vehicle.
14. Depress brake several times to set pad to disc 

clearance.

15. Check and top-up brake fluid.

M70 1148

A

B

BRAKES

REPAIRS

70-15

Brake Shoes - rear set

$% 70.40.09

Remove

1. Raise rear of vehicle.

WARNING: Do not work on or under a 
vehicle supported only by a jack. Always 
support the vehicle on safety stands.

2. Remove rear road wheels.
3. Remove rear brake drums.


 + 

 BRAKES, REPAIRS, Drum - rear.

4. Depress brake shoe clips and turn to release, 

remove 2 clips and 2 retaining pins.

5. Release handbrake cable from brake shoe 

lever.

6. Ease one brake shoe out of retaining groove in 

abutment followed by the other shoe.

7. Manoeuvre brake shoe assembly around wheel 

cylinder and rear hub and remove brake shoe 
assembly.

CAUTION: Ensure edges of brake shoes do 
not damage wheel cylinder dust covers.

BRAKES

70-16

REPAIRS

8. Fit an elastic band around wheel cylinder to 

retain pistons.

9. Noting their fitted position, release and remove 

return springs. Collect adjuster and expander.

10. Clean backplate and drum with brake cleaning 

fluid.

WARNING: Do not use petroleum based 
fluid as damage will occur to rubber 
components

11. Use a wire brush to remove any corrosion, take 

care not to damage wheel cylinder covers.

WARNING: Do not use compressed air to 
clean brake components. Dust from friction 
materials can be harmful if inhaled.

12. Inspect all parts for wear or damage.
13. Examine wheel cylinder dust seals for signs of 

brake fluid leakage, a certain amount of 
dampness is usual. However, if excessive fluid 
is apparent, lift dust seals and check for 
leakage. Renew wheel cylinders and brake 
shoes if linings are contaminated.

14. Check wheel cylinder pistons for freedom of 

movement.

15. Check brake adjuster threads,  nut and 

handbrake linkage for wear. Renew if 
necessary.

16. Check condition of return springs and renew if 

necessary.

17. Ensure brake adjuster is fully off.

Refit

1. Position adjuster and expander to brake shoes 

and fit return springs.

2. Smear brake shoe contact points with Molykote 

111 grease.

3. Remove elastic band from wheel cylinder.
4. Manoeuvre brake shoes around rear hub and 

locate to abutment and wheel cylinder.

5. Fit brake shoe retaining pins and secure with 

clips.

6. Connect hand brake cable to brake shoe lever.
7. Fit brake drum.


 + 

 BRAKES, REPAIRS, Drum - rear.

8. Apply brake pedal a min. of 30 times to  ensure 

full  adjustment of rear brake shoes after 
refitting.

9. Fit road wheel(s) and tighten nuts to 115  Nm 

(85 lbf.ft).

10. Remove stands and lower vehicle.


Content   ..  189  190  191  192   ..