Freelander 1. Manual - part 166


  Index      Land Rover     Freelander 1 - service manual 2002 year


Search            


Content   ..  164  165  166  167   ..


Freelander 1. Manual - part 166


AUTOMATIC GEARBOX - JATCO

REPAIRS

44-25

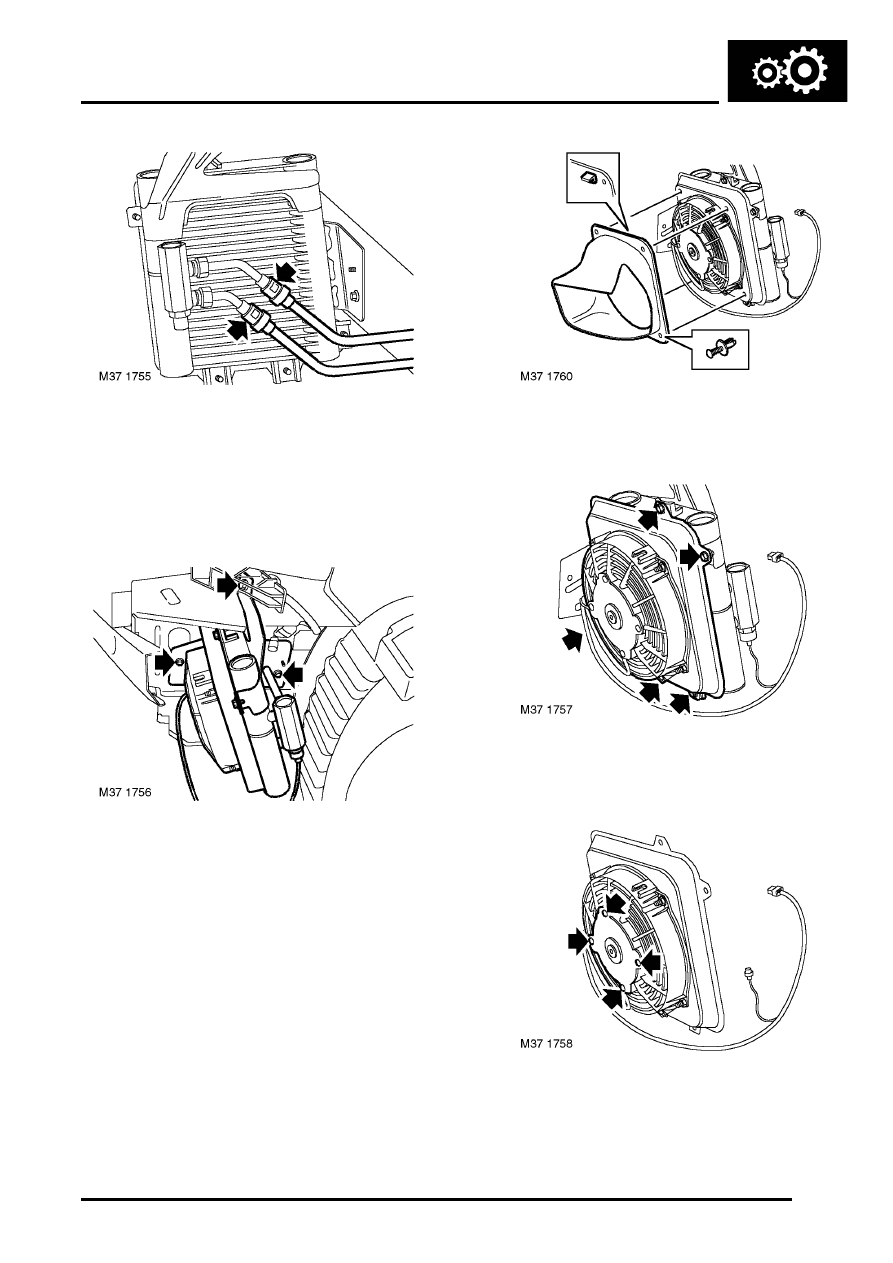
7. Disconnect cooler quick release hoses.

CAUTION: Before disconnecting or 
removing components, ensure the 
immediate area around joint faces and 
connections are clean. Plug open 
connections to prevent contamination.

8. Remove 3 bolts securing air blast cooler 

assembly to chassis and move aside.

9. Remove 2 scrivets, release cooler ducting from 

hooks and move aside.

10. Remove 5 bolts securing fan cowl to cooler 

matrix and move aside.

11. Remove 4 nuts securing fan motor to cowl and 

move aside.

NOTE: Do not carry out further dismantling if 
component is removed for access only.

AUTOMATIC GEARBOX - JATCO

44-26

REPAIRS

12. Remove cooler pipe union nuts and move pipes 

aside.

CAUTION: To prevent damage to 
components, use two spanners when 
loosening or tightening unions.

13. Remove and discard 'O' rings.

Refit

1. Fit new 'O' rings to oil cooler pipes.
2. Fit pipes to cooler matrix, align and tighten 

union nuts to 25 Nm (18 lbf.ft). 

3. Position fan cowl to cooler matrix, fit bolts and 

tighten to 5 Nm (3.5 lbf.ft). 

4. Position fan motor to cowl, fit nuts and tighten 

to 5 Nm (3.5 lbf.ft). 

5. Fit cooler duct and secure with scrivets.
6. Fit air blast cooler assembly, fit bolts and 

tighten upper bolt to 5 Nm (3.5 lbf.ft). Lower 
bolts should be tightened to 10 Nm (7.5 lbf.ft).    

7. Ensure connections are clean, then fit and 

secure flexible hoses.

8. Fit multiplug mounting bracket and tighten nut 

to 10 Nm (7.5 lbf.ft).

9. Connect harness multiplug, fit multiplug to 

mounting bracket.

10. Fit front bumper.


 + 

 EXTERIOR FITTINGS, REPAIRS, 

Bumper - assembly - front.

11. Connect battery earth lead.

Fluid cooler - Td4

$% 44.24.10

Remove

1. Disconnect battery earth lead.
2. Remove underbelly panel.


 + 

 EXTERIOR FITTINGS, REPAIRS, 

Panel - underbelly.

3. Position container to collect coolant spillage.

4. Release 2 clips and disconnect coolant hoses 

from fluid cooler.

5. Position container to collect fluid spillage.

6. Disconnect 2 fluid cooler hose unions and 

discard 'O' rings.

7. Remove 3 bolts securing fluid cooler bracket.
8. Remove fluid cooler.

AUTOMATIC GEARBOX - JATCO

REPAIRS

44-27

Refit

1. Clean cooler mounting points.
2. Position fluid cooler to mounting, fit bolts, 

tighten 2 bolts to 45 Nm (33 lbf.ft) and 
remaining bolt to 25 Nm (18 lbf.ft).   

3. Connect coolant hoses and secure with clips.
4. Lubricate new 'O' rings with clean transmission 

fluid and fit to fluid cooler hoses.

5. Connect hoses to fluid cooler and tighten 

unions to 18 Nm (13 lbf.ft).

6. Top-up gearbox fluid level.


 + 

 MAINTENANCE, MAINTENANCE, 

Automatic Gearbox – JATCO.

7. Connect battery earth lead.
8. Refill cooling system.


 + 

 COOLING SYSTEM - Td4, 

ADJUSTMENTS, Coolant - drain and refill.

9. Fit underbelly panel.


 + 

 EXTERIOR FITTINGS, REPAIRS, 

Panel - underbelly.

Fluid cooler - KV6

$% 44.24.10

Remove

1. Remove underbelly panel.


 + 

 EXTERIOR FITTINGS, REPAIRS, 

Panel - underbelly.

2. Position container to collect fluid spillage.

WARNING: Observe due care when draining 
gearbox fluid as the fluid can be very hot.

3. Disconnect 2 fluid cooler hose unions and 

discard 'O' rings.

CAUTION: Always fit plugs to open 
connections to prevent contamination.

4. Position container to collect coolant spillage.

5. Release 2 clips and disconnect coolant hoses 

from fluid cooler.

CAUTION: Always fit plugs to open 
connections to prevent contamination.

6. Remove 2 bolts securing fluid cooler.

AUTOMATIC GEARBOX - JATCO

44-28

REPAIRS

7. Remove fluid cooler.

Refit

1. Position fluid cooler to mounting bracket, fit 

bolts and tighten to 25 Nm (18 lbf.ft).

2. Connect coolant hoses and secure with clips.
3. Lubricate new 'O' rings with clean transmission 

fluid and fit 'O' rings to fluid cooler hoses
 

 + 

 CAPACITIES, FLUIDS AND 

LUBRICANTS, Lubrication.

4. Connect hoses to fluid cooler and tighten 

unions to 18 Nm (13 lbf.ft).

5. Refill cooling system.


 + 

 COOLING SYSTEM - K SERIES KV6, 

ADJUSTMENTS, Coolant - drain and refill.

6. Top-up gearbox fluid level.


 + 

 MAINTENANCE, MAINTENANCE, 

Automatic Gearbox – JATCO.

7. Fit underbelly panel.


 + 

 EXTERIOR FITTINGS, REPAIRS, 

Panel - underbelly.

Hose - fluid cooler 

$% 44.24.13 

This procedure is identical for both feed and return 
hoses.

Remove

1. Remove underbelly panel.


 + 

 EXTERIOR FITTINGS, REPAIRS, 

Panel - underbelly.

2. Position container to collect fluid spillage.

WARNING: Observe due care when draining 
gearbox fluid as the fluid can be very hot.

3. Disconnect hose from fluid cooler and discard 

'O' ring.

CAUTION: Always fit plugs to open 
connections to prevent contamination.

4. Loosen union and remove hose from gearbox.
5. Remove and discard 'O' ring.

M44 1639


Content   ..  164  165  166  167   ..