Freelander 1. Manual - part 164


  Index      Land Rover     Freelander 1 - service manual 2002 year


Search            


Content   ..  162  163  164  165   ..


Freelander 1. Manual - part 164


AUTOMATIC GEARBOX - JATCO

REPAIRS

44-17

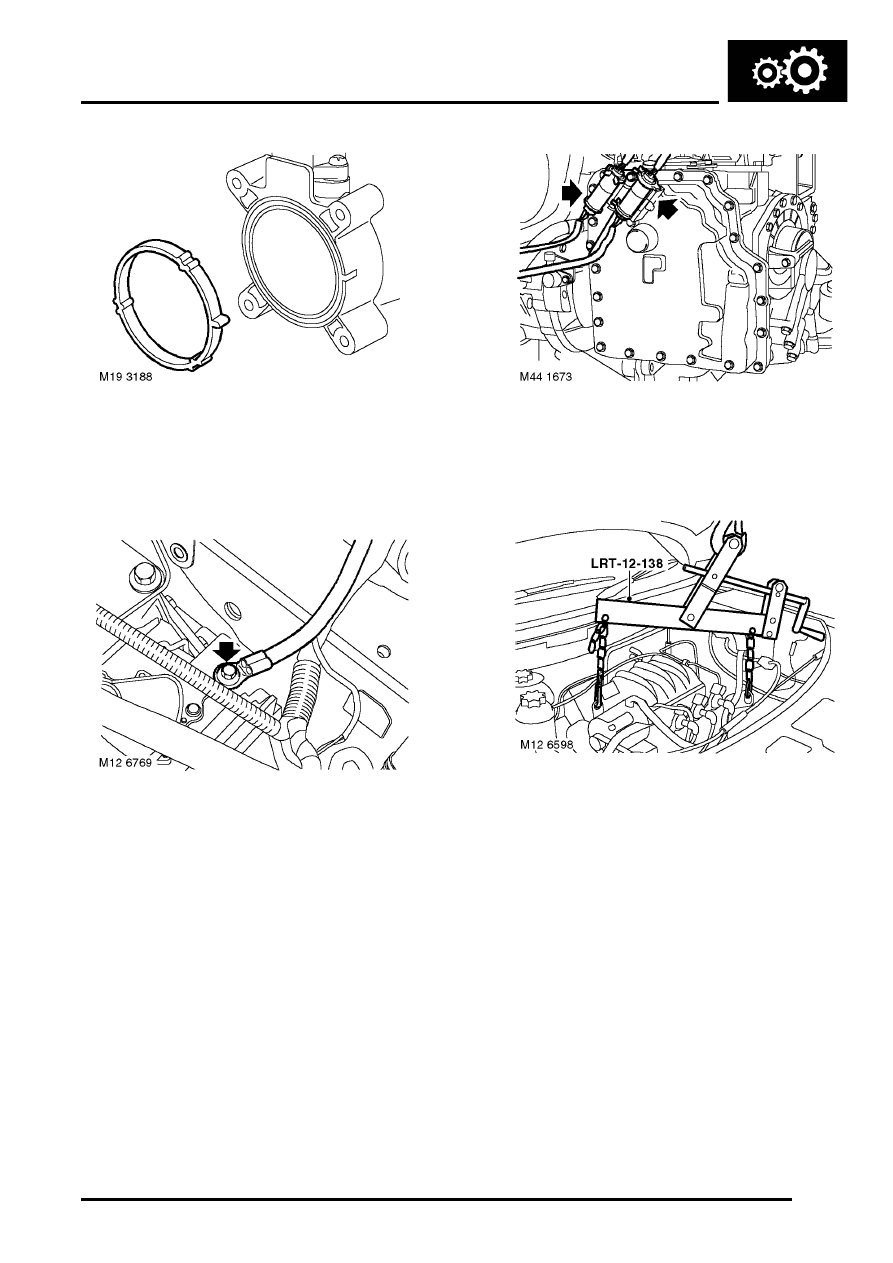
30. Remove and discard 'O' ring from throttle 

housing.

31. Remove starter motor.


 + 

 CHARGING AND STARTING, 

REPAIRS, Starter motor - KV6.

32. Remove bolt securing engine earth lead.

33. Release multiplugs from clips attached to fluid 

pan.

34. Disconnect 2 gearbox harness to main harness 

multiplugs.

35. Using a hoist, connect adjustable lifting 

bracket, LRT-12-138 to engine.

36. Raise hoist to take weight without exerting any 

load on the engine mountings.

AUTOMATIC GEARBOX - JATCO

44-18

REPAIRS

37. Fit suitable lifting brackets to gearbox and 

secure with nuts and bolts. 

38. Connect lifting equipment to brackets.

39. Remove through bolt securing LH engine 

mounting to gearbox bracket.

40. Remove 4 bolts securing LH mounting to body 

and remove mounting.

41. Remove 4 bolts securing LH mounting bracket 

to gearbox and remove bracket.

42. Remove 2 top bolts securing gearbox to 

engine.

43. Release gearbox from 2 dowels.
44. Manoeuvre and lower gearbox to floor.   

45. Fit converter retaining plate and secure with 

bolts.

Refit

1. Remove torque converter retaining plate.

M12 6789

M12 6788

M44 1689

AUTOMATIC GEARBOX - JATCO

REPAIRS

44-19

2. Ensure converter is fully located in oil pump 

drive by checking depth 'A' as illustrated. Depth 
A = 4 mm.

3. Clean gearbox to engine mating faces, dowels 

and dowel holes.

4. Fit gearbox assembly.
5. Fit bolts securing gearbox and tighten to 85 Nm 

(63 lbf.ft).

6. Position LH mounting bracket to gearbox, fit 

and tighten bolts to 85 Nm (63 lbf.ft).

7. Position LH mounting to body, fit and tighten 

bolts to 48 Nm (35 lbf.ft). 

8. Align gearbox bracket to LH body mounting, fit 

and tighten through bolt to 100 Nm (74 lbf.ft).

9. Disconnect lifting equipment.

10. Remove nuts and bolts securing lifting brackets 

to gearbox and remove brackets.

11. Connect engine and gearbox harness 

multiplugs to main harness.

12. Secure multiplugs to clips.
13. Position engine earth lead and secure with bolt.
14. Fit starter motor.


 + 

 CHARGING AND STARTING, 

REPAIRS, Starter motor - KV6.

15. Clean throttle housing and manifold chamber 

mating faces.

16. Fit new seal to inlet manifold chamber.
17. Position throttle housing to manifold chamber, 

fit Torx screws and tighten to 7 Nm (7 lbf.ft).

18. Connect throttle inner cable to throttle cam and 

secure outer cable in abutment bracket, if fitted.

19. Connect hose to cruise control actuator.
20. Secure breather hoses to throttle housing, if 

fitted.

21. Adjust throttle cable, if fitted.


 + 

 FUEL DELIVERY SYSTEM - 

PETROL, ADJUSTMENTS, Throttle cable - 
check and adjust - KV6.

22. Clean CKP sensor and mating face.
23. Fit CKP sensor, fit bolt and tighten to 9 Nm (7 

lbf.ft).

24. Position fluid cooler, tighten M12 bolts to 85 Nm 

(63 lbf.ft) and M8 bolt to 25 Nm (18 lbf.ft). 

25. Clean fluid cooler unions.
26. Lubricate new 'O' rings with clean transmission 

fluid and fit 'O' rings to fluid cooler hoses. 
 

 + 

 CAPACITIES, FLUIDS AND 

LUBRICANTS, Lubrication.

27. Connect fluid cooler hoses to gearbox and 

tighten unions to 18 Nm (13 lbf.ft).

28. Clean exhaust manifold and mating face on 

cylinder head.

29. Fit exhaust manifold gasket.
30. Position exhaust manifold, fit nuts and 

progressively tighten, from centre outwards to 
45 Nm (33 lbf.ft).

31. Connect HO2S multiplug and secure to support 

bracket.

32. Position IRD cooling hose retainer, fit bolt and 

tighten to 25 Nm (18 lbf.ft).

33. Align marks on drive plate to torque converter.
34. Fit bolts securing drive plate to torque converter 

and tighten bolts to 45 Nm (33 lbf.ft). 

35. Clean torque converter access plate.
36. Position access plate, fit bolts and tighten to 9 

Nm (7 lbf.ft).

37. Clean end of drive shaft and mating splines in 

gearbox.

38. Fit new circlip to LH drive shaft.
39. With assistance pull hub outwards, align drive 

shaft and fit to gearbox, taking care not to 
damage drive shaft oil seal.

CAUTION: Pull the drive shaft to ensure the 
circlip is fully engaged and retains the shaft.

40. Fit splash shield and secure with bolts.
41. Position trunnion to selector lever, locate inner 

cable through trunnion, do not tighten nut at this 
stage.

42. Position selector cable to gearbox bracket and 

secure with clip.

43. Adjust selector cable.


 + 

 AUTOMATIC GEARBOX - JATCO, 

ADJUSTMENTS, Selector cable - adjust.

44. Fit IRD.


 + 

 INTERMEDIATE REDUCTION 

DRIVE, REPAIRS, Intermediate reduction 
drive (IRD) unit - KV6.

45. Connect battery earth lead.
46. Fit engine acoustic cover.


 + 

 ENGINE - K SERIES KV6, REPAIRS, 

Cover - engine acoustic.

47. Untie and close bonnet.

A

M44 1668

AUTOMATIC GEARBOX - JATCO

44-20

REPAIRS

Gearbox - Td4

$% 44.20.02.99

Remove

1. Disconnect battery earth lead.
2. Tie bonnet back in upright position.
3. Remove intake ducting assembly.


 + 

 FUEL DELIVERY SYSTEM - DIESEL, 

REPAIRS, Ducting - intake assembly.

4. Remove fluid cooler.


 + 

 AUTOMATIC GEARBOX - JATCO, 

REPAIRS, Fluid cooler - Td4.

5. Remove starter motor.


 + 

 CHARGING AND STARTING, 

REPAIRS, Starter motor - Td4.

6. Remove IRD.


 + 

 INTERMEDIATE REDUCTION 

DRIVE, REPAIRS, Intermediate reduction 
drive (IRD) unit - Td4.

7. Secure LRT-54-026 to drive shaft inboard joint. 

Using a suitable lever, release inboard joint 
from gearbox.

8. With assistance, pull hub outwards and remove 

LH drive shaft from gearbox.

CAUTION: Pull the drive shaft horizontally 
to avoid damaging the differential oil seal.

9. Remove and discard circlip from LH drive shaft.

10. Loosen selector cable trunnion nut.
11. Release clip, disconnect selector cable and 

remove trunnion.

12. Remove bolt securing closing plate to gearbox.
13. Remove grommet from closing plate to gain 

access to torque converter retaining bolts.


Content   ..  162  163  164  165   ..