Freelander 1. Manual - part 121
 

  Index      Land Rover     Freelander 1 - service manual 2002 year


Search            


Content   ..  119  120  121  122   ..


Freelander 1. Manual - part 121


FUEL DELIVERY SYSTEM - PETROL

REPAIRS

19-2-7

REPAIRS

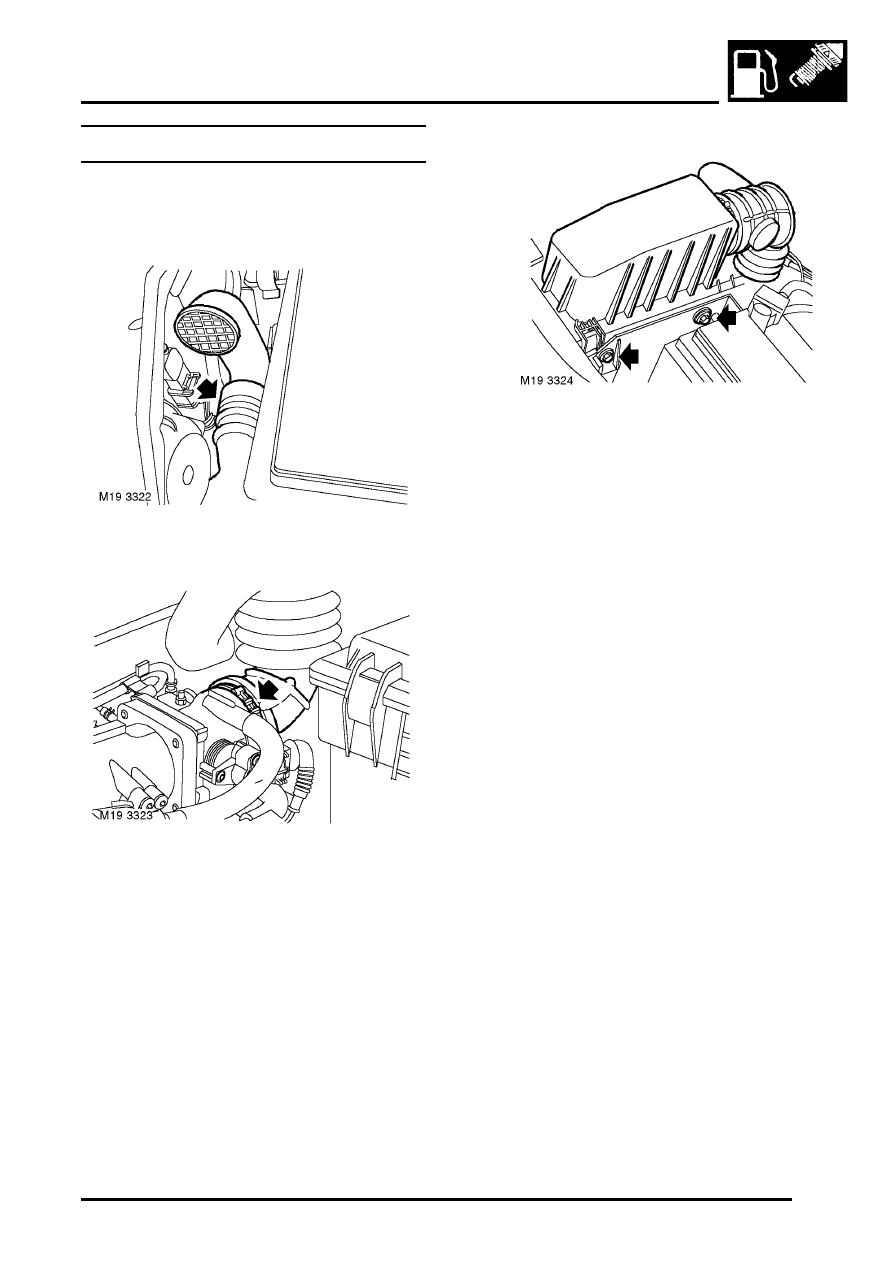
Air cleaner - K1.8

$% 19.10.01

Remove

1. Release air intake duct from air cleaner.

2. Remove clip and disconnect air intake hose 

from throttle housing.

3. Remove 2 bolts securing air cleaner to battery 

tray.

4. Remove air cleaner assembly.

Refit

1. Position air cleaner assembly.

NOTE: Ensure bottom of air cleaner is located 
on peg.

2. Fit bolts and tighten to 9 Nm (7 lbf.ft).
3. Connect air intake hose to throttle housing and 

secure with clip.

4. Connect air intake duct to air cleaner.

FUEL DELIVERY SYSTEM - PETROL

19-2-8

REPAIRS

Element - air cleaner - K1.8

$% 19.10.10

Remove

1. Release 4 clips securing air cleaner top casing.
2. Release casing and position aside.

3. Remove air cleaner element.

Refit

1. Clean inside of air cleaner.
2. Fit air cleaner element.
3. Position casing and secure with clips.

Element - air cleaner - KV6

$% 19.10.10

Remove

1. Remove acoustic cover.


 + 

 ENGINE - K SERIES KV6, REPAIRS, 

Cover - engine acoustic.

2. Remove 2 screws securing air cleaner element 

cartridge to acoustic cover.

3. Release cartridge from acoustic cover and 

remove air cleaner element from cartridge.

Refit

1. Clean air cleaner element cartridge.
2. Fit new air cleaner element in cartridge.
3. Position cartridge to acoustic cover, fit and 

tighten screws.

4. Fit engine acoustic cover.


 + 

 ENGINE - K SERIES KV6, REPAIRS, 

Cover - engine acoustic.

M19 3328

M19 3195

M19 3196

FUEL DELIVERY SYSTEM - PETROL

REPAIRS

19-2-9

Element - air cleaner - KV6 - NAS 

$% 19.10.10

Remove

1. Remove acoustic cover.


 + 

 ENGINE - K SERIES KV6, REPAIRS, 

Cover - engine acoustic.

2. Remove 2 screws securing heat shield to 

acoustic cover, remove heat shield.

3. Remove 2 screws securing air cleaner element 

cartridge to acoustic cover.

4. Remove cartridge from acoustic cover and 

remove element.

Refit

1. Clean cover and cartridge.
2. Fit element, fit cartridge to cover and secure 

with screws.

3. Fit heat shield and secure with screws.
4. Fit engine acoustic cover.


 + 

 ENGINE - K SERIES KV6, REPAIRS, 

Cover - engine acoustic.

Cable - throttle - KV6

$% 19.20.06

Remove

1. Remove engine acoustic cover.


 + 

 ENGINE - K SERIES KV6, REPAIRS, 

Cover - engine acoustic.

2. Release throttle cable from clips on harness 

brackets.

3. Release throttle cable from abutment bracket 

and disconnect cable from throttle body cam.

M19 3195

M19 3196

FUEL DELIVERY SYSTEM - PETROL

19-2-10 REPAIRS

4. Release clip securing throttle inner cable to 

throttle pedal and disconnect inner cable from 
pedal.

5. Rotate throttle outer cable to release from 

bulkhead and remove cable from vehicle.

Refit

1. Position cable, secure to bulkhead and connect 

inner cable to throttle pedal.

2. Connect throttle inner cable to throttle cam and 

secure outer cable in abutment bracket.

3. Secure throttle cable in clips on harness 

brackets.

4. Adjust throttle cable.


 + 

 FUEL DELIVERY SYSTEM - 

PETROL, ADJUSTMENTS, Throttle cable - 
check and adjust - KV6.

5. Fit engine acoustic cover.


 + 

 ENGINE - K SERIES KV6, REPAIRS, 

Cover - engine acoustic.

Switch - inertia

$% 19.22.09

Remove

1. Disconnect multiplug from fuel cut-off switch.
2. Remove bolt securing fuel cut-off switch 

bracket to bulkhead.

3. Remove fuel cut-off switch from bulkhead.
4. Remove 2 nuts securing fuel cut-off switch to 

bracket.

5. Remove fuel cut-off switch from bracket.

Refit

1. Position fuel cut-off switch to bracket.
2. Fit nuts securing fuel cut-off switch to bracket 

and tighten to 2 Nm (1.5 lbf.ft).

3. Position fuel cut-off switch bracket to bulkhead.
4. Fit and tighten bolt securing fuel cut-off switch 

bracket to bulkhead.

5. Connect multiplug to fuel cut-off switch.
6. To set the fuel cut-off switch, depress the top of 

the fuel cut-off switch.


Content   ..  119  120  121  122   ..