Freelander 1. Manual - part 32


  Index      Land Rover     Freelander 1 - service manual 2002 year


Search            


Content   ..  30  31  32  33   ..


Freelander 1. Manual - part 32


MAINTENANCE

MAINTENANCE

10-3

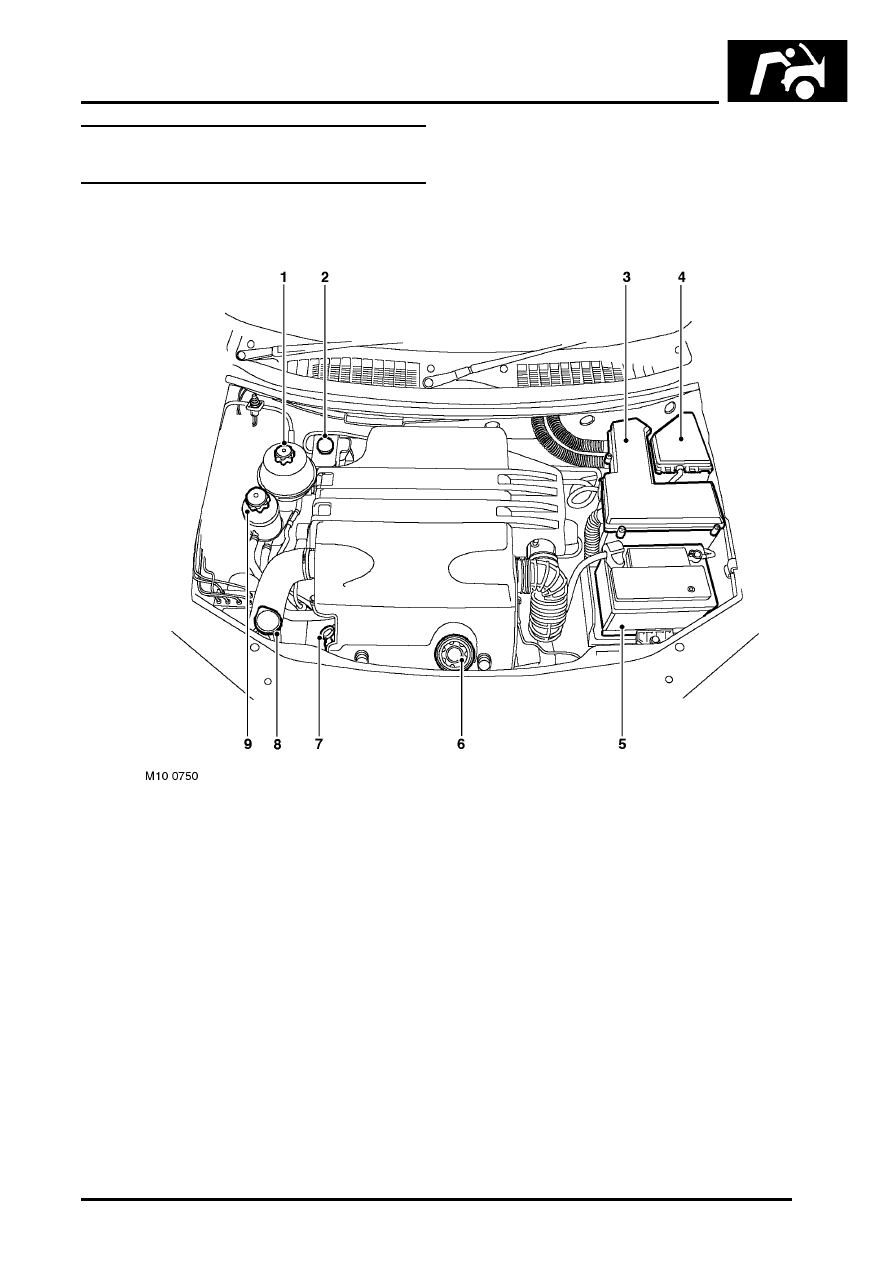
KV6 – Petrol Engine – Under Bonnet 
View

RHD shown, LHD similar

Cooling system expansion tank filler cap
Brake/Clutch fluid reservoir cap
Engine Control Module box
Engine compartment fusebox
Battery
Engine oil filler cap
Engine oil dipstick
Windscreen washer reservoir filler cap
Power steering reservoir

MAINTENANCE

10-4

MAINTENANCE

Seats and Seat Belts

Check

1. Check seat frames are secured to floor and 

show no signs of movement.

2. Check operation of seat slide and tilt 

mechanisms, ensuring there is no excessive 
play between seat cushion and seat back.

3. Check tightness of accessible seat fixings.
4. Fully extract seat belt and allow it to return 

under its own recoil mechanism.

5. Check entire length of seat belt webbing for 

signs of fraying or damage. Repeat for all belts.

6. Check security of seat belt upper mountings.
7. Check for correct operation of seat belt height 

adjusters.

8. Check security of seat belt buckle mountings.
9. Connect each belt to the correct buckle, check 

seat belt buckle and tongue are secure. 
Release seat belt buckle and check for correct 
operation.

10. Check tightness of accessible seat belt 

mountings.

Lamps, Horns and Warning Indicators

Check

1. Switch on side, head and tail lights and check 

operation.

2. Check headlamp dim/dip operation.
3. Check headlamp levelling operation.
4. Check turn signals and hazard warning lights 

operation.

5. Press brake pedal and check operation of 

brake lights.

6. Check all exterior lamp lenses for clarity and 

condition. Pay particular attention to head lamp 
lenses for signs of stone chips or damage.

7. Check horn for loud clear sound.
8. Check operation of all instrument pack warning 

and indicator lights.

9. Check for correct operation of interior courtesy 

lights.

10. Switch on headlamps (with ignition switch at 'O' 

position) and check light reminder warning 
operates when door is opened.

MAINTENANCE

MAINTENANCE

10-5

Wipers and Washers

Check

1. Operate screen washer and switch on wipers. 

Check washer jets are correctly aimed and 
check for smooth smearless operation across 
screen of wiper blades at all speeds, including 
intermittent.

2. Repeat operation for rear screen wipers/

washers.

3. Check all wiper blades for condition and signs 

of splits or damage.

4. Check security of wiper arms.

Handbrake

Check

1. With the vehicle stationary and on a level 

surface, apply and release handbrake and 
check for correct operation. If required, adjust 
handbrake. 
 

 + 

 BRAKES, ADJUSTMENTS, Cable - 

handbrake - check and adjust.

NOTE: Any adjustment required as a result of 
the checking process will be subject to 
additional labour and/or material cost and 
should not be carried out without the 
authorisation of the customer.

Adjust Handbrake (First 12,000 miles/12 months 
only)

1. Adjust handbrake cable. 


 + 

 BRAKES, ADJUSTMENTS, Cable - 

handbrake - check and adjust.

NOTE: Additional time is built into the first 
12,000/12 months service time to allow for 
handbrake cable adjustment.

MAINTENANCE

10-6

MAINTENANCE

Alarm Handset Battery

Replace

1. Insert the blade of a small, flat bladed 

screwdriver into the slot at the keyring end of 
the handset and carefully prise the two halves 
of the handset apart.

2. Slide the battery out of the clip taking care not 

to touch the circuit board or the battery 
contacts.

3. Press and hold each button in turn for at least 5 

seconds to drain any residual power from the 
handset.

4. Fit the replacement battery (Land Rover 

STC4080 or Panasonic CR2032) ensuring the 
correct polarity is maintained (+) side facing 
upwards. Avoid touching the flat surfaces of the 
battery.

5. Press the 2 halves of the handset together, 

making sure the two halves click into place 
correctly.

6. Check the operation of the handset.

Road Wheels

Remove

1. Loosen wheel nuts. Raise vehicle for wheel 

free condition and remove the wheel nuts.

2. Mark the wheel to stud relationship to ensure 

that the wheels are refitted in the same 
orientation.

Refit

1. Apply a thin coat of anti-seize compound to 

wheel hub centre.

2. Refit wheels to original hub position.

NOTE: When refitting road wheel nuts, do not 
overtighten using powered tools. Ensure the 
wheel nuts are correctly torqued in the correct 
sequence.

3. Tighten wheel nuts to 115 Nm (85 lbf.ft).


Content   ..  30  31  32  33   ..