Defender 90 / 110 / 130. Manual - part 34


  Index      Land Rover     Defender 90 / 110 / 130 - service repair manual


Search            


Content   ..  32  33  34  35   ..


Defender 90 / 110 / 130. Manual - part 34


2.50 

LITRE DIESEL ENGINE 

Whilst  this  is  rarely 

the  procedure  is 

nevertheless as follows: 
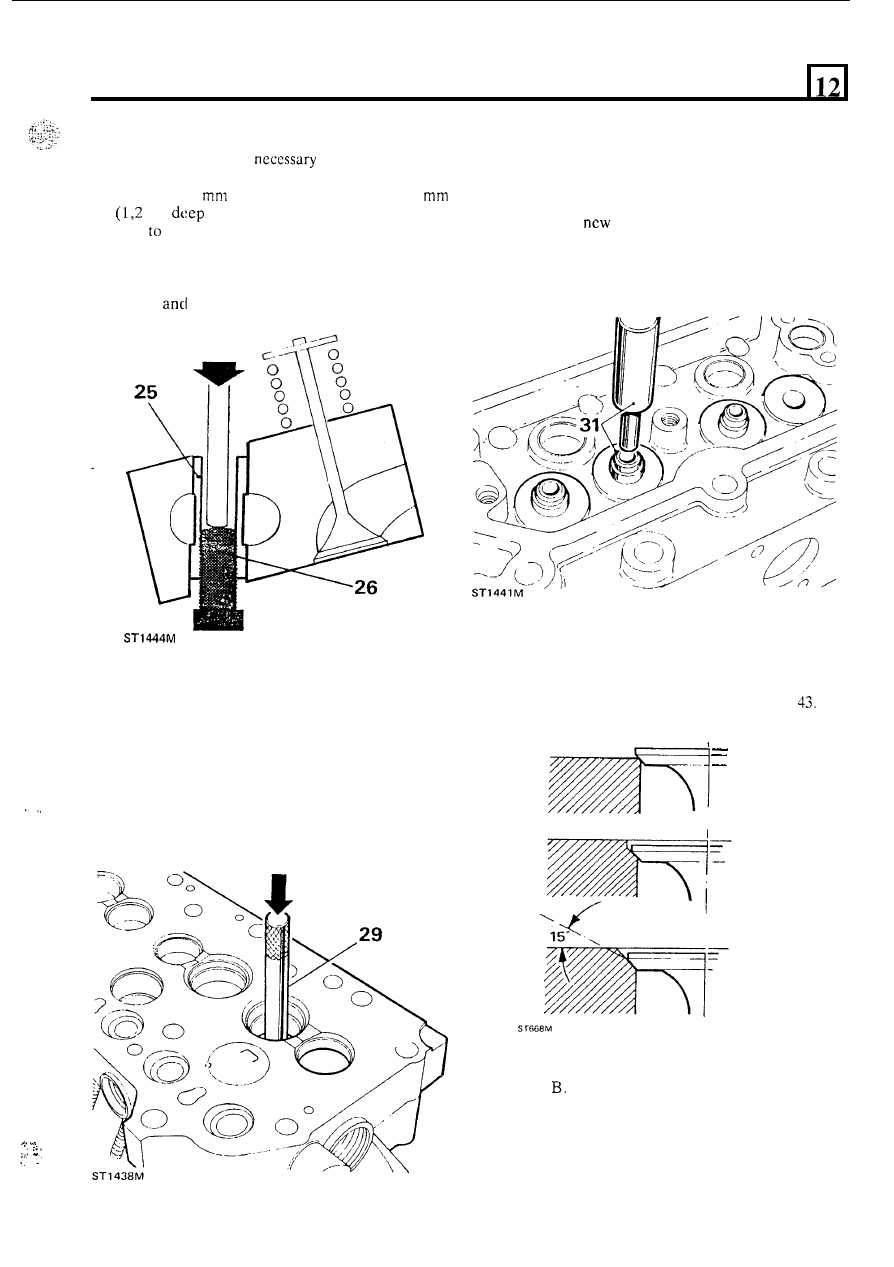
25. 

Using  an 

taper  tap,  cut  a  thread 

30 

in) 

in 

the  combustion  face  end  of  the 

tube 

be removed. 

26.  Screw an  appropriate  bolt  into  the  tube  and  press 

out the tube as illustrated. 

27.  Smear both ends of  a new tube with silicone rubber 

sealant 

press i t  into the cylinder head. 

chambers  face  downwards.  Since  the  inlet  and 
exhaust valve guides  are dimensionally different 

it 

is important  that the correct-guides are fitted to the 

appropriate ports. 

31.  Lubricate 

guides  with  engine  oil  and  using 

special  drift 600959 for the exhaust  and  601508 for 
the inlet  valve guides 

or suitable alternatives, drive 

in  the  n e w   guides  until  the  shoulder  is  flush  with 
the casting. 

Reface cylinder head valve 

seats 

32.  Damaged 

or  worn  valve  seats  can  be  refaced 

provided  they  are  not  abnormally  wide  due  to 
repeated refacing operations. See instruction 

Renew valve guides 

28.  Support  the  cylinder  head,  combustion  chamber 

uppermost  on  pieces  of  timber 

of  sufficient 

thickness to allow clearance for the valve  guides to 
be driven out. 

274401  for exhaust  guides  or suitable  alternatives 

29.  Using  special  drift  274400  for 

inlet 

guides  and 

drive out  the  old  guides  from the combustion  face 

,.. 

side. 

A. 

Correctly seated valve 

Undesirable condition 

C. Method of rectification 

55 

2.50 LITRE DIESEL ENGINE 

33. 

34. 

35. 

The  special  set 

of  hand  tools  recommended  for 

refacing  include  expandable  pilots  that 

fit 

tightly 

into  new 

or  worn  guides  to  ensure  that  the  valve 

seat  is  concentric  with  valve  guide. 

The  refacing 

tool 

has tungsten  carbide cutters and can be used  to 

cut a seat 

in a new exhaust seat insert. 

Select  the  correct  expandable  collet  for  the  valvc 
guide concerned  i.e. 

for inlet  guides  and 

8,5 

for exhaust. 

Loosely  assemble  the  collet,  expander  and  nuts. 

Ensure  that  the  chamfered  end 

of  the  expander  is 

towards the collet. 

36.  Insert 

pilot into 

valve guide 

the combustion  face  side 

of 

t h e  

cylinder head until 

the shoulder contacts the valve guide and the whole 

of  the collet is inside the valve guide. 

37. 

Expand  the  collet 

i n  

the  guide  by  turning  the 

bar  clockwise  whilst  holding  the  knurled 

nut. 

38.  Use  cutter  MS  621  and  ensure  that  the  cutter 

blades  are  correctly  fitted 

to  the  cutter  head  with 

the  angled  end  of 

t h e  

blade  downwards facing  the 

work, 

as  illustrated.  Check  that  the  cutter  blades 

are  adjusted  so  that  the  middle  of 

blade 

contacts the area of  material 

to be cut. Use 

key 

provided 

i n  the hand 

MS 76. 

39.  Fit  the 

to  the 

head  and  turn 

clockwise  using only  very  light  pressure.  Continue 
cutting 

to 

approximatcly 

centre 

of  the existing 

seat. 

40. 

To check  the effectiveness 

of 

the cutting opcration 

use  engineers’  blue 

or  a 

gauge 

from 

ceilophane. 

41.  Smear a 

quantity of 

blue  round 

valve  seat  and  revolve 

properly  ground  valve 

against  the  seat. 

continuous  fine 

should 

appear  round  the  valve. 

If  there  is 

a  gap  of 

more 

it 

can be corrected  by  lapping. 

56 

2.50 

LITRE DIESEL ENGINE 

... 

:

:

\


42.  Alternatively, insert 

strip of  cellophane between 

the valve and seat, hold the valve down by  the stein 
and slowly pull  out the cellophane. 

If  there  is drag 

the seal  is satisfactory 

in 

that  spot. Repeat this 

in 

at 

eight 

Lapping-in  will  correct  a  small 

open spot. 

43. 

several  trueing-up 

or 

lapping-in  operations 

valve seats may  have  an excessive width  which  can 
be  reduced  by 

special  correction  cutters 

which narrow the  seat by  removing  metal  from  the 
top  and  bottom  of  the  seat. 

60"  cutter  is 

recommended  for  bottom  narrowing  and  for  top 
narrowing  use a 

cutter. 

.. 

Renew inlet and exhaust seat inserts 

44.  Hold  the  cylinder  head  firmly  in 

a  vice,  wear 

protective  goggles  and  grind  the  old  insert  away 
until 

thin 

enough  to  be  cracked  and  prised  out. 

Take care not to damage the insert pocket. 

45.  Remove  any 

burrs 

and  swarf  from  the  pocket. 

Failure  to  do  this  could 

the  new  insert 

to 

crack when  being fitted. 

36.  Assemble 

new  exhaust  insert  to  the  replacer 

tool  number 530625 

so that  the chamfered edge of 

the insert  is  leading.  Using  a suitable  bolt  and  nut 
draw the insert 

into 

cylindcr head pocket. 

47.  Since  no  tool  is  available 

for  the  inlet  scat,  use  a 

suitable adaptor 

to 

press-in the new seat. Cut a new 

45" seat using cutter 

MS 621. 

.  . 

Reface valve seats 

48.  Valves  that  are satisfactory for further  service can 

be  refaced.  This  operation  should  be  carried  out 
using a valve grinding machine. Only the minimum 
of 

material  should  be  removed  from  the valve  face 

to 

avoid  thinning  of 

t h e  

valve  edge.  The  valve  is 

refaced correctly when  all pits are removed and t h e  

face concentric 

with 

the stem. 

Inlet 

valve seat face 

Exhaust valve seat facc 

valve  face 

-  - 

Exhaust valvc  face 

45" 

Lap-in valves 

49.  To ensure a  gas  tight  scal  betwccn 

valvc  facc 

and  valve  seat 

it 

is  ncccssary  to  lap-in  the 

valve  to  its seal. It  is  essential  to keep 

the valve  idcntificd with its seat once the lapping-in 

opcration has 

completed. 

50.  Unless the faces to bc 

are 

in 

poor condition 

it 

should only be necessary 

to 

fine valve lapping 

paste. Smear a 

quantity of  paste 

on the valve 

face and lubricate the valve stem with engine oil. 

51.  Insert the valve 

in  t h e  

guide and  using 

a  suction  type  valve  lapping  tool  employ  a  light 
reciprocating  action  while  occasionally  lifting  the 

valve  off  its  seat  and  turning 

i t  

so  that  the  valvc 

returns to a different position on the seat. 

57 

2.50 

LITRE DIESEL ENGINE 

52.  Continue  the  operation  until  a  continuous  matt 

grey  band  round  the  valve  face  is  obtained. 

To 

check  that  the lapping operation is successful, wipe 
off  the  valve  paste  from  the  valvc  and  seat  and 

of 

pencil  lines  across the valvc  face. 

Insert  the  valve  into the  guide  and  while  pressing 
the  valve  onto 

t h e  

seat 

the valve  a quarter 

turn  a  few  times. 

If  all  the  pencil 

are  cut 

through no further lapping is required. 
Wash  all  traces  of  grinding  paste  from 

valves 

and cylinder head seats. 

Assembly valves to cylinder head 

Insert the inlet valves into the guides and fit new oil 

seals 

the  plain  exterior.  Ensure  that  the  seal 

locates 

i n  the groove in the valve guide. 

Insert  the  exhaust  valves  and 

fit 

the  oil  seals with 

the 

exterior. They are 

than 

inlet 

valve 
Fit  the 

valve  spring and cup 

to each valvc  in 

turn  arid  using  valve  spring compressor, 276102 

or 

a suitable alternative,  secure the assembly with 
multi-groove butting cotters. 

56 

54 

55 

ROCKER SHAFT 

Dismantle and inspection 

the  locating  screw  and  washer  from 

number  two  rocker  bracket  and  withdraw  all  the 

from the rocker shalt. 

Remove 

t h e  

locknuts and  adjustment 

from 

rockers. 

Examine  the  rocker  shaft  for  wear  and  discard 

if 

the  bearing  surfacc  is  worn  more  than  0,025 
(0.001 in). 

60.  Inspect 

t h e  

rockers  and  discard 

if  the  pads  arc 

worn.  It  is  not  permissible  to  grind  pads  in  an 
attempt to reclaim the rockers. 

61.  Renew  bushes 

if 

the  clearance  betwecn  shaft  and 

bush  is  in  excess  of  0,101  to  0,127 

(0.004  to 

0.005 in). 

62.  Press 

in 

replacements  ensuring that 

prc-drilled 

oil holes coincide with  the 

holes 

in 

t h e  

rockers. 

The  following  cross  section 

o f  

a  rocker  shows 

oil drillings. 

63.  Using  a 

0,2 

(0.530 

in 

0.001  in) finish  the bushes and clear swarf 

from 

the 

oil 

holes. 

64.  Examine  the  ball-end 

of 

t h e  

adjusting  screws  and 

discard  any  that  are  worn.  Regrinding  is  not 
permissable.  Check  the 

for  damage  and 

that the oil  relief drilling is clear. 

Assemble rocker shaft assembly 

65.  Check that 

oil-ways 

in t h e  

rocker shaft are clcar 

and 

fit 

two rocker shaft bracket 

to 

the shaft 


Content   ..  32  33  34  35   ..