Defender (1999-2002). Manual - part 135


  Index      Land Rover     Defender - service manual 1999-2002 year


Search            


Content   ..  133  134  135  136   ..


Defender (1999-2002). Manual - part 135


86

ELECTRICAL

12

REPAIR

Refit

7. Fit solenoid to mounting bracket and secure with

screws.

8. Connect operating rod to solenoid assembly.
9. Fit solenoid to door, fit screw and tighten bolt to

6 Nm (4 lbf.ft).

10. Position harness to solenoid mounting bracket

and secure with clip.

11. Connect multiplug to solenoid.
12. Fit tail door trim casing. See CHASSIS AND

BODY, Repair.

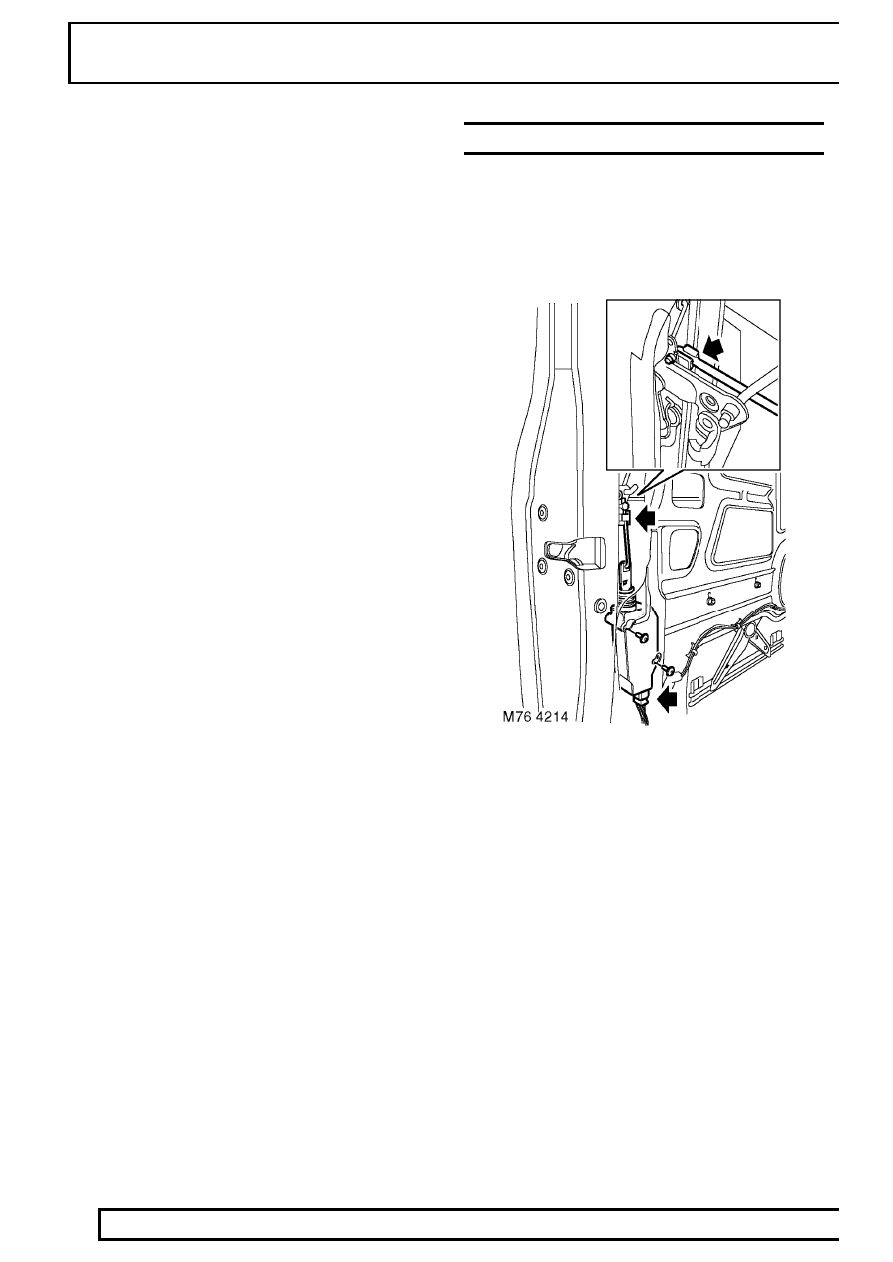
SOLENOID/MOTOR - FRONT DOOR - FROM 02MY

Service repair no - 86.26.08

Remove

1. Remove door trim casing. See CHASSIS AND

BODY, Repair.

2. Carefully peel back plastic sheet to expose

mechanism.

3. Release clip, detach and remove lock solenoid

link.

4. Loosen 2 screws securing solenoid, release

solenoid from mounting panel, disconnect
multiplug and remove solenoid.

Refit

5. Connect multiplug to solenoid, locate solenoid to

mounting panel and tighten screws.

6. Fit and secure link.
7. Secure plastic sheet.
8. Fit door trim casing. See CHASSIS AND

BODY, Repair.

9. Adjust door lock solenoid. See Adjustment.

ELECTRICAL

13

REPAIR

SOLENOID/MOTOR - REAR DOOR - FROM 02MY

Service repair no - 86.26.09

Remove

1. Remove plastic sheet. See CHASSIS AND

BODY, Repair.

2. Release clip, detach and remove lock solenoid

link.

3. Release clip and disconnect interior handle link

from latch mechanism.

4. Remove 3 bolts securing mounting panel.
5. Loosen remaining bolts and nut, ease mounting

panel away from door and retain in this position
for access.

6. Disconnect multiplug from solenoid.
7. Remove 2 screws securing solenoid.

8. Remove centre pin from bellcrank pivot and

release pivot from mounting panel.

9. Release bellcrank from sill button link and

remove from lock solenoid link.

10. Remove door lock solenoid.
11. Remove link from solenoid.

86

ELECTRICAL

14

REPAIR

Refit

12. Fit link to solenoid, position solenoid, fit bellcrank

and connect to sill button link.

13. Secure bellcrank to mounting panel and fit

centre pin.

14. Align solenoid and fit and tighten screws.
15. Connect multiplug to solenoid.
16. Fit mounting panel bolts and tighten all bolts and

nut to 10 Nm (7 lbf.ft).

17. Connect interior handle link to latch and secure

with clip.

18. Fit and secure solenoid link.
19. Fit plastic sheet. See CHASSIS AND BODY,

Repair.

HARNESS - REAR DOOR - FROM 02MY

Service repair no - 86.26.19

Remove

1. Remove rear door trim casing. See CHASSIS

AND BODY, Repair.

2. Remove nut and disconnect check strap.

3. Carefully peel back section of plastic sheet for

access to harness.

4. Disconnect multiplug from solenoid.
5. Release clips securing harness to panel.
6. Release harness sleeve and withdraw harness

from door.

ELECTRICAL

15

REPAIR

7. Release multiplug from location at base of ’B/C’

post and disconnect multiplug.

8. Release clip securing harness to ’B/C’ post.
9. Release harness sleeve and remove harness.

Refit

10. Feed harness through ’B/C’ post, connect and

secure multiplug.

11. Clip harness to ’B/C’ post and secure sleeve.
12. Connect multiplug to motor.
13. Secure harness clips and sleeve.
14. Connect check strap, fit nut and tighten

sufficiently to allow check strap to pivot without
rattling.

15. Secure plastic sheet.
16. Fit door trim casing. See CHASSIS AND

BODY, Repair.

REVERSE AND FOG GUARD LAMP - BULB

Service repair no - 86.40.90

Remove

1. Remove 2 screws securing lamp to housing and

withdraw. Disconnect bayonet bulb holder from
lamp housing.

2. Remove bulb.

Refit

3. Clean bulb and holder.
4. Fit new bulb to holder.
5. Fit bulb holder to lamp.
6. Position lamp, fit and tighten screws.


Content   ..  133  134  135  136   ..