Defender (1999-2002). Manual - part 78


  Index      Land Rover     Defender - service manual 1999-2002 year


Search            


Content   ..  76  77  78  79   ..


Defender (1999-2002). Manual - part 78


MANUAL GEARBOX

7

REPAIR

GEARBOX

Service repair no - 37.20.02.99

Remove

1. Disconnect battery negative lead.
2. Remove gear lever and transfer gearbox lever

knobs.

3. Remove gearbox tunnel carpet.
4. Remove gear lever cover.

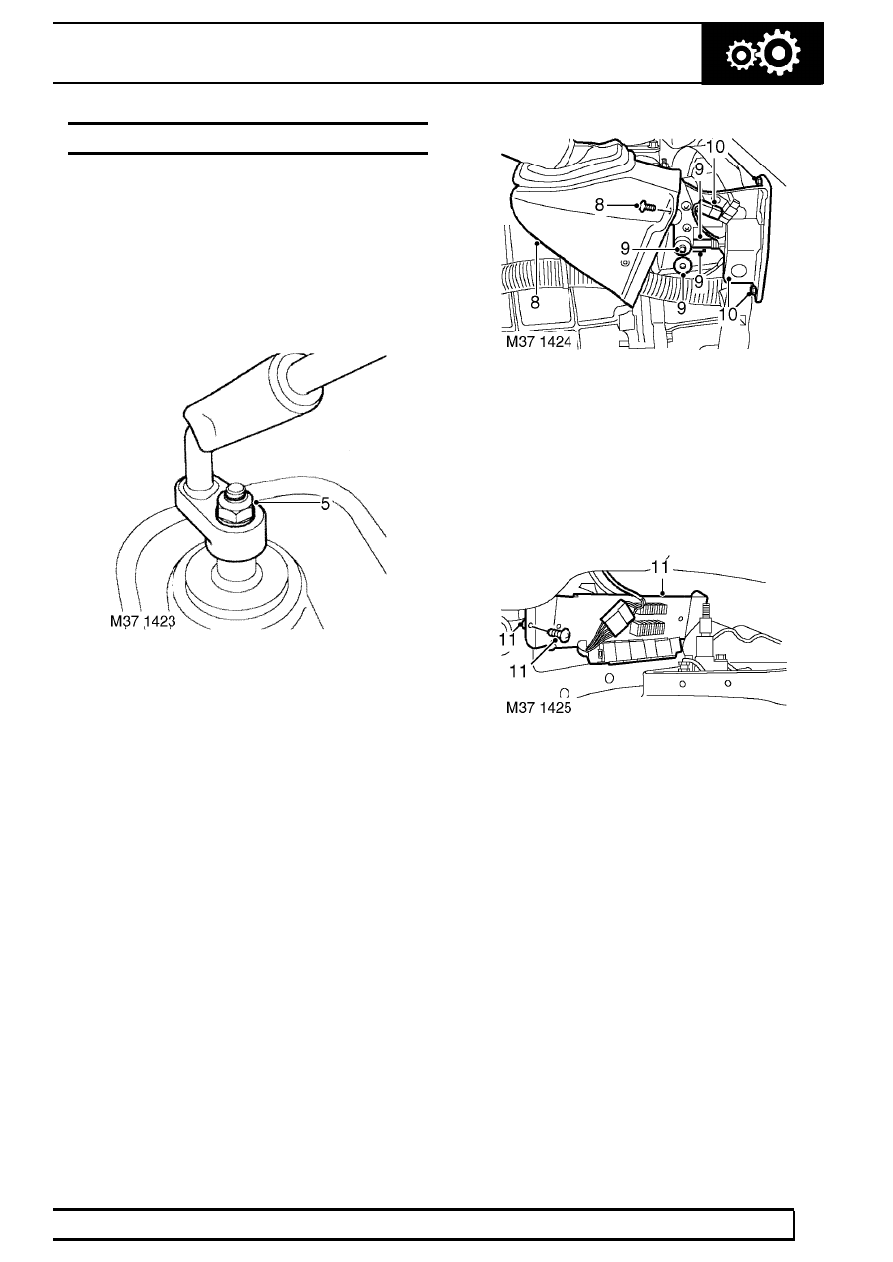
5. Remove nut and washer securing gear lever to

lower splined lever.

6. Mark gear lever spline setting to lower lever and

remove lever.

7. Release and remove insulation pad from tunnel.

8. Remove trim stud and lift up handbrake gaiter for

access to clevis pin.

9. Remove split pin, clevis pin, washer and

disconnect cable from handbrake lever; discard
split pin.

10. Remove 2 bolts securing hand-brake lever to

body, disconnect Lucar and remove lever.

11. Remove 2 screws securing relay panel and

collect 2 spacers.

37

MANUAL GEARBOX

8

REPAIR

12. Remove 13 screws securing tunnel cover.
13. Release and remove tunnel cover.
14. Remove cooling fan. See COOLING SYSTEM,

Repair.

15. Remove air filter. See FUEL SYSTEM, Repair.

16. Remove 2 upper bolts securing clutch housing to

engine.

17. Remove bolt securing shim to clutch housing.

18. Release gearbox breather pipes from clips on

heater hose.

19. Remove starter motor. See ELECTRICAL,

Repair.

20. Remove exhaust front pipe. See MANIFOLD

AND EXHAUST SYSTEM, Repair.

21. Drain gearbox oil. See Adjustment.
22. Drain transfer gearbox oil. See

MAINTENANCE ,

23. Remove 3 nuts securing intermediate silencer to

tail pipe.

24. Release silencer from mounting rubbers, remove

silencer and discard gasket.

25. Mark front and rear propeller shaft to transfer

gearbox flanges for reassembly purposes.

MANUAL GEARBOX

9

REPAIR

26. Remove 4 nuts securing front propeller shaft to

transfer gearbox, release propeller shaft from
output drive flange.

27. Remove 4 nuts, release rear propeller shaft from

brake drum.

28. Remove 2 bolts securing clutch slave cylinder,

release slave cylinder and position aside.

29. Fit support plate LRT-99-007 to gearbox jack.
30. Position gearbox jack and support plate to

gearbox and secure with 3 bolts.

31. Support the weight of gearbox.
32. Remove 4 nuts securing LH and RH mountings

to chassis and transfer gearbox mounting
brackets.

33. Remove bolts securing mountings to gearbox,

raise gearbox and remove both mountings and
heat shield from LH mounting and brackets.

37

MANUAL GEARBOX

10

REPAIR

34. Pull handbrake cable through heel board.

35. Disconnect multiplug from speed sensor and

release harness from clip on transfer gearbox.

36. Remove retaining nut and release battery earth

lead from transfer gearbox.

37. Release body harness clips from bracket on top

of transfer gearbox.

38. Lower gearbox jack sufficiently to allow transfer

gearbox lever to clear tunnel.

39. Disconnect 2 Lucars from differential lock switch,

multiplug from reverse light switch and multiplug
from low ratio detect switch - if fitted and release
multiplug from bracket.

40. Remove bolt and release earth leads from RH

side of transfer gearbox.

41. Support the weight of the engine.

42. Remove 6 bolts securing clutch housing to

engine.

43. With assistance, remove gearbox from engine.


Content   ..  76  77  78  79   ..