Jeep Wrangler (2022 year). Manual in english - page 12
 

  Index      Manuals     Jeep Wrangler (2022 year). Manual in english


Search            copyright infringement  


Content      ..     10      11      12      13     ..


Jeep Wrangler (2022 year). Manual in english - page 12


STARTING AND OPERATING

187

NOTE:

When the fuel nozzle “clicks” or shuts off, the 

fuel tank is full.

Tighten the fuel filler cap about a quarter turn 

until you hear one click. This is an indication that 

the cap is properly tightened.

If the fuel filler cap is not tightened properly, the 

MIL will come on. Be sure the cap is tightened 

every time the vehicle is refueled.

L

OOSE

 F

UEL

 F

ILLER

 C

AP

 M

ESSAGE


After fuel has been added, the vehicle diagnostic 

system can determine if the fuel filler cap is 

possibly loose, improperly installed, or damaged. If 

the system detects a malfunction, the “gASCAP” 

message will display in the odometer display. 

Tighten the gas cap until a "clicking" sound is 

heard. This is an indication that the gas cap is 

properly tightened. Push the odometer reset 

button to turn the message off. If the problem 

persists, the message will appear the next time the 

vehicle is started. This might indicate a damaged 

cap. If the problem is detected twice in a row, the 

system will turn on the MIL. Resolving the problem 

will turn the MIL off.

REFUELING THE VEHICLE — DIESEL ENGINE 

(IF EQUIPPED)   

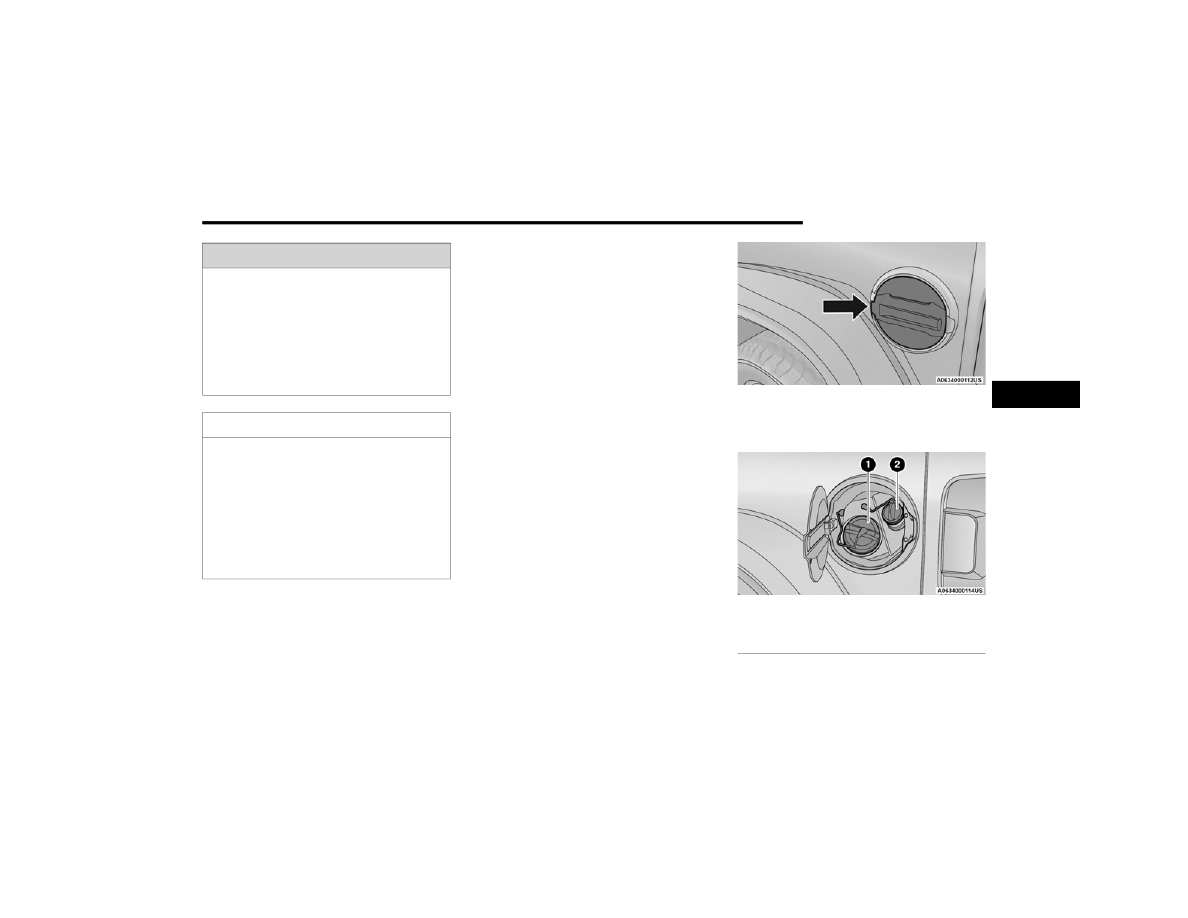
The fuel filler cap is located on the driver's side of 

the vehicle. If the fuel filler cap is lost or damaged, 

be sure the replacement cap is the correct one for 

this vehicle.
1. Open the fuel filler door.

Fuel Filler Door

2. Remove the fuel cap by rotating it counter

-

clockwise.

Fuel and Diesel Exhaust Fluid (DEF) Fill Location

Never add fuel when the engine is running. 

This is in violation of most state and federal 

fire regulations and may cause the Malfunc

-

tion Indicator Light to turn on.

A fire may result if fuel is pumped into a 

portable container that is inside of a vehicle. 

You could be burned. Always place fuel 

containers on the ground while filling.

CAUTION!

Damage to the fuel system or emission control 

system could result from using an improper 

fuel filler cap. A poorly fitting cap could let 

impurities into the fuel system. Also, a poorly 

fitting aftermarket cap can cause the Malfunc

-

tion Indicator Light (MIL) to illuminate, due to 

fuel vapors escaping from the system.

To avoid fuel spillage and overfilling, do not 

“top off” the fuel tank after filling.

WARNING!

1 — Diesel Fuel Filler
2 — DEF Filler

4

188

STARTING AND OPERATING


3. Fully insert the fuel nozzle into the filler pipe.
4. Fill the vehicle with fuel.

NOTE:

When the fuel nozzle “clicks” or shuts off, 

the fuel tank is full.

Wait five seconds before removing the fuel 

nozzle to allow excess fuel to drain from the 

nozzle.

5. Remove the fuel nozzle, reinstall fuel cap and 

close fuel filler door.

NOTE:

Tighten the fuel filler cap about a quarter turn until 

you hear one click. This is an indication that the 

cap is properly tightened.

A

VOID

 U

SING

 C

ONTAMINATED

 F

UEL

Fuel that is contaminated by water or dirt can 

cause severe damage to the engine fuel system. 

Proper maintenance of the engine fuel filter and 

fuel tank is essential see  

Ú

page 362.

B

ULK

 F

UEL

 S

TORAGE

 — D

IESEL

 F

UEL

If you store quantities of fuel, good maintenance of 

the stored fuel is also essential. Fuel contaminated 

with water will promote the growth of “microbes.” 

These microbes form “slime” that will clog the fuel 

filtration system and lines. Drain condensation 

from the supply tank and change the line filter on 

a regular basis.

NOTE:

When a diesel engine is allowed to run out of fuel, 

air is pulled into the fuel system.
If the vehicle will not start see  

Ú

page 364.

D

IESEL

 E

XHAUST

 F

LUID

Your vehicle is equipped with a Selective Catalytic 

Reduction (SCR) system to meet the very stringent 

diesel emissions standards required by the 

Environmental Protection Agency.
The purpose of the SCR system is to reduce levels 

of NOx (oxides of nitrogen emitted from engines) 

that are harmful to our health and the environment 

to a near-zero level. A small quantity of Diesel 

Exhaust Fluid (DEF) is injected into the exhaust 

upstream of a catalyst where, when vaporized, it 

converts smog-forming nitrogen oxides (NOx) into 

harmless nitrogen (N2) and water vapor (H2O), two 

natural components of the air we breathe. You can 

operate with the comfort that your vehicle is 

contributing to a cleaner, healthier world 

environment for this and generations to come.

System Overview

This vehicle is equipped with a Diesel Exhaust Fluid 

(DEF) injection system and a Selective Catalytic 

Reduction (SCR) catalyst to meet the emission 

requirements.
The DEF injection system consists of the following 

components:

DEF tank

DEF pump

DEF injector

CAUTION!

For diesel engines, only use diesel fuel for motor 

vehicles in accordance with ASTM D-975 Grade 

S15 specifications. The use of other products or 

mixtures may damage the engine beyond repair 

and consequently void the warranty, due to the 

damage caused. If you accidentally introduce 

other types of fuel into the tank, do not start the 

engine. Empty the tank. If the engine has been 

run for even an extremely limited amount of 

time, you must not only drain the fuel tank, but 

the rest of the supply circuit as well.

WARNING!

Do not open the high pressure fuel system with 

the engine running. Engine operation causes 

high fuel pressure. High pressure fuel spray can 

cause serious injury or death.

STARTING AND OPERATING

189

Electronically-heated DEF Lines

NOx sensors

Temperature sensors

SCR catalyst

The DEF injection system and SCR catalyst enable 

the achievement of diesel emission requirements; 

while maintaining outstanding fuel economy, 

drivability, torque and power ratings.
For system messages and warnings see  

Ú

page 120.

NOTE:

Your vehicle is equipped with a DEF injection 

system. You may occasionally hear an audible 

clicking noise from under the vehicle at a stop. 

This is normal operation.

The DEF pump will run for a period of time after 

engine shutdown to purge the DEF system. This 

is normal operation and may be audible from 

the rear of the vehicle.

Diesel Exhaust Fluid Storage

Diesel Exhaust Fluid (DEF) is considered a very 

stable product with a long shelf life. If DEF is kept 

in temperatures between 10° and 90°F (-12° and 

32°C), it will last a minimum of one year.

DEF is subject to freezing at the lowest 

temperatures. For example, DEF may freeze at 

temperatures at or below 12°F (-11°C). The 

system has been designed to operate in this 

environment.

NOTE:

When working with DEF, it is important to know 

that: 

Any containers or parts that come into contact 

with DEF must be DEF compatible (plastic or 

stainless steel). Copper, brass, aluminum, iron 

or non-stainless steel should be avoided as they 

are subject to corrosion by DEF.

If DEF is spilled, it should be wiped up 

completely.

Adding Diesel Exhaust Fluid

The DEF gauge (located on the instrument cluster 

display) will display the level of DEF remaining in 

the tank  

Ú

page 120.

NOTE:

Driving conditions (altitude, vehicle speed, load, 

etc.) will affect the amount of DEF that is used in 

your vehicle.

DEF FILL PROCEDURE

NOTE:

For the correct DEF fluid type see  

Ú

page 424.

1. Remove cap from DEF fill inlet (located in fuel 

door).

Fuel and Diesel Exhaust Fluid Fill Location

2. Insert DEF fill adapter/nozzle into DEF fill inlet.

NOTE:

The DEF gauge may take up to five seconds 

to update after adding a gallon or more of 

Diesel Exhaust Fluid (DEF) to the DEF tank. 

If you have a fault related to the DEF 

1 — Diesel Fuel Filler
2 — Diesel Exhaust Fluid Filler

4

190

STARTING AND OPERATING


(Continued)

system, the gauge may not update to the 

new level. See an authorized dealer for 

service.

The DEF gauge may also not immediately 

update after a refill if the temperature of the 

DEF fluid is below 12°F (-11°C). The DEF 

tank heater will possibly warm up the DEF 

fluid and allow the gauge to update after a 

period of run time. Under very cold condi

-

tions, it is possible that the gauge may not 

reflect the new fill level for several drives.

Excessive overfilling of the DEF tank can 

result in a MIL lamp/fault code and inaccu

-

rate level readings.

Refilling With Nozzles
You can fill up at any DEF distributor.
Proceed as follows:

Insert the DEF nozzle in the filler, start 

refilling and stop refilling at the first shut-off 

(the shut-off indicates that the DEF tank is 

full). Do not proceed with the refilling, to 

prevent spillage of DEF.

Extract the nozzle.

Refilling With Containers
Proceed as follows:

Check the expiration date.

Read the advice for use on the label before 

pouring the content of the bottle into the 

DEF tank.

If systems which cannot be screwed in (e.g. 

tanks) are used for refilling, after the indica

-

tion appears on the instrument panel 

display  

Ú

page 116 fill the DEF tank with no 

more than 2 gallons (8 liters).

If containers which can be screwed to the 

filler are used, the reservoir is full when the 

DEF level in the container stops pouring out. 

Do not proceed further.

CAUTION!

To avoid DEF spillage, and possible damage to 

the DEF tank from overfilling, do not “top off” 

the DEF tank after filling.

DO NOT OVERFILL. DEF will freeze below 12ºF 

(-11ºC). The DEF system is designed to work in 

temperatures below the DEF freezing point, 

however, if the tank is overfilled and freezes, 

the system could be damaged.

When DEF is spilled, clean the area immedi

-

ately with water and use an absorbent mate

-

rial to soak up the spills on the ground.

Do not attempt to start your engine if DEF is 

accidentally added to the diesel fuel tank as it 

can result in severe damage to your engine, 

including but not limited to failure of the fuel 

pump and injectors.

Never add anything other than DEF to the tank 

– especially any form of hydrocarbon such as 

diesel fuel, fuel system additives, gasoline, or 

any other petroleum-based product. Even a very 

small amount of these, less than 100 parts per 

million or less than 1 oz. per 78 gallons 

(295 liters) will contaminate the entire DEF 

system and will require replacement. If owners 

use a container, funnel or nozzle when refilling 

the tank, it should either be new or one that has 

only been used for adding DEF. Mopar® 

provides an attachable nozzle with its DEF for 

this purpose.

CAUTION!

STARTING AND OPERATING

191

3. Stop filling the DEF tank immediately when any 

of the following happen: DEF stops flowing 

from the fill bottle into the DEF fill inlet, DEF 

splashes out the fill inlet, or a DEF pump 

nozzle automatically shuts off.

4. Reinstall cap onto DEF fill inlet.

VEHICLE LOADING   

C

ERTIFICATION

 L

ABEL

As required by National Highway Traffic Safety 

Administration regulations, your vehicle has a 

certification label affixed to the driver's side door or 

pillar.
This label contains the month and year of 

manufacture, Gross Vehicle Weight Rating 

(GVWR), Gross Axle Weight Rating (GAWR) front 

and rear, and Vehicle Identification Number (VIN). 

A Month-Day-Hour (MDH) number is included on 

this label and indicates the Month, Day and Hour of 

manufacture. The bar code that appears on the 

bottom of the label is your VIN.

Gross Vehicle Weight Rating (GVWR) 

The GVWR is the total permissible weight of your 

vehicle including driver, passengers, vehicle, 

options and cargo. The label also specifies 

maximum capacities of front and rear axle systems 

(GAWR). Total load must be limited so GVWR and 

front and rear GAWR are not exceeded.

Payload

The payload of a vehicle is defined as the allowable 

load weight a truck can carry, including the weight 

of the driver, all passengers, options and cargo.

Gross Axle Weight Rating (GAWR)

The GAWR is the maximum permissible load on the 

front and rear axles. The load must be distributed 

in the cargo area so that the GAWR of each axle is 

not exceeded.
Each axle GAWR is determined by the components 

in the system with the lowest load carrying capacity 

(axle, springs, tires or wheels). Heavier axles or 

suspension components sometimes specified by 

purchasers for increased durability does not 

necessarily increase the vehicle's GVWR.

Tire Size

The tire size on the Vehicle Certification Label 

represents the actual tire size on your vehicle. 

Replacement tires must be equal to the load 

capacity of this tire size.

Rim Size

This is the rim size that is appropriate for the tire 

size listed.

Inflation Pressure

This is the cold tire inflation pressure for your 

vehicle for all loading conditions up to full GAWR.

Curb Weight

The curb weight of a vehicle is defined as the total 

weight of the vehicle with all fluids, including 

vehicle fuel, at full capacity conditions, and with no 

occupants or cargo loaded into the vehicle. The 

front and rear curb weight values are determined 

by weighing your vehicle on a commercial scale 

before any occupants or cargo are added.

Loading

The actual total weight and the weight of the front 

and rear of your vehicle at the ground can best be 

determined by weighing it when it is loaded and 

ready for operation.
The entire vehicle should first be weighed on a 

commercial scale to ensure that the GVWR has not 

been exceeded. The weight on the front and rear of 

the vehicle should then be determined separately 

to be sure that the load is properly distributed over 

the front and rear axle. Weighing the vehicle may 

show that the GAWR of either the front or rear axles 

has been exceeded but the total load is within the 

specified GVWR. If so, weight must be shifted from 

front to rear or rear to front as appropriate until the 

specified weight limitations are met. Store the 

heavier items down low and be sure that the 

weight is distributed equally. Stow all loose items 

securely before driving.

4

192

STARTING AND OPERATING


Improper weight distributions can have an adverse 

effect on the way your vehicle steers and handles 

and the way the brakes operate.

TRAILER TOWING 

In this section you will find safety tips and 

information on limits to the type of towing you can 

reasonably do with your vehicle. Before towing a 

trailer, carefully review this information to tow your 

load as efficiently and safely as possible.
To maintain the New Vehicle Limited Warranty 

coverage, follow the requirements and 

recommendations in this manual concerning 

vehicles used for trailer towing.

C

OMMON

 T

OWING

 D

EFINITIONS

The following trailer towing related definitions will 

assist you in understanding the following 

information:

Gross Vehicle Weight Rating (GVWR) 

The GVWR is the total allowable weight of your 

vehicle. This includes driver, passengers, cargo 

and tongue weight. The total load must be limited 

so that you do not exceed the GVWR  

Ú

page 191.

Gross Trailer Weight (GTW)

The GTW is the weight of the trailer plus the weight 

of all cargo, consumables and equipment 

(permanent or temporary) loaded in or on the 

trailer in its "loaded and ready for operation" 

condition.
The recommended way to measure GTW is to put 

your fully loaded trailer on a vehicle scale. The 

entire weight of the trailer must be supported by 

the scale.

Gross Combination Weight Rating (GCWR)

The GCWR is the total permissible weight of your 

vehicle and trailer when weighed in combination.

Gross Axle Weight Rating (GAWR) 

The GAWR is the maximum capacity of the front 

and rear axles. Distribute the load over the front 

and rear axles evenly. Make sure that you do not 

exceed either front or rear GAWR  

Ú

page 191.

Tongue Weight (TW)

The TW is the downward force exerted on the hitch 

ball by the trailer. You must consider this as part of 

the load on your vehicle.

Frontal Area

The frontal area is the maximum height multiplied 

by the maximum width of the front of a trailer.

Trailer Sway Control (TSC) – If Equipped

The TSC is a telescoping link that can be installed 

between the hitch receiver and the trailer tongue. 

It typically provides adjustable friction associated 

with the telescoping motion to dampen any 

unwanted trailer swaying motions while traveling.

Weight-Carrying Hitch

A weight-carrying hitch supports the trailer tongue 

weight, just as if it were luggage located at a hitch 

ball or some other connecting point of the vehicle. 

These kinds of hitches are commonly used to tow 

small and medium sized trailers.

CAUTION!

Do not load your vehicle any heavier than the 

GVWR or the maximum front and rear GAWR. If 

you do, parts on your vehicle can break, or it can 

change the way your vehicle handles. This could 

cause you to lose control. Overloading can 

shorten the life of your vehicle.

WARNING!

It is important that you do not exceed the 

maximum front or rear GAWR. A dangerous 

driving condition can result if either rating is 

exceeded.

STARTING AND OPERATING

193

Weight-Distributing Hitch

A Weight-Distributing Hitch works by applying 

leverage through spring (load) bars. They are 

typically used for heavier loads to distribute trailer 

tongue weight to the tow vehicle's front axle and 

the trailer axle(s). When used in accordance with 

the manufacturer's directions, it provides for a 

more level ride, offering more consistent steering 

and brake control thereby enhancing towing 

safety. The addition of a friction/hydraulic sway 

control also dampens sway caused by traffic and 

crosswinds and contributes positively to tow 

vehicle and trailer stability. Trailer sway control and 

a Weight-Distributing (load equalizing) Hitch are 

recommended for heavier Tongue Weights (TW) 

and may be required depending on vehicle and 

trailer configuration/loading to comply with Gross 

Axle Weight Rating (GAWR) requirements.

T

RAILER

 H

ITCH

 C

LASSIFICATION

The following chart provides the industry standard 

for the maximum trailer weight a given trailer hitch 

class can tow and should be used to assist you in 

selecting the correct trailer hitch for your intended 

towing condition.

WARNING!

An improperly adjusted Weight Distributing 

Hitch system may reduce handling, stability, 

braking performance, and could result in a 

collision.

Weight-Distributing Hitch Systems may not be 

compatible with surge brake couplers. Consult 

with your hitch and trailer manufacturer or a 

reputable Recreational Vehicle dealer for 

additional information.

Trailer Hitch Classification Definitions

Class  

Max. Trailer Hitch Industry Standards

Class I - Light Duty

2,000 lb (907 kg)

Class II - Medium Duty

3,500 lb (1,587 kg)

Class III - Heavy Duty

6,000 lb (2,721 kg)

Class IV - Extra Heavy Duty

10,000 lb (4,535 kg)

Refer to the “Trailer Towing Weights (Maximum Trailer Weight Ratings)” chart for the Maximum Gross Trailer Weight (GTW) towable for your given drivetrain.
All trailer hitches should be professionally installed on your vehicle.

4

194

STARTING AND OPERATING


T

RAILER

 T

OWING

 W

EIGHTS

 (M

AXIMUM

 T

RAILER

 W

EIGHT

 R

ATINGS

)    

NOTE:

The trailer tongue weight must be considered as 

part of the combined weight of occupants and 

cargo (i.e., the GVWR), and the GVWR should never 

exceed the weight referenced on the Tire and 

Loading Information placard  

Ú

page 391.

T

RAILER

 A

ND

 T

ONGUE

 W

EIGHT


Never exceed the maximum tongue weight 

stamped on your bumper or trailer hitch.

Weight Distribution

Consider the following items when computing the 

weight on the rear axle of the vehicle:

The tongue weight of the trailer.

The weight of any other type of cargo or equip

-

ment put in or on your vehicle.

The weight of the driver and all passengers.

NOTE:

Remember that everything put into or on the trailer 

adds to the load on your vehicle. Also, additional 

factory-installed options or dealer-installed options 

must be considered as part of the total load on 

your vehicle. Refer to the “Tire And Loading Infor

-

mation” placard for the maximum combined 

weight of occupants and cargo for your vehicle.

Engine/Transmission

Model

GCWR

Frontal Area

Maximum GTW

Maximum Trailer TW 

(See Note)

2.0L

Two–Door

8,016 lb (3,636 kg)

20 ft2 (1.86 m2)

2,000 lb (907 kg)

200 lb (91 kg)

Four–Door

8,117 lb (3,682 kg)

30 ft2 (2.79 m2)

3,500 lb (1,587 kg)

350 lb (158 kg)

3.6L

Two–Door

8,016 lb (3,636 kg)

20 ft2 (1.86 m2)

2,000 lb (907 kg)

200 lb (91 kg)

Four–Door

8,117 lb (3,682 kg)

30 ft2 (2.79 m2)

3,500 lb (1,587 kg)

350 lb (158 kg)

3.0L Diesel

Four–Door

8,427 lb (3,822 kg)

30 ft2 (2.79 m2)

3,500 lb (1,587 kg)

350 lb (158 kg)

Refer to local laws for maximum trailer towing speeds.

STARTING AND OPERATING

195

(Continued)

(Continued)

T

OWING

 R

EQUIREMENTS

To promote proper break-in of your new vehicle 

drivetrain components, the following guidelines 

are recommended:

Towing Requirements — Tires

Proper tire inflation pressures are essential to 

the safe and satisfactory operation of your 

vehicle.

Check the trailer tires for proper tire inflation 

pressures before trailer usage.

Check for signs of tire wear or visible tire 

damage before towing a trailer.

Replacing tires with a higher load carrying 

capacity will not increase the vehicle's GVWR 

and GAWR limits.

For further information  

Ú

page 391.

WARNING!

Improper towing can lead to a collision. Follow 

these guidelines to make your trailer towing as 

safe as possible:

Make certain that the load is secured in the 

trailer and that it will not shift during travel. 

When trailering cargo that is not fully secured, 

dynamic load shifts can occur that may be 

difficult for the driver to control. You could lose 

control of your vehicle and have a collision.

When hauling cargo, or towing a trailer, do not 

overload your vehicle or trailer. Overloading 

can cause a loss of control, poor performance, 

or damage to brakes, axle, engine, transmis

-

sion, steering, suspension, chassis structure, 

or tires.

Safety chains must always be used between 

your vehicle and trailer. Always connect the 

chains to the frame or hook retainers of the 

vehicle hitch. Cross the chains under the 

trailer tongue and allow enough slack for 

turning corners.

Vehicles with trailers should not be parked on 

a grade. When parking, apply the parking 

brake on the tow vehicle. Put the tow vehicle 

transmission in PARK. Always block or "chock" 

the trailer wheels.

GCWR must not be exceeded.

Total weight must be distributed between the 

tow vehicle and the trailer such that the 

following four ratings are not exceeded:

GVWR

GTW

GAWR

Tongue weight rating for the trailer hitch 

utilized.

CAUTION!

Do not tow a trailer at all during the first 

500 miles (805 km) the new vehicle is driven. 

The engine, axle or other parts could be 

damaged.

WARNING!

Then, during the first 500 miles (805 km) that 

a trailer is towed, do not drive over 50 mph 

(80 km/h) and do not make starts at full 

throttle. This helps the engine and other parts 

of the vehicle wear in at the heavier loads.

CAUTION!

4

196

STARTING AND OPERATING


Towing Requirements — Trailer Brakes

Do not interconnect the hydraulic brake system 

or vacuum system of your vehicle with that of 

the trailer. This could cause inadequate braking 

and possible personal injury.

An electronically actuated trailer brake 

controller is required when towing a trailer with 

electronically actuated brakes. When towing a 

trailer equipped with a hydraulic surge actuated 

brake system, an electronic brake controller is 

not required.

Trailer brakes are recommended for trailers 

over 1,000 lb (453 kg) and required for trailers 

in excess of 2,000 lb (907 kg).

Towing Requirements — Trailer Lights And 

Wiring

Whenever you pull a trailer, regardless of the trailer 

size, stop lights and turn signals on the trailer are 

required for motoring safety.
The Trailer Tow Package may include a four- and 

seven-pin wiring harness. Use a factory approved 

trailer harness and connector.

NOTE:

Do not cut or splice wiring into the vehicle’s wiring 

harness.
The electrical connections are all complete to the 

vehicle but you must mate the harness to a trailer 

connector. Refer to the following illustrations.

NOTE:

Disconnect trailer wiring connector from the 

vehicle before launching a boat (or any other 

device plugged into vehicle’s electrical connect) 

into water.

Be sure to reconnect once clear from water 

area.

Four-Pin Connector

WARNING!

Do not connect trailer brakes to your vehicle's 

hydraulic brake lines. It can overload your 

brake system and cause it to fail. You might 

not have brakes when you need them and 

could have an accident.

Towing any trailer will increase your stopping 

distance. When towing, you should allow for 

additional space between your vehicle and the 

vehicle in front of you. Failure to do so could 

result in an accident.

CAUTION!

If the trailer weighs more than 1,000 lb (453 kg) 

loaded, it should have its own brakes and they 

should be of adequate capacity. Failure to do 

this could lead to accelerated brake lining wear, 

higher brake pedal effort, and longer stopping 

distances.

1 — Ground
2 — Park
3 — Left Stop/Turn
4 — Right Stop/Turn

STARTING AND OPERATING

197

Seven-Pin Connector

T

OWING

 T

IPS

Before setting out on a trip, practice turning, 

stopping and backing the trailer in an area away 

from heavy traffic.
If using a manual transmission vehicle for trailer 

towing, all starts must be in FIRST gear to avoid 

excessive clutch slippage.

Automatic Transmission — If Equipped

Select the DRIVE range when towing. The 

transmission controls include a drive strategy to 

avoid frequent shifting when towing. However, if 

frequent shifting does occur while in DRIVE, you 

can use the AutoStick shift control to manually 

select a lower gear.

NOTE:

Using a lower gear while operating the vehicle 

under heavy loading conditions, will improve 

performance and extend transmission life by 

reducing excessive shifting and heat build-up. This 

action will also provide better engine braking.

AutoStick — If Equipped

When using the AutoStick shift control, select 

the highest gear that allows for adequate perfor

-

mance and avoids frequent downshifts. For 

example, choose “5” if the desired speed can be 

maintained. Choose “4” or “3” if needed to 

maintain the desired speed.

To prevent excess heat generation, avoid 

continuous driving at high RPM. Return to a 

higher gear or vehicle speed when grade and 

road conditions allow.

Cruise Control — If Equipped

Do not use in hilly terrain or with heavy loads.

When using the Cruise Control, if you experience 

speed drops greater than 10 mph (16 km/h), 

disengage until you can get back to cruising 

speed.

Use Cruise Control in flat terrain and with light 

loads to maximize fuel efficiency.

1 — Backup Lamps
2 — Running Lamps
3 — Left Stop/Turn
4 — Ground
5 — Battery
6 — Right Stop/Turn
7 — Electric Brakes

4

198

STARTING AND OPERATING


(Continued)

(Continued)

RECREATIONAL TOWING (BEHIND MOTORHOME)  

T

OWING

 T

HIS

 V

EHICLE

 B

EHIND

 A

NOTHER

 V

EHICLE

R

ECREATIONAL

 T

OWING

 — 

F

OUR

-W

HEEL

 D

RIVE

 M

ODELS

NOTE:

The transfer case must be shifted into (N) Neutral, 

automatic transmission must be in PARK, and 

manual transmission must be in gear (NOT in 

NEUTRAL) for recreational towing.

Towing Condition

Wheels OFF the Ground

Four-Wheel Drive Models

Flat Tow

NONE

See Instructions 

Automatic transmission in PARK.

Manual transmission in gear (NOT in NEUTRAL 

[N]).

Transfer case in (N) Neutral.

Tow in forward direction.

Dolly Tow

Front

NOT ALLOWED

Rear

NOT ALLOWED

On Trailer

ALL

OK

NOTE:

When towing your vehicle, always follow applicable state and provincial laws. Contact state and provincial Highway Safety offices for additional details.

CAUTION!

DO NOT dolly tow any 4WD vehicle. Towing 

with only one set of wheels on the ground 

(front or rear) will cause severe transmission 

and/or transfer case damage. Tow with all 

four wheels either ON the ground, or OFF the 

ground (using a vehicle trailer).

Tow only in the forward direction. Towing this 

vehicle backwards can cause severe damage 

to the transfer case.

Automatic transmissions must be placed in 

PARK for recreational towing.

CAUTION!

STARTING AND OPERATING

199

Shifting Into (N) Neutral  

Use the following procedure to prepare your 

vehicle for recreational towing:

1. Bring the vehicle to a complete stop on level 

ground.

2. Press and hold the brake pedal.
3. Shift the automatic transmission into 

NEUTRAL or press the clutch pedal on a 

manual transmission.

4. Turn the engine off.
5. Shift the transfer case lever into (N) Neutral.
6. Start the engine.
7. Shift the transmission into REVERSE.
8. Release the brake pedal (and clutch pedal on 

manual transmissions) for five seconds and 

ensure that there is no vehicle movement.

9. Repeat steps seven and eight with automatic 

transmission in DRIVE or manual transmission 

in FIRST gear.

10. Turn the engine off.

Manual transmissions must be placed in gear 

(not in NEUTRAL) for recreational towing.

Before recreational towing, perform the proce

-

dure outlined under “Shifting Into (N) Neutral” 

to be certain that the transfer case is fully in 

(N) Neutral. Otherwise, internal damage will 

result.

Towing this vehicle in violation of the above 

requirements can cause severe transmission 

and/or transfer case damage. Damage from 

improper towing is not covered under the New 

Vehicle Limited Warranty.

Do not use a fascia/bumper-mounted 

clamp-on tow bar on your vehicle. The bumper 

face bar will be damaged.

CAUTION!

WARNING!

You or others could be injured or killed if you 

leave the vehicle unattended with the transfer 

case in the (N) Neutral position without first fully 

engaging the parking brake. The transfer case 

(N) Neutral position disengages both the front 

and rear driveshafts from the powertrain, and 

will allow the vehicle to roll, even if the automatic 

transmission is in PARK (or manual transmission 

is in gear). The parking brake should always be 

applied when the driver is not in the vehicle.

WARNING!

You or others could be injured or killed if you 

leave the vehicle unattended with the transfer 

case in the (N) Neutral position without first fully 

engaging the parking brake. The transfer case 

(N) Neutral position disengages both the front 

and rear driveshafts from the powertrain, and 

will allow the vehicle to roll, even if the automatic 

transmission is in PARK. The parking brake 

should always be applied when the driver is not 

in the vehicle.

CAUTION!

It is necessary to follow these steps to be certain 

that the transfer case is fully in (N) Neutral 

before recreational towing to prevent damage to 

internal parts.

4

200

STARTING AND OPERATING


11. Firmly apply the parking brake.
12. Shift the transmission into PARK or place 

manual transmission in gear (NOT in 

NEUTRAL).

13. Attach the vehicle to the tow vehicle using a 

suitable tow bar.

14. Release the parking brake.

Shifting Out of (N) Neutral  

Use the following procedure to prepare your 

vehicle for normal usage.
1. Bring the vehicle to a complete stop, leaving 

it connected to the tow vehicle.

2. Firmly apply the parking brake.
3. Start the engine.
4. Press and hold the brake pedal.
5. Shift the transmission into NEUTRAL.
6. Turn the engine off.

7. Shift the transfer case lever to the desired 

position.

NOTE:

When shifting the transfer case out of (N) Neutral, 

the engine should remain off to avoid gear clash.
8. Shift the automatic transmission into PARK, or 

place manual transmission in NEUTRAL.

9. Release the brake pedal.
10. Disconnect vehicle from the tow vehicle.
11. Start the engine.
12. Press and hold the brake pedal.
13. Release the parking brake.
14. Shift the transmission into gear, release the 

brake pedal (and clutch pedal on manual 

transmissions), and check that the vehicle 

operates normally.

DRIVING TIPS

O

N

-R

OAD

 D

RIVING

 T

IPS

Utility vehicles have higher ground clearance and a 

narrower track to make them capable of 

performing in a wide variety of off-road 

applications. Specific design characteristics give 

them a higher center of gravity than conventional 

passenger cars.
An advantage of the higher ground clearance is a 

better view of the road, allowing you to anticipate 

problems. They are not designed for cornering at 

the same speeds as conventional passenger cars 

any more than low-slung sports cars are designed 

to perform satisfactorily in off-road conditions. 

Avoid sharp turns or abrupt maneuvers. As with 

other vehicles of this type, failure to operate this 

vehicle correctly may result in loss of control or 

vehicle rollover.

O

FF

-R

OAD

 D

RIVING

 T

IPS

Side Step Removal — If Equipped

NOTE:

Prior to off-road usage, the side steps should be 

removed to prevent damage if so equipped.
1. Remove both nuts and bolt from the 

underside of the vehicle for each bracket.

Underside Nuts

2. Remove the side step assembly.

CAUTION!

Damage to the transmission may occur if the 

transmission is shifted into PARK with the 

transfer case in (N) Neutral and the engine 

running. With the transfer case in (N) Neutral 

ensure that the engine is OFF before shifting the 

transmission into PARK.

STARTING AND OPERATING

201

Bumper End Cap Removal

The end caps on your vehicle’s front fascia/

bumper can be removed by following the steps 

below:

NOTE:

Bumper end caps are removable on steel fascia/

bumpers only.
1. Loosen the two bolts that retain the GAWR 

bracket (Bolts #1 and #2) to the end cap 

using a T45 torx bit screw driver. Do not 

remove the bolts.

Bolt #1

Bolt #2

2. Remove the remaining eight bolts.
3. Gently remove the end cap from the vehicle 

and store it where it will not get damaged.

4. Repeat this procedure on the other side.

The Basics Of Off-Road Driving

You will encounter many types of terrain driving 

off-road. You should be familiar with the terrain 

and area before proceeding. There are many types 

of surface conditions: hard-packed dirt, gravel, 

rocks, grass, sand, mud, snow and ice. Every 

surface has a different effect on your vehicle's 

steering, handling and traction. Controlling your 

vehicle is one of the keys to successful off-road 

driving, so always keep a firm grip on the steering 

wheel and maintain a good driving posture. Avoid 

sudden accelerations, turns or braking. In most 

cases, there are no road signs, posted speed limits 

or signal lights. Therefore, you will need to use your 

own good judgment on what is safe and what is 

not. When on a trail, you should always be looking 

ahead for surface obstacles and changes in 

terrain. The key is to plan your future driving route 

while remembering what you are currently driving 

over.

NOTE:

It is recommended that the Stop/Start system be 

disabled during off-road use.

When To Use 4L Range

When off-road driving, shift into 4L for additional 

traction and control on slippery or difficult terrain, 

ascending or descending steep hills, and to 

increase low speed pulling power. This range 

should be limited to extreme situations such as 

deep snow, mud, steep inclines, or sand where 

WARNING!

Always wear your seat belt and firmly tie down 

cargo. Unsecured cargo can become projectiles 

in an off-road situation.

CAUTION!

Never park your vehicle over dry grass or other 

combustible materials. The heat from your 

vehicle exhaust system could cause a fire.

4

202

STARTING AND OPERATING


additional low speed pulling power is needed. 

Vehicle speeds in excess of 25 mph (40 km/h) 

should be avoided when in 4L.

Simultaneous Brake And Throttle 

Operation

Many off-road driving conditions require the 

simultaneous use of the brake and throttle 

(two-footed driving). When climbing rocks, logs, or 

other stepped objects, using light brake pressure 

with light throttle will keep the vehicle from jerking 

or lurching. This technique is also used when you 

need to stop and restart a vehicle on a steep 

incline.

Driving In Snow, Mud And Sand

SNOW

In heavy snow or for additional control and traction 

at slower speeds, shift the transmission into a low 

gear and the transfer case into 4L if necessary. Do 

not shift to a lower gear than necessary to maintain 

headway. Over-revving the engine can spin the 

wheels and traction will be lost. If you start to slow 

to a stop, try turning your steering wheel no more 

than a 1/4 turn quickly back and forth, while still 

applying throttle. This will allow the tires to get 

fresh traction and help maintain your momentum.

MUD

Deep mud creates a great deal of suction around 

the tires and is very difficult to get through. You 

should use DRIVE, with the transfer case in the 4L 

position to maintain your momentum. If you start to 

slow to a stop, try turning your steering wheel no 

more than a 1/4 turn quickly back and forth for 

additional traction. Mud holes pose an increased 

threat of vehicle damage and getting stuck. They 

are normally full of debris from previous vehicles 

getting stuck. As a good practice before entering 

any mud hole, get out and determine how deep it 

is, if there are any hidden obstacles and if the 

vehicle can be safely recovered if stuck.

SAND

Soft sand is very difficult to travel through with full 

tire pressure. When crossing soft, sandy spots in a 

trail, maintain your vehicle's momentum and do 

not stop. The key to driving in soft sand is using the 

appropriate tire pressure, accelerating slowly, 

avoiding abrupt maneuvers and maintaining the 

vehicle's momentum. If you are going to be driving 

on large soft sandy areas or dunes, reduce your 

tire pressure to a minimum of 15 psi (103 kPa) to 

allow for a greater tire surface area. Reduced tire 

pressure will drastically improve your traction and 

handling while driving on the soft sand, but you 

must return the tires to normal air pressure before 

driving on pavement or other hard surfaces. Be 

sure you have a way to reinflate the tires prior to 

reducing the pressure.

Crossing Obstacles

(Rocks And Other High Points)

While driving off-road, you will encounter many 

types of terrain. These varying types of terrain bring 

different types of obstacles. Before proceeding, 

review the path ahead to determine the correct 

approach and your ability to safely recover the 

vehicle if something goes wrong. Keeping a firm 

grip on the steering wheel, bring the vehicle to a 

complete stop and then inch the vehicle forward 

CAUTION!

Do not use 4L when operating the vehicle on dry 

pavement. Driveline hardware damage can 

result.

CAUTION!

On icy or slippery roads, do not downshift at high 

engine RPM or vehicle speeds, because engine 

braking may cause skidding and loss of control.

CAUTION!

Reduced tire pressures may cause tire 

unseating and total loss of air pressure. To 

reduce the risk of tire unseating, while at a 

reduced tire pressure, reduce your speed and 

avoid sharp turns or abrupt maneuvers.


Content      ..     10      11      12      13     ..