Jeep Wrangler (2022 year). Manual in english - page 5
 

  Index      Manuals     Jeep Wrangler (2022 year). Manual in english


Search            copyright infringement  


Content      ..     3      4      5      6     ..


Jeep Wrangler (2022 year). Manual in english - page 5


GETTING TO KNOW YOUR VEHICLE

75

POWER WINDOWS — IF EQUIPPED 

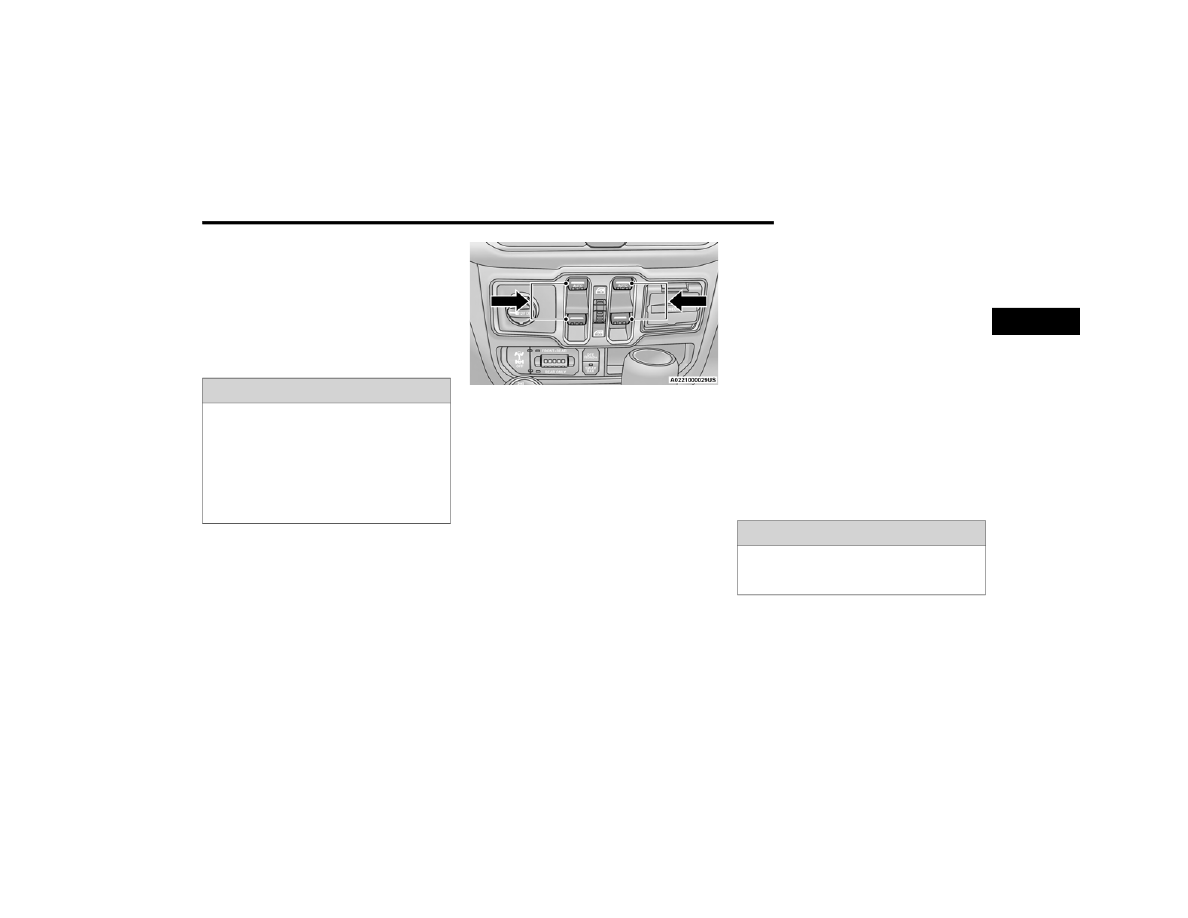
The power window switches are located on the 

instrument panel below the climate controls. Push 

the switch downward to open the window and 

upward to close the window.
The top left switch controls the left front window 

and the top right switch controls the right front 

window.

Power Window Switches

To open the window part way (manually), push the 

window switch down briefly and release.

NOTE:

The power window switches will remain active for 

up to 10 minutes after ignition is placed in the OFF 

position. Opening either front door will cancel this 

feature.

Four-Door Models
The lower left switch controls the left rear 

passenger window, and the lower right switch 

controls the right rear passenger window.

NOTE:

There are window switches located on the rear of 

the center console for the rear passenger windows 

in the four-door model.

A

UTO

-D

OWN

 F

EATURE


The driver door power and the passenger door 

power window switches have an Auto-Down 

feature. Push the window switch down to the 

second detent and release, and the window will go 

down automatically.
To stop the window from going all the way down 

during the Auto-Down operation, pull up on the 

switch briefly.

WARNING!

Never leave children unattended in a vehicle, 

and do not let children play with power windows. 

Do not leave the key fob in or near the vehicle, or 

in a location accessible to children. Occupants, 

particularly unattended children, can become 

entrapped by the windows while operating the 

power window switches. Such entrapment may 

result in serious injury or death.

WARNING!

There is no anti-pinch protection when the 

window is almost closed. Be sure to clear all 

objects from the window before closing.

2

76

GETTING TO KNOW YOUR VEHICLE


W

INDOW

 L

OCKOUT

 S

WITCH

Window Lockout Switch

The window lockout switch allows you to disable 

the window controls on the rear passenger doors. 

To disable the window controls, rotate the switch 

downward. To enable the window controls, rotate 

the switch upward.

W

IND

 B

UFFETING


Wind buffeting can be described as the perception 

of pressure on the ears or a helicopter-type sound 

in the ears. Your vehicle may exhibit wind buffeting 

with the windows down in certain open or partially 

open positions. This is a normal occurrence and 

can be minimized by adjusting the window 

opening.

WRANGLER TOPS 

P

ROVIDED

 T

OOLS

For your convenience, a tool kit is provided with 

your vehicle located in the center console. This kit 

includes the necessary tools required for the 

operations described in the following sections. All 

pieces fit into the ratchet for easy use.

NOTE:

The soft top and the hard top are to be used inde

-

pendently. Your vehicle warranty will not cover 

damage resulting from both tops being installed at 

the same time.

Provided Tools

If your vehicle is equipped with a Dual Top (four 

door models only), the soft top system will be 

provided in a separate box located in the rear of 

the vehicle for shipping purposes only.

L

OWERING

 T

HE

 S

OFT

 T

OP

 I

NTO


S

UNRIDER

® P

OSITION

Use this QR code to access your 

digital experience.

1 — Ratchet
2 — #T50 Torx Head Driver
3 — #T40 Torx Head Driver
4 — 15 mm Socket

WARNING!

The fabric quarter windows and fabric top are 

designed only for protection against the 

elements. Do not rely on them to contain occu

-

pants within the vehicle or to protect against 

injury during an accident. Remember, always 

wear seat belts.

Make sure hands and fingers are clear of all 

pinch points when installing and removing the 

soft tops. The lift assist mechanism and side 

bows may cause serious injury if fingers or 

hands get caught in between.

GETTING TO KNOW YOUR VEHICLE

77

(Continued)

If the temperature is below 72°F (24°C) and/or 

the top has been folded down for a period of time, 

the top will appear to have shrunk when you raise 

it, making it difficult to put up. This is caused by a 

natural contraction of the vinyl or acrylic materials 

of the fabric top.
Place the vehicle in a warm area. Pull steadily on 

the top fabric. The vinyl will stretch back to its 

original size and the top can then be installed. If 

the temperature is 41°F (5°C) or below, do not 

attempt to put the top down or roll the rear or side 

curtains.

CAUTION!

The soft top is not designed to carry any 

additional loads such as roof racks, spare tires, 

building, hunting, or camping supplies, and/or 

luggage, etc. Also, it was not designed as a 

structural member of the vehicle and, thus, 

cannot properly carry any additional loads other 

than environmental (rain, snow, etc.).

CAUTION!

Do not run a fabric top through an automatic 

car wash. Window scratches and wax buildup 

may result.

Do not lower the top when the temperature is 

below 41°F (5°C). Damage to the top may 

result.

Do not move your vehicle until the top has 

been either fully attached to the windshield 

frame, or fully lowered.

Do not fully lower the top with the windows 

installed. Window and top damage may occur.

For important information on cleaning and 

caring for your vehicle's fabric top  

Ú

page 409.

Do not use any tools (screwdrivers, etc.) to pry 

or force any of the clamps, clips, or retainers 

securing the soft top. Do not force or pry the 

soft top framework when opening or closing. 

Damage to the top may result.

Failure to follow these cautions may cause 

interior water damage, stains or mildew on the 

top material:

It is recommended that the top be free of 

water prior to opening it. Operating the top, 

opening a door or lowering a window while the 

top is wet may allow water to drip into the 

vehicle's interior.

Careless handling and storage of the soft top 

may damage the seals, causing water to leak 

into the vehicle's interior.

The soft top must be positioned properly to 

ensure sealing. Improper installation can 

cause water to leak into the vehicle's interior.

CAUTION!

2

78

GETTING TO KNOW YOUR VEHICLE


Four Door Side View Components

1 — #1 Bow

6 — #6 Bow

2 — #2 Bow

7 — Front Window Retainer

3 — #3 Bow

8 — Lower Window Retainer

4 — #4 Bow

9 — Rear Quarter Window

5 — #5 Bow

GETTING TO KNOW YOUR VEHICLE

79

Two Door Side View Components

1 — #1 Bow

6 — #6 Bow

2 — #2 Bow

7 — Front Window Retainer

3 — #3 Bow

8 — Lower Window Retainer

4 — #4 Bow

9 — Rear Quarter Window

5 — #5 Bow

2

80

GETTING TO KNOW YOUR VEHICLE


Two And Four Door Rear Components

1 — Rear Window Retainer Attachment Points
2 — Quarter Window Pillars
3 — Swing Gate Bar Retainers

GETTING TO KNOW YOUR VEHICLE

81

NOTE:

All lowering and raising the soft top instructions 

are applicable to both two and four door model 

vehicles.

Images shown are of four door models, and 

appearance of two door model components 

may differ.

The following options are available to you when 

lowering your vehicle’s soft top:

Sunrider® position with rear and quarter 

windows installed

Sunrider® position with rear and quarter panels 

removed

Sunrider® position with rear window installed 

and quarter panels removed

Fully lowered position with rear and quarter 

windows removed

Both quarter windows should be removed and 

installed together.
Lowering The Soft Top Into Sunrider® Position
1. Fold both sun visors forward against the 

windshield.

2. Release the header latches from the crossbar 

by pulling the handle downward. Make sure 

the hook is disengaged from its receiver.

Step Two

3. From both the left and right sides, lift up on the 

#1 Bow of the soft top to start the operation.

Step Three

4. Move to the side of the vehicle and use the 

side link to fold the soft top rearward into the 

Sunrider® position.

Step Four

NOTE:

If leaving the soft top in the Sunrider® position, 

secure the top by using the two hook-and-loop 

fasteners provided in the center console. 

Step Four

2

82

GETTING TO KNOW YOUR VEHICLE


NOTE:

The vehicle can be driven in the Sunrider® posi

-

tion with the rear window and quarter panel 

assemblies fully installed or completely 

removed.

The rear window and rear quarter windows must 

be removed before fully lowering the soft top to 

prevent damage to the top. Clean the side and 

rear windows before removal to assist in 

preventing scratching during removal of the soft 

top. If the plastic retainers are difficult to 

operate due to road dust, etc., clean them with 

a mild soap solution and a small brush. Cleaning 

products are available through an authorized 

dealer.

Removing The Soft Top Windows

NOTE:

Before fully lowering the soft top, the rear window 

and rear quarter windows must be removed.
Remove The Rear Window:
1. With the swing gate open, remove the rear 

window’s plastic retainers from the lower 

right and left corners.

Step One

2. Grab the swing gate bar, rotate it outward and 

upward releasing it from both the right and left 

retainers.

Step Two (Left Side Shown)

3. While holding the window in place, slide the 

swing gate bar to the left separating it from the 

rear window. Store in soft window bag (if 

equipped), or a safe location.

Step Three

4. Remove the plastic retainers from both 

quarter window pillars.

Step Four

GETTING TO KNOW YOUR VEHICLE

83

5. While keeping the rear window level, slide to 

the left until it is completely separate from its 

retainer. Do not pull downward while removing 

the rear window. Damage to the retainer could 

result.

Step Five

Remove The Right And Left Quarter Windows:
1. Through the rear opening, push the bottom 

corner outward and release tab from the 

bottom of the window pillar.

Step One

2. Undo the hook-and-loop fastener located at 

the upper front corner of each quarter window.

Step Two

3. Starting at the rear of the vehicle, remove 

plastic retainer from along the bottom of the 

window moving toward the front of the vehicle.

Step Three

4. Remove plastic retainer from the bottom to the 

top of the front window.

Step Four

2

84

GETTING TO KNOW YOUR VEHICLE


5. While keeping the window level, slide rearward 

until it is completely separate from its retainer. 

Do not pull downward while removing the 

window. Damage to the retainer could result.

Step Five

6. Store in soft window bag (if equipped) or a safe 

location.

NOTE:

For information on the use of the storage bag, refer 

to the next section.

Soft Top Window Storage Bag — 

If Equipped 

To safely store the soft top rear window, and rear 

quarter windows, proceed as follows:

NOTE:

The swing gate bar, once removed from the rear 

window, does not store in the soft window storage 

bag (if equipped).
1. With the bag opened completely, fold both 

fabric dividers downward and lay the first 

quarter window all the way to the right side 

with the inside of the window facing 

downward and the window pillar to the 

outside.

NOTE:

The quarter windows are marked “1” and “2” on 

the inside of the window pillar. 

Step One

Step One

2. Fold the first divider upward, covering the first 

quarter window.

Step Two

1 — Quarter Window Facing Downward
2 — Both Dividers Folded Down

GETTING TO KNOW YOUR VEHICLE

85

3. Lay the second quarter window on top of the 

first divider all the way to the left side with the 

inside of the window facing downward and the 

window pillar to the outside.

Step Three

4. Fold the second divider upward, covering the 

second quarter window.

Step Four

5. Lay the rear window on top of the second 

divider.

Step Five

6. Close the storage bag and store in a safe 

location.

Step Six

Lowering The Soft Top All The Way

1. Remove the rear window and quarter panel 

windows  

Ú

page 82.

2. From the Sunrider® position  

Ú

page 76, 

remove straps if previously secured and move 

to the rear of the vehicle.

1 — Quarter Window Facing Downward
2 — Second Divider Folded Down

2

86

GETTING TO KNOW YOUR VEHICLE


3. Locate the Sunrider® latch beneath the #6 

Bow of the soft top on the left side.

Step Three

4. Pull the latch to release the top, and allow the 

soft top to slide rearward freely in the guide 

tracks to the stowed position.

Step Four

5. While pushing downward slightly on the folded 

soft top, slide the lock lever on the left and 

right side lift assist mechanisms to the “lock” 

position.

Step Five (Locked Position)

6. Once the lock lever is in the “lock” position, 

push downward on each side of the folded soft 

top to ensure it is secure. An audible “click” 

may be heard.

Step Six

NOTE:

Secure the top by using the two hook-and-loop 

fasteners provided in the center console. 

Step Six

CAUTION!

Failure to follow the next steps could result in 

damage to the Soft Top or vehicle.

GETTING TO KNOW YOUR VEHICLE

87

R

AISING

 T

HE

 S

OFT

 T

OP

Use this QR code to access your 

digital experience.
Raising The Soft Top From The 

Fully Lowered Position
1. From the fully lowered 

position, remove straps if 

previously secured.

2. While pushing down on the rear of the top, 

slide the lock lever on the left and right side lift 

assist mechanisms to the “unlock” position.

Step Two

3. Push up and forward from the #5 Bow along 

the guide track until it locks into the Sunrider® 

position with an audible “click”.

Step Three

4. Gently pull rearward on the #6 Bow to ensure 

the top is locked in the Sunrider® position.

5. Using the side link, lift and push the soft top 

toward the front of the vehicle manually 

guiding the top into the closed position.

Step Five

Step Five

CAUTION!

Failure to follow the next steps could result in 

damage to the Soft Top or vehicle.

1 — Unlocked Position
2 — #5 Bow Location

2

88

GETTING TO KNOW YOUR VEHICLE


6. From inside the vehicle, pull the handle on the 

header latch downward to engage the hook 

into its receiver. Repeat on the other side.

Step Six

7. Pull the handle back upward while squeezing 

the hook, locking the latch into place.

Step Seven

Installing The Soft Top Windows

Install The Right And Left Quarter Windows
1. From the rear of the vehicle, guide the top of 

the window into the retainer and slide forward 

while keeping the window level. Repeat on 

the other side.

Step One

2. Place the top of the quarter window pillar into 

the top cover, and insert the bottom tab into 

the clip.

Step Two

Step Two

CAUTION!

Failure to follow all Quarter Window Install steps 

could result in damage to the Soft Top or vehicle.

GETTING TO KNOW YOUR VEHICLE

89

3. Engage the retainers on the front of the 

windows, ensuring they are fully engaged, 

followed by the retainers along the bottom of 

the windows.

Step Three

NOTE:

It is critical that the retainers are fully engaged 

before the vehicle resumes motion.
4. Secure the hook-and-loop fastener at the 

upper front corner of each quarter window by 

pressing firmly.

Step Four

Install The Rear Window
1. Guide the rear window into the retainer from 

left to right while keeping the window level.

Step One

2. Insert the swing gate bar into the retainers at 

the bottom of the window from left to the right.

Step Two

3. Rotate the swing gate bar into the left and right 

side retainers.

Step Three

4. Line up the rear window to the right side 

quarter window first, and engage the plastic 

retainers.

1 — Retainer At Front Of Quarter Window
2 — Retainer At Bottom Of Quarter Window

2

90

GETTING TO KNOW YOUR VEHICLE


5. Repeat with the left side quarter window.

Step Five

6. Engage the rear window retainers in the lower 

right and left corners.

Step Six

NOTE:

For information on removing your soft top, refer to 

the next section.

R

EMOVING

 T

HE

 S

OFT

 T

OP

Use this QR code to access your 

digital experience.

1. Fully lower the soft top  

Ú

page 85.

2. Make sure the lift assist mechanism on both 

the left and right sides are in the “lock” 

position, and an audible “click” is heard when 

pushing down on the #1 bow from each of the 

lift assist mechanisms before removing.

Step Two

3. Using the provided #40 Torx head driver and 

ratchet, unscrew the two Torx head screws on 

each lift assist mechanism, then lift the 

mechanism up and away from the vehicle.

Step Three

CAUTION!

Failure to follow the next steps could result in 

damage to the Soft Top or vehicle.

1 — Lock Position
2 — Torx Head Screw
3 — Torx Head Screw


Content      ..     3      4      5      6     ..