Jeep Wagoneer (2022 year). Manual in english - page 13
 

  Index      Manuals     Jeep Wagoneer (2022 year). Manual in english


Search            copyright infringement  


Content      ..     11      12      13      14     ..


Jeep Wagoneer (2022 year). Manual in english - page 13


STARTING AND OPERATING

205

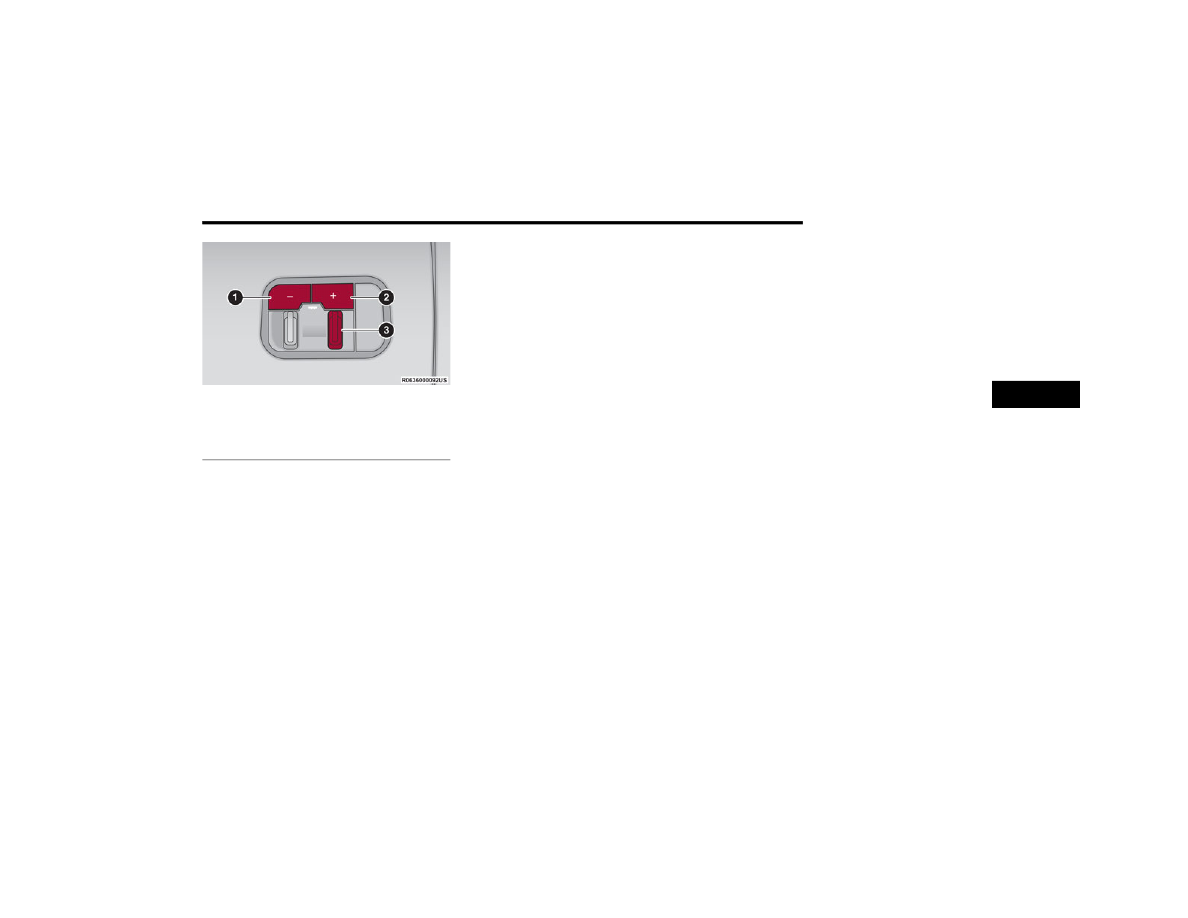
Integrated Trailer Brake Module (ITBM)

The user interface consists of the following:
Manual Brake Control Lever
Slide the manual brake control lever to the left to 

activate power to the trailer's electric brakes 

independent of the tow vehicle's brakes. If the 

manual brake control lever is activated while the 

brake is also applied, the greater of the two inputs 

determines the power sent to the trailer brakes.
The trailer and the vehicle's brake lamps will come 

on when either vehicle braking or manual trailer 

brakes are applied.

Trailer Brake Status Indicator Light
This light indicates the trailer electrical connection 

status.
If no electrical connection is detected after the 

ignition is turned on, pushing the GAIN adjustment 

button or sliding the manual brake control lever 

will display the GAIN setting for 10 seconds and the 

Trailer Brake Status Indicator Light will not be 

displayed.
If a fault is detected in the trailer wiring or the 

ITBM, the Trailer Brake Status Indicator Light will 

flash.
GAIN Adjustment Buttons (+/-)
Pushing these buttons will adjust the brake control 

power output to the trailer brakes in 

0.5 increments. The GAIN setting can be increased 

to a maximum of 10 or decreased to a minimum of 

0 (no trailer braking).
GAIN
The GAIN setting is used to set the trailer brake 

control for the specific towing condition and should 

be changed as towing conditions change. Changes 

to towing conditions include trailer load, vehicle 

load, road conditions and weather.

Adjusting GAIN

NOTE:

This should only be performed in a traffic free envi

-

ronment at speeds of approximately 20–25 mph 

(30–40 km/h).
1. Make sure the trailer brakes are in good 

working condition, functioning normally and 

properly adjusted. See a trailer dealer if 

necessary.

2. Hook up the trailer and make the electrical 

connections according to the trailer 

manufacturer's instructions.

3. When a trailer with electric/EOH brakes is 

plugged in, the trailer connected message 

should appear in the instrument cluster 

display (if the connection is not recognized by 

the ITBM, braking functions will not be 

available), the GAIN setting will illuminate and 

the correct type of trailer must be selected 

from the instrument cluster display options.

4. Push the UP or DOWN button on the steering 

wheel until “TRAILER TOW” appears on the 

screen.

5. Push the RIGHT arrow on the steering wheel to 

enter “TRAILER TOW”.

6. Push the UP or DOWN buttons until the “Trailer 

Brake Type” appears on the screen.

1 — GAIN Adjustment Button
2 — GAIN Adjustment Button
3 — Manual Brake Control Lever

4

206

STARTING AND OPERATING


7. Push the RIGHT arrow and then push the UP or 

DOWN buttons until the proper Trailer Brake 

Type appears on the screen.

8. In a traffic-free environment, tow the trailer on 

a dry, level surface at a speed of 20–25 mph 

(30–40 km/h) and squeeze the manual brake 

control lever completely.

9. If the trailer wheels lockup (indicated by 

squealing tires), reduce the GAIN setting; if the 

trailer wheels turn freely, increase the GAIN 

setting.

Repeat steps 8 and 9 until the GAIN setting is at a point 

just below trailer wheel lockup. If towing a heavier 

trailer, trailer wheel lockup may not be attainable even 

with the maximum GAIN setting of 10.
Display Messages
The trailer brake control interacts with the instrument 

cluster display. Display messages, along with a single 

chime, will be displayed when a malfunction is 

determined in the trailer connection, trailer brake 

control, or on the trailer  

Ú

page 107.

NOTE:

An aftermarket controller may be available for 

use with trailers with air or EOH trailer brake 

systems. To determine the type of brakes on 

your trailer and the availability of controllers, 

check with your trailer manufacturer or dealer.

Removal of the ITBM will cause errors and it 

may cause damage to the electrical system and 

electronic modules of the vehicle. See an autho

-

rized dealer if an aftermarket module is to be 

installed.

Towing Requirements — Trailer Lights And 

Wiring

Whenever pulling a trailer, regardless of the trailer 

size, stop lights and turn signals on the trailer are 

required for motoring safety.
The Trailer Tow Package may include a four- and 

seven-pin wiring harness. Use a factory approved 

trailer harness and connector.

NOTE:

Do not cut or splice wiring into the vehicle’s wiring 

harness.
The electrical connections are all complete to the 

vehicle but you must mate the harness to a trailer 

connector. Refer to the following illustrations.

NOTE:

Disconnect trailer wiring connector from the 

vehicle before launching a boat (or any other 

device plugged into the vehicle’s electrical 

connections) into water.

Be sure to reconnect once clear from water 

area.

Four-Pin Connector

WARNING!

Connecting a trailer that is not compatible with 

the ITBM system may result in reduced or 

complete loss of trailer braking. There may be a 

increase in stopping distance or trailer instability 

which could result in personal injury.

CAUTION!

Connecting a trailer that is not compatible with 

the ITBM system may result in reduced or 

complete loss of trailer braking. There may be a 

increase in stopping distance or trailer instability 

which could result in damage to your vehicle, 

trailer, or other property.

1 — Ground
2 — Park
3 — Left Stop/Turn
4 — Right Stop/Turn

STARTING AND OPERATING

207

Seven-Pin Connector

T

OWING

 T

IPS


Before towing, practice turning, stopping, and 

backing up the trailer in an area located away from 

heavy traffic. If equipped with Quadra-Lift air 

suspension, the automatic Entry/Exit feature may 

be disabled through the Uconnect Touchscreen 

Radio to prevent vehicle and trailer movement 

when gear selector is moved to PARK.

Automatic Transmission

Select the DRIVE (D) range when towing. The 

transmission controls include a drive strategy to 

avoid frequent shifting when towing. However, if 

frequent shifting does occur while in DRIVE, you 

can use the Electronic Range Select (ERS) shift 

control to manually select a lower gear.

NOTE:

Using a lower gear while operating the vehicle 

under heavy loading conditions, will improve 

performance and extend transmission life by 

reducing excessive shifting and heat build-up. This 

action will also provide better engine braking.

Cruise Control — If Equipped

Do not use on hilly terrain or with heavy loads.

When using the Cruise Control, if you experience 

speed drops greater than 10 mph (16 km/h), 

disengage until you can get back to cruising 

speed.

Use Cruise Control in flat terrain and with light 

loads to maximize fuel efficiency.

1 — Backup Lamps
2 — Running Lamps
3 — Left Stop/Turn
4 — Ground
5 — Battery
6 — Right Stop/Turn
7 — Electric Brakes

4

208

STARTING AND OPERATING


RECREATIONAL TOWING (BEHIND MOTORHOME) 

T

OWING

 T

HIS

 V

EHICLE

 B

EHIND

 A

NOTHER

 V

EHICLE

NOTE:

When towing your vehicle, always follow applicable state and provincial laws. Contact state and provincial Highway Safety offices for additional details.

Vehicles equipped with Quadra-Lift must be placed in Transport Mode before tying them down (from the body) on a trailer or flatbed truck  

Ú

page 143. If the 

vehicle cannot be placed in Transport mode (for example, engine will not run), tie-downs should be fastened over the tires using specific straps (not to the 

body). Failure to follow these instructions may cause fault codes to be set and/or cause loss of proper tie-down tension.

Towing Condition

Wheels OFF The Ground

Two-Wheel Drive Models

Four-Wheel Drive Models 

Without 4WD LOW Range

Four-Wheel Drive Models 

With 4WD LOW Range

Flat Tow

NONE

NOT ALLOWED

NOT ALLOWED

See Instructions

Transmission in PARK

Transfer case in N (Neutral)

Tow in forward direction

Dolly Tow

Front

NOT ALLOWED

NOT ALLOWED

NOT ALLOWED

Rear

OK

NOT ALLOWED

NOT ALLOWED

On Trailer

ALL

OK

OK

OK

STARTING AND OPERATING

209

(Continued)

R

ECREATIONAL

 T

OWING

 — T

WO

 W

HEEL


D

RIVE

 M

ODELS

DO NOT flat tow this vehicle. Damage to the 

drivetrain will result.
Recreational towing (for two-wheel drive models) is 

allowed ONLY if the rear wheels are OFF the 

ground. This may be accomplished using a tow 

dolly or vehicle trailer. If using a tow dolly, follow 

this procedure:
1. Properly secure the dolly to the tow vehicle, 

following the dolly manufacturer's 

instructions.

NOTE:

If vehicle is equipped with Quadra-Lift air 

suspension, ensure the vehicle is set to Normal 

Ride Height.
2. Drive the rear wheels onto the tow dolly.
3. Firmly apply the parking brake. Shift the 

transmission into PARK.

4. Turn the ignition OFF.
5. Properly secure the rear wheels to the dolly, 

following the dolly manufacturer’s 

instructions.

6. Install a suitable clamping device, designed for 

towing, to secure the front wheels in the 

straight position.

R

ECREATIONAL

 T

OWING

 — 

Q

UADRA

-T

RAC

 I (S

INGLE

-S

PEED


T

RANSFER

 C

ASE

) F

OUR

-W

HEEL

 D

RIVE


M

ODELS

Recreational towing is not allowed. These models 

do not have a N (Neutral) position in the transfer 

case.

NOTE:

This vehicle may be towed on a flatbed or vehicle 

trailer provided all four wheels are OFF the ground.

R

ECREATIONAL

 T

OWING

 — 

Q

UADRA

–T

RAC

 II/Q

UADRA

–D

RIVE

 II 

F

OUR

-W

HEEL

 D

RIVE

 M

ODELS

The transfer case must be shifted into N (Neutral) 

and the transmission must be in PARK (P) for 

recreational towing. The N (Neutral) selection 

button is located by the selector switch.

CAUTION!

Towing with the rear wheels on the ground will 

cause severe transmission damage. Damage 

from improper towing is not covered under the 

New Vehicle Limited Warranty.

CAUTION!

Towing this vehicle in violation of the above 

requirements can cause severe transmission 

and/or transfer case damage. Damage from 

improper towing is not covered under the New 

Vehicle Limited Warranty.

CAUTION!

DO NOT dolly tow any four-wheel drive vehicle. 

Towing with only one set of wheels on the 

ground (front or rear) will cause severe trans

-

mission and/or transfer case damage. Tow 

with all four wheels either ON the ground, or 

OFF the ground (using a vehicle trailer).

Tow only in a forward direction. Towing this 

vehicle backwards can cause severe damage 

to the transfer case.

The transmission must be in PARK for recre

-

ational towing.

Before recreational towing, perform the proce

-

dure outlined under “Shifting into N (Neutral)” 

to be certain that the transfer case is fully in N 

(Neutral). Otherwise, internal damage will 

result.

4

210

STARTING AND OPERATING


Shifting Into N (Neutral)

Use the following procedure to prepare your 

vehicle for recreational towing:
1. Bring the vehicle to a complete stop on level 

ground, with the engine running.

2. Press and hold the brake pedal.
3. Shift the transmission into NEUTRAL.
4. If vehicle is equipped with Quadra-Lift air 

suspension, ensure the vehicle is set to 

Normal Ride Height.

NOTE:

Steps 1 through 4 are requirements that 

must be met before pushing the N (Neutral) 

button, and must continue to be met until 

the shift has been completed. If any of 

these requirements are not met before 

pushing the N (Neutral) button or are no 

longer met during the shift, then the N 

(Neutral) indicator light will flash continu

-

ously until all requirements are met or until 

the N (Neutral) button is released.

The ignition must be in the ON/RUN position 

for a shift to take place and for the position 

indicator lights to be operable. If the ignition 

is not in the ON/RUN position, the shift will 

not take place and no position indicator 

lights will be on or flashing.

A flashing N (Neutral) position indicator light 

indicates that shift requirements have not 

been met.

If the vehicle is equipped with Quadra-Lift 

air suspension, the engine should be 

started and left running for a minimum of 

60 seconds (with all the doors closed) at 

least once every 24 hours. This process 

allows the air suspension to adjust the 

vehicle’s ride height to compensate for 

temperature effects.

5. Using a ballpoint pen or similar object, push 

and hold the recessed transfer case N 

(Neutral) button (located by the selector 

switch) for five seconds. The light behind the N 

symbol will begin to blink red, indicating shift in 

progress. The light will stop blinking (stay on 

solid) when the shift to N (Neutral) is complete. 

A “4WD Neutral Warning Vehicle May Move 

Even in Park” message will appear in the 

instrument cluster.

Towing this vehicle in violation of the above 

requirements can cause severe transmission 

and/or transfer case damage. Damage from 

improper towing is not covered under the New 

Vehicle Limited Warranty.

Do not use a bumper-mounted clamp-on tow 

bar on your vehicle. The bumper face bar will 

be damaged.

WARNING!

You or others could be injured or killed if you 

leave the vehicle unattended with the transfer 

case in the N (Neutral) position without first fully 

engaging the parking brake. The transfer case N 

(Neutral) position disengages both the front and 

rear driveshafts from the powertrain and will 

allow the vehicle to roll, even if the transmission 

is in PARK. The parking brake should always be 

applied when the driver is not in the vehicle.

CAUTION!

CAUTION!

It is necessary to follow these steps to be certain 

that the transfer case is fully in N (Neutral) 

before recreational towing to prevent damage to 

internal parts.

STARTING AND OPERATING

211

N (Neutral) Button

6. After the shift is completed and the N (Neutral) 

light stays on, release the N (Neutral) button.

7. Shift the transmission into REVERSE or DRIVE.
8. Release the brake pedal for five seconds and 

ensure that there is no vehicle movement.

9. Press and hold the brake pedal. Shift the 

transmission back into NEUTRAL.

10. Firmly apply the parking brake.
11. With the transmission and transfer case in N 

(Neutral), push and hold the ENGINE START/

STOP button until the engine turns off.

12. Place the transmission gear selector in PARK. 

Release the brake pedal.

13. Push the ENGINE START/STOP button twice 

(without pressing the brake pedal), to turn the 

ignition to the off position.

14. Attach the vehicle to the tow vehicle using a 

suitable tow bar.

15. Release the parking brake.

Shifting Out Of N (Neutral)

Use the following procedure to prepare your 

vehicle for normal usage:
1. Bring the vehicle to a complete stop, leaving 

it connected to the tow vehicle.

2. Firmly apply the parking brake.
3. Start the engine.

NOTE:

Steps 1 through 5 are requirements that 

must be met before pushing the N (Neutral) 

button, and must continue to be met until 

the shift has been completed. If any of 

these requirements are not met before 

pushing the N (Neutral) button or are no 

longer met during the shift, the N (Neutral) 

indicator light will flash continuously until all 

requirements are met or until the N 

(Neutral) button is released.

The ignition must be in the ON/RUN position 

for a shift to take place and for the position 

indicator lights to be operable. If the ignition 

is not in the ON/RUN position, the shift will 

not take place and no position indicator 

lights will be on or flashing.

A flashing N (Neutral) position indicator light 

indicates that shift requirements have not 

been met.

4. Press and hold the brake pedal.
5. Shift the transmission into NEUTRAL.
6. Using a ballpoint pen or similar object, push 

and hold the recessed transfer case N 

(Neutral) button (located by the selector 

switch) for two seconds.

N (Neutral) Button

7. When the N (Neutral) indicator light turns off, 

release the N (Neutral) button. After the N 

(Neutral) button has been released, the 

transfer case will shift to the position indicated 

by the selector switch.

8. Shift the transmission into PARK. Turn the 

engine off.

9. Release the brake pedal.

4

212

STARTING AND OPERATING


10. Disconnect vehicle from the tow vehicle.
11. Start the engine.
12. Press and hold the brake pedal.
13. Release the parking brake.
14. Shift the transmission into REVERSE or DRIVE, 

release the brake pedal, and check that the 

vehicle operates normally.

DRIVING TIPS

O

N

-R

OAD

 D

RIVING

 T

IPS

Utility vehicles have higher ground clearance and a 

narrower track to make them capable of 

performing in a wide variety of off-road 

applications. Specific design characteristics give 

them a higher center of gravity than conventional 

passenger cars.
An advantage of the higher ground clearance is a 

better view of the road, allowing you to anticipate 

problems. They are not designed for cornering at 

the same speeds as conventional passenger cars 

any more than low-slung sports cars are designed 

to perform satisfactorily in off-road conditions. 

Avoid sharp turns or abrupt maneuvers. As with 

other vehicles of this type, failure to operate this 

vehicle correctly may result in loss of control or 

vehicle rollover.

O

FF

-R

OAD

 D

RIVING

 T

IPS

Quadra-Lift — If Equipped

When off-roading, it is recommended that the 

lowest useable vehicle height that will clear the 

current obstacle or terrain be selected. The vehicle 

height should then be raised as required by the 

changes in terrain.
The Selec-Terrain switch will automatically change 

the vehicle to the optimized height based on the 

Selec-Terrain switch position. The vehicle height 

can be changed from the default height for each 

Selec-Terrain mode by normal use of the air 

suspension switches  

Ú

page 140.

When To Use 4WD LOW — If Equipped

When off-road driving, shift to 4WD LOW for 

additional traction. This range should be limited to 

extreme situations such as deep snow, mud, or 

sand where additional low speed pulling power is 

needed. Vehicle speeds in excess of 25 mph 

(40 km/h) should be avoided when in 4WD LOW.

Driving Through Water

Although your vehicle is capable of driving through 

water, there are a number of precautions that 

must be considered before entering the water.

NOTE:

Your vehicle is capable of water fording in up to 

20 inches (51 cm) of water, while crossing small 

rivers or streams. To maintain optimal perfor

-

mance of your vehicle's heating and ventilation 

system it is recommended to switch the system 

into recirculation mode during water fording.

Driving through water more than a few inches/

centimeters deep will require extra caution to 

ensure safety and prevent damage to your vehicle. 

If you must drive through water, try to determine 

the depth and the bottom condition (and location 

of any obstacles) prior to entering. Proceed with 

caution and maintain a steady controlled speed 

less than 5 mph (8 km/h) in deep water to 

minimize wave effects.

WARNING!

Do not drive in 4WD LOW on dry pavement; driveline 

damage may result. 4WD LOW locks front and rear 

drivelines together and does not allow for differential 

action between the front to rear driveshafts. Driving 

in 4WD LOW on pavement will cause driveline 

binding; use only on wet or slippery surfaces.

CAUTION!

When driving through water, do not exceed 

5 mph (8 km/h). Always check water depth 

before entering as a precaution, and check all 

fluids afterward. Driving through water may 

cause damage that may not be covered by the 

New Vehicle Limited Warranty.

STARTING AND OPERATING

213

Flowing Water
If the water is swift flowing and rising (as in storm 

run-off), avoid crossing until the water level 

recedes and/or the flow rate is reduced. If you 

must cross flowing water avoid depths in excess of 

9 inches (23 cm). The flowing water can erode the 

streambed, causing your vehicle to sink into 

deeper water. Determine exit point(s) that are 

downstream of your entry point to allow for drifting.
Standing Water
Avoid driving in standing water deeper than 

24 inches (60 cm), and reduce speed 

appropriately to minimize wave effects. Maximum 

speed is 5 mph (8 km/h).
Maintenance
After driving through deep water, inspect your 

vehicle fluids and lubricants (engine oil, 

transmission oil, axle, transfer case) to ensure the 

fluids have not been contaminated. Contaminated 

fluid (milky, foamy in appearance) should be 

flushed/changed as soon as possible to prevent 

component damage.

Driving In Snow, Mud And Sand

In heavy snow, when pulling a load, or for 

additional control at slower speeds, shift the 

transmission to a low gear and shift the transfer 

case to 4WD LOW if necessary  

Ú

page 140. Only 

shift into a lower gear to maintain forward motion. 

Over-revving the engine can spin the wheels and 

traction will be lost.
Avoid abrupt downshifts on icy or slippery roads, 

because engine braking may cause skidding and 

loss of control.

Hill Climbing

NOTE:

Before attempting to climb a hill, determine the 

conditions at the crest and/or on the other side.
Before climbing a steep hill, shift the transmission 

to a lower gear and shift the transfer case to 4WD 

LOW. Use FIRST gear and 4WD LOW for very steep 

hills.
If you stall or begin to lose forward motion while 

climbing a steep hill, allow your vehicle to come to 

a stop and immediately apply the brakes. Restart 

the engine, and shift into REVERSE (R). Back slowly 

down the hill, allowing the compression braking of 

the engine to help regulate your speed. If the 

brakes are required to control vehicle speed, apply 

them lightly and avoid locking or skidding the tires.

Remember, never drive diagonally across a hill. 

Always drive straight up or down.
If the wheels start to slip as you approach the crest 

of a hill, ease off the accelerator and maintain 

forward motion by turning the front wheels slowly. 

This may provide a fresh “bite” into the surface and 

will usually provide traction to complete the climb.

Traction Downhill

When descending mountains or hills, use Hill 

Descent Control or Selec-Speed Control to avoid 

repeated heavy braking.
If not equipped with Hill Descent Control or 

Selec-Speed Control use the following procedure:

WARNING!

If the engine stalls, you lose forward motion, or 

cannot make it to the top of a steep hill or grade, 

never attempt to turn around. To do so may 

result in tipping and rolling the vehicle. Always 

back carefully straight down a hill in REVERSE 

gear. Never back down a hill in NEUTRAL using 

only the brake.

4

214

STARTING AND OPERATING


Shift the transmission into a low gear, and the 

transfer case into 4WD LOW range. Let the vehicle 

go slowly down the hill with all four wheels turning 

against engine compression drag. This will permit 

you to control the vehicle speed and direction.
When descending mountains or hills, repeated 

braking can cause brake fade with loss of braking 

control. Avoid repeated heavy braking by 

downshifting the transmission whenever possible.

After Driving Off-Road

Off-road operation puts more stress on your 

vehicle than does most on-road driving. After going 

off-road, it is always a good idea to check for 

damage. That way you can get any problems taken 

care of right away and have your vehicle ready 

when you need it.

Completely inspect the underbody of your 

vehicle. Check tires, body structure, steering, 

suspension, and exhaust system for damage.

Inspect the radiator for mud and debris and 

clean as required.

Check threaded fasteners for looseness, partic

-

ularly on the chassis, drivetrain components, 

steering, and suspension. Retighten them, if 

required, and torque to the values specified in 

the Service Manual.

Check for accumulations of plants or brush. 

These things could be a fire hazard. They might 

hide damage to fuel lines, brake hoses, axle 

pinion seals, and propeller shafts.

After extended operation in mud, sand, water, or 

similar dirty conditions, have the radiator, fan, 

brake rotors, wheels, brake linings, and axle 

yokes inspected and cleaned as soon as 

possible.

If you experience unusual vibration after driving 

in mud, slush or similar conditions, check the 

wheels for impacted material. Impacted mate

-

rial can cause a wheel imbalance and freeing 

the wheels of it will correct the situation.

WARNING!

Abrasive material in any part of the brakes may 

cause excessive wear or unpredictable braking. 

You might not have full braking power when you 

need it to prevent a collision. If you have been 

operating your vehicle in dirty conditions, get 

your brakes checked and cleaned as necessary.

215

MULTIMEDIA

UCONNECT SYSTEMS  

For detailed information about your Uconnect 5/

5 NAV With 10.1-inch Display or Uconnect 5 NAV 

With 12-inch Display system, refer to your 

Uconnect Owner’s Manual Supplement.

NOTE:

Uconnect screen images are for illustration 

purposes only and may not reflect exact software 

for your vehicle.

CYBERSECURITY 

Your vehicle may be a connected vehicle and may 

be equipped with both wired and wireless 

networks. These networks allow your vehicle to 

send and receive information. This information 

allows systems and features in your vehicle to 

function properly.
Your vehicle may be equipped with certain security 

features to reduce the risk of unauthorized and 

unlawful access to vehicle systems and wireless 

communications. Vehicle software technology 

continues to evolve over time and FCA US LLC, 

working with its suppliers, evaluates and takes 

appropriate steps as needed. Similar to a 

computer or other devices, your vehicle may 

require software updates to improve the usability 

and performance of your systems or to reduce the 

potential risk of unauthorized and unlawful access 

to your vehicle systems.
The risk of unauthorized and unlawful access to 

your vehicle systems may still exist, even if the 

most recent version of vehicle software (such as 

Uconnect software) is installed.

NOTE:

FCA US LLC or your dealer may contact you 

directly regarding software updates.

To help further improve vehicle security and 

minimize the potential risk of a security breach, 

vehicle owners should:

Routinely check 

www.driveuconnect.com


(US Residents) or 

www.driveuconnect.ca


(Canadian Residents) to learn about avail

-

able Uconnect software updates.

Only connect and use trusted media 

devices (e.g. personal mobile phones, 

USBs, CDs).

Privacy of any wireless and wired communications 

cannot be assured. Third parties may unlawfully 

intercept information and private communications 

without your consent  

Ú

page 126.

WARNING!

It is not possible to know or to predict all of the 

possible outcomes if your vehicle’s systems 

are breached. It may be possible that vehicle 

systems, including safety related systems, 

could be impaired or a loss of vehicle control 

could occur that may result in an accident 

involving serious injury or death.

ONLY insert trusted devices/components into 

your vehicle. Media of unknown origin could 

possibly contain malicious software, and if 

installed in your vehicle, it may increase the 

possibility for vehicle systems to be breached.

As always, if you experience unusual vehicle 

behavior, take your vehicle to your nearest 

authorized dealer immediately.

5

216

MULTIMEDIA


UCONNECT SETTINGS    

The Uconnect system uses a combination of 

buttons on the touchscreen and buttons on the 

faceplate located on the center of the instrument 

panel. These buttons allow you to access and 

change the customer programmable features. 

Many features can vary by vehicle.
Buttons on the faceplate are located below and/or 

beside the Uconnect system in the center of the 

instrument panel. In addition, there is a Scroll/

Enter control knob located on the right side. Turn 

the control knob to scroll through menus and 

change settings. Push the center of the control 

knob one or more times to select or change a 

setting.
Your Uconnect system may also have Screen Off 

and Mute buttons on the faceplate.
Push the Screen Off button on the faceplate to turn 

off the Uconnect screen. Push the button again or 

tap the screen to turn the screen on.
Press the Back Arrow button to exit out of a Menu 

or certain option on the Uconnect system.
Push and hold the Power button on the radio’s 

faceplate for a minimum of 15 seconds to reset 

the radio.

C

USTOMER

 P

ROGRAMMABLE

 F

EATURES

Uconnect 5 NAV With 12-inch Display

Press the Vehicle button, then press the Settings 

tab on the top of the touchscreen. In this menu, the 

Uconnect system allows you to access all of the 

available programmable features.

NOTE:

Only one touchscreen area may be selected at a 

time.

Depending on the vehicle’s options, feature 

settings may vary.

Press the Open/Close button on the Front 

Comfort And Convenience Display to access the 

fold-out screen.

When making a selection, press the button on the 

touchscreen to enter the desired menu. Once in 

the desired menu, press and release the preferred 

setting option until a check mark appears next to 

the setting, showing that setting has been 

selected. Once the setting is complete, press the 

Vehicle button to exit to the screen. Pressing the 

Up or Down Arrow button on the right side of the 

screen will allow you to toggle up or down through 

the available settings.

1 — Uconnect Buttons On The Touchscreen
2 — Uconnect Buttons On The Faceplate

MULTIMEDIA

217

My Profile

When the My Profile button is pressed on the touchscreen, the system displays options related to the vehicle’s profiles.

NOTE:

Depending on the vehicle’s options, feature settings may vary.

Setting Name

Description

Language

This setting will change the language of the Uconnect system and Instrument 

Cluster Display. The available languages are English, Italiano, Français, and 

Español.

Display Mode

This setting will adjust the display for the radio to “Auto” or “Manual”. 

“Manual” allows for more customization with the radio display.

Display Brightness Headlights On

This setting will allow you to set the brightness when the headlights are on. To 

access this setting, Display Mode must be set to “Manual”. The “+” setting will 

increase the brightness; the “-” will decrease the brightness.

Display Brightness Headlights Off

This setting will allow you to set the brightness when the headlights are off. To 

access this setting, Display Mode must be set to “Manual”. The “+” setting will 

increase the brightness; the “-” will decrease the brightness.

Set Theme

This setting will allow you to change the display theme.

Units

This setting will allow you to change the units. The available options are 

“Speed” (MPH or km/h), “Distance” (mi or km), “Current Consumption” (MPG 

[US], MPG [UK], L/100 km, or km/L), “Pressure” (psi, kPa, or bar), and 

“Temperature” (°C or °F) units of measurement independently.

Touchscreen Beep

This setting will allow you to turn the touchscreen beep on or off.

Show Main Category Bar Labels

This setting will allow the main category bar labels to be shown on or off.

Navigation Next Turn Pop-ups Displayed In Cluster

This setting will display Navigation prompts in the Instrument Cluster Display.

5

218

MULTIMEDIA


Phone Pop-ups Displayed In Cluster

This setting will display smartphone notifications and messages in the 

Instrument Cluster Display.

Message Pop-ups Displayed with Button Press

This setting will turn message notifications on or off.

System Text Size

This setting will allow you to change the text on the radio to “Standard”, 

“Large”, or “Taller”.

Auto Launch with Off-Road+

This setting will determine how the Off-Road feature is launched through the 

radio when turning the vehicle on. The options are “Off”, “Forward Camera” (if 

equipped), and “Off Road Pages”.

Time Format

This setting will allow you to set the time format (AM/PM). Sync Time With GPS 

must be Off for this setting to be available. The “12 hrs” setting will set the time 

to a 12-hour format. The “24 hrs” setting will set the time to a 24-hour format.

Voice Options

This setting will allow you to change the voice options for the radio to “Male” 

or “Female”.

Wake Up Word

This setting will allow you to set the system “Wake Up” word. An available 

option is “Hey Uconnect”.

Voice Barge-in

This setting will allow Voice Barge-in to be turned on or off. For more 

information about Voice Barge-in, refer to your Uconnect Owner’s Manual 

Supplement.

Show Command List

This setting will allow the Command List to be shown on or off.

Ambient Color Personalization

This setting will redirect to a new menu that will allow you to change the 

ambient lighting color in the cabin.

Radio Off Delay

This setting will keep the radio on for the selected amount of time after vehicle 

shut off. The available options are “0 sec”, “45 sec”, “5 min”, and “10 min”.

Radio Off with Door

This setting will keep the radio on when a door is opened or until the Radio Off 

Delay time is reached. The available settings are “On” and “Off”.

Setting Name

Description

MULTIMEDIA

219

Key Off Power Delay

This setting will keep certain electrical features running after the engine is 

turned off. When any door is opened, the electronics will deactivate. The 

available settings are “0 sec”, “45 sec”, “5 min”, and “10 min”.

App Drawer Favoriting Pop-ups

This setting will allow you to favorite app drawer pop-ups with “On” and “Off” options.

App Drawer Unfavoritings Pop-ups

This setting will allow you to unfavorite app drawer pop-ups with “On” and 

Off” options.

New Text Message Pop-ups

This setting will allow you to have pop-up notifications for new text messages. 

Setting options are “On” and “Off”.

Missed Calls Message

This setting will allow you to have pop-up notifications for missed calls. Setting 

options are “On” and “Off”.

Navigation Pop-ups

This setting will allow you to have pop-up notifications for Navigation. Setting 

options are “On” and “Off”.

Navigation Settings

This setting will redirect to the list of Navigation settings. Refer to the Owner’s 

Manual Supplement for further information.

Auto-On Driver Heated/Ventilated Seat & Heated Steering Wheel With Vehicle 

Start

This setting will activate the vehicle’s comfort system and heated seats or 

heated steering wheel when the vehicle is remote started or ignition is 

started. The “Off” setting will not activate the comfort systems. The “Remote 

Start” setting will only activate the comfort systems when using Remote 

Start. The “All Start” setting will activate the comfort systems whenever the 

vehicle is started.

Audio Settings

This setting will open the submenu containing the audio settings  

Ú

page 237.

Setting Name

Description

5

220

MULTIMEDIA


Display

TomTom Traffic And Travel Services

This setting will turn TomTom® Traffic And Travel Services (if equipped) on or 

off. An active subscription is required for this feature to work.

Reset App Drawer to Default Order

This setting will reset the app drawer to its factory default layout.

Restore Settings to Default

This setting will return all the previously changed settings to their factory default.

More Profile Options

This setting will give access to more profile options.

Setting Name

Description

When the Display button is pressed on the touchscreen, the system will display the options related to the theme (if equipped), brightness, and color of the 

touchscreen. The available settings are:

NOTE:

Depending on the vehicle’s options, feature settings may vary.

Setting Name

Description

Language

This setting will change the language of the Uconnect system and Instrument 

Cluster Display. The available languages are English, Italiano, Français, and 

Español.

Display Mode

This setting will allow you to set the brightness manually or have the system 

set it automatically. The “Auto” setting has the system automatically adjust 

the display brightness. The “Manual” setting will allow the user to adjust the 

brightness of the display.


Content      ..     11      12      13      14     ..