Jeep Wagoneer (2022 year). Manual in english - page 11
 

  Index      Manuals     Jeep Wagoneer (2022 year). Manual in english


Search            copyright infringement  


Content      ..     9      10      11      12     ..


Jeep Wagoneer (2022 year). Manual in english - page 11


STARTING AND OPERATING

173

S

IDE

 D

ISTANCE

 W

ARNING

 S

YSTEM

The Side Distance Warning system detects the 

presence of side obstacles near the vehicle using 

the parking sensors located in the front and rear 

fascia/bumpers.

Side Distance Warning Display

The Side Distance Warning screen will only be 

displayed if this feature is enabled within Uconnect 

Settings  

Ú

page 216.

The system warns the driver with an acoustic 

signal and, when enabled, with visual indications 

on the instrument cluster display.

When the vehicle is in DRIVE, the Side Distance 

Warning volume/chime will match the Front 

ParkSense volume and chime type.
When the vehicle is in REVERSE, the Side Distance 

Warning volume/chime will match the Rear 

ParkSense volume and chime type.

NOTE:

Parksense will reduce the volume of the radio if on 

when the system is sounding an audible tone. An 

audible tone will only sound if a collision is 

possible.

Activation/Deactivation

The system can operate only after driving a short 

distance and if the vehicle speed is between 0 and 

7 mph (0 and 11 km/h). The system can be 

activated/deactivated via the "Settings" menu of 

the Uconnect system. If the ParkSense System is 

deactivated via the ParkSense hard switch then 

the Side Distance Warning system will 

automatically be deactivated.
Message on the display for Side Distance Warning 

feature:
“Wipe Sensors” — This message is displayed in the 

case of a failure of the Side Distance Warning 

system sensors. Free the bumpers of any 

obstacles, ensure that the front and rear fascia/

bumper are free of snow, ice, mud, dirt and debris 

to keep the ParkSense system operating properly.
“System Not Available” — This message is 

displayed if the Side Distance Warning system is 

not available. The failed operation of the system 

might be due to the insufficient voltage from the 

battery or other failures on the electrical system. 

Contact an authorized dealer as soon as possible 

to have the electrical system checked.

CAUTION!

ParkSense is only a parking aid and it is 

unable to recognize every obstacle, including 

small obstacles. Parking curbs might be 

temporarily detected or not detected at all. 

Obstacles located above or below the sensors 

will not be detected when they are in close 

proximity.

The vehicle must be driven slowly when using 

ParkSense in order to be able to stop in time 

when an obstacle is detected. It is recom

-

mended that the driver looks over his/her 

shoulder when using ParkSense.

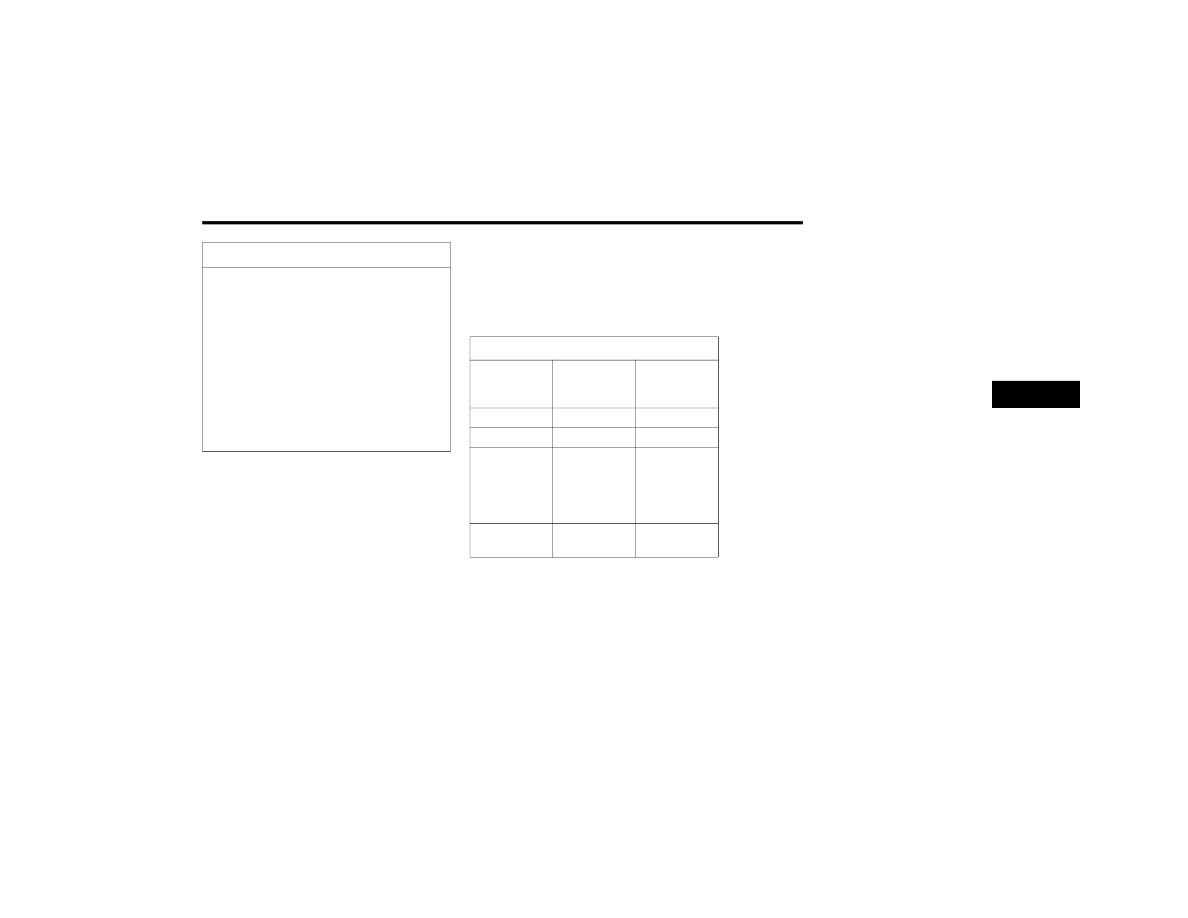
WARNING ALERTS

Distance 

(inches/cm)

Less than 

12 inches

(30 cm)

12 – 

24 inches 

(30–60 cm)

Arcs-Left

11th Flashing 12th Flashing

Arcs-Right

11th Flashing 12th Flashing

Audible Alert 

Chime

Continuous

Fast audible 

chime as the 

objects get 

close to the 

vehicle

Radio Volume 

Reduced

Yes

Yes

4

174

STARTING AND OPERATING


ParkSense Usage Precautions

Some conditions may influence the performance 

of the Side Distance Warning system:

NOTE:

Ensure that the front and rear fascia/bumper 

are free of snow, ice, mud, dirt and debris to 

keep the ParkSense system operating properly.

Construction equipment, large trucks, and other 

vibrations could affect the performance of 

ParkSense.

When you turn ParkSense off, the message to 

appear in the instrument cluster display will 

read “PARKSENSE OFF.” Furthermore, once you 

turn ParkSense off, it remains off until you turn 

it on again, even if you cycle the ignition key.

ParkSense, when on, will reduce the volume of 

the radio when it is sounding a tone.

Clean the ParkSense sensors regularly, taking 

care not to scratch or damage them. The 

sensors must not be covered with ice, snow, 

slush, mud, dirt or debris. Failure to do so can 

result in the system not working properly. The 

ParkSense system might not detect an obstacle 

behind or in front of the fascia/bumper, or it 

could provide a false indication that an obstacle 

is behind or in front of the fascia/bumper.

The presence of a tow hook without a trailer may 

interfere with the correct operation of the 

parking sensors. Before using the ParkSense 

system, it is recommended to remove the 

removable tow hook ball assembly and any 

attachments from the vehicle when it is not 

used for towing operations.

PARKSENSE ACTIVE PARK ASSIST SYSTEM — 

IF EQUIPPED

The ParkSense Active Park Assist system is 

intended to assist the driver during parallel and 

perpendicular parking maneuvers. The system 

works by identifying a proper parking space, 

providing audible/visual instructions, and 

controlling the steering wheel only, or the 

accelerator, gear selector, brakes, and the steering 

wheel (if equipped with the Fully Automated 

system). Depending on the driver's parking 

WARNING!

Drivers must be careful when backing up even 

when using ParkSense. Always check carefully 

behind your vehicle, look behind you, and be 

sure to check for pedestrians, animals, other 

vehicles, obstructions, and blind spots before 

backing up. You are responsible for safety and 

must continue to pay attention to your 

surroundings. Failure to do so can result in 

serious injury or death.

Before using ParkSense, it is strongly recom

-

mended that the ball mount and hitch ball 

assembly be disconnected from the vehicle 

when the vehicle is not used for towing. Failure 

to do so can result in injury or damage to vehi

-

cles or obstacles because the hitch ball will be 

much closer to the obstacle than the rear fascia 

when the vehicle sounds the continuous tone. 

Also, the sensors could detect the ball mount 

and hitch ball assembly, depending on its size 

and shape, giving a false indication that an 

obstacle is behind the vehicle.

CAUTION!

ParkSense is only a parking aid and it is 

unable to recognize every obstacle, including 

small obstacles. Parking curbs might be 

temporarily detected or not detected at all. 

Obstacles located above or below the sensors 

will not be detected when they are in close 

proximity.

The vehicle must be driven slowly when using 

ParkSense in order to be able to stop in time 

when an obstacle is detected. It is recom

-

mended that the driver looks over his/her 

shoulder when using ParkSense.

STARTING AND OPERATING

175

maneuver selection, the ParkSense Active Park 

Assist system is capable of maneuvering a vehicle 

into a parallel or a perpendicular parking space on 

either side (i.e., driver side or passenger side).
Two types of ParkSense Active Park Assist systems 

are available:

Semi-Automatic ParkSense Active Park Assist

ParkSense Automated Parking system

Semi-Automatic ParkSense Active Park Assist — 

If Equipped
The Semi-Automatic system detects parking 

spaces, and controls the steering wheel only. The 

driver maintains control of the accelerator, gear 

selector and brakes.
ParkSense Automated Parking — If Equipped
The Fully Automated system detects parking 

spaces, and controls the accelerator, gear 

selector, brakes, and steering wheel. In this mode, 

the system also provides obstacle detection by 

providing visual and audible warnings and 

automatic braking to avoid a collision.
If your vehicle is equipped with the Fully Automated 

system, you can switch between Semi-Automatic 

and Fully Automated mode in the Uconnect 

Settings  

Ú

page 216.

NOTE:

The driver is always responsible for controlling 

the vehicle, responsible for any surrounding 

objects, and must intervene as required.

The system is designed to assist the driver and 

not to substitute the driver.

During a Semi-Automatic or Fully Automated 

maneuver, if the driver touches the steering 

wheel after being instructed to remove their 

hands from the steering wheel, the system will 

cancel, and the driver will be required to manu

-

ally complete the parking maneuver.

The system may not work in all conditions (e.g. 

environmental conditions such as heavy rain, 

snow, etc., or if searching for a parking space 

that has surfaces that will absorb the ultrasonic 

sensor waves).

New vehicles from the dealership must have at 

least 30 miles (48 km) accumulated before the 

ParkSense Active Park Assist system is fully cali

-

brated and performs accurately. This is due to 

the system’s dynamic vehicle calibration to 

improve the performance of the feature. The 

system will also continuously perform the 

dynamic vehicle calibration to account for differ

-

ences such as over or under inflated tires and 

new tires.

E

NABLING

 A

ND

 D

ISABLING

 T

HE


P

ARK

S

ENSE

 A

CTIVE

 P

ARK

 A

SSIST


S

YSTEM

The ParkSense Active Park Assist 

system can be enabled and disabled 

with the ParkSense Active Park Assist 

switch, located on the switch panel on 

the forward part of the center console, in front of 

the gear selector.
To enable the ParkSense Active Park Assist 

system, push the ParkSense Active Park Assist 

switch once (LED turns on). Pushing the switch a 

second time will disable the system (LED turns off).
The ParkSense Active Park Assist system will turn 

off automatically for any of the following 

conditions:

Parking maneuver is completed

Vehicle speed is greater than 28 mph (45 km/h) 

when searching for a parking space during a Fully 

Automated maneuver

Vehicle speed is greater than 18 mph (30 km/h) 

when searching for a parking space during a 

Semi-Automatic maneuver

Vehicle speed is greater than 5 mph (7 km/h) 

during Semi-Automatic active steering guidance 

into the parking space

4

176

STARTING AND OPERATING


Steering wheel is touched during Fully Auto

-

mated or Semi-Automatic active steering guid

-

ance into the parking space

The gas pedal or brake pedal is pressed during 

Fully Automated active steering guidance into 

the parking space

ParkSense Front and Rear Park Assist switch is 

pushed

Any of the doors are opened during a Fully Auto

-

mated maneuver

The driver door is opened during a Semi-Auto

-

matic maneuver

Rear liftgate is opened

A trailer is connected

Vehicle is in 4WD Low

Cruise Control, Adaptive Cruise Control, or 

Active Driving Assist systems are engaged

Electronic Stability Control/Anti-Lock Braking 

System intervention

The ParkSense Active Park Assist system allows a 

maximum number of shifts between DRIVE and 

REVERSE. If the maneuver cannot be completed 

within the maximum amount of shifts, the system 

will cancel and the instrument cluster display will 

instruct the driver to complete the maneuver 

manually.

The ParkSense Active Park Assist system will only 

operate and search for a parking space when the 

following conditions are present:

Gear selector is in DRIVE

Ignition is in the RUN position

ParkSense Active Park Assist switch is activated

All of the doors are closed

Rear liftgate is closed

Vehicle speed is less than 15 mph (25 km/h) 

during a Semi-Automatic maneuver

Vehicle speed is less than 25 mph (40 km/h) 

during a Fully Automated maneuver

The outer surface and the underside of the front 

and rear fascias/bumpers are clean and clear 

of snow, ice, mud, dirt or other obstruction

NOTE:

During a Semi-Automatic maneuver, if the 

vehicle is driven above approximately 15 mph 

(25 km/h), the instrument cluster display will 

instruct the driver to slow down. If the vehicle is 

driven above approximately 18 mph (30 km/h), 

the system will cancel. The driver must then 

reactivate the system by pushing the ParkSense 

Active Park Assist switch.

During a Fully Automated maneuver, if the 

vehicle is driven above approximately 25 mph 

(40 km/h), the instrument cluster display will 

instruct the driver to slow down. If the vehicle is 

driven above approximately 28 mph (45 km/h), 

the system will cancel. The driver must then 

reactivate the system by pushing the ParkSense 

Active Park Assist switch.

When pushed, the LED on the ParkSense Active 

Park Assist switch will blink momentarily. If any of 

the above conditions are not present, then the LED 

will turn off.
If the vehicle is in any other gear than DRIVE, and 

an objected is detected in the vehicle’s path, the 

system will default to Parallel Park Exit. A prompt 

will appear in the Uconnect display, and the driver 

will need to select “Yes” or “No” for a Parallel Park 

Exit maneuver. Any other conditions will result in a 

default to a Parallel Parking maneuver.

P

ARK

S

ENSE

 A

UTOMATED

 P

ARKING

 — 

I

F

 E

QUIPPED

Parallel/Perpendicular Parking Space 

Assistance Operation

When the ParkSense Active Park Assist system is 

enabled, the driver must press “Park” on the 

Uconnect display, and the system will begin 

searching for valid parallel and perpendicular 

parking spaces.

STARTING AND OPERATING

177

NOTE:

The driver needs to make sure that the selected 

parking space for the maneuver remains free 

and clear of any obstructions (e.g. pedestrians, 

bicycles, etc.).

The driver is responsible to ensure that the 

selected parking space is suitable for the 

maneuver and free/clear of anything that may 

be overhanging or protruding into the parking 

space (e.g., ladders, tailgates, etc. from 

surrounding objects/vehicles).

When searching for a parking space, the driver 

should drive as parallel or perpendicular 

(depending on the type of maneuver) to other 

vehicles as possible.

While the vehicle is in DRIVE, there will be a full 

screen image in the Uconnect display. If the 

driver shifts to REVERSE while searching for a 

parking space, a camera image will appear in 

the Uconnect display with a “Shift To Drive” 

message.

Both types of valid spaces (parallel and 

perpendicular) will be displayed in the Uconnect 

display as they are found. The available spaces will 

update in real time.
When valid parking spaces have been found, the 

driver will be prompted to stop the vehicle.

Select A Space

The driver can then select a parking space by 

pressing the desired space on the Uconnect 

display.

NOTE:

If a space selection is attempted before the vehicle 

is stopped, a warning screen will appear in the 

Uconnect display with instructions to stop the 

vehicle to make a selection.
If the driver selects a perpendicular parking space, 

the system will prompt the driver to choose a 

Forward or Reverse parking method.

Choose Perpendicular Parking Method

NOTE:

You can press the “Back” button on the display to 

return to the parking space selection screen and 

select a different space.
Once the parallel or perpendicular parking 

maneuver selection has been made, a message 

will appear in the display with instructions to hold 

down the brake pedal and Active Park Assist 

switch. Both of these conditions must be met in 

order to begin the parking maneuver. The message 

also instructs the driver to push and hold the Active 

Park Assist switch for the entire maneuver.

NOTE:

When the Active Park Assist switch is held down, 

the turn signal for the side of the vehicle where the 

selected parking space is located will turn on auto

-

matically.

4

178

STARTING AND OPERATING


The system will then instruct the driver to remove 

hands from the steering wheel and feet from the 

pedals. This screen will be shown for a minimum of 

two seconds, or until the driver releases the brake 

pedal.
When the parking sequence is initiated by the 

driver after the previously described conditions are 

met, the Uconnect system will display a Top View 

along with either a rear camera view (if the vehicle 

is placed in REVERSE) or a forward camera view (if 

the vehicle is placed in DRIVE).
The Top View will have integrated ParkSense arcs 

in the image at the front and rear of the vehicle. 

The arcs will change color from yellow to red 

corresponding the distance zones to the oncoming 

object.
The system will then perform the parking 

maneuver. Once the maneuver is complete, the 

vehicle will automatically shift into PARK.
The system will display a “Complete!” message 

and instruct the driver to release the Active Park 

Assist switch.
Once the Active Park Assist switch is released, a 

chime will sound and the LED on the switch will 

turn off. After approximately five seconds, the 

previous Uconnect screen will display.

NOTE:

It is the driver's responsibility to use the brake 

and stop the vehicle. The driver should check 

their surroundings and be prepared to stop the 

vehicle either when instructed to, or when driver 

intervention is required.

When the system instructs the driver to remove 

their hands from the steering wheel, the driver 

should check their surroundings and begin to 

back up slowly.

The system will cancel the maneuver if the 

vehicle speed exceeds 28 mph (45 km/h) 

during active steering guidance into the parking 

space. The system will provide a warning to the 

driver at 28mph (40 km/h) that tells them to 

slow down. The driver is then responsible for 

completing the maneuver if the system is 

canceled.

If the system is canceled during the maneuver 

for any reason, the driver must take control of 

the vehicle.

WARNING!

Drivers must be careful when performing 

parallel or perpendicular parking maneuvers 

even when using the ParkSense Active Park 

Assist system. Always check carefully behind 

and in front of your vehicle, look behind and in 

front of you, and be sure to check for pedes

-

trians, animals, other vehicles, obstructions, 

and blind spots before backing up and moving 

forward. You are responsible for safety and 

must continue to pay attention to your 

surroundings. Failure to do so can result in 

serious injury or death.

Before using the ParkSense Active Park Assist 

system, it is strongly recommended that the 

ball mount and hitch ball assembly be discon

-

nected from the vehicle when the vehicle is 

not used for towing. Failure to do so can result 

in injury or damage to vehicles or obstacles 

because the hitch ball will be much closer to 

the obstacle than the rear fascia/bumper 

when the vehicle sounds the continuous tone. 

Also, the sensors could detect the ball mount 

and hitch ball assembly, depending on its size 

and shape, giving a false indication that an 

obstacle is behind the vehicle.

STARTING AND OPERATING

179

Parallel Park Exit

Enable the ParkSense Active Park Assist system by 

pressing the ParkSense Active Park Assist switch. 

To initiate a parking space exit maneuver, the 

vehicle must be stopped, and the driver must 

press “Exit” on the Uconnect display.
After the driver chooses a parallel park exit 

maneuver, the system will then prompt the driver 

to choose an exit method. The exit method options 

are Forward Left and Forward Right.

Choose Exit Method

NOTE:

If an exit method selection is attempted before the 

vehicle is stopped, the driver will be instructed to 

stop the vehicle to make a selection.
After the driver chooses a parallel exit side, a 

message appears in the Uconnect display with 

instructions to hold the brake pedal and hold down 

the Active Park Assist switch. Both of these 

conditions must be met before the maneuver can 

begin.
When the Active Park Assist switch is held down, 

the turn signal for the chosen exit side will turn on 

automatically.
The system will then instruct the driver to remove 

hands from the steering wheel and feet from the 

pedals. This screen will be shown for a minimum of 

two seconds, or until the driver releases the brake 

pedal.

When the exit sequence is initiated by the driver 

after the previously described conditions are met, 

the Uconnect system will display a Top View along 

with either a rear camera view (if the vehicle is 

placed in REVERSE) or a forward camera view (if 

the vehicle is placed in DRIVE), and the exit 

maneuver will begin.
The Top View will have integrated ParkSense arcs 

in the image at the front and rear of the vehicle. 

The arcs will change color from yellow to red 

corresponding the distance zones to the 

oncoming object.
The automatic maneuver ends when the vehicle is 

clear of the parking space, and the display shows 

the message of a completed maneuver. The vehicle 

will be in DRIVE and held hydraulically by the brakes 

until the driver presses the accelerator pedal. The 

system gives vehicle control back to the driver.
Once the driver regains control of the vehicle, a 

chime will sound and the LED on the switch will 

turn off. After approximately five seconds, the 

previous Uconnect screen will display.

Parking Maneuver Paused/Canceled

Certain conditions can pause or cancel a Fully 

Automated park or exit maneuver.
The ParkSense Automated Parking system can be 

paused due to the driver’s finger being removed 

from the Active Park Assist switch and/or an object 

in the vehicle’s path during a parking maneuver.

CAUTION!

The ParkSense Active Park Assist system is 

only a parking aid and it is unable to recognize 

every obstacle, including small obstacles. 

Parking curbs might be temporarily detected 

or not detected at all. Obstacles located above 

or below the sensors will not be detected 

when they are in close proximity.

The vehicle must be driven slowly when using 

the ParkSense Active Park Assist system in 

order to be able to stop in time when an 

obstacle is detected. It is recommended that 

the driver looks over his/her shoulder when 

using the ParkSense Active Park Assist 

system.

4

180

STARTING AND OPERATING


If one or more of these scenarios occur, automatic 

braking will bring the vehicle to a stop and hold the 

vehicle hydraulically by the brakes.
The driver will be instructed to hold the Active Park 

Assist switch to continue the park or exit 

maneuver. If the driver does not resume holding 

the switch down, the maneuver will cancel.
If the maneuver is paused due to an object in the 

vehicle’s path, a message will appear in the 

Uconnect display. The maneuver will remain 

paused until the object is no longer in the vehicle’s 

path.
The system can also be paused before the Active 

Park Assist switch is held down if the driver shifts 

into REVERSE.
The driver will be instructed to shift to DRIVE to 

continue the maneuver. If the vehicle is shifted into 

DRIVE, the process will continue on to the seek/

maneuver selection phase.

S

EMI

-A

UTOMATIC

 P

ARK

S

ENSE

 A

CTIVE


P

ARK

 A

SSIST

 — I

F

 E

QUIPPED

Parallel/Perpendicular Parking Space 

Assistance Operation

When the ParkSense Active Park Assist system is 

enabled, the driver must press “Park” on the 

Uconnect display, and the system will begin 

searching for valid parallel and perpendicular 

parking spaces.

NOTE:

If your vehicle is equipped with a Fully Automated 

system, you may have to update your selected 

setting in the Uconnect system to switch to a 

Semi-Automatic maneuver  

Ú

page 216.

NOTE:

The driver needs to make sure that the selected 

parking space for the maneuver remains free 

and clear of any obstructions (e.g. pedestrians, 

bicycles, etc.).

The driver is responsible to ensure that the 

selected parking space is suitable for the 

maneuver and free/clear of anything that may 

be overhanging or protruding into the parking 

space (e.g., ladders, tailgates, etc. from 

surrounding objects/vehicles).

When searching for a parking space, the driver 

should drive as parallel or perpendicular 

(depending on the type of maneuver) to other 

vehicles as possible.

While the vehicle is in DRIVE, there will be a full 

screen image in the Uconnect display. If the driver 

shifts to REVERSE while searching for a parking 

space, a camera image will appear in the 

Uconnect display with a “Shift To Drive” message.

Both types of valid spaces (parallel and 

perpendicular) will be displayed in the Uconnect 

display as they are found. The available spaces will 

update in real time.
When valid parking spaces have been found, and 

the vehicle is not in position, you will be instructed 

to move forward to position the vehicle for a 

perpendicular or parallel parking sequence 

(depending on the type of maneuver being 

performed).
A chime will sound, and the driver will be instructed 

to stop the vehicle and to select a space. This can 

be done by pressing the desired space on the 

Uconnect display.

Select A Space

STARTING AND OPERATING

181

If the driver selects a perpendicular parking space, 

the system will prompt the driver to choose a 

Forward or Reverse parking method.

Choose Perpendicular Parking Method

After a parking space has been selected, the driver 

will be instructed to remove hands from the 

steering wheel and shift into REVERSE.

Remove Hands From Wheel And Shift To Reverse

Once active steering begins, a camera image will 

appear in the Uconnect display with instructions 

that will display for the duration of the maneuver.
The system may then instruct the driver to wait for 

steering to complete before then instructing to 

check the vehicle’s surroundings, and move 

backward.

Move Backward

Several more gear shifts (DRIVE and REVERSE) 

while keeping hands off of the steering wheel will 

be instructed to the driver while checking the 

vehicle’s surroundings before completing the 

parking maneuver.
When the vehicle is in the parking position, the 

maneuver is complete and the driver will be 

instructed to check the vehicle's parking position, 

then shift the vehicle into PARK. The message 

“Complete! Check Parking Position” will be 

displayed momentarily.

NOTE:

It is the driver's responsibility to use the brake 

and stop the vehicle. The driver should check 

their surroundings and be prepared to stop the 

vehicle either when instructed to, or when driver 

intervention is required.

It is the driver’s responsibility to use the brake 

and accelerator during the Semi-Automatic 

parking maneuver.

When the system instructs the driver to remove 

their hands from the steering wheel, the driver 

should check their surroundings and begin to 

back up slowly.

The ParkSense Active Park Assist system will 

allow a maximum of eight shifts between DRIVE 

and REVERSE. If the maneuver cannot be 

completed within eight shifts, the system will 

cancel and the instrument cluster display will 

instruct the driver to complete the maneuver 

manually.

The system will cancel the maneuver if the 

vehicle speed exceeds 18 mph (30 km/h) 

during active steering guidance into the parking 

space. The system will provide a warning to the 

driver at 15 mph (25 km/h) that tells them to 

slow down. The driver is then responsible for 

completing the maneuver if the system is 

canceled.

4

182

STARTING AND OPERATING


If the system is canceled during the maneuver 

for any reason, the driver must take control of 

the vehicle.

Parallel Park Exit

Enable the ParkSense Active Park Assist system by 

pressing the ParkSense Active Park Assist switch. 

To initiate a parking space exit maneuver, the 

vehicle must be stopped, and the driver must 

press “Exit” on the Uconnect display.
After the driver chooses a parallel park exit 

maneuver, the system will then prompt the driver 

to choose an exit method. The exit method options 

are Forward Left and Forward Right.

Choose Exit Method

After an exit maneuver method has been selected, 

the driver will be instructed to remove hands from 

the steering wheel and shift into REVERSE.

Remove Hands From Wheel And Shift To Reverse

WARNING!

Drivers must be careful when performing 

parallel or perpendicular parking maneuvers 

even when using the ParkSense Active Park 

Assist system. Always check carefully behind 

and in front of your vehicle, look behind and in 

front of you, and be sure to check for pedes

-

trians, animals, other vehicles, obstructions, 

and blind spots before backing up and moving 

forward. You are responsible for safety and 

must continue to pay attention to your 

surroundings. Failure to do so can result in 

serious injury or death.

Before using the ParkSense Active Park Assist 

system, it is strongly recommended that the 

ball mount and hitch ball assembly be discon

-

nected from the vehicle when the vehicle is 

not used for towing. Failure to do so can result 

in injury or damage to vehicles or obstacles 

because the hitch ball will be much closer to 

the obstacle than the rear fascia/bumper 

when the vehicle sounds the continuous tone. 

Also, the sensors could detect the ball mount 

and hitch ball assembly, depending on its size 

and shape, giving a false indication that an 

obstacle is behind the vehicle.

CAUTION!

The ParkSense Active Park Assist system is 

only a parking aid and it is unable to recognize 

every obstacle, including small obstacles. 

Parking curbs might be temporarily detected 

or not detected at all. Obstacles located above 

or below the sensors will not be detected 

when they are in close proximity.

The vehicle must be driven slowly when using 

the ParkSense Active Park Assist system in 

order to be able to stop in time when an 

obstacle is detected. It is recommended that 

the driver looks over his/her shoulder when 

using the ParkSense Active Park Assist 

system.

STARTING AND OPERATING

183

Release the steering wheel and use the brake and 

accelerator pedals and gear selector as instructed, 

while the system handles the steering 

automatically for exiting the parking space. If the 

driver touches or holds the steering wheel 

(voluntarily or not) during the exit maneuver, the 

maneuver will be interrupted.
The Semi-Automatic maneuver ends when the 

display shows the message of a completed 

maneuver. At the end of the maneuver, the system 

gives vehicle control back to the driver.

ACTIVE LANE MANAGEMENT SYSTEM —

IF EQUIPPED

A

CTIVE

 L

ANE

 M

ANAGEMENT

 O

PERATION

The Active Lane Management (ALM) system uses a 

forward facing camera to detect lane markings or 

road edges and to measure vehicle position within 

the lane boundaries. It also uses the Blind Spot 

Monitoring sensors to detect vehicles in adjacent 

lanes while your vehicle is preparing to change 

lanes.
The system is operational at speeds above 37 mph 

(60 km/h) and below 112 mph (180 km/h).
When both lane markings are detected, and the 

vehicle approaches the lane marker (no turn signal 

applied), the Active Lane Management system 

provides a visual warning in the instrument cluster, 

as well as a steering assist torque (if configured in 

Uconnect Settings), to prompt the driver to remain 

within the lane boundaries. If the driver continues 

to drift out of the lane, the system provides a 

flashing visual warning through the instrument 

cluster display as well as a haptic steering wheel 

vibration (if configured in Uconnect Settings) when 

the vehicle crosses the lane boundary.
The warning will be in the form of a vibration in the 

steering wheel, and/or automatic steering 

assistance to direct the vehicle back toward the 

center of the lane.
When both lane markings are detected, and the 

driver uses the turn signal to indicate a lane 

change while the system detects another vehicle in 

the Blind Spot Monitoring zone on that side of the 

vehicle, the Active Lane Management system 

provides a warning in the form of steering assist 

and/or steering vibration (depending on radio 

settings) to guide the vehicle back to the center of 

the lane.
Depending on the type of warning selected, the 

system will either guide the vehicle back to the 

center of the lane, provide a vibration in the 

steering wheel, or both.

NOTE:

For an event where the Active Lane Management 

system is reacting to a target vehicle in the 

adjacent lane, the Blind Spot Monitoring indicator 

LED on the mirror will flash, and the steering wheel 

torque will be greater than for a normal lane 

departure (no vehicle in adjacent lane).
The driver may manually override the steering 

assist warning by applying force into the steering 

wheel at any time.
When only a single lane marking is detected and 

the driver drifts across the lane marking (no turn 

signal applied), the Active Lane Management 

system provides visual warnings through the 

instrument cluster display to prompt the driver to 

remain within the lane. When only a single lane 

marking is detected, a vibration and/or steering 

assist warning will not be provided.

NOTE:

When operating conditions have been met, the 

Active Lane Management system will monitor if the 

driver’s hands are on the steering wheel and 

provides an audible and visual warning to the 

driver if removed. The system will cancel if the 

driver does not return their hands to the wheel.

T

URNING

 A

CTIVE

 L

ANE

 M

ANAGEMENT


O

N

 O

R

 O

FF

The Active Lane Management button is 

located on the switch panel above the 

Uconnect display.
To turn the system on, push the Active 

Lane Management button (LED turns off). A 

message is shown in the instrument cluster display.

4

184

STARTING AND OPERATING


To turn the system off, push the button again (LED 

turns on).

NOTE:

The Active Lane Management system will retain 

the last system state on or off from the last ignition 

cycle when the ignition is placed in the ON/RUN 

position.

A

CTIVE

 L

ANE

 M

ANAGEMENT

 W

ARNING


M

ESSAGE

The Active Lane Management system will indicate 

the current lane drift condition through the 

instrument cluster display.
When the system is on, the lane lines are gray 

when both of the lane boundaries have not been 

detected.

System On (Gray Lines)

Left Lane Departure — Only Left Lane Detected

When the system is on and only the left lane 

marking has been detected, and the system is 

ready to provide visual warnings in the instru

-

ment cluster display and a vibration and/or 

steering assist warning in the steering wheel if a 

lane departure occurs, the left lane line will be 

green.

When the system senses the lane line has been 

approached (but not crossed), the left lane line 

will change to solid yellow and the system will 

provide haptic steering wheel vibration and/or 

steering assist torque (if programmed in 

Uconnect Settings).

When the system senses the lane line is being 

crossed, the left lane line will change to flashing 

yellow.

Lane Crossed (Flashing Yellow Line)

NOTE:

The Active Lane Management system operates 

with similar behavior for a right lane departure 

when only the right lane marking has been 

detected.
Left Lane Departure — Both Lanes Detected

When the system is on, the lane lines turn from 

gray to green to indicate that both of the lane 

markings have been detected. When both lane 

markings have been detected, the system is 

ready to provide visual warnings in the instru

-

ment cluster display and a vibration and/or 

steering assist warning in the steering wheel if a 

lane departure occurs.

Lanes Sensed (Green Lines)

STARTING AND OPERATING

185

When the system senses a lane drift situation, 

the left lane line turns solid yellow. At this time, 

steering assist warning is applied to the steering 

wheel in the opposite direction of the lane 

boundary.
For example: If approaching the left side of the 

lane the steering wheel will turn to the right.

Lane Drift (Solid Yellow Line)

When the system senses the lane line is being 

crossed, the left lane line changes from solid 

yellow to flashing yellow (on/off). At this time, 

vibration is applied to the steering wheel.
For example: If approaching the left side of the 

lane the steering wheel will turn to the right.

Lane Crossed (Flashing Yellow Line)

NOTE:

The Active Lane Management system operates 

with similar behavior for a right lane departure.

If the turn signal is activated, and the vehicle 

begins to depart the lane at the same time the 

Blind Spot Monitoring (BSM) system detects 

another vehicle in the BSM zones, the system 

will provide haptic steering wheel vibration and/

or steering assist torque (if programmed in 

Uconnect Settings).

C

HANGING

 A

CTIVE

 L

ANE

 M

ANAGEMENT


S

TATUS

Configurable settings for the Active Lane 

Management system are available within the 

Uconnect system  

Ú

page 216.

Selectable Warning Types:

Vibration Only

Steering Assist Only

Vibration And Steering Assist

Other configurable settings for this system are for 

the intensity of the vibration (high/med/low), 

steering assist warning (hi/med/low), and the 

warning zone sensitivity (early/medium/late).

NOTE:

The system will not apply vibration and/or 

steering assist to the steering wheel whenever a 

safety system engages (Anti-Lock Brakes, Trac

-

tion Control System, Electronic Stability Control, 

Forward Collision Warning, etc.).

The Blind Spot Monitoring system will be forced 

on when the ALM system is enabled.

The ALM system will be suppressed when the 

Active Driving Assist system (if equipped) is 

engaged.

4

186

STARTING AND OPERATING


PARKVIEW REAR BACK UP CAMERA 

Your vehicle is equipped with the ParkView Rear 

Back Up Camera that allows you to see an 

on-screen image of the rear surroundings of your 

vehicle whenever the gear selector is put into 

REVERSE. The image will be displayed on the 

Navigation/Multimedia radio display screen along 

with a caution note to “Check Entire Surroundings” 

across the top of the screen. After five seconds this 

note will disappear. The ParkView camera is 

located on the rear of the vehicle above the rear 

license plate.
When the vehicle is shifted out of REVERSE with 

camera delay turned off, the rear camera mode is 

exited and the previous screen appears.
Manual Activation Of The Backup Camera
1. Press the “Controls” button located on the 

bottom of the Uconnect display.

2. Press the “Backup Camera” button to turn the 

Rear View Camera system on.

NOTE:

The ParkView Rear Back Up Camera has program

-

mable modes of operation that may be selected 

through the Uconnect system  

Ú

page 216.

When the vehicle is shifted out of REVERSE with 

camera delay turned off, the rear camera mode is 

exited and the previous screen appears. When the 

vehicle is shifted out of REVERSE with camera 

delay turned on, the camera image will continue to 

be displayed for up to 10 seconds unless the 

following conditions occur: the vehicle speed 

exceeds 8 mph (13 km/h), the vehicle is shifted 

into PARK, the vehicle’s ignition is placed in the 

OFF position, or the touchscreen button “X” to 

disable the display of the Rear View Camera is 

pressed.
When enabled, active guidelines are overlaid on 

the image to illustrate the width of the vehicle and 

its projected backup path based on the steering 

wheel position. A dashed center line overlay 

indicates the center of the vehicle to assist with 

parking or aligning to a hitch/receiver. Different 

colored zones indicate the distance to the rear of 

the vehicle.
The following table shows the approximate 

distances for each zone:

NOTE:

If snow, ice, mud, or any foreign substance builds 

up on the camera lens, clean the lens, rinse with 

water, and dry with a soft cloth. Do not cover the 

lens.

Zone

Distance To The Rear Of 

The Vehicle

Red

0 - 1 ft (0 - 30 cm)

Yellow

1 ft - 6.5 ft (30 cm - 2 m)

Green

6.5 ft or greater

(2 m or greater)

WARNING!

Drivers must be careful when backing up even 

when using the ParkView Rear Back Up Camera. 

Always check carefully behind your vehicle, and 

be sure to check for pedestrians, animals, other 

vehicles, obstructions, or blind spots before 

backing up. You are responsible for the safety of 

your surroundings and must continue to pay 

attention while backing up. Failure to do so can 

result in serious injury or death.

CAUTION!

To avoid vehicle damage, ParkView should 

only be used as a parking aid. The ParkView 

camera is unable to view every obstacle or 

object in your drive path.

To avoid vehicle damage, the vehicle must be 

driven slowly when using ParkView to be able 

to stop in time when an obstacle is seen. It is 

recommended that the driver look frequently 

over his/her shoulder when using ParkView.

STARTING AND OPERATING

187

Rear Camera Washer
When the rear window washer is activated by 

pushing the windshield wiper/washer lever 

forward, the rear backup and digital rearview 

mirror (if equipped) cameras are also washed. For 

more information, see  

Ú

page 71.

Z

OOM

 V

IEW

When the Rear View Camera image is 

being displayed, and the vehicle speed 

is below 8 mph (13 km/h) while in any 

gear selector position, Zoom View is 

available. By pressing the “magnifying glass” icon 

in the upper left of the display screen, the image 

will zoom in to four times the standard view. 

Pressing the icon a second time will return the view 

to the standard Back Up Camera display.
When Zoom View is selected while the vehicle is in 

REVERSE, then shifted to DRIVE, the camera delay 

view will display the standard Back Up Camera 

view. If the vehicle is then returned to REVERSE 

gear from DRIVE, the Zoom View selection will 

automatically resume.
Shifting to NEUTRAL from any gear will maintain 

the selected view (Zoom or Standard) as long as 

the vehicle is below 8 mph (13 km/h).
If the vehicle is in PARK, Zoom View is available 

until the gear selector is placed in DRIVE or 

REVERSE and speeds are at or above 8 mph 

(13 km/h).

NOTE:

If the vehicle is in DRIVE, NEUTRAL, or REVERSE, 

and speed is greater than or equal to 8 mph 

(13 km/h), Zoom View is unavailable and the 

icon will appear grey.

While in Zoom View, the guidelines will not be 

visible.

V

IEWING

 A

T

 S

PEED

When the vehicle is in PARK, NEUTRAL 

or DRIVE, the Rear View Camera can be 

activated with the “Backup Camera” 

button in the Controls menu. This 

feature allows the customer to monitor the area 

directly behind the vehicle (or trailer, if equipped) 

for up to 10 seconds while driving. If the vehicle 

speed remains below 8 mph (13 km/h), the Rear 

View Camera image will be displayed continuously 

until deactivated via the “X” button on the 

touchscreen.

FAMCAM SYSTEM — IF EQUIPPED 

The FamCam system consists of an interior 

monitoring camera mounted on the headliner that 

allows the driver to view cargo/passengers in the 

rear interior of the vehicle through the Uconnect 

screen.

To activate the feature, press the 

FamCam button in the Controls tab of 

the Vehicle menu. The FamCam feature 

can also be accessed from the App 

Drawer, or the status bar at the top of the Uconnect 

display.
The display will show the entire view inside the 

vehicle on the left side of the screen, and will show 

a zoomed-in view of the selected seat on the right 

side of the screen.

FamCam Display Example (7 Passenger Vehicle Shown)

To change the seat shown in the zoomed-in view, 

press a different seat location on the left side of 

the display. The zoomed-in view will then show the 

new seat location. By default, the second row 

driver’s side seat will be displayed in the zoomed-in 

view.

4

188

STARTING AND OPERATING


The display will appear in color in well lit conditions 

and will appear black and white in low light 

conditions.
If the driver shifts into REVERSE or presses the “X” 

on the screen, the view will close. Otherwise, the 

FamCam view will remain on the display.

NOTE:

When FamCam is turned off, the selected seat in 

the zoomed-in view on the right side of the display 

will be retained. The next time the feature is acti

-

vated, the same seat will be shown in the 

zoomed-in view.

NIGHT VISION CAMERA SYSTEM — 

IF EQUIPPED 

Your vehicle may be equipped with a Night Vision 

Camera system which uses an infrared camera to 

view the area ahead of the vehicle, beyond the 

headlights, to detect people and large animals 

when it is dark outside.
The system detects pedestrians or large animals 

by measuring the temperature difference between 

the object and the surrounding area.
The thermal objects detected by the camera can 

be displayed in the instrument cluster display. 

Scroll to the Night Vision page in the instrument 

cluster display menu  

Ú

page 112 to display the 

Night Vision screen.

Warm objects (e.g. animals) will appear lighter on 

the display while cold objects (e.g. traffic signs) will 

appear darker.

NOTE:

Night Vision only shows objects of interest that 

are warmer or colder than the surroundings.

Adjust the instrument cluster dimmer control 

brightness to make the image appear brighter 

or dimmer.

To exit out of the Night Vision screen, select a 

different menu in the instrument cluster display.
A yellow or red border and box highlight will appear 

around objects of interest. More than one object of 

interest may be highlighted.

Highlight Around Objects Of Interest

The highlighting of the object(s) of interest will 

update in real time based upon the current Night 

Vision assessment.
The Night Vision system display can be deactivated 

under certain conditions. See  

Ú

page 190 for 

further information.
The two categories of Night Vision warnings are 

Pedestrian Warnings and Animal Warnings.

Pedestrian Warning Telltale

Animal Warning Telltale
A Pedestrian or Animal Warning is 

considered either Level 1 or Level 2. 

Level 1 warnings are yellow, and Level 2 

warnings are red. The colors are not configurable.
Level 1 Warnings:

Yellow telltale in the instrument cluster display

Yellow highlights around the detected pedes

-

trian/animal

Occurs when the vehicle is moving at speeds 

greater than 8 mph (13 km/h) and the target is 

in or approaching the vehicle path

Level 2 Warnings:

Red telltale in the instrument cluster display

Red highlights around the detected pedestrian/

animal


Content      ..     9      10      11      12     ..