Isuzu N-Series. Manual - part 955


  Index      Isuzu     Isuzu N-Series - service repair manual


Search            


Content   ..  953  954  955  956   ..


Isuzu N-Series. Manual - part 955


7B-56 Automatic Transmission (Smoother)


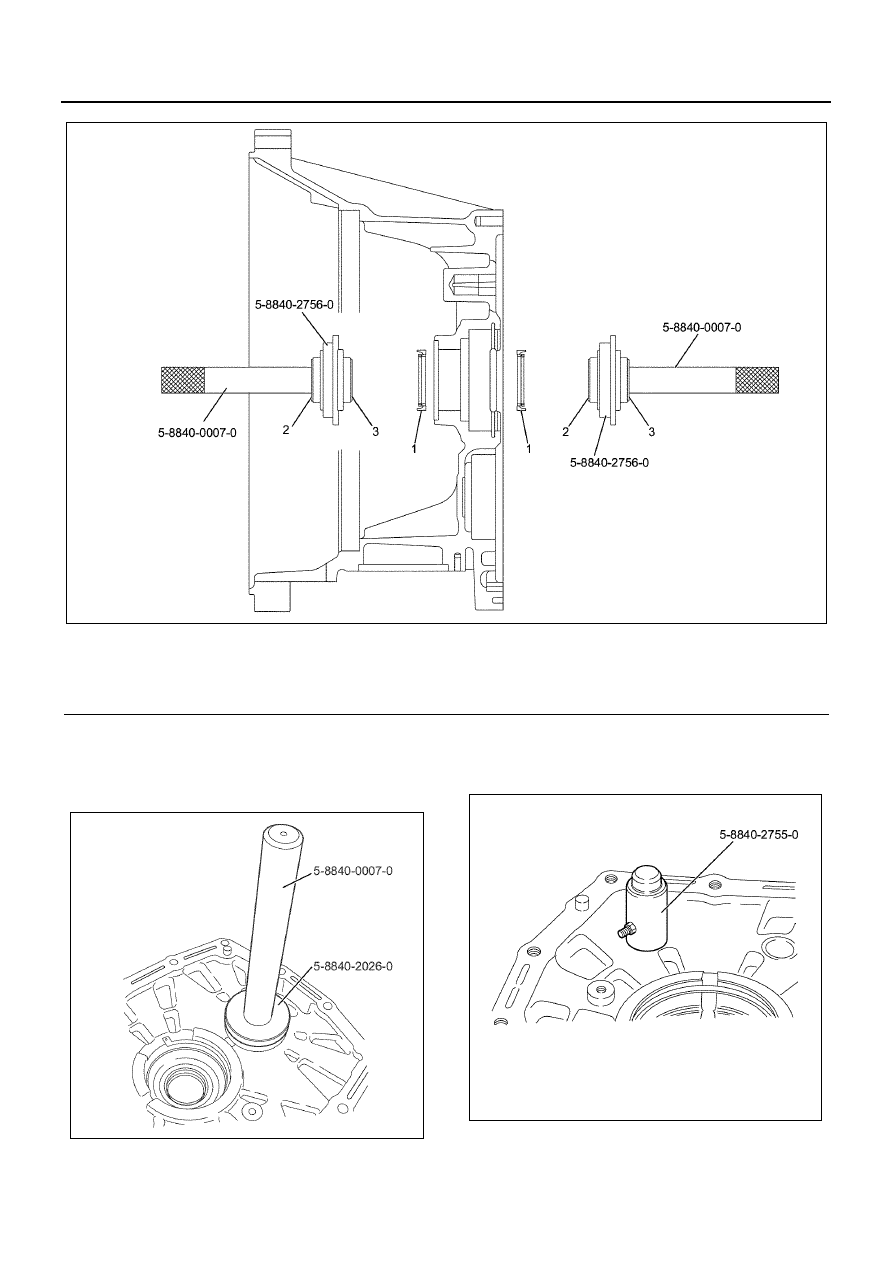
2. Inspect the counter shaft front bearing. If it needs

to be replaced with a new one due to wear or
damage, use a grip (5-8840-0007-0) and installer
(5-8840-2026-0) to press-fit the bearing outer race. 

3. Inspect the clutch housing bushing. If it needs to be

replaced with a new one due to wear or damage,
use an installer (5-8840-2755-0) to press-fit. 

• Before installing, carefully remove all

protrusions from the bore side of the old
caulking. 

Legend

1. Front Oil Seal

3. ENG Mark

2. T/M Mark

N7A1102E

N7A1103E

N7A1104E

Automatic Transmission (Smoother) 7B-57

• Before installing, securely caulk at three points,

avoiding the old caulking points and grooves. 

• For the second and subsequent press-fitting,

the notched part should face in the direction of
the clutch housing. 

• After press-fitting, check that the shift rod slides

smoothly. 

4. Install the main shaft assembly, top gear shaft

assembly, and counter shaft assembly. 
a. Use a lashing belt or some other belt from a

lashing device to bundle the main shaft
assembly, counter shaft assembly, and top
gear shaft assembly at two points so they
cannot separate. Tighten the belt securely.
When handing the top gear shaft, take care that
it does not drop. 

b. Stand the top gear shaft assembly, main shaft

assembly, and counter shaft assembly on a
support stand with the top gear shaft assembly
on top. 

c. Wrap the main shaft with tape to avoid damage

to the front oil seal. 

d. While using snap ring pliers to open the top

gear shaft bearing outer snap ring, which
already has been set on the clutch housing,
insert the top gear shaft, counter shaft, and
shaft rod into their appropriate positions in the
clutch housing. 

Caution:

• Confirm that the snap ring is installed properly. 

N7A1105E

N7A1095E

N7A1107E

N7A1108E

7B-58 Automatic Transmission (Smoother)

• Work carefully in order to avoid damaging the front

oil seal. 

5. Install the magnet in the clutch housing. 
6. Install the 5th relay lever in the clutch housing. 

Tighten:
44 N

⋅m (4.5 kg⋅m / 32.5 lb⋅ft)

7. Inspect the 4th — 5th shift arm bushing. If it needs

to be replaced with a new one due to wear or
damage, use an installer (5-8840-2755-0) to press-
fit with a press. 

8. Inspect the 2nd — 3rd shift arm bushing. If it needs

to be replaced with a new one due to wear or
damage, use an installer (5-8840-2755-0) to press-
fit with a press. 

• Before installing, carefully remove all

protrusions from the bore side of the old
caulking. 

• Press-fit the shift arm bushing taking care to

use the correct orientation and angle. Caulk at
three points, avoiding the bushing gap and old
caulking. 

• After press-fitting, check that the shift rod slides

smoothly. 

9. Install the 4th — 5th shift arm (7), 1st — Reverse

shift block (5), 2nd — 3rd shift arm (4), 1st —
Reverse shift arm (2), 1st — Reverse and 2nd —
and 3rd shift rod (1). 

• Use a hammer to drive the spring pins (3), (6)

into the spring pin holes. 

• When press-fitting spring pins, insert a round

bar on the opposite side of the shift rod, and
press-fit while taking care to avoid damage to
other parts. 

N7A1109E

N7A1110E

Automatic Transmission (Smoother) 7B-59

10. Install the 4th — 5th sub shift block (3), 4th — 5th

main shift block (2), 3rd — 4th shift block (1).

• Use a hammer to drive the spring pins (4), (5)

into the spring pin holes. 

• When press-fitting spring pins, insert a round

bar on the opposite side of the shift rod, and
press-fit while taking care to avoid damage to
other parts. 

11. Apply Three Bond TB1215 to the mating surface of

the transmission case and clutch housing, and
install to the clutch housing. 

• Before applying the Three Bond, remove all

moisture and oil from the contact surface. Use
a bead diameter of at least 2mm across the
entire surface, ensuring there are no gaps. 

Tighten:
46 N

⋅m (4.7 kg⋅m / 33.9 lb⋅ft)

N7A0333E

N7A0334E


Content   ..  953  954  955  956   ..