Isuzu N-Series. Manual - part 843


  Index      Isuzu     Isuzu N-Series - service repair manual


Search            


Content   ..  841  842  843  844   ..


Isuzu N-Series. Manual - part 843


MANUAL TRANSMISSION 7B-33

Assembly

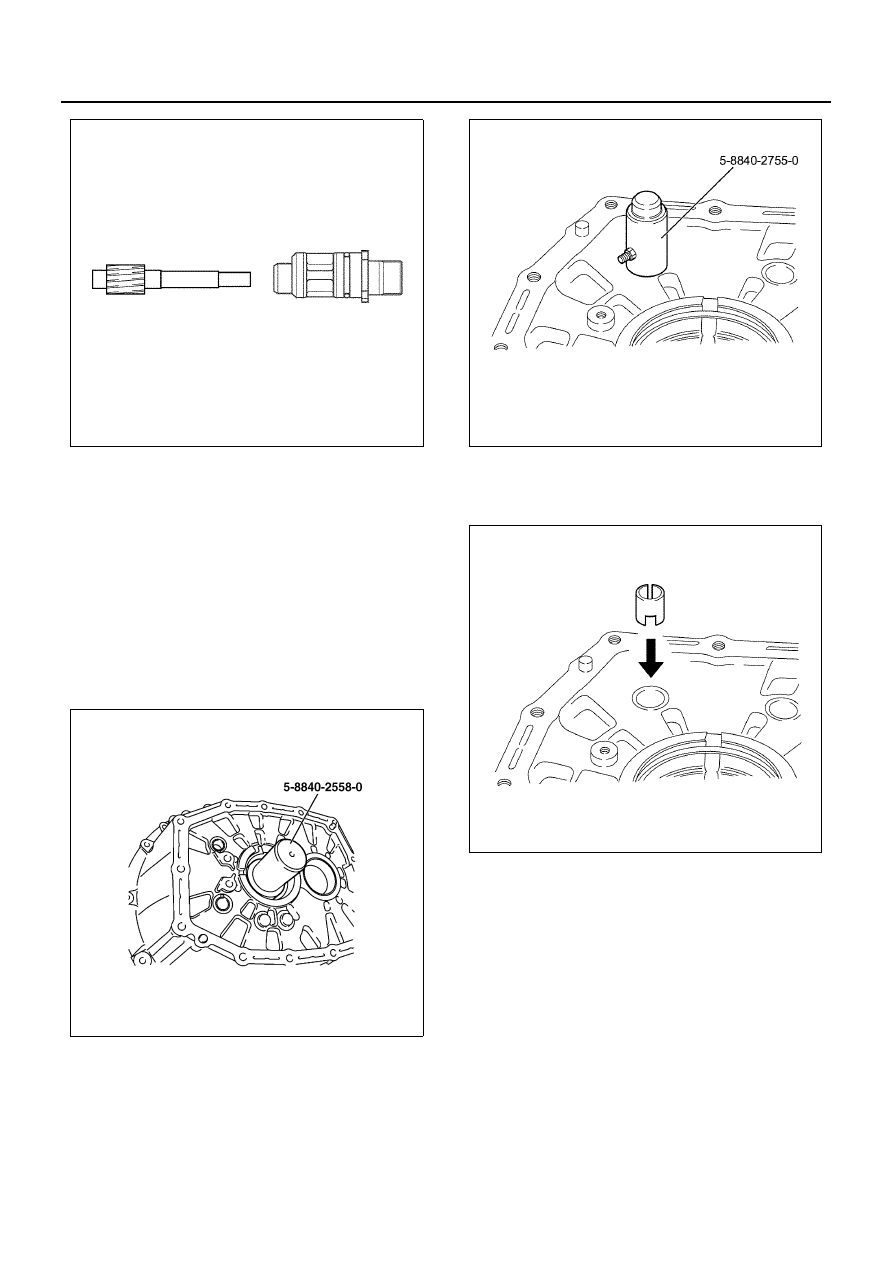
1. When finding the oil seal worn and damaged after

the check and replacing it with a new one, apply
engine oil 5W-30 around the oil seal, and then
press in the oil seal into the clutch housing using
the installer 5-8840-2558-0, or when the front PTO
is equipped, using the installer 5-8840-2754-0 and
the grip 5-8840-0007-0.

• Apply Besco L2 grease on the oil seal lip por-

tion.

Caution:
Be careful not to damage the oil seal lip portion.

2. When the clutch housing bush is replaced with a

new one after checking it for wear and damage,
press it in using the installer 5-8840-2755-0.

• During installation, caulk three portions secure-

ly except older caulking portions and grooves.

• For the bush pressing in for the second time

and onwards, press in the bush facing its
notched portion to the clutch housing.

3. Install the main shaft assembly, the top gear shaft

assembly and the counter shaft assembly.
a. Tie the main shaft assembly, the counter shaft

assembly and the top gear shaft at the two po-
sitions not to let them come apart using a lash-
ing belt or other belts with a fixing function, and
then fix them securely. Be careful not to drop
the top gear shaft while lifting up.

N7A1101E

N7A0326E

N7A1104E

N7A1105E

7B-34 MANUAL TRANSMISSION

b. Stick up the three of the top gear shaft assem-

bly, the main gear shaft assembly and the
counter shaft assembly on the support stand as
the top gear shaft assembly is put on the top.

c. Install the oil seal protector 5-8840-2793-0 to

the main shaft.

d. Set the top gear shaft bearing outer snap ring

to the clutch housing, spread it using a snap
ring pliers, and then insert it to the clutch hous-
ing after aligning the top gear shaft, the counter
shaft and the shift rod positions.

Caution:

• Make sure the snap ring is installed securely.
• Work carefully not to damage the front oil seal.

4. Install the magnet to the clutch housing.
5. Install the 5th relay lever to the clutch housing.

Tighten:
5th relay lever to 44 N

⋅m (4.5 kg⋅m / 34 lb⋅ft)

6. When replacing the 4th-5th shift arm bush with a

new one after checking it for wear or damage,
press fit the bush using the installer 5-8840-2755-
0.

7. When replacing the 2nd-3rd shift arm bush with a

new one after checking it for wear or damage,
press in the bush using the installer 5-8840-2755-
0.

• Press it taking care of the direction and angle of the

shift arm bush, caulk the three portions except the
bush cut and older caulking portions.

N7A1095E

N7A0329E

N7A1108E

N7A1109E

MANUAL TRANSMISSION 7B-35

8. Install the 4th-5th shift arm (7), the 1st-reverse shift

block (5), the 2nd-3rd shift arm (4), the 1st-reverse
shift arm (2), and the 1st-reverse and 2nd-3rd shift
rod (1).

• Drive the spring pin (3) and (6) using a hammer

after aligning the spring pin hole.

• When pressing in the spring pin, put a round

pole on the opposite side of the shift rod not to
damage other parts, and then press in the
spring pin.

9. Install the 4th-5th sub shift block (3), 4th-5th main

shift block (2), 4th-5th shift rod (1).

• Drive in the spring pin (4) and (5) using a ham-

mer after aligning the spring pin hole.

• When pressing in the spring pin, put a round

pole on the opposite side of the shift rod not to
damage other parts, and then press in the
spring pin.

N7A0332E

N7A0333E

7B-36 MANUAL TRANSMISSION

10. Apply ThreeBond 1215 to the mating surface of the

transmission case and the clutch housing, and
then install the clutch housing.

• Wipe off moisture and lubricant from the mating

surface, and then apply the bond continuously
with a diameter of 2 mm (0.079 in) or more.

Tighten:
Clutch housing to 46 N

⋅m (4.7 kg⋅m / 34 lb⋅ft)

11. Install the bearing rear outer race to the transmis-

sion case.

12. Install the shim to the counter shaft rear bearing.

a. Shift the position to the neutral.
b. Set the transmission assembly with the clutch

housing faced down.

N7A0334E

N7A1113E

N7A1114E


Content   ..  841  842  843  844   ..