Hyundai Tucson Plug-in Hybrid (2024 year). Manual in english - page 10
 

  Index      Manuals     Hyundai Tucson Plug-in Hybrid (2024 year). Manual in english


Search            copyright infringement  


Content      ..     8      9      10      11     ..


Hyundai Tucson Plug-in Hybrid (2024 year). Manual in english - page 10


Convenience Features

5-62

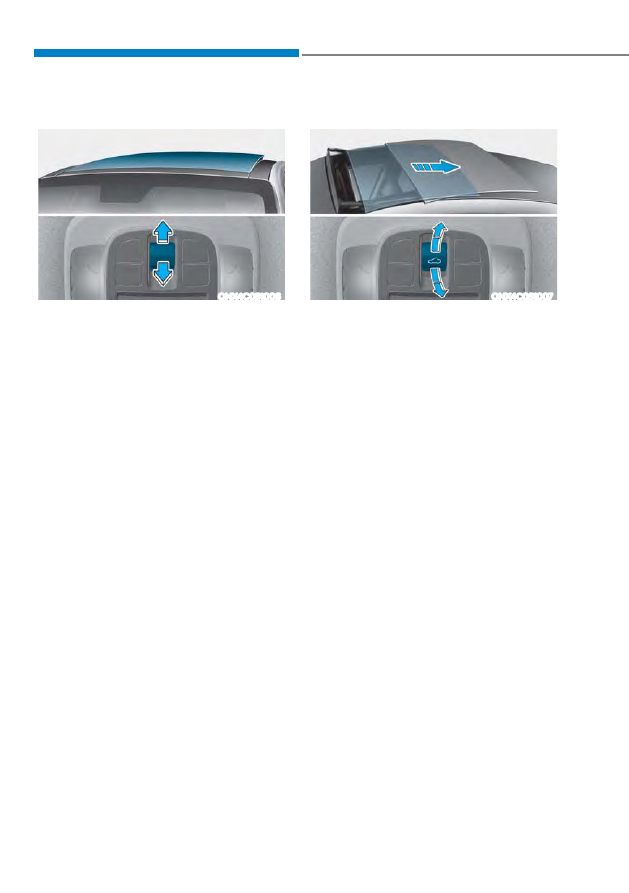
Tilt Open/Close 

ONX4C051006

ś

Push the sunroof switch upward, the 

sunroof glass tilts open. However, if 

the power sunshade is closed, the 

sunshade will open first.

ś

Push the sunroof switch upward 

or forward when the sunroof glass 

is tilt opened, the sunroof glass 

automatically closes. 

To stop the sunroof movement at any 

point, push the sunroof switch in any 

direction.

Slide Open/Close 

ONX4C051007

ś

Push the sunroof switch rearward to 

the first detent position, the sunroof 

glass slides open. However, if the 

power sunshade is closed, the power 

sunshade will open first.
Push the sunroof switch forward to 

the first detent position, the sunroof 

glass closes. However, if the sunroof 

glass is closed, the power sunshade 

will close.

ś

Push the sunroof switch forward or 

rearward to the first detent position, 

the sunroof glass moves until the 

switch is released. 

ś

Push the sunroof switch forward 

or rearward to the second detent 

position, the power sunshade and 

sunroof glass operate automatically 

(auto slide feature). 

To stop the sunroof movement at any 

point, push the sunroof switch in any 

direction.

05

5-63

Automatic Reversal 

ODH043039

If the power sunshade or sunroof glass 

senses any obstacle while it is closing 

automatically, it will reverse direction 

then stop at a certain position.
The auto reverse function may not 

work if an object thin or soft is caught 

between the sliding power sunshade or 

sunroof glass  and sunroof sash.

 WARNING

ś

Make sure heads, hands, arms or 

any other body parts or objects are 

out of the way before operating the 

sunroof. Body parts or objects may 

get caught causing injuries or vehicle 

damage.

ś

Never deliberately use your body 

parts to test the automatic reversal 

function. The power sunshade or 

sunroof glass may reverse direction, 

but there is a risk of injury.

NOTICE

ś

Do not continue to push the sunroof 

switch after the sunroof is fully 

opened, closed, or tilted. Damage to 

the sunroof motor could occur.

ś

Continuous operations such as slide 

open/close, tilt open/close, etc. may 

cause the motor or sunroof system to 

malfunction.

ś

Regularly remove any accumulated 

dust on the sunroof rail.

ś

Dust accumulated between the 

sunroof and roof panel can make 

noise open the sunroof and remove 

dust regularly using a clean cloth. 

ś

Do not try to open the sunroof when 

the temperature is below freezing 

or when the sunroof is covered 

with snow or ice. The sunroof may 

not work properly and may break if 

opened by force.

ś

Do not open or drive with the sunroof 

glass open immediately after rain or 

washing the vehicle. Water may wet 

the interior of the vehicle.

ś

Do not extend any luggage outside 

the sunroof while driving. Vehicle 

damage may occur if the vehicle 

suddenly stops.

 WARNING

Do not extend your head, arms, body 

parts or objects outside the sunroof 

while driving. Injuries may occur if the 

vehicle suddenly stops.

Convenience Features

5-64

Resetting the Sunroof 

ONX4E050143

In some circumstances resetting the 

sunroof operation may need to be 

performed. Some instances where 

resetting the sunroof may be required 

include:

ś

When battery terminal (For plug-in 

hybrid vehicle) or battery connector 

(For hybrid vehicle) is either 

disconnected or discharged

ś

When the sunroof fuse is replaced

ś

If the sunroof one-touch AUTO OPEN/

CLOSE operation is not functioning 

properly

Sunroof resetting procedure:
1.  It is recommended to perform the 

reset procedure with the vehicle 

engine running. Start the vehicle in P 

(Park).

2.  Make sure the power sunshade and 

sunroof glass are in the fully closed 

position. If the power sunshade 

and sunroof glass are open, push 

the switch forward until the power 

sunshade and sunroof glass are fully 

closed.

3.  Release the switch when the power 

sunshade and sunroof glass are fully 

closed.

4.  Push the switch forward until the 

power sunshade and  sunroof glass 

move slightly. Then release the switch.

5.  Once again push and hold the sunroof 

switch forward until the power 

sunshade and sunroof glass slide open 

and close. Do not release the switch 

until the operation is completed. 

If you release the switch during 

operation, start the procedure again 

from step 2.

 Information

If the sunroof is not reset when the vehicle 
battery terminal (For plug-in hybrid 
vehicle) or battery connector (For hybrid 
vehicle) is disconnected or discharged, or 
the sunroof fuse is blown, the sunroof may 
not operate normally.

05

5-65

Sunroof Open Warning

ONX4040010 

If the driver turns off the engine
when the sunroof is not fully closed, the 

warning chime will sound for several 

seconds and the sunroof open warning 

will appear on the cluster LCD display.
Close the sunroof securely when leaving 

your vehicle.

 CAUTION

Make sure the sunroof is closed fully 

when leaving your vehicle.
If the sunroof is left open, rain or snow 

may wet the interior of the vehicle. 
Also, leaving the sunroof open when the 

vehicle is unattended may invite theft.

Convenience Features

5-66

EXTERIOR FEATURES

Hood

Opening the hood

ONX4050020 

1.  Park the vehicle and set the parking 

brake.

2.  Pull the release lever to unlatch the 

hood. The hood should pop open 

slightly.

ONX4050021

3.  Go to the front of the vehicle, raise the 

hood slightly, push up the secondary 

hood release lever (1) inside of the 

hood center and lift the hood (2).

ONX4050022

4.  Pull up on the hood support rod.
5.  Install the end of the hood support rod 

into the slot located on the hood (3).

 WARNING

ś

Grasp the hood support rod in the 

area wrapped in rubber when the 

engine is hot. The rubber portion will 

insulate the heat and protect you 

from burn or injury.

ś

The end of the hood support rod 

must be inserted fully into the hood 

slot whenever you inspect the engine 

compartment. This will prevent 

the hood from falling and possibly 

injuring you.

05

5-67

Closing the hood

1.  Before closing the hood, check in and 

around the engine compartment to 

ensure the following:


- Any tools or other loose objects 

are removed from the engine room 

area or hood opening area


- All glove, rags, or other 

combustible material is removed 

from the engine compartment


- All filler caps are tightly and 

correctly installed

2.  Return the hood support rod rod to its 

clip to prevent it from rattling. 

3.  Lower the hood until it is about 30 cm 

(12in.) above the closed position and 

let it drop. Make sure that it locks into 

place. 

4.  Check that the hood has engaged 

properly. If the hood can be raised 

slightly, it is not properly engaged. 

Open it again and close it with a little 

more force. 

 WARNING

ś

Before closing the hood, ensure 

all obstructions are removed from 

around the hood opening.

ś

Always double check to be sure that 

the hood is firmly latched before 

driving away. Check there is no 

hood open warning light or message 

displayed on the instrument cluster. 

Driving with the hood opened may 

cause a total loss of visibility, which 

might result in an accident.

ś

Do not move the vehicle with the 

hood in the raised position, as vision 

is obstructed, which might result in 

an accident, and the hood could fall 

or be damaged.

Liftgate

Opening the liftgate

ONX4H050003 

Make sure the vehicle is in P (Park) and 

set the parking brake.
Then do one of the following:
1.  Unlock all doors with the Door Unlock 

button on your smart key. Press the 

liftgate handle button and open the 

liftgate.

2.  Press and hold the liftgate Open 

button on the smart key to unlock the 

liftgate.  Then press the liftgate handle 

button on the vehicle and open the 

liftgate.

3.  With the Smart Key in your 

possession, press the liftgate handle 

button and open the liftgate.

Convenience Features

5-68

Closing the liftgate

ONX4050024

Lower the liftgate lid and press down 

until it locks. To be sure the liftgate lid is 

securely fastened, always check by trying 

to pull it up again without pressing the 

liftgate handle button.

 WARNING

Always keep the liftgate completely 

closed while the vehicle is in motion. If 

it is left open or ajar, poisonous exhaust 

gases containing carbon monoxide 

(CO) may enter the vehicle and serious 

illness or death may result.

NOTICE

To prevent damage to the liftgate 

support struts and the attached 

hardware, always close the liftgate 

before driving.

 Information

In cold and wet climates, the liftgate lock 
mechanism and the liftgate support struts 
may not operate properly in extreme 
cold temperatures.  Use caution when 
operating the liftgate in sub-zero freezing 
conditions.

 WARNING

ONX4050025

Do not grab or hold on to the liftgate 

support struts at any time.  Damage to 

the liftgate support struts could result.  

Deformation of the liftgate support 

struts may cause vehicle damage and 

personal injury may occur.

 WARNING

ś

NEVER allow anyone to occupy the 

luggage compartment of the vehicle 

at any time. If the liftgate is partially 

or totally latched and the person 

is unable to get out, serious injury 

or death could occur due to lack 

of ventilation, exhaust fumes and 

rapid heat build-up, or because of 

exposure to cold weather conditions. 

The luggage compartment is also 

a highly dangerous location in the 

event of a crash because it is not a 

protected occupant space but is a 

part of the vehicle’s crush zone.

ś

Your vehicle should be kept locked 

and keys should be kept out of 

the reach of children. Parents 

should teach their children about 

the dangers of playing in luggage 

compartments.

05

5-69

Emergency liftgate safety release

ONX4050026

Your vehicle is equipped with the 

emergency liftgate safety release lever 

located on the bottom of the liftgate.
When someone is inadvertently locked 

in the luggage compartment, the liftgate 

can be opened by moving the lever in the 

direction of the arrow and pushing the 

liftgate open.

 WARNING

ś

For emergencies, be fully aware 

of the location of the emergency 

liftgate safety release lever in the 

vehicle and how to open the liftgate 

if you are accidentally locked in the 

luggage compartment.

ś

No one should be allowed to occupy 

the luggage compartment of the 

vehicle at any time. The luggage 

compartment is a very dangerous 

location in the event of a crash.

ś

Use the release lever for 

emergencies only. Use with extreme 

caution, especially while the vehicle 

is in motion.

Power Liftgate (if equipped)

Power liftgate operating conditions

The power liftgate operates when 

the gear is in P (Park) with the engine 

running. However, the power liftgate will 

operate regardless of the gear position 

when the engine is off. Also, the liftgate 

can be opened only when vehicle speed 

is below 1.8 mph (3 km/h).
For safety, before attempting to open or 

close the liftgate, make sure the vehicle 

is in P (Park).

 WARNING

ś

Never leave children or animals 

unattended in your vehicle. Children 

may operate the power liftgate. 

Doing so can result in injury to 

themselves or others and can 

damage the vehicle.

ś


ONX4050084N

Make sure that there are no people 

or objects in the path of the power 

liftgate or smart liftgate prior to 

use. Serious injury, damage to the 

vehicle or damage to surrounding 

objects (for example, walls, ceilings, 

vehicles, etc.) may result if contact 

with the liftgate occurs.

Convenience Features

5-70

NOTICE

ś

Do not close or open the liftgate 

manually. This may cause damage to 

the power liftgate. If it is necessary 

to close or open the liftgate manually 

when battery terminal (For plug-in 

hybrid vehicle) or battery connector 

(For hybrid vehicle) is discharged or 

disconnected, do not apply excessive 

force.

ś

Do not operate the power liftgate 

more than 10 times continuously 

when the engine is not running. Use 

the power liftgate with the engine 

running when the power liftgate is 

used repeatedly to prevent battery 

discharge.

ś

Do not leave the power liftgate open 

for a long period of time. This may 

drain the battery.

ś

Do not apply excessive force when 

the power liftgate is operating. Doing 

so could result in vehicle damage. 

ś


ONX4050025

Do not grab or hold on to the liftgate 

support struts at any time. Damage 

to the liftgate support struts could 

result. Deformation of the liftgate 

support struts may cause vehicle 

damage and personal injury may 

occur.

ś

Do not modify or repair any part 

of the power liftgate by yourself. 

This must be done by an authorized 

HYUNDAI dealer.

ś

Do not operate the power liftgate 

under the following conditions. 

The power liftgate may not operate 

properly. 


-

One side of the vehicle is lifted to 

inspect the vehicle or change a tire


-

Parking on an uneven road such as 

a slope, etc.

ś

Close the liftgate completely and 

lock all doors and liftgate using the 

central door lock button before using 

an automatic car wash. 

ś

Do not spray high pressure water 

directly on the power liftgate outside 

open/close button. The liftgate may 

open unintentionally.

05

5-71

 Information

ś

If the liftgate is not fully closed and 
vehicle speed is at or above 1.8 mph (3 
km/h), a warning will sound 10 times. 
Immediately park the vehicle at a safe 
place, close the liftgate, and check 
that the liftgate open warning on the 
instrument cluster is turned off.

ś

In cold and wet climates, the outside 
power liftgate open/close button may 
not work properly due to freezing 
conditions. If this occurs, remove the 
ice before using the outside power 
liftgate open/close button or use the 
power liftgate open/close button on the 
smart key or the instrument panel.

ś

Operating the power liftgate more 
than 5 times continuously could cause 
damage to the operating motor. If 
this occurs, the power liftgate will not 
operate to prevent the motor from 
overheating. If any of the power liftgate 
buttons are pressed to try to open the 
liftgate, the chime will sound 3 times, 
but the liftgate will remain closed. 
Allow the power liftgate system to cool 
for about 1 minute before operating the 
system again.

Operating the power liftgate

Power liftgate open/close button (Smart 
key, Instrument panel)

ONX4E050144

ONX4050028

When the liftgate is closed, press the 

power liftgate open/close button for 1 

second. The power liftgate opens with a 

warning sound. 
While the liftgate is opening, press the 

button to stop liftgate operation. 
When the power liftgate is opened, press 

and hold the power liftgate open/close 

button to close the liftgate. If you release 

the button while the liftgate is closing, 

power liftgate operation will stop with a 

warning sound for 5 seconds. 
Also, if the smart key is not within 

operation range (approximately 10 

m) from the vehicle, power liftgate 

operation will stop with a warning sound 

for 5 seconds. 

Convenience Features

5-72

Power liftgate open/close button (Outside 
the power liftgate)

ONX4051027N

When the liftgate is closed, press the 

power liftgate open/close button to open 

the liftgate. 
If the vehicle is locked, press the power 

liftgate open/close button with the smart 

key in your possession. 
If the liftgate is unlocked, the liftgate 

will open or close with a warning sound 

when the power liftgate open/close 

button is pressed without carrying the 

smart key.

Power liftgate open/close button (Inside 
the power liftgate)

ONX4E050062R

Press the power liftgate open/close 

button. The liftgate opens or closes with 

a warning sound.  

Automatic reverse 

During power liftgate operation if the 

power liftgate senses any obstacle, 

the liftgate will stop or will fully open. 

The automatic reverse feature may 

not operate properly, or it may operate 

unexpectedly under the following 

circumstances:

ś

The automatic reverse feature may 

not detect the resistance if the 

detected resistance is below a certain 

level, or if the liftgate is almost fully 

closed near the latched position.

ś

The automatic reverse feature may 

operate if a strong impact is applied 

with no obstructions placed.

 WARNING

Never intentionally place any object 

or part of your body in the path of 

the power liftgate to make sure the 

automatic reverse feature operates. 

Serious injury, or damage to the vehicle 

or object may occur.

 Information

The power liftgate may stop operating if 
the automatic reverse feature operates 
more than two times while attempting to 
open or close the liftgate. If this occurs, 
carefully open or close the liftgate 
manually, and then after 30 seconds try to 
operate the power liftgate automatically 
again.

05

5-73

Setting the power liftgate

To use each feature, you must select the 

opening speed or opening height from 

the settings menu. Deselect the settings 

when you do not want to use the feature.  

Power liftgate opening speed

To adjust the power liftgate speed, select 

œ8VHU6HWWLQJVƟ'RRU/LIWJDWHƟ3RZHU
/LIWJDWH2SHQLQJ6SHHGƟ)DVW6ORZŔ
LQWKHLQVWUXPHQWFOXVWHURUœ6HWXSƟ
9HKLFOH6HWWLQJVƟ'RRU/LIWJDWHƟ3RZHU
/LIWJDWH2SHQLQJ6SHHGƟ)DVW6ORZŔLQ

the infotainment system. (Default setting 

is ‘Fast’)

Power liftgate opening height

To adjust the power liftgate opening 

KHLJKWVHOHFWœ8VHU6HWWLQJVƟ'RRU
/LIWJDWHƟ3RZHU/LIWJDWH2SHQLQJ+HLJKW
Ɵ)XOO2SHQ/HYHO/HYHO/HYHO8VHU

Height Setting’ in the instrument cluster 

RUœ6HWXSƟ9HKLFOH6HWWLQJVƟ'RRU
/LIWJDWHƟ3RZHU/LIWJDWH2SHQLQJ+HLJKW
Ɵ)XOO2SHQ/HYHO/HYHO/HYHO

User Height Setting’ in the infotainment 

system.

The infotainment system may change 

after updates. For detailed information 

on system settings, See additional 

information in supplied Infotainment 

Manual. 

User height setting

1.  Position the liftgate manually to the 

height you prefer.

2.  Press the power liftgate open/close 

button located inside the liftgate for 

more than 3 seconds. 
If ‘User Height Setting’ is selected for 

the power liftgate opening height, the 

power liftgate will automatically open 

to the height manually set by you.

 Information

ś

If the power liftgate opening height 
has not been manually set, the power 
liftgate will fully open when ‘User 
Height Setting’ from the infotainment 
system is selected.

ś

If one of the height setting (Full Open/
Level 3/Level 2/Level 1) is selected from 
the settings menu in the infotainment 
system, and then ‘User Height Setting’ 
is selected, the liftgate will open to the 
height manually set by you.

ś

The power liftgate opening speed 
and opening height settings change 
according to the linked User Profile. 
If the User Profile is changed, power 
liftgate opening speed and opening 
height settings will change accordingly.

Convenience Features

5-74

Resetting the power liftgate

In some circumstances resetting the 

power liftgate operation may need to 

be performed. Some instances where 

resetting the power liftgate may be 

required include:

ś

When the 12-volt battery is recharged 

ś

When the 12-volt battery is reinstalled 

after removal or replacement (for 

Plug-in Hybrid vehicle)

ś

When the related fuse is reinstalled 

after removal or replacement

ONX4E050145

1.  With the engine off or running, put the 

gear in P (Park).

2.  Press the power liftgate open/close 

inner button (B) and outer button (A) 

simultaneously until a chime sounds.

3.  Slowly close the liftgate manually.
4.  Press the power liftgate open/close 

outer button. The power liftgate will 

open with a chime sound.
Wait until the liftgate fully opens to 

complete resetting. If the liftgate 

stops before it is fully open, resetting 

cannot be completed. 

 Information

If the power liftgate does not operate 
properly after the above procedure, have 
the system inspected by an authorized 
HYUNDAI dealer.

Emergency liftgate safety release

ONX4E050059R

To unlock and open the liftgate manually 

from inside the luggage compartment, 

perform the following procedure:
1.  Insert a long, flat object, such as a key 

into the opening at the bottom of the 

liftgate. 

2.  Slide the latch in the direction of the 

arrow to unlock the liftgate.

3.  Push the liftgate to open.

 WARNING

ś

For emergencies, be fully aware 

of the location of the emergency 

liftgate safety release latch in the 

vehicle and how to open the liftgate 

if you are accidentally locked in the 

luggage compartment.

ś

No one, including animals, should 

be allowed to occupy the luggage 

compartment of the vehicle at any 

time. The luggage compartment is a 

very dangerous location in the event 

of an accident.

ś

Use the release latch for 

emergencies only. Use extreme 

caution, especially while the vehicle 

is in motion.

05

5-75

Smart Liftgate (if equipped)

ONX4050031

On a vehicle equipped with a smart key, 

the liftgate can be opened with hands-

free activation using the smart liftgate 

system.

Using smart liftgate

The hands-free smart liftgate system 

can be opened automatically when the 

following conditions are met:

ś

The smart liftgate option is enabled in 

the Settings menu in the infotainment 

system screen.

ś

The smart liftgate is activated and 

ready 15 seconds after all the doors 

are closed and locked.

ś

The smart liftgate will open when 

the smart key is detected in the area 

behind the vehicle for 3 seconds.

 Information

The smart liftgate will NOT operate when:

ś

A door is not locked or closed.

ś

The smart key is detected within 
15 seconds from when the doors were 
closed and locked.

ś

The smart key is detected within 
15 seconds after the doors are closed 
and locked, and within 60 in. (150 
cm) from the front door handles. (for 
vehicles equipped with Welcome Light).

ś

The smart key is in the vehicle.

1. Settings

To activate the Smart Liftgate, go to 

User Settings Mode and select Smart 

Liftgate on the LCD display.

2.  Detect and Alert

The smart liftgate detecting area 

extends approximately 20-40 in. (50-

100 cm) behind the vehicle. If you are 

positioned in the detecting area and 

are carrying the smart key, the hazard 

warning lights will blink and the chime 

will sound to alert you that the smart 

liftgate will open.

 Information

Do not approach the detecting area if you 
do not want the liftgate to open. If you 
have unintentionally entered the detecting 
area and the hazard warning lights and 
chime starts to operate, move away from 
the area behind the vehicle with the smart 
key. The liftgate will remain closed.

3. Automatic opening

After the hazard warning lights blink 

and the chime sounds 6 times, the 

smart liftgate will open.

Convenience Features

5-76

Deactivating smart liftgate

„

Type A

„

Type B

OTMA050009

OTMA050010

1. Door lock
2. Door unlock
3.  Liftgate open/close (Power liftgate)

If you press any button on the smart key 

during the Detect and Alert stage, the 

smart liftgate will be deactivated.
Make sure to be aware of how to 

deactivate the smart liftgate for 

emergency situations.

ś

If you press the door unlock button 

(2), the smart liftgate will be 

deactivated temporarily. But, if you do 

not open any door for 30 seconds, the 

smart liftgate will be activated again.

ś

If you press the liftgate open button 

(3) for more than 1 second, the liftgate 

opens.

ś

The smart liftgate will still be activated 

if you press the door lock button (1) or 

liftgate open/close button (3) on the 

smart key as long as the smart liftgate 

is not already in the Detect and Alert 

stage.

ś

In case you have deactivated the 

smart liftgate by pressing the smart 

key button and opened a door, the 

smart liftgate can be activated again 

by closing and locking all doors.

Detecting area

ONX4050032

ś

The smart liftgate detecting area 

extends approximately 20-40 in. (50-

100 cm) behind the vehicle. If you are 

positioned in the detecting area and 

are carrying the smart key, the hazard 

warning lights will blink and the chime 

will sound for about 3 seconds to alert 

you that the liftgate will open.

ś

The alert stops once the smart key is 

moved outside of the detecting area 

within the 3 second period.

 Information

ś

Smart liftgate may not operate 
properly if any of the following occur:


-

The smart key is close to a radio 
transmitter such as a radio station or 
an airport which can interfere with 
normal operation of the transmitter.


-

The smart key is near a mobile two 
way radio system or a mobile phone.


-

Another vehicle’s smart key is being 
operated close to your vehicle.

ś

Smart liftgate detecting area may 
change when:


-

The vehicle is parked on an incline 
or slope.


-

One side of the vehicle is raised or 
lowered relative to the opposite side.

05

5-77

Fuel Filler Door (Hybrid vehicle) 

Opening the fuel filler door

ONX4E050033

1.  Turn the engine off.
2.  Ensure driver’s door is unlocked.
3.  Press the rear center edge of the fuel 

filler door.

ONX4H050002

4.  Pull the fuel filler door (1) outward to 

access the fuel tank cap.

5.  To remove the fuel tank cap (2), turn 

it counterclockwise. You may hear a 

hissing noise as the pressure inside 

the tank equalizes.

6.  Place the cap on the fuel filler door.

 Information

The fuel filler door will unlock when 
driver’s door is unlocked.

To unlock fuel filler door:

ś

Press the unlock button on your smart 
key

ś

Press the central door unlock button on 
armrest trim of driver’s door

ś

Pull the driver’s inside door handle 
outward

The fuel filler door will lock when 
driver’s door is locked.

To lock fuel filler door:

ś

Press the lock button on your smart key

ś

Press the Central Door lock button on 
armrest trim of driver’s door


Ã

All doors will automatically lock after 
the vehicle speed exceeds 9 mph. Fuel 
filler door is also locked when vehicle 
speed exceeds 9 mph.

 Information

If the fuel filler door does not open 
because ice has formed around it, tap 
lightly or push on the door to break the 
ice and release the door. Do not pry on the 
door. If necessary, spray around the door 
with an approved deicer fluid (do not use 
radiator antifreeze) or move the vehicle to 
a warm place and allow the ice to melt.

Convenience Features

5-78

Closing the fuel filler door

1.  To install the fuel tank cap, turn it 

clockwise until it “clicks” one time.

2.  Close the fuel filler door until it is 

latched securely.

 Information

To lock the fuel filler door, make sure the 
fuel filler door is completely closed.  Press 
the LOCK button on the remote key or 
smart key to lock your vehicle.  The fuel 
filler door will also lock.

Note that if the fuel filler door is not 
completely closed when the vehicle is 
locked, the fuel filler door will not be 
locked.

 CAUTION

Make sure the fuel filler door is 

completely closed before driving 

through a car wash or operating a high 

pressure spray washer.

 WARNING

Automotive fuel is highly flammable 

and explosive. Failure to follow these 

guidelines may result in SERIOUS 

INJURY or DEATH:

ś

Read and follow all warnings posted 

at the gas station.

ś

Before refueling, note the location 

of the Emergency Fuel Shut-Off, if 

available, at the gas station.

ś

Before touching the fuel nozzle, you 

should eliminate the potential build-

up of static electricity by touching 

a metal part of the vehicle, a safe 

distance away from the fuel filler 

neck, nozzle, or other gas source, 

with your bare hand.

ś

Do not use mobile phones while 

refueling. Electric current and/or 

electronic interference from cellular 

phones can potentially ignite fuel 

vapors and cause a fire.

ś

Do not get back into a vehicle 

once you have begun refueling. 

You can generate a buildup of 

static electricity by touching, 

rubbing or sliding against any item 

or fabric capable of producing 

static electricity. Static electricity 

discharge can ignite fuel vapors 

causing a fire. If you must re-enter 

the vehicle, you should once again 

eliminate potentially dangerous 

static electricity discharge by 

touching a metal part of the vehicle, 

away from the fuel filler neck, nozzle 

or other fuel source, with your bare 

hand.

ś

When using an approved portable 

fuel container, be sure to place the 

container on the ground prior to 

refueling. Static electricity discharge 

from the container can ignite fuel 

vapors causing a fire.
Once refueling has begun, contact 

between your bare hand and the 

vehicle should be maintained until 

the filling is complete.

ś

Use only approved portable plastic 

fuel containers designed to carry and 

store fuel.

ś

When refueling, always shift the 

gear to the P (Park) position, set 

the parking brake, and press the 

Engine Start/Stop button to the 

OFF position. Sparks produced by 

electrical components related to the 

engine can ignite fuel vapors causing 

a fire.

ś

Do not use matches or a lighter and 

do not smoke or leave a lit cigarette 

in your vehicle while at a gas station, 

especially during refueling.

ś

Do not over-fill or top-off your 

vehicle tank, which can cause fuel 

spillage.

05

5-79

ś

If a fire breaks out during refueling, 

leave the vicinity of the vehicle, and 

immediately contact the manager 

of the gas station and then contact 

the local fire department. Follow any 

safety instructions they provide.

ś

If pressurized fuel sprays out, it can 

cover your clothes or skin and thus 

subject you to the risk of fire and 

burns. Always remove the fuel cap 

carefully and slowly. If the cap is 

venting fuel or if you hear a hissing 

sound, wait until the condition stops 

before completely removing the cap.

ś

Always check that the fuel cap is 

installed securely to prevent fuel 

spillage in the event of an accident.

 Information

Make sure to refuel your vehicle according 
to the “Fuel Requirements” section in 
suggested in chapter 1.

NOTICE

ś

Do not spill fuel on the exterior 

surfaces of the vehicle. Any type of 

fuel spilled on painted surfaces may 

damage the paint.

ś

If the fuel filler cap requires 

replacement, use only a genuine 

HYUNDAI cap or the equivalent 

specified for your vehicle. An 

incorrect fuel filler cap can result 

in a serious malfunction of the fuel 

system or emission control system.

Fuel Filler Door (Plug-in hybrid 

vehicle)

Opening the fuel filler door

ONX4EPH051001L

1.  Turn the vehicle completely OFF.  Do 

not leave the vehicle with the ignition 

in the ON position or with the engine 

running.  Doing so may cause the 

check engine light to illuminate.

2.  Push the fuel filler door open button.

NOTICE

If the fuel filler door does not open 

because ice has formed around it, tap 

lightly or push on the lid to break the 

ice and release the lid. Do not pry on the 

lid. If necessary, spray around the lid 

with an approved de-icer fluid (do not 

use radiator anti-freeze) or move the 

vehicle to a warm place and allow the 

ice to melt.

Convenience Features

5-80

OAEPHQ049830L

3.  Wait until the fuel tank is 

depressurized. This message 

may appear in the LCD cluster 

display while the fuel system is 

depressurizing. The fuel door will 

open after a few seconds.

OAEPHQ049832L

NOTICE

ś

It may take up to 20 seconds to open 

fuel filler door.

ś

When the fuel filler door is frozen 

and does not open after 20 seconds 

at freezing temperature, slightly tap 

the fuel filler door and then attempt 

to open it.

ONX4EPH051002L

4.  Pull the fuel filler door (1) out to fully 

open.

5.  To remove the fuel tank cap (2), turn 

it counterclockwise. You may hear a 

hissing noise as the pressure inside 

the tank equalizes. 

6.  Place the cap on the fuel filler door. 

NOTICE

ś

It may take up to 20 seconds to 

unlock fuel filler door.

ś

If the fuel filler door does not open 

because ice has formed around it, 

tap lightly or push on the door to 

break the ice and release the door.

ś

Do not pry on the door. If necessary, 

spray around the door with an 

approved de-icer fluid (do not use 

radiator anti-freeze) or move the 

vehicle to a warm place and allow 

the ice to melt.

05

5-81

 WARNING

ś

Before refueling, be sure to check 

what type of fuel is used for your 

vehicle. If you put diesel fuel into 

a gasoline-powered vehicle or 

gasoline into a diesel-powered 

vehicle, it may affect the fuel system 

and cause serious damage to the 

vehicle.

ś

Add fuel into the fuel tank within 

20 minutes after opening the fuel 

filler door. After 20 minutes, the fuel 

tank may shut off, causing fuel to 

overflow. In this case, re-press the 

fuel filler door opening button.

ś

Do not leave the fuel filler door 

opened for an extended period of 

time. It may discharge the battery.

ś

Close the fuel filler door after fueling 

the vehicle. If you start the vehicle 

with the fuel filler door opened, 

the message, “Check fuel door”, 

illuminates on the LCD display.

ś

Avoid refueling the vehicle while 

charging the (high-voltage) hybrid 

battery. It may cause a fire or an 

explosion due to static electricity.

Closing the fuel filler door

1.  To install the cap, turn it clockwise 

until it “clicks” once. This indicates 

that the cap is securely tightened.

2.  Close the fuel filler lid and push it in 

lightly making sure that it is securely 

closed.

 WARNING

Automotive fuel is highly flammable 

and explosive. Failure to follow these 

guidelines may result in SERIOUS 

INJURY or DEATH:

ś

Read and follow all warnings posted 

at the gas station.

ś

Before refueling, note the location 

of the Emergency Fuel Shut-Off, if 

available, at the gas station.

ś

Before touching the fuel nozzle, you 

should eliminate the potential build-

up of static electricity by touching 

a metal part of the vehicle, a safe 

distance away from the fuel filler 

neck, nozzle, or other gas source, 

with your bare hand.

ś

Do not use mobile phones while 

refueling. Electric current and/or 

electronic interference from cellular 

phones can potentially ignite fuel 

vapors and cause a fire.

ś

Do not get back into a vehicle 

once you have begun refueling. 

You can generate a buildup of 

static electricity by touching, 

rubbing or sliding against any item 

or fabric capable of producing 

static electricity. Static electricity 

discharge can ignite fuel vapors 

causing a fire. If you must re-enter 

the vehicle, you should once again 

eliminate potentially dangerous 

static electricity discharge by 

touching a metal part of the vehicle, 

away from the fuel filler neck, nozzle 

or other fuel source, with your bare 

hand.

Convenience Features

5-82

ś

When using an approved portable 

fuel container, be sure to place the 

container on the ground prior to 

refueling. Static electricity discharge 

from the container can ignite fuel 

vapors causing a fire.
Once refueling has begun, contact 

between your bare hand and the 

vehicle should be maintained until 

the filling is complete.

ś

Use only approved portable plastic 

fuel containers designed to carry and 

store fuel.

ś

When refueling, always shift the 

gear to the P (Park) position, set 

the parking brake, and press the 

Engine Start/Stop button to the 

OFF position. Sparks produced by 

electrical components related to the 

engine can ignite fuel vapors causing 

a fire.

ś

Do not use matches or a lighter and 

do not smoke or leave a lit cigarette 

in your vehicle while at a gas station, 

especially during refueling.

ś

Do not over-fill or top-off your 

vehicle tank, which can cause fuel 

spillage.

ś

If a fire breaks out during refueling, 

leave the vicinity of the vehicle, and 

immediately contact the manager 

of the gas station and then contact 

the local fire department. Follow any 

safety instructions they provide.

ś

If pressurized fuel sprays out, it can 

cover your clothes or skin and thus 

subject you to the risk of fire and 

burns. Always remove the fuel cap 

carefully and slowly. If the cap is 

venting fuel or if you hear a hissing 

sound, wait until the condition stops 

before completely removing the cap.

ś

Always check that the fuel cap is 

installed securely to prevent fuel 

spillage in the event of an accident.

 Information

Make sure to refuel your vehicle according 
to the “Fuel Requirements” section in 
suggested in chapter 1.

NOTICE

ś

Do not spill fuel on the exterior 

surfaces of the vehicle. Any type of 

fuel spilled on painted surfaces may 

damage the paint.

ś

If the fuel filler cap requires 

replacement, use only a genuine 

HYUNDAI cap or the equivalent 

specified for your vehicle. An 

incorrect fuel filler cap can result 

in a serious malfunction of the fuel 

system or emission control system.

 WARNING

In case of using EV drive mode for a 

certain time without running engine, 

EMM (Engine Maintenance Mode) will 

automatically activate by the system to 

protect the fuel system and the engine. 

Therefore, even though if it is possible 

to use EV drive mode with enough 

battery power, the engine may run by 

the system to protect fuel system and 

the engine. If you leave the fuel without 

refueling or using for over 6 months, the 

remained fuel in the fuel system may 

be deteriorated. From this, corrosion 

or blocking problem may occur. It is 

recommended using minimum 40 % of 

remained fuel at least every 6 months 

by selecting Hybrid (CS)mode and 

refuel the vehicle with new fuel.

05

5-83

Emergency fuel filler door release

ONX4EPH051006L

If the fuel filler door does not opendue 

to battery discharge and failure 

ofthe electrical wiring, follow the 

belowprocedure.
1.  Open the tailgate and remove the 

sidetrim upper cover (1).

2.  Pull the emergency handle lightlyin 

the direction of the arrow, the fuelfiller 

door will open. 

If this occurs, open the fuel tank 

cap slowly for the fuel tank may be 

pressurized. If a hissing sound is heard, 

wait until the sound stops, Then, remove 

the fuel tank cap and refuel slowly. 

Refueling quickly may cause the fuel to 

overflow.

 CAUTION

Do not pull the handle excessively, 

otherwise the luggage compartment 

area trim or release handle may be 

damaged.

Convenience Features

5-84

LIGHTING

Exterior Lights

Lighting control

To operate the lights, turn the knob at 

the end of the control lever to one of the 

following positions:

ODN8A059200

1. OFF
2. AUTO headlight
3. Position light
4. Headlight

Daytime Running Light (DRL)

The Daytime Running Lights (DRL) can 

make it easier for others to see the front 

of your vehicle during the day, especially 

after dawn and before sunset. The 

Daytime Running Lights (DRL) should 

be illuminated whenever you are driving 

during daylight hours.  The DRL system 

will be ON when the headlight stalk is 

in the OFF or the AUTO Position (when 

daylight is detected) and the Electronic 

Parking Brake (EPB) is released.

The DRL system will turn off when:

ś

The headlights are ON.

ś

The parking brake is applied.

ś

The vehicle is turned off.

ODN8A059201

AUTO headlight

The position lamp and headlight will 

be turned ON or OFF automatically 

depending on the amount of daylight as 

measured by the ambient light sensor (1) 

at the upper end of the windshield glass.

Even with the AUTO headlight feature 

in operation, it is recommended to 

manually turn ON the headlights when 

driving at night or in a fog, driving in the 

rain, or when you enter dark areas, such 

as tunnels and parking facilities.

NOTICE

ś

Do not cover or spill anything on the 

sensor (1) located at the upper end of 

the windshield glass.

ś

Do not clean the sensor using 

a window cleaner, the cleanser 

may leave a light film which could 

interfere with sensor operation.

ś

If your vehicle has window tint or 

other types of metallic coating on the 

front windshield, the AUTO headlight 

system may not work properly.

05

5-85

ODN8A059202

Position light (

)

The position light, license plate light and 

instrument cluster light are turned ON.

ODN8A059203 

Headlight (

)

The headlight, position light, license 

plate light and instrument cluster light 

are turned ON.

 Information

The ignition switch must be in the ON 
position to turn on the headlight.

High beam operation

ODN8A059205

To turn on the high beam headlight, push 

the lever away from you. The lever will 

return to its original position.
The high beam indicator will light when 

the headlight high beams are switched 

on.
To turn off the high beam headlight, pull 

the lever towards you. The low beams 

will turn on.

ODN8A059204 

To flash the high beam headlight, pull the 

lever towards you, then release the lever. 

The high beams will remain ON as long 

as you hold the lever towards you.

Convenience Features

5-86

Turn signals and lane change signals

ODN8A059207

To signal a turn, push down on the lever 

for a left turn or up for a right turn in 

position (A).
If an indicator stays on and does not flash 

or if it flashes abnormally, one of the turn 

signal bulbs may be burned out and will 

require replacement.

One touch turn signal

To use One Touch Turn Signal push the 

turn signal lever up or down to position 

(B) and then release it.
The lane change signals will blink 3, 5 or 

7 times.
You can enable the One Touch Turn 

Signal function or choose the number 

RIEOLQNLQJE\VHOHFWLQJœ6HWXSƟ8VHU
6HWWLQJVƟ/LJKWVƟ2QH7RXFK7XUQ6LJQDO
Ɵ2IIIODVKHVIODVKHVIODVKHVŔLQWKH

instrument panel LCD cluster.

Battery saver function

The purpose of this feature is to prevent 

the battery from being discharged. 

The system automatically turns off the 

position lamp when the driver turns the 

vehicle off and opens the driver-side 

door.
With this feature, the position lamps will 

turn off automatically if the driver parks 

on the side of road at night.
If necessary, to keep the lamps on when 

the vehicle is turned off, perform the 

following:
However, the position lamps stay ON 

even when the driver-side door is opened 

if the headlight switch is turned to the 

position lamp or AUTO (if equipped) 

position after the engine is turned off.
If necessary, to keep the lamps on 

turn the position lamps OFF and ON 

again using the headlight switch on 

the steering column after the engine is 

turned off.

05

5-87

Headlight delay function 

If you place the ignition switch to the 

ACC position or the OFF position with 

the headlights ON, the headlights (and/

or position lamps) remain on for about 

5 minutes. However, if the driver’s door 

is opened and closed, the headlights 

are turned off after 15 seconds. Also, 

with the vehicle off if the driver’s door is 

opened and closed, the headlights (and/

or position lamps) are turned off after 15 

seconds.
The headlights (and/or position lamps) 

can be turned off by pressing the lock 

button on the smart key twice or turning 

the headlight switch to the OFF or AUTO 

position.
You can enable the headlight delay 

IXQFWLRQE\VHOHFWLQJœ6HWXSƟ8VHU
6HWWLQJVƟ/LJKWVƟ+HDGOLJKW'HOD\

NOTICE

If the driver exits the vehicle through 

another door besides the driver 

door, the battery saver function 

does not operate and the headlight 

delay function does not turn OFF 

automatically.
This may cause the battery to 

discharge. To avoid battery discharge, 

turn OFF the headlights manually from 

the headlight switch before exiting the 

vehicle.

Convenience Features

5-88

+,*+%($0$66,67ǣ+%$Ǥ

ODN8059206

High Beam Assist automatically controls 

the headlights between high beam and 

low beam depending on the detected 

ambient light, such as an oncoming 

vehicle or leading vehicle.

Detecting sensor

ONX4PH071001N

[1] : Front view camera

The front view camera is used as a 

detecting sensor to detect ambient light 

and brightness while driving.
Refer to the picture above for the 

detailed location of the detecting sensor.

NOTICE

Always keep the front view camera in 

good condition to maintain optimal 

performance of High Beam Assist.
For more details on the precautions 

of the front view camera, refer to 

“Forward Collision-Avoidance Assist 

(FCA)” section in chapter 7. 

High Beam Assist Settings

:LWKWKHHQJLQHRQVHOHFWœ/LJKWVƟ+LJK

Beam Assist’ from the Settings menu to 

turn on High Beam Assist and deselect to 

turn off the function.

 WARNING

For your safety, change the Settings 

after parking the vehicle at a safe 

location.

05

5-89

High Beam Assist Operation 

Display and control

ś

After selecting ‘High Beam Assist’ 

in the Settings menu, High Beam 

Assist will operate by following the 

procedure below. 


- Place the headlight switch in 

the AUTO position and push 

the headlight lever towards the 

instrument cluster. The High Beam 

Assist (

) indicator light will 

illuminate on the cluster and the 

function will be enabled.


- When the function is enabled, high 

beam will turn on when vehicle 

speed is above 25 mph (40 km/h). 

When vehicle speed is below 15 

mph (25 km/h), high beam will not 

turn on.


- The High Beam (

) indicator light 

will illuminate on the cluster when 

high beam is on.

ś

When High Beam Assist is operating, 

if the headlight lever or switch is used, 

the function operates as follow: 


- If the headlight lever is pulled 

towards you when the high beam 

is off, the high beam will turn on 

without High Beam Assist canceled. 

When you let go of the headlight 

lever, the lever will move to the 

middle and the high beam will turn 

off.


- If the headlight lever is pulled 

towards you when the high beam is 

on by High Beam Assist, low beam 

will be on and the function will turn 

off.


- If the headlight switch is placed 

from AUTO to another position 

(headlight/position/off), High 

Beam Assist will turn off and the 

corresponding lamp will turn on.

ś

When High Beam Assist is operating, 

high beam switches to low beam if 

any of the following conditions occur:


- When the headlight of an oncoming 

vehicle is detected.


- When the tail lamp of a vehicle in 

front is detected.


- When the headlight or tail lamp of a 

motorcycle or a bicycle is detected.


- When the surrounding ambient light 

is bright enough that high beams 

are not required.


- When streetlights or other lights are 

detected.

 Information

The images and colors in the cluster may 
differ depending on the cluster type or 
theme selected from the cluster.

Convenience Features

5-90

High Beam Assist Malfunction 

and Limitations 

High Beam Assist malfunction 

OTM050218N

When High Beam Assist is not working 

properly, the ‘Check High Beam Assist 

(HBA) system’ warning message 

will appear and   warning light will 

illuminate on the cluster. Have the 

function inspected by an authorized 

HYUNDAI dealer.

Limitations of High Beam Assist

High Beam Assist may not work properly 

in the following situations:

ś

Light from an oncoming or front 

vehicle is not detected because of 

lamp damage, or because it is hidden 

from sight, etc.

ś

Head lamp of an oncoming or front 

vehicle is covered with dust, snow or 

water.

ś

An oncoming or front vehicle’s 

headlights are off but the fog lamps 

are on, etc.

ś

There is a lamp that has a similar 

shape as a vehicle’s lamp.

ś

Headlights have been damaged or not 

repaired properly.

ś

Headlights are not aimed properly.

ś

Driving on a narrow curved road, 

curved road, rough road, uphill or 

downhill.

ś

Vehicle in front is partially visible on a 

crossroad or curved road.

ś

There is a traffic light, reflecting sign, 

flashing sign or mirror ahead.

ś

There is a temporary reflector or flash 

ahead (construction area).

ś

The road conditions are bad such as 

being wet, iced or covered with snow.

ś

A vehicle suddenly appears from a 

curve.

ś

The vehicle is tilted from a flat tire or 

is being towed.

ś

Light from a vehicle is not detected 

because of exhaust fume, smoke, fog, 

snow, etc.

For more details on the limitations 

of the front view camera, refer to 

“Forward Collision-Avoidance Assist 

(FCA)” section in chapter 7. 

 WARNING

ś

At times, High Beam Assist may not 

work properly. It is the responsibility 

of the driver for safe driving 

practices and always check the road 

conditions for your safety.

ś

When High Beam Assist does not 

operate normally, change the 

headlight position manually between 

high beam and low beam.

05

5-91

INTERIOR LIGHTS

 WARNING

Do not use the interior lights when 

driving in the dark. The interior lights 

may obscure your view and cause an 

accident.

NOTICE

Do not use the interior lights for 

extended periods when the vehicle is 

turned off or the battery will discharge.

Interior Lamp AUTO OFF

The interior lamps will automatically go 

off approximately 10 minutes after the 

vehicle is turned off and the doors are 

closed. If a door is opened, the lamp 

will go off 40 minutes after the vehicle 

is turned off. If the doors are locked by 

the smart key and the vehicle enters the 

armed stage of the theft alarm system, 

the lamps will go off five seconds later.

Front lamps

ONX4H050006N

Front room lamp (1) 

 :

Press the button to turn ON the room 

lamp for the front/rear seats.

Front Door Lamp (2) (

):

The front or rear room lamps come on 

when the front or rear doors are opened 

if the engine is running or not. When 

doors are unlocked by the remote key or 

smart key, the front and rear lamps come 

on for approximately 30 seconds as long 

as any door is not opened. The front and 

rear room lamps go out gradually after 

approximately 30 seconds when the 

door is closed. However, if the Engine 

Start/Stop button is in the ON position 

or all doors are locked, the front and rear 

lamps will turn off. If a door is opened 

with the Engine Start/Stop button in the 

ACC position or the OFF position, the 

front and rear lamps stay on for about 20 

minutes.

Front Map Lamp (3):

Press either lenses to turn the map lamp 

on or off. This light produces a spot 

beam for convenient use as a map lamp 

at night or as a personal lamp for the 

driver and the front passenger.

Convenience Features

5-92

Rear Lamps

„

Type A

ODN8059211

„

Type B

OLFP048099

Rear room lamp switch :

Press this button to turn the room lamp 

on and off.

Vanity Mirror Lamp

OTM050200

Push the switch to turn the light on or off.

ś

 :  The lamp will turn on if this 

button is pressed.

ś

 :  The lamp will turn off if this 

button is pressed.

05

5-93

Glove Box Lamp

ONX4050039

The glove box lamp turns on when the 

glove box is opened.

Luggage Compartment Lamp

ONX4050040

ś

OFF : The luggage compartment lamp 

is off. 

ś

ON : The luggage compartment lamp 

stays on at all times.


- It turns on while the liftgate is 

opened, and turns off while closed. 

If the Engine Start/Stop button is 

in OFF position while the liftgate 

opened, the lamp stays on for about 

10 minutes before turns off.   


Content      ..     8      9      10      11     ..