Hyundai Palisade (2024 year). Manual in english - page 17
 

  Index      Manuals     Hyundai Palisade (2024 year). Manual in english


Search            copyright infringement  


Content      ..     15      16      17      18     ..


Hyundai Palisade (2024 year). Manual in english - page 17


7

7-137

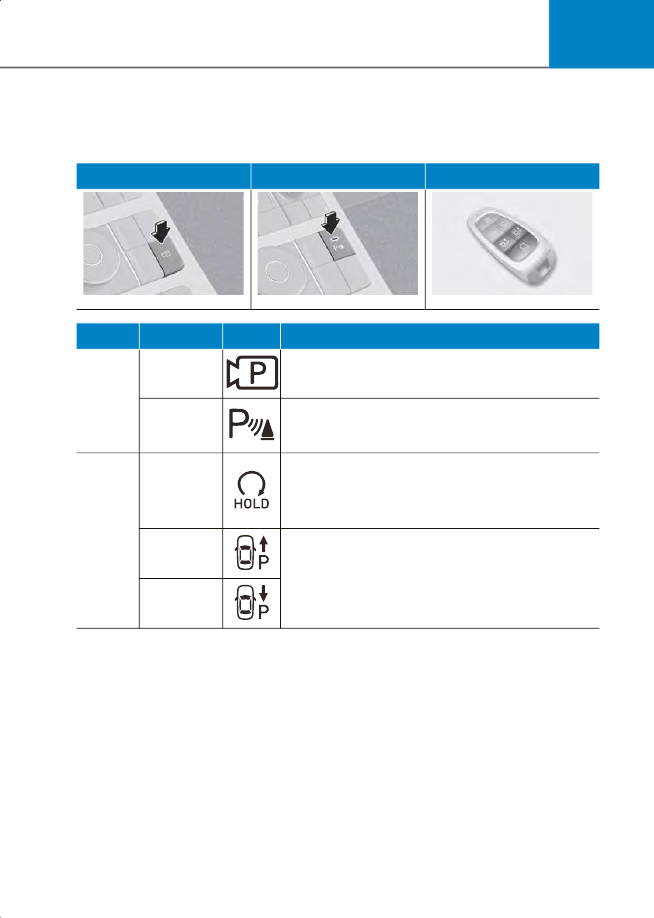
Remote Smart Parking Assist Operation

Remote Smart Parking Assist button

Parking/View button

Parking Safety button

Smart key

B0384KO01

B0376KO01

B0384KO02

Location

Name

Symbol

Description

Inside 

vehicle

Parking/

View button

• Press and hold the Parking/View button to turn on 

Remote Smart Parking Assist. Also, Forward/Reverse 

Parking Distance warning will automatically turn on.

Parking 

Safety 

button

• Press the Parking Safety button while Remote Smart 

Parking Assist is operating to end Remote Smart 

Parking Assist operation.

Smart 

key

Remote 

Start button

• Press the Remote Start button after the door is locked 

with the engine off to start the engine remotely.

• Press the Remote Start button while Remote Smart 

Parking or Remote Operation function is operating to 

end function operation.

Forward 

button

• When using the Remote Operation function, the 

vehicle moves in the direction of the button while the 

button is pressed.

Backward 

button

CarManuals2.com

Driver Assistance System

7-138

Remote Operation

Operating order

Remote Operation operates in the 

following order:
1. Getting ready to remotely move 

forward and backward

2. Remotely moving forward and 

backward

1.

Getting ready to remotely move 

forward and backward

There are two ways to operate Remote 

Operation function.

B0384KO03

Method (1) Using the function with 

engine off
1) Within a certain range from the 

vehicle press the door lock ( ) button 

on the smart key and lock all doors.

2) Press and hold the Remote Start 

button (

) within 4 seconds until the 

engine starts.
• For more details on remotely 

starting the engine, refer to 

Remote Start” section in chapter 

6.

B0384KO04

B0384EU01

Method (2) Using the function with 

engine on
1) Park the vehicle in front of the space 

where you want to use Remote 

Operation function, and shift the gear 

to P (Park).

2) Press and hold the Parking/View 

(

) button to turn on Smart 

Parking Assist. A message ‘Under 

Remote Control’ will appear on the 

infotainment system screen.

3) Get out of the vehicle with the smart 

key and close all doors.

 Information


'Agree' must be selected on the 

infotainment system screen and the 

infotainment system has to operate 

properly to use Remote Operation 

function.


CarManuals2.com

7

7-139

2.

Remotely moving forward and 

backward

B0384KO06

1) Press and hold one of the Forward 

(

) or Backward (

) button on the 

smart key.
• Remote Smart Parking Assist will 

automatically control the steering 

wheel, vehicle speed and gearshift. 

The vehicle will move in the 

direction of the button pressed.

• While Remote Operation function 

is operating, if the you let the 

button, the vehicle will stop and 

function control will pause. The 

function will start operating again 

when the button is pressed and 

held again.

2) Hold down the Forward (

) or 

Backward (

) button until the 

vehicle reaches the target location.

3) When Remote Operation is done, get 

in the vehicle with the smart key or 
press the Remote Start (

) button 

on the smart key from outside the 

vehicle.
• The message will appear on the 

infotainment system screen. The 

vehicle will automatically shift to P 

(Park) and engage the parking 

brake.

• When the Remote Start (

) button 

is pressed, the vehicle will turn off. 

If the driver is in the vehicle, the 

vehicle will retain ON position.

 Information


• Remote Operation can control the 

vehicle remotely using the smart key 

outside the vehicle.

• Check that all smart keys are outside 

the vehicle when using Remote 

Operation function.

• Remote Operation function will operate 

only when the smart key is within 13 ft. 

(4 m) from the vehicle. If there is no 

vehicle movement even when the 

Forward or Backward button is pressed 

on the smart key, check the distance to 

the vehicle and press the button again.

• The detecting range of the smart key 

may vary depending on the 

surroundings that are affected by radio 

waves such as transmission tower, 

broadcast station, etc.

• When remotely moving forward using 

method (1), it is recognized as an exit 

situation, and the vehicle moves 13 ft. (4 

m) to check for pedestrians, animals or 

objects around the vehicle. After 

confirmation, the steering wheel is 

controlled according to the condition 

ahead.

• When remotely moving forward using 

method (2), it is recognized as a parking 

situation, and will immediately control 

the steering wheel according to the 

condition ahead to assist with entering 

the parking space and aligning the 

vehicle. However, performance may 

reduce depending on the pedestrians, 

animals, shape of objects, location, 

etc., around the vehicle.

• For moving remotely backward, both 

method (1) and (2) aligns the steering 

wheel first, and then will only move the 

vehicle straight.


CarManuals2.com

Driver Assistance System

7-140


WARNING


• When using Remote Operation 

function, make sure that all passengers 

have gotten out of the vehicle.

• If the vehicle’s battery is discharged or 

Remote Smart Parking Assist 

malfunctions when parked in a narrow 

parking space, Remote Operation 

function will not operate. Always park 

your vehicle in a space wide enough for 

you to get in or out of your vehicle.

• Please note that depending on the 

parking space, you may not be able to 

exit from the space you have entered 

by using Remote Operation function.

• After parking, the surrounding may 

change due to the movement of 

surrounding vehicles. If this occurs, 

Remote Operation function may not 

operate.

• Before leaving the vehicle, close 

windows and sunroofs, and make sure 

the engine is off before locking the 

doors.


Remote Operation function operation 

status

 Information


• Operation status by the hazard warning 

light may not be applicable based on 

the regulation of your state.

• If the smart key is not within the 

operating range from the vehicle 

(approximately 13 ft. (4m)), the smart 

key LED will not illuminate or blink. Use 

the smart key within the operating 

range.


Operation 

status

Smart key LED

Hazard 

warning 

light

Under 

control

Green LED 

continuously 

blinks

-

Pause

Red LED 

continuously 

blinks

Blinks

Off

Red LED 

illuminates for 

4 seconds and 

then turns off

Blinks 3 

times and 

turns off

Complete

Green LED 

illuminates for 

4 seconds and 

then turns off

Blinks 1 

time and 

turns off

CarManuals2.com

7

7-141

How to turn off Remote Operation function 

while operating

• Press the Parking/View (

) button 

while the infotainment system screen 

guides the driver using method 2.

• Shift the gear from P (Park) to any other 

position while the infotainment system 

screen guides the driver using method 

2.

• Press the Parking Safety ( ) button or 

select ‘Cancel’ on the infotainment 

system screen.

• Press the Remote Start (

) button on 

the smart key while the vehicle is being 

controlled by Remote Operation 

function. Remote Operation function 

will turn off. At this time, the engine will 

turn off.

• Get on the vehicle with the smart key. 

Remote Operation function will turn 

off. At this time, the engine will remain 

on.

The function will pause in the following 

conditions when:

• There is a pedestrian, animal or object 

in the direction the vehicle is moving

• The door or liftgate is open

• The Forward (

) or Backward (

button is not continuously pressed

• Simultaneously pressing multiple 

buttons on a smart key

• The smart key is not operated within 13 

ft. (4 m) from the vehicle

• Button of another smart key is pressed 

in addition to the operating smart key

• Rear Cross-Traffic Collision-Avoidance 

Assist operates while the vehicle is 

being controlled in the reverse 

direction.

• The vehicle moves 22 ft. (7 m) while the 

smart key is pressed with Remote 

Operation function (maximum travel 

distance per button press)

The function will cancel in the following 

conditions when:

When Remote Operation function is 

canceled, the vehicle will automatically 

stop, shift the gear to P (Park) and engage 

EPB (Electronic Parking Brake).
• The steering wheel is steered
• The gear is shifted while the vehicle is 

moving

• Operating EPB while the vehicle is 

moving

• The engine hood is open
• The brake pedal or accelerator pedal is 

depressed when all the doors are 

closed

• The smart key is outside the vehicle 

when the brake pedal is depressed 

while the driver's door is open

• Rapid acceleration occurs
• Vehicle skid occurs
• The wheel is stuck by an obstacle and 

cannot move

• Approximately 3 minutes and 50 

seconds has passed after Remote 

Operation function has started to 

operate

• The slope of the road exceeds the 

operational range

• The function is paused for more than 1 

minute

• The total travel distance of the vehicle 

has exceeded 45 ft. (14 m) after Remote 

Operation function operation

• The steering wheel, gearshift, braking, 

and drive controls are not working 

properly

• There is a problem with the smart key or 

the smart key battery is low

• ABS, TCS or ESC system operates due 

to slippery road conditions

• The alarm of the Theft Alarm System 

sounds

CarManuals2.com

Driver Assistance System

7-142

Remote Smart Parking Assist 

Malfunction and Limitations

Remote Smart Parking Assist 

malfunction

B0387EU01

Remote Smart Parking Assist check

When Remote Smart Parking Assist is not 

working properly, the ‘Check Parking 

Assist’ warning message will appear on 

the infotainment system screen. If the 

message appears, stop using Remote 

Smart Parking Assist, and have the 

vehicle inspected by an authorized 

HYUNDAI dealer.

B0387EU02

Remote Smart Parking Assist canceled

When Remote Parking Assist is operating, 

the function can be canceled, and the 

‘Parking Assist Canceled’ warning 

message may appear regardless of the 

parking order. Other messages may 

appear depending on the situations. 

Follow the instructions provided on the 

infotainment system screen while parking 

your vehicle with Remote Parking Assist. 

Always look around and pay attention 

when using Remote Smart Parking Assist.

B0387EU03

Remote Smart Parking Assist standby

‘Parking Assist Conditions Not Met’ 

message appears when Parking/View 

(

) button has been pressed and held 

while Remote Smart Parking Assist is in 

standby.
After a while, press and hold the 

Parking/View (

) button again to see if 

Remote Smart Parking Assist works.
The message appears even when the 

smart key's battery is low. Check the 

smart key battery level.

CarManuals2.com

7

7-143

Limitations of Remote Smart Parking 

Assist

In the following circumstances, Remote 

Smart Parking Assist performance to park 

or exit the vehicle may be limited, there 

may be a risk of collision, or Remote 

Smart Parking Assist may turn off. Park or 

exit the vehicle manually if necessary.
• An object is attached to the steering 

wheel

• The vehicle is installed with a snow 

chain, spare tire or different size wheel

• Tire pressure is lower or higher than the 

standard tire pressure

• Your vehicle is loaded with cargo longer 

or wider than your vehicle or a trailer is 

connected to your vehicle

• There is a problem with the wheel 

alignment

• Your vehicle is leaned severely to one 

side

• Your vehicle is equipped with a trailer 

hitch

• The license plate is installed differently 

from the original location

• There is a person, animal or object 

above or below the ultrasonic sensor 

when Remote Smart Parking Assist is 

activated

• The parking space is curved or diagonal
• There is an obstacle such as a person, 

animal or object (trash can, bicycle, 

motorcycle, shopping cart, narrow 

pillar, etc.) near the parking space

• There is a circular pillar or narrow pillar, 

or a pillar surrounded by objects such 

as fire extinguisher, etc., near the 

parking space

• The road surface is bumpy (curbstone, 

speed bump, etc.)

• The road is slippery
• The parking space is near a vehicle with 

higher ground clearance or big, such as 

a truck, etc.

• The parking space is Inclined

• There is heavy wind
• Operating Remote Smart Parking Assist 

on uneven roads, gravel roads, bushes, 

etc.

• The performance of the ultrasonic 

sensor is affected by extremely hot or 

cold weather

• The ultrasonic sensor is covered with 

snow or water

• An object that generates ultrasonic 

waves is nearby

• A wireless device with a transmission 

function operates near the ultrasonic 

sensors

• Your vehicle is affected by another 

vehicle’s Parking Distance Warning

• The sensor is mounted or positioned 

incorrectly by an impact to the bumper

• When the ultrasonic sensor cannot 

detect the following objects:
- Sharp or slim objects, such as ropes, 

chains or small poles

- Objects smaller than 40 in. (100 cm) 

in length and narrower than 6 in. (14 

cm) in diameter

- Objects which tend to absorb sensor 

frequency, such as clothes, spongy 

material or snow

- A narrow object such as a corner of a 

square pillar

- Person, animal or object near the 

ultrasonic sensor

CarManuals2.com

Driver Assistance System

7-144

Remote Smart Parking Assist may not 

operate properly under the following 

circumstances:
• Parking on inclines

B0387KO12

Park manually when parking on 

inclines.

• Parking on uneven road

B0387KO13

Remote Smart Parking Assist may 

cancel when the vehicle slips, or the 

vehicle cannot move due to road 

conditions such as pebbles or 

fragmented stones.

• Parking behind a truck

B0387KO14

Do not use Remote Smart Parking 

Assist around vehicles with higher 

ground clearance, such as a bus, truck, 

etc. It may lead to an accident.

• Parking near a pillar

B0387KO15

Remote Smart Parking Assist 

performance may reduce or collision 

with an obstacle may occur when there 

is a narrow object, circular pillar, square 

pillar, or a pillar surrounded by objects 

such as a fire extinguisher, etc., near 

the parking space. The driver should 

park the vehicle manually.

CarManuals2.com

7

7-145

• Parking in a parking space with a 

vehicle on one side only

B0387KO16

If Remote Smart Parking Assist is used, 

when parking in a parking space with a 

vehicle only on one side, your vehicle 

may cross the parking line to avoid the 

parked vehicle.

• Parking diagonal

B0387KO17

Remote Operation may not operate 

provide properly in a diagonal parking 

space.

• Parking in snow

B0387KO19

Snow may interfere with sensor 

operation, or Remote Smart Parking 

Assist may cancel if the road is slippery 

while parking.


WARNING


Take the following precautions when 

using Remote Smart Parking Assist:
• The driver is responsible for safe 

parking and exit when using Remote 

Smart Parking Assist.

• When using Remote Smart Parking 

Assist, stay out of the way in the 

direction the vehicle moves for your 

safety.

• Always check surroundings when using 

Remote Smart Parking Assist. You may 

collide with pedestrians, animals, or 

objects if they are near the sensor or are 

in the sensor’s blind spot area.

• A collision may occur if a pedestrian, 

animal, or object suddenly appears 

while Remote Smart Parking Assist is 

operating.

• Do not use Remote Smart Parking 

Assist when under the influence of 

alcohol.

• Do not let children or other people to 

use the smart key.

• If Remote Smart Parking Assist is used 

continuously for a long period, it may 

adversely affect Remote Smart Parking 

Assist performance.

CarManuals2.com

Driver Assistance System

7-146

• Remote Smart Parking Assist may not 

operate properly if the vehicle needs 

wheel alignment adjustment such as 

when the vehicle tilts to one side. Have 

the vehicle inspected by an authorized 

HYUNDAI dealer.

• Noise may be heard when braking 

occurs by Remote Smart Parking Assist 

or when the brake pedal is depressed 

by the driver.

• Remote Smart Parking Assist may 

suddenly apply the brake to avoid 

collision.

• Use Remote Smart Parking Assist only 

in a parking space that is large enough 

for the vehicle to move safely.


NOTICE


• If the 3rd stage warning (continuous 

beep) of the Forward/Reverse Parking 

Distance Warning sounds while 

Remote Smart Parking Assist is 

operating, it means the obstacle 

detected is close to your vehicle. At this 

time, Remote Smart Parking Assist will 

temporarily stop operating. Make sure 

there are no pedestrians, animals, or 

objects around your vehicle.

• Depending on brake operation, the 

stop lights may come on while the 

vehicle is moving.

• If the vehicle is remotely started that 

has been parked in cold weather for a 

long time, the operation of Remote 

Smart Parking function may be delayed 

or canceled depending on vehicle 

condition.


CarManuals2.com

7

7-147

Declaration Of 

if equipped

Conformity

Front Radar

The radio frequency components 

complies:
• For USA

OANATEL342

• For Canada

OANATEL343

CarManuals2.com

Driver Assistance System

7-148

Front Corner Radar/Rear 

Corner Radar

The radio frequency components 

complies:
• For USA

OANATEL424

• For Canada

OANATEL425

CarManuals2.com

8

8.  Emergency Situations

Hazard Warning Flasher..................................................................................................8-2
In Case Of An Emergency While Driving........................................................................8-2

If the Engine Stalls While Driving................................................................................8-2
If the Engine Stalls at a Crossroad or Crossing..........................................................8-2
If You Have a Flat Tire While Driving ..........................................................................8-3

If The Engine Will Not Start.............................................................................................8-3
Jump Starting ..................................................................................................................8-4
If The Engine Overheats..................................................................................................8-7
Tire Pressure Monitoring System (TPMS) ......................................................................8-8

Check Tire Pressure .....................................................................................................8-9
Tire Pressure Monitoring System................................................................................8-9
Low Tire Pressure Indicator....................................................................................... 8-10
TPMS (Tire Pressure Monitoring System) malfunction indicator ............................ 8-11
Changing a Tire with TPMS ........................................................................................8-12

If You Have A Flat Tire (With Spare Tire)...................................................................... 8-13

Jack and Tools............................................................................................................ 8-14
Removing and Storing the Spare Tire....................................................................... 8-14
Changing Tires ........................................................................................................... 8-15
Jack Label................................................................................................................... 8-19

Towing............................................................................................................................8-20

Towing Service...........................................................................................................8-20
Removable Towing Hook ...........................................................................................8-21
Emergency Towing ....................................................................................................8-22

CarManuals2.com

Emergency Situations

8-2

Hazard Warning Flasher

B0389KO01

The hazard warning flasher serves as a 

warning to other drivers to exercise 

extreme caution when approaching, 

overtaking, or passing your vehicle.
It should be used whenever emergency 

repairs are being made or when the 

vehicle is stopped near the edge of a 

roadway.
To turn the hazard warning flasher on or 

off, press the hazard warning flasher 

button with the ignition switch or Engine 

Start/Stop button in any position. The 

hazard warning flasher button is located 

in the center fascia panel. All turn signal 

lights will flash simultaneously.
• The hazard warning flasher operates 

regardless of whether your vehicle is 

running or not.

• The turn signals do not work when the 

hazard flasher is on.

In Case Of An Emergency 

While Driving

If the Engine Stalls While 

Driving

• Reduce your speed gradually, keeping 

a straight line. Move cautiously off the 

road to a safe place.

• Turn on your hazard warning flasher.
• Try to start the engine again. If your 

vehicle will not start, contact an 

authorized HYUNDAI dealer or seek 

other qualified assistance.

If the Engine Stalls at a 

Crossroad or Crossing

If the engine stalls at a crossroads or 

crossing, if safe to do so, shift the gear to 

N (Neutral) and then push the vehicle to a 

safe location.

CarManuals2.com

8

8-3

If You Have a Flat Tire While 

Driving

If a tire goes flat while you are driving:
• Take your foot off the accelerator pedal 

and let the vehicle slow down while 

driving straight ahead. Do not apply the 

brakes immediately or attempt to pull 

off the road as this may cause loss of 

vehicle control resulting in an accident. 

When the vehicle has slowed to such a 

speed that it is safe to do so, brake 

carefully and pull off the road. Drive off 

the road as far as possible and park on 

firm, level ground. If you are on a 

divided highway, do not park in the 

median area between the two traffic 

lanes.

• When the vehicle is stopped, press the 

hazard warning flasher button, shift the 

gear to P (Park), apply the parking 

brake, and place ignition switch to the 

LOCK/OFF position.

• Have all passengers get out of the 

vehicle. Be sure they all get out on the 

side of the vehicle that is away from 

traffic.

• When changing a flat tire, follow the 

instructions provided later in this 

chapter.

If The Engine Will Not 

Start

• Be sure to shift the gear to N (Neutral) 

or P (Park). The engine starts only when 

the gear is in N (Neutral) or P (Park).

• Turn on the interior light. If the light 

dims or goes out when you operate the 

starter, the battery is drained.
See instructions for “Jump Starting” 

provided in this chapter.

• Check the fuel level and add fuel if 

necessary.

If the vehicle still does not start, call an 

authorized HYUNDAI dealer for 

assistance.

NOTICE


Push or pull starting the vehicle may 

cause the catalytic converter to overload 

which can lead to damage to the emission 

control system.


CarManuals2.com

Emergency Situations

8-4

Jump Starting

Jump starting can be dangerous if done 

incorrectly. Follow the jump starting 

procedure in this section to avoid serious 

injury or damage to your vehicle. If in 

doubt about how to properly jump start 

your vehicle, we strongly recommend 

that you have a service technician or 

towing service do it for you.


WARNING


To prevent SERIOUS INJURY or DEATH to 

you or bystanders, always follow these 

precautions when working near or 

handling the battery:

D0455KO02

Always read and follow instructions 

carefully when handling a battery.

D0455KO07

Wear eye protection designed to protect 

the eyes from acid splashes.

D0455KO03

Keep all flames, sparks, or smoking 

materials away from the battery.

D0455KO04

Hydrogen is always present in battery 

cells, is highly combustible, and may 

explode if ignited.

D0455KO05

Keep batteries out of reach of children.

D0455KO06

Batteries contain sulfuric acid which is 

highly corrosive. Do not allow acid to 

contact your eyes, skin or clothing.
If acid gets into your eyes, flush your eyes 

with clean water for at least 15 minutes 

and get immediate medical attention. If 

acid gets on your skin, thoroughly wash 

the area. If you feel pain or a burning 

sensation, get medical attention 

immediately.
• When lifting a plastic-cased battery, 

excessive pressure on the case may 

cause battery acid to leak. Lift with a 

battery carrier or with your hands on 

opposite corners.

• Do not attempt to jump start your 

vehicle if your battery is frozen.

• NEVER attempt to recharge the battery 

when the vehicle’s battery cables are 

connected to the battery.

• The electrical ignition system works 

with high voltage.
NEVER touch these components with 

the engine running or when the ignition 

switch or Engine Start/Stop button is in 

the ON position.


CarManuals2.com

8

8-5

Jump starting procedure

1. Position the vehicles close enough that 

the jumper cables will reach, but do not 

allow the vehicles to touch.

2. Avoid fans or any moving parts in the 

engine compartment at all times, even 

when the vehicles are turned off.

3. Turn off all electrical devices such as 

radios, lights, air conditioning, etc. Put 

the vehicles in P (Park) and set the 

parking brake. Turn both vehicles OFF.

4. Open the engine hood.
5. Remove the engine compartment fuse 

box cover.


CAUTION


Before jump starting, make sure to 

correctly identify the positive (+) and 

negative (-) terminals to avoid reverse 

polarity connections.


B0401KO01

6. Connect the jumper cables in the exact 

sequence shown in the illustration. First 

connect one jumper cable to the red, 

positive (+) jumper terminal of your 

vehicle (1).

7. Connect the other end of the jumper 

cable to the red, positive (+) 

battery/jumper terminal of the 

assisting vehicle (2).

8.Connect the second jumper cable to 

the black, negative (-) battery/jumper 

terminal of the assisting vehicle (3).

9. Connect the other end of the second 

jumper cable to the black, negative (-) 

chassis ground of your vehicle (4).
Do not allow the jumper cables to 

contact anything except the correct 

battery or jumper terminals or the 

correct ground. Do not lean over the 

battery when making connections.


WARNING


Do not connect the jumper cable to the 

negative (-) jumper terminal of the 

discharged battery. A spark could 

cause the battery to explode and lead 

to a personal injury or vehicle damage.


CarManuals2.com

Emergency Situations

8-6

10.Start the engine of the assisting vehicle 

and let it run at approximately 2,000 

RPM for a few minutes. Then start your 

vehicle.

11.Keep your vehicle operating for at least 

30 minutes at idle or driving to assure 

your battery receives enough charge to 

be able to start on its own after the 

vehicle is shut off. A completely 

discharged battery may require as long 

as 60 minutes runtime to fully recharge 

it. If the vehicle has run for less, the 

vehicle may not restart.

If your vehicle will not start after a few 

attempts, it probably requires service. In 

this event please seek qualified 

assistance. If the cause of your battery 

discharging is not apparent, have your 

vehicle checked by an authorized 

HYUNDAI dealer.
Disconnect the jumper cables in the exact 

reverse order you connected them:
1. Disconnect the jumper cable from the 

black, negative (-) chassis ground of 

your vehicle (4).

2. Disconnect the other end of the jumper 

cable from the black, negative (-) 

battery/chassis ground of the assisting 

vehicle (3).

3. Disconnect the second jumper cable 

from the red, positive (+) 

battery/jumper terminal of the 

assisting vehicle (2).

4. Disconnect the other end of the jumper 

cable from the red, positive (+) jumper 

terminal of your vehicle (1).

 Information


An inappropriately disposed battery can 

be harmful to the environment and 

human health. Dispose of the battery 

according to your local law(s) or 

regulations.


NOTICE


To prevent damage to your vehicle:
• Only use a 12 V power supply (battery or 

jumper system) to jump start your 

vehicle.

• Do not attempt to jump start your 

vehicle by push-starting.


WARNING


While jump starting your vehicle, avoid 

the positive (+) and negative (-) cables to 

come in contact. A spark could cause 

personal injury.


CarManuals2.com

8

8-7

If The Engine Overheats

If your temperature gauge indicates 

overheating, you experience a loss of 

power, or hear loud pinging or knocking, 

the engine may be overheating. If this 

happens, you should:
1. Pull off the road and stop as soon as it is 

safe to do so.

2. Shift the gear to P (Park) and set the 

parking brake. If the air conditioning is 

ON, turn it OFF.

3. If engine coolant is running out under 

the vehicle or steam is coming out from 

the hood, stop the engine. Do not open 

the hood until the coolant has stopped 

running or the steaming has stopped. If 

there is no visible loss of engine coolant 

and no steam, leave the engine running 

and check to be sure the engine cooling 

fan is operating. If the fan is not 

running, turn the engine off.


WARNING


While the engine is running, keep 

hands, clothing and tools away from 

the moving parts such as the cooling 

fan and drive belt to prevent serious 

injury.


4. Check for coolant leaking from the 

radiator, hoses or under the vehicle. (If 

the air conditioning has been in use, it is 

normal for cold water to be draining 

from it when you stop.)

5. If engine coolant is leaking out, stop the 

engine immediately and call the 

nearest authorized HYUNDAI dealer for 

assistance.


WARNING


Your vehicle is equipped with a 

pressurized coolant reserve tank. 

NEVER remove the radiator cap or the 

drain plug while the engine and radiator 

are HOT.
Hot coolant and steam may blow out 

under pressure, causing serious injury.
Turn the engine off and wait until the 

engine cools down. Use extreme care 

when removing the radiator cap. Wrap 

a towel or thick rag around it, and turn it 

counterclockwise slowly to release 

some of the pressure from the system. 

Step back while the pressure is 

released.
When you are sure all the pressure has 

been released, continue turning the cap 

counter-clockwise to remove it.


CarManuals2.com

Emergency Situations

8-8

6.If you cannot find the cause of the 

overheating, wait until the engine 

temperature has returned to normal. 

Then, if coolant has been lost, carefully 

add coolant to the reservoir to bring the 

fluid level in the reservoir up to the 

halfway mark.

7. Proceed with caution, keeping alert for 

further signs of overheating. If 

overheating happens again, call an 

authorized HYUNDAI dealer for 

assistance.


CAUTION


• Serious loss of coolant indicates a leak 

in the cooling system and have the 

system checked by an authorized 

HYUNDAI dealer.

• When the engine overheats from low 

engine coolant, suddenly adding 

engine coolant may cause cracks in the 

engine. To prevent damage, add engine 

coolant slowly in small quantities. It 

may require several refilling cycles to 

properly fill the engine cooling system. 

If necessary, an authorized HYUNDAI 

dealer should be consulted to perform 

this task.


Tire Pressure Monitoring 

System (TPMS)

B0406KO01

B0404EU02

(1) Low Tire Pressure Telltale/TPMS 

Malfunction Indicator

(2) Low Tire Pressure Position Telltale and 

Tire Pressure Telltale (Shown on the 
LCD display)

CarManuals2.com

8

8-9

Check Tire Pressure

B0091EU12

• You can check the tire pressure in the 

Drive Assist mode on the cluster.
Refer to the “View Modes” section in 

chapter 4.

• Tire pressure is displayed after a few 

minutes of driving after initial vehicle 

start up.

• If tire pressure is not displayed when 

the vehicle is stopped, ‘Drive to display’ 

message will appear. After driving, 

check the tire pressure.

• The displayed tire pressure values may 

differ from those measured with a tire 

pressure gauge.

• You can change the tire pressure unit 

from the Settings menu in the 

infotainment system. Select:
-

Setup

 > 

General

 > 

Units

 > 

Tire 

Pressure Unit

 > 

psi, kpa, bar

 Information


The infotainment system may change 

after software updates. For more 

information, refer to the user’s manual 

provided in the infotainment system and 

the quick reference guide.


Tire Pressure Monitoring 

System


WARNING


Over-inflation or under-inflation can 

reduce tire life, adversely affect vehicle 

handling, and lead to sudden tire failure 

that may cause loss of vehicle control 

resulting in an accident.


Each tire, including the spare (if 

provided), should be checked monthly 

when cold and inflated to the inflation 

pressure recommended by the vehicle 

manufacturer on the vehicle placard or 

tire inflation pressure label. (If your 

vehicle has tires of a different size than 

the size indicated on the vehicle placard 

or tire inflation pressure label, you should 

determine the proper tire inflation 

pressure for those tires.)
As an added safety feature, your vehicle 

has been equipped with a tire pressure 

monitoring system (TPMS) that 

illuminates a Low Tire Pressure Telltale 

when one or more of your tires is 

significantly under-inflated. Accordingly, 

when the Low Tire Pressure Telltale 

illuminates, you should stop and check 

your tires as soon as possible, and inflate 

them to the proper pressure. Driving on a 

significantly under-inflated tire causes 

the tire to overheat and can lead to tire 

failure.
Under-inflation also reduces fuel 

efficiency and tire tread life, and may 

affect the vehicle’s handling and stopping 

ability.
Please note that the TPMS is not a 

substitute for proper tire maintenance, 

and it is the driver’s responsibility to 

maintain correct tire pressure, even if 

under-inflation has not reached the level 

to trigger illumination of the TPMS low 

tire pressure telltale.

CarManuals2.com

Emergency Situations

8-10

Your vehicle has also been equipped with 

a TPMS malfunction indicator to indicate 

when the system is not operating 

properly. The TPMS malfunction indicator 

is combined with the Low Tire Pressure 

Telltale. When the system detects a 

malfunction, the telltale will flash for 

approximately one minute and then 

remain continuously illuminated. This 

sequence will continue upon subsequent 

vehicle start-ups as long as the 

malfunction exists.
When the malfunction indicator is 

illuminated, the system may not be able 

to detect or signal low tire pressure as 

intended. TPMS malfunctions may occur 

for a variety of reasons, including the 

installation of replacement or alternate 

tires or wheels on the vehicle that prevent 

the TPMS from functioning properly.
Always check the TPMS malfunction 

telltale after replacing one or more tires or 

wheels on your vehicle to ensure that the 

replacement or alternate tires and wheels 

allow the TPMS to continue to function 

properly.

NOTICE


If any of the below happens, have the 

system checked by an authorized 

HYUNDAI dealer.
1. The Low Tire Pressure Telltale/ TPMS 

Malfunction Indicator does not 

illuminate for 3 seconds when the 

ignition switch or Engine Start/Stop 

button is placed to the ON position or 

when the engine is running.

2. The TPMS Malfunction Indicator 

remains illuminated after blinking for 

approximately 1 minute.

3. The Low Tire Pressure Position Telltale 

remains illuminated.


Low Tire Pressure Indicator

B0406KO01

B0404EU03

[A] : Low Tire Pressure Warning Light

[B] : Low Tire Pressure Position and Tire Pressure 

Telltale

When the tire pressure monitoring 

system warning indicators are illuminated 

and a warning message displayed on the 

cluster LCD display, one or more of your 

tires is significantly under-inflated. The 

Low Tire Pressure Position Telltale will 

indicate which tire is significantly 

under-inflated by illuminating the 

corresponding position light.
If either telltale illuminates, immediately 

reduce your speed, avoid hard cornering 

and anticipate increased stopping 

distances. You should stop and check 

your tires as soon as possible. Inflate the 

tires to the proper pressure as indicated 

on the vehicle’s placard or tire inflation 

pressure label located on the driver’s side 

center pillar outer panel.

CarManuals2.com

8

8-11

If you cannot reach a service station or if 

the tire cannot hold the newly added air, 

replace the low pressure tire with the 

spare tire.
The Low Tire Pressure LCD position 

indicator will remain on and the TPMS 

Malfunction Indicator may blink for one 

minute and then remain illuminated until 

you have the low pressure tire repaired 

and replaced on the vehicle.


CAUTION


In winter or cold weather, the Low Tire 

Pressure Telltale may be illuminated if the 

tire pressure was adjusted to the 

recommended tire inflation pressure in 

warm weather. It does not mean your 

TPMS is malfunctioning because the 

decreased temperature leads to a 

proportional lowering of tire pressure.
When you drive your vehicle from a warm 

area to a cold area or from a cold area to a 

warm area, or the outside temperature is 

greatly higher or lower, you should check 

the tire inflation pressure and adjust the 

tires to the recommended tire inflation 

pressure.


WARNING


Low pressure damage
Significantly low tire pressure makes the 

vehicle unstable and can contribute to 

loss of vehicle control and increased 

braking distances.
Continued driving on low pressure tires 

can cause the tires to overheat and fail.


TPMS (Tire Pressure 

Monitoring System) 

malfunction indicator

C0087KO11

The TPMS Malfunction Indicator will 

illuminate after it blinks for approximately 

one minute when there is a problem with 

the Tire Pressure Monitoring System.
Have the system checked by an 

authorized HYUNDAI dealer as soon as 

possible.

NOTICE


If there is a malfunction with the TPMS, 

the Low Tire Pressure Position Telltale will 

not be displayed even though the vehicle 

has an under-inflated tire.


NOTICE


The TPMS Malfunction Indicator may 

illuminate after blinking for one minute if 

the vehicle is near electric power supply 

cables or radio transmitters such as police 

stations, government and public offices, 

broadcasting stations, military 

installations, airports, transmitting 

towers, etc.
Additionally, the TPMS Malfunction 

Indicator may illuminate if snow chains 

are used or electronic devices such as 

computers, chargers, remote starters, 

navigation, etc. This may interfere with 

normal operation of the TPMS.


CarManuals2.com

Emergency Situations

8-12

Changing a Tire with TPMS

If you have a flat tire, the Low Tire 

Pressure and Position telltales will come 

on. Have the flat tire repaired by an 

authorized HYUNDAI dealer as soon as 

possible or replace the flat tire with the 

spare tire.

NOTICE


It is recommended that you do not use a 

puncture-repairing agent not approved 

by HYUNDAI dealer or the equivalent 

specified for your vehicle to repair and/or 

inflate a low pressure tire. Tire sealant not 

approved by HYUNDAI dealer or the 

equivalent specified for your vehicle may 

damage the tire pressure sensor.


The spare tire (if equipped) does not 

come with a tire pressure monitoring 

sensor. When the low pressure tire or the 

flat tire is replaced with the spare tire, the 

Low Tire Pressure Telltale will remain on. 

Also, the TPMS Malfunction Indicator will 

illuminate after blinking for one minute if 

the vehicle is driven at speed above 15.5 

mph (25 km/h) for approximately 10 

minutes.
Once the original wheel equipped with a 

tire pressure monitoring sensor is re 

inflated to the recommended pressure 

and reinstalled on the vehicle, the Low 

Tire Pressure Telltale and TPMS 

Malfunction Indicator will go off within a 

few minutes of driving.

If the indicators do not extinguish after a 

few minutes, please visit an authorized 

HYUNDAI dealer.
Each wheel is equipped with a tire 

pressure sensor mounted inside the tire 

behind the valve stem (except for the 

spare tire). You must use TPMS specific 

wheels. It is recommended that you 

always have your tires serviced by an 

authorized HYUNDAI dealer.
You may not be able to identify a tire with 

low pressure by simply looking at it. 

Always use a good quality tire pressure 

gauge to measure. Please note that a tire 

that is hot (from being driven) will have a 

higher pressure measurement than a tire 

that is cold.
A cold tire means the vehicle has been 

sitting for 3 hours and driven for less than 

1 mile (1.6 km) in that 3 hour period.
Allow the tire to cool before measuring 

the inflation pressure. Always be sure the 

tire is cold before inflating to the 

recommended pressure.


WARNING


• The TPMS cannot alert you to severe 

and sudden tire damage caused by 

external factors such as nails or road 

debris.

• If you feel any vehicle instability, 

immediately take your foot off the 

accelerator, apply the brakes gradually 

with light force, and slowly move to a 

safe position off the road.


CarManuals2.com

8

8-13


WARNING


Tampering with, modifying, or disabling 

the Tire Pressure Monitoring System 

(TPMS) components may interfere with 

the system’s ability to warn the driver of 

low tire pressure conditions and/or TPMS 

malfunctions. Tampering with, 

modifying, or disabling the Tire Pressure 

Monitoring System (TPMS) components 

may void the warranty for that portion of 

the vehicle.


WARNING


This device complies with Part 15 of the 

FCC rules.
1. This device may not cause harmful 

interference.

2. This device must accept any 

interference received, including 

interference that may cause undesired 

operation.

3. Changes or modifications not expressly 

approved by the party responsible for 

compliance could void the user’s 

authority to operate the equipment.


If You Have A Flat Tire 

(With Spare Tire)


WARNING


Changing a tire can be dangerous. Follow 

the instructions in this section when 

changing a tire to reduce the risk of 

serious injury or death.


CAUTION


Be careful as you use the jack handle to 

stay clear of the flat end. The flat end has 

sharp edges that could cause cuts.


CarManuals2.com

Emergency Situations

8-14

Jack and Tools

B0413EU01

B0413EU02

(1) Jack handle
(2) Jack
(3) Wheel lug nut wrench
(4) Socket
(5) Screwdriver
(6) Towing hook
The jack, jack handle, wheel lug nut 

wrench and socket are stored in the 

luggage compartment under the 

lug-gage box cover.
The jack is provided for emergency tire 

changing only.

Removing and Storing the 

Spare Tire

B0413EU04

Your spare tire is stored underneath your 

vehicle, directly below the cargo area.
To remove the spare tire:
1. Open the liftgate.
2. Find the plastic hex bolt cover and 

remove the cover with a coin or 

flat-blade screwdriver.

B0413EU05

3. Connect the socket (A) and wheel lug 

nut wrench (B).

4. Loosen the bolt enough to lower the 

spare tire.
Turn the wrench counterclockwise until 

the spare tire reaches the ground.

5. After the spare tire reaches the ground, 

continue to turn the wrench 

counterclockwise, and draw the spare 

tire outside. Never rotate the wrench 

excessively, otherwise the spare tire 

carrier may be damaged.

CarManuals2.com

8

8-15

B0413EU06

6.Draw out the retainer guide (1) through 

the center hole of the spare tire.

To store the spare tire:
1. Lay the tire on the ground with the 

valve stem facing up.

2. Place the wheel under the vehicle and 

install the retainer guide and chain 

through the wheel center.

3. Turn the wrench clockwise until it 

clicks.


CAUTION


Ensure the spare tire retainer guide is 

properly aligned with the center of the 

spare tire to prevent the spare tire from 

“rattling”.
Otherwise, it may cause the spare tire to 

fall off the carrier and lead to an accident.


Changing Tires


WARNING


A vehicle can slip or roll off of a jack 

causing serious injury or death to you or 

those nearby. Take the following safety 

precautions:
• Never place any portion of your body 

under a vehicle that is supported by a 

jack.

• NEVER attempt to change a tire in the 

lane of traffic. ALWAYS move the 

vehicle completely off the road on 

level, firm ground away from traffic 

before trying to change a tire. If you 

cannot find a level, firm place off the 

road, call a towing service for 

assistance.

• Be sure to use the jack provided with 

the vehicle.

• ALWAYS place the jack on the 

designated jacking positions on the 

vehicle and NEVER on the bumpers or 

any other part of the vehicle for jacking 

support.

• Do not start or run the engine while the 

vehicle is on the jack.

• Do not allow anyone to remain in the 

vehicle while it is on the jack.

• Keep children away from the road and 

the vehicle.


CarManuals2.com

Emergency Situations

8-16

Follow these steps to change your 

vehicle’s tire:
1. Park on a level, firm surface.
2. Move the shift button into P (Park), 

apply the parking brake, and place the 

ignition switch or press Engine 

Start/Stop button in the LOCK/OFF 

position.

3. Press the hazard warning flasher 

button.

4. Remove the wheel lug nut wrench, jack, 

jack handle and spare tire from the 

vehicle.

5. Block both the front and rear of the tire 

diagonally opposite of the tire you are 

changing.

B0413EU11

6.Loosen the wheel lug nuts 

counterclockwise one turn each in the 

order shown above, but do not remove 

any lug nuts until the tire has been 

raised off of the ground.

B0413EU12

[A] : Front

[B] : Rear

7. Place the jack at the designated jacking 

position under the frame closest to the 

tire you are changing. The jacking 

positions are plates welded to the 

frame with two notches. Never jack at 

any other position or part of the vehicle. 

Doing so may damage the side seal 

molding or other parts of the vehicle.

B0413EU13

8. Insert the jack handle into the jack and 

turn it clockwise, raising the vehicle 

until the tire clears the ground. Make 

sure the vehicle is stable on the jack.

9. Loosen the lug nuts with the wheel lug 

nut wrench and remove them with your 

fingers. Remove the wheel from the 

studs and lay it flat on the ground out of 

the way. Remove any dirt or debris from 

the studs, mounting surfaces, and 

wheel.

10.Install the spare tire onto the studs of 

the hub.

CarManuals2.com

8

8-17

11.Tighten the lug nuts with your fingers 

onto the studs with the smaller end of 

the lug nuts closest to the wheel.

12.Lower the vehicle to the ground by 

turning the jack handle 

counterclockwise.

B0413EU10

13.Use the wheel lug nut wrench to 

tighten the lug nuts in the order shown. 

Double-check each lug nut until they 

are tight. After changing tires, have an 

authorized HYUNDAI dealer tighten the 

lug nuts to their proper torque as soon 

as possible. 

The wheel lug nut should 

be tightened to 79-94 lbf·ft (11-13 

kgf·m).

If you have a tire gauge, check the tire 

pressure (see “Tires And Wheels” section 

in chapter 2 for tire pressure 

instructions.). If the pressure is lower or 

higher than recommended, drive slowly 

to the nearest service station and adjust it 

to the recommended pressure. Always 

reinstall the valve cap after checking or 

adjusting tire pressure. If the cap is not 

replaced, air may leak from the tire. If you 

lose a valve cap, buy another and install it 

as soon as possible. After changing tires, 

secure the flat tire and return the jack and 

tools to their proper storage locations.

NOTICE


• Check the tire pressure as soon as 

possible after installing a spare tire. 

Adjust it to the recommended pressure.

• Check and tighten the wheel lug nuts 

after driving over 30 mile (50 km) if tires 

are replaced. Recheck the tire wheel 

lug nuts after driving over 600 mile 

(1,000 km).


CAUTION


Your vehicle has metric threads on the 

studs and wheel bolts. Make certain 

during tire changing that the same bolts 

that were removed are reinstalled. If you 

have to replace your wheel bolts make 

sure they have metric threads to avoid 

damaging the studs and ensure the wheel 

is properly secured to the hub. Consult an 

authorized HYUNDAI dealer for 

assistance.


If any of the equipment such as the jack, 

wheel nuts, studs, or other equipment is 

damaged or in poor condition, do not 

attempt to change the tire and call for 

assistance.

CarManuals2.com

Emergency Situations

8-18

Use of compact spare tires

Compact spare tires are designed for 

emergency use only. Drive carefully on 

the compact spare tire and always follow 

the safety precautions.


WARNING


To prevent compact spare tire failure and 

loss of control possibly resulting in an 

accident:
• Use the compact spare tire only in an 

emergency.

• NEVER operate your vehicle over 50 

mph (80 km/h).

• Do not exceed the vehicle’s maximum 

load rating or the load carrying capacity 

shown on the sidewall of the compact 

spare tire.

• Do not use the compact spare tire 

continuously. Repair or replace the 

original tire as soon as possible to avoid 

failure of the compact spare tire.


When driving with the compact spare tire 

mounted to your vehicle:
• Check the tire pressure after installing 

the compact spare tire. The compact 

spare tire should be inflated to 60 psi 

(420 kPa).

• Do not take this vehicle through an 

automatic car wash while the compact 

spare tire is installed.

• Do not use the compact spare tire on 

any other vehicle because this tire has 

been designed especially for your 

vehicle.

• The compact spare tire’s tread life is 

shorter than a regular tire. Inspect your 

compact spare tire regularly and 

replace worn compact spare tires with 

the same size and design, mounted on 

the same wheel.

• Do not use more than one compact 

spare tire at a time.

• Do not tow a trailer while the compact 

spare tire is installed.

NOTICE


When the original tire and wheel are 

repaired and reinstalled on the vehicle, 

the lug nut torque must be set correctly. 

The correct lug nut tightening torque is 

79-94 lbf·ft (11-13 kgf·m).


NOTICE


To prevent damaging the compact spare 

tire and your vehicle:
• Drive slowly enough for the road 

conditions to avoid all hazards, such as 

a potholes or debris.

• Avoid driving over obstacles. The 

compact spare tire diameter is smaller 

than the diameter of a conventional tire 

and reduces the ground clearance 

approximately 1 inch (25 mm).

• Do not use tire chains on the compact 

spare tire. Because of the smaller size, a 

tire chain will not fit properly.

• Do not use the compact spare tire on 

any other wheels, nor should standard 

tires, snow tires, wheel covers or trim 

rings be used with the compact spare 

wheel.

• Do not suddenly accelerate or 

decelerate (0 - 25 mph (0 - 40 km/h)) in 

any driving mode. It may cause leakage 

of transfer oil.


CarManuals2.com

8

8-19

Jack Label

OOS067043

The actual Jack label in the vehicle may differ from the illustration.
For more detailed specifications, refer to the label attached to the jack.
(1) Model Name
(2) Maximum allowable load
(3) When using the jack, set your parking brake.
(4) When using the jack, stop the engine.
(5) Do not get under a vehicle that is supported by a jack.
(6) The designated locations under the frame
(7) When supporting the vehicle, the base plate of jack must be vertical under the lifting 

point.

(8) Shift into Reverse gear on vehicles with manual transmission or shift the gear to the 

P position on vehicles with automatic transmission.

(9) The jack should be used on firm level ground.
(10)Jack manufacture
(11) Production date
(12)Representative company and address

CarManuals2.com

Emergency Situations

8-20

Towing

Towing Service

B0412EU01

B0412EU02

(1) : Dollies
If emergency towing is necessary, we 

recommend having it done by an 

authorized HYUNDAI dealer or a 

commercial tow-truck service. Proper 

lifting and towing procedures are 

necessary to prevent damage to the 

vehicle. The use of wheel dollies or 

flatbed is recommended.
On 2WD vehicles, it is acceptable to tow 

the vehicle with the rear wheels on the 

ground (without dollies) and the front 

wheels off the ground. If any of the loaded 

wheels or suspension components are 

damaged or the vehicle is being towed 

with the front wheels on the ground, use 

a towing dolly under the front wheels.
When being towed by a commercial tow 

truck and wheel dollies are not used, the 

front of the vehicle should always be 

lifted, not the rear.

If your vehicle is an 4WD vehicle, it must 

be towed with a wheel lift and dollies or 

flatbed equipment with all the wheels off 

the ground.

NOTICE


• Do not lift the vehicle by the tow fitting 

or body and chassis parts. Otherwise 

the vehicle may be damaged.

• A 4WD vehicle should never be towed 

with the wheels on the ground. This can 

cause serious damage to the 

transmission or the 4WD system.


CAUTION


• Do not tow the vehicle with the front 

wheels on the ground as this may cause 

damage to the vehicle.

B0412EU03

• Do not tow with sling-type equipment. 

Use wheel lift or flatbed equipment.

B0412EU04


CarManuals2.com


Content      ..     15      16      17      18     ..