Hyundai Palisade (2024 year). Manual in english - page 12
 

  Index      Manuals     Hyundai Palisade (2024 year). Manual in english


Search            copyright infringement  


Content      ..     10      11      12      13     ..


Hyundai Palisade (2024 year). Manual in english - page 12


6

6-49

OJX1069071L

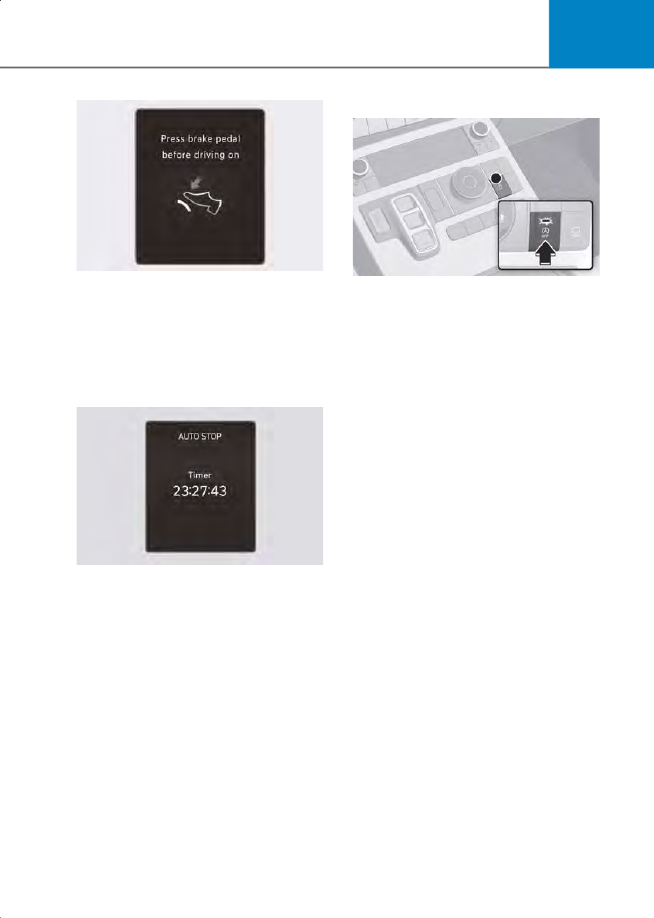
Press brake pedal before driving on

When the gear is shifted from N (Neutral) 

to R (Reverse), D (Drive) or Manual shift 

mode without the brake pedal depressed, 

a message will appear on the cluster LCD 

display. To activate auto start, depress 

the brake pedal.

B0802EU04

AUTO STOP elapsed time

AUTO STOP display shows the elapsed 

time of engine stop by the Idle Stop and 

Go system.
You may check AUTO STOP elapsed time 

in the Utility view on the instrument 

cluster.
To reset the information, press and hold 

the OK button when viewing the AUTO 

STOP. The AUTO STOP elapsed time will 

reset simultaneously. Refer to “View 

Modes” section in chapter 4.

ISG System Off

B0285KO01

Press the ISG OFF button to turn off ISG 

system. The ISG OFF button indicator will 

illuminate. To use the system, press the 

ISG OFF button again.

CarManuals2.com

Driving Your Vehicle

6-50

Forced to Restart Engine

The engine is automatically restarted in 

the following situations.
• The brake vacuum pressure is low
• The engine has stopped for about 5 

minutes

• The air conditioning is ON with the fan 

speed set to a certain high level

• The front defroster is ON
• The battery is weak
• The cooling and heating performance 

of the climate control system is 

unsatisfactory

• The vehicle is shifted to P (Park) or R 

(Reverse)

• The door is opened or the seatbelt is 

unfastened

• The EPB switch is pressed when Auto 

Hold is activated

The Auto Stop ( ) indicator blinks in 

green for 5 seconds on the instrument 

cluster when the engine is restarted.


WARNING


When the engine is in Idle Stop mode, the 

engine may restart without the driver 

taking any action. Before leaving the 

vehicle or working on the engine 

compartment, turn off the engine by 

placing the ignition switch to the 

LOCK/OFF position.


ISG Malfunction

ISG system may not operate when there is 

a malfunction with the ISG sensors or ISG 

system.
The following will occur, when there is a 

malfunction with the ISG system:
• The Auto Stop ( ) indicator will 

illuminate in yellow on the instrument 

cluster.

Contact an authorized HYUNDAI dealer.

Calibrating the Battery Sensor

If the AGM battery is reconnected or 

replaced, ISG system will not operate 

immediately. If you want to use the 

system, the battery sensor needs to be 

calibrated following the below procedure.

B0288KO01

[A] : Battery sensor

1. Turn off the engine.
2. Disconnect all electronic devices that 

were additionally installed after the 

vehicle was delivered, such as 

navigation, dashcam, etc.

3. After 4 hours with the engine off, turn 

the engine on and off 3 to 4 times.

CarManuals2.com

6

6-51

 Information


The ISG system may not operate in the 

following situations.
• There is a malfunction with the ISG 

system.

• The battery is weak.
• The brake vacuum pressure is low.
If this occurs, have the ISG system 

checked by an authorized HYUNDAI 

dealer.


NOTICE


Use only a genuine HYUNDAI ISG battery 

for replacement. If not, the ISG system 

may not properly operate.
Do not recharge the ISG battery with a 

general battery charger. It may damage 

or explode the ISG battery.
Do not remove the battery cap. The 

battery electrolyte, which is harmful to 

the human body, may leak out.


Drive Mode Integrated 

Control System

Selecting Drive Mode

Drive mode may be selected according to 

the driver's preference or road condition.

B0294KO01

B1003EU02

[A] : 2WD

[B] : AWD

Changing Drive Mode

• The mode changes whenever the 

DRIVE MODE selection knob is rotated.

• Press the DRIVE/TERRAIN button to 

change from normal driving mode to 

multi terrain mode. After the button is 

pressed, rotate the knob with in 4 

seconds to select SNOW, MUD or 

SAND. (AWD)

CarManuals2.com

Driving Your Vehicle

6-52

if equipped

ECO mode

btn_WIK-209

ECO mode helps improve fuel efficiency 

for eco-friendly driving.
Fuel efficiency varies according to the 

driver's driving habit and road condition.
• When ECO mode is selected, the ECO 

indicator will illuminate on the 

instrument cluster.

• When ECO mode is activated:

- The acceleration response may be 

slightly reduced if the accelerator 

pedal is depressed moderately.

- The air conditioner performance may 

be limited.

- The shift pattern of the automatic 

transmission may change.

- Engine noise may be louder at some 

automatic transmission shifts as 

down-shift requires pressing down 

more on the accelerator.
The above situations are normal 

conditions when ECO mode is 

activated to help improve fuel 

efficiency.

SPORT mode

btn_WIK-208

SPORT mode provides sporty but firm 

riding.
In SPORT mode, the fuel efficiency may 

decrease.
• When SPORT mode is selected, the 

SPORT indicator will illuminate on the 

instrument cluster.

• Whenever the engine is restarted, the 

drive mode will revert back to 

COMFORT mode. If SPORT mode is 

desired, re-select SPORT mode.

• When SPORT mode is activated:

- The engine RPM will tend to remain 

raised over a certain length of time 

even after releasing the accelerator

- Upshifts are delayed when 

accelerating

NOTICE


In the SPORT mode, the fuel efficiency 

may decrease.


CarManuals2.com

6

6-53

CUSTOM Mode Features

SMART mode

SMART mode selects the proper driving 

mode among SMART ECO, SMART 

COMFORT and SMART SPORT by judging 

the driver's driving habits (for example, 

mild or dynamic) from the brake pedal 

depression or the steering wheel 

operation.

Various driving situations, which you may 

encounter in SMART mode

• The driving mode automatically 

changes to ECO mode after a certain 

period of time, when you gently 

depress the accelerator pedal (Your 

driving is categorized to be mild.).

• The driving mode automatically 

changes from SMART ECO mode to 

SMART COMFORT mode after a certain 

period of time, when you sharply or 

repetitively depress the accelerator 

pedal.

• The driving mode automatically 

changes to SMART COMFORT mode 

with the same driving patterns, when 

the vehicle starts to drive on an upward 

slope of a certain angle. The driving 

mode automatically returns to SMART 

ECO mode, when the vehicle enters a 

leveled road.

• The driving mode automatically 

changes to SMART SPORT mode only in 

harsh driving situations. In most of the 

normal driving situations, the driving 

mode sets to be either in SMART ECO 

mode or in SMART COMFORT mode.

• The driving mode automatically 

changes to SMART SPORT, when you 

abruptly accelerate the vehicle or 

repetitively operate the steering wheel 

(Your driving is categorized to be 

sporty.). In this mode, your vehicle 

drives in a lower gear for abrupt 

accelerating or decelerating and 

increases the engine brake 

performance.

For general description of SMART ECO, 

SMART COMFORT, and SMART SPORT 

modes, refer to “ECO, COMFORT, SPORT 

mode features”.

Limitation of SMART mode

SMART may be limited in following 

situations. ECO, COMFORT, SPORT mode 

features
• The driver is using the paddle shifter to 

manually shift gear. (The system 

prioritizes the driver’s manual shifting)

• Smart Cruise Control is activated.
• The transmission oil temperature is 

either extremely low or extremely high.

 Information


• When you mildly drive the vehicle in 

SMART mode, the driving mode 

changes to ECO mode to improve fuel 

efficiency. However, the actual fuel 

efficiency may differ depending on 

your driving situations such as slope 

angle, and vehicle speed.

• When you dynamically drive the vehicle 

in SMART mode by abruptly 

decelerating or sharply curving, the 

driving mode changes to SPORT mode. 

However, it may adversely affect fuel 

economy.


CarManuals2.com

Driving Your Vehicle

6-54

if equipped

Multi Terrain Mode (AWD)

Multi terrain mode may be selected 

according to the driver's preference or 

road condition.

B1001KO08

Press the DRIVE/TERRAIN button to 

change from Drive mode to Multi terrain 

mode. After the button is pressed, rotate 

the knob within 4 seconds to select 

SNOW, MUD or SAND. When the 

DRIVE/TERRAIN button is pressed again, 

the previous Drive mode will be 

reselected.

B1003EU01

For more details on Terrain mode, refer 

to“All Wheel Drive (AWD)” section in this 

chapter.

if equipped

TOW Mode

When towing a trailer, switching to TOW 

mode enables smooth driving by 

changing the shifting pattern to suit 

heavy loads.

Operating button

B1007EU01

Press the Tow mode button to turn on or 

off the function.

Setting features

B1007EU02

When the gear is in P (Park), select '

Setup


Vehicle

 > 

Drive Mode

 > 

Tow Mode

from the infotainment system to set the 

weight of trailer to be towed.

 Information


It is impossible to change Drive/Terrain 

mode when operating in Tow mode.


CarManuals2.com

6

6-55

Special Driving 

Conditions

Hazardous Driving Conditions

When hazardous driving elements are 

encountered such as water, snow, ice, 

mud and sand, take the following 

precautions:
• Drive cautiously and maintain a longer 

braking distance.

• Avoid abrupt braking or steering.
• When your vehicle is stuck in snow, 

mud, or sand, use second gear. 

Accelerate slowly to avoid unnecessary 

wheel spin.

• Put sand, rock salt, tire chains or other 

non-slip materials under the wheels to 

provide additional traction while the 

vehicle becomes stuck in ice, snow, or 

mud.


WARNING


Using the paddle shifters to downshift to 

a lower gear while driving on slippery 

surfaces can cause an accident. The 

sudden change in tire speed could cause 

the tires to skid. Be careful when 

downshifting on slippery surfaces.


Rocking the Vehicle

If it is necessary to rock the vehicle to free 

it from snow, sand, or mud, first turn the 

steering wheel right and left to clear the 

area around your front wheels. Then, shift 

back and forth between R (Reverse) and a 

forward gear.
Try to avoid spinning the wheels, and do 

not race the engine.
To prevent transmission wear, wait until 

the wheels stop spinning before shifting 

gears. Release the accelerator pedal 

while shifting, and press lightly on the 

accelerator pedal while the transmission 

is in gear. Slowly spinning the wheels in 

forward and reverse directions causes a 

rocking motion that may free the vehicle.


WARNING


If the vehicle is stuck and excessive wheel 

spin occurs, the temperature in the tires 

can increase very quickly. If the tires 

become damaged, a tire blow out or tire 

explosion can occur. This condition is 

dangerous - you and others may be 

injured. Do not attempt this procedure if 

people or objects are anywhere near the 

vehicle.
If you attempt to free the vehicle, the 

vehicle can overheat quickly, possibly 

causing an engine compartment fire or 

other damage. Try to avoid spinning the 

wheels as much as possible to prevent 

overheating of either the tires or the 

engine. DO NOT allow the vehicle to spin 

the wheels above 35 mph (56 km/h).


 Information


The ESC system must be turned OFF 

before rocking the vehicle.


CarManuals2.com

Driving Your Vehicle

6-56

NOTICE


If you are still stuck after rocking the 

vehicle a few times, have the vehicle 

pulled out by a tow vehicle to avoid 

engine overheating, possible damage to 

the transmission, and tire damage. See 

“Towing” section in chapter 8.


Smooth Cornering

Avoid braking or gear changing in 

corners, especially when roads are wet. 

Ideally, corners should always be taken 

under gentle acceleration.

Driving at Night

Night driving presents more hazards than 

driving in the daylight. Here are some 

important tips to remember:
• Slow down and keep more distance 

between you and other vehicles, as it 

may be more difficult to see at night, 

especially in areas where there may not 

be any street lights.

• Adjust your mirrors to reduce the glare 

from other drivers’ headlights.

• Keep your headlights clean and 

properly aimed. Dirty or improperly 

aimed headlights will make it much 

more difficult to see at night.

• Avoid staring directly at the headlights 

of oncoming vehicles. You could be 

temporarily blinded, and it will take 

several seconds for your eyes to 

readjust to the darkness.

Driving in the Rain

Rain and wet roads can make driving 

dangerous. Here are a few things to 

consider when driving in the rain or on 

slick pavement:
• Slow down and allow extra following 

distance. A heavy rainfall makes it 

harder to see and increases the 

distance needed to stop your vehicle.

• Turn OFF your Cruise Control. (if 

equipped)

• Replace your windshield wiper blades 

when they show signs of streaking or 

missing areas on the windshield.

• Be sure your tires have enough tread. If 

your tires do not have enough tread, 

making a quick stop on wet pavement 

can cause a skid and possibly lead to an 

accident. See “Tire Replacement” 

section in chapter 9.

• Turn on your headlights to make it 

easier for others to see you.

• Driving too fast through large puddles 

can affect your brakes. If you must go 

through puddles, try to drive through 

them slowly.

• If you believe your brakes may be wet, 

apply them lightly while driving until 

normal braking operation returns.

Hydroplaning

If the road is wet enough and you are 

going fast enough, your vehicle may have 

little or no contact with the road surface 

and actually ride on the water. The best 

advice is SLOW DOWN when the road is 

wet.
The risk of hydroplaning increases as the 

depth of tire tread decreases, refer to 

Tire Replacement” section in chapter 9.

Driving in Flooded Areas

Avoid driving through flooded areas 

unless you are sure the water is no higher 

than the bottom of the wheel hub. Drive 

through any water slowly. Allow adequate 

stopping distance because brake 

performance may be reduced.
After driving through water, dry the 

brakes by gently applying them several 

times while the vehicle is moving slowly.

CarManuals2.com

6

6-57

Highway Driving

Tires

Adjust the tire inflation, as specified. 

Under-inflation may overheat or damage 

the tires.
Do not install worn-out or damaged tires, 

which may reduce traction or fail the 

braking operation.

 Information


Never over-inflate your tires above the 

maximum inflation pressure, as specified 

on your tires.


Fuel, engine coolant and engine oil

Driving at higher speeds on the highway 

consumes more fuel and is less efficient 

than driving at a slower, more moderate 

speed. Maintain a moderate speed in 

order to conserve fuel when driving on 

the highway.
Be sure to check both the engine coolant 

level and the engine oil before driving.

Drive belt

A loose or damaged drive belt may 

overheat the engine.

Reducing the Risk of a 

Rollover

Your multi-purpose passenger vehicle is 

defined as a Sports Utility Vehicle (SUV). 

SUV’s have higher ground clearance and 

a narrower track to make them capable of 

performing in a wide variety of off-road 

applications. The specific design 

characteristics give them a higher center 

of gravity than ordinary vehicles making 

them more likely to roll over if you make 

abrupt turns. Utility vehicles have a 

significantly higher rollover rate than 

other types of vehicles. Due to this risk, 

driver and passengers are strongly 

recommended to buckle their seat belts. 

In a rollover crash, an unbelted person is 

significantly more likely to die than a 

person wearing a seat belt.
There are steps that a driver can make to 

reduce the risk of a rollover. If at all 

possible, avoid sharp turns or abrupt 

maneuvers, do not load your vehicle with 

heavy cargo on the roof, and never 

modify your vehicle in any way.


WARNING


Utility vehicles have a significantly higher 

rollover rate than other types of vehicles. 

To prevent rollovers or loss of control:
• Take corners at slower speeds than you 

would with a passenger vehicle.

• Avoid sharp turns and abrupt 

maneuvers.

• Do not modify your vehicle in any way 

that you would raise the center of 

gravity.

• Keep tires properly inflated.
• Do not carry heavy cargo on the roof.


WARNING


In a rollover crash, an unbelted person is 

significantly more likely to die than a 

person wearing a seat belt. Make sure all 

passengers are wearing their seat belts.


CarManuals2.com

Driving Your Vehicle

6-58

Winter Driving

The severe weather conditions of winter 

quickly wear out tires and cause other 

problems. To minimize winter driving 

problems, you should take the following 

suggestions:

Snow or Icy Conditions

You need to keep sufficient distance 

between your vehicle and the vehicle in 

front of you.
Apply the brakes gently. Speeding, rapid 

acceleration, sudden brake applications, 

and sharp turns are potentially very 

hazardous practices. During deceleration, 

use engine braking to the fullest extent. 

Sudden brake applications on snowy or 

icy roads may cause the vehicle to skid.
To drive your vehicle in deep snow, it may 

be necessary to use snow tires or to install 

tire chains on your tires.
Always carry emergency equipment. 

Some of the items you may want to carry 

include tire chains, tow straps or chains, a 

flashlight, emergency flares, sand, a 

shovel, jumper cables, a window scraper, 

gloves, ground cloth, coveralls, a blanket, 

etc.

Snow tires


WARNING


Snow tires should be equivalent in size 

and type to the vehicle’s standard tires. 

Otherwise, the safety and handling of 

your vehicle may be adversely affected.


If you mount snow tires on your vehicle, 

make sure to use the same Inflation 

pressure as the original tires. Mount snow 

tires on all four wheels to balance your 

vehicle’s handling in all weather 

conditions. The traction provided by 

snow tires on dry roads may not be as 

high as your vehicle’s original equipment 

tires. Check with the tire dealer for 

maximum speed recommendations.

if equipped

Summer tires

• Summer tires are used to maximize the 

driving performance on dry roads.

• If the temperature is below 44.6 °F (7 

°C) or you are driving on snowy or icy 

roads, the summer tires lose their brake 

performance and traction as the tire 

grip weakens significantly.

• If the temperature is below 44.6 °F (7 

°C) or you are driving on snowy or icy 

roads, mount snow tires or all-season 

tires of the same size with your 

vehicle’s standard tire for safe driving. 

Both snow and all-season tires have 

M+S markings.

• When using the M+S tires, use tires with 

the same tread produced by the same 

manufacturer for safe driving.

• When driving with the M+S tires with 

the lower maximum allowable speed 

than that of the vehicle’s standard 

summer tire, be careful not to exceed 

the speed allowed for the M+S tires.

CarManuals2.com

6

6-59

Tire chains

B0308EU01

Since the sidewalls of radial tires are 

thinner than other types of tires, they may 

be damaged by mounting some types of 

tire chains on them. Therefore, the use of 

snow tires is recommended instead of tire 

chains. If tire chains must be used, use 

genuine HYUNDAI Parts and install the 

tire chain after reviewing the instructions 

provided with the tire chains. Damage to 

your vehicle caused by improper tire 

chain use is not covered by your vehicle 

manufacturer’s warranty.


WARNING


The use of tire chains may adversely 

affect vehicle handling:
• Drive less than 20 mph (30 km/h) or the 

chain manufacturer’s recommended 

speed limit, whichever is lower.

• Drive carefully and avoid bumps, holes, 

sharp turns, and other road hazards, 

which may cause the vehicle to 

bounce.

• Avoid sharp turns or locked wheel 

braking.


 Information


• Install tire chains only in pairs and on 

the front tires. It should be noted that 

installing tire chains on the tires will 

provide a greater driving force, but will 

not prevent side skids.

• Do not install studded tires without first 

checking local and municipal 

regulations for possible restrictions 

against their use.


Chain Installation

When installing tire chains, follow the 

manufacturer’s instructions and mount 

them as tightly possible. Drive slowly (less 

than 20 mph (30 km/h)) with chains 

installed. If you hear the chains 

contacting the body or chassis, stop and 

tighten them. If they still make contact, 

slow down until the noise stops. Remove 

the tire chains as soon as you begin 

driving on cleared roads.
When mounting snow chains, park the 

vehicle on level ground away from traffic. 

Turn on the vehicle Hazard Warning 

Flasher and place a triangular emergency 

warning device behind the vehicle (if 

available). Always place the vehicle in P 

(Park), apply the parking brake and turn 

off the engine before installing snow 

chains.

CarManuals2.com

Driving Your Vehicle

6-60

NOTICE


When using tire chains:
• Wrong size chains or improperly 

installed chains can damage your 

vehicle’s brake lines, suspension, body 

and wheels.

• Use SAE “S” class or wire chains.
• If you hear noise caused by chains 

contacting the body, retighten the 

chain to prevent contact with the 

vehicle body.

• To prevent body damage, retighten the 

chains after driving 0.3-0.6 miles 

(0.5-1.0 km).

• Do not use tire chains on vehicles 

equipped with aluminum wheels. If 

unavoidable, use a wire type chain.

• Use wire chains less than 0.59 in. (15 

mm) thick to prevent damage to the 

chain’s connection.


Winter Precautions

Use high quality ethylene glycol coolant

Your vehicle is delivered with high quality 

ethylene glycol coolant in the cooling 

system. It is the only type of coolant that 

should be used because it helps prevent 

corrosion in the cooling system, 

lubricates the water pump and prevents 

freezing. Be sure to replace or replenish 

your coolant in accordance with the 

maintenance schedule in chapter 9. 

Before winter, have your coolant tested to 

assure that its freezing point is sufficient 

for the temperatures anticipated during 

the winter.

Check battery and cables

Winter temperatures affect battery 

performance. Inspect the battery and 

cables, as specified in chapter 9. The 

battery charging level can be checked by 

an authorized HYUNDAI dealer or in a 

service station.

Change to “winter weight” oil if 

necessary

In some regions during winter, it is 

recommended to use the “winter weight” 

oil with lower viscosity In addition, 

replace the engine oil and filter if it is 

close to the next maintenance interval. 

Fresh engine oil ensures optimum engine 

operation during the winter months. For 

further information, refer to chapter 2. 

When you are not sure about a type of 

winter weight oil, consult an authorized 

HYUNDAI dealer.

Check spark plugs and ignition system
Inspect the spark plugs, as specified in 

chapter 9.

 If necessary, replace them. 

Also check all ignition wirings and 

components for any cracks, wear-out, 

and damage.

To prevent locks from freezing

To prevent the locks from being frozen, 

spray approved de-icing fluid or glycerin 

into key holes. When a lock opening is 

already covered with ice, spray approved 

de-icing fluid over the ice to remove it. 

When an internal part of a lock freezes, try 

to thaw it with a heated key. Carefully use 

the heated key to avoid an injury.

Use approved window washer 

anti-freeze solution in system

To prevent the window washer from 

being frozen, add authorized window 

washer anti-freeze solution, as specified 

on the window washer container. 

Window washer anti-freeze solution is 

available from an authorized HYUNDAI 

dealer, and most vehicle accessory 

outlets. Do not use engine coolant or 

other types of anti-freeze solution, to 

prevent any damage to the vehicle paint.

CarManuals2.com

6

6-61

Do not let your parking brake freeze

Under some conditions your parking 

brake can freeze in the engaged position. 

This is most likely to happen when there is 

an accumulation of snow or ice around or 

near the rear brakes or if the brakes are 

wet. When there is the risk that your 

parking brake may freeze, temporarily 

apply it with the gear in P (Park). Also, 

block the rear wheels in advance, so the 

vehicle may not roll. Then, release the 

parking brake.

Do not let ice and snow accumulate 

underneath

Under some conditions, snow and ice can 

build up under the fenders and interfere 

with the steering. When driving in such 

conditions during the severe winter, you 

should check underneath the vehicle on a 

regular basis, to ensure that the front 

wheels and the steering components is 

unblocked.

Carry emergency equipment

In accordance with weather conditions, 

you should carry appropriate emergency 

equipment, while driving. Some of the 

items you may want to carry include tire 

chains, tow straps or chains, flashlight, 

emergency flares, sand, shovel, jumper 

cables, window scraper, gloves, ground 

cloth, coveralls, blanket, etc.

Do not place objects or materials in the 

engine compartment

Putting objects or materials in the engine 

compartment may cause an engine 

failure or combustion, because they may 

block the engine cooling. Such damage 

will not be covered by the manufacturer’s 

warranty.

Drive your vehicle when water vapor 

condenses and accumulates inside the 

exhaust pipes

When the vehicle is stopped for a long 

time in winter while the engine is running, 

water vapor may condense and 

accumulate inside the exhaust pipes. 

Water in the exhaust pipes may cause 

noise, etc., but it is drained driving at 

medium to high speed.

CarManuals2.com

Driving Your Vehicle

6-62

Trailer Towing

If you are considering towing with your 

vehicle, be sure to take extra precautions 

while driving. Only experienced drivers 

should consider towing. Plan your trip 

accordingly as vehicle speed limits for 

vehicles towing trailers may be different. 

Always follow posted speed limits for 

vehicles towing with trailers.
Remember that trailering is different than 

just driving your vehicle by itself. 

Trailering means changes in handling, 

durability, and fuel economy. Successful, 

safe trailering requires correct 

equipment, and it has to be used 

properly. Damage to your vehicle caused 

by improper trailer towing is not covered 

by your vehicle manufacturer’s warranty.
This section contains time-tested, 

important trailering tips and safety rules. 

Many of these are important for your 

safety and that of your passengers. Please 

read this section carefully before you pull 

a trailer.


WARNING


Take the following precautions:
• If you don’t use the correct equipment 

and/or drive improperly, you can lose 

control of the vehicle when you are 

pulling a trailer. For example, if the 

trailer is too heavy, the braking 

performance may be reduced. You and 

your passengers could be seriously or 

fatally injured. Pull a trailer only if you 

have followed all the steps in this 

section.

• Before towing, make sure the total 

trailer weight, GCW (Gross 

Combination Weight), GVW (Gross 

Vehicle Weight), GAW (Gross Axle 

Weight) and trailer tongue load are all 

within the limits.

• When you tow a trailer, make sure to 

turn off the Idle Stop and Go system.


If You Decide to Pull a Trailer?

Here are some important points if you 

decide to pull a trailer:
• Consider using a sway control. You can 

ask a trailer hitch dealer about sway 

control.

• Do not do any towing with your vehicle 

during its first 1,200 miles (2,000 km) in 

order to allow the engine to properly 

break in. Failure to heed this caution 

may result in serious engine or 

transmission damage.

• When towing a trailer, consult an 

authorized HYUNDAI dealer for further 

information on additional requirements 

such as a towing kit, etc.

• Always drive your vehicle at posted 

towing speed limit.

• Carefully observe the weight and load 

limits provided in the following pages.

• When towing a trailer, be sure to 

disable Reverse Parking 

Collision-Avoidance Assist. If towing 

and going in reverse the system will 

activate as it detects the trailer. Also, 

before towing a trailer disable all 

Driving Assistance systems as 

precaution such as Forward 

Collision-Avoidance Assist, Lane 

Keeping Assist, Smart Cruise Control 

and others.

CarManuals2.com

6

6-63

Trailer weight

Tongue Load / Total Trailer Weight

OOSH069129L

What is the maximum safe weight of a 

trailer? It should never weigh more than 

the maximum trailer weight with trailer 

brakes. But even that can be too heavy. It 

depends on how you plan to use your 

trailer. For example, speed, altitude, road 

grades, outside temperature and how 

often your vehicle is used to pull a trailer 

are all important. The ideal trailer weight 

can also depend on any special 

equipment that you have on your vehicle.

Tongue load

Gross Axle Weight / Gross Vehicle Weight

OOSH069130L

The tongue load is an important weight to 

measure because it affects the total Gross 

Vehicle Weight (GVW) of your vehicle. 

The trailer tongue should weigh a 

minimum of 10% of the total loaded trailer 

weight, within the limits of the maximum 

(15%) trailer tongue load permissible.
After you’ve loaded your trailer, weigh the 

trailer and then the tongue, separately, to 

see if the weights are proper. If they 

aren’t, you may be able to correct them 

simply by moving some items around in 

the trailer.


WARNING


Take the following precautions:
• Never load a trailer with more weight in 

the rear than in the front. The front 

should be loaded with approximately 

60% of the total trailer load; the rear 

should be loaded with approximately 

40% of the total trailer load.

• Never exceed the maximum weight 

limits of the trailer or trailer towing 

equipment. Improper loading can 

result in damage to your vehicle and/or 

personal injury. Check weights and 

loading at a commercial scale or 

highway patrol office equipped with 

scales.


CarManuals2.com

Driving Your Vehicle

6-64

Reference weight and distance 

when towing a trailer

*1 Tongue weight should be between allowable 

10-15%

Trailer Towing Equipment

Hitches

B1004KO01

It’s important to have the correct hitch 

equipment. Crosswinds, large trucks 

going by, and rough roads are a few 

reasons why you’ll need the right hitch. 

Here are some rules to follow:
• Do you have to make any holes in the 

body of your vehicle when you install a 

trailer hitch? If you do, then be sure to 

seal the holes later when you remove 

the hitch. If you don’t seal them, carbon 

monoxide (CO) from your exhaust can 

get into your vehicle, as well as dirt and 

water.

• The bumpers on your vehicle are not 

intended for hitches. Do not attach 

rental hitches or other bumper-type 

hitches to them. Use only a 

frame-mounted hitch that does not 

attach to the bumper.

• A HYUNDAI trailer hitch accessory is 

available at an authorized HYUNDAI 

dealer.

Safety chains

You should always attach chains between 

your vehicle and your trailer.
Instructions about safety chains may be 

provided by the hitch manufacturer or 

trailer manufacturer. Follow the 

manufacturer’s recommendation for 

attaching safety chains. Always leave just 

enough slack so you can turn with your 

trailer. And, never allow safety chains to 

drag on the ground.

Trailer brakes

If your trailer is equipped with a braking 

system, make sure it conforms to your 

state’s regulations and that it is properly 

installed and operating correctly.
If your trailer weighs more than the 

maximum trailer weight without trailer 

brakes loaded, then it needs its own 

brakes and they must be adequate. Be 

sure to read and follow the instructions 

for the trailer brakes so you’ll be able to 

install, adjust and maintain them 

properly. Be sure not to modify your 

vehicle’s brake system.


WARNING


Do not use a trailer with its own brakes 

unless you are absolutely certain that you 

have properly set up the brake system. 

This is not a task for amateurs. Use an 

experienced, competent trailer shop for 

this work.


ltem

With 

trailer 

package

Maximum trailer 

weight

lbs. (kg)

With 

brake 

system

5,000

(2,268)

Without 

brake 

system

1,653
(750)

Maximum tongue weight 

*1

Ibs. (kg)

500

(227)

CarManuals2.com

6

6-65

Driving with a Trailer

Towing a trailer requires a certain amount 

of experience. Before setting out for the 

open road, you must get to know your 

trailer. Acquaint yourself with the feel of 

handling and braking with the added 

weight of the trailer. And always keep in 

mind that the vehicle you are driving is 

now longer and not nearly as responsive 

as your vehicle is by itself.
Before you start, check the trailer hitch 

and platform, safety chains, electrical 

connector(s), lights, tires and brakes.
During your trip, occasionally check to be 

sure that the load is secure, and that the 

lights and trailer brakes are still working.

Distance

Stay at least twice as far behind the 

vehicle ahead as you would when driving 

your vehicle without a trailer. This can 

help you avoid situations that require 

heavy braking and sudden turns.

Passing

You will need more passing distance up 

ahead when you’re towing a trailer. And, 

because of the increased vehicle length, 

you’ll need to go much farther beyond the 

passed vehicle before you can return to 

your lane.

Backing up

Hold the bottom of the steering wheel 

with one hand. Then, to move the trailer 

to the left, move your hand to the left. To 

move the trailer to the right, move your 

hand to the right. Always back up slowly 

and, if possible, have someone guide you.

Making turns

When you’re turning with a trailer, make 

wider turns than normal. Do this so your 

trailer won’t strike soft shoulders, curbs, 

road signs, trees, or other objects. Avoid 

jerky or sudden maneuvers. Signal well in 

advance.

Turn signals

When you tow a trailer, your vehicle has 

to have a different turn signal flasher and 

extra wiring. The green arrows on your 

instrument panel will flash whenever you 

signal a turn or lane change. Properly 

connected, the trailer lights will also flash 

to alert other drivers you’re about to turn, 

change lanes, or stop.
When towing a trailer, the green arrows 

on your instrument panel will flash for 

turns even if the bulbs on the trailer are 

burned out. Thus, you may think drivers 

behind you are seeing your signals when, 

in fact, they are not. It’s important to 

check frequently to be sure the trailer 

bulbs are still working. You must also 

check the lights every time you 

disconnect and then reconnect the wires.


WARNING


Do not connect a trailer lighting system 

directly to your vehicle’s lighting system. 

Use an approved trailer wiring harness. 

Failure to do so could result in damage to 

the vehicle electrical system and/or 

personal injury. Consult an authorized 

HYUNDAI dealer for assistance.


CarManuals2.com

Driving Your Vehicle

6-66

Driving on hills

Reduce speed and shift to a lower gear 

before you start down a long or steep 

downgrade. If you don’t shift to a lower 

gear, you may have to use your brakes 

excessively and they would overheat and 

may not operate efficiently.
On a long uphill grade, shift to a lower 

gear and reduce your speed to around 45 

mph (70 km/h) to reduce the possibility of 

engine and transmission overheating.
If your trailer weighs more than the 

maximum trailer weight without trailer 

brakes and you have an automatic 

transmission, you should drive in D 

(Drive) when towing a trailer.
Operating your vehicle in D (Drive) when 

towing a trailer will minimize heat 

build-up and extend the life of your 

transmission.

NOTICE


To prevent engine and/or transmission 

overheating:
• When towing a trailer on steep grades 

(in excess of 6%) pay close attention to 

the engine coolant temperature gauge 

to ensure the engine does not overheat. 

If the needle of the coolant 

temperature gauge moves towards “H” 

(HOT), pull over and stop as soon as it is 

safe to do so, and allow the engine to 

idle until it cools down. You may 

proceed once the engine has cooled 

sufficiently.

• When towing a trailer, your vehicle 

speed may be much slower than the 

general flow of traffic, especially when 

climbing an uphill grade. Use the right 

hand lane when towing a trailer on an 

uphill grade. Choose your vehicle 

speed according to the maximum 

posted speed limit for vehicles with 

trailers, the steepness of the grade, and 

your trailer weight.


Parking on hills

Generally, if you have a trailer attached to 

your vehicle, you should not park your 

vehicle on a hill.
However, if you ever have to park your 

trailer on a hill, here’s how to do it:
1. Pull the vehicle into the parking space.

Turn the steering wheel in the direction 

of the curb (right if headed down hill, 

left if headed up hill).

2. Shift the gear to P (Park).
3. Set the parking brake and shut off the 

vehicle.

4. Place wheel chocks under the trailer 

wheels on the down hill side of the 

wheels.

5. Start the vehicle, hold the brakes, shift 

to neutral, release the parking brake 

and slowly release the brakes until the 

trailer chocks absorb the load.

6. Reapply the brakes and parking brakes.
7. Shift the gear to P (Park) when the 

vehicle is parked on a uphill grade and 

in R (Reverse) on a downhill.

8. Shut off the vehicle and release the 

vehicle brakes but leave the parking 

brake set.


WARNING


To prevent serious or fatal injury:
• Do not get out of the vehicle without 

the parking brake firmly set. If you have 

left the engine running, the vehicle can 

move suddenly. You and others could 

be seriously or fatally injured.

• Do not apply the accelerator pedal to 

hold the vehicle on an uphill.


CarManuals2.com

6

6-67

Driving the vehicle after it has been 

parked on a hill

1. With the gear in P (Park), apply your 

brakes and hold the brake pedal down 

while you:
• Start your engine;
• Shift into gear; and
• Release the parking brake.

2. Slowly remove your foot from the brake 

pedal.

3. Drive slowly until the trailer is clear of 

the chocks.

4. Stop and have someone pick up and 

store the chocks.

Maintenance When Towing a 

Trailer

Your vehicle will need service more often 

when you regularly pull a trailer. 

Important items to pay particular 

attention to include engine oil, 

transmission fluid, axle lubricant and 

cooling system fluid. Brake condition is 

another important item to frequently 

check. If you’re trailering, it’s a good idea 

to review these items before you start 

your trip. Don’t forget to also maintain 

your trailer and hitch. Follow the 

maintenance schedule that accompanied 

your trailer and check it periodically. 

Preferably, conduct the check at the start 

of each day’s driving. Most importantly, 

all hitch nuts and bolts should be tight.

NOTICE


To prevent vehicle damage:
• Due to higher load during trailer usage, 

overheating might occur on hot days or 

during uphill driving. If the coolant 

gauge indicates over-heating, switch 

off the air conditioner and stop the 

vehicle in a safe area to cool down the 

engine.

• Do not switch off the engine while the 

coolant gauge indicates over-heating.
(Keep the engine idle to cool down the 

engine)

• When towing check transmission fluid 

more frequently.


CarManuals2.com

Driving Your Vehicle

6-68

Vehicle Load Limit

Two labels on your driver’s door sill 

show how much weight your vehicle 

was designed to carry: the Tire and 

Loading Information Label and the 

Certification Label.
Before loading your vehicle, 

familiarize yourself with the following 

terms for determining your vehicle’s 

weight ratings, from the vehicle’s 

specifications and the Certification 

Label:

Base curb weight

This is the weight of the vehicle 

including a full tank of fuel and all 

standard equipment. It does not 

include passengers, cargo, or 

optional equipment.

Vehicle curb weight

This is the weight of your new vehicle 

when you picked it up from your 

dealer plus any aftermarket 

equipment.

Cargo weight

This figure includes all weight added 

to the Base Curb Weight, including 

cargo and optional equipment.

GAW (Gross Axle Weight)

This is the total weight placed on 

each axle (front and rear) - including 

vehicle curb weight and all payload.

GAWR (Gross Axle Weight Rating)

This is the maximum allowable 

weight that can be carried by a single 

axle (front or rear). These numbers 

are shown on the Certification Label. 

The total load on each axle must 

never exceed its GAWR.

GVW (Gross Vehicle Weight)

This is the Base Curb Weight plus 

actual Cargo Weight plus passengers.

GVWR (Gross Vehicle Weight Rating)

This is the maximum allowable 

weight of the fully loaded vehicle 

(including all options, equipment, 

passengers and cargo). The GVWR is 

shown on the Certification Label 

located on the driver’s door sill.

CarManuals2.com

6

6-69

The Loading Information 

Label

B1006EU01

B1006EU02

B1006EU03

B1006EU04

The label located on the driver’s door 

sill gives the original tire size, cold tire 

pressures recommended for your 

vehicle, the number of people that 

can be in your vehicle and vehicle 

capacity weight.

Vehicle capacity weight

1. 7 persons: 1,173 lbs. (532 kg)
2. 8 persons: 1,323 lbs. (600 kg)
Vehicle capacity weight is the 

maximum combined weight of 

occupants and cargo. If your vehicle 

is equipped with a trailer, the 

combined weight includes the 

tongue load.

Seating capacity

1. Total: 7 persons (Front seat: 2 

persons, Rear seat: 5 persons)

2.Total: 8 persons (Front seat: 2 

persons, Rear seat: 6 persons)

Seating capacity is the maximum 

number of occupants including a 

driver, your vehicle may carry. 

However, the seating capacity may 

be reduced based upon the weight of 

all of the occupants, and the weight 

of the cargo being carried or towed. 

Do not overload the vehicle as there 

is a limit to the total weight, or load 

limit including occupants and cargo, 

the vehicle can carry.

CarManuals2.com

Driving Your Vehicle

6-70

Towing capacity

With trailer brakes: 5,000 Ibs. (2,268 

kg)
Without trailer brakes: 1,653 Ibs. (750 

kg)
Towing capacity is the maximum 

trailer weight including its cargo 

weight, your vehicle can tow.

Cargo capacity

The cargo capacity of your vehicle 

will increase or decrease depending 

on the weight and the number of 

occupants and the tongue load, if 

your vehicle is equipped with a trailer.

Steps for determining correct load 

limit

1. Locate the statement “The 

combined weight of occupants and 

cargo should never exceed XXX lbs. 

or XXX kg.” on your vehicle's 

placard.

2.Determine the combined weight of 

the driver and passengers that will 

be riding in your vehicle.

3.Subtract the combined weight of 

the driver and passengers from XXX 

lbs. or XXX kg.

4.The resulting figure equals the 

available amount of cargo and 

luggage load capacity. For 

example, if the "XXX" amount 

equals 1,400 lbs. (635 kg) and there 

will be five 150 lbs. (68 kg) 

passengers in your vehicle, the 

amount of available cargo and 

luggage load capacity is 650 lbs. 

(295 kg).
(1,400 - 750 (5 x 150) = 650 lbs. or 

635 – 340 (5 x 68) = 295 kg)

5.Determine the combined weight of 

luggage and cargo being loaded on 

the vehicle. That weight may not 

safely exceed the available cargo 

and luggage load capacity 

calculated in Step 4.

6.If your vehicle will be towing a 

trailer, load from your trailer will be 

transferred to your vehicle. Consult 

this manual to determine how this 

reduces the available cargo and 

luggage load capacity of your 

vehicle.

CarManuals2.com

6

6-71


WARNING


Do not overload the vehicle as there is a limit to the total weight, or load limit, 

including occupants and cargo, the vehicle can carry. Overloading can shorten 

the life of the vehicle. If the GVWR or the GAWR is exceeded, parts on the vehicle 

can break, and it can change the handling of your vehicle. These could cause 

you to lose control and result in an accident.


Example 1

+

Maximum 

Load

(1,400 lbs.)

(635 kg)

Passenger Weight

(150 lbs. × 2 = 300 lbs.)

(68 kg × 2 = 136 kg)

Cargo Weight

(1,100 lbs.)

(499 kg)

Example 2

+

Maximum 

Load

(1,400 lbs.)

(635 kg)

Passenger Weight

(150 lbs. × 5 = 750 lbs.)

(68 kg × 5 = 340 kg)

Cargo Weight

(650 lbs.)

(295 kg)

Example 3

+

Maximum 

Load

(1,400 lbs.)

(635 kg)

Passenger Weight

(172 lbs. × 5 = 860 lbs.)

(78 kg × 5 = 390 kg)

Cargo Weight

(540 lbs.)

(245 kg)

CarManuals2.com

Driving Your Vehicle

6-72

Certification label

Table_OBH059070

The certification label is located on 

the driver's door sill at the center 

pillar and shows the maximum 

allowable weight of the fully loaded 

vehicle. This is called the GVWR 

(Gross Vehicle Weight Rating). The 

GVWR includes the weight of the 

vehicle, all occupants, fuel and cargo.
This label also tells you the maximum 

weight that can be supported by the 

front and rear axles, called Gross Axle 

Weight Rating (GAWR).
The total weight of the vehicle, 

including all occupants, accessories, 

cargo, and trailer tongue load must 

not exceed the Gross Vehicle Weight 

Rating (GVWR) or the Gross Axle 

Weight Rating (GAWR). To find out 

the actual loads on your front and 

rear axles, you need to go to a weigh 

station and weigh your vehicle. Be 

sure to spread out your load equally 

on both sides of the centerline.


WARNING


Overloading
• Never exceed the GVWR for your 

vehicle, the GAWR for either the 

front or rear axle and vehicle 

capacity weight. Exceeding these 

ratings can affect your vehicle's 

handling and braking ability, and 

cause an accident.

• Do not overload your vehicle. 

Overloading your vehicle can cause 

heat buildup in your vehicle's tires 

and possible tire failure, increased 

stopping distances and poor 

vehicle handling-all of which may 

result in a crash.


NOTICE


Overloading your vehicle may cause 

damage. Repairs would not be 

covered by your warranty. Do not 

overload your vehicle.


WARNING


If you carry items inside your vehicle 

(for example, suitcases, tools, 

packages, or anything else), they are 

moving as fast as the vehicle. If you 

have to stop or turn quickly, or if there 

is a crash, the items will keep going 

and can cause an injury if they strike 

the driver or a passenger.
• Put items in the cargo area of your 

vehicle. Try to spread the weight 

evenly.

• Do not stack items, like suitcases, 

inside the vehicle above the tops of 

the seats.

• Do not leave an unsecured child 

restraint in your vehicle.

• When you carry something inside 

the vehicle, secure it.


CarManuals2.com

7

7.  Driver Assistance System

Driver Assistance system functions can be updated by infotainment software update. 

Descriptions for each function of the system may differ from the owners' manual once 

updated. Refer to the user's manual provided in the infotainment system and the quick 

reference guide.
Forward Collision-Avoidance Assist (FCA) .................................................................... 7-4

Forward Collision-Avoidance Assist Settings ............................................................ 7-7
Forward Collision-Avoidance Assist Operation ........................................................7-10
Forward Collision-Avoidance Assist Malfunction and Limitations.........................7-20

Lane Keeping Assist (LKA)............................................................................................. 7-28

Lane Keeping Assist Settings .................................................................................... 7-28
Lane Keeping Assist Operation.................................................................................7-30
Lane Keeping Assist Malfunction and Limitations .................................................. 7-32

Blind-Spot Collision Warning (BCW)............................................................................ 7-33

Blind-Spot Collision Warning Settings ..................................................................... 7-35
Blind-Spot Collision Warning Operation .................................................................. 7-37
Blind-Spot Collision Warning Malfunction and Limitations.................................... 7-39

Safe Exit Assist (SEA)..................................................................................................... 7-44

Safe Exit Assist Settings............................................................................................. 7-45
Safe Exit Assist Operation .........................................................................................7-46
Safe Exit Assist Malfunction and Limitations...........................................................7-48

Manual Speed Limit Assist (MSLA)............................................................................... 7-50

Manual Speed Limit Assist Settings..........................................................................7-50
Manual Speed Limit Assist Operation .......................................................................7-51

Intelligent Speed Limit Assist (ISLA) ............................................................................ 7-53

Intelligent Speed Limit Assist Settings..................................................................... 7-54
Intelligent Speed Limit Assist Operation.................................................................. 7-55
Intelligent Speed Limit Assist Malfunction and Limitations ................................... 7-57

Driver Attention Warning (DAW) .................................................................................. 7-59

Driver Attention Warning Settings............................................................................7-60
Driver Attention Warning Operation.........................................................................7-60
Driver Attention Warning Malfunction and Limitations ...........................................7-61

Blind-Spot View Monitor (BVM) ...................................................................................7-64

Blind-Spot View Monitor Settings ............................................................................ 7-65
Blind-Spot View Monitor Operation ......................................................................... 7-65
Blind-Spot View Monitor Malfunction......................................................................7-66

CarManuals2.com

7

Smart Cruise Control (SCC).......................................................................................... 7-66

Smart Cruise Control Settings...................................................................................7-67
Smart Cruise Control Operation............................................................................... 7-68
Smart Cruise Control Malfunction and Limitations ................................................. 7-77

Navigation-based Smart Cruise Control (NSCC).........................................................7-82

Navigation-based Smart Cruise Control Settings....................................................7-83
Navigation-based Smart Cruise Control Operation.................................................7-83
Limitations of Navigation-based Smart Cruise Control ..........................................7-85

Lane Following Assist (LFA).......................................................................................... 7-89

Lane Following Assist Settings ................................................................................. 7-89
Lane Following Assist Operation.............................................................................. 7-90
Lane Following Assist Malfunction and Limitations ................................................7-92

Highway Driving Assist (HDA).......................................................................................7-92

Highway Driving Assist Settings............................................................................... 7-94
Highway Driving Assist Operation ............................................................................7-95
Highway Driving Assist Malfunction and Limitations .............................................7-101

Rear View Monitor (RVM)............................................................................................ 7-103

Rear View Monitor Settings ..................................................................................... 7-103
Rear View Monitor Operation.................................................................................. 7-104
Rear View Monitor Malfunction and Limitations ................................................... 7-105

Surround View Monitor (SVM) .................................................................................... 7-106

Surround View Monitor Settings ............................................................................. 7-107
Surround View Monitor Operation..........................................................................7-108
Surround View Monitor Malfunction and Limitations ............................................7-110

Rear Cross-Traffic Collision-Avoidance Assist (RCCA) ...............................................7-111

Rear Cross-Traffic Collision-Avoidance Assist Settings ..........................................7-111
Rear Cross-Traffic Collision-Avoidance Assist Operation ...................................... 7-112
Rear Cross-Traffic Collision-Avoidance Assist Malfunction and Limitations ....... 7-115

Reverse Parking Distance Warning (PDW)................................................................. 7-120

Reverse Parking Distance Warning Settings .......................................................... 7-120
Parking Distance Warning Operation ...................................................................... 7-121
Reverse Parking Distance Warning Malfunction and Limitations .........................7-122

Forward/Reverse Parking Distance Warning (PDW) ................................................. 7-124

Forward/Reverse Parking Distance Warning Settings .......................................... 7-124
Forward/Reverse Parking Distance Warning Operation ........................................7-125

CarManuals2.com

Driver Assistance System

7-4

Forward 

Collision-Avoidance 

Assist (FCA)

Basic function

B0311KO01

Forward Collision-Avoidance Assist 

detects a vehicle, a powered 

two-wheeler, a pedestrian, or a cyclist 

ahead on the road and may warn you of a 

possible collision with a warning message 

on the instrument cluster and a warning 

sound. Also, Forward Collision-Avoidance 

Assist may assist with braking your 

vehicle to help reduce collision speed or 

avoid a collision.
In addition, when driving at high speeds, 

Forward Collision-Avoidance Assist will 

help detect vehicles in front and adjacent 

lanes. If a collision is imminent when 

changing lanes, Forward 

Collision-Avoidance Assist will apply 

emergency braking to help prevent a 

collision. (if equipped)

Junction Turning function

B0311KO02

Junction Turning function helps avoid a 

collision with an oncoming vehicle in an 

adjacent lane when turning left at a 

crossroad with the turn signal on by 

applying emergency braking.

if equipped

Junction Crossing function

B0311KO03

Junction Crossing function helps avoid a 

collision with oncoming vehicles on the 

left or right side when crossing an 

intersection by applying emergency 

braking.

CarManuals2.com

7

7-5

if equipped

Lane-Change Oncoming function

B0311KO04

[A] : Oncoming vehicle

Lane-Change Oncoming function helps 

avoid a collision with an oncoming 

vehicle when changing lanes by assisting 

the driver’s steering.

if equipped

Lane-Change Side function

B0311KO05

[A] : Front-side vehicle

Lane-Change Side function helps avoid a 

collision with the vehicle ahead in the 

next lane when changing lanes by 

assisting the driver’s steering.

if equipped

Evasive Steering Assist function

B0311KO06

• Driver steering assist

Evasive Steering Assist function helps 

avoid a collision with a vehicle, 

pedestrian or cyclist ahead in the same 

lane. When a risk of collision is 

detected, Evasive Steering Assist 

function will warn the driver and if the 

driver steers to avoid collision it will 

assist the driver’s steering.

• Evasive steering assist

Evasive Steering Assist function helps 

avoid a collision with a pedestrian or 

cyclist ahead in the same lane. When a 

risk of collision is detected, Evasive 

Steering Assist function will warn the 

driver and if there is space to avoid 

collision in the lane, it will assist the 

driver’s steering.

CarManuals2.com

Driver Assistance System

7-6

Detecting sensor

B0311KO07

B0311KO08

B0311KO09

[A] : Front view camera

[B] : Front radar

[C] : Front corner radar (if equipped)

[D] : Rear corner radar (if equipped)

Refer to the picture above for the detailed 

location of the detecting sensors.


CAUTION


Take the following precautions to 

maintain optimal performance of the 

detecting sensor:
• Never disassemble the detecting 

sensor or sensor assembly, or cause 

any damage to it.

• If the detecting sensors have been 

replaced or repaired, have the vehicle 

inspected by an authorized HYUNDAI 

dealer.

• Never install any accessories or stickers 

on the front windshield, or tint the front 

windshield.

• Exercise extreme caution to keep the 

front view camera dry.

• Never place any reflective objects (for 

example, white paper, mirror) over the 

dashboard.

• Do not place any objects near the front 

windshield or install any accessories on 

the front windshield. It can affect the 

performance of the defogging and 

defrosting function of the climate 

control system, which may prevent the 

Driver Assistance systems from 

operating.

• Do not apply license plate frame or 

objects, such as a bumper sticker, film 

or a bumper guard, near the front radar 

cover.

• Do not change the position of the 

license plate. The front radar’s 

detection and control performance 

may be affected.

• Always keep the front radar and cover 

clean and free of dirt and debris.
Use only a soft cloth to wash the 

vehicle. Do not spray pressurized water 

directly on the sensor or sensor cover.

CarManuals2.com

7

7-7

• If the radar or around the radar has 

been damaged or impacted in any way, 

Forward Collision-Avoidance Assist 

may not properly operate even though 

a warning message does not appear on 

the cluster. Have the vehicle inspected 

by an authorized HYUNDAI dealer.

• Use only genuine HYUNDAI parts to 

repair or replace a damaged front radar 

cover. Do not apply paint to the front 

radar cover.

• Vehicles equipped with front corner 

radar and/or rear corner radar
- Do not apply license plate frame or 

objects, such as a bumper sticker, 

film or a bumper guard, near the front 

corner radar or rear corner radar.

- The function may not work properly 

when the bumper has been replaced, 

or the surroundings of the front 

corner radar or rear corner radar has 

been damaged or paint has been 

applied.

- If a trailer, carrier, etc., is installed, it 

may adversely affect the 

performance of the rear corner radar 

or Forward Collision-Avoidance 

Assist may not operate properly.


Forward Collision-Avoidance 

Assist Settings

Forward Safety

B0312EU01

With the engine on, select or deselect 

Driver Assistance

 > 

Driving Safety

’ from 

the Settings menu to set whether to use 

each function.
• If ‘Forward Safety’ is selected, Forward 

Collision-Avoidance Assist will warn the 

driver with a warning message, an 

audible warning and steering wheel 

vibration depending on the collision 

risk levels. Braking will be applied 

depending on the collision risk levels. If 

‘Forward Safety’ is deselected, Forward 

Safety will turn off and the warning light 

 will illuminate on the cluster.

CarManuals2.com

Driver Assistance System

7-8

if equipped

Forward Cross-Traffic Safety

B0312EU02

With the engine on, select or deselect 

Driver Assistance

 > 

Driving Safety

 > 

Forward Cross-Traffic Safety

’ from the 

Settings menu to turn on Junction 

Crossing function and deselect to turn off 

the function.

if equipped

Forward/Side Safety

B0312EU03

With the engine on, select or deselect 

Driver Assistance

 > 

Driving Safety

 > 

Forward/Side Safety

’ from the Settings 

menu to turn on Lane-Change Oncoming 

function, Lane-Change Side function, 

Evasive Steering Assist function and 

deselect to turn off the function.
If ‘Forward/Side Safety’ is selected, 

Forward Collision-Avoidance Assist will 

warn the driver, steering wheel vibration 

depending on the collision risk levels. 

Steering assist will be applied depending 

on the collision risk levels. If 

‘Forward/Side Safety’ is deselected, 

Forward/Side Safety will turn off and the 
warning light 

 will illuminate on the 

cluster.
The driver can monitor Forward 

Collision-Avoidance Assist On/Off status 

from the Settings menu. If the warning 
light 

 or 

 remains ON when Forward 

Collision-Avoidance Assist is on, Have the 

vehicle inspected by an authorized 

HYUNDAI dealer.


WARNING


When the engine is restarted, Forward 

Collision-Avoidance Assist will always 

turn on. However, if ‘Forward Safety’, 

‘Forward-Cross Traffic Safety’ and 

‘Forward/Side Safety’ is deselected, the 

driver should always be aware of the 

surroundings and drive safely.


CarManuals2.com


Content      ..     10      11      12      13     ..