Hyundai Palisade (2024 year). Manual in english - page 10
 

  Index      Manuals     Hyundai Palisade (2024 year). Manual in english


Search            copyright infringement  


Content      ..     8      9      10      11     ..


Hyundai Palisade (2024 year). Manual in english - page 10


5

5-143

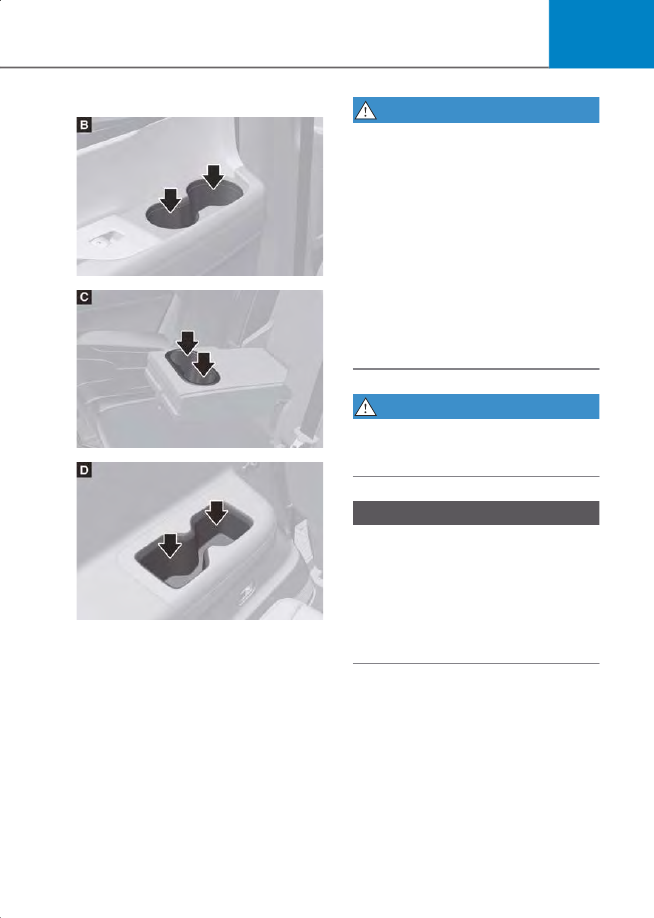
Rear (2nd row, 3rd row)

B0225KO03

B0225KO05

B0225KO04

[B] : 2

rd

 row seat,

[C] : 2

rd

 row seat armrest (if equipped)

[D] : 3

rd

 row seat

Cups or small beverages cups may be 

placed in the cup holders.


WARNING


• Avoid abrupt starting and braking when 

the cup holder is in use to prevent 

spilling your drink. If hot liquid spills, 

you could be burned. Such a burn to the 

driver could cause loss of vehicle 

control resulting in an accident.

• Do not place uncovered or unsecured 

cups, bottles, cans, etc., in the cup 

holder containing hot liquid while the 

vehicle is in motion. Injuries may result 

in the event of a sudden stop or 

collision.

• Only use soft cups in the cup holders. 

Hard objects can injure you in an 

accident.


WARNING


Keep cans or bottles out of direct sun light 

and do not put them in a hot vehicle. It 

may explode.


NOTICE


• Keep your drinks sealed while driving to 

prevent spilling your drink. If liquid 

spills, it may get into the vehicle’s 

electrical/electronic system and 

damage electrical/electronic parts.

• When cleaning spilled liquids do not 

use hot air to blow out or dry the cup 

holder. This may damage the interior.


CarManuals2.com

Convenience Features

5-144

Conversation mirror

B9023EU01

You can see widely the rear view through 

the conversation mirror.
To open:
Press the cover and the holder will slowly 

open.
To close:
Push back into position.

Sunvisor

B0226KO01

To use the sunvisor, pull it downward.
To use the sunvisor to block the sun from 

the side window, pull it rearward, release 

it from the bracket (1) and swing it to the 

side (2) towards the window.
To use the vanity mirror, pull down the 

sunvisor and slide the mirror cover (3) .
Adjust the sunvisor forward or backward 

(4) as needed (if equipped). Use the ticket 

holder (5) to hold tickets.
Close the vanity mirror cover securely and 

return the sunvisor to its original position 

after use.


WARNING


For your safety, do not block your view 

when using the sunvisor.


NOTICE


The tab (5) adjacent to the vanity mirror 

on the sunvisor can be used for toll road 

tickets or self parking tickets. Use caution 

when inserting tickets into the ticket 

holder to avoid damage. Refrain from 

putting several tickets in the ticket holder 

as this could also damage the retaining 

tab.


CarManuals2.com

5

5-145

Power Outlet

B0228KO01

B0228KO02

B0228KO03

[A] : Front

[B] : Rear (2

nd

 row)

[C] : Luggage compartment

The power outlet is designed to provide 

power for mobile telephones or other 

devices designed to operate with vehicle 

electrical systems.
The devices should draw less than 180 W 

with the engine running.


WARNING


Avoid electrical shocks. Do not place your 

fingers or foreign objects (pin, etc.) into a 

power outlet or touch the power outlet 

with a wet hand.


NOTICE


To prevent damage to the power outlets:
• Use the power outlet only when the 

engine is running and remove the 

accessory plug after use. Using the 

accessory plug for prolonged periods of 

time with the engine off could cause 

the battery to discharge.

• Only use 12 volts electric accessories 

which are less than 180 watts in electric 

capacity.

• Adjust the air-conditioner or heater to 

the lowest operating level when using 

the power outlet.

• Close the cover when not in use.
• Some electronic devices can cause 

electronic interference when plugged 

into a vehicle’s power outlet. These 

devices may cause excessive audio 

static and malfunctions in other 

electronic systems or devices used in 

your vehicle.

• Push the plug in as far as it will go. If 

good contact is not made, the plug may 

overheat and the fuse may open.

• Plug in battery equipped 

electrical/electronic devices with 

reverse current protection. The current 

from the battery may flow into the 

vehicle’s electrical/electronic system 

and cause system malfunction.


CarManuals2.com

Convenience Features

5-146

USB Charger

B0229KO01

B0229KO02

[A] : Front

[B] : Rear (2

nd

 row)

B0229KO03

B0229KO04

B0920EU01

[C] : Rear (3

rd

 row, left side)

[D] : Rear (3

rd

 row, right side)

[E] : Center console storage (if equipped)

The USB charger is designed to recharge 

batteries of small size electrical devices 

using a USB cable.
The electrical devices can be recharged 

when the ignition switch is in the ON or 

START position.
The battery charging state may be 

monitored on the electrical device.
Disconnect the USB cable from the USB 

port after use.

CarManuals2.com

5

5-147

• A smart phone or a tablet PC may get 

warmer during the re-charging 

process. It does not indicate any 

malfunction with the charging system.

• A smart phone or a tablet PC, which 

adopts a different re-charging method, 

may not be properly re-charged. In this 

case, use an exclusive charger of your 

device.

• The charging terminal is only to 

recharge a device. Do not use the 

charging terminal either to turn ON an 

audio or to play media In the 

infotainment system.

 Information


Charging may not be possible when using 

a Type-C converter sold by a mobile 

phone manufacturer or commercially 

available.


NOTICE


• Use the USB charger when the engine is 

running. Using the USB charger for 

prolonged periods of time with the 

engine off could cause the battery to 

discharge.

• To prevent damage to the USB charger:

- Do not insert foreign objects or spill 

liquid into the outlet. The USB 

charging terminal may be damaged.

- Do not use devices with current 

consumption exceeding 2,100 mA 

(2.1 A).


if equipped

AC Inverter

B0920EU01

The AC inverter supplies 115 volts (150 

watts) electric power to operate electric 

accessories or equipment.

 Information


B0920EU02

• Rated voltage: AC 115 volts
• Maximum electric power: 150 watts
• In order to avoid an electrical system 

failure, electric shock, etc., be sure to 

read owner’s manual before use.

• Be sure to close the cover except the 

time of use.


CarManuals2.com

Convenience Features

5-148


WARNING


To reduce a risk of serious or fatal injuries:
• Do not use a heated electric device 

such as a coffeepot, toaster, heater, 

iron, etc.

• Do not insert foreign objects into the 

outlet and do not touch the outlet as 

you may get shocked.

• Do not let children touch the AC 

inverter.


NOTICE


• To prevent the battery from being 

discharged, do not use the AC inverter 

while the engine is not running.

• When not using the AC inverter, make 

sure to close the AC inverter cover.

• After using an electric accessory or 

equipment, pull the plug out. Leaving 

the accessory or equipment plugged in 

for a long time may cause battery 

discharge.

• Do not use an electric accessory or 

equipment the power consumption of 

which is greater than 220 volts/200 

watts.

• Some electric accessories or 

equipment can cause electronic 

interference. It may cause excessive 

audio noise and malfunctions in other 

electric systems or devices in the 

vehicle.

• Do not use broken electric accessories 

or equipment, which may damage the 

AC inverter and electrical systems of 

the vehicle.

• Do not use two or more electric 

accessories or equipment at the same 

time. It may cause damage to the 

electrical systems of the vehicle.

• When the input voltage is lower, outlet 

LED will blink and the AC inverter will 

turn off automatically. If the input 

voltage goes up to normal, the AC 

inverter will turn on again.


Wireless Smart Phone 

Charging System

B0230KO01

[A] : Indicator light

[B] : Charging pad

On certain models, the vehicle comes 

equipped with a wireless smart phone 

charger.
The system is available when all doors are 

closed, and when the ignition switch or 

Engine Start/Stop button is in the ON or 

START position.

CarManuals2.com

5

5-149

Charging smart phone

Visit your smart phone manufacturer’s 

website to check whether your smart 

phone supports the Qi technology.
The wireless charging process starts 

when you put a Qi-enabled smart phone 

on the wireless charging unit with the 

screen facing up.
1. The wireless smart phone charger is 

available when all doors are closed, and 

when the ignition switch is in the ON or 

START position.

2. Turn on the wireless charging function 

from the Settings menu in the 

infotainment system. Select:

Setup

 > 

Vehicle

 > 

Convenience

 > 

Wireless Charging System

3. Place the smart phone in the center of 

the wireless charging pad. The 

indicator light is orange when the smart 

phone is charging and turns blue when 

phone charging is complete.

 Information


• Remove other items, including the 

smart key and the card key from the 

wireless charging pad.

• For flip type smartphones, when using 

wireless charging, place the 

smartphone folded with the device’s 

back placed on the center of the 

wireless charging unit.


The indicator light will blink orange for 10 

seconds if there is a malfunction in the 

wireless charging system.
In this case, temporarily stop the charging 

process, and re-attempt to charge your 

smart phone again.
The system warns you with a message on 

the LCD display if the smart phone is still 

on the wireless charging unit after the 

vehicle is turned OFF and the front door is 

opened.
For some manufacturer’s smart phones, 

the system may not warn you even 

though the smart phone is left on the 

wireless charging unit. This is due to the 

particular characteristic of the smart 

phone and not a malfunction of the 

wireless charging.

NOTICE


• The wireless smart phone charging 

system may not support certain smart 

phones, which are not verified for the 
Qi specification ( ).

• When placing your smart phone on the 

charging pad, position the phone in the 

middle of the mat for optimal charging 

performance. If your smart phone is off 

to the side, the charging rate may be 

less and in some cases the smart phone 

may experience higher heat 

conduction.

• In some cases, the wireless charging 

may stop temporarily when the smart 

key is used, either when starting the 

vehicle or locking/unlocking the doors, 

etc.

• When charging certain smart phones, 

the charging indicator may not change 

to blue when the smart phone is fully 

charged.

CarManuals2.com

Convenience Features

5-150

• The wireless charging process may 

temporarily stop, when temperature 

abnormally increases inside the 

wireless smart phone charging system. 

The wireless charging process restarts, 

when temperature falls to a certain 

level.

• The wireless charging process may 

temporarily stop when there is any 

metallic item, such as a coin, between 

the wireless smart phone charging 

system and smart phone.

• When charging some smart phones 

with a self-protection feature, the 

wireless charging speed may decrease 

and the wireless charging may stop.

• If the smart phone has a thick cover, the 

wireless charging may not be possible.

• If the smart phone is not completely 

contacting the charging pad, wireless 

charging may not operate properly.

• If the ignition switch or Engine 

Start/Stop button is in the OFF position, 

the charging also stops.

• When any smart phone without a 

wireless charging function or a metallic 

object is placed on the charging pad, a 

small noise may sound. This small 

sound is due to the vehicle discerning 

compatibility of the object placed on 

the charging pad. It does not affect 

your vehicle or the smart phone in any 

way.

• Some smart phones may not be able to 

charge depending on the internal 

structure of the smart phone. If this 

occurs, try charging the mobile phone 

by moving it to the left or right side of 

the wireless charging pad. However, for 

some foldable smart phones that have 

magnets inside the smart phone, try 

charging the smart phone while holding 

it close to the left side of the wireless 

charging pad.


NOTICE


Some magnetic items like credit cards, 

phone cards or rail tickets may be 

damaged if left with the smart phone 

during the charging process.


 Information


This device complies with Part 15 of the 

FCC rules.
Operation is subject to the following three 

conditions:
1. This device may not cause harmful 

interference, and

2. This device must accept any 

interference received, including 

interference that may cause undesired 

operation.

3. Changes or modifications not expressly 

approved by the party responsible for 

compliance could void the user’s 

authority to operate the device.


Clock

The clock can be set from the 

infotainment system.


WARNING


Do not attempt to adjust the clock while 

driving. Doing so may result in distracted 

driving which may lead to an accident 

involving personal injury or death.


 Information


For more information, refer to the user's 

manual provided in the infotainment 

system and the quick reference guide.


CarManuals2.com

5

5-151

Coat Hook

B0231KO01

These hooks are not designed to hold 

large or heavy items.


WARNING


B0231KO02

Do not hang other objects such as 

hangers or hard objects except clothes. 

Also, do not put heavy, sharp or breakable 

objects in the clothes pockets. In an 

accident or when the curtain air bag is 

inflated, it may cause vehicle damage or 

personal injury.


Floor Mat Anchor(s)

ALWAYS use the Floor Mat Anchors to 

attach the front floor mats to the vehicle. 

The anchors on the front floor carpet keep 

the floor mats from sliding forward.


WARNING


Do not overlay additional mats or liners 

over the floor mats. If using All Weather 

mats, remove the carpeted floor mats 

before installing them. Only use floor 

mats designed to connect to the anchors.


WARNING


The following must be observed when 

installing ANY floor mat to the vehicle.
• Ensure to remove a protective film 

attached on the carpet before 

attaching a floor mat on the front floor 

carpet. Otherwise, the floor mat may 

move freely on the protective film and it 

could result in unintentional braking or 

accelerating.

• Ensure that the floor mats are securely 

attached to the vehicle’s floor mat 

anchor(s) before driving the vehicle.

• Do not use ANY floor mat that cannot 

be firmly attached to the vehicle’s floor 

mat anchors.

• Do not stack floor mats on top of one 

another (for example, all-weather 

rubber mat on top of a carpeted floor 

mat). Only a single floor mat should be 

installed in each position.


NOTICE


Your vehicle was manufactured with 

driver’s side floor mat anchors that are 

designed to securely hold the floor mat in 

place. To avoid any interference with 

pedal operation, HYUNDAI recommends 

that the HYUNDAI floor mat designed for 

use in your vehicle be installed.


CarManuals2.com

Convenience Features

5-152

if equipped

Rear Side Window Sunshades

Use the rear side window sunshade to 

block external light coming through the 

rear window glass.

Manual sunshades

B0233KO01

1. Lift the sunshade by the handle (A).
2. Hang the sunshade on both sides of the 

hook (B). If the sunshade is hung on one 

side of the hook, the sunshade may be 

wrinkled.

NOTICE


• Do not hang any other object except 

the rear side window sunshade on the 

hooks.

• If you pull the rear side window 

sunshade or apply force to return the 

sunshade to its original position after 

use, you may find the sunshade 

wrinkled or out of shape. To lower the 

sunshade, be sure to put the handle 

downward and slowly return the 

sunshade to its original position.

• Sunshades may not work properly if 

foreign objects (coins, toys, cookies, 

etc.) are stuck in the door. Be careful 

that the foreign objects do not get into 

the door.


if equipped

Cargo Net Holder

To keep items from shifting in the cargo 

area, you can use the 4 holders located in 

the luggage board to attach a cargo net.
Make sure the cargo net is securely 

attached to the holders in the luggage 

board.
If necessary, contact your authorized 

HYUNDAI dealer to obtain a luggage net.


WARNING


Avoid eye injury. DO NOT overstretch the 

cargo net. ALWAYS keep your face and 

body out of the cargo net’s recoil path. 

DO NOT use the cargo net when the strap 

has visible signs of wear or damage.
Use the cargo net to keep only light items 

from shifting in the cargo area.


CarManuals2.com

5

5-153

if equipped

Cargo Security Screen

Use the cargo security screen to cover 

items stored in the cargo area.

Using the cargo security screen

B9027EU02

1. Pull the cargo security screen towards 

the rear of the vehicle by the handle (1).

2. Insert the guide pin (2) into the guide 

(3).

 Information


Pull out the cargo security screen with the 

handle in the center to prevent the guide 

pin from falling out of the guide.


When the cargo security screen is not in 

use:

1. Pull the cargo security screen rearward 

and up to release it from the guides.

2. The cargo security screen will 

automatically slide back in.

 Information


The cargo security screen may not 

automatically slide back in if the cargo 

security screen is not fully pulled out. Pull 

the cargo screen out all the way and then 

slowly allow the screen to retract back in.


NOTICE


Since the cargo security screen may be 

damaged or malformed, do not put 

luggage on it when it is used.


WARNING


• Do not place objects on the cargo 

security screen. Such objects may be 

thrown about inside the vehicle and 

possibly injure vehicle occupants 

during an accident or when braking.

• Never allow anyone to ride in the 

luggage compartment. It is designed 

for luggage only.

• Maintain the balance of the vehicle and 

locate the weight as forward as 

possible.


Removing the cargo security screen

1. Push one side of the cargo screen 

inward to compress the spring and 

release the screen from the vehicle.

2. While the spring is compressed, pull out 

the cargo security screen.

3. Open the luggage tray and keep the 

cargo security screen in the tray.

CarManuals2.com

Convenience Features

5-154

Removing the cargo security screen 

from the luggage tray

B9027EU03

1. Pull up the screen board.

B9027EU04

2. Push in the guide pin.

B9027EU05

3. While pushing the guide pin, pull out 

the cargo security screen.

NOTICE


Since the cargo security screen may be 

damaged or malformed, do not put 

luggage on it when it is used.


Exterior Features

Roof Side Rails

B0919KO01

If your vehicle comes with roof side rails, 

then roof side rails crossbars can be 

installed on top of your vehicle.
The roof side rails crossbars are an 

accessory and are available at your local 

HYUNDAI dealer.

NOTICE


If the vehicle is equipped with a sunroof, 

be sure not to position cargo onto the roof 

side rails in such a way that it could 

interfere with sunroof operation.


NOTICE


• When carrying cargo on the roof side 

rails, take the necessary precautions to 

make sure the cargo does not damage 

the roof of the vehicle.

• When carrying large objects on the roof 

side rails, make sure they do not exceed 

the overall roof length or width.


CarManuals2.com

5

5-155


WARNING


• The following specification is the 

maximum weight that can be loaded 

onto the roof side rails. Distribute the 

load as evenly as possible onto the roof 

side rails and secure the load firmly.
Loading cargo or luggage in excess of 

the specified weight limit on the roof 

side rails may damage your vehicle.

• The vehicle center of gravity will be 

higher when items are loaded onto the 

roof side rails. Avoid sudden starts, 

braking, sharp turns, abrupt maneuvers 

or high speeds that may result in loss of 

vehicle control or rollover resulting in 

an accident.

• Always drive slowly and turn corners 

carefully when carrying items on the 

roof side rails. Severe wind updrafts, 

caused by passing vehicles or natural 

causes, can cause sudden upward 

pressure on items loaded on the roof 

side rails. This is especially true when 

carrying large, flat items such as wood 

panels or mattresses. This could cause 

the items to fall off the roof side rails 

and cause damage to your vehicle or 

others around you.

• To prevent damage or loss of cargo 

while driving, check frequently before 

or while driving to make sure the items 

on the roof side rails are securely 

fastened.


Infotainment System

NOTICE


• If you install an aftermarket HID head 

lamp, your vehicle’s audio and 

electronic devices may not function 

properly.

• Prevent chemicals such as perfume, 

cosmetic oil, sun cream, hand cleaner, 

and air freshener from contacting the 

interior parts because they may cause 

damage or discoloration.


USB Port

B0241KO01

You can use an USB cable to connect 

audio devices to the vehicle USB port.

 Information


When using a portable audio device 

connected to the power outlet, noise may 

occur during playback. If this happens, 

use the portable audio device’s power 

source.


ROOF SIDE 

RAILS

220 lbs. (100 kg)

EVENLY DISTRIBUTED

CarManuals2.com

Convenience Features

5-156

Antenna

B0237KO01

The shark fin antenna will receive AM, FM 

broadcast and SXM channel signals and 

transmit data.

Steering Wheel Remote 

Controls

B0238EU01

NOTICE


Do not operate multiple audio remote 

control buttons simultaneously.


(1) VOLUME (VOL + / VOL -)

Push the lever up or down to adjust the 

volume.

 Information


You can set the volume level of each 

source (FM, AM, SXM, USB, BT, etc.) 

individually by adjusting the VOLUME 

scroll.
Then the infotainment system saves the 

last volume level of each source in the 

system sound settings.
If you change the source, the volume will 

revert to the previously set volume for 

that source.


(2) SEEK/PRESET (

 / 

)

If the SEEK/PRESET switch is pressed up 

or down and held for 0.8 second or more, 

it will function in the following modes:

RADIO mode

It will function as the AUTO SEEK select 

button. It will SEEK until you release the 

button.

MEDIA mode

It will function as the FF/RW button.

If the SEEK/PRESET switch is pressed up 

or down, it will function in the following 

modes:

RADIO mode

It will function as the PRESET STATION 

UP/DOWN button.

MEDIA mode

It will function as the TRACK UP/ DOWN 

button.

CarManuals2.com

5

5-157

(3) MODE

Press the MODE button to toggle through 

Radio mode.

(4) MUTE ( )

Press the MUTE ( ) button to mute or 

activate the sound.

(5) Custom ( )

Press the Custom button to set frequently 

used features.

 Information


The infotainment system may change 

after software updates. For more 

information, refer to the user's manual 

provided in the infotainment system and 

the quick reference guide.


Infotainment System

B0239KO01

For more information, refer to the user's 

manual provided in the infotainment 

system and the quick reference guide.

Voice Recognition

B0243KO01

For more information, refer to the user's 

manual provided in the infotainment 

system and the quick reference guide.

CarManuals2.com

Convenience Features

5-158

Bluetooth® Wireless 

Technology

B0242KO01

B0242EU02

(1) Call/Answer/Call end button
(2) Microphone
For more information, refer to the user's 

manual provided in the infotainment 

system and the quick reference guide.


CAUTION


To avoid driver distractions, do not 

excessively operate the device while 

driving the vehicle which may lead to an 

accident.


CarManuals2.com

6

6.  Driving Your Vehicle

Before Driving ..................................................................................................................6-4

Before Entering the Vehicle ........................................................................................6-4
Before Starting .............................................................................................................6-4

Ignition Switch .................................................................................................................6-5

Key Ignition Switch ......................................................................................................6-5
Engine Start/Stop Button ............................................................................................6-8

Vehicle Auto-shut Off.................................................................................................... 6-13

Operating Conditions ................................................................................................ 6-13
Deactivating Conditions............................................................................................ 6-13
System Operation ...................................................................................................... 6-13

Automatic Transmission ............................................................................................... 6-14

Automatic Transmission Operation.......................................................................... 6-14
LCD Display Messages (Cluster)............................................................................... 6-19
Paddle Shifter (Manual Shift Mode) .........................................................................6-24
Good Driving Practices..............................................................................................6-24

Braking System ..............................................................................................................6-25

Power-Assist Brakes ..................................................................................................6-25
Disc Brakes Wear Indicator .......................................................................................6-26
Electronic Parking Brake (EPB) .................................................................................6-26
Auto Hold....................................................................................................................6-30
Anti-Lock Brake System (ABS)..................................................................................6-33
Electronic Stability Control (ESC) .............................................................................6-35
Vehicle Stability Management (VSM)....................................................................... 6-37
Hill-Start Assist Control (HAC) ..................................................................................6-38
Trailer Stability Assist (TSA).......................................................................................6-39
Downhill Brake Control (DBC).................................................................................. 6-40
Good Braking Practices ............................................................................................. 6-41

All Wheel Drive (AWD)...................................................................................................6-42

All Wheel Drive (AWD) Operation .............................................................................6-42
AWD Operation ..........................................................................................................6-43
Emergency Precautions ............................................................................................6-45

Idle Stop And Go (ISG)...................................................................................................6-47

ISG System Operation ...............................................................................................6-47
ISG System Off .......................................................................................................... 6-49
Forced to Restart Engine...........................................................................................6-50
ISG Malfunction..........................................................................................................6-50

CarManuals2.com

6

Calibrating the Battery Sensor ................................................................................. 6-50

Drive Mode Integrated Control System ....................................................................... 6-51

Selecting Drive Mode................................................................................................. 6-51
Changing Drive Mode ................................................................................................ 6-51
CUSTOM Mode Features .......................................................................................... 6-53
Multi Terrain Mode (AWD) ........................................................................................ 6-54
TOW Mode ................................................................................................................. 6-54

Special Driving Conditions ........................................................................................... 6-55

Hazardous Driving Conditions.................................................................................. 6-55
Rocking the Vehicle .................................................................................................. 6-55
Smooth Cornering ..................................................................................................... 6-56
Driving at Night ......................................................................................................... 6-56
Driving in the Rain ..................................................................................................... 6-56
Driving in Flooded Areas........................................................................................... 6-56
Highway Driving .........................................................................................................6-57
Reducing the Risk of a Rollover ................................................................................6-57

Winter Driving ............................................................................................................... 6-58

Snow or Icy Conditions ............................................................................................. 6-58
Winter Precautions....................................................................................................6-60

Trailer Towing................................................................................................................ 6-62

If You Decide to Pull a Trailer?.................................................................................. 6-62
Trailer Towing Equipment......................................................................................... 6-64
Driving with a Trailer ................................................................................................. 6-65
Maintenance When Towing a Trailer ....................................................................... 6-67

Vehicle Load Limit.........................................................................................................6-68

The Loading Information Label ................................................................................6-69

CarManuals2.com

6

6-3


WARNING


Carbon monoxide (CO) gas is toxic. Breathing CO can cause unconsciousness and death.


Engine exhaust contains carbon monoxide which cannot be seen or smelled.

Do not inhale engine exhaust.

If at any time you smell engine exhaust inside the vehicle, open the windows 

immediately. Exposure to CO can cause unconsciousness and death by asphyxiation.

Be sure the exhaust system does not leak.

The exhaust system should be checked whenever the vehicle is raised to change the oil 

or for any other purpose. If you hear a change in the sound of the exhaust or if you drive 

over something that strikes the underneath side of the vehicle, have the exhaust system 

checked as soon as possible by an authorized HYUNDAI dealer.

Do not run the engine in an enclosed area

.

Letting the engine idle in your garage, even with the garage door open, is a hazardous 

practice. Run the engine only long enough to start the engine and to move the vehicle 

out of the garage.

Avoid idling the engine for prolonged periods with people inside the vehicle.

If it is necessary to idle the engine for a prolonged period with people inside the vehicle, 

be sure to do so only in an open area with the air intake set at “Fresh” and fan control set 

to high so fresh air is drawn into the interior.

Keep the air intakes clear.

To assure proper operation of the ventilation system, keep the ventilation air intakes 

located in front of the windshield clear of snow, ice, leaves, or other obstructions.

If you must drive with the liftgate open:

Close all windows.
Open instrument panel air vents.
Set the air intake control at “Fresh”, the air flow control at “Floor” or “Face”, and the fan 

control set to high.


WARNING


CALIFORNIA PROPOSITION 65 WARNING
Engine exhaust and a wide variety of automobile components including components 

found in the interior furnishings in a vehicle, contain or emit harmful chemicals known to 

the State of California to cause cancer and birth defects and reproductive harm. In 

addition, certain fluids contained in vehicles and certain products of components contain 

or emit chemicals known to the State of California to cause cancer and birth defects or 

other reproductive harm.


CarManuals2.com

Driving Your Vehicle

6-4

Before Driving

Before Entering the Vehicle

• Be sure all windows, side view 

mirror(s), and outside lights are clean 

and unobstructed.

• Remove frost, snow, or ice.
• Visually check the tires for uneven wear 

and damage.

• Check under the vehicle for any sign of 

leaks.

• Be sure there are no obstacles behind 

you if you intend to back up.

Before Starting

• Make sure the hood, the liftgate, and 

the doors are securely closed and 

locked.

• Adjust the position of the seat and 

steering wheel.

• Adjust the inside and outer side view 

mirrors.

• Verify all the lights work.
• Fasten your seat belt. Check that all 

passengers have fastened their seat 

belts.

• Check the gauges and indicators in the 

instrument panel and the messages on 

the instrument display when ignition 

switch or Engine Start/Stop button is in 

the ON position.

• Check that any items you are carrying 

are stored properly or fastened down 

securely.


WARNING


To reduce the risk of SERIOUS INJURY or 

DEATH, take the following precautions:
• ALWAYS wear your seat belt. All 

passengers must be properly belted 

whenever the vehicle is moving. For 

more information, refer to “Seat Belts” 

section in chapter 3.

• Always drive defensively. Assume other 

drivers or pedestrians may be careless 

and make mistakes.

• Stay focused on the task of driving. 

Driver distraction can cause accidents.

• Leave plenty of space between you and 

the vehicle in front of you.


WARNING


NEVER drink or take drugs and drive.
Drinking or taking drugs and driving is 

dangerous and may result in an accident 

and SERIOUS INJURY or DEATH.
Drunk driving is the number one 

contributor to the highway death toll each 

year. Even a small amount of alcohol will 

affect your reflexes, perceptions and 

judgment. Just one drink can reduce your 

ability to respond to changing conditions 

and emergencies and your reaction time 

gets worse with each additional drink.
Driving while under the influence of drugs 

is as dangerous or more dangerous than 

driving under the influence of alcohol.
You are much more likely to have a 

serious accident if you drink or take drugs 

and drive. If you are drinking or taking 

drugs, don’t drive. Do not ride with a 

driver who has been drinking or taking 

drugs. Choose a designated driver or call 

a taxi.


CarManuals2.com

6

6-5

Ignition Switch


WARNING


To reduce the risk of SERIOUS INJURY or 

DEATH, take the following precautions:
• NEVER allow children or any person 

who is unfamiliar with the vehicle to 

touch the ignition switch or related 

parts. Unexpected and sudden vehicle 

movement can occur.

• NEVER reach through the steering 

wheel for the ignition switch, or any 

other control, while the vehicle is in 

motion. The presence of your hand or 

arm in this area may cause a loss of 

vehicle control resulting in an accident.


if equipped

Key Ignition Switch

B0246EU02

[A] : LOCK

[B] : ACC

[C] : ON

[D] : START

Whenever the front door is opened, the 

ignition switch will illuminate, provided 

the ignition switch is not in the ON 

position. The light will go off immediately 

when the ignition switch is turned on or 

go off after about 30 seconds when the 

door is closed. (if equipped)


WARNING


• NEVER turn the ignition switch to the 

LOCK or ACC position while the vehicle 

is in motion except in an emergency.
This will result in the engine turning off 

and loss of power assist for the steering 

and brake systems. This may lead to 

loss of directional control and braking 

function, which could cause an 

accident.

• Before leaving the driver's seat, always 

make sure the shift button is in P (Park) 

position, apply the parking brake, and 

turn the ignition switch to the LOCK 

position.
Unexpected vehicle movement may 

occur if these precautions are not 

followed.


NOTICE


Never use aftermarket keyhole covers. 

This may generate start-up failure due to 

communication failure.


CarManuals2.com

Driving Your Vehicle

6-6

Key Ignition Switch Positions

Switch 

Position

Action

Notes

LOCK

To turn the ignition switch to the LOCK 

position, push the key in at the ACC 

position and turn the key towards the 

LOCK position.
The ignition key can be removed in 

the LOCK position.
The steering wheel locks to protect 

the vehicle from theft. (if equipped)

ACC

Some electrical accessories are 

usable. The steering wheel unlocks.

If difficulty is experienced turning the 

ignition switch to the ACC position, 

turn the key while turning the steering 

wheel right and left to release.

ON

This is the normal key position when 

the engine has started. All features 

and accessories are usable.
The warning lights can be checked 

when you turn the ignition switch 

from ACC to ON.

Do not leave the ignition switch in the 

ON position when the engine is not 

running to prevent the battery from 

discharging.

START

To start the engine, turn the ignition 

switch to the START position. The 

switch returns to the ON position 

when you let go of the key.

The engine will crank until you release 

the key.

CarManuals2.com

6

6-7

Starting the Engine


WARNING


• Always wear appropriate shoes when 

operating your vehicle. Unsuitable 

shoes, such as high heels, ski boots, 

sandals, flip-flops, etc., may interfere 

with your ability to use the brake, 

accelerator and clutch pedals.

• Do not start the vehicle with the 

accelerator pedal depressed. The 

vehicle can move which can lead to an 

accident.

• Wait until the engine RPM is normal. 

The vehicle may suddenly move if the 

brake pedal is released when the RPM is 

high.


1. Make sure the Electronic Parking Brake 

(EPB) is applied.

2. Make sure the shift button is in P (Park).
3. Depress the brake pedal.
4. Turn the ignition switch to the START 

position. Hold the key (maximum of 10 

seconds) until the engine starts and 

release it.

 Information


• Do not wait for the engine to warm up 

while the vehicle remains stationary.
Start driving at moderate engine 

speeds. (Steep accelerating and 

decelerating should be avoided.)

• Always start the vehicle with your foot 

on the brake pedal. Do not depress the 

accelerator while starting the vehicle. 

Do not race the engine while warming it 

up.


NOTICE


To prevent damage to the vehicle:
• Do not hold the ignition key in the 

START position for more than 10 

seconds. Wait 5 to 10 seconds before 

trying again.

• Do not turn the ignition switch to the 

START position with the engine 

running. It may damage the starter.

• If traffic and road conditions permit, 

you may put the shift button in the N 

(Neutral) position while the vehicle is 

still moving and turn the ignition switch 

to the START position in an attempt to 

restart the engine.

• Do not push or tow your vehicle to start 

the engine.


CarManuals2.com

Driving Your Vehicle

6-8

if equipped

Engine Start/Stop Button

B0246KO01

Whenever the front door is opened, the 

Engine Start/Stop button will illuminate 

and will go off 30 seconds after the door 

is closed.


WARNING


• To reduce risk of serious injury or death, 

NEVER allow children or any person 

who is unfamiliar with the vehicle to 

touch the Engine Start/Stop button or 

related parts. Unexpected and sudden 

vehicle movement can occur.

• To turn the vehicle off in an emergency:

Press and hold the Engine Start/Stop 

button for more than two seconds OR 

Rapidly press and release the Engine 

Start/Stop button three times (within 

three seconds).
If the vehicle is still moving, you can 

restart the vehicle without depressing 

the brake pedal by pressing the Engine 

Start/Stop button with the gear in the N 

(Neutral) position.


WARNING


• NEVER press the Engine Start/Stop 

button while the vehicle is in motion 

except in an emergency. This will result 

in the vehicle turning off and loss of 

power assist for the steering and brake 

systems. This may lead to loss of 

directional control and braking 

function, which could cause an 

accident.

• Before leaving the driver’s seat, always 

make sure the gear is in the P (Park) 

position, set the parking brake, press 

the Engine Start/Stop button to the OFF 

position, and take the Smart Key with 

you. Unexpected vehicle movement 

may occur if these precautions are not 

followed.

• NEVER reach through the steering 

wheel for the Engine Start/Stop button 

or any other control while the vehicle is 

in motion. The presence of your hand or 

arm in this area may cause a loss of 

vehicle control resulting in an accident.


CarManuals2.com

6

6-9

Engine Stop/Start Button Positions

 Information


To prevent vehicle battery discharge, the Engine Start/Stop button changes to the OFF 

position when the Engine Start/Stop button is in the ACC or ON position with the gear in 

P (Park) for a certain period of time. When the function operates, the tail lamps will turn 

off. To use the tail lamps again, turn the headlight switch located on the steering column 

to the OFF and ON position again.


Button Position

Action

Notes

OFF

To turn off the engine, press the 

Engine Start/Stop button with the 

vehicle shifted to P (Park).If the 

Engine Start/Stop button is 

pressed with the vehicle shifted to 

D (Drive), R (Reverse) or N 

(Neutral), the gear automatically 

shift to P (Park).

ACC

Press the Engine Start/Stop 

button when the button is in the 

OFF position without depressing 

the brake pedal.
Some of the electrical accessories 

are usable.

If you leave the Engine Start/Stop 

button in the ACC position for more 

than one hour, the battery power 

will turn off automatically to 

prevent the battery from 

discharging.

ON

Press the Engine Start/Stop 

button while it is in the ACC 

position without depressing the 

brake pedal.
The warning lights can be checked 

before the engine is started.

Do not leave the Engine Start/Stop 

button in the ON position when the 

engine is not running to prevent 

the battery from discharging.

START

To start the engine, depress the 

brake pedal and press the Engine 

Start/ Stop button with the gear 

shifted to the P (Park) or the N 

(Neutral) position.
For your safety, start the engine 

with the gear shifted to the P 

(Park) position.

If you press the Engine Start/Stop 

button without depressing the 

brake pedal, the engine does not 

start and the Engine Start/Stop 

button changes as follows:

OFF

 > 

ACC

 > 

ON

 > 

OFF

CarManuals2.com

Driving Your Vehicle

6-10

Starting the Engine


WARNING


• Always wear appropriate shoes when 

operating your vehicle. Unsuitable 

shoes, such as high heels, ski boots, 

sandals, flipflops, etc., may interfere 

with your ability to use the brake and 

accelerator pedals.

• Do not start the vehicle with the 

accelerator pedal depressed.
The vehicle can move which can lead to 

an accident.

• Wait until the engine RPM is normal. 

The vehicle may suddenly move if the 

brake pedal is released when the RPM is 

high.


 Information


• The vehicle will start by pressing the 

Engine Start/Stop button, only when 

the smart key is in the vehicle.

• Even if the smart key is in the vehicle, 

and when it is far away from the driver, 

the engine may not start.

• When the Engine Start/Stop button is in 

the ACC or ON position, if any door is 

open, the system checks for the smart 

key. When the smart key is not in the 
vehicle, the ‘

’ indicator will blink 

and the warning 'Key not in vehicle' will 

come on. When all doors are closed, the 

chime will also sound for about 5 

seconds. Keep the smart key in the 

vehicle.


1. Always carry the smart key with you.
2. Make sure the parking brake is applied.
3. Make sure the gear is shifted to P (Park) 

by pressing the P button.

4. Depress the brake pedal.
5. Press the Engine Start/Stop button.

 Information


• Do not wait for the engine to warm up 

while the vehicle remains stationary.
Start driving at moderate engine 

speeds. Steep accelerating and 

decelerating should be avoided.

• Always start the vehicle with your foot 

on the brake pedal. Do not depress the 

accelerator while starting the vehicle. 

Do not race the engine while warming it 

up.


CarManuals2.com

6

6-11

NOTICE


To prevent damage to the vehicle:
• If the engine stalls while you are in 

motion, do not attempt to shift the gear 

to the P (Park) position.
If traffic and road conditions permit, 

you may put the gear in N (Neutral) 

while the vehicle is still moving and 

press the Engine Start/Stop button in 

an attempt to restart the engine.

• Do not push or tow your vehicle to start 

the vehicle.


NOTICE


To prevent damage to the vehicle:
Do not press the Engine Start/Stop button 

for more than 10 seconds except when 

the stop lamp fuse is blown.
When the stop lamp fuse is blown, you 

cannot normally start the engine. Replace 

the fuse with a new one. If you are not 

able to replace the fuse, you can start the 

engine by pressing and holding the 

Engine Start/Stop button for 10 seconds 

with the Engine Start/Stop button in the 

ACC position.
For your safety always depress the brake 

pedal before starting the vehicle.


Emergency Starting

B0248KO01

If the smart key battery is weak or the 

smart key does not work correctly, you 

can start the vehicle by pressing the 

Engine Start/Stop button with the smart 

key in the direction of the picture above.

Turning Off the Engine

1. Stop the vehicle and depress the brake 

pedal fully.

2. Press the P button to shift to P (Park).
3. Press the Engine Start/Stop button to 

the OFF position and apply the parking 

brake.

CarManuals2.com

Driving Your Vehicle

6-12

if equipped

Remote Start

B0250EU01

B0250EU02

You can start the vehicle using the 

Remote Start button of the smart key.

To start the vehicle remotely:
1. Press the door lock button within 32 ft. 

(10 m) from the vehicle.

2. Press the remote start ( ) button for 

over 2 seconds within 4 seconds after 

locking the doors. The hazard warning 

lights will blink.

3. To turn off the remote start function, 

press the remote start ( ) button once.

• The remote start ( ) button may not 

operate if the smart key is not within 32 

ft. (10 m).

• The vehicle will not remotely start if the 

engine hood or liftgate is opened.

• The vehicle must be in P (Park) for the 

remote start function to start.

• The engine turns off if you get in the 

vehicle without a registered smart key.

• The engine turns off if you do not get in 

the vehicle within 10 minutes after 

remotely starting the vehicle.

• Do not idle the engine for a long period.

CarManuals2.com

6

6-13

if equipped

Vehicle Auto-shut Off

If your vehicle is parked and the engine is 

left on for a long period of time, the 

engine will turn off automatically to help 

reduce fuel consumption and prevent 

accidents caused by carbon dioxide 

poisoning.

Operating Conditions

Vehicle Auto-Shut Off timer operates 

when all the following conditions are 

satisfied:
• Vehicle speed is below 1.8 mph (3 

km/h), and the gear is shifted to P (Park)

• The brake pedal and accelerator pedal 

are not depressed

• The driver’s seat belt is unfastened
• The passenger seat is empty
• The infotainment system is being 

updated

Deactivating Conditions

Vehicle Auto-Shut Off timer turns off 

when one of the situation occur:
• Vehicle speed is above 1.8 mph (3 

km/h)

• The gear is shifted to R (Reverse), D 

(Drive) or N (Neutral)

• The brake pedal or accelerator pedal is 

depressed

• The driver’s seat belt is fastened
• A passenger is in the passenger’s seat

System Operation

B1005EU01

When all the conditions are satisfied, the 

Vehicle Auto-Shut Off operates and turns 

the engine off automatically after 60 

minutes.
A timer appears on the instrument cluster 

30 minutes before vehicle shut off.

Resetting cluster timer

To reset the cluster timer, do one of 

following:
• Release the accelerator pedal or brake 

pedal after Vehicle Auto-Shut Off is 

complete.

• Press the OK button on the steering 

wheel while the timer appears on the 

instrument cluster.


CAUTION


Do not leave a passenger or a pet in the 

vehicle in hot weather since the air 

conditioning system turns off when the 

engine is off.


CarManuals2.com

Driving Your Vehicle

6-14

Automatic Transmission

A0251KO01

Depress the brake pedal whenever pressing the shift button to change gear or shifting P.

Automatic Transmission Operation

The automatic transmission has eight forward speeds and one reverse speed.
The individual speeds are selected automatically in the D (Drive) position.


WARNING


The automatic transmission shift button or interior parts might get hot when a vehicle is 

parked out-side during hot weather. Always be careful when the vehicle is hot.


CarManuals2.com

6

6-15


WARNING


To reduce the risk of serious injury or 

death:
• ALWAYS check the surrounding areas 

near your vehicle for people, especially 

children, before shifting a vehicle into D 

(Drive) or R (Reverse).

• Before leaving the driver's seat, always 

make sure the vehicle is shifted to the P 

(Park) position, then apply the parking 

brake, then place the ignition switch or 

press the Engine Start/Stop button to 

the LOCK/OFF position. Unexpected 

and sudden vehicle movement can 

occur if these precautions are not 

followed.

• When using the paddle shifter (manual 

shift mode), do not use engine braking 

(shifting from a high gear to lower gear) 

rapidly on slippery roads. The vehicle 

may slip causing an accident.


Transmission ranges

P (Park)

Always come to a complete stop before 

shifting into P (Park).

B0252EU06

To shift the gear to P (Park), press the P 

button while depressing the brake pedal.
If you turn the engine off in R (Reverse), N 

(Neutral) or D (Drive), the gear will 

automatically shift to P (Park).


WARNING


• Shifting into P (Park) while the vehicle is 

in motion may cause you to lose control 

of the vehicle.

• After the vehicle has stopped, always 

make sure the vehicle is in P (Park), 

apply the parking brake, and turn the 

engine off.

• When parking on an incline, shift the 

gear to P (Park) and apply the parking 

brake to prevent the vehicle from 

rolling downhill.


CarManuals2.com

Driving Your Vehicle

6-16

Automatic gear shift to P (Park)

The gear is shifted to P (Park) 

automatically for safety reasons under 

the following conditions:
• When the engine is turned off with the 

gear in R (Reverse), D (Drive) or N 

(Neutral).

• When the driver’s door is open with the 

engine running, the gear in R (Reverse), 

D (Drive) or N (Neutral), the seat belt 

unfastened and the vehicle at a 

standstill.

• When the driver’s or front passenger’s 

door is open with the gear in N (Neutral) 

and the vehicle is off.

In situations the gear must be in P (Park), 

always check if the gear is shifted to P 

(Park) by checking the cluster.

R (Reverse)

Use this position to drive the vehicle 

rearward.

B0252EU07

To shift the gear R (Reverse), press the R 

button while depressing the brake pedal.
When the vehicle is stopped in the R 

(Reverse) position, if you open the driver's 

door with the seat belt unfastened, the 

gear will automatically shift to P (Park).
However, if the vehicle is in motion, the 

gear may not automatically shift to P 

(Park) to prevent automatic transmission 

damage.

NOTICE


Always come to a complete stop before 

shifting into or out of R (Reverse); you 

may damage the transmission if you shift 

into R (Reverse) while the vehicle is in 

motion.


N (Neutral)

The wheels and transmission are not 

engaged.

B0252EU05

To shift the gear to N (Neutral), press the 

N button from R (Reverse) or D (Drive) 

while depressing the brake pedal.
Always depress the brake pedal when you 

are shifting from N (Neutral) to another 

gear.
If you turn the engine off in N (Neutral), 

the gear will automatically shift to P 

(Park).
However, if you need to stay in N 

(Neutral) with the engine off, refer to “To 

stay in N (Neutral) when vehicle is OFF”.


CAUTION


The engine can be started with the gear in 

N (Neutral), but for you safety, be sure to 

start the engine with the gear in P (Park).


CarManuals2.com


Content      ..     8      9      10      11     ..