Honda Pilot (2024 year). Manual in english - page 16
 

  Index      Manuals     Honda Pilot (2024 year). Manual in english


Search            copyright infringement  


Content      ..     14      15      16      17     ..


Honda Pilot (2024 year). Manual in english - page 16


Continued

517

uu

When Driving

u

Starting the Engine

Driving

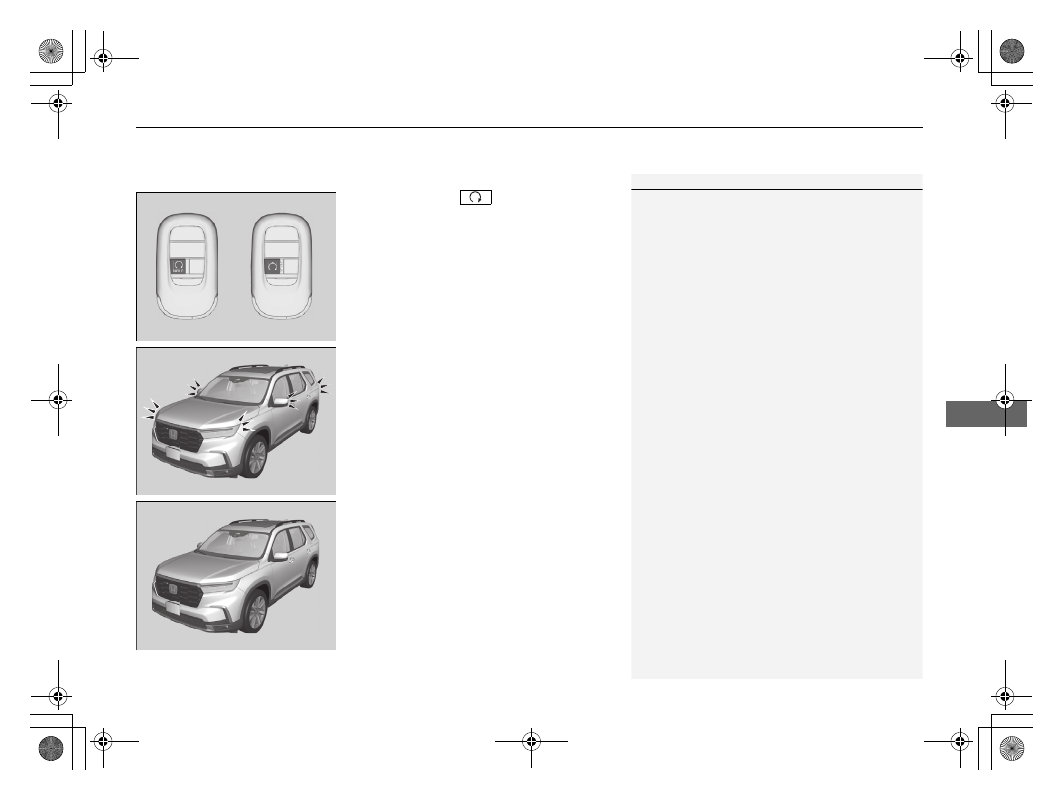
To stop the engine

Press and hold the 

 button for one 

second.

If the engine stops successfully, the exterior 
lights flash once.

When the keyless remote is out of the keyless 
access system range, the exterior lights will 
not flash.
The engine will not stop.

u

Go within the range, and try again.

1

Remote Engine Start

*

The engine may stop while it is running if:

You do not start the vehicle within 10 minutes of 
starting the engine with the keyless remote.

The engine is stopped by using the keyless remote.

The security system alarm is not set.

The door is unlocked with the built-in key.

The hood is open, or any door or the tailgate is 
unlocked.

You press the shift lever release button.

The engine coolant temperature is extremely high.

The battery is low.

The engine oil pressure is low.

The malfunction indicator lamp comes on if there is 
a problem with the emissions control systems.

While the engine is running, the vehicle will 
automatically precondition inside the vehicle.
When it is warm outside:

The climate control system is activated in 
recirculation mode.

When it is cold outside:

The defroster is activated at a moderately warm 
temperature.

The rear defogger, heated door mirrors

*

, front seat 

heaters

*

, and heated steering wheel

*

 are activated.

2

Rear Defogger/Heated Door Mirror

*


Button

 P. 232

2

Front Seat Heaters

*

 P. 280

2

Heated Steering Wheel

*

 P. 279

* Not available on all models

uu

When Driving

u

Starting the Engine

518

Driving

1.

Depress and hold the brake pedal, then press the 

ENGINE START/STOP

 button.

2.

Keeping your right foot on the brake pedal, put the transmission into 

(

D

. Select 

(

R

 when reversing.

3.

With the parking brake applied, release the brake pedal and gently depress the 
accelerator pedal.

u

Make sure the parking brake indicator (red) goes off.

2

Parking Brake

 P. 641

Hill start assist system

Hill start assist keeps the brake engaged briefly to help prevent the vehicle from 
rolling on inclines as you move your foot from the brake pedal to the accelerator.

Put the transmission into 

(

D

 or 

(

S

 when facing uphill, or 

(

R

 when facing downhill, 

then release the brake pedal.

You can turn the engine off when the vehicle is completely stopped.

1.

Depress the brake pedal and change the shift position to 

(

P

.

u

Do not release the brake pedal until you have confirmed that 

(

P

 is shown on 

the shift position indicator.

2.

Press the 

ENGINE START/STOP

 button.

Starting to Drive

Stopping the Engine

1

Starting to Drive

You can also release the parking brake by pressing 
the electric parking brake switch while depressing the 
brake pedal. When facing downhill, you can start 
your vehicle more smoothly by manually releasing it 
with the electric parking brake switch than by 
releasing it with the accelerator pedal.

The engine stops when the transmission is taken out 
of 

(

P

 before the 

ENGINE START/STOP

 button is 

pressed. Follow step 1 when starting to drive.

When the engine was started using 
the keyless remote

*

When the engine was started using the keyless remote

*

When the engine was started in any case

1

Hill start assist system

Hill start assist may not prevent the vehicle from 
rolling downhill on a very steep or slippery slope, and 
will not operate on small inclines.

Hill start assist will operate even when VSA

®

 is 

switched off.

Hill start assist is not a replacement for the parking 
brake.

1

Stopping the Engine

The power mode will automatically turn to VEHICLE 
OFF about 20 minutes after the following conditions 
have been met:

A door has been opened, such as when leaving the 
vehicle.

The transmission is in 

(

P

.

The driver’s seat belt is not fastened.

* Not available on all models

519

uu

When Driving

u

Precautions While Driving

Continued

Driving

Precautions While Driving

Utility vehicles have a significantly higher rollover rate than other types of vehicles. 
To prevent rollovers or loss of control:

Take corners at slower speeds than you would with a passenger vehicle.

Avoid sharp turns and abrupt maneuvers whenever possible.

Do not modify your vehicle in any way that you would raise the center of gravity.

Do not carry heavy cargo on the roof.

Never carry more than 165 lbs (75 kg) of cargo on the roof rack (Honda accessory).

Avoid driving in deep water and on flooded roads. This can damage the engine, 
driveline, or cause electrical component failure.

Driving Guidelines for Your Utility Vehicle

In Rain

1

Precautions While Driving

NOTICE

Do not select a shift button while pressing the 
accelerator pedal. You could damage the 
transmission.

NOTICE

If you repeatedly turn the steering wheel at an 
extremely low speed, or hold the steering wheel in 
the full left or right position for a while, the electric 
power steering (EPS) system heats up. The system 
goes into a protective mode, and limits its 
performance. The steering wheel becomes harder 
and harder to operate. Once the system cools down, 
the EPS system is restored. Repeated operation under 
these conditions can eventually damage the system.

If the power mode is set to ACCESSORY while 
driving, the engine will shut down and all steering 
and brake power assist functions will stop, making it 
difficult to control the vehicle.

Do not select 

(

N

 while driving as you will lose engine 

braking (and acceleration) performance.

During the first 600 miles (1,000 km) of operation, 
avoid sudden acceleration or full throttle operation so 
as not to damage the engine or powertrain.

Avoid hard braking for the first 200 miles (300 km) 
after purchasing your new vehicle or replacing the 
brake pads or rotors to allow for proper break-in.

uu

When Driving

u

Automatic Transmission

520

Driving

If there is a strong impact with something under the vehicle, stop in a safe location. 
Check the underside of the vehicle for damage or any fluid leaks.

Automatic Transmission

When the engine runs at higher idle speeds, the creeping force increases.
Keep the brake pedal firmly depressed when stopped.

Quickly depressing the accelerator pedal while driving uphill may cause the 
transmission to drop to a lower gear, unexpectedly increasing vehicle speed. Depress 
the accelerator pedal carefully, especially on slippery roads and curves.

Other Precautions

Creeping

Kickdown

1

Driving Guidelines for Your Utility Vehicle

Failure to operate your vehicle correctly might result 
in a crash or a rollover.

2

Important Handling Information

 P. 40

2

Precautions While Driving

 P. 519

521

uu

When Driving

u

Shifting

Continued

Driving

Shifting

Change the gear position in accordance with your driving needs.

Shift button positions

1

Shifting

To prevent malfunction and unintended 
engagement:

Do not spill any liquids on or around shift buttons.

Do not place or drop any objects on or around shift 
buttons.

Do not let passengers or children operate the shift 
buttons.

The beeper sounds and a message appears on the 
driver information interface when you depress the 
accelerator pedal with the gear position in 

(

N

.

Change the gear position to 

(

D

 or 

(

R

 with the brake 

pedal depressed.

3

WARNING

The vehicle can roll away if left unattended 
without confirming that Park is engaged.

A vehicle that rolls away could cause a crash 
resulting in serious injury or death.

Always keep your foot on the brake pedal 
until you have confirmed that 

(

P

 is shown 

on the gear position Indicator.

Park

Used when parking or starting the engine.

Reverse

Used when reversing.

Neutral

Transmission is not locked.

Drive/S Position

Each time you press the 

 button, the mode 

switches between Drive and S position mode.
Used for:

Normal driving (gears change between 1st 
and 10th automatically).

Temporarily driving in the sequential mode

Automatically changing gears between 1st 
and 8th (8th gear is used only at high speed).

Driving in the sequential mode

D/S

Drive

S Position

uu

When Driving

u

Shifting

522

Driving

(

P

 (parking) button

Park your vehicle in a safe place with the 
power mode in ON, then apply the brakes and 
press the 

(

P

 button to put the transmission in 

Park.
The indicators on the sides of the 

(

P

 button 

come on.

1

Shifting

When shifting gears in extremely low temperatures 
(−22°F/−30°C), there may be a short delay before the 
shift is indicated in the display. Always confirm you 
are in the correct gear before driving.

(

P

 Button

Continued

523

uu

When Driving

u

Shifting

Driving

Shift Operation

1

Shift Operation

NOTICE

When you change 

(

D

 to 

(

R

 and vice versa, depress 

the brake pedal to come to a complete stop, then 
select the intended gear position while maintaining 
brake pressure.

Always keep your foot on the brake pedal until you 
have confirmed that 

(

P

 is shown on the gear 

position indicator.

Use the gear position indicator and the shift button 
indicator to check the gear position before selecting 
a shift button.

If the indicator of the currently selected gear position, 
or all the gear position indicators are blinking 
simultaneously, there is a problem with the 
transmission.
Avoid sudden acceleration and have the transmission 
checked by a dealer as soon as possible.

The fuel supply may be cut off if you drive at engine 
speeds in or over the tachometer red zone (engine speed 
limit). If this happens, you may experience a slight jolt.

When the engine speed is increased while the 
transmission is in 

(

N

(

P

 or 

(

R

, the fuel supply may 

be cut off even without the engine speed entering 
the tachometer red zone.

The beeper sounds once when you change to 

(

R

.

2

Settings

*

 P. 140

2

Customized Features

 P. 426

Press the 

(

P

 button.

Pull back the 

(

R

 button.

Press the 

(

N

 button.

Press the 

 button.

Each time you press the button, 
the mode switches between Drive 
and S Position mode.

D/S

Shift Button 
Indicator

Models with A-type meter

Models with B-type meter

Gear Position Indicator 
(Transmission System Indicator)

Tachometer Red Zone

M

 (sequential 

mode) Indicator

Sequential Mode 
Gear Selection 
Indicator

Sequential Mode 
Gear Selection 
Indicator

* Not available on all models

uu

When Driving

u

Shifting

524

Driving

When opening the driver’s door

If you open the driver’s door under the following conditions, the gear position 
automatically changes to 

(

P

.

The vehicle is stationary with the engine running, or moving at 1 mph (2 km/h) or 
slower.

The transmission is in other than 

(

P

.

You have unfastened the driver side seat belt.

u

If you manually change the gear position from 

(

P

 with the brake pedal 

depressed, the gear position will automatically return to 

(

P

 once you release 

the brake pedal.

When turning off the power mode

If you turn the engine off while the vehicle is stationary, and the transmission is in 
other than 

(

P

, the gear position automatically changes to 

(

P

.

1

When opening the driver’s door

While the system is designed to automatically change 
the gear position to 

(

P

 under the described 

conditions, in the interest of safety you should always 
select 

(

P

 before opening the driver’s door.

Make sure to park the vehicle in a safe place.

2

When Stopped

 P. 650

If you want to drive the vehicle after the gear position 
has automatically changed to 

(

P

 under the described 

conditions, close the door, fasten the seat belt, 
depress the brake pedal, then change the gear 
position.

If you leave the vehicle, turn off the engine and lock 
the doors.

Continued

525

uu

When Driving

u

Shifting

Driving

If you want to keep the transmission in 

(

N

 position [car wash mode]

With the engine running:

1.

Press and hold the brake pedal.

2.

Select 

(

N

, then release the button to display (Neutral) 

(

N

 hold mode on the driver 

information interface.

3.

Press and hold 

(

N

 again for two seconds.

u

This puts the vehicle in car wash mode which must be used when your vehicle 
is pulled through a conveyor type automatic car wash where you or an 
attendant do not remain in the vehicle.

1

If you want to keep the transmission in 

(

N

 position [car wash mode]

Note that the transmission may not stay in 

(

N


position while any of the following indicators is on:

Transmission system indicator.

Malfunction indicator lamp.

Charging system indicator.

526

uu

When Driving

u

Shifting

Driving

If the 

ENGINE START/STOP

 button is pressed after car wash mode has been activated, 

the power mode will change to ACCESSORY and a message will be displayed on the 
driver information interface.

u

For 15 minutes the gear position remains in 

(

N

 with the power mode in 

ACCESSORY. After that, the position automatically changes to 

(

P

 and the 

power mode changes to OFF.

u

Manually changing to 

(

P

 cancels ACCESSORY mode. The 

(

P

 indicator comes 

on and the power mode changes to OFF. You must always shift to 

(

P

 when 

car wash mode is no longer needed.

Models with A-type meter

Models with B-type meter

527

uu

When Driving

u

Shifting

Continued

Driving

Restrictions on selecting a gear position

You cannot select a gear position under certain circumstances that may lead to a crash.

When the 
transmission is in:

1. Under these circumstances:

2. If you try to change to 
the following:

3. The gear position 
remains in/changes to:

How to change the 
gear position

(

P

The brake pedal is not depressed.

Other gear position

(

P

Release the accelerator 
pedal and depress the 
brake pedal.

The accelerator pedal is 
depressed.

(

N

The vehicle is moving at low 
speed without the brake pedal 
depressed.

(

N

The vehicle is moving at low 
speed with the accelerator pedal 
depressed.

(

N

(

D

 or 

(

S

The vehicle is moving forward.

(

R

Stop your vehicle in a 
safe place, keep the 
brake pedal pressed, 
and select the 
appropriate gear 
position.

(

R

 or 

(

N

The vehicle is moving backward.

(

D

(

S

(

R

(

N

(

D

 or 

(

S

The vehicle is moving.

(

P

uu

When Driving

u

Shifting

528

Driving

Use the paddle shifters to change between 1st and 10th gears without removing 
your hands from the steering wheel. The transmission will switch to the sequential 
mode.

When the transmission is in 

(

D

:

The vehicle will go into the sequential mode momentarily, and the sequential mode 
gear selection indicator will come on.
When the vehicle goes into the sequential mode by 

(

-

 paddle shifter and the lower 

gear is available, the transmission properly selects single or double gear change.
Once the vehicle starts traveling at constant speed or accelerates, the sequential 
mode will be automatically turned off, and the sequential mode gear selection 
indicator will go off.

Holding the 

(

+

 paddle shifter for two seconds will cancel this mode.

When the transmission is in 

(

S

The vehicle will go into the sequential mode, and the 

M

 (sequential mode) indicator 

and sequential mode gear selection indicator will come on.
If the vehicle speed increases and the engine speed reaches near the tachometer red 
zone, the transmission automatically shifts up to the next gear.
Holding the 

(

+

 paddle shifter for two seconds or pushing 

 button will cancel 

this mode. When the sequential mode is canceled, the sequential mode indicator 
and sequential mode gear selection indicator go off.

Sequential Mode

1

Sequential Mode

The sequential mode may be canceled if the drive 
mode is changed to another drive mode.

D/S

529

uu

When Driving

u

Shifting

Driving

Sequential Mode Operation

1

Sequential Mode Operation

Each paddle shift operation makes a single or double 
gear change.
To change gears continuously, release the paddle 
shifter before pulling it again for the next gear.

If the sequential mode gear selection indicator blinks 
when you try to shift up or down, this means your 
vehicle speed is not in its allowable gear range or the 
protection of transmission system is necessary.
Slightly accelerate to shift up and decelerate to shift 
down while the indicator is blinking.

Sequential 
Mode Gear 
Selection 
Indicator

*1

*2

*1: Models with A-type meter
*2: Models with B-type meter

Downshifting when pulling 
the 

 paddle shifter.

(Changes to a lower gear)

Upshifting when pulling 
the 

 paddle shifter.

(Changes to a higher gear)

Paddle Shifter 
(Shift down)

Paddle Shifter 
(Shift up)

530

uu

When Driving

u

Auto Idle Stop

Driving

Auto Idle Stop

To help maximize fuel economy, the engine automatically stops when the vehicle 
comes to a stop, depending on environmental and vehicle operating conditions. The 
indicator (green) comes on at this time.

The environmental and vehicle conditions that 
impact Auto Idle Stop system operation are 
varied.

2

Auto Idle Stop Activates When:

 P. 532, 533

The engine then restarts once the vehicle is 
about to move again, and the indicator 
(green) goes off.

2

The Engine Automatically Restarts When:


P. 534

If the driver’s door is opened while the 
indicator (green) comes on, a buzzer sounds 
to notify you that the Auto Idle Stop function 
is in operation.

A message associated with Auto Idle Stop 
appears on the driver information interface.

1

Auto Idle Stop

The 12-volt battery installed in this vehicle is 
specifically designed for a model with Auto Idle Stop. 
Using a 12-volt battery other than this specified type 
may shorten the 12-volt battery life, and prevent 
Auto Idle Stop from activating. If you need to replace 
the 12-volt battery, make sure to select the specified 
type. Ask a dealer for more details.

Auto Idle Stop 
Indicator (Green)

Continued

531

uu

When Driving

u

Auto Idle Stop

Driving

The Auto Idle Stop suspend indicator comes 
on and a message appears on the driver 
information interface when the Auto Idle Stop 
system cannot be activated.

2

Indicators

 P. 98

2

Auto Idle Stop System ON/OFF

 P. 531

To turn the Auto Idle Stop system off, press 
this button. The Auto Idle Stop system stops.

u

Auto Idle Stop system will stop, the 
indicator will come on and a message 
appears on the driver information 
interface.

The Auto Idle Stop system is turned on every 
time you start the engine, even if you turned it 
off the last time you drove the vehicle.

Auto Idle Stop Suspend Indicator

Auto Idle Stop System ON/OFF

1

Auto Idle Stop System ON/OFF

If you turn off the Auto Idle Stop system while it is 
activated, the engine will restart.

2

Auto Idle Stop Activates When:

 P. 532

If you press and hold the Auto Idle Stop 

OFF

 button, 

you can select whether to display the status messages 
or not.

Auto Idle Stop 
OFF Indicator

Auto Idle Stop 

OFF

 Button

uu

When Driving

u

Auto Idle Stop

532

Driving

The vehicle stops with the shift position in 

(

D

 and the brake pedal depressed.

When you put the transmission into 

(

P

, the Auto Idle Stop continues to operate, 

even if the brake pedal is released.

u

If you depress the brake pedal, the engine may automatically restart.

Auto Idle Stop does not activate when:

The Auto Idle Stop 

OFF

 button is pressed.

The driver’s seat belt is not fastened.

The engine is not adequately warmed up or coolant temperature is high.

The transmission fluid temperature is low or high.

The vehicle comes to a stop again before the vehicle speed reaches 3 mph 
(5 km/h) after the engine starts.

The vehicle is stopped on a steep incline.

The transmission is in a position other than 

(

D

.

The engine is started with the hood open.

u

Turn off the engine. Close the hood before you restart the engine to activate 
Auto Idle Stop.

The battery charge is low.

The internal temperature of the battery is 14°F (−10°C) or less.

The climate control system is in use, and the outside temperature is below −4°F 
(−20°C) or over 104°F (40°C).

The climate control system is in use, and the temperature is set to the 

Hi

 or 

Lo

.

 is ON (indicator on).

The Drive Mode is changed to 

SNOW

TOW

SPORT

*

TRAIL

*

, or 

SAND

*

 mode.

Auto Idle Stop Activates When:

1

Auto Idle Stop Activates When:

Do not open the hood while the Auto Idle Stop 
function is activated. If the hood is opened, the 
engine will not restart automatically.

In this case, restart the engine with the 

ENGINE 

START/STOP

 button.

2

Starting the Engine

 P. 512

Pressing the 

ENGINE START/STOP

 button causes 

the engine to no longer restart automatically. Follow 
the standard procedure to start the engine.

2

Starting the Engine

 P. 512

When ACC with Low Speed Follow is in operation, 
the vehicle stops without depressing the brake pedal 
and Auto Idle Stop may activate. In such cases, the 
engine may restart if you change the shift position 
other than 

(

D

.

* Not available on all models

533

uu

When Driving

u

Auto Idle Stop

Continued

Driving

Auto Idle Stop may not activate when:

The vehicle is stopped by braking suddenly.

The steering wheel is operated.

The fan speed is high.

The climate control system is in use, and there is a significant difference between 
the set temperature and the actual interior temperature.

The climate control system is in use, and humidity in the interior is high.

uu

When Driving

u

Auto Idle Stop

534

Driving

The brake pedal is released (without the automatic brake hold system activated).

The accelerator pedal is depressed (with the automatic brake hold system 
activated).

2

Automatic Brake Hold

 P. 645

The engine restarts even if the brake pedal is depressed

*1

 when:

The Auto Idle Stop 

OFF

 button is pressed.

The steering wheel is operated.

The transmission is put into 

(

R

 or 

(

S

, or when it is set from 

(

N

 to 

(

D

.

u

If you put the transmission into 

(

P

 after the Auto Idle Stop activates, the Auto 

Idle Stop continues to operate. In this case, the engine restarts when you 
depress the brake pedal.

The pressure on the brake pedal is reduced and the vehicle starts moving while 
stopped on an incline.

The brake pedal is released slightly during a stop.

The battery charge becomes low.

The accelerator pedal is depressed.

The driver’s seat belt is unlatched.

 is ON (indicator on).

The climate control system is in use, and the difference between the set 
temperature and actual interior temperature becomes significant.

The climate control system is being used to dehumidify the interior.

The vehicle ahead of you starts again when your vehicle stops automatically with 
ACC with Low Speed Follow.

The Drive Mode is changed to 

SNOW

TOW

SPORT

*

TRAIL

*

, or 

SAND

*

 mode.

The Engine Automatically Restarts When:

1

The Engine Automatically Restarts When:

If you are using an electronic device during Auto Idle 
Stop, the device may temporarily be turned off when 
the engine restarts.

1

The engine restarts even if the brake pedal is depressed

*1

 when:

*1: With the automatic brake hold system activated, 
you can release the brake pedal while Auto Idle Stop 
is in operation.
If the automatic brake hold system has been turned 
off, or if there is a problem with the system, the 
engine will restart automatically when you release 
the brake pedal.

2

Automatic Brake Hold

 P. 645

* Not available on all models

535

uu

When Driving

u

Auto Idle Stop

Driving

Briefly keeps the brake applied after releasing the brake pedal to restart the engine. 
This can keep your vehicle from unexpectedly moving while on an incline.

Starting Assist Brake Function

536

uu

When Driving

u

Drive Mode System

Driving

Drive Mode System

Press the drive mode switch to select the appropriate mode. The mode you select 
appears on the driver information interface.

1

Drive Mode System

The mode may not be able to be changed under 
some driving conditions.
If there is a vehicle system failure, the following 
message will also appear on the driver information 
interface, and you cannot select any other mode.

*

*

Drive Mode Switch

*

* Not available on all models

Continued

537

uu

When Driving

u

Drive Mode System

Driving

Enhances responsiveness to the driver’s input.

Optimizes the balance between operability 
and comfort.

SPORT Mode

*

1

SPORT Mode

*

While in 

SPORT

 mode, the Auto Idle Stop System will 

stay disabled regardless of the Auto Idle Stop 

OFF


button.

2

Auto Idle Stop

 P. 530

NORMAL Mode

* Not available on all models

uu

When Driving

u

Drive Mode System

538

Driving

Facilitates fuel-efficient driving.

Maximizes controllability on snowy road 
through powertrain settings.

ECON Mode

1

ECON

 Mode

While in 

ECON

 mode, the climate control system will 

be less effective and the vehicle slower to accelerate.

SNOW Mode

1

SNOW

 Mode

NOTICE

SNOW

 mode does not allow you to drive on snowy 

or frozen roads in all situations. There are limits to 

SNOW

 mode. 

When driving on snowy or frozen roads; mount 
winter tires or tire chains, reduce speed, and maintain 
sufficient distance between vehicles. 

2

Winter Tires

 P. 724

While in 

SNOW

 mode, the Auto Idle Stop System will stay 

disabled regardless of the Auto Idle Stop 

OFF

 button.

2

Auto Idle Stop

 P. 530

Continued

539

uu

When Driving

u

Drive Mode System

Driving

Maximizes controllability on roads with mud, 
gravel, or loose dirt.

Maximizes controllability on soft, sandy roads 
or off-highway through powertrain settings.

TRAIL Mode

*

1

TRAIL Mode

*

While in 

TRAIL

 Mode, images from the Surround 

View Camera System are displayed while your vehicle 
speed is about 12 mph (20 km/h) or lower. When the 
vehicle's speed reaches about 16 mph (25 km/h) or 
higher, the display will return to the previous screen.

2

Surround View Camera System

*

 P. 663

While in 

TRAIL

 mode, the Auto Idle Stop System will 

stay disabled regardless of the Auto Idle Stop 

OFF


button.

2

Auto Idle Stop

 P. 530

While in 

TRAIL

 mode, the VSA

®


OFF

 indicator turns 

on to indicate that the VSA

®

 system is optimized for 

this drive mode.

2

VSA

®

 On and Off

 P. 545

TRAILWatch

TM

SAND Mode

*

1

SAND Mode

*

While in 

SAND

 mode, the Auto Idle Stop System will 

stay disabled regardless of the Auto Idle Stop 

OFF


button.

2

Auto Idle Stop

 P. 530

While in 

SAND

 mode, the VSA

®


OFF

 indicator turns 

on to indicate that the VSA

®

 system is optimized for 

this drive mode.

2

VSA

®

 On and Off

 P. 545

* Not available on all models

uu

When Driving

u

Drive Mode System

540

Driving

Optimizes balance between driving 
performance and comfort when towing a 
trailer.

TOW Mode

1

TOW Mode

While in 

TOW

 Mode, some features of Honda 

Sensing are turned off.

2

Honda Sensing

®

 P. 556

When the Drive Mode is in 

TOW

 mode, Low Speed 

Braking Control and the rear parking sensor system 
do not operate when reversing.

2

Low Speed Braking Control

*

 P. 573

2

Parking Sensor System

*

 P. 652

While in 

TOW

 mode, the Auto Idle Stop System will 

stay disabled regardless of the Auto Idle Stop 

OFF


button.

2

Auto Idle Stop

 P. 530

For more details on towing, refer to the following.

2

Towing a Trailer

 P. 496

Models with Parking Sensor System

* Not available on all models

541

uu

When Driving

u

Drive Mode System

Driving

The mode for the next start-up is saved according to the following chart.

Each keyless remote has its own mode saved.

Next Start-up Mode

Last Mode

Next Mode

SPORT

*

NORMAL

NORMAL

NORMAL

ECON

ECON

SNOW

NORMAL

TRAIL

*

NORMAL

SAND

*

NORMAL

TOW

NORMAL

Models with driving position memory system

* Not available on all models

542

uu

When Driving

u

Hill Descent Control System

Driving

Hill Descent Control System

When driving down hills where engine braking is not enough to decelerate the 
vehicle, this system helps maintain a constant vehicle speed without needing to 
depress the brake pedal.

The system operates under the following conditions.

Driving at a speed between about 2-12 mph (3-20 km/h).

Driving downhill.

Accelerator pedal and brake pedal are not depressed.

The system’s operating status

Green: Activated

White: Standby

Vehicle speed display

White: Set speed

Gray: Current speed

u

Blinks when the vehicle speed is above 
the operating speed.

Hill Descent Control Operating Conditions

Driver Information Interface Display

1

Hill Descent Control System

The brake lights automatically come on while the 
system is in operation.

The system may not operate when driving down a 
gentle slope. Check the Hill Descent Control System 
indicator to see if the system is in operation.

The system may activate even when not driving 
downhill, such as when the vehicle leans while 
driving over uneven surfaces.

3

WARNING

Hill descent control cannot maintain a 
constant vehicle speed in every situation.

When driving down a very steep hill or on 
slippery road surfaces, the vehicle may not 
be able to maintain the vehicle speed and 
could cause a crash, resulting in serious 
injury or death.

Since Hill Descent Control is not designed 
to increase the limits of vehicle 
performance, the driver must always be 
aware of road surface conditions and drive 
safely.

System’s Operating Status

Vehicle Speed 
Display

Current Speed

Operating Range of Set Speed

543

uu

When Driving

u

Hill Descent Control System

Driving

To turn the system on

When the vehicle speed is less than about 
12 mph (20 km/h), press the 

 button to 

turn the system on.

u

The system goes into standby mode, and 
the Hill Descent Control System indicator 
(white) comes on.

When all the working conditions are met, the 
system activates, and the vehicle begins to 
maintain the vehicle speed when driving 
downhill.

u

The Hill Descent Control System indicator 
(green) comes on when operating.

To adjust the set speed

Depress the accelerator pedal or brake pedal 
to adjust the vehicle speed within the 
operating range. The vehicle speed at which 
you release the accelerator pedal or brake 
pedal will be the set speed.

To turn the system off

Press the 

 button to turn the system off.

How to Operate Hill Descent Control

1

How to Operate Hill Descent Control

Using the system repeatedly for a long time may 
cause the brakes to heat up and make the system go 
into standby mode temporarily.

Hill Descent Control is turned off every time you turn 
the engine off, even if it was turned on the last time 
you drove the vehicle.

The pedals may vibrate or you may hear the system 
working when in operation.

Hill Descent Control 
System Indicator

 (Hill Descent Control) Button

1

To turn the system off

When the vehicle speed is 37 mph (60 km/h) or more, 
the system turns off automatically.

544

uu

When Driving

u

Vehicle Stability Assist

TM

 (VSA

®

), aka Electronic Stability Control (ESC), System

Driving

Vehicle Stability Assist

TM

 (VSA

®

), aka Electronic 

Stability Control (ESC), System

VSA

®

 helps stabilize the vehicle during cornering if the vehicle turns more or less 

than what was intended. It also assists in maintaining traction on slippery surfaces. 
It does so by regulating engine output and selectively applying the brakes.

When VSA

®

 activates, you may notice that the 

engine does not respond to the accelerator. 
You may also notice some noise from the 
hydraulic brake system. You will also see the 
indicator blink.

VSA

®

 Operation

1

Vehicle Stability Assist

TM

 (VSA

®

), aka Electronic Stability Control 

(ESC), System

The VSA

®

 may not function properly if tire type and 

size are mixed. Make sure to use the same size and 
type of tire, and the air pressures as specified.

When the VSA

®

 system indicator comes on and stays 

on while driving, there may be a problem with the 
system. While this may not interfere with normal 
driving, have your vehicle checked by a dealer 
immediately.

VSA

®

 cannot enhance stability in all driving situations 

and does not control the entire braking system. You 
still need to drive and corner at speeds appropriate 
for the conditions and always leave a sufficient 
margin of safety.

The main function of the VSA

®

 system is generally 

known as Electronic Stability Control (ESC). The 
system also includes a traction control function.

The Vehicle Stability Assist

TM

 (VSA

®

) system, Adaptive 

Cruise Control (ACC) with Low Speed Follow, brake 
system (amber), and safety support indicators may 
come on in amber along with a message in the driver 
information interface when you set the power mode 
to ON after reconnecting the battery.
Drive a short distance at more than 12 mph (20 km/h).
Each indicator should go off. If any do not, have your 
vehicle checked by a dealer.

VSA

®

 System 

Indicator

545

uu

When Driving

u

Vehicle Stability Assist

TM

 (VSA

®

), aka Electronic Stability Control (ESC), System

Driving

This button is on the driver side control panel. 
To partially disable VSA

®

 functionality/

features, press and hold it until you hear a 
beep.

Your vehicle will have normal braking and 
cornering ability, but traction control function 
will be less effective.

u

Traction control function change not 
required during 

SAND

 mode

*

 and 

TRAIL


mode

*

.

To restore VSA

®

 functionality/features, press 

the  

(VSA

®


OFF

) button until you hear a 

beep. 

VSA

®

 is turned on every time you start the 

engine, even if you turned it off the last time 
you drove the vehicle.

VSA

®

 On and Off

1

Vehicle Stability Assist

TM

 (VSA

®

), aka Electronic Stability Control 

(ESC), System

In certain unusual conditions when your vehicle gets 
stuck in shallow mud or fresh snow, it may be easier 
to free it with the VSA

®

 temporarily switched off.

When the 

 (VSA

®


OFF

) button is pressed, the 

traction control function becomes less effective. This 
allows for the wheels to spin more freely at low 
speed. You should only attempt to free your vehicle 
with the VSA

®

 off if you are not able to free it when 

the VSA

®

 is on.

Immediately after freeing your vehicle, be sure to 
switch VSA

®

 on again. We do not recommend driving 

your vehicle with the VSA

®

 system switched off.

You may hear a motor sound coming from the 
engine compartment while system checks are being 
performed immediately after starting the engine or 
while driving. This is normal.

 (VSA

®


OFF

) button does not function while the 

drive mode is in 

SAND

 mode

*

 or 

TRAIL

 mode

*

.

2

Drive Mode System

 P. 536

VSA

®

 OFF Indicator

* Not available on all models

546

uu

When Driving

u

Agile Handling Assist

Driving

Agile Handling Assist

Lightly brakes each of the front and rear wheels, as needed, when you turn the 
steering wheel, and helps support the vehicle’s stability and performance during 
cornering.

1

Agile Handling Assist

The agile handling assist cannot enhance stability in 
all driving situations. You still need to drive and 
corner at speeds appropriate for the conditions and 
always leave a sufficient margin of safety.

When the VSA

®

 system indicator comes on and stays 

on while driving, the agile handling assist does not 
activate.

You may hear a sound coming from the engine 
compartment while the agile handling assist is 
activated. This is normal.

547

uu

When Driving

u

Intelligent Variable Torque Management (i-VTM4

TM

) AWD System

*

Driving

Intelligent Variable Torque Management (i-VTM4

TM

) AWD System

*

The intelligent variable torque management (i-VTM4

TM

) AWD system is a full time all 

wheel drive system that automatically controls and transfers varying amount of 
engine torque to all wheels independently according to the driving conditions.

You still need to exercise the same care when accelerating, steering, and braking 
that you would in a two-wheel drive vehicle.

Avoid continuously driving on slippery surfaces where a wheel is likely to spin out, 
and do not drive if the 

AWD temperature too hot. Do not drive. Idle engine to 

allow system to cool.

 message appears. Driving continuously under such 

conditions can damage the system’s torque distribution unit.

If 

AWD temperature too hot. Do not drive. Idle engine to allow system to 

cool.

 message appears on the driver information interface while driving, it indicates 

the differential temperature is too high. If this happens, pull to the side of the road 
when it is safe, change the shift position to 

(

P

, and idle the engine until the 

message disappears. If the message does not disappear, take your vehicle to a dealer 
to have it checked.

1

Intelligent Variable Torque Management (i-VTM4

TM

) AWD System

*

NOTICE

Do not continuously spin the front tires of your 
vehicle. Continuously spinning the front tires can 
cause transmission or rear differential damage.

The intelligent variable torque management 
(i-VTM4

TM

) AWD system may not function properly if 

tire type and size are mixed. Make sure to use the 
same size and type of tire, and the air pressures as 
specified.

2

Tire and Wheel Replacement

 P. 722

* Not available on all models

548

uu

When Driving

u

Tire Pressure Monitoring System (TPMS) with Tire Fill Assist

Driving

Tire Pressure Monitoring System (TPMS) with Tire 
Fill Assist

Monitors the tire pressure while you are 
driving. If your vehicle’s tire pressure becomes 
significantly low, the Low Tire Pressure/TPMS 
indicator comes on and a message appears on 
the driver information interface.

1

Tire Pressure Monitoring System (TPMS) with Tire Fill Assist

Conditions such as low ambient temperature and 
altitude change directly affect tire pressure and can 
trigger the Low Tire Pressure/TPMS indicator to come 
on.

2

If the Low Tire Pressure/TPMS Indicator 
Comes On or Blinks

 P. 764

Tire pressure checked and inflated in:

Warm weather can become under-inflated in 
colder weather.

Cold weather can become overinflated in warmer 
weather.

The Low Tire Pressure/TPMS indicator will not come 
on as a result of overinflation.

Only use genuine TPMS specified wheels since your 
vehicle’s wheels are equipped with the low tire 
pressure/TPMS sensor.
If you drive your vehicle without the genuine TPMS 
specified wheels, the low tire pressure/TPMS 
indicator blinks for one minutes and then stays on.

2

Tire and Wheel Replacement

 P. 722

The TPMS audibly and visually informs you of 
changes in tire pressure of the individual tire that you 
are adjusting using audible and visual indications.

If a change in tire pressure has been significant, the 
system beeps and the hazard lights flash continuously 
for five seconds when the specified tire pressure is 
reached. Stop filling the tire.

Low Tire Pressure/
TPMS Indicator


Content      ..     14      15      16      17     ..