Honda Pilot (2024 year). Manual in english - page 5
 

  Index      Manuals     Honda Pilot (2024 year). Manual in english


Search            copyright infringement  


Content      ..     3      4      5      6     ..


Honda Pilot (2024 year). Manual in english - page 5


165

uu

Gauges and Displays

u

Driver Information Interface Right Side Area (B-type-Meter)

Continued

In

strum

e

nt Pa

nel

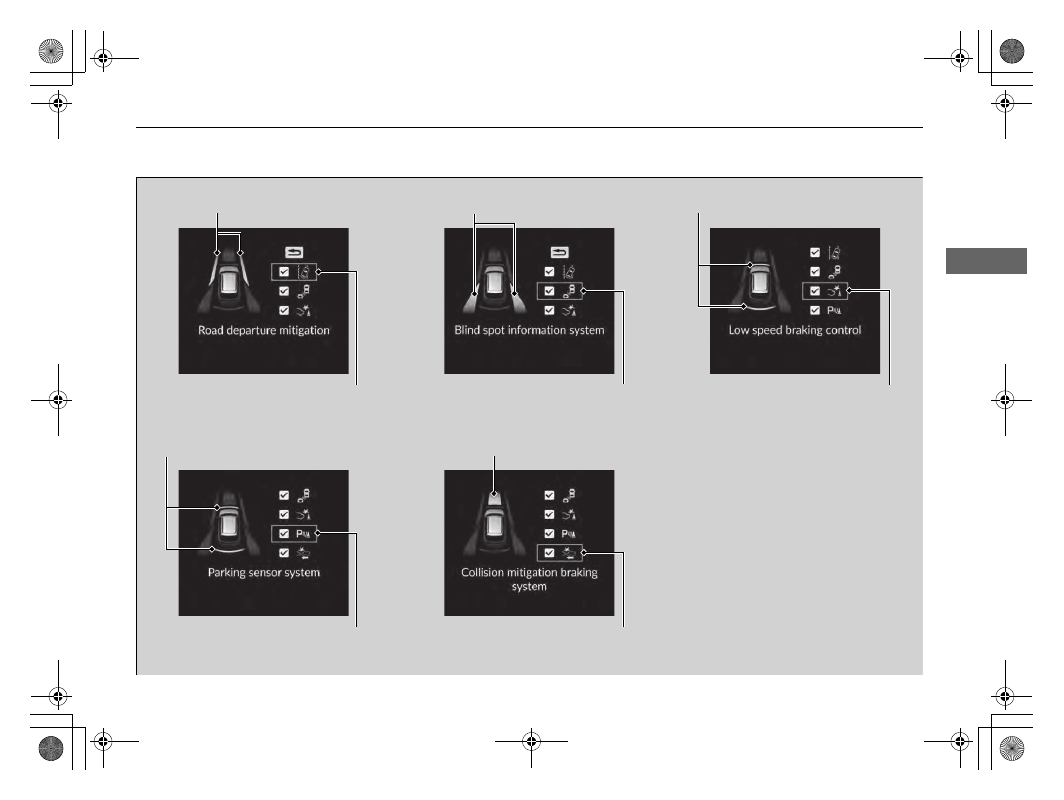
Area Info for Road Departure 
Mitigation System

Road Departure Mitigation 
System Icon and Status Info

Area Info for CMBS

TM

CMBS

TM

 Icon and Status Info

Area Info for Parking 
Sensor System

Area Info for Blind Spot 
Information System

Area Info for Low Speed 
Braking Control

Blind Spot Information System 
Icon and Status Info

Low Speed Braking Control 
Icon and Status Info

Parking Sensor System 
Icon and Status Info

uu

Gauges and Displays

u

Driver Information Interface Right Side Area (B-type-Meter)

166

In

strum

e

nt Pa

nel

Enables you to show another unit on the 
driver information interface, head-up display 
and audio/information screen and set the 
displayed measurements to read in either 
miles and mph or km and km/h.

Press and hold the right selector wheel when 
you select the No Content/Unit Change screen 
on the driver information interface. Each time 
you do this, the unit will change from miles 
and mph to km and km/h or vice versa. After 
this, a confirmation screen will appear for a 
few seconds.

Press the right selector wheel when the 

Brightness

 screen is displayed.

When the power mode is in ON, you can use the right selector wheel to adjust 
instrument panel brightness.

Brighten: 

Roll the right selector wheel up.

Dim: 

Roll the right selector wheel down.

Press the right selector wheel to exit.

Speed/Distance Units

Brightness

1

Brightness

The brightness of the gauge is automatically adjusted 
depending on the ambient brightness.

The brightness dims when the ambient light is 
dark.

The brightness brightens when the ambient light is 
bright.

You can change the setting even when the ambient 
lighting is bright, but the brightness of the gauge 
won’t change.

Continued

167

uu

Gauges and Displays

u

Driver Information Interface Right Side Area (B-type-Meter)

In

strum

e

nt Pa

nel

Arrange content on the right side area

You can choose which contents to display on the right side area.

1.

Press the right selector wheel when you 
select the 

Gauge display settings

 on the 

driver information interface.

2.

Roll the right selector wheel to scroll to 
select 

Hide/show

, then press the right 

selector wheel.

3.

Roll the right selector wheel to scroll 
between contents, then press the right 
selector wheel to check or uncheck them.

Gauge Display Settings

1

Arrange content on the right side area

Contents that are gray cannot be removed from the 
right side area.

When you customize settings, shift to 

(

P

.

uu

Gauges and Displays

u

Driver Information Interface Right Side Area (B-type-Meter)

168

In

strum

e

nt Pa

nel

Change gauge design

You can change the gauge design to a round or bar design.

1.

Press the right selector wheel when you 
select the 

Gauge display settings

 on the 

driver information interface.

2.

Roll the right selector wheel to scroll to 
select 

Gauge design

, then press the right 

selector wheel.

3.

Roll the right selector wheel to scroll to 
select your desired settings, then press the 
right selector wheel.

You can check if there are any active warning messages.

1

Change gauge design

When using the 

Round minimal

 or 

Bar minimal


gauge design, a simplified display is used when ACC 
with Low Speed Follow is in operation.

Warnings

1

Warnings

If there are multiple warnings, you can roll the right 
selector wheel to see other warnings.

169

uu

Gauges and Displays

u

Head-Up Display

*

Continued

In

strum

e

nt Pa

nel

Head-Up Display

*

Shows the current mode for ACC with Low Speed Follow, LKAS, and Traffic Jam 
Assist; compass or turn-by-turn directions; and vehicle speed. You can choose which 
item to be displayed using the driver information interface. They are displayed when 
the power mode is in ON.

The display also shows the following 
messages.

Lane Departure Warning: 

When your 

vehicle is too close to the traffic lane lines, 
the lane departure warning appears.

2

Road Departure Mitigation System


P. 579

2

Lane Keeping Assist System (LKAS)


P. 609

2

Traffic Jam Assist

 P. 622

Head-up Warning Lights:

Flash when the 

BRAKE

 message appears 

on the driver information interface.

2

Collision Mitigation Braking System

TM


(CMBS

TM

)

 P. 561

2

Low Speed Braking Control

*

 P. 573

2

Adaptive Cruise Control (ACC) with 
Low Speed Follow

 P. 587

Lane Departure Warning

* Not available on all models

uu

Gauges and Displays

u

Head-Up Display

*

170

In

strum

e

nt Pa

nel

Traffic Sign Recognition System: 

Shows 

certain detected traffic signs while driving.
If speed limit warning is activated, the sign 
icon blinks when the maximum speed of 
the traffic sign detected is exceeded by a 
threshold, when compared with the vehicle 
speed.

2

Traffic Sign Recognition System

 P. 631

Shows the display for changing the head-up display settings on the driver 
information interface.

Roll the right selector wheel to scroll to select 

Head-Up Display settings

, then 

press the right selector wheel.

2

Switching the Display

 P. 154

Traffic Sign Recognition System

Head-Up Display Settings

1

Head-Up Display

*

The default speed limit warning threshold is the 
maximum speed of the traffic sign detected.

You can adjust the threshold for speed limit warning.

2

Customized Features

 P. 426

1

Head-Up Display Settings

HUD content

2

To change head-up display content

 P. 171

HUD brightness

2

Adjusting the head-up display brightness


P. 172

HUD height

2

Adjusting the head-up display height


P. 172

* Not available on all models

171

uu

Gauges and Displays

u

Head-Up Display

*

Continued

In

strum

e

nt Pa

nel

To change head-up display content

1.

Roll the right selector wheel to scroll to select 

HUD content

, then press the right 

selector wheel.

2.

Roll the right selector wheel to scroll to select desired item, then press the right 
selector wheel.

Speedometer

2

Speedometer

 P. 173

Navigation

2

Navigation

 P. 173

Driver assist

2

Current Mode for ACC with Low Speed Follow, LKAS, and Traffic Jam Assist


P. 173

OFF

Head-Up Display

Speedometer

Driver assist

Navigation

OFF

uu

Gauges and Displays

u

Head-Up Display

*

172

In

strum

e

nt Pa

nel

Adjusting the head-up display brightness

Roll the right selector wheel to scroll to select 

HUD brightness

, then press the right 

selector wheel.

Brighten

: Roll the right selector wheel up. 

Dim

: Roll the right selector wheel down. 

Press the right selector wheel to exit.

Adjusting the head-up display height

Roll the right selector wheel to scroll to select 

HUD height

, then press the right 

selector wheel.

Raise the head-up display

: Roll the right selector wheel up.

Lower the head-up display

: Roll the right selector wheel down.

Press the right selector wheel to exit.

1

Adjusting the head-up display height

When you unlock and open the driver’s door with a 
remote transmitter or keyless access system, the 
head-up display adjusts automatically to one of the 
two preset positions.

173

uu

Gauges and Displays

u

Head-Up Display

*

In

strum

e

nt Pa

nel

Shows your driving speed in mph or km/h.

Shows the current mode for ACC with Low Speed Follow, LKAS, and Traffic Jam 
Assist.

2

Adaptive Cruise Control (ACC) with Low Speed Follow

 P. 587

2

Lane Keeping Assist System (LKAS)

 P. 609

2

Traffic Jam Assist

 P. 622

Compass

Shows the compass screen.

Turn-by-Turn Directions

When driving guidance is provided by the navigation system, Android Auto or Apple 
CarPlay, turn-by-turn directions to your destination appear.

2

Refer to the Navigation System Manual

2

Android Auto

TM

 P. 392

2

Apple CarPlay

 P. 385

Speedometer

Current Mode for ACC with Low Speed Follow, LKAS, and 

Traffic Jam Assist

Navigation

1

Speedometer

Switch between mph and km/h by using the driver 
information interface or the customized features on 
the audio/information screen.

2

Speed/Distance Units

 P. 166

2

Customized Features

 P. 426

1

Navigation

You can select whether the turn-by-turn display 
comes on during the route guidance.

2

Customized Features

 P. 426

Turn-by-turn directions may not be available for all 
apps.

174

This page intentionally left blank.

175

Controls

This chapter explains how to operate the various controls necessary for driving.

Clock

.................................................. 176

Locking and Unlocking the Doors

Key .................................................. 178

Low Keyless Remote Signal Strength ......... 180

Locking/Unlocking the Doors from the 

Outside .......................................... 181

Locking/Unlocking the Doors from the 

Inside ............................................. 192

Childproof Door Locks ..................... 194
Auto Door Locking/Unlocking .......... 195

Tailgate

.............................................. 196

Security System

................................ 207

Windows

................................................ 210

Panoramic Roof

*

............................... 213

Operating the Switches Around the 

Steering Wheel

ENGINE START/STOP Button............. 217
Lights............................................... 220
Auto High-Beam .............................. 226
Wipers and Washers ........................ 229

Rear Defogger/Heated Door Mirror

*


Button........................................ 232

Heated Windshield Button

*

............. 232

Driving Position Memory System

*

.... 233

Adjusting the Steering Wheel........... 235

Mirrors

............................................... 236

Seats

Front Seats ...................................... 239
Second Row Seats ........................... 243
Third Row Seats............................... 249
Rear Seat Reminder ......................... 251
Maintain a Proper Sitting Position .... 252
Head Restraints................................ 253
Armrest ........................................... 258

Interior Convenience Items

.............. 260

Climate Control System

................... 283

* Not available on all models

176

Co
ntrols

Clock

Adjusting the Clock

You can adjust the time in the clock display with the power mode in ON.

1.

Press the 

MENU

 button.

2.

Select 

Clock Settings

.

3.

Select 

Automatic Time

, then select 

OFF

.

4.

Select 

Set Time

.

5.

Select 

12H

/

24H

 to change 12 or 24 hour 

clock.

6.

Select  

or .

7.

Select 

Set

 to set the time.

Adjusting the Time

1

Adjusting the Clock

The clock is automatically updated through the audio 
system.

You can also select and enter with the selector knob 
instead of the touch panel.

Models with 7-in. Color Touchscreen

MENU

 Button

Models with 7-in. Color Touchscreen

3

4

177

uu

Clock

u

Adjusting the Clock

Co
ntrols

1.

Press the 

 button.

2.

Select 

General Settings

.

3.

Select 

System

.

4.

Select 

Date & Time

.

5.

Select 

Set Date & Time

.

6.

Select 

Automatic Date & Time

, then 

select 

OFF

.

To adjust date:
7.

Select 

Set Date

.

8.

Select  

or .

9.

Select 

Save

 to set the date.

To adjust time:
7.

Select 

Set Time

.

8.

Select  

or .

9.

Select 

Save

 to set the time.

1

Adjusting the Clock

You can also adjust the clock by touching the clock 
displayed on the header area of the audio/
information screen, Clock displayed on the home 
screen, or 


All Apps

.

1. Touch the clock on the screen.

The clock screen of the face-type appears.

2. Select 

Settings

.

3. Select 

Date & Time

.

4. Select 

Set Date & Time

.

5. Select 

Automatic Date & Time

, then select 

OFF

.

6. Select 

Set Date

 or 

Set Time

.

7. Adjusting the dates, hours, and minutes by 

selecting  

or .

8. Select 

Save

 to set the time.

You can customize the clock display to show the 12 
hour clock or 24 hour clock.

2

How to Customize the General Settings


P. 426

You can customize the date display to 

MM/DD/

YYYY

DD/MM/YYYY

, or 

YYYY/MM/DD

.

2

How to Customize the General Settings


P. 426

Models with 9-in. Color Touchscreen

3

4

Models with 9-in. Color Touchscreen

3

4

3

4

178

Co
ntrols

Locking and Unlocking the Doors

Key

This vehicle comes with the following keys:

Use the keys to start and stop the engine, and 
lock and unlock all the doors, tailgate, and 
fuel fill door.

1

Key

All the keys have an immobilizer system. The 
immobilizer system helps protect against vehicle 
theft.

2

Immobilizer System

 P. 207

Follow the advice below to prevent damage to the 
keys:

Do not leave the keys in direct sunlight, or in 
locations with high temperature or high humidity.

Do not drop the keys or set heavy objects on them.

Keep the keys away from liquids, dust, and sand.

Do not take the keys apart except for replacing the 
battery.

If the circuits in the keys are damaged, the engine 
may not start, and the remote transmitter may not 
work.
If the keys do not work properly, have them 
inspected by a dealer.

You can remotely start the engine using the remote 
engine start.

2

Remote Engine Start

*

 P. 514

Models with 

 button

Models without 

 button

Models with 

 button and tailgate 

unlock button

Models with 

 button and power 

tailgate button

* Not available on all models

179

uu

Locking and Unlocking the Doors

u

Key

Co
ntrols

The built-in key can be used to unlock the 
doors when the keyless remote battery 
becomes weak and the power door unlock 
operation is disabled.

To remove the built-in key, push the release 
button and then pull out the key. To reinstall 
the built-in key, push the built-in key into the 
keyless remote until it clicks.

Contains a number that you will need if you 
purchase a replacement key.

Built-in Key

Release Button

Built-in Key

Key Number Tag

1

Key Number Tag

Keep the key number tag separate from the key in a 
safe place outside of your vehicle.
If you wish to purchase an additional key, contact a 
dealer.

If you lose your key and you cannot start the engine, 
contact a dealer.

180

uu

Locking and Unlocking the Doors

u

Low Keyless Remote Signal Strength

Co
ntrols

Low Keyless Remote Signal Strength

The vehicle transmits radio waves to locate the keyless remote to start the engine; 
lock and unlock all the doors and the fuel fill door; and open the tailgate, and the 
power tailgate

*

.

In the following cases, starting the engine, locking/unlocking the doors/fuel fill door, 
or opening the tailgate/power tailgate

*

 may be inhibited, or operation may be 

unstable:

Strong radio waves are being transmitted by nearby equipment.

You are carrying the keyless remote together with telecommunications 
equipment, laptop computers, cell phones, or wireless devices.

A metallic object is touching or covering the keyless remote.

1

Low Keyless Remote Signal Strength

Communication between the keyless remote and the 
vehicle consumes the keyless remote’s battery.
Battery life is about two years, but this varies 
depending on regularity of use.
The battery is consumed whenever the keyless 
remote is receiving strong radio waves. Avoid placing 
it near electrical appliances such as televisions and 
personal computers.

* Not available on all models

181

uu

Locking and Unlocking the Doors

u

Locking/Unlocking the Doors from the Outside

Continued

Co
ntrols

Locking/Unlocking the Doors from the Outside

When you carry the keyless remote, you can 
lock/unlock the doors and fuel fill door, and 
open the tailgate.

You can lock/unlock the doors, fuel fill door, 
and tailgate within a radius of about 32 inches 
(80 cm) of the outside door handle or tailgate 
outer handle.

Using the Keyless Access System

1

Locking/Unlocking the Doors from the Outside

If the interior light switch is in the door activated 
position, the interior light comes on when you unlock 
the doors and tailgate.
No doors opened: The light fades out after 30 
seconds.
Doors and tailgate relocked: The light goes off 
immediately.

2

Interior Lights

 P. 260

1

Using the Keyless Access System

If you do not open a door or the tailgate within 30 
seconds of unlocking the vehicle with the keyless 
access system, the doors and tailgate will 
automatically relock.

You can lock or unlock doors using the keyless access 
system only when the power mode is in VEHICLE OFF.

uu

Locking and Unlocking the Doors

u

Locking/Unlocking the Doors from the Outside

182

Co
ntrols

Locking the doors and tailgate

Touch the door lock sensor on the front or 
rear

*

 doors, or press the lock button on the 

tailgate.

u

All the doors, fuel fill door, and tailgate 
lock, and the security system sets.

u

Some exterior lights flash once and the 
beeper sounds once.

1

Using the Keyless Access System

Do not leave the keyless remote in the vehicle 
when you get out. Carry it with you.

Even if you are not carrying the keyless remote, you 
can lock/unlock the doors and tailgate while 
someone else with the remote is within range.

The door may be unlocked if the door handle is 
covered with water in heavy rain or in a car wash if 
the keyless remote is within range.

If you grip a door handle or touch a door lock 
sensor wearing gloves, the door sensor may be 
slow to respond or may not respond by unlocking 
or locking the doors.

After locking the door, you have up to two seconds 
during which you can pull the door handle to 
confirm whether the door is locked. If you need to 
unlock the door immediately after locking it, wait 
at least two seconds before gripping the handle, 
otherwise the door will not unlock.

The door might not open if you pull it immediately 
after gripping the door handle. Grip the handle 
again and confirm that the door is unlocked before 
pulling the handle.

Even within the 32 inches (80 cm) radius, you may 
not be able to lock/unlock the doors with the 
keyless remote if it is above or below the outside 
handle.

The keyless remote may not operate if it is too close 
to the door, door glass and tailgate.

Door Lock 
Sensor

Lock Button

* Not available on all models

Continued

183

uu

Locking and Unlocking the Doors

u

Locking/Unlocking the Doors from the Outside

Co
ntrols

Unlocking the doors and tailgate

Grab the driver’s door handle:

u

The driver’s door and fuel fill door 
unlock.

u

Some exterior lights flash twice and the 
beeper sounds twice.

Grab the front passenger’s door or rear

*

 door 

handle:

u

All doors, tailgate, and fuel fill door 
unlock.

u

Some exterior lights flash twice and the 
beeper sounds twice.

Press the tailgate outer handle:

u

The tailgate unlocks.

u

Some exterior lights flash twice and the 
beeper sounds twice.

2

Opening/Closing the Tailgate

 P. 197

1

Using the Keyless Access System

The light flash, beep and door unlock mode settings 
can be customized using the driver information 
interface or audio/information screen.

2

Settings

*

 P. 140

2

How to Customize the Vehicle Settings


P. 436

When you go into the keyless access system working 
range with all the doors locked, the puddle lights 
come on for 30 seconds.
The lights do not come on if you have previously 
stayed within the range for more than two minutes, 
or the doors have been locked for a few days.
The feature activates again after you drive the 
vehicle, then lock the doors.

You can also unlock and open the power tailgate.

2

Opening/Closing the Power Tailgate

*


P. 199

Models with 7-in. Color Touchscreen

Models with 9-in. Color Touchscreen

Models with puddle lights

Models with power tailgate

Outer Handle

* Not available on all models

uu

Locking and Unlocking the Doors

u

Locking/Unlocking the Doors from the Outside

184

Co
ntrols

Locking the doors and tailgate (Walk 
away auto lock

®

)

When you walk away from the vehicle with all 
doors and tailgate closed while carrying the 
keyless remote, the doors and tailgate will 
automatically lock.
The auto lock function activates when all 
doors and tailgate are closed or all doors are 
closed and tailgate begins power close 
operation

*

, and the keyless remote is within 

about 5 feet (1.5 m) radius of the outside door 
handle or tailgate outer handle.
Exit vehicle while carrying keyless remote and 
close door(s) and tailgate.

1.

While within about 5 feet (1.5 m) radius of 
the vehicle.

u

The beeper sounds; the auto lock 
function will be activated.

2.

Carry the keyless remote beyond about 5 
feet (1.5 m) from the vehicle and remain 
outside this range for 2 or more seconds.

u

Some exterior lights flash; the beeper 
sounds; all doors and tailgate will then 
lock.

1

Locking the doors and tailgate (Walk away auto lock

®

)

The auto lock function is set to OFF as the factory 
default setting. The auto lock function can be set to 
ON using the driver information interface or audio/
information screen.
If you set the auto lock function to ON using the 
driver information interface or audio/information 
screen, only the remote transmitter that was used to 
unlock the driver’s door prior to the setting change 
can activate auto lock.

2

Settings

*

 P. 140

2

How to Customize the Vehicle Settings


P. 436

After the auto lock function has been activated, 
when you stay within the locking/unlocking 
operation range, the indicator on the keyless remote 
will continue to flash until the doors and tailgate are 
locked.

When you stay beside the vehicle within the 
operation range, the doors and tailgate will 
automatically lock approximately 30 seconds after 
the auto lock function activating beeper sounds.

When you open a door or tailgate after the auto lock 
function activating beeper sounds, the auto lock 
function will be canceled.

Models with 7-in. Color Touchscreen

Models with 9-in. Color Touchscreen

The activation range of 
the auto lock function is 
about 5 feet (1.5 m)

* Not available on all models

Continued

185

uu

Locking and Unlocking the Doors

u

Locking/Unlocking the Doors from the Outside

Co
ntrols

To temporarily deactivate the function:

1.

Set the power mode to OFF.

2.

Open the driver’s door.

3.

Using the master door lock switch, operate 
the lock as follows:
Lock  

Unlock  

Lock  

Unlock.

u

The beeper sounds and the function is 
deactivated.

To restore the function:

Set the power mode to ON.

Lock the vehicle without using the auto lock 
function.

With the keyless remote on you, move out 
of the auto lock function operation range.

Open any door.

1

Locking the doors and tailgate (Walk away auto lock

®

)

Under the following circumstances, the auto lock 
function will not activate:

The remote is inside the vehicle.

The remote is taken out of its operational range 
before all the doors and tailgate are closed.

If you use the power tailgate walk away close 
function when all the doors are closed, the auto lock 
function will also be activated.

u

When you walk away from the vehicle while the 

power tailgate is automatically closing, it will 
continue to lock automatically.

2

Power Tailgate Walk Away Close

*

 P. 201

The auto lock function does not operate when any of 
the following conditions are met.

The keyless remote is inside the vehicle.

A door, tailgate, or the hood is not closed.

The power mode is set to any mode other than 
OFF.

The keyless remote is not located within a radius of 
about 5 feet (1.5 m) from the vehicle when you get 
out of the vehicle and close the doors and tailgate.

u

The beeper will not sound.

u

The beeper will sound.

Models with power tailgate walk away close

All models

* Not available on all models

uu

Locking and Unlocking the Doors

u

Locking/Unlocking the Doors from the Outside

186

Co
ntrols

1

Locking the doors and tailgate (Walk away auto lock

®

)

Auto lock function operation stop beeper

After the auto lock function has been activated, the 
auto lock operation stop beeper sounds for 
approximately two seconds in the following cases.

The keyless remote is put inside the vehicle through 
a window.

You are located too close to the vehicle.

The keyless remote is put inside the tailgate.

If the warning beeper sounds, check that you are 
carrying the keyless remote. Then, open/close a door 
and confirm the auto lock activation beeper sounds 
once.

Continued

187

uu

Locking and Unlocking the Doors

u

Locking/Unlocking the Doors from the Outside

Co
ntrols

Locking the doors and tailgate

Press the lock button.

Once:

u

Some exterior lights flash, all the doors, 
fuel fill door, and tailgate lock, and the 
security system sets.

Twice (within five seconds after the first 
push):

u

The beeper sounds and verifies the 
security system is set.

Unlocking the doors and tailgate

Press the unlock button.

Once:

u

Some exterior lights flash twice, and the 
driver’s door and fuel fill door unlock.

Twice:

u

The remaining doors and tailgate unlock.

Using the Remote Transmitter

1

Using the Remote Transmitter

If you do not open a door within 30 seconds of 
unlocking the vehicle with the remote transmitter, 
the doors will automatically relock.
You can change the relock timer setting.

2

Settings

*

 P. 140

2

How to Customize the Vehicle Settings


P. 436

You can lock or unlock doors using the remote 
transmitter only when the power mode is in VEHICLE 
OFF.

The remote transmitter uses low-power signals, so 
the operating range may vary depending on the 
surroundings.

If the distance at which the remote transmitter works 
varies, the battery is probably low.
If the LED does not come on when you press a 
button, the battery is dead.

2

Replacing the Remote Battery

 P. 727

You can customize the door unlock mode setting.

2

Settings

*

 P. 140

2

How to Customize the Vehicle Settings


P. 436

Models with 7-in. Color Touchscreen

Models with 9-in. Color Touchscreen

Models with 7-in. Color Touchscreen

Models with 9-in. Color Touchscreen

LED

Unlock 
Button

Lock 
Button

* Not available on all models

uu

Locking and Unlocking the Doors

u

Locking/Unlocking the Doors from the Outside

188

Co
ntrols

If the unlock button of the keyless remote does not work, use the built-in key 
instead. The keyhole is behind the door handle.

Pull and hold the outer handle.
Insert the built-in key into the key cylinder 
from below the handle and then turn it.

Unlocking the Doors Using a Key

1

Unlocking the Doors Using a Key

When unlocking, the driver’s door unlocks first. Turn 
the key a second time within a few seconds to unlock 
the remaining doors and the tailgate.

If the lock button of the keyless remote does not 
work, refer to the following.

2

Locking a Door Without Using a Key

 P. 189

Continued

189

uu

Locking and Unlocking the Doors

u

Locking/Unlocking the Doors from the Outside

Co
ntrols

If you do not have the key on you, or if for some reason you cannot lock a door using 
the key, you can lock the door without it.

Locking the front doors

Push the lock tab forward 

a

 or push the 

master door lock switch in the lock direction 

b

, and close the door.

Locking the rear doors

Push the lock tab forward and close the door.

Locking a Door Without Using a Key

1

Locking a Door Without Using a Key

When you lock the driver’s door, all the other doors 
and tailgate lock at the same time.
Before locking a door, make sure that the key is not 
inside the vehicle.

uu

Locking and Unlocking the Doors

u

Locking/Unlocking the Doors from the Outside

190

Co
ntrols

Lockout protection function

If the vehicle cannot detect the keyless 
remote, lockout protection activates.

u

A beeper sounds, some exterior lights 
flash, the doors unlock, and a message 
appears on the driver information 
interface.

u

This allows you to open a door in case 
the keyless remote is still inside the 
vehicle.

If you do not open a door, all doors relock 
after 15 seconds.

To avoid non-detection, make sure to keep 
the keyless remote away from cell phones and 
other devices that may cause signal 
interference.

1

Locking a Door Without Using a Key

You can change the lockout protection operation 
setting.

2

Settings

*

 P. 140

2

How to Customize the Vehicle Settings


P. 436

Models with 7-in. Color Touchscreen

Models with 9-in. Color Touchscreen

* Not available on all models

191

uu

Locking and Unlocking the Doors

u

Locking/Unlocking the Doors from the Outside

Co
ntrols

The vehicle will automatically lock after you 
lock the doors in advance then close the doors 
and tailgate.

Activate lock presetting after closing the 
driver’s door.

1.

Touch the door lock sensor on the front 
door or press the lock button on the remote 
transmitter.

u

Alert sounds and lock presetting is 
activated.

2.

Close all doors and the tailgate.

u

Some exterior lights flash and a beeper 
sounds when vehicle locks.

Make sure the doors and tailgate are locked 
before moving away from the vehicle.

Locking the doors and tailgate (lock presetting)

1

Locking the doors and tailgate (lock presetting)

Lock presetting will be reset if a door or the tailgate is 
opened before the vehicle has locked completely.

Before locking a door, make sure that the key is not 
inside the vehicle.

You can turn this function on and off.

2

Settings

*

 P. 140

2

How to Customize the Vehicle Settings


P. 436

3

WARNING

Opening or closing the power tailgate on 
someone’s hands or fingers can cause 
serious injury. Make sure all hands and 
fingers, especially children’s, are clear of 
the power tailgate.

Models with power tailgate

All models

Models with 7-in. Color Touchscreen

Models with 9-in. Color Touchscreen

Door Lock 
Sensor

* Not available on all models

192

uu

Locking and Unlocking the Doors

u

Locking/Unlocking the Doors from the Inside

Co
ntrols

Locking/Unlocking the Doors from the Inside

Locking a door

Push the lock tab forward.

Unlocking a door

Pull the lock tab rearward.

Using the Lock Tab

1

Using the Lock Tab

When you lock the door using the lock tab on the 
driver’s door, all of the other doors and the tailgate 
lock at the same time.
When you unlock the door using the lock tab on the 
driver’s door, only the driver’s door will unlock.

To unlock

Lock Tab

To lock

Continued

193

uu

Locking and Unlocking the Doors

u

Locking/Unlocking the Doors from the Inside

Co
ntrols

Pull the front door inner handle.

u

The door unlocks and opens in one 
motion.

Unlocking and opening the driver’s door from the inner handle unlocks all the other 
doors.

To avoid all the doors unlocking use the lock tab on the driver’s door to unlock, then 
lock again before opening the door.

u

This setting works for one time only.

If you do not want all the doors to unlock all the time, customize the 

Auto door 

unlock

*1

/

Auto Door Unlock

*2

 setting to 

OFF

 using the driver information interface 

or audio/information screen.

2

Settings

*

 P. 140

2

How to Customize the Vehicle Settings

 P. 436

*1 : Models with 7-in. Color Touchscreen
*2 : Models with 9-in. Color Touchscreen

Unlocking Using the Front Door Inner Handle

1

Unlocking Using the Front Door Inner Handle

The front door inner handles are designed to allow 
front seat occupants to open the door in one motion. 
However, this feature requires that front seat 
occupants never pull a front door inner handle while 
the vehicle is in motion.

Children should always ride in a rear seat where 
childproof door locks are provided.

2

Childproof Door Locks

 P. 194

Inner Handle

Models with 7-in. Color Touchscreen

Models with 9-in. Color Touchscreen

* Not available on all models

uu

Locking and Unlocking the Doors

u

Childproof Door Locks

194

Co
ntrols

Press the master door lock switch in as shown 
to lock or unlock all doors, fuel fill door, and 
the tailgate.

Childproof Door Locks

The childproof door locks prevent the rear doors from being opened from the inside 
regardless of the position of the lock tab.

Slide the lever in the rear door to the lock 
position, and close the door.

When opening the door

Open the door using the outside door handle.

Using the Master Door Lock Switch

1

Using the Master Door Lock Switch

When you lock/unlock either of the front doors using 
the master door lock switch, all the other doors and 
the tailgate lock/unlock at the same time.

To unlock

Master Door Lock Switch

To lock

Setting the Childproof Door Locks

1

Childproof Door Locks

To open the door from the inside when the 
childproof door lock is on, put the lock tab in the 
unlock position, lower the rear window, put your 
hand out of the window, and pull the outside door 
handle.

Lock

Unlock

195

uu

Locking and Unlocking the Doors

u

Auto Door Locking/Unlocking

Co
ntrols

Auto Door Locking/Unlocking

Your vehicle locks or unlocks all doors automatically when a certain condition is met.

Drive lock mode

All doors and tailgate lock when the vehicle’s speed reaches about 10 mph (15 
km/h).

Driver’s door open mode

All doors and tailgate unlock when the driver’s door is opened.

Auto Door Locking

Auto Door Unlocking

1

Auto Door Locking/Unlocking

You can turn off or change to another auto door 
locking/unlocking setting using the driver 
information interface or audio/information screen.

2

Settings

*

 P. 140

2

How to Customize the Vehicle Settings


P. 436

Models with 7-in. Color Touchscreen

Models with 9-in. Color Touchscreen

* Not available on all models

196

Co
ntrols

Tailgate

Precautions for Opening/Closing the Tailgate

Always make sure individuals and objects are clear of the tailgate before opening or 
closing it.

Open the tailgate all the way.

u

If it is not fully opened, the tailgate may begin to close under its own weight.

Be careful when it is windy. The wind may cause the tailgate to close.

Keep the tailgate closed while driving to:

u

Avoid possible damage.

u

Prevent exhaust gas from leaking into the vehicle.

2

Carbon Monoxide Gas

 P. 95

1

Precautions for Opening/Closing the Tailgate

Be careful not to hit your head on the tailgate or to 
put your hands between the tailgate and the cargo 
area when closing the tailgate.

When you are storing or picking up cargo from the 
cargo area, or by using a forward and back kicking 
motion under the center of the rear bumper for 
hands free access

*

, while the engine is idling, do not 

stand in front of the exhaust pipe. You may get 
burned.

Do not allow any passenger in the cargo space. They 
may get hurt during hard braking, a sudden 
acceleration, or a crash.

3

WARNING

Anyone caught in the path of a tailgate 
that is being opened or closed can be 
seriously injured.

Make sure that all people are clear of the 
tailgate before opening or closing it.

Models without power tailgate

All models

* Not available on all models


Content      ..     3      4      5      6     ..