Honda Pilot (2024 year). Manual in english - page 6
 

  Index      Manuals     Honda Pilot (2024 year). Manual in english


Search            copyright infringement  


Content      ..     4      5      6      7     ..


Honda Pilot (2024 year). Manual in english - page 6


197

uu

Tailgate

u

Opening/Closing the Tailgate

Continued

Co
ntrols

Opening/Closing the Tailgate

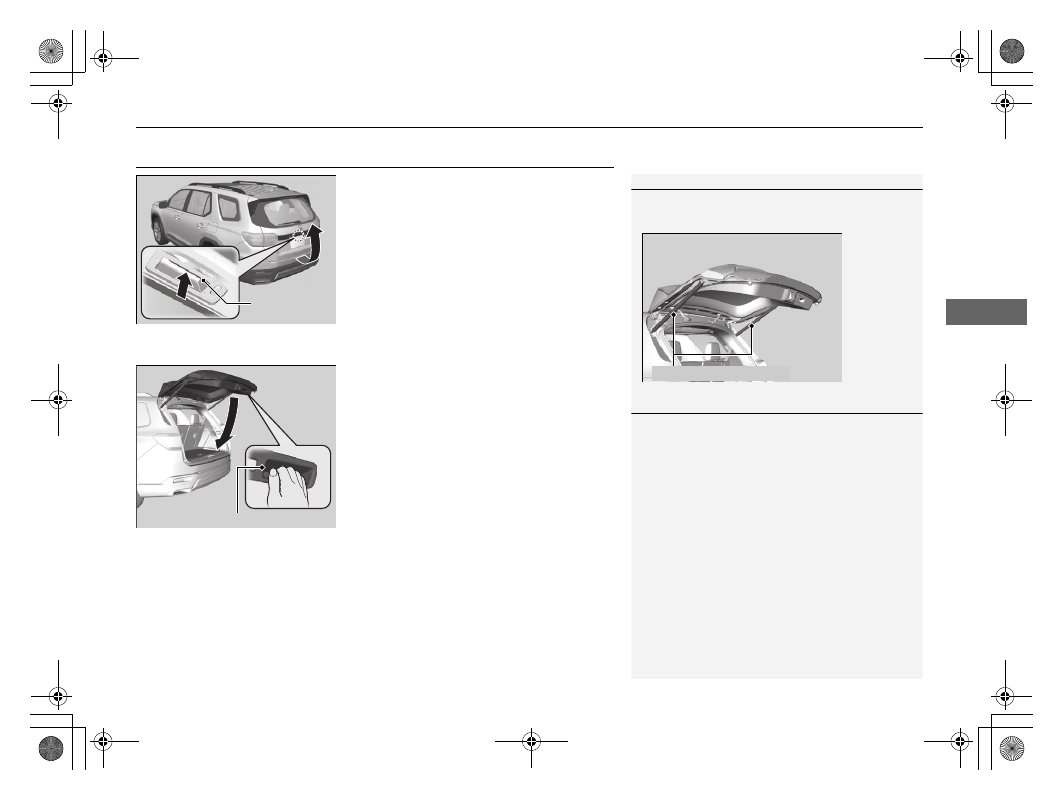
When all the doors are unlocked or you press 
the tailgate unlock button

*

 on the remote 

transmitter, the tailgate is unlocked.

Press the tailgate outer handle and lift open 
the tailgate.

If you are carrying the keyless remote, you do 
not have to unlock the tailgate before 
opening it.

To close the tailgate, grab the inner handle, 
pull the tailgate down, and push it closed 
from outside.

If you close the tailgate when all the doors are 
locked, the tailgate locks automatically.

1

Precautions for Opening/Closing the Tailgate

Make sure cargo or other items do not touch the 
tailgate support struts.

Tailgate Support Struts

Outer Handle

Inner Handle

1

Opening/Closing the Tailgate

Do not leave the keyless remote in the vehicle 
when you get out. Carry it with you.

Even if you are not carrying the keyless remote, you 
can unlock the tailgate while someone else with 
the remote is within range.

Do not leave the keyless remote inside the cargo 
area and close the tailgate. The beeper sounds and 
the tailgate cannot be closed.

* Not available on all models

uu

Tailgate

u

Opening/Closing the Tailgate

198

Co
ntrols

Press the tailgate unlock button to unlock the 
tailgate.

Using the Remote Transmitter

*

1

Using the Remote Transmitter

*

If you have unlocked and opened the tailgate using 
the remote transmitter, when closing, the tailgate 
locks automatically.

Tailgate 
Unlock 
Button

Tailgate 
Unlock 
Button

* Not available on all models

199

uu

Tailgate

u

Opening/Closing the Power Tailgate

*

Continued

Co
ntrols

Opening/Closing the Power Tailgate

*

The power tailgate can be operated by pressing the power tailgate button on the 
remote transmitter, pressing the power tailgate button in the driver’s side control 
panel, pressing the outer handle on the tailgate, or by using a forward and back 
kicking motion under the center of the rear bumper for hands free access

*

.

The power tailgate can be opened/closed when the transmission is in 

(

P

.

1

Opening/Closing the Power Tailgate

*

NOTICE

Do not push or pull on the power tailgate when it is 
being automatically opened or closed.
Forcibly opening or closing the power tailgate while 
in operation can deform the tailgate frame.

When operating the power tailgate, make sure there 
is enough space around your vehicle. People near the 
tailgate may be seriously hurt if the tailgate hits or 
closes on their heads. Be especially cautious if 
children are around.

The power tailgate may not open or close under the 
following conditions:

You start the engine while the tailgate is 
automatically opening or closing.

The vehicle is parked on a steep hill.

The vehicle is swaying in a strong wind.

The tailgate or the roof is covered with snow or ice.

3

WARNING

Opening or closing a power tailgate while 
any part of a passenger is in the tailgate’s 
operating path can cause serious injury.
Make sure all passengers or objects are 
clear of the tailgate operating range 
before opening or closing the tailgate.

* Not available on all models

uu

Tailgate

u

Opening/Closing the Power Tailgate

*

200

Co
ntrols

Use a forward and back kicking motion for 
about 1 second under the center of the rear 
bumper to open or close the power tailgate 
while carrying the keyless remote.

u

Some exterior lights will flash and a 
beeper will sound, then the tailgate will 
begin to move.

Using the Hands Free Access

*

1

Using the Hands Free Access

*

During rain or in other instances when the vehicle 
becomes wet, the sensor may not properly detect 
your foot motion.

When performing work on or around the rear section 
of the vehicle, you may inadvertently open or close 
the tailgate.
To prevent this from happening, select Customized 
Features on the audio/information screen and then 
select OFF for the feature.

2

How to Customize the Vehicle Settings


P. 436

If you hold your foot under the bumper for too long 
or sweep your foot from side to side, the power 
tailgate does not open or close.

This function will not operate if you don’t have the 
keyless remote on you. Please make sure you have 
the keyless remote on you.

1 sec.

* Not available on all models

Continued

201

uu

Tailgate

u

Opening/Closing the Power Tailgate

*

Co
ntrols

When you walk away from the vehicle while carrying the keyless remote, the power 
tailgate will automatically close.

1.

Carry the keyless remote and press the walk 
away close button.

u

The indicator on the walk away close 
button will turn green when the walk 
away close is activated.

2.

Walk at least 3 feet (1.0 m) away from the 
vehicle within 30 seconds of pressing the 
walk away close button.

u

Some exterior lights flash and a beeper 
sounds, then the power tailgate begins 
to close.

Power Tailgate Walk Away Close

*

1

Power Tailgate Walk Away Close

*

When auto lock function is set to ON, the vehicle will 
automatically lock when all doors and the tailgate 
have closed.

2

Locking the doors and tailgate (Walk away 
auto lock

®

)

 P. 184

Walk Away Close Button

Walk at least 3 feet 
(1.0 m) away

* Not available on all models

uu

Tailgate

u

Opening/Closing the Power Tailgate

*

202

Co
ntrols

Press the power tailgate button for more than 
one second to operate when the power mode 
is in VEHICLE OFF.

u

Some exterior lights flash and the beeper 
sounds.

If you press the button again while the power 
tailgate is moving, it will stop. Press the button 
for more than one second, and the power 
tailgate will reverse direction.

Customizing when to open the tailgate

Anytime:

 The power tailgate unlocks and opens at the same time. This is the 

default setting.

When unlocked

*1

/When Unlocked

*2

:

 The tailgate opens when all doors are 

unlocked.

2

Settings

*

 P. 140

2

How to Customize the Vehicle Settings

 P. 436

*1 : Models with 7-in. Color Touchscreen
*2 : Models with 9-in. Color Touchscreen

Using the Remote Transmitter

1

Opening/Closing the Power Tailgate

*

If you close the power tailgate when all the doors are 
locked, the power tailgate locks automatically.

If you replace the battery or the power tailgate fuse 
while the tailgate is open, the power tailgate may be 
disabled. The power tailgate resumes once you 
manually close the tailgate.

Installing aftermarket components other than Honda 
Genuine Accessories on the power tailgate may 
prevent it from fully opening or closing.

Make sure the power tailgate is fully open before you 
transport your cargo in and out.

The beeper sounds when you start driving while the 
power tailgate is still open, or closing.

Do not touch the sensors located on both sides of the 
tailgate. The power tailgate does not close if you 
touch either sensor when you are trying to close the 
tailgate.

Be careful not to scratch the sensors with a sharp 
object. If scratched, they can be damaged, and the 
power tailgate closing feature malfunctions.

If the power tailgate meets resistance while opening 
or closing, the auto reverse feature reverses the 
direction. The beeper sounds three times.

Power 
Tailgate 
Button

Models with 7-in. Color Touchscreen

Models with 9-in. Color Touchscreen

* Not available on all models

Continued

203

uu

Tailgate

u

Opening/Closing the Power Tailgate

*

Co
ntrols

To open or close the power tailgate, press the 
power tailgate button for about one second.

u

Some exterior lights flash and the beeper 
sounds.

If you press the button again while the power 
tailgate is moving, it will stop. Press the button 
for about one second, and the power tailgate 
will reverse direction.

If you press the outer handle of the tailgate for 
no longer than one second, the tailgate opens 
automatically.

u

The beeper sounds.

u

If you want to open the tailgate 
manually, press the outer handle for 
more than one second.

2

Opening/Closing the Tailgate

 P. 197

If you are carrying the keyless remote, you do 
not have to unlock the tailgate before 
opening it.

If you press the outer handle again while the 
power tailgate is moving, it will stop. Press the 
outer handle, and the power tailgate will 
reverse direction.

Using the Power Tailgate Button

1

Opening/Closing the Power Tailgate

*

The auto reverse function stops sensing when the 
tailgate is almost closed to make sure that it fully 
closes.

Power Tailgate 
Button

Using the Tailgate Outer Handle

1

Using the Tailgate Outer Handle

Do not leave the keyless remote in the vehicle 
when you get out. Carry it with you.

Even if you are not carrying the keyless remote, you 
can unlock the tailgate while someone else with 
the remote is within range.

Do not leave the keyless remote inside the cargo 
area and close the tailgate. The beeper sounds and 
the tailgate cannot be closed.

You can change the power tailgate operation setting 
on and off.

2

Settings

*

 P. 140

2

How to Customize the Vehicle Settings


P. 436

Models with 7-in. Color Touchscreen

Models with 9-in. Color Touchscreen

Outer Handle

* Not available on all models

204

uu

Tailgate

u

Opening/Closing the Power Tailgate

*

Co
ntrols

Press the tailgate inner button on the tailgate 
to close the power tailgate.

u

The beeper sounds.

If you press the tailgate inner button again 
while the power tailgate is moving, it will stop. 
Press and release the tailgate inner button 
again, and the power tailgate will reverse 
direction.

Using the Tailgate Inner Button

Tailgate Inner Button

Continued

205

uu

Tailgate

u

Opening/Closing the Power Tailgate

*

Co
ntrols

The extent to which the power tailgate 
automatically opens can be programmed.

To program:

1.

Open the tailgate to the desired position.

2.

Press and hold the tailgate inner button. 
You will hear one long beep, followed by 
two short beeps.

Programming Tailgate Position

1

Programming Tailgate Position

If the tailgate is only slightly opened, the position 
cannot be programmed, even if you push the tailgate 
inner button.

If you want to reprogram the power tailgate to open 
all the way, manually raise the tailgate to its upper 
most position and follow the directions in step 2.

Tailgate Inner Button

uu

Tailgate

u

Opening/Closing the Power Tailgate

*

206

Co
ntrols

If you manually close the power tailgate, it latches automatically.

Automatically lowers the power tailgate when there is a possibility that the fully 
opened power tailgate can fall down by its own weight (for example, by snow on 
the tailgate). The beeper sounds while the power tailgate lowers.

Auto-Closer

Power Tailgate Fall Detection

1

Auto-Closer

Keep your hands away from the tailgate when you 
manually close the tailgate and let it latch 
automatically. It is dangerous to put your hands 
around the tailgate as it starts to latch itself.

The auto-closer feature does not activate if you press 
and hold the tailgate outer handle while the power 
tailgate is closing.

NOTICE

Do not put any force on the tailgate while the power 
tailgate is latching.

1

Power Tailgate Fall Detection

If you try to manually close the power tailgate 
immediately after it fully opens, the power tailgate 
fall detection may activate.

Once the power tailgate fall detection activates, wait 
until the power tailgate fully closes. Keep away from 
the power tailgate when it is in motion.

If the power tailgate fall detection constantly 
activates, consult a dealer.

207

Continued

Co
ntrols

Security System

Immobilizer System

This system prevents a key that has not been pre-registered from starting the 
engine.

Pay attention to the following when pressing the 

ENGINE START/STOP

 button:

Do not allow objects that emit strong radio waves near the 

ENGINE START/

STOP

 button.

Make sure the key is not covered by or touching a metal object.

Do not bring a key from another vehicle’s immobilizer system near the 

ENGINE 

START/STOP

 button.

Do not put the key near magnetic items. Electronic device, such as televisions and 
audio systems, emit strong magnetic fields. Note that even a key chain can 
become magnetic.

Security System Alarm

The security system alarm activates when the tailgate, hood, or doors are forcibly 
opened. The alarm does not activate if the tailgate or doors are opened with the key, 
remote transmitter, or keyless access system.

However, the alarm activates if a door is opened with the key and then the hood is 
opened before the power mode is set to ON.

1

Immobilizer System

NOTICE

Leaving the key in the vehicle can result in theft or 
accidental movement of the vehicle.
Always take the key with you whenever you leave the 
vehicle unattended.

Do not alter the system or add other devices to it.
Doing so may damage the system and make your 
vehicle inoperable.

Apply and hold the brake pedal before turning the 
vehicle on the first time after the battery has been 
disconnected.

Canadian models

1

Security System Alarm

Do not alter the system or add other devices to it.
Doing so may damage the system and make your 
vehicle inoperable.

The security alarm continues for a maximum of two 
minutes until the security system alarm deactivates.

uu

Security System

u

Security System Alarm

208

Co
ntrols

When the security system alarm activates

The horn sounds intermittently, and some exterior lights flash.

To deactivate the security system alarm

Unlock the vehicle using the key, remote transmitter, or keyless access system. The 
system, along with the horn and flashing lights, is deactivated.

Setting the security system alarm

The security system alarm automatically sets when the following conditions have 
been met:

The power mode is set to VEHICLE OFF.

The hood is closed.

All doors and the tailgate are locked from outside with the remote transmitter or 
keyless access system.

When the security system alarm sets

The security system alarm indicator in the instrument panel blinks and the blinking 
interval changes after about 15 seconds.

To cancel the security system alarm

The security system alarm is canceled when the vehicle is unlocked using the remote 
transmitter or keyless access system, or when the power mode is set to ON. The 
security system alarm indicator goes off at the same time.

1

Security System Alarm

Do not set the security system alarm when someone 
is in the vehicle or a window is open. The system can 
accidentally activate when:

Unlocking the door with the lock tab.

Opening the hood with the hood release.

Opening the tailgate with the power tailgate 
button on the dashboard.

If the battery goes dead after you have set the 
security system alarm, the security alarm may go off 
once the battery is recharged or replaced.
If this occurs, deactivate the security system alarm by 
unlocking a door using the key, remote transmitter, 
or keyless access system.

Models with power tailgate

209

uu

Security System

u

Security System Alarm

Co
ntrols

The panic button on the remote 
transmitter

If you press the panic button for 
approximately one second, the following will 
occur for about 30 seconds:

The horn sounds.

Some exterior lights flash.

Canceling panic mode

Press any button on the remote transmitter, or 
set the power mode to ON.

Panic Mode

Panic Button

210

Co
ntrols

Windows

Opening/Closing the Power Windows

The power windows can be opened and closed when the power mode is in ON, 
using the switches on the doors.

The driver’s side switches can be used to open and close all the windows. The power 
window lock button on the driver’s side must be switched off (not pushed in, 
indicator off) to open and close the windows from anywhere other than the driver’s 
seat.

When the power window lock button is pushed in, the indicator comes on and you 
can only operate the driver’s window. Turn the power window lock button on if a 
child is in the vehicle.

1

Opening/Closing the Power Windows

The power windows can be operated for up to 10 
minutes after you set the power mode to VEHICLE 
OFF.
Opening either front door cancels this function.

Auto Reverse

If a power window senses resistance when closing 
automatically, it will stop closing and reverse 
direction.

The driver’s window auto reverse function is disabled 
when you continuously pull up the switch.

The auto reverse function stops sensing when the 
window is almost closed to ensure that it fully closes.

3

WARNING

Closing a power window on someone’s 
hands or fingers can cause serious injury.

Make sure your passengers are away from 
the windows before closing them.

Continued

211

uu

Windows

u

Opening/Closing the Power Windows

Co
ntrols

Manual operation

To open: 

Push the switch down lightly, and 

hold it until the desired position is reached.

To close: 

Pull the switch up lightly, and hold it 

until the desired position is reached.

Automatic operation

To open:

 Push the switch down firmly.

To close:

 Pull the switch up firmly.

The window opens or closes completely. To 
stop the window at any time, push or pull the 
switch briefly.

Opening/Closing the Windows with Auto-Open/Close 

Function

1

Opening/Closing the Power Windows

While driving with any of the windows open, you 
may hear a booming, throbbing, or helicopter-type 
noise or pressure. This is called wind buffeting. This is 
a normal occurrence that can be minimized.

If you hear a wind buffeting noise with any of the 
windows slightly or open the panoramic roof

*

 to the 

comfort position.

Power Window Lock Button

Front 
Passenger’s 
Window 
Switch

Driver’s 
Window 
Switch

Indicator

Rear Passenger’s 
Window Switch

* Not available on all models

uu

Windows

u

Opening/Closing the Power Windows

212

Co
ntrols

To open: 

Press the unlock button, and then 

within 10 seconds, press it again and hold it.

If the windows stop midway, repeat the 
procedure.

Pull and hold the outer handle. Insert the key 
into the key cylinder completely from below 
the handle.

To open: 

Unlock the driver’s door with the 

key. Within 10 seconds of returning the key to 
the central position, turn the key in the unlock 
direction and hold it there.

Release the key to stop the windows at the 
desired position. If you want further 
adjustment, repeat the same operation.

Opening the Windows with the Remote

1

Opening the Windows with the Remote

If you open the windows with the remote 
transmitter, the panoramic roof will open 
automatically along with them.

You can turn off or on the feature to open the 
windows with the keyless remote setting using the 
driver information interface or audio/information 
screen.

2

Settings

*

 P. 140

2

How to Customize the Vehicle Settings


P. 436

Models with panoramic roof

All models

Models with 7-in. Color Touchscreen

Models with 9-in. Color Touchscreen

Unlock Button

Opening the Windows with the Key

1

Opening the Windows with the Key

If you open the windows with the key, the panoramic 
roof will open automatically along with them.

Models with panoramic roof

Open

* Not available on all models

213

Continued

Co
ntrols

Panoramic Roof

*

Opening/Closing the Panoramic Roof

You can operate the panoramic roof and sunshade when the power mode is in ON. 
Use the switch in the front of the ceiling to open and close the panoramic roof and 
sunshade.

1

Panoramic Roof

*

NOTICE

Opening the panoramic roof in below freezing 
temperature or when it is covered with snow or ice 
can damage the panoramic roof panel or motor.

The panoramic roof and sunshade can be operated 
for up to 10 minutes after you set the power mode to 
VEHICLE OFF.
Opening either front door cancels this function.

When resistance is detected, the auto reverse 
function causes the panoramic roof and sunshade to 
change directions, then stop. Auto reverse stops 
sensing when the panoramic roof and sunshade are 
almost closed to ensure that it fully closes.

3

WARNING

Opening or closing the panoramic roof and 
sunshade on someone’s hands or fingers 
can cause serious injury.

Make sure all hands and fingers are clear of 
the panoramic roof and sunshade before 
opening or closing it.

* Not available on all models

uu

Panoramic Roof

*

u

Opening/Closing the Panoramic Roof

214

Co
ntrols

Automatic operation

To open: 

Pull the switch back firmly.

To close: 

Push the switch forward firmly.

The sunshade will automatically open or close 
all the way. To stop the sunshade midway, 
push the switch briefly.

Manual operation

To open: 

Pull the switch back lightly, and 

hold it until the desired position is reached.

To close: 

Push the switch forward lightly, and 

hold it until the desired position is reached.

Using the Sunshade Switch

1

Panoramic Roof

*

You can use the remote transmitter or the key to 
operate the panoramic roof.

2

Opening the Windows with the Remote


P. 212

2

Opening the Windows with the Key

 P. 212

Open

Close

1

Using the Sunshade Switch

The sunshade can be opened or closed to adjust the 
amount of light that enters the cabin.

When you use the sunshade switch to open the 
sunshade, the panoramic roof does not move.

The sunshade cannot be fully closed if the panoramic 
roof is open. When you close the sunshade with the 
panoramic roof open, the sunshade stops slightly 
before the panoramic roof. When you push the 
switch forward again, the sunshade and the 
panoramic roof close together.

* Not available on all models

Continued

215

uu

Panoramic Roof

*

u

Opening/Closing the Panoramic Roof

Co
ntrols

Automatic operation

To open:

 Pull the switch back firmly.

To close:

 Push the switch forward firmly.

The panoramic roof will automatically open or 
close all the way. To stop the panoramic roof 
midway, pull or push the switch briefly.

Manual operation

To open:

 Pull the switch back lightly, and 

hold it until the desired position is reached.

To close:

 Push the switch forward lightly, and 

hold it until the desired position is reached.

Tilting the panoramic roof up

To tilt:

 Push on the center of the panoramic 

roof switch.

u

The sunshade will open automatically 
and the panoramic roof will start to tilt 
up.

To close:

 Push the switch forward firmly, then 

release.

Using the Panoramic Roof Switch

1

Using the Panoramic Roof Switch

The panoramic roof cannot be fully opened in a 
single operation. The panoramic roof has a 
“comfort” position or wind noise reduction position 
at which the roof first stops. To open fully, pull the 
switch back again after the roof has stopped at this 
position.

Whenever the panoramic roof is opening, the 
sunshade moves along with it. However, when the 
panoramic roof is closing, the sunshade does not 
move.

When you tilt open the panoramic roof, the sunshade 
opens slightly to let in fresh air. When you close the 
panoramic roof from this position, the sunshade 
returns to its closed position.

Comfort Position

Full Open Position

Open

Close

Tilt

uu

Panoramic Roof

*

u

Opening/Closing the Panoramic Roof

216

Co
ntrols

1

Using the Panoramic Roof Switch

When you tilt open or slide open the panoramic roof, 
if the climate control is set to AUTO it will 
automatically switch to fresh air mode to reduce 
wind noise. When you close the panoramic roof, 
depending on the situation it will change to 
recirculation or fresh air mode.

217

Continued

Co
ntrols

Operating the Switches Around the Steering Wheel

ENGINE START/STOP Button

If you carry the keyless remote and press 

ENGINE START/STOP

 button without 

depressing the brake pedal, the power mode 
will change in this order: VEHICLE 
OFF

ACCESSORY

ON

VEHICLE OFF.

VEHICLE OFF:

Vehicle power is turned OFF.

ACCESSORY:

The audio system and some accessories can be 
used.

ON:

All accessories can be used.

Changing the Power Mode

1

ENGINE START/STOP Button

If the keyless remote is set in a storage box or another 
place where its signal can be interrupted, the power 
mode may not change.

218

uu

Operating the Switches Around the Steering Wheel

u

ENGINE START/STOP Button

Co
ntrols

If you leave the vehicle for 30 to 60 minutes with the transmission in 

(

P

 and the 

power mode in ACCESSORY, the vehicle automatically goes into the mode similar to 
VEHICLE OFF (LOCK) to avoid draining the battery.

If you open the driver’s door when the power mode is set to ACCESSORY, a warning 
beep sounds.

Automatic Power Off

Power Mode Reminder

219

uu

Operating the Switches Around the Steering Wheel

u

ENGINE START/STOP Button

Co
ntrols

When the power mode is set to any mode 
other than OFF and you remove the keyless 
remote from the vehicle and shut the door, an 
alarm will sound. If the alarm continues to 
sound, place the keyless remote in another 
location.

When the power mode is in 
ACCESSORY

The alarm will sound from outside the vehicle.

When the power mode is in ON

An alarm will sound both inside and outside 
the vehicle. In addition, a warning indicator 
will appear on the instrument panel.

Keyless Remote Reminder

1

Keyless Remote Reminder

When the keyless remote is within the system’s 
operational range, and all the doors are closed, the 
warning function cancels.

If the keyless remote is taken out of the vehicle after 
the engine has been turned on, you can no longer 
change the 

ENGINE START/STOP

 button mode or 

restart the engine. Always make sure that the keyless 
remote is in your vehicle when you operate the 

ENGINE START/STOP

 button.

Removing the keyless remote from the vehicle 
through a window does not activate the warning 
buzzer.

Do not put the keyless remote on the dashboard or in 
the glove box. It may cause the warning buzzer to go 
off. Under some other conditions that can prevent 
the vehicle from locating the keyless remote, the 
warning buzzer may also go off even if the keyless 
remote is within the system’s operational range.

220

uu

Operating the Switches Around the Steering Wheel

u

Lights

Co
ntrols

Lights

The lights will turn on automatically 
depending on the ambient brightness. They 
can also be switched on and off manually.

The exterior lights will switch on automatically 
when the light switch is set to 

AUTO

 while 

the power mode is in ON.

Manual operation

Headlights/parking lights:

Turn the light switch to 

.

Parking lights:

Turn the light switch to 

.

Headlight/parking lights off:

Turn the light switch to 

OFF

 and release it while the transmission is in 

(

P

 or the 

parking brake is applied. 

u

The lights will come back on automatically when:

The light switch is turned to 

OFF

 again and released.

The transmission is changed out of 

(

P

 and the parking brake is released.

Headlights/Parking Lights

1

Lights

When the lights are on, the lights on indicator in the 
instrument panel will be on.

2

Lights On Indicator

 P. 108

1

Headlights/Parking Lights

When the parking lights are on, the side marker, tail, 
and rear license plate lights will also switch on.

Do not leave the lights on when the engine is off 
because it will cause the battery to discharge.

When the light switch is turned to 

 or 

 and 

the power is turned to OFF, a beeper sounds when 
the driver’s door is opened.

When the light switch is turned to 

AUTO

 and the 

ambient light levels are low, the headlights and 
parking lights will switch on if you unlock a door. 
They will switch off when the door is locked.

If you suspect that the headlights are not positioned 
properly, have the vehicle inspected by a dealer.

Continued

221

uu

Operating the Switches Around the Steering Wheel

u

Lights

Co
ntrols

When the headlights are on, push the lever forward. Pull the lever back to return to 
low beams.

Flashing the high beams

Pull the lever back to switch on the high 
beams.

u

Release the lever to return to low beams.

High Beams

1

Headlights/Parking Lights

The light sensor is in the location shown below. Do 
not cover this light sensor with anything; otherwise, 
the automatic lighting system may not work properly.

Models without automatic intermittent wipers

Models with automatic intermittent wipers

uu

Operating the Switches Around the Steering Wheel

u

Lights

222

Co
ntrols

The turn signals can be used when the power 
mode is in ON.

: Turn signal

Push the lever up or down based on the 
direction you want to turn, and the turn signal 
will blink.

: One-touch turn signal

When you lightly push the lever up or down 
and release it, the turn signal will blink 3 
times.

u

If you lightly push the lever in the 
opposite direction while it is blinking, the 
blinking will stop.

Turn Signals

1

Headlights/Parking Lights

You can adjust the auto light sensitivity as follows:

2

Settings

*

 P. 140

2

How to Customize the Vehicle Settings


P. 436

Setting

The exterior lights come on 

when the ambient light is

Max

High

Mid

Low

Min

U.S. models

Bright

Dark

Models with 7-in. Color Touchscreen

Models with 9-in. Color Touchscreen

1

Turn Signals

The turn signal indicator on the instrument panel will 
blink when the external turn signal blinks.

2

Indicators

 P. 98

* Not available on all models

Continued

223

uu

Operating the Switches Around the Steering Wheel

u

Lights

Co
ntrols

The headlights automatically come on when the wipers are used several times within 
a certain number of intervals with the headlight switch in 

AUTO

.

The headlights automatically go off a few minutes later if the wipers are stopped.

The headlights, all other exterior lights, and the instrument panel lights turn off 15 
seconds after you set the power mode to VEHICLE OFF, take the remote with you, 
and close the driver’s door.

If you set the power mode to VEHICLE OFF with the headlight switch on, but do not 
open the door, the lights turn off after 10 minutes (3 minutes, if the switch is in the 

AUTO

 position).

The lights turn on again when you unlock or open the driver’s door. If you unlock 
the door, but do not open it within 15 seconds, the lights go off. If you open the 
driver’s door, you will hear a reminder chime alerting you that the lights are on.

Headlight Integration with Wipers

Automatic Lighting Off Feature

1

Headlight Integration with Wipers

This feature activates while the headlights are off in 

AUTO

.

The instrument panel brightness does not change 
when the headlights come on.

At dark ambient light levels, the automatic lighting 
control feature turns on the headlights, regardless of 
the number of wiper sweeps.

You can turn the headlight integration with wipers 
function on and off.

2

Settings

*

 P. 140

2

How to Customize the Vehicle Settings


P. 436

Models with 7-in. Color Touchscreen

Models with 9-in. Color Touchscreen

1

Automatic Lighting Off Feature

You can change the headlight auto off timer setting.

2

Settings

*

 P. 140

2

How to Customize the Vehicle Settings


P. 436

Models with 7-in. Color Touchscreen

Models with 9-in. Color Touchscreen

* Not available on all models

224

uu

Operating the Switches Around the Steering Wheel

u

Lights

Co
ntrols

When the low beam headlights are on, turn 
the fog light switch on to use the fog lights.

Fog Lights

*

* Not available on all models

225

uu

Operating the Switches Around the Steering Wheel

u

Lights

Co
ntrols

The parking/daytime running lights come on when the following conditions have 
been met:

The power mode is in ON.

The headlight switch is 

AUTO

.

Rotating the light switch to 

OFF

 will turn off the daytime running lights.

The daytime running lights turn off once the headlight switch is turned on, or when 
the head light switch is in 

AUTO

 and it is getting darker outside.

Daytime Running Lights

226

uu

Operating the Switches Around the Steering Wheel

u

Auto High-Beam

Co
ntrols

Auto High-Beam

The front sensor camera detects the light sources ahead of the vehicle such as the 
lights of a preceding or oncoming vehicle, or street lights. When you are driving at 
night, the system automatically switches the headlights between low beam and high 
beam depending on the situation.

Activating the system

When all of the following conditions have been met, the auto high-beam indicator 
comes on and automatically switches between the high beam and low beam, 
depending on the situation.

The power mode is in ON.

The light switch is in 

AUTO

.

The lever is in the low beam position.

The headlights have been automatically 
activated.

It is dark outside the vehicle.

If the auto high-beam indicator does not come on even when all the conditions have 
been met, carry out either of the procedures below and the indicator will come on.

Pull the lever toward you and release it.

Turn the light switch to 

 then turn the light switch to 

AUTO

.

How to Use the Auto High-Beam

1

Auto High-Beam

The auto high-beam system does not always operate 
in every situation. This system is just for assisting the 
driver. Always observe your surroundings and 
manually switch the headlights between high beam 
and low beam if necessary.

If you find the timing of beam changes inconvenient 
for driving, change the headlight beams manually.

The range and the distance at which the camera can 
recognize light sources varies depending on 
conditions surrounding your vehicle.

Regarding the handling of the camera mounted to 
the inside of the windshield, refer to the following.

2

Front Sensor Camera

 P. 637

For the auto high-beam to work properly:

Do not place an object that reflects light on the 
dashboard.

Keep the windshield around the camera clean. 
When cleaning the windshield, be careful not to 
apply the windshield cleanser to the camera lens.

Do not attach an object, sticker, or film to the area 
around the camera.

Do not touch the camera lens.

If the camera receives a strong impact, or repairing of 
the area near the camera is required, consult a dealer.

Light Switch

Auto High-Beam 
Indicator

Continued

227

uu

Operating the Switches Around the Steering Wheel

u

Auto High-Beam

Co
ntrols

Automatic switching between high-beam and low-beam

When the auto high-beam indicator comes on, the headlights switch between high 
beam and low beam based on the following conditions.

1

How to Use the Auto High-Beam

In the following cases, the auto high-beam system 
may not switch the headlights properly or the 
switching timing may be changed. If the automatic 
switching operation does not fit your driving habits, 
please switch the headlights manually.

The brightness of the lights from the preceding or 
oncoming vehicle is intense or poor.

Visibility is poor due to the weather (rain, snow, 
fog, windshield frost, etc.).

Surrounding light sources, such as street lights, 
electric billboards, and traffic lights are illuminating 
the road ahead.

The brightness level of the road ahead constantly 
changes.

The road is bumpy or has many curves.

A vehicle suddenly appears in front of you, or a 
vehicle in front of you is not in the preceding or 
oncoming direction.

Your vehicle is tilted with a heavy load in the rear.

A traffic sign, mirror, or other reflective object 
ahead is reflecting strong light toward the vehicle.

The oncoming vehicle frequently disappears under 
roadside trees or behind median barriers.

The preceding or oncoming vehicle is a motorcycle, 
bicycle, mobility scooter, or other small vehicle.

The auto high-beam system keeps the headlight low 
beam on when:

Windshield wipers are operating at a high speed.

The camera has detected a dense fog.

High beam

All of the following conditions 
must be met before the high 
beams turn on.

Your vehicle speed is 25 mph 
(40 km/h) or more.

There are no preceding or 
oncoming vehicles with 
headlights or taillights turned 
on.

There are few street lights on 
the road ahead.

Low beam

One of the following conditions 
must be met before the low beams 
turn on.

Your vehicle speed is 15 mph 
(24 km/h) or less.

There is a preceding or 
oncoming vehicle with 
headlights or taillights turned 
on.

There are many street lights on 
the road ahead.

uu

Operating the Switches Around the Steering Wheel

u

Auto High-Beam

228

Co
ntrols

Manual switching between high-beam and low-beam

If you want to manually switch the headlights between high beam and low beam, 
follow either of the procedures below. Note that when you do this, the auto high-
beam indicator will turn off and the auto high-beam will be deactivated.

Using the lever:

Pull the lever toward you for flashing the high beams then release it.

u

To reactivate the auto high-beam, follow either of the procedures below and 
the auto high-beam indicator will come on.

Pull the lever toward you and release it.

Turn the light switch to 

 and then to 

AUTO

 when the lever is in the low beam 

position.

Using the light switch:

Turn the light switch to 

.

u

To reactivate the auto high-beam, turn the light switch to 

AUTO

 when the 

lever is in the low beam position and the auto high-beam indicator will come 
on.

1

How to Use the Auto High-Beam

How to turn off the Auto High-Beam System

You can turn the auto high-beam system on and off.

2

Settings

*

 P. 140

2

How to Customize the Vehicle Settings


P. 436

If the 

Some driver assist systems cannot operate: 

Camera temperature too high

 message appears:

Use the climate control system to cool down the 
interior and, if necessary, also use defroster mode 
with the airflow directed toward the camera.

Start driving the vehicle to lower the windshield 
temperature, which cools down the area around 
the camera.

If the 

Some driver assist systems cannot operate: 

Clean front windshield or poor viewing 
condition.

 message appears:

Park your vehicle in a safe place, and make sure the 
windshield is clean. Clean the windshield if it is 
dirty. If the message does not disappear after 
driven for a while, have your vehicle checked by a 
dealer.

Models with 7-in. Color Touchscreen

Models with 9-in. Color Touchscreen

* Not available on all models


Content      ..     4      5      6      7     ..