Honda Accord (2022 year). Manual in english - page 33
 

  Index      Manuals     Honda Accord (2022 year). Manual in english


Search            copyright infringement  


Content      ..     31      32      33      34     ..


Honda Accord (2022 year). Manual in english - page 33


uu

Parking Your Vehicle

u

Cross Traffic Monitor

*

526

Driving

The system activates when:

The power mode is in ON.

The Cross Traffic Monitor is turned on.

2

Cross Traffic Monitor On and Off

 P. 528

The transmission is in 

(

R

.

Your vehicle is moving at 3 mph (5 km/h) or 
lower.

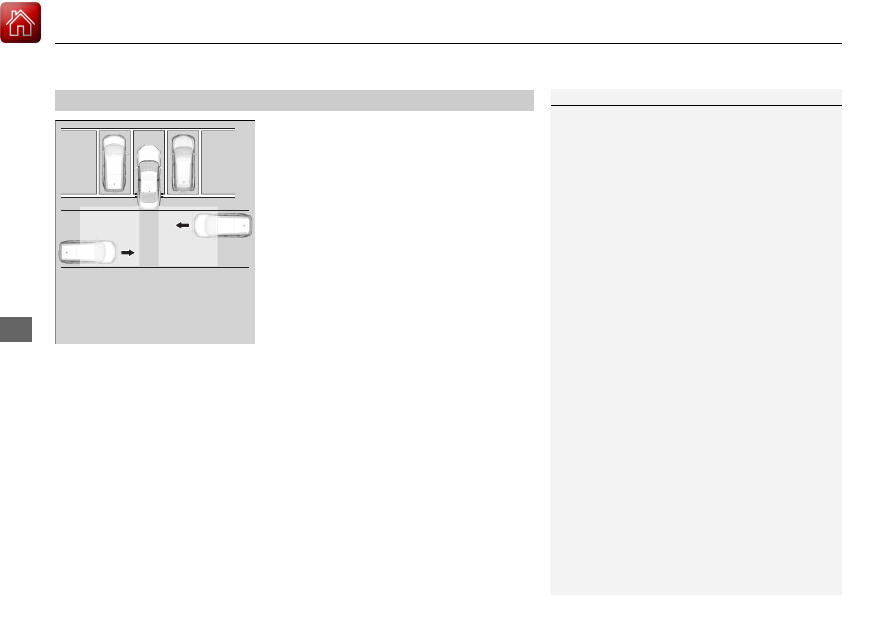
When a vehicle is detected approaching from a rear corner, Cross Traffic Monitor 
alerts you with a buzzer and a displayed warning.

The system will not detect a vehicle that approaches from directly behind your 
vehicle, nor will it provide alerts about a detected vehicle when it moves directly 
behind your vehicle.

The system does not provide alerts for a vehicle that is moving away from your 
vehicle, and it may alert for pedestrians, bicycles, or stationary objects.

How the System Works

1

Cross Traffic Monitor

*

Cross Traffic Monitor may not detect or may delay 
alerting an approaching vehicle, or may alert without 
an approaching vehicle under the following 
conditions:

An obstacle, such as another vehicle and a wall, 
near your vehicle’s rear bumper, is blocking the 
radar sensor’s scope.

Your vehicle is moving at the speed of about 3 mph 
(5 km/h) or higher.

A vehicle is approaching at the speed other than 
between about 6 mph (10 km/h) and 16 mph (25 
km/h).

The system picks up external interference such as 
other radar sensors from another vehicle or strong 
radio wave transmitted from a facility nearby.

Either corner of the rear bumper is covered with 
snow, ice, mud or dirt.

When there is bad weather.

Your vehicle is on an incline.

Your vehicle is tilted due to a heavy load in the rear.

Your vehicle is reversing towards a wall, a pole, a 
vehicle, and so on.

The rear bumper or the sensors have been improperly 
repaired or the rear bumper has been deformed. 
Have your vehicle checked by a dealer.

For proper operation, always keep the rear bumper 
corner area clean.
Do not cover the rear bumper corner area with labels 
or stickers of any kind.

Radar sensors:
Underneath the rear bumper 
corners

* Not available on all models

Continued

527

uu

Parking Your Vehicle

u

Cross Traffic Monitor

*

Driving

An arrow icon appears on the side a vehicle is approaching on the audio/information 
screen.

When the System Detects a Vehicle

1

When the System Detects a Vehicle

If the 

 on the lower right changes to 

 in amber 

when the transmission is in 

(

R

, mud, snow or ice, 

etc. may have accumulated in the vicinity of the 
sensor. The system is temporarily canceled. Check the 
bumper corners for any obstructions, and thoroughly 
clean the area if necessary.

If the 

 comes on when the transmission is in 

(

R

there may be a problem with the Cross Traffic 
Monitor system. Do not use the system and have your 
vehicle checked by a dealer.

If the display remains the same with the transmission 
in 

(

R

, there may be a problem with the rear camera 

system and the Cross Traffic Monitor system.
Do not use the system and have your vehicle checked 
by a dealer.

Wide View

Normal View

Arrow Icon

Top Down View

528

uu

Parking Your Vehicle

u

Cross Traffic Monitor

*

Driving

You can switch the system on and off using the audio/information screen.

2

Customized Features

 P. 351

The system can also be turned on and off on 
the audio/information screen by pressing the 
Cross Traffic Monitor icon.

Cross Traffic Monitor On and Off

Cross Traffic Monitor icon

529

Continued

Driving

Multi-View Rear Camera

About Your Multi-View Rear Camera

The audio/information screen can display your vehicle’s rear view. The display 
automatically changes to the rear view when the transmission is put into 

(

R

.

Multi-View Rear Camera Display Area

1

About Your Multi-View Rear Camera

The rear camera view is restricted. You cannot see 
the corner ends of the bumper or what is underneath 
the bumper. Its unique lens also makes objects 
appear closer or farther than they actually are.

Visually confirm that it is safe to drive before backing 
up. Certain conditions (such as weather, lighting, and 
high temperatures) may also restrict the rear view. Do 
not rely on the rearview display which does not give 
you all information about conditions at the back of 
your vehicle.

If the camera lens is covered with dirt or moisture, 
use a soft, moist cloth to keep the lens clean and free 
of debris.

You can change the 

Fixed Guideline

 and 

Dynamic 

Guideline

 settings.

2

Customized Features

 P. 351

Fixed Guideline
ON:

 Guidelines appear when you put the 

transmission into 

(

R

.

OFF:

 Guidelines do not appear.

Dynamic Guideline
ON:

 Guidelines move according to the steering wheel 

direction.

OFF:

 Guidelines do not move.

Top Down View Mode

Normal View Mode

Wide View Mode

Guidelines

Bumper

Camera

Approx. 39 inches (1 m)

Approx. 20 inches (50 cm)

530

uu

Multi-View Rear Camera

u

About Your Multi-View Rear Camera

Driving

You can view three different camera modes on the audio/information screen.

Touch the appropriate icon to switch the mode.

: Wide view mode
: Normal view mode
: Top down view mode

If you were last using Wide view mode or Normal view mode, the same view 
mode will be activated the next time you put the transmission into 

(

R

.

If you were using Top down view mode before turning off the engine, the next 
time you set the power mode to ON and put the transmission into 

(

R

, the view 

mode you were using just before using Top down view mode (Wide view mode 
or Normal view mode) will be activated.

If you were using Top down view mode and 10 seconds elapsed after you took 
the transmission out of 

(

R

, the view mode you were using just before selecting 

Top down view mode (Wide view mode or Normal view mode) will be activated 
the next time you put the transmission into 

(

R

.

531

Driving

Refueling

Fuel Information

Fuel recommendation

Use of a lower octane gasoline can cause a persistent, heavy metallic knocking noise 
that can lead to engine damage.

Top tier detergent gasoline

Because the level of detergency and additives in gasoline vary in the market, Honda 
endorses the use of “TOP TIER Detergent Gasoline” where available to help 
maintain the performance and reliability of your vehicle. TOP TIER Detergent 
Gasoline meets a new gasoline standard jointly established by leading automotive 
manufacturers to meet the needs of today’s advanced engines.

Qualifying gasoline retailers will, in most cases, identify their gasoline as having met 
“TOP TIER Detergent Gasoline” standards at the retail location. This fuel is 
guaranteed to contain the proper level of detergent additives and be free of metallic 
additives. The proper level of detergent additives, and absence of harmful metallic 
additives in gasoline, help avoid buildup of deposits in your engine and emission 
control system. 

For further important fuel-related information for your vehicle, or on information on 
gasoline that does not contain MMT, visi

www.hondacars.com.

 In Canada, visit 

www.honda.ca

 for additional information on gasoline. For more information on top 

tier gasoline, visit 

www.toptiergas.com

.

Fuel tank capacity: 14.8 US gal (56 L)

Unleaded gasoline, pump octane number 87 or higher

1

Fuel Information

NOTICE

We recommend quality gasoline containing 
detergent additives that help prevent fuel system and 
engine deposits. In addition, in order to maintain 
good performance, fuel economy, and emissions 
control, we strongly recommend the use of gasoline 
that does NOT contain harmful manganese-based 
fuel additives such as MMT, if such gasoline is 
available.

Use of gasoline with these additives may adversely 
affect performance, and cause the malfunction 
indicator lamp on your instrument panel to come on. 
If this happens, contact a dealer for service.
Some gasoline today is blended with oxygenates such 
as ethanol. Your vehicle is designed to operate on 
oxygenated gasoline containing up to 15% ethanol 
by volume. Do not use gasoline containing methanol. 
If you notice any undesirable operating symptoms, try 
another service station or switch to another brand of 
gasoline.

532

uu

Refueling

u

How to Refuel

Driving

How to Refuel

Your fuel tank is not equipped with a fuel filler cap. You can insert the filler nozzle 
directly into the filler neck. The tank seals itself again when you pull out the filler 
nozzle.

1.

Stop your vehicle with the service station 
pump on the left side of the vehicle in the 
rear.

2.

Turn off the engine.

3.

Unlock the driver’s door.

u

The fuel fill door on the outer side of the 
vehicle will unlock.

4.

Press and release the area indicated by the 
arrow to release the fuel fill door. You will 
here a click and the lid will open slightly.

5.

Manually pull the fuel fill door to a fully 
open position.

1

How to Refuel

The fuel filler opening is designed to accept only 
service station filler nozzles for refueling. Use of 
smaller diameter tubes (e.g., those used to siphon 
fuel for other uses) or other non-service station 
devices can damage the area in and around the filler 
opening.

Use the master door lock switch to unlock the fuel fill 
door.
The vehicle doors and fuel fill door automatically 
relock if the keyless remote unlock function is used. 
This can be deactivated by briefly opening then 
closing the driver’s door.

3

WARNING

Gasoline is highly flammable and explosive. 
You can be burned or seriously injured 
when handling fuel.

Stop the engine, and keep heat, sparks, 
and flames away.

Handle fuel only outdoors.

Wipe up spills immediately.

Press

Fuel Fill Door

533

uu

Refueling

u

How to Refuel

Driving

6.

Place the end of the filler nozzle on the 
lower part of filler opening, then insert it 
slowly and fully.

u

Make sure that the end of the filler 
nozzle goes down along with the filler 
pipe.

u

Keep the filler nozzle level.

u

When the tank is full, the filler nozzle will 
click off automatically.

u

If you do not fill up the tank to full, 
always add a minimum of 1.3 US gal (5 L) 
of fuel.

u

After filling, wait about five seconds 
before removing the filler nozzle.

7.

Shut the fuel fill door by hand.

1

How to Refuel

If the filler nozzle keeps turning off when the tank is 
not full, there may be a problem with the pump’s fuel 
vapor recovery system. Try filling at another pump. If 
this does not fix the problem, consult a dealer.

The filler nozzle automatically stops to leave space in 
the fuel tank so that fuel does not overflow as a result 
of changes in air temperature.

Do not continue to add fuel after the filler nozzle has 
automatically stopped. Additional fuel can exceed 
the full tank capacity.

If you have to refuel your vehicle from a portable 
container, use the funnel provided with your vehicle.

2

Refueling From a Portable Fuel Container


P. 630

If you repeatedly fill the tank with less than the 
specified minimum amount of fuel, the malfunction 
indicator lamp may come on. If this happens, have 
your vehicle checked by a dealer.

1.5 L engine models

1.5 L engine models

All models

534

Driving

Fuel Economy and CO

2

 Emissions

Improving Fuel Economy and Reducing CO

2

 Emissions

Achieving fuel economy and reducing CO

2

 emissions is dependent on several 

factors, including driving conditions, load weight, idling time, driving habits, and 
vehicle condition. Depending on these and other factors, you may not achieve the 
rated fuel economy of this vehicle.

You can optimize your fuel economy with proper maintenance of your vehicle. 
Always maintain your vehicle in accordance with the messages displayed on the 
driver information interface.

Use engine oil with the viscosity recommended.

2

Recommended Engine Oil

 P. 551

Maintain the specified tire pressure.

Do not load the vehicle with excess cargo.

Keep your vehicle clean. A buildup of snow or mud on your vehicle’s underside 
adds weight and increases wind resistance.

Maintenance and Fuel Economy

1

Improving Fuel Economy and Reducing CO

2

 Emissions

Direct calculation is the recommended method to 
determine actual fuel consumed while driving.

In Canada, posted fuel economy numbers are 
established following a simulated test. For more 
information on how this test is performed, please visit 

https://www.nrcan.gc.ca

 and search for “fuel 

consumption testing” in the search field at the top of 
the page.

Miles driven

Gallons of 

fuel

Miles per 

Gallon

100

Liters of fuel

Kilometers 

driven

L per 100 km

535

Driving

Turbo Engine Vehicle

Handling Precautions

The turbocharger is a high-precision device to obtain greater horsepower by 
delivering a large volume of compressed air into the engine using a turbine driven by 
the engine’s exhaust gas pressure.

When the engine is cold just after starting, avoid revving the engine or sudden 
acceleration.

Always replace the engine oil and engine oil filter according to the Maintenance 
Minder

TM

. The turbine rotates at very high speeds over 100,000 rpm and its 

temperature reaches over 1,292°F (700°C). It is lubricated and cooled by engine 
oil. If you fail to replace the engine oil and filter at the scheduled distance or 
interval, deteriorated engine oil may cause failure such as sticking and abnormal 
noise of the turbine bearing.

1

Turbo Engine Vehicle

The scheduled maintenance intervals for replacing 
the filter is indicated on the driver information 
interface. Follow the information on replacement 
timing.

2

Maintenance Minder

TM

 P. 541

The temperature gauge pointer is at the 

 mark 

when you restart the engine after driving under high 
load conditions such as at high speed or in hilly 
terrain. This is normal. The gauge goes down after 
you idle or drive the vehicle for about one minute.

H

537

Maintenance

This chapter discusses basic maintenance.

Before Performing Maintenance

Inspection and Maintenance ............ 538
Safety When Performing Maintenance..... 539
Parts and Fluids Used in Maintenance 

Service ........................................... 540

Maintenance Minder

TM

..................... 541

Maintenance Under the Hood

Maintenance Items Under the Hood..... 548
Opening the Hood ........................... 550
Recommended Engine Oil ................ 551
Oil Check ......................................... 552
Adding Engine Oil ............................ 554
Changing the Engine Oil and Oil Filter ..... 555

Engine Coolant ................................ 559
Transmission Fluid............................ 561
Brake Fluid....................................... 562
Refilling Window Washer Fluid......... 563

Replacing Light Bulbs

....................... 564

Checking and Maintaining Wiper 

Blades

.......................................... 572

Checking and Maintaining Tires

Checking Tires ................................. 575
Tire and Loading Information Label ...... 576
Tire Labeling .................................... 576
DOT Tire Quality Grading (U.S. Vehicles).......578
Wear Indicators................................ 580

Tire Service Life................................ 580
Tire and Wheel Replacement ........... 581
Tire Rotation.................................... 582
Winter Tires ..................................... 583

Battery

............................................... 584

Remote Transmitter Care

Replacing the Remote Battery .......... 586

Climate Control System Maintenance

.... 587

Cleaning

Interior Care .................................... 588
Exterior Care.................................... 590

Accessories and Modifications

........ 593

538

Main

tenan

ce

Before Performing Maintenance

Inspection and Maintenance

For your safety, perform all listed inspections and maintenance to keep your vehicle 
in good condition. If you become aware of any abnormality (noise, smell, insufficient 
brake fluid, oil residue on the ground, etc.), have your vehicle inspected by a dealer. 
(Note, however, that service at a dealer is not mandatory to keep your warranties in 
effect.)

Routine inspections

Perform inspections before long distance trips, when washing the vehicle, or when 
refueling.

2

Maintenance

 P. 28

Periodic inspections

Check the brake fluid level monthly.

2

Brake Fluid

 P. 562

Check the tire pressure monthly. Examine the tread for wear and foreign objects.

2

Checking and Maintaining Tires

 P. 575

Check the operation of the exterior lights monthly.

2

Replacing Light Bulbs

 P. 564

Check the condition of the wiper blades at least every six months.

2

Checking and Maintaining Wiper Blades

 P. 572

Types of Inspection and Maintenance

1

Inspection and Maintenance

Maintenance, replacement, or repair of 
emissions control devices and systems may be 
done by any automotive repair establishment or 
individuals using parts that are “certified” to 
EPA standards.

According to state and federal regulations, failure to 
perform maintenance on the maintenance main 
items marked with # will not void your emissions 
warranties. However, all maintenance services should 
be performed in accordance with the intervals 
indicated by the driver information interface.

2

Maintenance Service Items

 P. 545

If you want to perform complex maintenance tasks 
that require more skills and tools, you can purchase a 
subscription to the Service Express website at 

www.techinfo.honda.com

.

2

Authorized Manuals

 P. 644

If you want to perform maintenance yourself, make 
sure that you have the necessary tools and skills first.
After performing maintenance, update the records in 
the separate maintenance booklet.

U.S. models

539

uu

Before Performing Maintenance

u

Safety When Performing Maintenance

Main

tenan

ce

Safety When Performing Maintenance

Some of the most important safety precautions are given here.
However, we cannot warn you of every conceivable hazard that can arise in performing 
maintenance. Only you can decide whether you should perform a given task.

To reduce the possibility of fire or explosion, keep cigarettes, sparks, and flames 
away from the battery and all fuel related parts.

Never leave rags, towels, or other flammable objects under the hood.

u

Heat from the engine and exhaust can ignite them, causing a fire.

To clean parts, use a commercially available degreaser or parts cleaner, not 
gasoline.

Wear eye protection and protective clothing when working with the battery or 
compressed air.

Engine exhaust contains carbon monoxide, which is poisonous and can kill you.

u

Only operate the engine if there is sufficient ventilation.

The vehicle must be in a stationary condition.

u

Make sure your vehicle is parked on level ground, the parking brake is set, and 
the engine is off.

Be aware that hot parts can burn you.

u

Make sure to let the engine and exhaust system cool thoroughly before 
touching vehicle parts.

Be aware that moving parts can injure you.

u

Do not start the engine unless instructed, and keep your hands and limbs away 
from moving parts.

u

Do not open the hood while the Auto Idle Stop function is activated.

Maintenance Safety

Vehicle Safety

1

Safety When Performing Maintenance

3

WARNING

Improperly maintaining this vehicle or 
failing to correct a problem before driving 
can cause a crash in which you can be 
seriously hurt or killed.

Always follow the inspection and 
maintenance recommendations according 
to the schedules in this owner’s manual.

3

WARNING

Failure to properly follow maintenance 
instructions and precautions can cause you 
to be seriously hurt or killed.

Always follow the procedures and 
precautions in this owner’s manual.

Models with Auto Idle Stop

540

uu

Before Performing Maintenance

u

Parts and Fluids Used in Maintenance Service

Main

tenan

ce

Parts and Fluids Used in Maintenance Service

The use of Honda genuine parts and fluids is recommended when maintaining and 
servicing your vehicle. Honda genuine parts are manufactured according to the 
same high quality standards used in Honda vehicles.

1

Parts and Fluids Used in Maintenance Service

Do not press the engine cover forcibly. This may 
damage the engine cover and component parts.

2.0 L engine models

542

uu

Maintenance Minder

TM

u

To Use Maintenance Minder

TM

Main

tenan

ce

To Use Maintenance Minder

TM

Maintenance items, which should be serviced at the same time that you replace the 
engine oil, appear on the driver information interface.
You can view them on the engine oil life screen at any time.

1.

Set the power mode to ON.

2.

Press the 

 (home) button.

3.

Roll the left selector wheel until 

 is displayed.

4.

Press the left selector wheel to go to the 

Maintenance Minder

 screen. The 

engine oil life appears on the driver information interface along with maintenance 
items due soon.

Displaying the Maintenance Minder Information

1

Displaying the Maintenance Minder Information

Based on the engine operating conditions, the 
remaining engine oil life is calculated and displayed 
as a percentage.

There is a list of maintenance main and sub items you 
can view on the driver information interface.

2

Maintenance Service Items

 P. 545

Displayed Engine Oil 

Life (%)

Calculated Engine Oil 

Life (%)

100

100 to 91

90

90 to 81

80

80 to 71

70

70 to 61

60

60 to 51

50

50 to 41

40

40 to 31

30

30 to 21

20

20 to 16

15

15 to 11

10

10 to 6

5

5 to 1

0

0

 (home) Button

Engine Oil Life

Main Item

Sub Item

Left Selector Wheel

543

uu

Maintenance Minder

TM

u

To Use Maintenance Minder

TM

Continued

Main

tenan

ce

Maintenance Minder Messages on the Driver Information 

Interface

Maintenance Message

Oil Life Display

Explanation

Information

-

When you select the Maintenance 
Minder screen, it displays codes for 
maintenance items due at the next 
engine oil change, along with the 
percentage of engine oil life 
remaining.

-

Maintenance Due Soon

15 %

The engine oil life indicator starts to 
appear along with other due-soon 
maintenance item codes when the 
remaining oil life drops to 15 
percent.

The engine oil is approaching the end 
of its service life.


Content      ..     31      32      33      34     ..