Honda Pilot (2022 year). Manual in english - page 27
 

  Index      Manuals     Honda Pilot (2022 year). Manual in english


Search            copyright infringement  


Content      ..     25      26      27      28     ..


Honda Pilot (2022 year). Manual in english - page 27


429

uu

Bluetooth

®

 HandsFreeLink

®

u

HFL Menus

Continued

Features

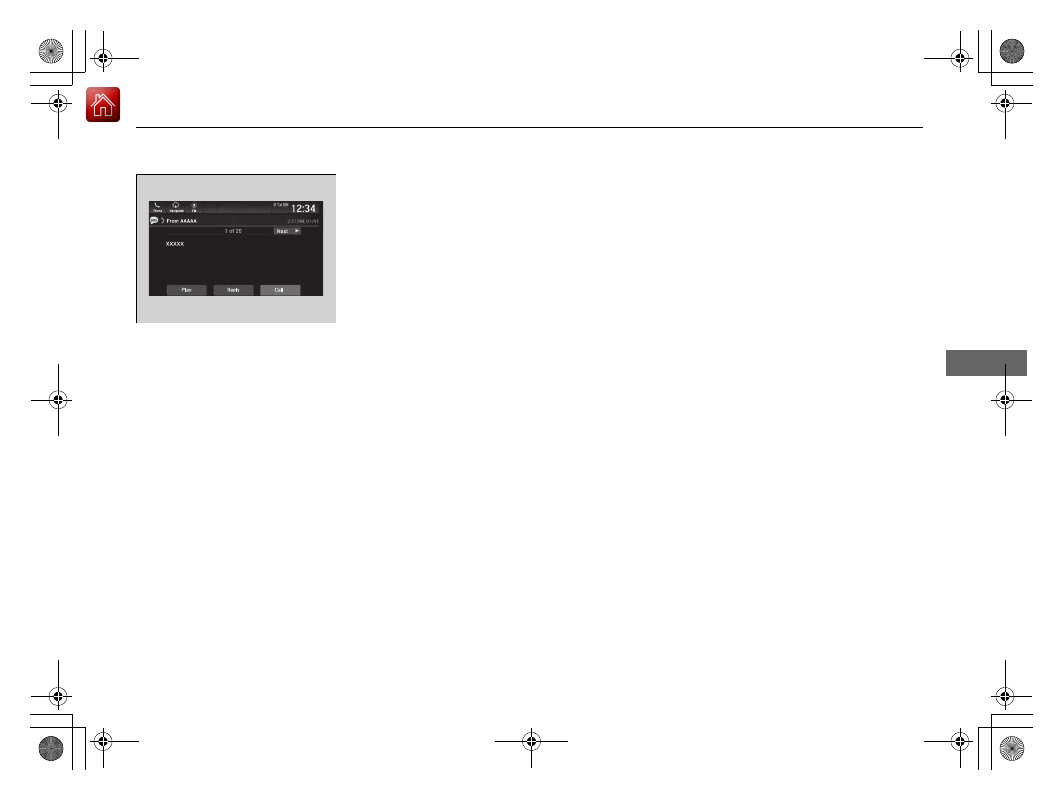
Making a call to a sender

1.

Go to the text message screen.

2.

Select 

Call

.

uu

Bluetooth

®

 HandsFreeLink

®

u

HFL Menus

430

Features

Automatic collision notification

If your vehicle’s airbags deploy or if the unit 
detects that the vehicle is severely impacted, 
your vehicle automatically will attempt to 
connect to the HondaLink

®

 operator. If 

connected, information about your vehicle, its 
location, and its condition can be sent to the 
operator

*1

; you also can speak to the operator 

when connected. 

IMPORTANT:

 For vehicles equipped with HondaLink

®

 Assist, owner activation 

constitutes authorization for Honda to collect information from your vehicle needed 
to provide the service, and agreement to the Terms of Use at 

www.hondalink.com/TermsAndConditions

. In a crash, HondaLink

®

 Assist will 

attempt to notify emergency services but NEITHER HONDA NOR ITS SERVICE 
PROVIDERS GUARANTEE THAT SUCH NOTIFICATION WILL OCCUR.

Honda reserves the right to terminate HondaLink

®

 Assist services at any time or for 

any reason, and in the future may not be able to provide services due to changes in, 
or obsolescence of, technology integral to the service or changes in governmental 
regulation.

*1: Depending on your phone and adequate cellular coverage, your vehicle’s location may not 
be sent to the operator.

In Case of Emergency

1

In Case of Emergency

Your vehicle may not be able to connect to the 
operator if the battery level is low, the line is 
disconnected, or you do not have adequate cellular 
coverage.

You cannot use this emergency service when:

You travel outside the HondaLink

®

 service coverage 

areas.

There is a problem with the connecting devices, 
such as the microphones, speakers, or the unit 
itself.

You cannot operate other phone-related functions 
using the screen while talking to the operator.
Select 

Hang Up

 to terminate the connection to your 

vehicle.

1

Automatic collision notification

If the unit fails to connect to the operator, it 
repeatedly tries until it succeeds.

Continued

431

uu

Bluetooth

®

 HandsFreeLink

®

u

HFL Menus

Features

To enable notification

1.

Go to the phone settings screen.

2

Phone settings screen

 P. 410

2.

Select 

HondaLink Assist

.

3.

Select 

ON

 or 

OFF

.

1

To enable notification

Setting options:

ON

: Notification is available.

OFF

: Disable the feature.

uu

Bluetooth

®

 HandsFreeLink

®

u

HFL Menus

432

Features

Manual operator connection

*

If you need to talk to the HondaLink

®

 operator 

in a situation where no airbag has deployed, 
you can manually connect to them by pressing 
the 

ASSIST

 button with the power mode in 

ACCESSORY or ON.

1.

Open the cover attached to the ceiling 
console.

2.

Press the 

ASSIST

 button.

u

You are connected to the HondaLink

®


operator.

1

Manual operator connection

*

Do not press the button while driving. When you 
need to contact the operator, park the vehicle in a 
safe place.

If the unit fails to connect to the operator, it 
automatically cancels the action after three minutes.

If necessary, the cover can be broken to access the 

ASSIST

 button.

ASSIST

 Button

* Not available on all models

433

Features

CabinTalk

TM*

Your audio system allows you or the front passenger voices to be broadcast to the 
second and third row seat’s passengers using the rear speakers and/or headphones. 

1.

Select .

2.

Select 

CabinTalk

.

u

Select 

Speakers

 to broadcast to the rear 

speakers.

u

Select 

Headphones

 to broadcast to 

headphones.

u

Select 

Mic is On

 to mute your voice.

How to use

1

CabinTalk

TM

*

You can also switch to the 

CabinTalk

 screen by 

selecting 

CabinTalk

 on the front control panel for 

the Blu-ray/DVD rear entertainment system.

2

Front Control Panel Operation

 P. 350

When 

Speakers

 is selected, you can adjust the 

speaker volume by turning the volume knob.

Models with center speaker

Models with center speaker

Models without center speaker

Models with center speaker

* Not available on all models

435

Driving

This chapter discusses driving and refueling.

Before Driving

................................... 436

Towing a Trailer

................................ 442

Off-Highway Driving Guidelines

..... 452

When Driving

Starting the Engine .......................... 454
Automatic Transmission ................... 461
Shifting ............................................ 462
Auto Idle Stop.................................. 470
ECON Mode .................................... 475
Intelligent Traction Management...... 476

Vehicle Stability Assist

TM

 (VSA

®

), aka Electronic 

Stability Control (ESC), System..............478

Agile Handling Assist ....................... 480
Blind spot information System

*

........ 481

LaneWatch

TM

*

.................................. 484

Intelligent Variable Torque Management (i-

VTM4

TM

) AWD System

*

.................. 486

Tire Pressure Monitoring System (TPMS) 

with Tire Fill Assist.......................... 487

Tire Pressure Monitoring System (TPMS) - 

Required Federal Explanation ......... 489

Honda Sensing

®

................................ 491

Collision Mitigation Braking System

TM


(CMBS

TM

) ....................................... 494

Adaptive Cruise Control (ACC)......... 506
Lane Keeping Assist System (LKAS) .. 519

Road Departure Mitigation (RDM) 

System ....................................... 528

Front Sensor Camera ....................... 533
Radar Sensor.................................... 535

Braking

Brake System ................................... 536
Anti-lock Brake System (ABS) ........... 538
Brake Assist System ......................... 539

Parking Your Vehicle

When Stopped ................................ 540
Parking Sensor System

*

................... 542

Cross Traffic Monitor

*

..................... 547

Multi-View Rear Camera

.................. 551

Refueling

Fuel Information .............................. 553
How to Refuel ................................. 554

Fuel Economy and CO

2

 Emissions

Improving Fuel Economy and Reducing 

CO

2

 Emissions................................ 556

* Not available on all models

436

Driving

Before Driving

Driving Preparation

Check the following items before you start driving.

Make sure there are no obstructions on the windows, door mirrors, exterior 
lights, or other parts of the vehicle.

u

Remove any frost, snow, or ice.

u

Remove any snow on the roof, as this can slip down and obstruct your field of 
vision while driving. If frozen solid, remove ice once it has softened.

u

When removing ice from around the wheels, be sure not to damage the wheel 
or wheel components.

Make sure the hood is securely closed.

u

If the hood opens while driving, your front view will be blocked.

Make sure the tires are in good condition.

u

Check air pressures, and check for damage and excessive wear.

2

Checking and Maintaining Tires

 P. 588

Make sure there are no people or objects behind or around the vehicle.

u

There are blind spots from the inside.

Exterior Checks

1

Exterior Checks

NOTICE

When doors are frozen shut, use warm water around 
the door edges to melt any ice. Do not try to force 
them open, as this can damage the rubber trim 
around the doors. When done, wipe dry to avoid 
further freezing.

Do not pour warm water into the key cylinder.
You will be unable to insert the key if the water 
freezes in the hole.

Heat from the engine and exhaust can ignite 
flammable materials left under the hood, causing a 
fire. If you’ve parked your vehicle for an extended 
period, inspect and remove any debris that may have 
collected, such as dried grass and leaves that have 
fallen or have been carried in for use as a nest by a 
small animal.  Also, check under the hood for leftover 
flammable materials after you or someone else has 
performed maintenance on your vehicle.

Continued

437

uu

Before Driving

u

Driving Preparation

Driving

Store or secure all items on board properly.

u

Carrying too much cargo, or improperly storing it, can affect your vehicle’s 
handling, stability, stopping distance, and tires, and make it unsafe.

2

Maximum Load Limit

 P. 439

Do not pile items higher than the seat height.

u

They can block your view and may be thrown forward in the event of sudden 
braking.

Do not place anything in the front seat footwells. Make sure to secure the floor 
mat.

u

An object or unsecured floor mat can interfere with your brake and accelerator 
pedal operation while driving.

If you have any animals on board, do not let them move around in the vehicle.

u

They may interfere with driving and a crash could occur.

Securely close and lock all doors and the tailgate.

2

Locking/Unlocking the Doors from the Inside

 P. 136

Adjust your seating position properly.

u

Adjust the head restraint, too.

2

Adjusting the Seats

 P. 181

2

Adjusting the Front and Second Row Outer Seat Head Restraint Positions


P. 187

Adjust the mirrors and steering wheel properly.

u

Adjust them while sitting in the proper driving position.

2

Adjusting the Steering Wheel

 P. 178

2

Adjusting the Mirrors

 P. 179

Interior Checks

1

Interior Checks

The headlight aim is set by the factory, and does not 
need to be adjusted. However, if you regularly carry 
heavy items in the cargo area or tow a trailer, have 
the aiming readjusted at a dealer or by a qualified 
technician.

438

uu

Before Driving

u

Driving Preparation

Driving

Be sure items placed on the floor behind the front seats cannot roll under the 
seats.

u

They can interfere with the driver’s ability to operate the pedals, the operation 
of the seats, or the operation of the sensors under the seats.

Everyone in the vehicle must fasten their seat belt.

2

Fastening a Seat Belt

 P. 40

Make sure that the indicators in the instrument panel come on when you start the 
vehicle, and go off soon after.

u

Always have a dealer check the vehicle if a problem is indicated.

2

Indicators

 P. 80

439

uu

Before Driving

u

Maximum Load Limit

Continued

Driving

Maximum Load Limit

The maximum load for your vehicle is 1,173 lbs (532 kg).

The maximum load for your vehicle is 1,340 lbs (608 kg).

See the Tire and Loading Information label attached to the driver’s 
doorjamb.

This figure includes the total weight of all occupants, cargo, and 
accessories, and the tongue load if you are towing a trailer.

Steps for Determining Correct Load Limit -

(1)

Locate the statement “The combined weight of occupants and 
cargo should never exceed XXX kg or XXX lbs.” on your 
vehicle’s placard.

(2)

Determine the combined weight of the driver and passengers 
that will be riding in your vehicle.

(3)

Subtract the combined weight of the driver and passengers 
from XXX kg or XXX lbs.

1

Maximum Load Limit

Gross Vehicle Weight Rating (GVWR):
The maximum allowable weight of the vehicle, all 
occupants, all accessories, all cargo, and the tongue 
load.

2

Specifications

 P. 644

Gross Axle Weight Rating (GAWR):
The maximum allowable weight of the vehicle axle.

2

Specifications

 P. 644

3

WARNING

Overloading or improper loading 
can affect handling and stability 
and cause a crash in which you 
can be hurt or killed.

Follow all load limits and other 
loading guidelines in this manual.

Second row captain seat models

Second row bench seat models

All models

Label Example

440

uu

Before Driving

u

Maximum Load Limit

Driving

(4)

The resulting figure equals the available amount of cargo and 
luggage load capacity. For example, if the “XXX” amount 
equals 1,400 lbs. and there will be five 150 lb. passengers in 
your vehicle, the amount of available cargo and luggage load 
capacity is 650 lbs.
(1,400 - 750 (5 x 150) = 650 lbs.)

(5)

Determine the combined weight of luggage and cargo being 
loaded on the vehicle. That weight may not safely exceed the 
available cargo and luggage load capacity calculated in step 4.

(6)

If your vehicle will be towing a trailer, load from your trailer will 
be transferred to your vehicle. Consult this manual to 
determine how this reduces the available cargo and luggage 
load capacity of your vehicle.

441

uu

Before Driving

u

Maximum Load Limit

Driving

In addition, the total weight of the vehicle, all occupants, 
accessories, cargo, and trailer tongue load must not exceed the 
Gross Vehicle Weight Rating (GVWR) or the Gross Axle Weight 
Rating (GAWR). Both are on a label on the driver’s doorjamb.

1

Maximum Load Limit

Towing a Trailer:
See Towing a Trailer to determine whether your 
vehicle is designed to tow a tailer.

2

Towing a Trailer

 P. 442

Load Limits Example

Example1

Max Load 

1,173 lbs 

(532 kg)

Passenger Weight 

150 lbs x 2 = 300 lbs 

(68 kg x 2 = 136 kg)

Cargo Weight 

873 lbs 

(396 kg)

Example2

Max Load 

1,173 lbs 

(532 kg)

Passenger Weight 

150 lbs x 5 = 750 lbs 

(68 kg x 5 = 340 kg)

Cargo Weight 

423 lbs 

(192 kg)

442

Driving

Towing a Trailer

Towing Preparation

Your vehicle can tow a trailer if you carefully observe the load limits, use the proper 
equipment, and follow the towing guidelines. Check the load limits before driving.

Total trailer weight

Do not exceed the maximum allowable 
weight of the trailer, cargo, and everything in 
or on it shown in the table.
Towing loads in excess of this can seriously 
affect vehicle handling and performance and 
can damage the engine and drivetrain.

Each weight limit is calculated based on the following conditions:

Occupants fill seats from the front of the vehicle to the back.

Each occupant weighs 150 lbs (68 kg).

Each occupant has 17.6 lb (8 kg) cargo in the cargo area.

Any additional weight, cargo or accessories reduce the maximum trailer weight and 
maximum tongue load.

Towing Load Limits

1

Towing Load Limits

Check if all loads are within limits at a public scale.
If a public scale is not available, add the estimated 
weight of your cargo load to the weight of your 
trailer (as quoted by the manufacturer), and then 
measure the tongue load with an appropriate scale or 
tongue gauge or estimate it based on cargo 
distribution.

Refer to the trailer owner’s manual for additional 
information.

Break-in Period
Avoid towing a trailer during your vehicle’s first 600 
miles (1,000 km).

Never exceed the gross weight ratings.
Gross weight information

2

Vehicle Specifications

 P. 644

3

WARNING

Exceeding any load limit or improperly 
loading your vehicle and trailer can cause a 
crash in which you can be seriously hurt or 
killed.

Check the loading of your vehicle and 
trailer carefully before starting to drive.

Total Load

Number of 

occupants

AWD models with 

ATF cooler

AWD models 

without ATF cooler

2WD models

2

5,000 lbs (2,268 kg)

3,500 lbs (1,588 kg)

3,500 lbs (1,588 kg)

3

4,750 lbs (2,155 kg)

3,250 lbs (1,474 kg)

3,250 lbs (1,474 kg)

4

4,500 lbs (2,041 kg)

3,000 lbs (1,361 kg)

3,000 lbs (1,361 kg)

5

4,250 lbs (1,928 kg)

2,750 lbs (1,247 kg)

2,750 lbs (1,247 kg)

6

4,000 lbs (1,814 kg)

2,500 lbs (1,134 kg)

2,500 lbs (1,134 kg)

7

2,500 lbs (1,134 kg)

2,250 lbs (1,021 kg)

2,250 lbs (1,021 kg)

8

Towing not recommended

443

uu

Towing a Trailer

u

Towing Preparation

Continued

Driving

Tongue load

The weight of the tongue with a fully loaded 
trailer on the hitch should be approximately:
Boat trailers: 5 – 15% of the total trailer 
weight
Other trailers: 10 – 15% of total trailer weight

Ton

g

ue Loa

d

Tongue Load

Number of 

occupants

AWD models with or without 

ATF cooler

2WD models

2

500 lbs (227 kg)

350 lbs (159 kg)

3

475 lbs (215 kg)

325 lbs (147 kg)

4

450 lbs (204 kg)

300 lbs (136 kg)

5

375 lbs (170 kg)

275 lbs (125 kg)

6

250 lbs (113 kg)

240 lbs (109 kg)

7

125 lbs (57 kg)

115 lbs (52 kg)

8

Towing not recommended

uu

Towing a Trailer

u

Towing Preparation

444

Driving

How to weigh the trailer loads using the public scale

Check each weight in the order indicated as shown.
Refer to the table on the right for each weight’s limit except for the tongue load.

2

Tongue load

 P. 443

If you cannot weigh the rear axle, subtract 1 from 2.

The maximum gross combined weight (4) decreases by 2% for every 1,000 feet 
(305 meters) of elevation.

To calculate the tongue load, subtract 5 from 6.

Refer to the trailer owner’s manual for additional information.

1

How to weigh the trailer loads using the public scale

Fully load the vehicle and trailer. An attendant who 
watches the scale is needed as all occupants should 
stay in the vehicle.

If a public scale is not available, add the estimated 
weight of your cargo load to the weight of your 
trailer (as quoted by the manufacturer), and then 
measure the tongue load with an appropriate scale or 
tongue gauge or estimate it based on cargo 
distribution.

Weight limit for

2WD models

AWD models

Front gross axle

2,734 lbs 

(1,240 kg)

2,855 lbs 

(1,295 kg)

Gross vehicle

5,545 lbs 

(2,515 kg)

5,842 lbs 

(2,650 kg)

Rear gross axle

2,965 lbs 

(1,345 kg)

3,142 lbs 

(1,425 kg)

Gross combined

8,025 lbs 

(3,640 kg)

9,755 lbs 

(4,425 kg)

1. Front gross axle weight.

2. Gross vehicle weight.

4. Gross combined weight.

3. Rear gross axle weight.

5. Hitched trailer weight.
6. Unhitched trailer weight.

Continued

445

uu

Towing a Trailer

u

Towing Preparation

Driving

Towing generally requires a variety of supplemental equipment.
To ensure the best quality, we recommend that you purchase Honda equipment 
whenever possible.

Trailer brakes

Recommended for any trailer with a total weight of 1,000 lbs (450 kg) or more:
There are two common types of trailer brakes: surge and electric. Surge brakes are 
common for boat trailers, since the brakes will get wet.
If you choose electric brakes, be sure they are electronically actuated. Do not 
attempt to attach trailer brakes to your vehicle’s hydraulic system, as it will lower 
braking effectiveness and create a potential hazard.
The 4-pin gray connector installed in your vehicle has all of the circuits required to 
install most electric trailer brake controllers.

Have a qualified mechanic install your trailer 
brake controller following the trailer brake 
controller manufacturer’s instructions. Failure 
to properly install the trailer brake controller 
may increase the distance it takes for you to 
stop your vehicle when towing a trailer.

Towing Equipment and Accessories

1

Towing Equipment and Accessories

Make sure that all equipment is properly installed and 
maintained, and that it meets federal, state, province/
territory, and local regulations.

Consult your trailer maker for proper installation and 
setup of the equipment.
Improper installation and setup can affect the 
handling, stability, and braking performance of your 
vehicle.

Consult your trailer sales or rental agency if any other 
items are recommended or required for your towing 
situation.

The lighting and wiring of trailers can vary by type 
and brand. If a connector is required, it should only 
be installed by a qualified technician.

Trailer packages and products:

Ball mount, hitch plug, hitch pin etc.

Wiring harness kit

Trailer hitch kit (jumper harness included)

2

Trailer brakes

 P. 445

Automatic transmission cooler

Are available at a dealer.

1

Trailer brakes

The 4-pin gray connector is located under the 
instrument panel near the top of the parking brake 
pedal.

Electric Brake 
(Brown)

Ground (Black)

+B (Light Green) 
(20A)

Stop (Violet)

Trailer brake controller 
connector’s terminals:


Content      ..     25      26      27      28     ..