Honda Ridgeline. Manual - part 387
 

  Index      Honda     Honda Ridgeline - service repair manual 2006-2008 year


Search            


Content   ..  385  386  387  388   ..


Honda Ridgeline. Manual - part 387


03

04

01

02

SJC8A00J18526327911KBAT00

20-186

20-186

Openers

Hood Latch Replacement (cont’d)

Fuel Fill Door Opener Replacement

A

B

Fastener Locations

: Bolt, 2

A

6 x 1.0 mm
9.8 N·m
(1.0 kgf·m,
7.2 lbf·ft)

A

B

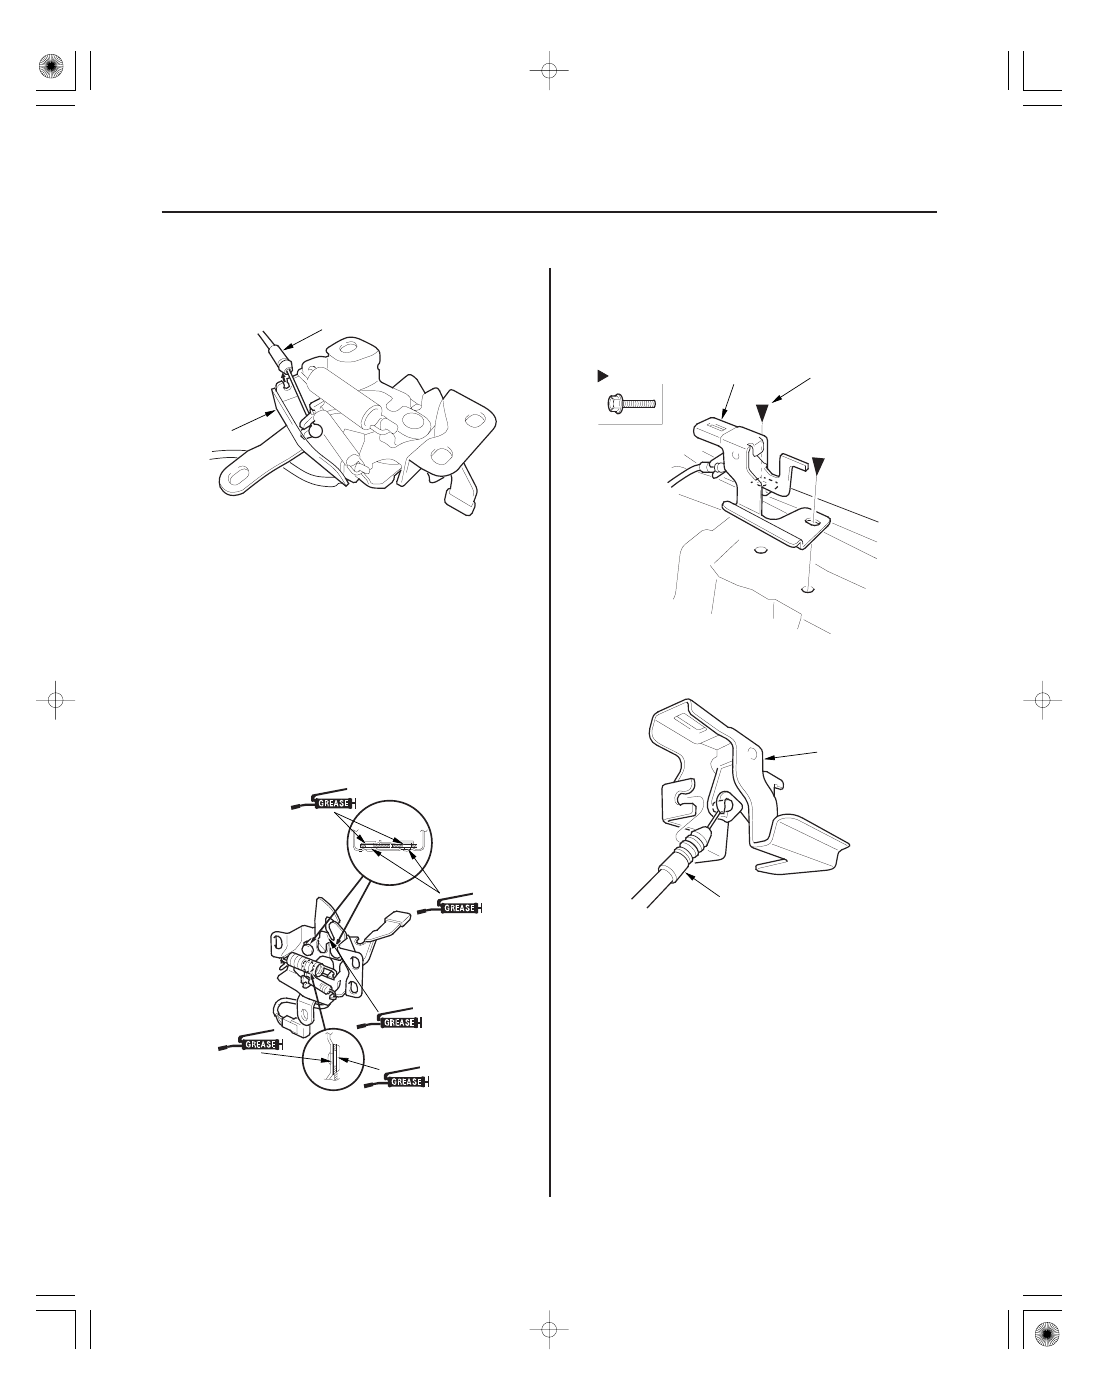
4. Disconnect the hood opener cable (A) from the

hood latch (B). Take care not to kink the cable.

5. Install the latch in the reverse order of removal, and

note these items:

• Apply multipurpose grease to the hood latch as

indicated by the arrows.

• Make sure the hood opener cable is connected

properly and hood latch switch connector is
plugged in properly.

• Make sure the cable actuates the latch before you

close the hood.

• Adjust the hood latch alignment (see step 3 on

page 20-135).

• Make sure the hood opens properly and locks

securely.

1. Remove the left front door sill trim (see page 20-60).

2. Remove the bolts, then remove the fuel fill door

opener (A) from the body.

3. Disconnect the fuel fill door opener cable (A) from

the opener (B). Take care not to kink the cable.

4. Install the fuel fill door opener in the reverse order

of removal, and note these items:

• Make sure the fuel fill door opener cable is

connected properly.

• Make sure the fuel fill door opens properly.

01

02

SJC8A00J18573535261KBAT00

20-187

In-Bed Trunk Lid Latch Replacement

Fastener Locations

: Clip, 7

A

Fastener Locations

: Bolt, 2

6 x 1.0 mm
9.8 N·m
(1.0 kgf·m, 7.2 lbf·ft)

A

B

C

NOTE:

• Put on gloves to protect your hands.
• Take care not to scratch the in-bed trunk lid.

1. Open the in-bed trunk lid.

2. Using a clip remover, remove the clips, then

remove the in-bed trunk lid inner cover (A).

3. Remove the bolts, then remove the in-bed trunk lid

latch (A) from the in-bed trunk lid. Disconnect the
in-bed trunk lid latch cable (B) and actuator
connector (C). Take care not to kink the cable.

4. Install the latch in the reverse order of removal, and

note these items:

• Make sure the connector is plugged in properly.
• Make sure the in-bed trunk lid opens properly

and locks securely.

01

02

03

04

SJC8A00J18573535271KBAT00

20-188

Openers

In-Bed Trunk Lid Opener Replacement

Fastener Location

: Bolt, 1

A

6 x 1.0 mm
9.8 N·m
(1.0 kgf·m,
7.2 lbf·ft)

A

B

C

Fastener Locations

: Nut, 2

A

6 x 1.0 mm
9.8 N·m
(1.0 kgf·m, 7.2 lbf·ft)

A

B

C

NOTE:

• Put on gloves to protect your hands.
• Take care not to scratch the in-bed trunk lid.

1. Remove the in-bed trunk lid latch (see page 20-187).

2. Remove the bolt, then remove the in-bed trunk lid

anchor cable plate (A) from the in-bed trunk lid.

3. Disconnect the in-bed trunk lid opener switch

connector (A) and cylinder switch connector (B),
and then remove them and cable clip (C).

4. Remove the nuts securing the in-bed trunk lid

opener (A).

5. Remove the in-bed trunk lid opener (A) by pulling it

out, and pull out the wire harnesses (B) and in-bed
trunk lid cable (C) through the opener opening in
the in-bed trunk lid.

05

06

07

Foam tape: Thickness 3 mm (0.12 in.)

Width 40 mm (1.6 in.)

20-189

A

D

B

C

C

A

B

B

A

6. Remove the foam tapes (A) and vinyl tape (B) from

the wire harnesses (C) and in-bed trunk lid latch
cable (D).

7. Remove the opener seat (A) from the opener (B).

8. Disconnect the in-bed trunk lid latch cable (A) from

the opener (B).

9. Install the opener in the reverse order of removal,

and note these items:

• Replace the foam tape and vinyl tape with new

ones.

• Make sure the opener seat is installed properly.
• Make sure the in-bed trunk lid opener switch

connector and cylinder switch connector are
plugged in properly and the in-bed trunk lid latch
cable is connected properly.

• Make sure the in-bed trunk lid opens properly.


Content   ..  385  386  387  388   ..