Ford F-150 (2024 year). Manual in english - page 4
 

  Index      Manuals     Ford F-150 (2024 year). Manual in english


Search            copyright infringement  


Content      ..     2      3      4      5     ..


Ford F-150 (2024 year). Manual in english - page 4


E308677

Tablet stand.

A

Tool inset.

B

Clamp pocket.

C

Standard and metric ruler.

D

Cup holder.

E

Tailgate anchors.

F

E336605

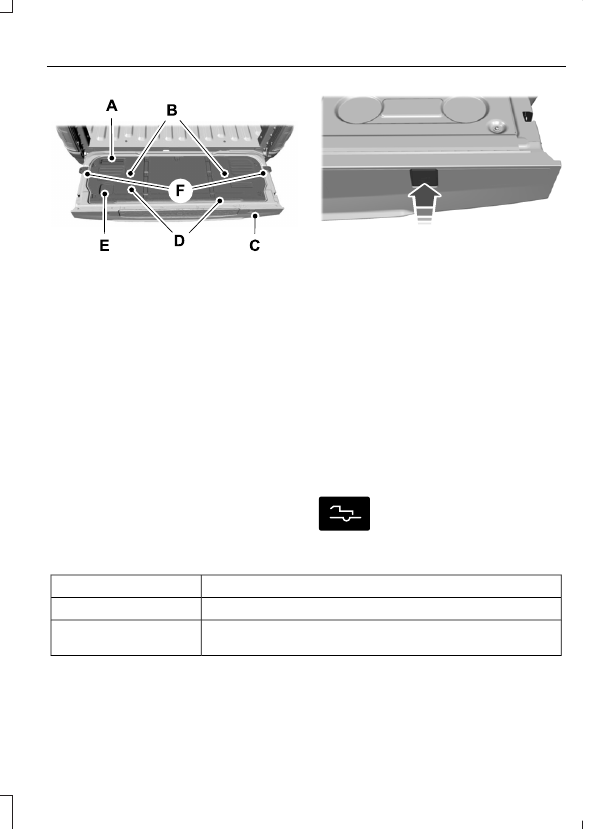
The tailgate work surface contains clamp
pockets that allows you to secure work
material.

Note:

Damage could occur to the tailgate

if you overload the vertical clamp arm in any
direction.

Note:

When you finish using the tailgate

work surface, make sure you remove all of
your belongings, then close the tailgate.

TAILGATE –
TROUBLESHOOTING

TAILGATE – WARNING LAMPS

E311338

Illuminates when the tailgate is
not completely closed.

TAILGATE – INFORMATION MESSAGES

Action

Message

The tailgate is not completely closed.

Tailgate Ajar

You need to stow the tailgate step before the power tailgate

can close.

Power Tailgate Stow

Step

125

Tailgate - Vehicles With: Power Tailgate

TAILGATE – FREQUENTLY ASKED
QUESTIONS

Why won't my power tailgate open?

Make sure the tailgate is in power
mode. Make sure the transmission is
in park (P), ensure nothing is
obstructing the tailgate path and or
causing resistance (tonneau cover or
other aftermarket accessory, freezing
conditions or being parked downhill).
If you have continued issues, the
battery voltage may be low or other
system issues. See an authorized
dealer.

Why won't my power tailgate close?

Make sure the tailgate is in power
mode. Your vehicle speed is at or
above 2.5 mph (4 km/h), the tailgate
encountered an obstacle or freezing
conditions. After removing the
obstacles, manually close the tailgate
to resume normal operation. If you
have continued issues, the battery
voltage may be low or other system
issues. See an authorized dealer.

126

Tailgate - Vehicles With: Power Tailgate

TAILGATE PRECAUTIONS

WARNING: 

It is extremely

dangerous to ride in a cargo area, inside
or outside of a vehicle. In a crash, people
riding in these areas are more likely to be
seriously injured or killed. Do not allow
people to ride in any area of your vehicle
that is not equipped with seats and
seatbelts. Make sure everyone in your
vehicle is in a seat and properly using a
seatbelt. Failure to follow this warning
could result in serious personal injury or
death.

OPENING THE TAILGATE

OPENING THE TAILGATE FROM
INSIDE YOUR VEHICLE

The vehicle must be in park (P) to operate
the tailgate.

E369056

Press the button on the
instrument panel twice within
three seconds.

OPENING THE TAILGATE FROM
OUTSIDE YOUR VEHICLE

1.

Unlock the vehicle with the remote
control or power door unlock control.

Note:

If an intelligent access transmitter is

within 3 ft (1 m) of the tailgate, the tailgate
unlocks when you press the tailgate release
button.

E346998

2. Press the button in the top of the

tailgate handle twice within three
seconds.

OPENING THE TAILGATE USING
THE REMOTE CONTROL

E191530

Press the remote control button
twice within three seconds.

REMOVING AND INSTALLING
THE TAILGATE

WARNING: 

Always properly secure

cargo to prevent shifting cargo or cargo
falling from the vehicle. Failure to do so
could result in compromised vehicle
stability and serious personal injury to
vehicle occupants or others.

WARNING: 

The tailgate is heavy.

Removal of the tailgate requires two
adults. Failure to follow this instruction
could result in personal injury or property
damage.

Note:

Skip to Step 4 if your vehicle does

not have power door locks.

127

Tailgate - Vehicles With: Remote Release Tailgate

E189556

1.

Unlatch the tailgate.

2. Disconnect the power door locks in-line

connector. It is under the pickup box
on the right-hand side of the vehicle
near the spare tire.

3. Install a protective cap on the in-line

connector portion that remains under
the pickup box.

Note:

 A protective cap should be in the

glove compartment.

4. Partially lower the tailgate. Carefully

feed the tailgate harness up through
the gap between the pickup box and
the bumper and place it out of the way
under the pickup box.

5. Lower the tailgate.

E311529

6. Use a screwdriver to gently pry the

spring clip on each connector past the
head of the support screw. Disconnect
the cable.

7.

Disconnect the other cable.

8. Lift the tailgate to 45 degrees from the

horizontal position.

9. Lift the right-hand side off its hinge.

10.

Lift the tailgate to 80 degrees from
the horizontal position.

11.

Remove the tailgate from the
left-hand side hinge by sliding it to
the right.

12.

Install the tailgate in reverse order.

TAILGATE STEP

ACCESSING THE TAILGATE STEP

1.

Lower the tailgate.

2. Push the button in the center of the

step molding. The step pops out
slightly.

E187718

3. Pull the step out fully. Lower the step

to its lowest position.

128

Tailgate - Vehicles With: Remote Release Tailgate

E189557

4. Pull the yellow handle stop backward

out of the tailgate until it fully extends.

5. To lock the handle in place, rotate the

handle up from the horizontal to the
vertical position until you hear a click.

Note:

Do not tow with the step or grab

handle.

Replace the slip resistance tape or grab
handle molding if it appears as worn or
damaged.

To reduce the risk of falling:

Only operate the step when your
vehicle is on a level surface.

Only operate the step in areas with
sufficient lighting.

Make sure you use the grab handle
when climbing on the step.

Do not use the step with bare feet.

Make sure the step is clean before use.

Keep the step load below the total
maximum load of 350 lb (159 kg).

STOWING THE TAILGATE STEP

1.

Press the yellow button on the handle
to lower and then press the yellow
lever at the bottom of the handle to
unlock. Rotate the handle down from
the vertical to the horizontal position
and push it into the tailgate.

2. Rotate the step up until it is horizontal,

then push it back into the tailgate until
the step is secure.

Note:

Make sure to close and fully latch the

step before moving your vehicle. Do not
drive with the step or grab handle open.

Note:

The power tailgate cannot close if

the step is open. A warning message
appears and a tone sounds. After stowing
the step the power close function is
restored.

TAILGATE WORK SURFACE

 (IF

EQUIPPED)

The tailgate work surface is a durable and
functional surface on the inside portion of
your tailgate you can use to perform
various tasks.

To use the tailgate work surface, fold down
the tailgate.

E308677

Tablet stand.

A

Tool inset.

B

Clamp pocket.

C

Standard and metric ruler.

D

Cup holder.

E

Tailgate anchors.

F

129

Tailgate - Vehicles With: Remote Release Tailgate

E336605

The tailgate work surface contains clamp
pockets that allows you to secure work
material.

Note:

Damage could occur to the tailgate

if you overload the vertical clamp arm in any
direction.

Note:

When you finish using the tailgate

work surface, make sure you remove all of
your belongings, then close the tailgate.

TAILGATE –
TROUBLESHOOTING

TAILGATE – WARNING LAMPS

E311338

Illuminates when the tailgate is
not completely closed.

TAILGATE – INFORMATION MESSAGES

Action

Message

The tailgate is not completely closed.

Tailgate Ajar

The vehicle must be in park (P) to operate the remote release

tailgate.

Shift to Park to

operate tailgate

130

Tailgate - Vehicles With: Remote Release Tailgate

TAILGATE – FREQUENTLY ASKED
QUESTIONS

Why won't my tailgate open?

Make sure the transmission is in park
(P), ensure nothing is obstructing the
tailgate path and or causing resistance
(tonneau cover or other aftermarket
accessories, freezing conditions or
being parked downhill). If you have
continued issues, the battery voltage
may be low or other system issues. See
an authorized dealer.

131

Tailgate - Vehicles With: Remote Release Tailgate

PASSIVE ANTI-THEFT
SYSTEM

WHAT IS THE PASSIVE ANTI-
THEFT SYSTEM

The passive anti-theft system prevents
someone from starting your vehicle with
an incorrectly coded key.

Note:

Do not leave a duplicate coded key

in your vehicle. Always take the keys and
lock all the doors when leaving your vehicle.

HOW DOES THE PASSIVE ANTI-
THEFT SYSTEM WORK

The passive anti-theft system arms when
you switch your vehicle off.

It disarms when you switch your vehicle on
with a correctly coded key.

Note:

The system is not compatible with

non-Ford aftermarket remote start systems.

Note:

Do not leave a duplicate coded key

in your vehicle. Always take the keys and
lock all doors when leaving your vehicle.

ANTI-THEFT ALARM SYSTEM

(IF EQUIPPED)

WHAT IS THE ANTI-THEFT ALARM
SYSTEM

The anti-theft alarm system warns you of
an unauthorized entry to your vehicle.

HOW DOES THE ANTI-THEFT
ALARM SYSTEM WORK

When armed, the anti-theft alarm is
triggered in any of the following ways:

If someone opens a door, the tailgate
or the hood without a correctly coded
key or remote control.

If you turn the power on without a
correctly coded key.

If the interior sensors detect movement
inside your vehicle.

If the inclination sensors detect an
attempt to raise your vehicle.

If someone disconnects the vehicle
battery or the battery backup alarm.

If someone disconnects the trailer. See

Connecting a Trailer

 (page 420).

Any further attempts to carry out one of
the above, sounds the alarm again.

If the anti-theft alarm is triggered, the
alarm horn sounds for 30 seconds and the
turn signals flash for five minutes.

WHAT IS THE PERIMETER ALARM

The perimeter alarm is designed to detect
unauthorized access to your vehicle.

WHAT ARE THE INTERIOR
SENSORS

 (If Equipped)

The interior sensors are designed to detect
any movement inside your vehicle.

The interior sensors are in the overhead
console.

Note:

Do not cover the interior sensors.

132

Security

WHAT ARE THE INCLINATION
SENSORS

 (If Equipped)

The inclination sensor is designed to detect
an attempt to raise your vehicle, for
example to remove a wheel or to tow it
away.

ARMING THE ANTI-THEFT ALARM
SYSTEM

The alarm is ready to arm when you switch
your vehicle off.

Lock your vehicle with your remote control
to arm the alarm.

DISARMING THE ANTI-THEFT
ALARM SYSTEM

Disarm the alarm by performing any of the
following actions:

Unlock the doors or luggage
compartment with the remote control.

Switch your vehicle on or start your
vehicle.

ANTI-THEFT ALARM SYSTEM
SETTINGS

 (IF EQUIPPED)

WHAT ARE THE ALARM SECURITY
LEVELS

You can select two levels of alarm security,
motion sensors on and motion sensors off.

Motion Sensors On

Motion sensors on is the standard setting.

In motion sensors on, all equipped sensors
are on when you arm the alarm.

Note:

Do not arm the alarm with motion

sensors on if passengers, animals or other
moving objects are inside your vehicle.

Motion Sensors Off

In motion sensors off, the interior sensor
and the inclination sensor are off when you
arm the alarm.

All the other equipped sensors activate
when you arm the alarm in this mode.

SETTING THE ALARM SECURITY
LEVEL

1.

Press 

Settings

 on the touchscreen.

2. Press 

Vehicle

.

3. Press 

Alarm System

.

4. Press 

Motion Sensors

.

5. Press a setting.

WHAT IS ASK ON EXIT

You can choose which level of security you
require after you switch your vehicle off.

Note:

If you do not choose a setting, the

system defaults to all sensors.

SWITCHING ASK ON EXIT ON AND
OFF

1.

Press 

Settings

 on the touchscreen.

2. Press 

Vehicle

.

3. Press 

Alarm System

.

4. Switch 

Ask on Exit

 on or off.

USING THE POLICE
PERIMETER ALERT SYSTEM -
POLICE

Note:

The system monitors moving

pedestrians and detects objects such as
vehicles and bikes. The system may not
detect fast vehicles, stationary objects and
small objects such as birds.

133

Security

Note:

The system does not function outside

of Park (P) or when any door is open.

The system uses sensors to monitor
detected objects moving near your parked
vehicle.

Detected moving objects display as
moving dots on the instrument cluster
display.

E413090

Once the system detects approaching
objects crossing the selected range
perimeter, the vehicle sounds a tone, and
may roll up the windows and lock the
doors.

In addition to an audible alert, the system
may activate the rear view camera to show
potential threats approaching from behind.

Switching the Police Perimeter
Alert On and Off

E405502

While the vehicle is running and in Park (P),
press and release the button located on
the instrument panel. To switch the system
off, press the button again.

The system automatically turns off if you:

Shift your vehicle out of Park (P).

Switch your vehicle off.

Open a door.

Note:

When the feature is active, an icon

displays on the instrument cluster.

Police Perimeter Alert Settings

Note:

When the Police Idle feature is active,

windows do not automatically roll up.

Note:

When window or door locking is

active, corresponding icons display in the
instrument cluster.

Note:

When Low mode is active, window

or door locking setting is not available.

The system has three range settings: Low,
Medium or High. When Perimeter Alert is
active, use the controls on the steering
wheel to adjust the range settings in the
instrument cluster. The system defaults
to Medium range every time you switch it
on.

When Dark Car mode is active, the radar
map in the instrument cluster switches off.

Object Detection

Note:

The system may not detect a

pedestrian who is near a large obstruction
such as a vehicle or a wall until the
pedestrian moves away from the
obstruction.

Note:

Sensor reflections from stationary

objects may cause false objects to briefly
appear on the Police Perimeter Alert System
display.

134

Security

Note:

Sensor obstructions such as, dirt,

mud, precipitation, repair compound,
stickers, graphics, bumper guards, trailers,
bicycle racks or cargo racks in front of the
sensors can cause system sensing
degradation.

The system uses sensors on both sides of
your vehicle. The sensor performs best
when you park your vehicle in an open area
without large obstructions or walls nearby.

E298030

System Error

If the system senses a Police Perimeter
Alert System fault, a warning message
appears in the information display.

System Configuration

See your authorized dealer for system
configurations.

SECURITY – TROUBLESHOOTING

SECURITY – INFORMATION MESSAGES

Details

Message

The system has not detected a correctly coded key.

No Key Detected

The system has malfunctioned.  Have your vehicle checked
as soon as possible.

Starting System Fault

Displays when the alarm has been triggered due to unauthor-
ized entry.

Vehicle Alarm To Stop
Alarm, Start Vehicle.

Alarm

135

Security

SECURITY – FREQUENTLY ASKED
QUESTIONS

What should I do if there is a
potential alarm problem with my
vehicle?

Take all remote controls to an
authorized dealer if there is a potential
alarm problem with your vehicle.

What should I do if my vehicle is
unable to start with a correctly
coded key?

Have your vehicle checked as soon as
possible.

136

Security

POWER RUNNING BOARD
PRECAUTIONS

WARNING: 

In extreme climates,

excessive ice buildup may occur, causing
the running boards not to deploy. Make
sure that the running boards have
deployed, and have finished moving
before attempting to step on them. The
running boards will resume normal
function once the blockage is cleared.

WARNING: 

Switch off the running

boards before jacking or placing any
object under your vehicle. Never place
your hand between the extended running
board and your vehicle. A moving running
board may cause injury.

Do not use the running boards, front and
rear hinge assemblies, running board
motors, or the running board underbody
mounts to lift your vehicle when jacking.
Use proper jacking points.

The running boards could move slower in
cold temperatures.

POWER RUNNING BOARD
SETTINGS

1.

Press 

Features

 on the touchscreen.

2. Press 

Power Running Board

.

3. Press 

SETTINGS

.

Power Boards Modes

Note:

When the vehicle speed is more than

3 mph (5 km/h), the option to select the
modes disables, to avoid unintended
operation.

Note:

The power running boards reverse

direction and move to the end of travel if
they encounter an object when moving.
Keep the power running boards and
brackets clean for optimum performance.

Off

The power running boards remain stowed,
regardless of door position.

Auto

The power running boards deploy when
you approach your vehicle with a remote
control, unlock the door or open the door.

The power running boards stow:

After a few seconds when you close
the doors.

Instantly after you close and lock the
doors.

If you unlock the door but do not open
it, after the timeout.

If you have switched approach
detection on and do not open a door
before the auto timer setting expires.

When the vehicle speed is more than
3 mph (5 km/h).

Note:

When you select this mode, an option

displays that allows you to select how long
the running boards stay deployed without
opening the door.

Out

The power running boards remain
deployed, regardless of door position. The
power running boards stow when the
vehicle speed is more than 5 km/h, and the
mode changes to auto. You need to select
Out mode again if you want the power
running boards to stay deployed at the end
of each trip.

137

Power Running Boards

 (If Equipped)

Approach detection

When you switch approach detection on
with auto switched on, the running boards
deploy when you approach your vehicle
with a remote control.

POWER RUNNING BOARD
KICK SWITCH

You can use the power running board kick
switch to deploy and stow the running
boards without opening or closing the door.

E334917

Press the switch with your foot to use the
power running board kick switch.

Pressing the kick switch with the power
running boards stowed switches the mode
to 

Out

.

Pressing the kick switch with the power
running boards deployed switches the
mode to 

Auto

.

Note:

When you use the kick switch, the

power running board mode changes until
you press the kick switch again.

You can change the kick switch setting
through the touchscreen.  See 

Power

Running Board Settings

 (page 137).

Kick switch

Always active

The kick switch is on regardless of whether
the doors are locked or unlocked.

Only while unlocked

The kick switch is on only with the doors
unlocked.

POWER RUNNING BOARDS –
TROUBLESHOOTING

POWER RUNNING BOARDS –
FREQUENTLY ASKED QUESTIONS

Why is there unwanted noise
coming from my power running
boards?

The power running board mechanism
could trap debris such as mud, dirt,
snow, ice and salt. If this happens, set
the running boards to the deployed
position. Wash the system, in particular
the front and rear hinge arms, with a
high-pressure car wash wand.

138

Power Running Boards

 (If Equipped)

ADJUSTING THE STEERING
WHEEL - VEHICLES WITH:
MANUAL ADJUSTABLE
STEERING COLUMN

WARNING: 

Do not adjust the

steering wheel when your vehicle is
moving.

Note:

 Make sure that you are sitting in the

correct position.  See 

Sitting in the Correct

Position

 (page 195).

E359744

1.

Unlock the steering column.

2. Adjust the steering wheel to the

position you prefer.

3. Lock the steering column.

ADJUSTING THE STEERING
WHEEL - VEHICLES WITH:
POWER ADJUSTABLE
STEERING COLUMN

WARNING: 

Do not adjust the

steering wheel when your vehicle is
moving.

Note:

 Make sure that you are sitting in the

correct position.  See 

Sitting in the Correct

Position

 (page 195).

E261582

Press the top or bottom of the control to
move the steering wheel up or down.

Press the front or rear of the control to
move the steering wheel in or out.

You can save and recall the steering wheel
position with the memory function. See

Recalling a Preset Position

 (page 210).

139

Steering Wheel

RESETTING THE STOPPING
POSITION - VEHICLES WITH:
POWER ADJUSTABLE
STEERING COLUMN

Note:

The steering wheel stops when it

detects an obstruction. This sets a new
stopping position.

To reset the steering column to its normal
stopping position:

1.

Confirm there is nothing obstructing
the motion of the steering column.

2. Press and hold the steering column

control until the steering column stops
moving.

3. Press the steering column control

again.

Note:

The steering column may start to

move again.

4. When the steering column stops,

continue holding the control for a few
seconds.

5. Repeat for each direction, as necessary.

HORN

E270945

Press on the center of the
steering wheel near the horn icon
to activate the horn.

SWITCHING THE HEATED
STEERING WHEEL ON AND OFF
- VEHICLES WITH: HEATED
STEERING WHEEL

E256621

To activate the heated steering
wheel, press the button on the
climate control unit. An indicator

illuminates when the heated steering
wheel is on. To turn it off, press the heated
steering wheel button again.

Note:

The engine must be running to use

the heated steering wheel.

Note:

A sensor regulates the temperature

of the steering wheel.

Note:

The heated steering wheel may

remain on after remote starting your vehicle,
depending on the remote start settings. It
may also turn on when you start your vehicle
if it was on the last time the engine was
switched off.

Note:

In warm temperatures, the steering

wheel quickly reaches its maximum
temperature and the system reduces the
current to the heating element. This could
cause you to think that the system has
stopped working but it has not. This is
normal.

140

Steering Wheel

ADJUSTING THE PEDALS

WARNING: 

Do not use the pedal

adjustment controls when the vehicle is
moving. Failure to follow this instruction
could result in personal injury or death.

Your control is on the left-hand side of the
steering column or on the instrument
panel.

E176213

Farther away from you.

A.

Closer to you.

B.

You can save and recall the pedal positions
with the memory feature.  See 

Memory

Function

 (page 210).

141

Adjustable Pedals

 (If Equipped)

WIPERS

WIPER PRECAUTIONS

Do not operate the wipers on a dry
windshield. This could scratch the glass or
damage the wiper blades. Use the
windshield washers before wiping a dry
windshield.

Fully defrost the windshield before you
switch the windshield wipers on.

Switch the windshield wipers off before
entering a car wash.

SWITCHING WINDSHIELD WIPERS
ON AND OFF

E382879

High-speed wipe.

A

Low-speed wipe.

B

Intermittent wipe.

C

Off.

D

E270969

Use the rotary control.

AUTOWIPERS

 (IF EQUIPPED)

WHAT ARE AUTOWIPERS

Autowipers turns on and controls the
speed and frequency of the windshield
wipers.

AUTOWIPERS SETTINGS

1.

Press 

Settings

 on the touchscreen.

2. Press 

Vehicle Settings

.

3. Press 

Wipers

.

4. Switch 

Rain Sensing

 on or off.

Note:

When you switch the feature off, the

wipers do not operate based on the rain
sensor. When you switch on the windshield
wipers to the intermittent wipe position with
the feature off, the wipers use the wipe
speed set by the rotary control.

ADJUSTING THE SENSITIVITY OF
THE RAIN SENSOR

E383614

Low sensitivity.

A

High sensitivity.

B

Use the rotary control to set the rain sensor
sensitivity.

142

Wipers and Washers

Note:

Use intermittent wipe positions to

adjust the rain sensor sensitivity.

When you select low sensitivity, the wipers
operate when the sensor detects a large
amount of water on the windshield.

When you select high sensitivity, the wipers
operate when the sensor detects a small
amount of water on the windshield.

CHECKING THE WIPER
BLADES

E142463

Run the tip of your fingers over the edge of
the blade to check for roughness.

REPLACING THE FRONT
WIPER BLADES

E165804

1.

Pull the wiper blade and arm away
from the glass.

Note:

Do not hold the wiper blade to lift the

wiper arm.

E327597

2

2. Lift the wiper blade primary locking clip.

E327598

3. Press the wiper blade secondary

locking clip.

4. Remove the wiper blade.

Note:

Make sure that the wiper arm does

not spring back against the glass when the
wiper blade is not attached.

5. To install, reverse the removal

procedure.

Note:

Make sure that the wiper blade locks

into place.

143

Wipers and Washers

WASHERS

WASHER PRECAUTIONS

WARNING: 

If you operate your

vehicle in temperatures below 41°F
(5°C), use washer fluid with antifreeze
protection. Failure to use washer fluid
with antifreeze protection in cold
weather could result in impaired
windshield vision and increase the risk
of injury or accident.

Do not operate the washers when the
washer reservoir is empty. This could cause
the washer pump to overheat.

Keep the outside of the windshield clean.
The rain sensor is very sensitive and the
wipers may operate if dirt, mist or insects
hit the windshield.

USING THE WINDSHIELD WASHER

E311291

E270967

Press and hold the button at the
end of the lever to operate the
windshield washer.

Note:

A courtesy wipe occurs a short time

after the wipers stop to clear any remaining
washer fluid when switched on.  See

Switching the Courtesy Wipe On and Off

(page 144).

SWITCHING THE COURTESY WIPE
ON AND OFF

1.

Press 

Settings

 on the touchscreen.

2. Press 

Vehicle Settings

.

3. Press 

Wipers

.

4. Switch 

Courtesy Wipe

 on or off.

Note:

When you switch the feature on, the

wipers make an additional single wipe at
the end of the washer request. When you
switch it off, the wipers finish the current
washer request.

ADDING WASHER FLUID

E328222

WASHER FLUID SPECIFICATION

See 

Washer Fluid Specification

 (page

607).

WIPERS AND WASHERS
VIDEOS

Improving Your Windshield Wiper
Performance Video Link

Courtesy Wipe Video Link

144

Wipers and Washers

WIPERS AND WASHERS –
TROUBLESHOOTING

WIPERS AND WASHERS –
WARNING LAMPS

E132353

Illuminates when the windshield
washer fluid is low.

WIPERS AND WASHERS –
FREQUENTLY ASKED QUESTIONS

Why are there streaks and smears
on the windshield?

The wiper blades could be dirty, worn
or damaged. Check the wiper blades.
See 

Checking the Wiper Blades

(page 143).  If the wiper blades are dirty,
clean them with washer fluid or water
applied with a soft sponge or cloth. If
the wiper blades are worn or damaged,
install new ones.  See 

Replacing the

Front Wiper Blades

 (page 143).

145

Wipers and Washers

EXTERIOR LIGHTING
CONTROL - EXCLUDING:
POLICE

E327629

Lamps off.

A

Parking lamps on.

B

Autolamps on.

C

Headlamps on.

D

Rotate the control to make a selection.

Note:

The lighting control defaults to

autolamps every time you switch your
vehicle on.

EXTERIOR LIGHTING
CONTROL - POLICE

E327629

Lamps off.

A

Parking lamps on.

B

Autolamps on.

C

Headlamps on.

D

Rotate the control to make a selection.

Note:

The lighting control defaults to the

last known state every time you switch your
vehicle on.

HEADLAMPS

USING THE HIGH BEAM
HEADLAMPS

E327570

E67019

Push the lever away from you to
switch the high beams on.

Push the lever forward again or pull the
lever toward you to switch the high beams
off.

Slightly pull the lever toward you and
release it to flash the headlamps.

Note:

Continuous activation only occurs

with the headlamps on.

SWITCHING HEADLAMP EXIT
DELAY ON AND OFF

To switch headlamp exit delay on, pull the
turn signal lever toward you after switching
your vehicle off.

To switch headlamp exit delay off, pull the
turn signal lever toward you again or switch
your vehicle on.

146

Exterior Lighting

Note:

The headlamps turn off after three

minutes with any door open or 30 seconds
after the last door closes.

ADJUSTING THE LEVEL OF THE
HEADLAMPS

Your vehicle has a dynamic leveling
system. The headlamps do not require
additional aim adjustment.

HEADLAMP INDICATORS

Lamps On

E71341

Illuminates when you switch the
low beam headlamps or the
parking lamps on.

Headlamp High Beam

E67019

Illuminates when you switch the
high beam headlamps on.

HEADLAMPS –
TROUBLESHOOTING

HEADLAMPS – FREQUENTLY
ASKED QUESTIONS

Why is there condensation in the
headlamps?

Headlamps have vents to
accommodate normal changes in air
pressure. Condensation can be a
natural by-product of this design.
When moist air enters the lamp
assembly through the vents, there is a
possibility that condensation can occur
when the temperature is cold. When
normal condensation occurs, a fine
mist can form on the interior of the
lens. The fine mist eventually clears
and exits through the vents during
normal operation.

How much condensation is
acceptable?

The presence of a fine mist, for
example no streaks, drip marks or large
droplets. A fine mist covers less than
50% of the lens.

How long does it take for the
acceptable condensation to clear?

Clearing time can take as long as 48
hours under dry weather conditions.

How much condensation is
unacceptable?

A water puddle inside the lamp.
Streaks, drip marks or large droplets
present on the interior of the lens.

What should I do if unacceptable
condensation is present?

Have your vehicle checked as soon as
possible.

Why do my headlamps turn off
when I have them switched on
when I switch my vehicle off?

The battery saver turns the headlamps
off after a short period of time after you
switch your vehicle off.

AUTOLAMPS

WHAT ARE AUTOLAMPS

WARNING: 

The system does not

relieve you of your responsibility to drive
with due care and attention. You may
need to override the system if it does not
turn the headlamps on in low visibility
conditions, for example daytime fog.

147

Exterior Lighting

Autolamps turn the headlamps on in low
light situations or when the windshield
wipers operate.

AUTOLAMP SETTINGS

Autolamp Exit Delay

You can adjust the amount of time the
autolamps remain on after you switch off
your vehicle. Use the touchscreen to
choose a delay setting.

1.

Press 

Settings

 on the touchscreen.

2. Press 

Vehicle Settings

.

3. Press 

Lighting

.

4. Press 

Autolamp Delay

.

5. Press a setting.

Note:

 If the setting is off, the external

lamps switch off immediately when you
shut down your vehicle.

Note:

You can pull the turn signal toward

you to manually switch on the delay setting.
See 

Headlamps

 (page 146).

EXTERIOR LAMPS

USING THE TURN SIGNAL LAMPS

E311431

E67018

Push the lever up or down to
switch the turn signal lamps on.

Set the lever to the middle position to
switch the turn signal lamps off.

Note:

Tap the lever up or down to make the

turn signal lamps flash three times.

Turn Signal Lamp Indicator

E67018

It flashes when you switch the
turn signal lamps on.

Note:

An increase in the rate of flashing

warns of a failed turn signal lamp.

HOW DO CORNERING LAMPS
WORK

 (If Equipped)

The cornering lamps illuminate the inside
of a corner when you are turning the
steering wheel or when you switch the turn
signal lamps on. They turn on when the
vehicle speed is below 25 mph (40 km/h).

Note:

Only the cornering lamp on the side

your vehicle is turning illuminates.

Note:

Cornering lamps do not operate if

you switch the front fog lamps on.

148

Exterior Lighting

E327599

Headlamp beam.

A

Cornering lamp beam.

B

SWITCHING THE DAYTIME
RUNNING LAMPS ON AND OFF -
VEHICLES WITH: CONFIGURABLE
DAYTIME RUNNING LAMPS

WARNING: 

The daytime running

lamps system does not activate the rear
lamps and may not provide adequate
lighting during low visibility driving
conditions. Make sure you switch the
headlamps on, as appropriate, during all
low visibility conditions. Failure to do so
may result in a crash.

1.

Press 

Settings

 on the touchscreen.

2. Press 

Vehicle Settings

.

3. Press 

Lighting

.

4. Switch 

Daytime Running Lights

 on or

off.

The daytime running lamps turn on when
all of the following occur:

You switch the system on.

You switch your vehicle on.

The vehicle is not in park (P).

The lighting control is in the autolamps
position.

The headlamps are off.

Note:

Other lighting control positions do

not turn on the daytime running lamps.

SWITCHING THE DAYTIME
RUNNING LAMPS ON AND OFF -
VEHICLES WITH: DAYTIME
RUNNING LAMPS (DRL)

WARNING: 

The daytime running

lamps system does not activate the rear
lamps and may not provide adequate
lighting during low visibility driving
conditions. Make sure you switch the
headlamps on, as appropriate, during all
low visibility conditions. Failure to do so
may result in a crash.

Daytime running lamps are always on
unless you switch on the headlamps or
your vehicle is in park (P).

USING THE FRONT FOG LAMPS

 (If

Equipped)

To switch the lamps on or off:

1.

Set the lighting control to the parking
lamps, headlamps or autolamps
position.

Note:

When the lighting control is in the

autolamps position, you cannot switch the
fog lamps on unless the low beam
headlamps are on.

149

Exterior Lighting

2.

 Press the button on the

lighting control to switch the front fog
lamps on or off.

Note:

Only switch the front fog lamps on

during reduced visibility.

Note:

The brightness of the daytime running

lamps may decrease when the front fog
lamps are switched on.

Note:

The front fog lamps lights switch off

automatically when high beams are
activated.

Front Fog Lamps Indicator

It illuminates when you switch
the front fog lamps on.

SWITCHING THE CARGO LAMPS
ON

E189587

Press the button in the lighting
control or in the rear cargo box.

SWITCHING THE SPOT LAMPS ON
AND OFF

 (If Equipped)

The spot lamp buttons are near the lighting
control.

E340436

Press the button to switch on the
left-hand spot lamp.

E340437

Press the button to switch on the
right-hand spot lamp.

Move the position of the exterior mirrors
to adjust the aim.

Note:

Make sure you switch your vehicle on,

with the vehicle in accessory mode or
running.

Note:

The spot lamps turn off after 6 mph

(10 km/h).

Note:

The spot lamps illuminate the area

in front of and to the side of your vehicle.

SWITCHING WELCOME LIGHTING
ON AND OFF

The system turns on the exterior lamps
when you approach your vehicle with an
authenticated device, unlock your vehicle
or interact with any of the doors. If you
open or close any door, the lamps stay on
for a short period of time to provide
courtesy lighting.

Note:

Welcome lighting still displays when

you use your remote control to unlock your
vehicle or interact with any of the doors.

To switch the system on or off:

1.

Press 

Settings

 on the touchscreen.

2. Press 

Vehicle

.

3. Press 

Lighting

.

4. Switch 

Welcome Lighting

 on or off.

Note:

Depending on your vehicle's

configuration, you may not have the option
to switch the feature on and off.

To conserve power, the system may not
work when you are approaching your
vehicle if:

The 12-volt battery is low.

The system was triggered 10 times
prior to starting the vehicle.

The vehicle is left unused for a few
days.

USING THE OFF-ROAD DRIVING
LAMPS - RAPTOR

The off-road driving lamps switch is
connected to the AUX 1 switch on the
auxiliary switch panel. When the switch is
turned on, the indicator light on the switch
illuminates and the circuit provides power
to the off-road driving lights

150

Exterior Lighting

E220728

Note:

Off-road driving lamps are for

off-road use only. Use on public roads may
violate local laws.

Note:

Only switch the off-road driving

lamps on during reduced visibility in off-road
conditions.

Note:

The off-road driving lamps only

operate when accessory mode is active, and
the engine is in the on or off position. Leave
the engine running to maintain battery
charge when using the off-road driving
lamps.

EXTERIOR LAMPS ON AUDIBLE
WARNING

Sounds when you open the driver door and
the exterior lamps are on.

EXTERIOR ZONE LIGHTING

 (IF

EQUIPPED)

WHAT IS EXTERIOR ZONE
LIGHTING

Exterior zone lighting divides the exterior
lighting into zones and allows you to switch
them on and off to provide lighting around
the perimeter of your vehicle.

USING THE EXTERIOR ZONE
LIGHTING

1.

Press 

Features

 on the touchscreen.

2. Press 

Zone Lighting

.

E339129

On and off button.

A

Settings menu.

B

Exterior lamp indicators.

C

Individual zones on and off.

D

All zones on and off.

E

You can use zone lighting when your
vehicle is on or off. When it is off, the
lighting turns off after a certain period of
time.

You can also use individual zone controls
to switch on each zone.

Note:

Make sure to remove exterior lighting

covers when using zone lighting.

Note:

When your vehicle is off and the timer

has one minute remaining, the direction
indicators flash six times.

Note:

Indicators on the touchscreen

illuminate when the lights outside of the
zone lighting control are on.

Note:

You can remotely control the zone

lighting using the FordPass app.

Note:

Vehicles without spot lamps only

have two zones.

151

Exterior Lighting

EXTERIOR ZONE LIGHTING
SETTINGS

1.

Press 

Features

 on the touchscreen.

2. Press 

Zone Lighting

.

3. Press the settings menu in the upper

right-hand corner.

4. Press a setting.

Enable Autolamp Override

This setting allows your vehicle to override
the autolamps when using zone lighting.

When you access zone lighting for the first
time, you can choose this setting. You can
change this setting at any time.

Include Reverse Lamps

This setting turns the reverse lamps on
when you switch the rear lighting zone on.

Switch this setting off if you have a backup
alarm installed to prevent the reverse
lamps from turning on and sounding the
alarm when using zone lighting.

AUTOMATIC HIGH BEAM
CONTROL - EXCLUDING:
POLICE

HOW DOES AUTOMATIC HIGH
BEAM CONTROL WORK

Automatic high beam control turns the
high beams on if it is dark enough and no
other traffic is present. If it detects an
approaching vehicle’s headlamps or tail
lamps, or street lighting ahead, the system
turns the high beams off.

A camera sensor, centrally mounted
behind the windshield of your vehicle,
continuously monitors conditions to turn
the high beams on and off.

E327596

Without automatic high beam
control.

A

With automatic high beam
control.

B

AUTOMATIC HIGH BEAM
CONTROL PRECAUTIONS

WARNING: 

The system does not

relieve you of your responsibility to drive
with due care and attention. You may
need to override the system if it does not
turn the high beams on or off.

152

Exterior Lighting

WARNING: 

The system may not

switch the high beams off if the lights of
oncoming vehicles are hidden by
obstacles, for example guard rails.

WARNING: 

You may need to

override the system when approaching
other road users.

WARNING: 

In situations with poor

visibility, such as fog, heavy rain or other
inclement weather, you may need to
override or completely switch off the
system.

AUTOMATIC HIGH BEAM
CONTROL REQUIREMENTS

The system turns the high beams on if all
of the following occur:

You switch the system on.

You set the lighting control to the
autolamps position.

The ambient light level is low enough
that you require high beams.

There is no traffic in front of your
vehicle.

The vehicle speed is greater than
approximately 25 mph (40 km/h).

AUTOMATIC HIGH BEAM
CONTROL LIMITATIONS

The system turns the high beams off if any
of the following occur:

You switch the system off.

You set the lighting control to any
position except autolamps.

The ambient light level is high enough
that you do not require high beams.

The system detects an approaching
vehicle's headlamps or a leading
vehicle's tail lamps.

The system detects severe rain, snow
or fog.

The system detects street lighting.

The camera has reduced visibility.

The vehicle speed falls below
approximately 19 mph (30 km/h).

Note:

The deactivation speed may be lower

on curves.

SWITCHING AUTOMATIC HIGH
BEAM CONTROL ON AND OFF

1.

Press 

Settings

 on the touchscreen.

2. Press 

Vehicle

.

3. Press 

Lighting

.

4. Switch 

Auto High Beam

 on or off.

AUTOMATIC HIGH BEAM
CONTROL INDICATORS

E146105

Illuminates to confirm when the
system is ready to assist.

OVERRIDING AUTOMATIC HIGH
BEAM CONTROL

E308790

Push the lever away from you to switch
the high beams on.

Push the lever away from you again to
switch the high beams off.

153

Exterior Lighting

Push the lever away from you for a third
time to switch automatic high beam

control back on.

AUTOMATIC HIGH BEAM CONTROL – TROUBLESHOOTING -
EXCLUDING: POLICE

AUTOMATIC HIGH BEAM CONTROL – INFORMATION MESSAGES

Details

Message

The camera has reduced visibility.  Clean the windshield.  If
the message continues to appear, have your vehicle checked
as soon as possible.

Front Camera Low Visib-
ility Clean Screen

The camera has malfunctioned.  Wait a short period of time
for the camera to cool down.  If the message continues to
appear, have your vehicle checked as soon as possible.

Front Camera Tempor-
arily Not Available

The camera has malfunctioned.  Have your vehicle checked
as soon as possible.

Front Camera Malfunc-
tion Service Required

ADAPTIVE FRONT LIGHTING

 (IF

EQUIPPED)

HOW DOES ADAPTIVE FRONT
LIGHTING WORK

Adaptive front lighting adapts when you
are steering around a curve or if the camera
detects lane markings indicating a curve.

154

Exterior Lighting

E161714

Without adaptive front lighting.

A

With adaptive front lighting.

B

SWITCHING ADAPTIVE FRONT
LIGHTING ON AND OFF

Set the lighting control to the autolamps
position to use adaptive front lighting.

Note:

Other lighting control positions do

not turn on adaptive front lighting.

EXTERIOR LIGHTING VIDEOS

Intelligent Three Blink Turn Signal Video
Link

Auto High Beams Video Link

Configurable Daytime Running Lamps Video
Link

155

Exterior Lighting

SWITCHING ALL OF THE
INTERIOR LAMPS ON AND OFF

The lamps turn on under the following
conditions:

You open any door.

You press a button on the remote
control.

You press the all lamps on button on
the overhead console.

E259649

Press to switch all interior lamps
on or off.

SWITCHING THE FRONT
INTERIOR LAMPS ON AND OFF
- EXCLUDING: POLICE
RESPONDER

E339273

The front interior lamp switches are on the
overhead console.

Note:

The position of each button on the

overhead console depends on your vehicle.

Individual Map Lamps

E262193

Press to switch the left-hand
individual dome lamp on and off.

Press to switch the right-hand
individual dome lamp on and off.

SWITCHING THE FRONT
INTERIOR LAMPS ON AND OFF
- POLICE RESPONDER

E339273

The front interior lamp switches are on the
overhead console.

Note:

The position of each button on the

overhead console depends on your vehicle.

Night Vision Red Task Lamp

E281231

E259649

Press to switch the lamp on or
off.

Individual Map Lamps

E262193

Press to switch the left-hand
individual dome lamp on and off.

Press to switch the right-hand
individual dome lamp on and off.

156

Interior Lighting


Content      ..     2      3      4      5     ..