Ford F-150 (2024 year). Manual in english - page 3
 

  Index      Manuals     Ford F-150 (2024 year). Manual in english


Search            copyright infringement  


Content      ..     1      2      3      4      ..


Ford F-150 (2024 year). Manual in english - page 3


Lock

E138623

Press the button to lock all
doors.  See 

Unlocking and

Locking the Doors Using the

Remote Control

 (page 101).

Sounding the Panic Alarm

 (If Equipped)

E138624

Press the button to sound the
panic alarm.  Press the button
again or switch the ignition on to

turn it off.

Note:

The panic alarm operates regardless

of the ignition position.

USING THE REMOTE CONTROL

WARNING: 

Do not leave a key or

remote control unattended in the vehicle.
Children or pets could operate the power
windows, moonroof or other controls.
Failure to follow this instruction could
result in personal injury or death.

Use your remote control to access various
vehicle systems.

Note:

The buttons on your remote may vary

depending on the vehicle region or options.

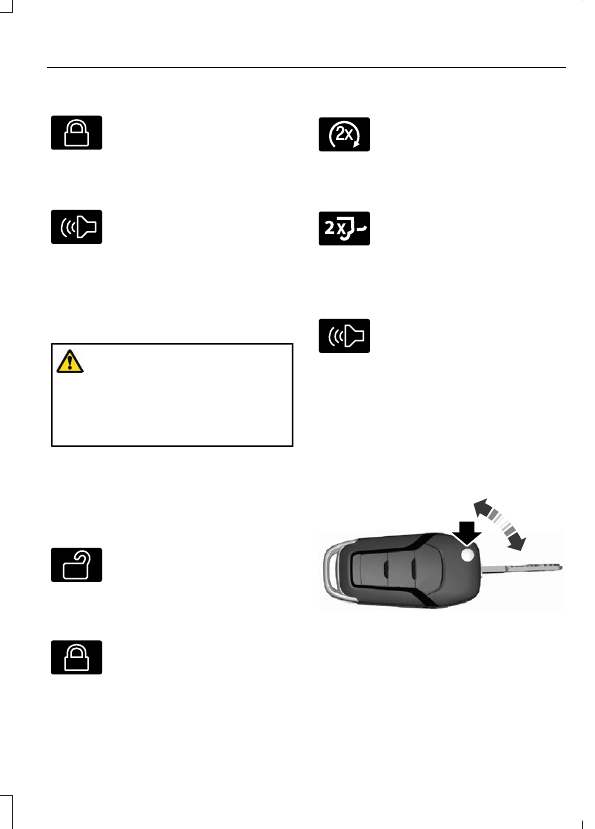
Unlock

E138629

Press the button to unlock all
doors.  See 

Unlocking and

Locking the Doors Using the

Remote Control

 (page 101).

Lock

E138623

Press the button to lock all
doors.  See 

Unlocking and

Locking the Doors Using the

Remote Control

 (page 101).

Remote Start

 (If Equipped)

E138625

Press the button twice within
three seconds to remote start.
See 

What Is Remote Start

(page 183).

Tailgate

 (If Equipped)

E191530

Press the button twice within
three seconds to open the
tailgate.  See 

Opening the

Tailgate Using the Remote Control

(page 115).

Panic Alarm

 (If Equipped)

E138624

Press the button to sound the
panic alarm.  See 

Sounding the

Panic Alarm

 (page 94).

OPENING AND CLOSING THE
FLIP KEY

Opening Your Flip Key

Press the round button on the remote
control to extend the flip key.

E191532

Note:

Inspect the key blade for debris.

Periodically clean with a brush.

93

Keys and Remote Controls
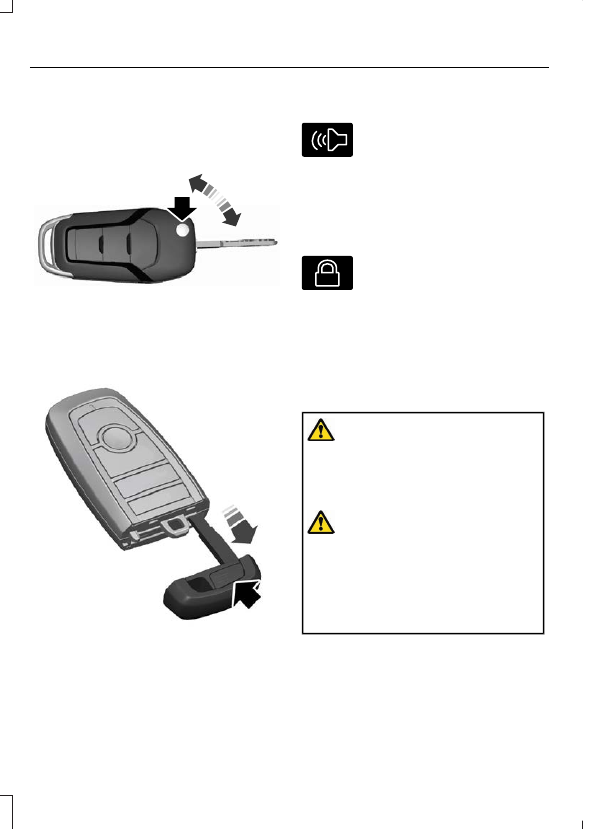
Closing Your Flip Key

Press and hold the round button on the
remote control to fold the key blade when
not in use.

E191532

REMOVING THE KEY BLADE

E322866

Push the release button on your passive
key and pull the key blade out.

SOUNDING THE PANIC ALARM

E138624

Press the button to sound the
panic alarm.  Press the button
again, or switch the ignition on

to turn it off.

Note:

The panic alarm only operates when

the ignition is off.

LOCATING YOUR VEHICLE

E138623

Press the lock button twice
within three seconds.  The turn
signal lamps flash.

Note:

We recommend you use this method

to locate your vehicle.

CHANGING THE REMOTE
CONTROL BATTERY - POLICE
RESPONDER

WARNING: 

Keep batteries away

from children to prevent ingestion.
Failure to follow this instruction could
result in personal injury or death. If
ingested, immediately seek medical
attention.

WARNING: 

If the battery

compartment does not securely close,
stop using the remote control and
replace it as soon as possible. In the
meantime, keep the remote control away
from children. Failure to follow this
instruction could result in personal injury
or death.

The remote control uses one coin-type
three-volt lithium battery CR2032 or
equivalent.

94

Keys and Remote Controls

E107998

Make sure you dispose of old
batteries in an environmentally
friendly way.  Seek advice from

local authorities about recycling old
batteries.

E203601

1.

Twist a thin coin in the slot of the
remote control near the key ring to
remove the battery cover.

Note:

Do not remove the rubber cover and

circuit board from the front housing of the
remote control.

Note:

Do not wipe off any grease on the

battery terminals or on the back surface of
the circuit board.

2. Remove the old battery.

3. Insert the new battery.  Refer to the

symbols inside the remote control for
the correct orientation of the battery.
Press the battery down to make sure
you have it fully seated in the housing.

4. Reinstall the battery housing cover

onto the remote control.

Note:

 Replacing the battery does not erase

the programmed key from your vehicle.  The
remote control operates normally.

CHANGING THE REMOTE
CONTROL BATTERY -
VEHICLES WITH: PUSH
BUTTON START

WARNING: 

Keep batteries away

from children to prevent ingestion.
Failure to follow this instruction could
result in personal injury or death. If
ingested, immediately seek medical
attention.

WARNING: 

If the battery

compartment does not securely close,
stop using the remote control and
replace it as soon as possible. In the
meantime, keep the remote control away
from children. Failure to follow this
instruction could result in personal injury
or death.

The remote control uses one coin-type
3-volt lithium battery CR2450 or
equivalent.

E322866

95

Keys and Remote Controls

1.

Push the release button and pull the
key blade out.

E303824

2. Twist a thin coin under the tab hidden

behind the key blade head to remove
the battery cover.

E218402

3. Insert a screwdriver, and carefully

remove the battery.

4. Install a new battery with the 

+

 facing

upward.

5. Reinstall the battery housing cover

onto the transmitter and install the key
blade.

E107998

Dispose of old batteries in an
environmentally friendly way.
Seek advice from your local

authority about recycling old batteries.

Note:

Do not wipe off any grease on the

battery terminals or on the back surface of
the circuit board.

Note:

 Replacing the battery does not erase

the programmed key from your vehicle.  The
remote control should operate normally.

96

Keys and Remote Controls

CHANGING THE REMOTE
CONTROL BATTERY -
VEHICLES WITH: FLIP KEY

WARNING: 

Keep batteries away

from children to prevent ingestion.
Failure to follow this instruction could
result in personal injury or death. If
ingested, immediately seek medical
attention.

WARNING: 

If the battery

compartment does not securely close,
stop using the remote control and
replace it as soon as possible. In the
meantime, keep the remote control away
from children. Failure to follow this
instruction could result in personal injury
or death.

Battery Replacement Procedure

The remote control uses one coin-type
3-volt lithium battery CR2032 or
equivalent.

Press the button to release the key blade
before beginning the procedure.

E191533

1.

Insert a screwdriver, in the position
shown and gently push the clip.

2. Press the clip down to release the

battery cover.

E151799

3. Carefully remove the cover.

E151800

4. Insert a screwdriver as shown to

release the battery.

E151801

Note:

Do not touch the battery contacts or

the printed circuit board with the
screwdriver.

5. Remove the battery.

97

Keys and Remote Controls

6. Install a new battery with the 

+

 facing

up.

7.

Replace the battery cover.

E107998

Dispose of old batteries in an
environmentally friendly way.
Seek advice from your local

authority about recycling old batteries.

Note:

Do not wipe off any grease on the

battery terminals or on the back surface of
the circuit board.

Note:

 Replacing the battery does not erase

the programmed key from your vehicle.  The
remote control should operate normally.

REPLACING A LOST KEY OR
REMOTE CONTROL

You can purchase replacement keys or
remote controls from an authorized dealer.
Authorized dealers can program remote
controls for your vehicle.

E151795

Note:

 Your vehicle keys came with a

security label that provides important key
cut information.  Keep the label in a safe
place for future reference.

PROGRAMMING THE REMOTE
CONTROL - VEHICLES WITH:
PUSH BUTTON START

General Information

You must have two previously
programmed remote controls inside your
vehicle and the new unprogrammed
remote controls readily accessible. Contact
an authorized dealer to have the spare
remote control programmed if two
previously programmed remotes are not
available.  Make sure that your vehicle is
off before beginning this procedure.  Make
sure that you close all the doors before
beginning and that they remain closed
throughout the procedure.  Perform all
steps within 30 seconds of starting the
sequence.  Stop and wait for at least one
minute before starting again if you perform
any steps out of sequence.

Read and understand the entire procedure
before you begin.

Note:

You can program a maximum of four

remote controls to your vehicle.

Note:

If your programmed remote controls

are lost or stolen and you do not have an
extra coded remote, you need to have your
vehicle towed to an authorized dealer. Store
an extra programmed remote away from
your vehicle in a safe place to help prevent
any inconvenience. Contact an authorized
dealer to purchase additional spare or
replacement remotes.

Steps for Programming Your Spare
Remote Control

Note:

Your vehicle is equipped with one of

the following center consoles.

98

Keys and Remote Controls

Programming Backup Location

E312216

E269950

1.

Place the first programmed remote in
the backup slot inside the cup holder
or center console with your foot off the
brake pedal, press and release the push
button ignition switch.

2. Wait five seconds and then press and

release the push button ignition switch
again.

3. Remove the remote control.

4. Within 10 seconds, place a second

programmed remote control in the
backup slot.  Press and release the
push button ignition switch.

5. Wait five seconds and then press and

release the push button ignition switch
again.  Keep the ignition on for at least
three seconds, but no more than 10
seconds.

6. Remove the remote control.

7.

Place the unprogrammed remote
control in the backup slot and press
and release the push button ignition
switch.

Programming is now complete.  With your
foot on the brake pedal, press the push
button ignition switch to verify the remote
control functions operate and your vehicle
starts with the new remote control.

If programming was not successful, wait
10 seconds and repeat Steps 1 through 7.
If you are still unsuccessful, take your
vehicle to an authorized dealer.

PROGRAMMING THE REMOTE
CONTROL - VEHICLES WITH:
FLIP KEY

General Information

You can program your own remote control
to your vehicle. This procedure programs
both the engine immobilizer keycode and
the remote entry portion of the remote
control to your vehicle.

Only use remote controls with an
integrated mechanical key.

You must have two previously
programmed coded remote controls and
the new un–programmed remote readily
accessible. Contact an authorized dealer
to have the spare remote control
programmed if the two previously
programmed coded remote controls are
not available.

Read and understand the entire procedure
before you begin.

Steps for Programming Your Spare
Remote Control

1.

Insert the first previously programmed
coded key into the ignition.

99

Keys and Remote Controls

2. Switch the ignition from off to on.  Keep

the ignition on for at least three
seconds, but no more than 10 seconds.

3. Switch the ignition off and remove the

first coded key from the ignition.

4. After three seconds but within 10

seconds of switching the ignition off,
insert the second previously coded key
into the ignition.

5. Switch the ignition from off to on.  Keep

the ignition on for at least three
seconds, but no more than 10 seconds.

6. Switch the ignition off and remove the

second previously programmed coded
key from the ignition.

7.

After three seconds but within 10
seconds of switching the ignition off
and removing the previously
programmed coded key, insert the new
un–programmed key into the ignition.

8. Switch the ignition from off to on.  Keep

the ignition on for at least six seconds
until you hear the door locks cycle.

9. Remove the newly programmed coded

key from the ignition.

The key starts the engine if programming
is successful. You can operate the keyless
remote entry system with the new remote
control with integrated key.

If programming was not successful, wait
20 seconds and repeat Steps 1 through 8.
If you are still unsuccessful, take your
vehicle to an authorized dealer.

Note:

You can program a maximum of six

coded remote controls to your vehicle.

KEYS AND REMOTE
CONTROLS AUDIBLE
WARNINGS - VEHICLES WITH:
FLIP KEY

Sounds when you open the driver's door,
turn off the vehicle and you have left the
key in the ignition.

KEYS AND REMOTE
CONTROLS AUDIBLE
WARNINGS - VEHICLES WITH:
PUSH BUTTON START

Key In Reminder

Sounds when the following conditions are
met:

Vehicle is out of park (P).

You switch the vehicle off.

You open the driver's door.

You have left the key inside the vehicle.

KEYS AND REMOTE CONTROLS – TROUBLESHOOTING

KEYS AND REMOTE CONTROLS – INFORMATION MESSAGES

Action

Message

Replace remote control battery.

Key Battery Low Replace
Soon

100

Keys and Remote Controls

OPERATING THE DOORS
FROM OUTSIDE YOUR
VEHICLE

UNLOCKING AND LOCKING THE
DOORS USING THE REMOTE
CONTROL

You can only use the remote control when
your vehicle is stationary.

Unlocking the Doors

E267112

Press the button to unlock all
doors. One long flash of the turn
signal lamps confirms that your

vehicle has unlocked.

One-Stage Unlocking

E138629

Press the button to unlock all
doors.

Two-Stage Unlocking (If Equipped)

E138629

Press the button to unlock the
driver's door.  Press the button
again within three seconds to

unlock all doors.

Locking the Doors

E267111

Press the button to lock all
doors.  One short flash of the
turn signal lamps confirms your

vehicle is locked.

A tone sounds when you press the lock
button twice within three seconds on the
remote control confirms your vehicle is
locked.

Note:

For more information on operating

the doors from outside your vehicle See

Keyless Entry Keypad

 (page 107).

UNLOCKING AND LOCKING THE
DOORS USING THE KEY BLADE

If there is a power door lock fault you can
use the key blade to lock and unlock the
doors.

E333745

Lock.

A

Unlock.

B

OPERATING THE DOORS
FROM INSIDE YOUR VEHICLE

UNLOCKING AND LOCKING THE
DOORS USING THE CENTRAL
LOCKING

The power door lock control is on the front
doors.

E267112

Press the button to unlock all
doors.

E267111

Press the button to lock all
doors.

Note:

The central locking only operates if

the front doors are fully closed.

101

Doors and Locks

OPENING THE DOORS FROM
INSIDE YOUR VEHICLE

Pull the interior door handle twice to
unlock and open a rear door.  The first pull
unlocks the door and the second pull
opens the door.

AUTOUNLOCK

WHAT IS AUTOUNLOCK

Autounlock is a feature that centrally
unlocks the vehicle doors when your
vehicle comes to a stop and you open the
driver door.

AUTOUNLOCK REQUIREMENTS

Autounlock unlocks all the doors after:

1.

The vehicle speed exceeds 12 mph
(20 km/h).

2. Your vehicle comes to a stop.

3. You open the driver door.

Note:

Autounlock operates for only 10

minutes after the ignition is switched off.

SWITCHING AUTOUNLOCK ON

AND OFF

1.

Press 

Settings

 on the touchscreen.

2. Press 

Vehicle Settings

.

3. Switch 

Autounlock

 on or off.

AUTOLOCK

WHAT IS AUTOLOCK

Autolock is a locking feature that centrally
locks your vehicle doors when driving.

AUTOLOCK REQUIREMENTS

Autolock locks all the doors after:

1.

All doors are closed and the ignition is
on.

2. Your vehicle speed exceeds 12 mph

(20 km/h).

Autolock repeats if:

1.

Your vehicle is stopped.

2. Any door is opened and closed again.
3. Your vehicle speed exceeds 12 mph

(20 km/h).

MISLOCK

WHAT IS MISLOCK

Mislock is a locking feature that warns you
if your vehicle has not locked.

MISLOCK LIMITATIONS

When you press the lock button once, the
turn signals do not flash if:

Any door or the tailgate is open.

The hood is open.

If you switch mislock off, the horn does not
sound if you press the lock button on the
remote control when a door is open.

SWITCHING MISLOCK ON AND
OFF

1.

Press 

Settings

 on the touchscreen.

2. Press 

Vehicle Settings

.

3. Switch 

Mislock Chirp

 on or off.

102

Doors and Locks

AUTORELOCK

HOW DOES AUTORELOCK WORK

The doors automatically relock if you do
not open a door within 45 seconds of
unlocking the doors with the remote
control.  The door locks and the alarm
return to their previous state.

DOORS AND LOCKS AUDIBLE
WARNINGS

Door Ajar Audible Warning

Sounds when any front door is not fully
closed and your vehicle is moving.

DOORS AND LOCKS –
TROUBLESHOOTING

DOORS AND LOCKS – WARNING
LAMPS

Door Ajar Warning Lamp

E249859

Illuminates when you switch the
ignition on and remains on if any
door or the hood is open.

DOORS AND LOCKS – INFORMATION MESSAGES

Details

Message

Displays if a door is open. Fully close the door.

Driver Door Ajar

Passenger Door Ajar

Rear Left Door Ajar

Rear Right Door Ajar

Displays if a hood is open. Fully close the hood.

Hood Ajar

103

Doors and Locks

DOORS AND LOCKS –
FREQUENTLY ASKED QUESTIONS

Can accessories such as steps or
handles be used with the latch
assembly?

Do not use the door latch assembly to
attach any accessory, such as handles
or steps, as this can cause damage to
your vehicle.

104

Doors and Locks

WHAT IS KEYLESS ENTRY

The system allows you to lock and unlock
your vehicle without taking the passive key
out of your pocket or purse.

KEYLESS ENTRY LIMITATIONS

Make sure your remote control is within 3 ft
(1 m) from the front door handles and the
tailgate.

The system could not function if:

The remote control remains stationary
for about a minute.

The vehicle battery has no charge.

The remote control battery has no
charge.

There is interference causing issues
with the remote control frequencies.

The remote control is too close to
metal objects or electronic devices, for
example keys or a cell phone.

KEYLESS ENTRY SETTINGS

Switching Keyless Entry On and
Off

1.

From the settings menu, press Vehicle.
See 

Center Display

 (page 630).

2. Press Locks.

Reprogramming the Unlocking
Function

You can enable the two-stage unlocking
function allowing you to unlock only the
driver door when you touch the unlock
sensor.

Press and hold both the lock and unlock
buttons on the remote control for four
seconds to disable or enable two-stage
unlocking.

If you program the unlocking function so
that only the driver door unlocks, you can
unlock all of the other doors from inside
your vehicle using the power door lock
control. You can unlock individual doors
by pulling the interior door handles on
those doors.

Key Detection Alert

Displays a message in the instrument
cluster if no valid key is detected, when you
exit your vehicle with a key, after the last
front door is closed and your keyless
vehicle is in run, indicating your vehicle is
still on. The horn sounds if you have driven
the vehicle and reached a speed of 16 mph
(25 km/h) and the above mentioned
conditions are met.

You can switch the audible alert on or off.

1.

From the settings menu, press Vehicle.
See 

Center Display

 (page 630).

2. Switch Key Detection Alert On or Off.

USING KEYLESS ENTRY

Unlocking the Doors

E333747

With your passive key within 3 ft (1 m) of
your vehicle, touch the unlock sensor on
the back of the door handle for a brief
period and then pull on the door handle to
unlock, being careful not to touch the lock
sensor at the same time or pull on the door
handle too quickly. The intelligent access
system requires a brief delay to
authenticate your passive key.

105

Keyless Entry

 (If Equipped)

Locking the Doors

E333746

With your passive key within 3 ft (1 m) of
your vehicle, touch the outer door handle
lock sensor for approximately one second
to lock, being careful not to touch the
unlock sensor on the back of the door
handle at the same time. After locking, you
can immediately pull on the door handle
to confirm locking occurred without
inadvertently unlocking.

KEYLESS ENTRY –
TROUBLESHOOTING

KEYLESS ENTRY – FREQUENTLY
ASKED QUESTIONS

Why does the keyless entry system not
function?

If the system does not function it may
be limited.  See 

Keyless Entry

Limitations

 (page 105).  If the system

still does not function use the remote
control or the key blade to lock and
unlock your vehicle.

Why can I not lock my vehicle?

If you electronically lock your vehicle
with a rear door or the tailgate open,
the system searches for a passive key
inside your vehicle after you close the
last door. If the system detects a key,
all doors unlock indicating that a key
is inside. Your vehicle locks if another
passive key is within the detection
range after you close the last door.

106

Keyless Entry

 (If Equipped)

WHAT IS THE KEYLESS ENTRY
KEYPAD

The keyless entry keypad allows you to
lock and unlock your vehicle using the
keypad on the window trim.

KEYLESS ENTRY KEYPAD
LIMITATIONS

The system may not function if:

The vehicle battery has no charge.

LOCATING THE KEYLESS
ENTRY KEYPAD

The keypad is near the driver window and
illuminates when you touch it.

E190936

KEYLESS ENTRY KEYPAD
MASTER ACCESS CODE

What is the Master Access Code

The master access code is a factory-set
five-digit entry code. You can operate the
keypad with the master access code at
any time. The master access code can be
displayed in the instrument cluster display
and is available from an authorized dealer.

Displaying the Master Access Code
in the Instrument Cluster Display

Read and understand the following before
you begin the process.

You must have two previously
programmed intelligent access key
inside your vehicle.

Make sure that your vehicle is off.

Make sure you do not press the brake
pedal during the procedure.

Make sure that you close all the doors
and that they remain closed
throughout the procedure.

Perform all steps within 30 seconds of
starting the sequence. If you perform any
of the steps out of sequence, stop and wait
for at least one minute before starting
again.

Note:

Do not place the device on the

wireless accessory charging area during the
procedure.

1.

Access the backup slot. See

Accessing the Passive Key Backup
Position

 (page 243).

2. Place the first intelligent access key

into the backup slot.

3. Press the push button ignition switch

once and wait for a few seconds.

4. Press the push button ignition switch

again and remove the intelligent access
key from the center console.

5. Insert the second programmed

intelligent access key into the backup
slot in the center console, then press
the push button ignition switch.

The master access code appears in the
instrument cluster display for a few
seconds.

Note:

The code may not display until after

other warning messages display.

107

Keyless Entry Keypad

 (If Equipped)

KEYLESS ENTRY KEYPAD
PERSONAL ACCESS CODES

Programming a Personal Entry
Code

1.

Enter the five-digit master code.

2. Press 

1·2

 on the keypad within five

seconds.

3. Enter your personal five-digit code.

You must do this within five seconds
of completing Step 2.

4. Press 

1·2

 on the keypad to save

personal code 1.

The doors lock then unlock to confirm that
programming was successful.

To program additional personal entry
codes, repeat Steps 1 through 3, then for
Step 4:

Press 

3·4

 to save personal code 2.

Press 

5·6

 to save personal code 3.

Press 

7·8

 to save personal code 4.

Press 

9·0

 to save personal code 5.

If your vehicle comes with the operating
system, you can also program the system
with a personal entry code.

Hints:

Do not set a code that uses five of the
same number.

Do not use five numbers in sequential
order.

The five-digit master code works even
if you have set your own personal code.

Erasing a Personal Code

1.

Enter the five-digit master code.

2. Press and release 

1·2

 on the keypad

within five seconds.

3. Press and hold 

1·2

 for two seconds.

You must do this within five seconds
of completing Step 2.

All personal codes erase and only the
five-digit master code works.

Anti-Scan Feature

The keypad goes into an anti-scan mode
if you enter the wrong code seven times.
This mode turns off the keypad for one
minute and the keypad lamp flashes.

The anti-scan feature turns off after:

One minute of keypad inactivity.

You press the unlock button on the
remote control.

You switch the ignition on.

You unlock your vehicle using keyless
entry.

USING THE KEYLESS ENTRY
KEYPAD

Unlocking the Driver Door

E138637

Enter the factory-set five-digit code or your
personal code.  You must press each
number within five seconds of each other.

108

Keyless Entry Keypad

 (If Equipped)

Note:

All doors unlock if the two-stage

unlocking feature is disabled.  See 

Keyless

Entry Settings

 (page 105).

Unlocking All Doors

Enter the factory-set code or your personal
code, then press 

3-4

 within five seconds.

To Release the Remote Power
Release Tailgate

Enter the factory-set code or your personal
code, then press 

5-6

 control within five

seconds.

Locking the Doors

E138637

Press and hold 

7·8

 and 

9·0

 at the same

time with the driver door closed.

Note:

You do not need to enter the code

first.

KEYLESS ENTRY KEYPAD –
TROUBLESHOOTING

KEYLESS ENTRY KEYPAD –
FREQUENTLY ASKED QUESTIONS

Why does the keypad not accept the
access code?

If you enter the access code too fast
on the keypad, the unlock function
may not work. Slowly re-enter the
access code.

Why does the keypad not function?

The keypad goes into an anti-scan
mode if you enter a wrong code seven
times. The anti-scan mode disables
the keypad for one minute and the red
light flashes.

KEYLESS ENTRY KEYPAD
VIDEOS

SecuriCode Keyless Entry Keypad Video Link

109

Keyless Entry Keypad

 (If Equipped)

HOW DOES EASY ENTRY AND
EXIT WORK

Easy entry and exit moves the driver seat
rearward up to 2 in (5 cm) and the steering
column up when you switch the ignition
off. The driver seat and steering column
return to their previous positions when you
switch the ignition on.

Note:

Depending on your vehicle, the

column may move up and in.

SWITCHING EASY ENTRY AND
EXIT ON AND OFF

1.

Press 

Settings

 on the touchscreen.

2. Press 

Vehicle

.

3. Select 

Easy Entry/Exit

.

If you press any adjustment or memory
button when in easy exit mode, the system
cancels the operation.

110

Easy Entry and Exit - Vehicles With: Driver Memory Seat

TAILGATE PRECAUTIONS

WARNING: 

It is extremely

dangerous to ride in a cargo area, inside
or outside of a vehicle. In a crash, people
riding in these areas are more likely to be
seriously injured or killed. Do not allow
people to ride in any area of your vehicle
that is not equipped with seats and
seatbelts. Make sure everyone in your
vehicle is in a seat and properly using a
seatbelt. Failure to follow this warning
could result in serious personal injury or
death.

OPENING THE TAILGATE

OPENING THE TAILGATE FROM
OUTSIDE YOUR VEHICLE

E333071

Pull up on the handle to release the
tailgate.

Note:

You may need to unlock the tailgate

first.

LOCKING AND UNLOCKING
THE TAILGATE

Manual

E332901

Lock.

A

Unlock.

B

1.

Insert the ignition key into the tailgate
lock.

2. Turn it to the left to lock the tailgate.

3. Turn it to the right to unlock the

tailgate.

Power

You can lock and unlock the tailgate with
the remote control or power door unlock
control.

REMOVING AND INSTALLING
THE TAILGATE

WARNING: 

Always properly secure

cargo to prevent shifting cargo or cargo
falling from the vehicle. Failure to do so
could result in compromised vehicle
stability and serious personal injury to
vehicle occupants or others.

111

Tailgate - Vehicles With: Manual Tailgate

WARNING: 

The tailgate is heavy.

Removal of the tailgate requires two
adults. Failure to follow this instruction
could result in personal injury or property
damage.

Note:

Skip to Step 4 if your vehicle does

not have power door locks.

E189556

1.

Unlatch the tailgate.

2. Disconnect the power door locks in-line

connector. It is under the pickup box
on the right-hand side of the vehicle
near the spare tire.

3. Install a protective cap on the in-line

connector portion that remains under
the pickup box.

Note:

 A protective cap should be in the

glove compartment.

4. Partially lower the tailgate. Carefully

feed the tailgate harness up through
the gap between the pickup box and
the bumper and place it out of the way
under the pickup box.

5. Lower the tailgate.

E311529

6. Use a screwdriver to gently pry the

spring clip on each connector past the
head of the support screw. Disconnect
the cable.

7.

Disconnect the other cable.

8. Lift the tailgate to 45 degrees from the

horizontal position.

9. Lift the right-hand side off its hinge.

10.

Lift the tailgate to 80 degrees from
the horizontal position.

11.

Remove the tailgate from the
left-hand side hinge by sliding it to
the right.

12.

Install the tailgate in reverse order.

TAILGATE STEP

 (IF EQUIPPED)

ACCESSING THE TAILGATE STEP

1.

Lower the tailgate.

2. Push the button in the center of the

step molding. The step pops out
slightly.

112

Tailgate - Vehicles With: Manual Tailgate

E187718

3. Pull the step out fully. Lower the step

to its lowest position.

E189557

4. Pull the yellow handle stop backward

out of the tailgate until it fully extends.

5. To lock the handle in place, rotate the

handle up from the horizontal to the
vertical position until you hear a click.

Note:

Do not tow with the step or grab

handle.

Replace the slip resistance tape or grab
handle molding if it appears as worn or
damaged.

To reduce the risk of falling:

Only operate the step when your
vehicle is on a level surface.

Only operate the step in areas with
sufficient lighting.

Make sure you use the grab handle
when climbing on the step.

Do not use the step with bare feet.

Make sure the step is clean before use.

Keep the step load below the total
maximum load of 350 lb (159 kg).

STOWING THE TAILGATE STEP

1.

Press the yellow button on the handle
to lower and then press the yellow
lever at the bottom of the handle to
unlock. Rotate the handle down from
the vertical to the horizontal position
and push it into the tailgate.

2. Rotate the step up until it is horizontal,

then push it back into the tailgate until
the step is secure.

Note:

Make sure to close and fully latch the

step before moving your vehicle. Do not
drive with the step or grab handle open.

Note:

The power tailgate cannot close if

the step is open. A warning message
appears and a tone sounds. After stowing
the step the power close function is
restored.

TAILGATE WORK SURFACE

 (IF

EQUIPPED)

The tailgate work surface is a durable and
functional surface on the inside portion of
your tailgate you can use to perform
various tasks.

To use the tailgate work surface, fold down
the tailgate.

113

Tailgate - Vehicles With: Manual Tailgate

E308677

Tablet stand.

A

Tool inset.

B

Clamp pocket.

C

Standard and metric ruler.

D

Cup holder.

E

Tailgate anchors.

F

E336605

The tailgate work surface contains clamp
pockets that allows you to secure work
material.

Note:

Damage could occur to the tailgate

if you overload the vertical clamp arm in any
direction.

Note:

When you finish using the tailgate

work surface, make sure you remove all of
your belongings, then close the tailgate.

114

Tailgate - Vehicles With: Manual Tailgate

TAILGATE PRECAUTIONS

WARNING: 

It is extremely

dangerous to ride in a cargo area, inside
or outside of a vehicle. In a crash, people
riding in these areas are more likely to be
seriously injured or killed. Do not allow
people to ride in any area of your vehicle
that is not equipped with seats and
seatbelts. Make sure everyone in your
vehicle is in a seat and properly using a
seatbelt. Failure to follow this warning
could result in serious personal injury or
death.

OPENING THE TAILGATE

OPENING THE TAILGATE FROM
INSIDE YOUR VEHICLE

To operate the power tailgate, the vehicle
must be in park (P) or reverse (R) and the
vehicle speed is less than 2.5 mph
(4 km/h).

E308661

Press the button on the
instrument panel.

Note:

A tone sounds while the tailgate

opens.

Note:

The tailgate stops and reverses if it

detects an obstruction when opening.

Note:

An alert sounds if the electronic

tailgate is in manual mode.

Note:

A pop-up message appears on the

touchscreen if the tailgate is in manual
mode asking if you want to change back to
power mode.

OPENING THE TAILGATE FROM
OUTSIDE YOUR VEHICLE

1.

Unlock the vehicle with the remote
control or power door unlock control.

Note:

If an intelligent access transmitter is

within 3 ft (1 m) of the tailgate, the tailgate
unlocks when you press the tailgate release
button.

E410279

2. Press the button on the tailgate handle.

OPENING THE TAILGATE USING
THE REMOTE CONTROL

E191530

Press the remote control button
twice within three seconds.

CLOSING THE TAILGATE

CLOSING THE TAILGATE FROM
INSIDE YOUR VEHICLE

E308661

Press the button on the
instrument panel.

Note:

The tailgate does not close with the

tailgate step ajar. A Step Ajar message
displays on instrument panel.

CLOSING THE TAILGATE FROM
OUTSIDE YOUR VEHICLE

You can close the power tailgate by:

Pressing the tailgate button on your
remote control twice within three
seconds.

Pressing the button on the tailgate
once.

115

Tailgate - Vehicles With: Multi-Access Tailgate

Note:

A tone sounds while the tailgate

closes.

Note:

The tailgate stops and reverses if it

detects an obstruction when closing.

Lift-to-Close

To close the tailgate automatically using
lift-to-close, lift the tailgate approximately
4 in (10 cm) and hold it for a few seconds.

Note:

If the tailgate position is more than

halfway open, it may not close
automatically.

Manual Close

You can close the tailgate manually when
you lift the tailgate in a continuous motion.

If you stop the tailgate motion, the
lift-to-close feature engages and power
closes the tailgate.

Putting the Tailgate in Manual Mode

You can put the tailgate in manual mode
through the vehicle settings in your
touchscreen.

Note:

In manual mode, the tailgate only

opens by the tailgate release button on the
tailgate and messaging is reduced.

Note:

A pop-up message appears on the

touchscreen if you press the tailgate button
on the instrument panel when the tailgate
is in Manual mode.

CLOSING THE TAILGATE USING
THE REMOTE CONTROL

E191530

Press the remote control button
twice within three seconds.

USING THE MULTI-ACCESS
TAILGATE

WARNING: 

Do not hang, sit, or

stand on an open swing gate when the
vehicle is moving. Failure to follow this
instruction could result in personal injury.

The multi-access tailgate is a combination
of tailgate and swing gate. You can open
the swing gate without opening the
tailgate, to access the pickup bed.

Note:

Fully close the power tailgate to

operate the swing gate.

Note:

Fully close the swing gate to operate

the tailgate.

Opening the Swing Gate

1.

Unlock the vehicle using the remote
control or power door unlock control.

E410281

2. Press the button inside the swing gate

handle.

Note:

If an intelligent access transmitter is

within 3 ft (1 m) of the swing gate, the swing
gate unlocks when you press the swing gate
release button.

Note:

Make sure the vehicle is in park (P).

Note:

Do not leave the swing gate open

while driving. This could damage the swing
gate and its components.

116

Tailgate - Vehicles With: Multi-Access Tailgate

REMOVING AND INSTALLING
THE TAILGATE

WARNING: 

Always properly secure

cargo to prevent shifting cargo or cargo
falling from the vehicle. Failure to do so
could result in compromised vehicle
stability and serious personal injury to
vehicle occupants or others.

WARNING: 

The tailgate is heavy.

Removal of the tailgate requires two
adults. Failure to follow this instruction
could result in personal injury or property
damage.

E189556

1.

Put the tailgate into manual mode by
accessing the vehicle settings using the
touchscreen.

2. Open the tailgate.

3. Disconnect the power door locks in-line

connector. It is under the pickup box
on the left-hand side of the vehicle
near the spare tire.

4. Install a protective cap on the in-line

connector portion that remains under
the pickup box.

Note:

 The protective cap is in the glove

compartment.

5. Partially raise the tailgate. Carefully

feed the tailgate harness up through
the gap between the pickup box and
the bumper and place it out of the way
under the pickup box.

6. Fully lower the tailgate.

E410278

7.

Remove the retaining screw.

E311529

8. Use a screwdriver to gently pry the

spring clip on each connector past the
head of the support screw. Disconnect
the cable.

9. Disconnect the other cable.

117

Tailgate - Vehicles With: Multi-Access Tailgate

10.

Lift the tailgate to 45 degrees from
the horizontal position.

11.

Lift the left-hand side off its hinge.

12.

Lift the tailgate to 80 degrees from
the horizontal position.

13.

Remove the tailgate from the
right-hand side hinge by sliding it to
the left.

14.

Install the tailgate in reverse order.

Note:

After reinstalling the tailgate it is

important to reinstall the retaining screw to
the recommended torque,7 lb.ft (10 Nm).
Failure to install the retaining screw can
cause the tailgate to detach.

TAILGATE WORK SURFACE

 (IF

EQUIPPED)

The tailgate work surface is a durable and
functional surface on the inside portion of
your tailgate you can use to perform
various tasks.

To use the tailgate work surface, fold down
the tailgate.

E410274

Tablet stand.

A

Tool inset.

B

Clamp pocket.

C

Standard and metric ruler.

D

Cup holder.

E

Tailgate anchors.

F

E410275

The tailgate work surface contains clamp
pockets that allows you to secure work
material.

Note:

Damage could occur to the tailgate

if you overload the vertical clamp arm in any
direction.

Note:

When you finish using the tailgate

work surface, make sure you remove all of
your belongings, then close the tailgate.

TAILGATE –
TROUBLESHOOTING

TAILGATE – WARNING LAMPS

E311338

Illuminates when the tailgate is
not completely closed.

E410273

Illuminates when the swing gate
is not completely closed.

118

Tailgate - Vehicles With: Multi-Access Tailgate

TAILGATE – INFORMATION MESSAGES

Details

Message

The tailgate is not completely closed.

Tailgate ajar

Make sure the vehicle is in park (P) to operate the tailgate.

Shift to Park to operate

tailgate

The swing gate is not completely closed.

Swing gate ajar

You need to close the swing gate to open the power tailgate.

Close swing gate before

opening tailgate

Displays when you are using the instrument panel button to

open the tailgate and the tailgate is in manual mode.

Power Tailgate is in

Manual Mode. Switch to

Power Mode?

119

Tailgate - Vehicles With: Multi-Access Tailgate

TAILGATE – FREQUENTLY ASKED
QUESTIONS

Why won't my tailgate open?

Make sure the transmission is in park
(P) or reverse (R).

Your vehicle speed is at or above 2 mph
(4 km/h).

Make sure the swing gate is completely
closed.

Make sure nothing is obstructing the
tailgate path and or causing resistance,
such as tonneau cover or other
aftermarket accessories, freezing
conditions or being parked downhill.

If you have continued issues, the
battery voltage may be low or other
system issues. See an authorized
dealer.

Why won't my tailgate close?

Make sure the tailgate is in power
mode.

Your vehicle speed is at or above 2 mph
(4 km/h).

The tailgate encountered an obstacle
or freezing conditions. After removing
the obstacles, manually close the
tailgate to resume normal operation.

If you have continued issues, the
battery voltage may be low or other
system issues. See an authorized
dealer.

Why won't my swing gate open?

Make sure vehicle is in park (P).

Make sure the tailgate is completely
closed.

120

Tailgate - Vehicles With: Multi-Access Tailgate

TAILGATE PRECAUTIONS

WARNING: 

It is extremely

dangerous to ride in a cargo area, inside
or outside of a vehicle. In a crash, people
riding in these areas are more likely to be
seriously injured or killed. Do not allow
people to ride in any area of your vehicle
that is not equipped with seats and
seatbelts. Make sure everyone in your
vehicle is in a seat and properly using a
seatbelt. Failure to follow this warning
could result in serious personal injury or
death.

OPENING THE TAILGATE

OPENING THE TAILGATE FROM
INSIDE YOUR VEHICLE

To operate the power tailgate, the vehicle
must be in park (P) or reverse (R) and the
vehicle speed is less than 2.5 mph
(4 km/h).

E308661

Press the button on the
instrument panel.

Note:

A tone sounds while the tailgate

opens.

Note:

The tailgate stops and reverses if it

detects an obstruction when opening.

Note:

An alert sounds if the electronic

tailgate is in manual mode.

Note:

A pop-up message appears on the

touchscreen if the tailgate is in manual
mode asking if you want to change back to
power mode.

OPENING THE TAILGATE FROM
OUTSIDE YOUR VEHICLE

1.

Unlock the vehicle with the remote
control, power door unlock control or
your phone as a key device.

Note:

If an authorized device is within 3 ft

(1 m) of the tailgate, the tailgate unlocks
when you press the tailgate release button.

E359757

2. Press the button on the middle of the

tailgate.

OPENING THE TAILGATE USING
THE REMOTE CONTROL

E191530

Press the remote control button
twice within three seconds.

CLOSING THE TAILGATE

CLOSING THE TAILGATE FROM
INSIDE YOUR VEHICLE

E308661

Press the button on the
instrument panel.

Note:

The tailgate does not close with the

tailgate step ajar. A Step Ajar message
displays on instrument panel.

121

Tailgate - Vehicles With: Power Tailgate

CLOSING THE TAILGATE FROM
OUTSIDE YOUR VEHICLE

You can close the power tailgate by:

Pressing the tailgate button on your
remote control twice within three
seconds.

Pressing the button on the tailgate
once.

Note:

A tone sounds while the tailgate

closes.

Note:

The tailgate stops and reverses if it

detects an obstruction when closing.

Lift-to-Close

To close the tailgate automatically using
lift-to-close, lift the tailgate approximately
4 in (10 cm) and hold it for a few seconds.

Note:

If the tailgate position is more than

halfway open, it may not close
automatically.

Manual Close

You can close the tailgate manually when
you lift the tailgate in a continuous motion.

If you stop the tailgate motion, the
lift-to-close feature engages and power
closes the tailgate.

Putting the Tailgate in Manual Mode

You can put the tailgate in manual mode
through the vehicle settings in your
touchscreen.

Note:

In manual mode, the tailgate only

opens by the tailgate release button on the
tailgate and messaging is reduced.

Note:

A pop-up message appears on the

touchscreen if you press the tailgate button
on the instrument panel when the tailgate
is in Manual mode.

CLOSING THE TAILGATE USING
THE REMOTE CONTROL

E191530

Press the remote control button
twice within three seconds.

REMOVING AND INSTALLING
THE TAILGATE

WARNING: 

Always properly secure

cargo to prevent shifting cargo or cargo
falling from the vehicle. Failure to do so
could result in compromised vehicle
stability and serious personal injury to
vehicle occupants or others.

WARNING: 

The tailgate is heavy.

Removal of the tailgate requires two
adults. Failure to follow this instruction
could result in personal injury or property
damage.

E189556

1.

Put the tailgate into manual mode by
accessing the vehicle settings using the
touchscreen.

2. Open the tailgate.

3. Disconnect the power door locks in-line

connector. It is under the pickup box
on the right-hand side of the vehicle
near the spare tire.

122

Tailgate - Vehicles With: Power Tailgate

4. Install a protective cap on the in-line

connector portion that remains under
the pickup box.

Note:

 The protective cap is in the glove

compartment.

5. Partially raise the tailgate. Carefully

feed the tailgate harness up through
the gap between the pickup box and
the bumper and place it out of the way
under the pickup box.

6. Fully lower the tailgate.

E310339

7.

Remove the retaining screw.

E311529

8. Use a screwdriver to gently pry the

spring clip on each connector past the
head of the support screw. Disconnect
the cable.

9. Disconnect the other cable.

10.

Lift the tailgate to 45 degrees from
the horizontal position.

11.

Lift the right-hand side off its hinge.

12.

Lift the tailgate to 80 degrees from
the horizontal position.

13.

Remove the tailgate from the
left-hand side hinge by sliding it to
the right.

14.

Install the tailgate in reverse order.

Note:

After reinstalling the tailgate it is

important to reinstall the retaining screw to
the recommended torque, 7 lb.ft (10 Nm).
Failure to install the retaining screw can
cause the tailgate to detach.

TAILGATE STEP

ACCESSING THE TAILGATE STEP

1.

Lower the tailgate.

2. Push the button in the center of the

step molding. The step pops out
slightly.

123

Tailgate - Vehicles With: Power Tailgate

E187718

3. Pull the step out fully. Lower the step

to its lowest position.

E189557

4. Pull the yellow handle stop backward

out of the tailgate until it fully extends.

5. To lock the handle in place, rotate the

handle up from the horizontal to the
vertical position until you hear a click.

Note:

Do not tow with the step or grab

handle.

Replace the slip resistance tape or grab
handle molding if it appears as worn or
damaged.

To reduce the risk of falling:

Only operate the step when your
vehicle is on a level surface.

Only operate the step in areas with
sufficient lighting.

Make sure you use the grab handle
when climbing on the step.

Do not use the step with bare feet.

Make sure the step is clean before use.

Keep the step load below the total
maximum load of 350 lb (159 kg).

STOWING THE TAILGATE STEP

1.

Press the yellow button on the handle
to lower and then press the yellow
lever at the bottom of the handle to
unlock. Rotate the handle down from
the vertical to the horizontal position
and push it into the tailgate.

2. Rotate the step up until it is horizontal,

then push it back into the tailgate until
the step is secure.

Note:

Make sure to close and fully latch the

step before moving your vehicle. Do not
drive with the step or grab handle open.

Note:

The power tailgate cannot close if

the step is open. A warning message
appears and a tone sounds. After stowing
the step the power close function is
restored.

TAILGATE WORK SURFACE

 (IF

EQUIPPED)

The tailgate work surface is a durable and
functional surface on the inside portion of
your tailgate you can use to perform
various tasks.

To use the tailgate work surface, fold down
the tailgate.

124

Tailgate - Vehicles With: Power Tailgate


Content      ..     1      2      3      4      ..