Ford Explorer (2024 year). Manual in english - page 8
 

  Index      Manuals     Ford Explorer (2024 year). Manual in english


Search            copyright infringement  


Content      ..     6      7      8      9     ..


Ford Explorer (2024 year). Manual in english - page 8


3. Switch on the low beam headlamps

and open the hood.

E142465

4. On the wall or screen you will observe

a flat zone of high intensity light
located at the top of the beam pattern.
If the top edge of the flat zone of high
intensity light is not on the horizontal
reference line, adjust the aim of the
headlamp beam.

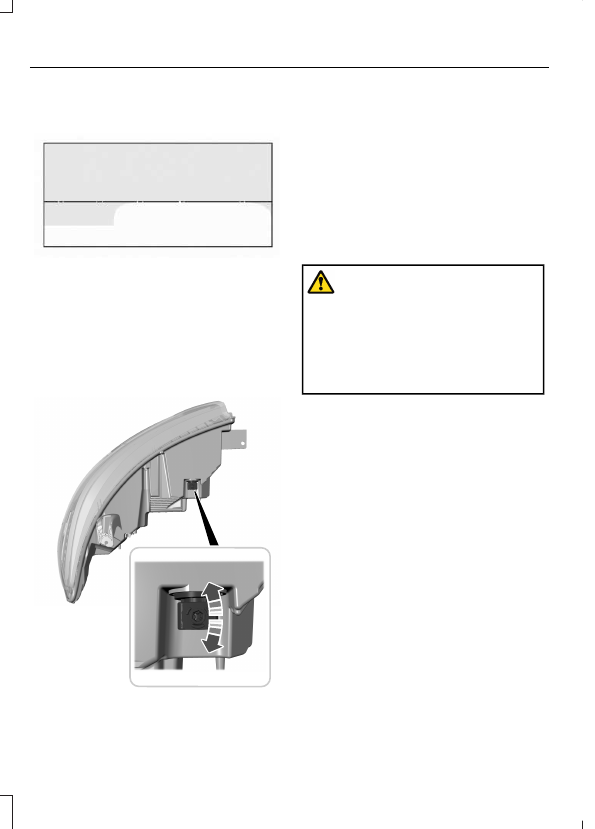
E292172

5. Use a suitable tool, for example a

screwdriver or socket wrench, to turn
the adjuster clockwise or
counterclockwise to adjust the vertical
aim of the headlamp.  The horizontal
edge of the brighter light should touch
the horizontal reference line.

6. Close the hood and switch off the

lamps.

WASHER FLUID CHECK

WARNING: 

If you operate your

vehicle in temperatures below 41.0°F
(5°C), use washer fluid with antifreeze
protection. Failure to use washer fluid
with antifreeze protection in cold
weather could result in impaired
windshield vision and increase the risk
of injury or accident.

Note:

The front and rear washer systems

are supplied from the same reservoir.

Add fluid to fill the reservoir if the level is
low. Only use a washer fluid that meets
our specifications.  See 

Capacities and

Specifications

 (page 278).

State or local regulations on volatile
organic compounds may restrict the use
of methanol, a common windshield washer
antifreeze additive. Washer fluids
containing non-methanol antifreeze
agents should be used only if they provide
cold weather protection without damaging
the vehicle’s paint finish, wiper blades or
washer system.

FUEL FILTER

Your vehicle is equipped with a lifetime
fuel filter that is integrated with the fuel
tank. Regular maintenance or replacement
is not needed.

234

Maintenance

CHECKING THE WIPER
BLADES

E142463

Run the tip of your fingers over the edge of
the blade to check for roughness.

Clean the wiper blades with washer fluid
or water applied with a soft sponge or
cloth.

CHANGING THE FRONT WIPER
BLADES

You can improve poor wiper quality by
cleaning the wiper blades and the
windshield.

Replace the wiper blades at least annually
for optimum performance.

E129990

1.

Lift the wiper arm and then press the
wiper blade locking buttons together.

Note:

Do not hold the wiper blade to lift the

wiper arm.

Note:

Make sure that the wiper arm does

not spring back against the glass when the
wiper blade is not attached.

2. Slightly rotate the wiper blade.

3. Remove the wiper blade.

4. To install, reverse the removal

procedure.

Note:

Make sure that the wiper blade locks

into place.

CHANGING THE REAR WIPER
BLADES

You can improve poor wiper quality by
cleaning the wiper blades and the
windshield.

Replace the wiper blades at least annually
for optimum performance.

E183236

1.

Lift the wiper arm.

Note:

Do not hold the wiper blade to lift the

wiper arm.

2. Remove the wiper blade.

235

Maintenance

Note:

Make sure that the wiper arm does

not spring back against the glass when the
wiper blade is not attached.

3. To install, reverse the removal

procedure.

Note:

Make sure that the wiper blade locks

into place.

CHANGING A BULB

WARNING: 

Switch the lamps and

the ignition off. Failure to do so could
result in serious personal injury.

WARNING: 

Bulbs can become hot.

Let the bulb cool down before removing
it. Failure to do so could result in
personal injury.

Use the correct specification bulb.  See

Bulb Specification Chart

 (page 304).

Install in the reverse order unless otherwise
stated.

Rear Direction Indicator and
Reversing Lamp

E292168

1.

Switch all of the lamps and the ignition
off.

2. Use a suitable tool, for example a

screwdriver, to carefully remove the
access cover.

3. Remove the side cover.

4. Remove the screw that secures the

lamp assembly.

5. Gently pull the lamp assembly away

from the vehicle.

6. Turn the bulb holder counterclockwise

and remove it.

7.

Remove the bulb by pulling it straight
out.

E292171

Rear direction indicator.

A

Reverse lamp.

B

LED Lamps

LED lamps are not serviceable items.  See
an authorized dealer if they fail.

The following lamps are LED:

Headlamp low beam.

Headlamp high beam.

Front direction indicator.

Side direction indicator.

Daytime running lamps.

Front fog lamps (if equipped).

Brake and rear lamp.

Rear side marker lamp.

236

Maintenance

Rear fog lamps (if equipped).

Front side marker lamps.

Front signature lamps.

Central high mounted brake lamp.

License Plate Lamp

E292276

A

B

A

1

2

20

3

A

A

1.

Use a suitable tool, for example a
screwdriver, to carefully remove the
lamp.

2. Turn the bulb holder counterclockwise

and remove it.

3. Remove the bulb by pulling it straight

out.

237

Maintenance

GENERAL INFORMATION

Your dealer has many quality products
available to clean your vehicle and protect
its finishes.

CLEANING PRODUCTS

Materials

For best results, use the following products
or products of equivalent quality:

For additional information and assistance,
we recommend that you contact an
authorized dealer.

Specification

Name

Motorcraft® Bug and Tar Remover, ZC-42 (U.S. & Canada)

ESR-M5B194-B

Motorcraft® Custom Bright Metal Cleaner, ZC-15 (U.S. & Canada)

ESR-M14P4-A

Motorcraft® Detail Wash, ZC-3-A (U.S. & Canada)

ESR-M14P3-A

Motorcraft® Engine Shampoo and Degreaser, ZC-20 (U.S.)

Motorcraft® Engine Shampoo, CXC-66-A (Canada)

Motorcraft® Premium Leather and Vinyl Cleaner, ZC-56 (U.S. &
Canada)

Motorcraft® Multi-Purpose Cleaner, CXC-101 (Canada)

WSS-M14P19-A

Motorcraft® Premium Windshield Wash Concentrate with
Bitterant, ZC-32-B2 (U.S.)

WSS-M14P19-A

Motorcraft® Premium Quality Windshield Washer Fluid, CXC-37-
F/M (Canada)

Motorcraft® Professional Strength Carpet & Upholstery Cleaner,
ZC-54 (U.S. & Canada)

ESR-M14P5-A

Motorcraft® Premium Glass Cleaner, CXC-100 (Canada)

Motorcraft® Spot and Stain Remover, ZC-14 (U.S.)

ESR-M14P5-A

Motorcraft® Ultra-Clear Spray Glass Cleaner, ZC-23 (U.S.)

Motorcraft® Wheel and Tire Cleaner, ZC-37-A (U.S. & Canada)

238

Vehicle Care

CLEANING THE EXTERIOR

Wash your vehicle regularly with cool or
lukewarm water and a neutral pH
shampoo, we recommend Motorcraft
Detail Wash.

Never use strong household detergents
or soap, for example dish washing or
laundry liquid. These products can
discolor and spot painted surfaces.

Never wash your vehicle when it is hot
to the touch, or during strong or direct
sunlight.

Dry your vehicle with a chamois or soft
terry cloth towel to eliminate water
spotting.

Immediately remove fuel spillages, bird
droppings, insect deposits and road tar.
These may cause damage to your
vehicle’s paintwork or trim over time.
We recommend Motorcraft Bug and
Tar Remover.

Remove any exterior accessories, for
example antennas, before entering a
car wash.

When filling with AdBlue®, remove any
residue on painted surfaces
immediately.

Note:

Suntan lotions and insect repellents

can damage painted surfaces. If these
substances come in contact with your
vehicle, wash the affected area as soon as
possible.

Cleaning the Exterior Precautions

Immediately remove fuel spillages, AdBlue
residuals, bird droppings, insect deposits
and road tar. These may cause damage to
your vehicle’s paintwork or trim over time.

Remove any exterior accessories, for
example antennas, before entering a car
wash.

Cleaning the Exterior Lamps

Note:

Do not scrape the exterior lamps

lenses or use abrasives, alcoholic solvents
or chemical solvents to clean them.

Note:

Do not wipe the exterior lamps when

they are dry.

Exterior Chrome Parts

Apply a high quality-cleaning product
to bumpers and other chrome parts.
Follow the manufacturer’s instructions.
We recommend Motorcraft Custom
Bright Metal Cleaner.

Do not apply the cleaning product to
hot surfaces. Do not leave the cleaning
product on chrome surfaces longer
than the time recommended.

Using non-recommended cleaners can
result in severe and permanent
cosmetic damage.

Note:

Never use abrasive materials, for

example steel wool or plastic pads as they
can scratch the chrome surface.

Note:

Do not use chrome cleaner, metal

cleaner or polish on wheels or wheel covers.

Exterior Plastic Parts

For routine cleaning we recommend
Motorcraft Detail Wash. If tar or grease
spots are present, we recommend
Motorcraft Bug and Tar Remover.

Stripes or Graphics

 (If Equipped)

Hand washing your vehicle is preferred
however, pressure washing may be used
under the following conditions:

Do not use water pressure higher than
2,000 psi (14,000 kPa).

Do not use water hotter than 179°F
(82°C).

239

Vehicle Care

Use a spray with a 40 degree wide
spray angle pattern.

Keep the nozzle at a 12 in (305 mm)
distance and 90 degree angle to your
vehicle's surface.

Note:

Holding the pressure washer nozzle

at an angle to the vehicle's surface may
damage graphics and cause the edges to
peel away from the vehicle's surface.

Underbody

Regularly clean the entire underside of your
vehicle. This includes the chassis, body
floor sheet metal and wheel wells using
fresh water. Keep body and door drain
holes free of debris or foreign material.

Under Hood

For removing black rubber marks from
under the hood we recommend Motorcraft
Wheel and Tire Cleaner or Motorcraft Bug
and Tar Remover.

WAXING

Regular waxing is necessary to protect your
car's paint from the elements. We
recommend that you wash and wax the
painted surface once or twice a year.

When washing and waxing, park your
vehicle in a shaded area out of direct
sunlight. Always wash your vehicle before
applying wax.

Use a quality wax that does not contain
abrasives.

Follow the manufacturer’s instructions
to apply and remove the wax.

Apply a small amount of wax in a
back-and-forth motion, not in circles.

Do not allow wax to come in contact
with any non-body (low-gloss black)
colored trim. The wax will discolor or
stain the parts over time.

Roof racks.

Bumpers.

Grained door handles.

Side moldings.

Mirror housings.

Windshield cowl area.

Do not apply wax to glass areas.

After waxing, your car's paint should
feel smooth, and be free of streaks and
smudges.

CLEANING THE ENGINE

Engines are more efficient when they are
clean because grease and dirt buildup keep
the engine warmer than normal.

When washing:

Take care when using a power washer
to clean the engine. The high-pressure
fluid could penetrate the sealed parts
and cause damage.

Do not spray a hot engine with cold
water to avoid cracking the engine
block or other engine components.

Spray Motorcraft Engine Shampoo and
Degreaser on all parts that require
cleaning and pressure rinse clean. In
Canada, use Motorcraft Engine
Shampoo.

Note:

If your vehicle has an engine cover

remove the cover before application of
Motorcraft Engine Shampoo and Degreaser.
Immediately rinse away any over spray.

240

Vehicle Care

Never wash or rinse the engine while it
is hot or running; water in the running
engine may cause internal damage.

Never wash or rinse any ignition coil,
spark plug wire or spark plug well, or
the area in and around these locations.

Cover the battery, power distribution
box, and air filter assembly to prevent
water damage when cleaning the
engine.

CLEANING THE WINDOWS AND
WIPER BLADES

Car wash chemicals and environmental
fallout can result in windshield and wiper
blade contamination. Dirty windshield and
wipers will result in poor windshield wiper
operation. Keep the windshield and wiper
blades clean to maintain windshield wiper
performance.

To clean the windshield and wiper blades:

Clean the windshield with a
non-abrasive glass cleaner. When
cleaning the interior of the windshield,
avoid getting any glass cleaner on the
instrument panel or door panels. Wipe
any glass cleaner off these surfaces
immediately.

For windshields contaminated with
tree sap, chemicals, wax or bugs, clean
the entire windshield using steel wool
(no greater than 0000 grade) in a
circular motion and rinse with water.

Clean the wiper blades with isopropyl
rubbing alcohol or windshield washer
concentrate.

Note:

 Do not use razor blades or other

sharp objects to clean or remove decals
from the inside of the heated rear window.
The vehicle warranty does not cover
damage caused to the heated rear window
grid lines.

CLEANING THE INTERIOR

WARNING: 

Do not use cleaning

solvents, bleach or dye on the vehicle's
seatbelts, as these actions may weaken
the belt webbing.

WARNING: 

On vehicles equipped

with seat-mounted airbags, do not use
chemical solvents or strong detergents.
Such products could contaminate the
side airbag system and affect
performance of the side airbag in a crash.

For fabric, carpets, cloth seats and seats
equipped with side airbags:

Remove dust and loose dirt with a
vacuum cleaner.

Remove light stains and soil with
Motorcraft Professional Strength
Carpet & Upholstery Cleaner.

If grease or tar is present on the
material, spot-clean the area first with
Motorcraft Spot and Stain Remover. In
Canada, use Motorcraft Multi-Purpose
Cleaner.

If a ring forms on the fabric after spot
cleaning, clean the entire area
immediately (but do not oversaturate)
or the ring will set.

Do not use household cleaning
products or glass cleaners, which can
stain and discolor the fabric and affect
the flame retardant abilities of the seat
materials.

Mirrors

Do not clean the housing or glass of any
mirror with harsh abrasives, fuel or other
petroleum or ammonia-based cleaning
products.

241

Vehicle Care

CLEANING THE INSTRUMENT
PANEL AND INSTRUMENT
CLUSTER LENS

WARNING: 

Do not use chemical

solvents or strong detergents when
cleaning the steering wheel or
instrument panel to avoid contamination
of the airbag system.

Note:

Follow the same procedure as

cleaning leather seats for cleaning leather
instrument panels and leather interior trim
surfaces.

Clean the instrument panel and cluster
lens with a clean, damp and soft cloth,
then use a clean, dry and soft cloth to dry
these areas.

Avoid cleaners or polishes that increase
the gloss of the upper portion of the
instrument panel. The dull finish in this
area helps protect you from
undesirable windshield reflection.

Do not use any household cleaning
products or glass cleaners as these
may damage the finish of the
instrument panel, interior trim and
cluster lens.

Wash or wipe your hands clean if you
have been in contact with certain
products such as insect repellent and
suntan lotion to avoid possible damage
to the interior painted surfaces.

Do not allow air fresheners and hand
sanitizers to spill onto interior surfaces.
If a spill occurs, wipe off immediately.
Your warranty may not cover these
damages.

If a staining liquid like coffee or juice has
been spilled on the instrument panel or on
interior trim surfaces:

1.

Wipe up spilled liquid using a clean,
soft cloth as quickly as possible.

2. Use Motorcraft Premium Leather and

Vinyl Cleaner or a commercially
available leather cleaning product for
automotive interiors. Test any cleaner
or stain remover on an inconspicuous
area.

3. Alternatively, wipe the surface with a

clean, soft cloth and a mild soap and
water solution. Dry the area with a
clean, soft cloth.

4. If necessary, apply more soap and

water solution or cleaning product to
a clean, soft cloth and press it onto the
soiled area. Allow this to set at room
temperature for 30 minutes.

5. Remove the soaked cloth, then with a

clean, damp cloth, use a rubbing
motion for 60 seconds on the soiled
area.

6. Dry the area with a clean, soft cloth.

CLEANING LEATHER SEATS

Note:

Follow the same procedure as

cleaning leather seats for cleaning leather
instrument panels and leather interior trim
surfaces.

For routine cleaning, wipe the surface with
a soft, damp cloth and a mild soap and
water solution. Dry the area with a clean,
soft cloth.

For cleaning and removing stains such as
dye transfer, use Motorcraft Premium
Leather and Vinyl Cleaner or a
commercially available leather cleaning
product for automotive interiors.

Note:

Test any cleaner or stain remover on

an inconspicuous area.

You should:

Remove dust and loose dirt with a
vacuum cleaner.

Clean and treat spills and stains as
soon as possible.

242

Vehicle Care

Do not use the following products as these
may damage the leather:

Oil and petroleum or silicone-based
leather conditioners.

Household cleaners.

Alcohol solutions.

Solvents or cleaners intended
specifically for rubber, vinyl and
plastics.

REPAIRING MINOR PAINT
DAMAGE

We recommend that you contact an
authorized dealer to identify your vehicle
color code. Authorized dealers have
touch-up paint to match your vehicle's
color.

Before repairing minor paint damage, use
a cleaner to remove particles such as bird
droppings, tree sap, insect deposits, tar
spots, road salt and industrial fallout.

Read the instructions before using cleaning
products.

CLEANING THE WHEELS

1.

Regularly clean them with a wheel
cleaner. We recommend that you use
Ford approved wheel cleaner if
available.

2. Remove dirt and brake dust with a

sponge.

3. Remove tar and grease with a bug and

tar remover. We recommend that you
use Ford approved bug and tar remover
if available.

4. Thoroughly rinse the wheels with water

after cleaning.

If you intend on parking your vehicle for an
extended period after cleaning the wheels
with a wheel cleaner, drive your vehicle for
a few minutes before doing so. This
reduces the risk of corrosion of the brake
discs, brake pads and linings.

Do not clean the wheels when they are hot.

Note:

 Some car washes could damage

wheel rims and covers.

Note:

 Using non-recommended cleaners,

harsh cleaning products, chrome wheel
cleaners or abrasive materials could
damage wheel rims, covers and bolts.

VEHICLE STORAGE

If you plan on storing your vehicle for 30
days or more, read the following
maintenance recommendations to make
sure your vehicle stays in good operating
condition.

We engineer and test all motor vehicles
and their components for reliable, regular
driving.  Under various conditions,
long-term storage may lead to degraded
engine performance or failure unless you
use specific precautions to preserve engine
components.

General

Store all vehicles in a dry, ventilated
place.

Protect from sunlight, if possible.

If vehicles are stored outside, they
require regular maintenance to protect
against rust and damage.

243

Vehicle Care

Body

Wash your vehicle thoroughly to
remove dirt, grease, oil, tar or mud from
exterior surfaces, rear-wheel housing
and the underside of front fenders.

Periodically wash your vehicle if it is
stored in exposed locations.

Touch-up exposed or primed metal to
prevent rust.

Cover chrome and stainless steel parts
with a thick coat of auto wax to prevent
discoloration.  Re-wax as necessary
when you wash your vehicle.

Lubricate all hood, door and luggage
compartment hinges and latches with
a light grade oil.

Cover interior trim to prevent fading.

Keep all rubber parts free from oil and
solvents.

Engine

Change the engine oil and filter prior to
storage because used engine oil
contains contaminates which may
cause engine damage.

Start the engine every 15 days for a
minimum of 15 minutes.  Run at fast
idle with the climate controls set to
defrost until the engine reaches normal
operating temperature.

With your foot on the brake, shift
through all the gears while the engine
is running.

We recommend that you change the
engine oil before you use your vehicle
again.

Fuel system

Fill the fuel tank with high-quality fuel
until the first automatic shutoff of the
fuel pump nozzle.

Cooling system

Protect against freezing temperatures.

When removing your vehicle from
storage, check coolant fluid level.
Confirm that there are no cooling
system leaks and that fluid is at the
recommended level.

Disconnecting Your 12 Volt Battery

Check and recharge as necessary. Keep
connections clean.

If storing your vehicle for more than 30
days without recharging the battery,
we recommend that you disconnect
the battery cables to maintain battery
charge for quick starting.

Note:

It is necessary to reset memory

features if you disconnect the battery
cables.

Brakes

Make sure the brakes and parking brake
release fully.

Tires

Maintain recommended air pressure.

Miscellaneous

Make sure all linkages, cables, levers
and pins under your vehicle are covered
with grease to prevent rust.

Move vehicles at least 25 ft (7.5 m)
every 15 days to lubricate working parts
and prevent corrosion.

244

Vehicle Care

Removing Vehicle From Storage

When your vehicle is ready to come out of
storage, do the following:

Wash your vehicle to remove any dirt
or grease film build-up on window
surfaces.

Check windshield wipers for any
deterioration.

Check under the hood for any foreign
material that may have collected
during storage such as mice or squirrel
nests.

Check the exhaust for any foreign
material that may have collected
during storage.

Check tire pressures and set tire
inflation per the Tire Label.

Check brake pedal operation. Drive
your vehicle 15 ft (4.5 m) back and
forth to remove rust build-up.

Check fluid levels (including coolant,
oil and gas) to make sure there are no
leaks, and fluids are at recommended
levels.

If you remove the battery, clean the
battery cable ends and check for
damage.

Contact an authorized dealer if you have
any concerns or issues.

BODY STYLING KITS

The distance between the underside of
your vehicle and the ground is less than
that of other models.  Drive with extreme
care to avoid damage to your vehicle.

245

Vehicle Care

GENERAL INFORMATION

Use only approved wheel and tire sizes,
using other sizes could damage your
vehicle. If you change the diameter of the
tires from that fitted at the factory, the
speedometer may not display the correct
speed, and the All Wheel Drive (AWD)
system may not function properly. Take
your vehicle to an authorized dealer to
have the system reprogrammed. If you
intend to change the size of the wheels
from that fitted by the manufacturer, you
can check the suitability with an authorized
dealer.

Additional information related to the
functionality and maintenance of your tires
can be found later in this chapter.  See 

Tire

Care

 (page 247).

The recommended tire inflation pressures
can be found on the Tire Label, which is
located on the B-pillar or the edge of the
driver's door. This information can also be
found on the Safety Compliance
Certification Label, affixed to either the
door hinge pillar, door-latch post, or the
door edge that meets the door latch post;
next to the driver’s seating position.

We strongly recommend maintaining these
tire pressures at all times. Failure to follow
the tire pressure recommendations can
cause uneven treadwear patterns, reduced
fuel economy, and adversely affect the
way your vehicle handles.

Note:

Check and set the tire pressure at the

ambient temperature in which you are
intending to drive your vehicle and when the
tires are cold.

Note:

Check your tire pressures at least

once per month.

Set the pressure for your spare tire to the
highest value given for your vehicle and tire
size combination, if equipped.

Notice to utility vehicle and truck
owners

WARNING: 

Utility vehicles have a

significantly higher rollover rate than
other types of vehicles.

WARNING: 

Vehicles with a higher

center of gravity (utility and four-wheel
drive vehicles) handle differently than
vehicles with a lower center of gravity
(passenger cars). Avoid sharp turns,
excessive speed and abrupt steering in
these vehicles. Failure to drive cautiously
increases the risk of losing control of your
vehicle, vehicle rollover, personal injury
and death.

WARNING: 

In a rollover crash, an

unbelted person is significantly more
likely to die than a person wearing a
seatbelt.

WARNING: 

Do not become

overconfident in the ability of four-wheel
drive vehicles. Although a four-wheel
drive vehicle may accelerate better than
a two-wheel drive vehicle in low traction
situations, it won't stop any faster than
two-wheel drive vehicles. Always drive
at a safe speed.

Utility vehicles and trucks handle
differently than passenger cars in the
various driving conditions that are
encountered on streets, highways and
off-road. Utility vehicles and trucks are not
designed for cornering at speeds as high
as passenger cars any more than low-slung
sports cars are designed to perform
satisfactorily under off-road conditions.

246

Wheels and Tires

Study your owner's manual and any
supplements for specific information about
equipment features, instructions for safe
driving and additional precautions to
reduce the risk of an accident or serious
injury.

How your vehicle differs from
other vehicles

Sport utility vehicles and trucks can differ
from some other vehicles in a few
noticeable ways. Your vehicle may be:

Higher - to allow higher load carrying
capacity and to allow it to travel over
rough terrain without getting hung up
or damaging underbody components.

Shorter - to give it the capability to
approach inclines and drive over the
crest of a hill without getting hung up
or damaging underbody components.
All other things held equal, a shorter
wheelbase may make your vehicle
quicker to respond to steering inputs
than a vehicle with a longer wheelbase.

Narrower - to provide greater
maneuverability in tight spaces,
particularly in off-road use.

As a result of the above dimensional
differences, Sport utility vehicles and
trucks often have a higher center of gravity
and a greater difference in center of gravity
between the loaded and unloaded
condition. These differences that make
your vehicle so versatile also make it
handle differently than an ordinary
passenger car.

TIRE CARE

Information About Uniform
Tire Quality Grading

E142542

Tire Quality Grades apply to new
pneumatic passenger car tires.
The Quality grades can be found
where applicable on the tire
sidewall between tread shoulder
and maximum section width. For
example: 

Treadwear 200

Traction AA Temperature A

.

These Tire Quality Grades are
determined by standards that the
United States Department of
Transportation has set.

Tire Quality Grades apply to new
pneumatic passenger car tires.
They do not apply to deep tread,
winter-type snow tires,
space-saver or temporary use
spare tires, light truck or LT type
tires, tires with nominal rim
diameters of 10 to 12 inches or
limited production tires as defined
in Title 49 Code of Federal
Regulations Part 575.104 (c)(2).

247

Wheels and Tires

U.S. Department of
Transportation Tire quality
grades: 

 The U.S. Department of

Transportation requires Ford
Motor Company to give you the
following information about tire
grades exactly as the government
has written it.

Treadwear

The treadwear grade is a
comparative rating based on the
wear rate of the tire when tested
under controlled conditions on a
specified government test course.
For example, a tire graded 150
would wear 1½ times as well on
the government course as a tire
graded 100. The relative
performance of tires depends
upon the actual conditions of their

use, however, and may depart
significantly from the norm due to
variations in driving habits, service
practices, and differences in road
characteristics and climate.

Traction AA A B C

WARNING: 

The traction

grade assigned to this tire is
based on straight-ahead braking
traction tests, and does not
include acceleration, cornering,
hydroplaning or peak traction
characteristics.

The traction grades, from highest
to lowest are AA, A, B, and C. The
grades represent the tire’s ability
to stop on wet pavement as
measured under controlled
conditions on specified
government test surfaces of
asphalt and concrete. A tire
marked C could have poor traction
performance.

Temperature A B C

WARNING: 

The

temperature grade for this tire is
established for a tire that is
properly inflated and not
overloaded. Excessive speed,
underinflation, or excessive
loading, either separately or in
combination, can cause heat
buildup and possible tire failure.

The temperature grades are A
(the highest), B and C,
representing the tire’s resistance
to the generation of heat and its
ability to dissipate heat when
tested under controlled conditions
on a specified indoor laboratory
test wheel. Sustained high
temperature can cause the
material of the tire to degenerate
and reduce tire life, and excessive
temperature can lead to sudden
tire failure. The grade C
corresponds to a level of
performance which all passenger
car tires must meet under the

248

Wheels and Tires

Federal Motor Vehicle Safety
Standard No. 139. Grades B and A
represent higher levels of
performance on the laboratory
test wheel than the minimum
required by law.

Glossary of Tire Terminology

*

Tire label:

 A label showing the

original equipment tire sizes,
recommended inflation pressure
and the maximum weight the
vehicle can carry.

*

Tire Identification Number

(TIN):

 A number on the sidewall

of each tire providing information
about the tire brand and
manufacturing plant, tire size and
date of manufacture. Also referred
to as DOT code.
*

Inflation pressure:

 A measure

of the amount of air in a tire.

*

Standard load:

 A class of

P-metric or Metric tires designed
to carry a maximum load at set
pressure. For example: For
P-metric tires 35 psi (2.4 bar) and
for Metric tires 36 psi (2.5 bar).
Increasing the inflation pressure
beyond this pressure will not
increase the tire’s load carrying
capability.

*

Extra load:

 A class of P-metric

or Metric tires designed to carry a
heavier maximum load at 42 psi
(2.9 bar). Increasing the inflation
pressure beyond this pressure will
not increase the tire’s load
carrying capability.

*

kPa:

 Kilopascal, a metric unit of

air pressure.

*

PSI:

 Pounds per square inch, a

standard unit of air pressure.

*

Cold tire pressure:

 The tire

pressure when the vehicle has
been stationary and out of direct
sunlight for an hour or more and
prior to the vehicle being driven for
1 mi (1.6 km).

*

Recommended inflation

pressure:

 The cold inflation

pressure found on the Safety
Compliance Certification Label
(affixed to either the door hinge
pillar, door-latch post, or the door
edge that meets the door-latch
post, next to the driver's seating
position), or Tire Label located on

the B-Pillar or the edge of the
driver door.

B-pillar:

 The structural member

at the side of the vehicle behind
the front door.

*

Bead area of the tire:

 Area of

the tire next to the rim.

Sidewall of the tire:

 Area

between the bead area and the
tread.

*

Tread area of the tire:

 Area of

the perimeter of the tire that
contacts the road when mounted
on the vehicle.

*

Rim:

 The metal support (wheel)

for a tire or a tire and tube
assembly upon which the tire
beads are seated.

249

Wheels and Tires

Information Contained on the
Tire Sidewall

Both United States and Canada
Federal regulations require tire
manufacturers to place
standardized information on the
sidewall of all tires. This
information identifies and
describes the fundamental
characteristics of the tire and also
provides a U.S. DOT Tire
Identification Number for safety
standard certification and in case
of a recall.

Information on P Type Tires

H

I

J

K

L

M

A

B

C D

E

F

G

E142543

P215/65R15 95H is an example of
a tire size, load index and speed
rating. The definitions of these
items are listed below. (Note that
the tire size, load index and speed
rating for your vehicle could be
different from this example.)

A.

P:

 Indicates a tire, designated

by the Tire and Rim Association,
that could be used for service on
cars, sport utility vehicles,
minivans and light trucks.

Note:

 If

your tire size does not begin with
a letter this could mean it is
designated by either the European
Tire and Rim Technical
Organization or the Japan Tire
Manufacturing Association.

B.

215:

 Indicates the nominal

width of the tire in millimeters
from sidewall edge to sidewall
edge. In general, the larger the
number, the wider the tire.

C.

65:

 Indicates the aspect ratio

which gives the tire's ratio of
height to width.
D.

R:

 Indicates a radial type tire.

E.

15:

 Indicates the wheel or rim

diameter in inches. If you change
your wheel size, you will have to
purchase new tires to match the
new wheel diameter.

F.

95:

 Indicates the tire's load

index. It is an index that relates to
how much weight a tire can carry.
You could find this information in
your owner’s manual. If not,
contact a local tire dealer.

Note:

You may not find this

information on all tires because it
is not required by federal law.

250

Wheels and Tires

G.

H:

 Indicates the tire's speed

rating. The speed rating denotes
the speed at which a tire is
designed to be driven for extended
periods of time under a standard
condition of load and inflation
pressure. The tires on your vehicle
could operate at different
conditions for load and inflation
pressure. These speed ratings may
need to be adjusted for the
difference in conditions. The
ratings range from 81 mph
(130 km/h) to 186 mph
(299 km/h). These ratings are
listed in the following chart.

Note:

You may not find this

information on all tires because it
is not required by federal law.

Speed rating

Letter
rating

81 mph (130 km/h)

M

87 mph (140 km/h)

N

99 mph (159 km/h)

Q

106 mph (171 km/h)

R

112 mph (180 km/h)

S

118 mph (190 km/h)

T

124 mph (200 km/h)

U

130 mph (210 km/h)

H

149 mph (240 km/h)

V

Speed rating

Letter
rating

168 mph (270 km/h)

W

186 mph (299 km/h)

Y

Note:

For tires with a maximum

speed capability over 149 mph
(240 km/h), tire manufacturers
sometimes use the letters ZR. For
those with a maximum speed
capability over 186 mph
(299 km/h), tire manufacturers
always use the letters ZR.

H.

U.S. DOT Tire Identification

Number (TIN):

 This begins with

the letters DOT and indicates that
the tire meets all federal
standards. The next two numbers

or letters are the plant code
designating where it was
manufactured, the next two are
the tire size code and the last four
numbers represent the week and
year the tire was built. For
example, the numbers 317 mean
the 31st week of 1997. After 2000,
the numbers go to four digits. For
example, 2501 means the 25th
week of 2001. The numbers in
between are identification codes
used for traceability. This
information is used to contact
customers if a tire defect requires
a recall.

I.

M+S or M/S:

 Mud and Snow, or

AT:

 All Terrain, or

AS:

 All Season.

251

Wheels and Tires

J.

Tire Ply Composition and

Material Used:

 Indicates the

number of plies or the number of
layers of rubber-coated fabric in
the tire tread and sidewall. Tire
manufacturers also must indicate
the ply materials in the tire and the
sidewall, which include steel,
nylon, polyester, and others.

K.

Maximum Load:

 Indicates the

maximum load in kilograms and
pounds that can be carried by the
tire. See the Safety Compliance
Certification Label (affixed to
either the door hinge pillar,
door-latch post, or the door edge
that meets the door-latch post,
next to the driver's seating
position), for the correct tire
pressure for your vehicle.
L.

Treadwear, Traction and

Temperature Grades:

*

Treadwear

 The treadwear grade

is a comparative rating based on
the wear rate of the tire when
tested under controlled conditions
on a specified government test
course. For example, a tire graded
150 would wear one and one-half
times as well on the government
course as a tire graded 100.

*

Traction:

 The traction grades,

from highest to lowest are AA, A,
B, and C. The grades represent the
tire's ability to stop on wet
pavement as measured under
controlled conditions on specified
government test surfaces of
asphalt and concrete. A tire
marked C could have poor traction
performance.

*

Temperature:

 The temperature

grades are A (the highest), B and
C, representing the tire's
resistance to the generation of
heat and its ability to dissipate
heat when tested under controlled
conditions on a specified indoor
laboratory test wheel.

M.

Maximum Inflation

Pressure:

 Indicates the tire

manufacturers' maximum
permissible pressure or the
pressure at which the maximum
load can be carried by the tire. This
pressure is normally higher than
the vehicle manufacturer's
recommended cold inflation
pressure which can be found on
the Safety Compliance
Certification Label (affixed to
either the door hinge pillar,
door-latch post, or the door edge
that meets the door-latch post,
next to the driver's seating
position), or Tire Label which is
located on the B-Pillar or the edge
of the driver’s door. The cold
inflation pressure should never be
set lower than the recommended
pressure on the vehicle label.

252

Wheels and Tires

The tire suppliers could have
additional markings, notes or
warnings such as standard load
or radial tubeless.

Additional Information
Contained on the Tire Sidewall
for LT Type Tires

Note:

Tire Quality Grades do not

apply to this type of tire.

A

B

C

B

D

E142544

LT type tires have some additional
information beyond those of P
type tires; these differences are
described below.

A.

LT:

 Indicates a tire, designated

by the Tire and Rim Association,
that is intended for service on light
trucks.

B.

Load Range and Load

Inflation Limits:

 Indicates the

tire's load-carrying capabilities
and its inflation limits.

C.

Maximum Load Dual lb (kg)

at psi (kPa) cold:

 Indicates the

maximum load and tire pressure
when the tire is used as a dual,
defined as four tires on the rear
axle (a total of six or more tires on
the vehicle).

D.

Maximum Load Single lb

(kg) at psi (kPa) cold:

 Indicates

the maximum load and tire
pressure when the tire is used as
a single, defined as two tires
(total) on the rear axle.

Information on T Type Tires

T145/80D16 is an example of a
tire size.

Note:

The temporary tire size for

your vehicle could be different from
this example. Tire Quality Grades

do not apply to this type of tire.

253

Wheels and Tires

A

B

C

D

E

E142545

T type tires have some additional
information beyond those of P
type tires; these differences are
described below:

A.

T:

 Indicates a type of tire,

designated by the Tire and Rim
Association, that is intended for
temporary service on cars, sport
utility vehicles, minivans and light
trucks.

B.

145:

 Indicates the nominal

width of the tire in millimeters
from sidewall edge to sidewall
edge. In general, the larger the
number, the wider the tire.

C.

80:

 Indicates the aspect ratio

which gives the tire's ratio of
height to width. Numbers of 70 or
lower indicate a short sidewall.

D.

D:

 Indicates a diagonal type tire.

R:

 Indicates a radial type tire.

E.

16:

 Indicates the wheel or rim

diameter in inches. If you change
your wheel size, you will have to
purchase new tires to match the
new wheel diameter.

Recommended Tire Pressures
and Inflating Your Tires

Safe operation of your vehicle
requires that your tires are
properly inflated. Remember that
a tire can lose up to half of its air
pressure without appearing flat.

Every day before you drive, check
your tires. If one looks lower than
the others, use a tire gauge to
check the pressure of all tires and
adjust if required.

At least once a month and before
long trips, inspect each tire and
check the tire pressure with a tire
gauge (including spare, if
equipped). Inflate all tires to the
inflation pressure recommended
by Ford Motor Company.

WARNING: 

Under-inflation

is the most common cause of
tire failures and may result in
severe tire cracking, tread
separation or blowout, with
unexpected loss of vehicle

254

Wheels and Tires

control and increased risk of
injury. Under-inflation increases
sidewall flexing and rolling
resistance, resulting in heat
buildup and internal damage to
the tire. It also may result in
unnecessary tire stress, irregular
wear, loss of vehicle control and
accidents. A tire can lose up to
half of its air pressure and not
appear to be flat!

You are strongly urged to buy a
reliable tire pressure gauge, as
automatic service station gauges
could be inaccurate. Ford
recommends the use of a digital
or dial-type tire pressure gauge
rather than a stick-type tire
pressure gauge. Use the
recommended cold inflation

pressure for optimum tire
performance and wear.
Under-inflation or over-inflation
could cause uneven treadwear
patterns.

Always inflate your tires to the

Ford recommended inflation
pressure even if it is less than the
maximum inflation pressure
information found on the tire. You
will find a Tire Label containing
the Ford recommended tire
inflation pressure by the tire size
and other important information
located on the B-Pillar or the edge
of the driver’s door.

The Ford recommended tire
inflation pressure is also found on
the Safety Compliance
Certification Label (affixed to
either the door hinge pillar,
door-latch post, or the door edge
that meets the door-latch on the
B-pillar, or on the edge of the
driver’s door.

Failure to follow the tire pressure
recommendations can cause
uneven treadwear patterns and
adversely affect the way your
vehicle handles.

Checking Pressure when tires
are hot:

If pressures are checked after tires
have been driven for more than
three minutes or more than 1 mile,

(2 km) the tires become hot and
the pressures will increase by
approximately 4 psi (27.6 kPa).
Therefore when the tire pressure
is adjusted under these conditions,
it should be increased to a gauge
reading of 4 psi (27.6 kPa) greater
than the recommended cold
inflation pressure.

After inflating the tires while hot,
make sure to recheck tire pressure
later once the tires are cold.

255

Wheels and Tires

For Example Only

33 psi (230

kPa)

Gauge reading

of hot tire

32 psi (220

kPa)

If recom-

mended, cold

inflation pres-

sure is

The hot tire pressure is only 1 psi

(10 kPa) greater than the

recommended cold inflation

pressure. Therefore, add 3 psi

(20 kPa) more to increase the

hot pressure to 4 psi (30 kPa)

over the recommended cold

inflation pressure.

36 psi (250

kPa)

New hot pres-

sure

Inspecting Your Tires and
Wheel Valve Stems

Periodically inspect the tire treads
for uneven or excessive wear and
remove objects such as stones,
nails or glass that could be
wedged in the tread grooves.
Check the tire and valve stems for
holes, cracks, or cuts that could
permit air leakage and repair or
replace the tire and replace the
valve stem. Inspect the tire
sidewalls for cracking, cuts,
bruises and other signs of damage
or excessive wear. If internal
damage to the tire is suspected,
have the tire demounted and

inspected in case it needs to be
repaired or replaced. For your
safety, tires that are damaged or
show signs of excessive wear
should not be used because they
are more likely to blow out or fail.

Improper or inadequate vehicle
maintenance can cause tires to
wear abnormally. Inspect all your
tires, including the spare,
frequently, and replace them if
one or more of the following
conditions exist:

Tire Wear

E142546

When the tread is worn down to
2/32 inch (1.6 mm), tires must be
replaced to help prevent your
vehicle from skidding and
hydroplaning. Built-in treadwear
indicators, or wear bars, which
look like narrow strips of smooth
rubber across the tread will
appear on the tire when the tread
is worn down to 2/32 inch (1.6
mm).

256

Wheels and Tires

When the tire tread wears down
to the same height as these wear
bars, the tire is worn out and must
be replaced.

Damage

Periodically inspect the tire treads
and sidewalls for damage (such
as bulges in the tread or sidewalls,
cracks in the tread groove and
separation in the tread or
sidewall). If damage is observed
or suspected, have the tire
inspected by a tire professional.
Tires can be damaged during
off-road use, so inspection after
off-road use is also
recommended.

Age

WARNING: 

Tires degrade

over time depending on many
factors such as weather, storage
conditions, and conditions of use
(load, speed, inflation pressure)
the tires experience throughout
their lives.
In general, tires should be
replaced after six years
regardless of tread wear.
However, heat caused by hot
climates or frequent high loading
conditions can accelerate the
aging process and may require
tires to be replaced more
frequently.

You should replace your spare
tire when you replace the road
tires or after six years due to
aging even if it has not been
used.

U.S. DOT Tire Identification
Number

Both United States and Canada
Federal regulations require tire
manufacturers to place

standardized information on the
sidewall of all tires. This
information identifies and
describes the fundamental
characteristics of the tire and also
provides a U.S. DOT Tire
Identification Number for safety
standard certification and in case
of a recall.
This begins with the letters DOT
and indicates that the tire meets
all federal standards. The next
two numbers or letters are the
plant code designating where it
was manufactured, the next two
are the tire size code and the last
four numbers represent the week
and year the tire was built. For
example, the numbers 317 mean
the 31st week of 1997. After 2000,
the numbers go to four digits. For
example, 2501 means the 25th
week of 2001. The numbers in
between are identification codes
used for traceability. This
information is used to contact
customers if a tire defect requires
a recall.

257

Wheels and Tires

Tire Replacement
Requirements

Your vehicle is equipped with tires
designed to provide a safe ride
and handling capability.

WARNING: 

Only use

replacement tires and wheels
that are the same size, load
index, speed rating, and type as
those originally provided for your
vehicle. The recommended tire
and wheel sizes can be found on
the Tire Label on the driver side
door frame or the edge of the
driver door. If this information is
not found in those locations, or
for additional options, contact
your authorized dealer. Use of
any tire or wheel not
recommended, could affect the
safety and performance of your
vehicle, which could result in an
increased risk of loss of vehicle
control, vehicle rollover, personal
injury and death.

WARNING: 

To reduce the

risk of serious injury, when
mounting replacement tires and
wheels, you should not exceed
the maximum pressure indicated
on the sidewall of the tire to set
the beads without additional
precautions listed below. If the
beads do not seat at the
maximum pressure indicated,
re-lubricate and try again.

WARNING: 

For a mounting

pressure more than 20 psi
(1.38 bar) greater than the
maximum pressure, a Ford
dealer or other tire service
professional should do the
mounting.

WARNING: 

Always inflate

steel carcass tires with a remote
air fill with the person inflating
standing at a minimum of 12 ft
(3.66 m) away from the wheel
and tire assembly.

WARNING: 

When inflating

the tire for mounting pressures
up to 20 psi (1.38 bar) greater
than the maximum pressure on
the tire sidewall, the following
precautions must be taken to
protect the person mounting the
tire:

Make sure that you have the
correct tire and wheel size.

Lubricate the tire bead and
wheel bead seat area again.

Stand at a minimum of 12 ft
(3.66 m) away from the wheel
and tire assembly.

Use both eye and ear
protection.

Important:

 Remember to replace

the wheel valve stems when the
road tires are replaced on your
vehicle.

258

Wheels and Tires

It is recommended that the two
front tires or two rear tires
generally be replaced as a pair, if
the worn tires still have usable
tread depth. To avoid potential All
Wheel Drive (AWD) malfunction
or All Wheel Drive (AWD) system
damage, it is recommended to
replace all four tires rather than
mixing significantly worn tires with
new tires.

The tire pressure sensors mounted
in the wheels (originally installed
on your vehicle) are not designed
to be used in aftermarket wheels.

The use of wheels or tires not
recommended by Ford Motor
Company could affect the
operation of your tire pressure
monitoring system.
If the tire pressure monitoring
system indicator is flashing, your
system is malfunctioning. Your
replacement tire might be
incompatible with your tire
pressure monitoring system, or
some component of the system
could be damaged.

Safety Practices

WARNING: 

If your vehicle

is stuck in snow, mud or sand, do
not rapidly spin the tires;
spinning the tires can tear the
tire and cause an explosion. A
tire can explode in as little as
three to five seconds.

WARNING: 

Do not spin the

wheels at over 34 mph
(55 km/h). The tires may fail and
injure a passenger or bystander.

HIGH SPEED DRIVING CAN BE
DANGEROUS

Correct inflation pressure is
especially important. However, at
high speeds, even with the correct
inflation pressure, a road hazard
for example is more difficult to
avoid and if contact is made, has
a greater chance of causing tire
damage than at a lower speed.
Moreover, driving at high speed
reduces the reaction time
available to avoid accidents and
bring your vehicle to a safe stop.

If you see any damage to a tire or
wheel, replace it with the spare at
once and visit a participating Tire
Retailer.

Exceeding the maximum speeds
shown on the following page for
each type of tire will cause the tire
to build up excessive heat which
can cause tire damage that could
result in sudden tire destruction
and rapid air loss. Failure to
control a vehicle when one or
more tires experience a sudden air
loss can lead to an accident.

In any case, you should not
exceed reasonable speeds as
indicated by the legal limits
and driving conditions.

259

Wheels and Tires

DO NOT OVERLOAD: DRIVING
ON ANY OVERLOADED TIRE IS
DANGEROUS

The maximum load rating of your
tires is molded on the tire sidewall.
Do not exceed this rating. Follow
the loading instructions of the
manufacturer of your vehicle and
this will ensure that your tires are
not overloaded. Tires which are
loaded beyond their maximum
allowable loads for the particular
application will build up excessive
heat that may result in sudden tire
destruction. Do not exceed the
gross axle weight rating for any
axle on your vehicle.

TIRE ALTERATIONS

Do not make or allow to be made

any alterations on your tires.
Alterations may prevent proper
performance, leading to tire
damage which can result in an
accident. Tires which become
unserviceable due to alterations
such as truing, whitewall inlays,
addition of balancing or sealant
liquids, or the use of tire dressing
containing petroleum distillates
are excluded from warranty
coverage.

REPAIRS - WHEREVER
POSSIBLE, SEE YOUR TIRE
RETAILER AT ONCE

If any tire sustains a puncture,
have the tire demounted and
thoroughly inspected by a tire
retailer for possible damage that
may have occurred. A tread area
puncture in any passenger or light
truck tire can be repaired provided
that the puncture hole is not more
than 1/4” in diameter, not more
than one radial cable per casing
ply is damaged, and the tire has
not been damaged further by the
puncturing object or by running
underinflated. Tire punctures
consistent with these guidelines
should only be repaired by
following the US Tire

Manufacturers Association
(USTMA) recommended repair
procedures. Plug-only repairs
done on-the-wheel are considered
improper and therefore, not
recommended. Such repairs are
not reliable and may cause further
damage to the tire.

STORAGE

Tires contain waxes and
emollients to protect their outer
surfaces from ozone and weather
checking. As the tire rolls and
flexes, the waxes and emollients
continually migrate to the surface,
replenishing this protection
throughout the normal use of the
tire. Consequently, when tires sit
unused for long periods of time (a
month or more) their surfaces

260

Wheels and Tires

become dry and more susceptible
to ozone and weather checking
and the casing becomes
susceptible to flat spotting.

For

this reason, tires should always
be stored in a cool, dry, clean,
indoor environment. If storage
is for one month or more,
eliminate the weight from the
tires by raising the vehicle or by
removing the tires from the
vehicle. Failure to store tires in
accordance with these
instructions could result in
damage to your tires or
premature aging of the tires
and sudden tire failure.

When tires are stored, be sure they
are placed away from sources of
heat and ozone such as direct

sunlight, hot pipes and electric
generators. Be sure that surfaces
on which tires are stored are clean
and free from grease, gasoline or
other substances, which could
deteriorate the rubber. Failure to
store tires in accordance with
these instructions could result in
damage to your tires or premature
aging of the tires and sudden tire
failure.

FOLLOW THESE MOUNTING
RECOMMENDATIONS

Tire changing can be dangerous
and must be done by
professionally trained persons
using proper tools and
procedures as specified by the
US Tire Manufacturers
Association (USTMA). Single
or dual assemblies must be
completely deflated before
demounting.

Your tires should be mounted on
wheels of correct size and type
and which are in good, clean
condition. Wheels that are bent,
chipped, rusted (steel wheels) or
corroded (alloy wheels) may
cause tire damage. The inside of
the tire must be free from foreign

material. Have your retailer check
the wheels before mounting new
tires. Mismatched tires and rims
can explode during mounting.
Also, mismatched tires and rims
can result in dangerous tire failure
on the road. If a tire is mounted by
error on the wrong-sized rim, do
not remount it on the proper rim -
scrap it. It may have been
damaged internally (which is not
externally visible) by having been
dangerously stretched and could
fail on the highway.

261

Wheels and Tires

Old valves may leak. When new
tubeless tires are mounted,
have new valves of the correct
type installed. Tubeless tires
must only be mounted on
wheels designed for tubeless
tires i.e., wheels which have
safety humps or ledges.

It is recommended that you have
your tires and wheels balanced.
Tires and wheels, which are not
balanced, may cause steering
difficulties, a bumpy ride, and
irregular tire wear.

Be sure that all your valves
have suitable valve caps. The
valve cap is the primary seal
against air loss.

TEMPORARY SPARE TIRES

When using any temporary spare
tire, be sure to follow the vehicle
manufacturer’s instructions.

REMEMBER... TO AVOID
DAMAGE TO YOUR TIRES AND
POSSIBLE ACCIDENT:

CHECK TIRE PRESSURE AT
LEAST ONCE EACH MONTH
WHEN TIRES ARE COLD AND
BEFORE LONG TRIPS.

DO NOT
UNDERINFLATE/OVERINFLATE.

DO NOT OVERLOAD.

DRIVE AT MODERATE

SPEEDS, OBSERVE LEGAL
LIMITS.

AVOID DRIVING OVER
POTHOLES, OBSTACLES,
CURBS OR EDGES OF
PAVEMENT.

AVOID EXCESSIVE WHEEL
SPINNING.

IF YOU SEE ANY DAMAGE TO
A TIRE, REPLACE WITH THE
SPARE AND VISIT ANY
AUTHORIZED RETAILER AT
ONCE.

IF YOU HAVE ANY
QUESTIONS, CONTACT YOUR
AUTHORIZED RETAILER.

Driving habits have a great deal
to do with your tire mileage and
safety.

*Observe posted speed limits
*Avoid fast starts, stops and turns

*Avoid potholes and objects on
the road

*Do not run over curbs or hit the
tire against a curb when parking

Highway Hazards

No matter how carefully you drive,
there is always the possibility that
you could eventually have a flat
tire on the highway. Drive slowly
to the closest safe area out of
traffic. This could further damage
the flat tire, but your safety is
more important.

262

Wheels and Tires

If you feel a sudden vibration or
ride disturbance while driving, or
you suspect your tire or vehicle
has been damaged, immediately
reduce your speed. Drive with
caution until you can safely pull
off the road. Stop and inspect the
tires for damage. If a tire is
under-inflated or damaged,
deflate it, remove wheel and
replace it with your spare tire and
wheel. If you cannot detect a
cause, have the vehicle towed to
the nearest repair facility or tire
dealer to have the vehicle
inspected.

Tire and Wheel Alignment

A bad jolt from hitting a curb or
pothole can cause the front end
of your vehicle to become

misaligned or cause damage to
your tires. If your vehicle seems to
pull to one side when you are
driving, the wheels could be out of
alignment. Have an authorized
dealer check the wheel alignment
periodically.

Wheel misalignment in the front
or the rear can cause uneven and
rapid treadwear of your tires and
should be corrected by an
authorized dealer. Front-wheel
drive vehicles and those with an
independent rear suspension (if
equipped) could require alignment
of all four wheels.

The tires should also be balanced
periodically. An unbalanced tire
and wheel assembly could result
in irregular tire wear.

Tire Rotation

Note:

If your tires show uneven

wear, ask an authorized dealer to
check for and correct any wheel
misalignment, tire imbalance or
mechanical problem involved
before tire rotation.

Note:

Your vehicle could be

equipped with a dissimilar spare
wheel and tire assembly. A
dissimilar spare wheel and tire
assembly is defined as a spare
wheel and tire assembly that is
different in brand, size or
appearance from the road tires and
wheels. If you have a dissimilar
spare wheel and tire assembly, it is
intended for temporary use only
and should not be used in a tire
rotation.

Note:

After having your tires

rotated, inflation pressure must be
checked and adjusted to the
vehicle requirements.

Rotating your tires at the
recommended interval (as
indicated in the Scheduled
Maintenance information) will
help your tires wear more evenly,
providing better tire performance
and longer tire life. Sometimes
irregular tire wear can be
corrected by rotating the tires.

263

Wheels and Tires

E142547

Police Wheels and Tires

Wheel rims

To withstand the demands placed
on vehicles driven under heavy
duty service conditions, Ford
Motor Company installs heavy
duty wheels.

Tires

Tires (including the spare) are
speed-rated radials for police use.
Use only the recommended tire
size and speed ratings.

In regions with snow and ice
during the winter months,
installation of snow tires could be
desirable. Snow tires will usually
exhibit a drop in dry pavement
handling, but could show an
increase in snow and ice traction.
When snow tires are used, they
should be installed on all four
wheels, never on the drive wheels
only.

Tire storage

Most high performance tires are
made with a nylon overlay. As
such, the following steps should
be taken to avoid flatspotting
when the vehicles are not used for
a period of time.

Fleets should store the vehicles
with 44 psi (303 kPa) in the
tires.

If the vehicle is stored for
periods longer than 30 days,
you should move it several feet
at least once during each
30-day period, so that a
different portion of the tread
contacts the ground.

Tire pressure should be
reduced to the recommended
pressure shown on the vehicle
certification label before the
vehicle is placed back into
service.

USING SNOW CHAINS

WARNING: 

Do not exceed 30 mph

(50 km/h). Failure to follow this
instruction could result in the loss of
control of your vehicle, personal injury or
death.

WARNING: 

Do not use snow chains

on snow-free roads.

WARNING: 

Only fit snow chains to

specified tires.

264

Wheels and Tires

WARNING: 

If your vehicle is fitted

with wheel trims, remove them before
fitting snow chains.

Only use snow chains on rear wheels.
Install snow chains in pairs. Do not use
self-tensioning snow chains.

Only use snow chains on the following
specified tire sizes:

255/60R18

Only install chains that are 10 mm
or less.

255/65R18

Only install chains that are 10 mm
or less.

265/60R18

Only install chains that are 10 mm
or less.

255/55R20

Only install chains that are 10 mm
or less.

We recommend you use steel wheels of
the same size and specification if snow
chains are required because chains may
chip aluminum wheels.

Follow these guidelines when using snow
tires and traction devices:

If possible, avoid fully loading your
vehicle.

Purchase snow chains from a
manufacturer that clearly labels body
to tire dimension restrictions.

When driving with snow chains do not
exceed 30 mph (50 km/h) or the
maximum speed recommended by the
chain manufacturer, whichever is less.

Drive cautiously. If you hear the snow
chains rub or bang against the vehicle,
stop and tighten them. If this does not
work, remove the snow chains to
prevent vehicle damage.

Remove the snow chains when they
are no longer needed. Do not use snow
chains on dry roads.

If a temporary spare wheel is mounted
on your vehicle, do not use snow chains
on the axle with the temporary spare
wheel.

Use snow chains that fit against the
sidewall of the tire to prevent the
chains from touching the wheel rims
or suspension, see following
illustration.

265

Wheels and Tires


Content      ..     6      7      8      9     ..