Ford Expedition (2024 year). Manual in english - page 11
 

  Index      Manuals     Ford Expedition (2024 year). Manual in english


Search            copyright infringement  


Content      ..     9      10      11      12     ..


Ford Expedition (2024 year). Manual in english - page 11


E250825

To access the second storage
compartment, fold the cover back a
second time.

To close, lower the cover.

ADJUSTING THE LUGGAGE
COMPARTMENT DIVIDER

Advanced Luggage Compartment
Divider

 (If Equipped)

WARNING: 

Do not load any objects

on the shelf that may obstruct your vision
or strike occupants of the vehicle in the
case of a sudden stop or collision.

WARNING: 

Do not place people or

pets on or under the parcel shelf.

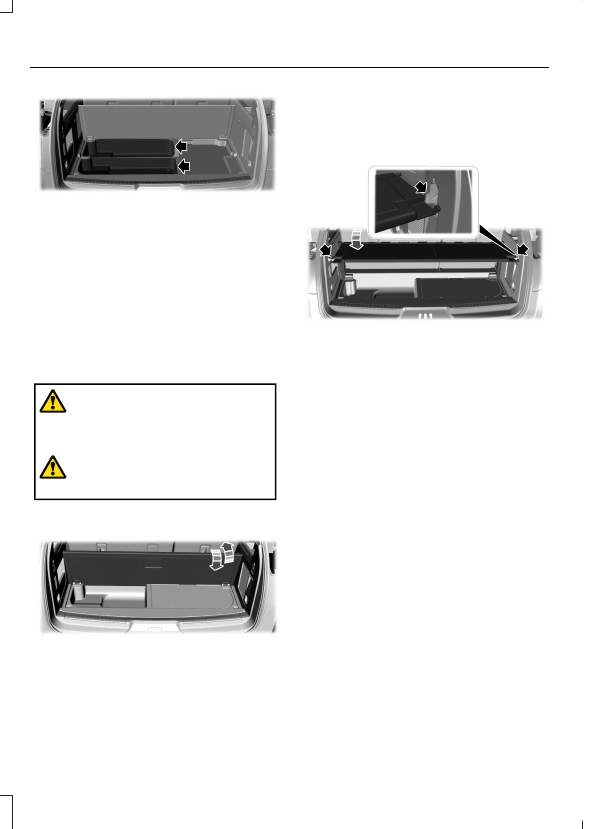
Forward Divider

E250828

To move the board into the divider position,
lift up on the handle and position the board
vertically at a 90° angle.

Note:

The board operates with friction

hinges. This allows you to put it in any
position between a 0° and a 90° angle.

Cargo Shelf

E250829

To move the board into the shelf position,
lift the board and move it to the horizontal
position. Once the board is horizontal,
insert the forward-facing nubs into the
hooks on either side.

For the short wheelbase, it is necessary to
raise up the second panel toward the front
of the vehicle when you have the seats
folded down.

For the long wheelbase, it is necessary to
raise up the second panel toward the front
of the vehicle.

Note:

Before moving the board into the

shelf position, you may need to flip down
the hooks.

Note:

Do not put more than 50 lb (22 kg)

on the shelf.

346

Luggage Compartment

Rear Barrier (Bulkhead Position)

E250830

To move the board into the rear barrier or
bulkhead position, lift the board and move
it to the vertical position. Once the board
is vertical, insert the rearward facing nubs
into the hooks on either side.

Note:

Before moving the board into the rear

barrier or bulkhead position, you may need
to flip down the hooks.

347

Luggage Compartment

CONNECTING A TRAILER
PRECAUTIONS

Do not tow a trailer until you drive your
vehicle at least 1,000 mi (1,600 km).

Consult your local motor vehicle laws for
towing a trailer.

See the instructions included with towing
accessories for the proper installation and
adjustment specifications.

Service your vehicle more frequently if you
tow a trailer.  See 

General Maintenance

Information

 (page 537).

If you use a rental trailer, follow the
instructions the rental agency gives you.

When attaching the trailer wiring connector
to your vehicle, only use a proper fitting
connector that works with the vehicle and
trailer functions.

Account for the trailer coupler weight as
part of your vehicle load when calculating
the total vehicle weight.

Do not exceed the load limits.  See

Calculating the Load Limit

 (page 341).

HITCHES

INSTALLING A HITCH

WARNING: 

Do not cut, drill, weld

or modify the trailer hitch. Modifying the
trailer hitch could reduce the hitch rating.

Do not use a hitch that either clamps onto
the bumper or attaches to the axle. You
must distribute the load in your trailer so
that 10-15% of the total weight of the
trailer is on the tongue. Do not exceed the
tongue load rating indicated on the hitch
receiver.

Trailer Hitch Cover

Your vehicle has a removable trailer hitch
cover. To remove the trailer hitch cover:

E268259

1.

Grab the trailer hitch cover at the
bottom and pull towards the rear of
the vehicle until the bottom of the
trailer hitch cover unsnaps from the
bumper.

2. Grab the trailer hitch cover at the edge

and rotate until the top of the trailer
hitch cover unsnaps from the bumper,
then remove the trailer hitch cover.

To install the trailer hitch cover:

E268260

1.

Line up the snaps on the trailer hitch
cover to the holes on the bumper and
push forward until it snaps into place.

348

Connecting a Trailer

HOOKING UP A TRAILER USING A
WEIGHT-DISTRIBUTING HITCH

WARNING: 

Do not adjust the spring

bars so that your vehicle's rear bumper
is higher than before attaching the trailer.
Doing so will defeat the function of the
weight-distributing hitch, which may
cause unpredictable handling, and could
result in serious personal injury.

A weight-distributing hitch helps distribute
tongue load to all towing vehicle and trailer
wheels. For more information, visit the links
in the following table.

Website

Market

https://

www.fleet.ford.com/

towing-guides/

United States of

America

https://

www.fleet.ford.ca/

towing-guides/

Canada

CONNECTING A TRAILER

Recognizing a Trailer

1.

Attach the trailer and wiring connector
to your vehicle.

2. Switch on your vehicle.

3. Set up a profile for the trailer using the

touchscreen.

Note:

If your vehicle does not recognize the

trailer, press and hold the brake pedal for a
few seconds.

Note:

Trailer profiles store trailer types,

dimensions, preferences, trailer specific
mileage and fuel economy.

Note:

Disabling the trailer detection

notification makes the default trailer profile
active when a connection is detected.

E163167

When attaching the trailer wiring connector
to your vehicle, only use a proper fitting
connector that works with the vehicle and
trailer functions.

Trailer Light Check

WARNING: 

Never connect any

trailer lamp wiring to the vehicle's tail
lamp wiring; this may damage the
electrical system resulting in fire. Contact
your authorized dealer as soon as
possible for assistance in proper trailer
tow wiring installation. Additional
electrical equipment may be required.

Most towed vehicles require trailer lamps.
Make sure all running lights, brake lights,
turn signals and hazard lights are working.

Safety Chains

Install trailer safety chains to the trailer
hitch as recommended by the
manufacturer. Cross the chains under the
trailer coupler and allow enough slack for
turning tight corners. Do not allow the
chains to drag on the ground.

Note:

Do not attach safety chains to the

bumper. Always connect the safety chains
to the frame or hook retainers of your trailer
hitch.

349

Connecting a Trailer

E265060

If the trailer safety chain hook has a latch,
make sure to fully close the latch.

350

Connecting a Trailer

CONNECTING A TRAILER – TROUBLESHOOTING

CONNECTING A TRAILER – INFORMATION MESSAGES

Description

Message

The system senses a trailer connection

becomes disconnected, either intentionally

or unintentionally, during a given ignition

cycle.

Trailer Disconnected

There are certain faults in your vehicle

wiring and trailer wiring or brake system.

Trailer Wiring Fault

There is a fault with your trailer battery, or

your trailer battery voltage is very low.

Trailer Battery Not Charging See Manual

One or more tires on your trailer is below

the specified tire pressure.

Trailer Tire Low Specified:

Displays when one or more tires on the

trailer is above the recommended temper-

ature.

Trailer Tire Over Temperature

A trailer tire pressure sensor is malfunc-

tioning. If the warning stays on or continues

to come on, have the system checked as

soon as possible.

Trailer Tire Pressure Sensor Fault

The trailer tire pressure monitoring system

is malfunctioning. If the warning stays on

or continues to come on, have the system

checked.

Trailer Tire Pressure Monitor Fault

The system cannot detect the trailer tire

pressure monitoring system.

Trailer Tire Pressure Monitor Capability Not

Detected

The trailer tire pressure monitoring system

is not setup.

Trailer Tire Pressure Indication Not Setup

See Manual

351

Connecting a Trailer

TOWING A TRAILER
PRECAUTIONS

WARNING: 

Do not exceed

the GVWR or the GAWR
specified on the certification
label.

WARNING: 

Towing trailers

beyond the maximum
recommended gross trailer
weight exceeds the limit of your
vehicle and could result in engine
damage, transmission damage,
structural damage, loss of
vehicle control, vehicle rollover
and personal injury.

WARNING: 

Do not exceed

the lowest rating capacity for
your vehicle or trailer hitch.
Overloading your vehicle or
trailer hitch can impair your
vehicle stability and handling.
Failure to follow this instruction
could result in the loss of control
of your vehicle, personal injury or
death.

WARNING: 

Make sure that

the vertical load on the tow ball
is between the minimum and
maximum recommended weight
at all times. Failure to follow this
instruction could result in the
loss of control of your vehicle,
personal injury or death.

WARNING: 

Do not cut,

drill, weld or modify the trailer
hitch. Modifying the trailer hitch
could reduce the hitch rating.

WARNING: 

The anti-lock

brake system does not control
the trailer brakes.

Towing a trailer also depends on
additional systems present in your

vehicle. See 

Lane Centering

Precautions

 (page 282).

TRAILER BRAKE
PRECAUTIONS

WARNING: 

Do not connect a

trailer's hydraulic brake system directly
to your vehicle's brake system. Your
vehicle may not have enough braking
power and your chances of having a
collision greatly increase.

WARNING: 

Do not tow a trailer

fitted with electric trailer brakes unless
your vehicle is fitted with a compatible
aftermarket electronic trailer brake
controller. Failure to follow this
instruction could result in the loss of
control of your vehicle, personal injury or
death. For additional information and
assistance, we recommend that you
contact an authorized dealer.

Electric brakes and manual, automatic or
surge-type trailer brakes are safe if you
install them properly and adjust them to
the manufacturer's specifications. The
trailer brakes must meet local and federal
regulations.

352

Towing a Trailer

The rating for the tow vehicle's braking
system operation is at the gross vehicle
weight rating, not the gross combined
weight rating.

Certain states require functioning trailer
brakes for trailers over a specified weight.
Be sure to check state regulations for this
specified weight.

Ford Motor Company recommends
separate functioning brake systems for
trailers weighing more than 1,500 lb
(680 kg) when loaded.

TOWING A TRAILER
LIMITATIONS

The vehicle's load capacity
designation is by weight, not by
volume, so you cannot necessarily
use all available space when
loading a vehicle or trailer.
Towing a trailer also depends on
additional systems present in your
vehicle. See 

Lane Centering

Limitations

 (page 283).

Note:

Your vehicle could have

reduced performance when
operating at high altitudes and
when heavily loaded or towing a
trailer. When driving at elevation,
to match driving performance as
perceived at sea level, reduce gross
vehicle weight and gross
combination weight by 2% per
1,000 ft (300 m) elevation.

LOADING YOUR TRAILER

To help minimize how trailer
movement affects your vehicle
when driving:

Load the heaviest items closest
to the trailer floor.

Load the heaviest items
centered between the left and
right side trailer tires.

Load the heaviest items above
the trailer axles or just slightly
forward toward the trailer
tongue. Do not allow the final
trailer tongue weight to go
above or below 10-15% of the
loaded trailer weight. The
trailer tongue weight should
never exceed 10% of the
maximum towing capacity.

Select a ball mount with the
correct rise or drop. When both
the loaded vehicle and trailer
are connected, the trailer frame
should be level, or slightly
angled down toward your
vehicle, when viewed from the
side.

TRAILER TOWING HINTS

Towing a trailer places an extra load on
your vehicle's engine, transmission, axle,
brakes, tires and suspension. Periodically
inspect these components during and after
any towing operation.

When driving with a trailer or payload, a
slight takeoff vibration or shudder may be
present due to the increased payload
weight.

353

Towing a Trailer

Your vehicle may have a temporary or
conventional spare tire. A temporary spare
tire is different in diameter or width,
tread-type, or is from a different
manufacturer than the road tires on your
vehicle. Consult information on the tire
label or Safety Compliance label for
limitations when using.

When towing a trailer:

Obey country specific regulations for
towing a trailer.

Do not drive faster than 70 mph
(113 km/h) during the first 500 mi
(800 km).

Do not make full-throttle starts.

Check your hitch, electrical connections
and trailer wheel lug nuts thoroughly
after you have traveled 50 mi (80 km).

When stopped in congested or heavy
traffic during hot weather, place the
transmission in park (P) to aid engine
and transmission cooling and to help
A/C performance.

Turn off the speed control with heavy
loads or in hilly terrain. The speed
control may turn off when you are
towing on long, steep slopes.

Shift to a lower gear when driving down
a long or steep hill. Do not continuously
apply the brakes, as they may overheat
and become less effective.

If your transmission has Grade Assist
or Tow/Haul, use this feature when
towing. This provides engine braking
and helps eliminate excessive
transmission shifting for optimum fuel
economy and transmission cooling.

Your vehicle has AdvanceTrac with roll
stability control. When towing a trailer,
additional loads could cause the
AdvanceTrac system to engage during
cornering maneuvers. Reduce cornering
speeds to make sure that you can
maintain control of the vehicle and
trailer if the AdvanceTrac system
engages.

Allow more distance for stopping with
a trailer attached. Anticipate stops and
gradually brake.

Avoid parking on a slope. However, if
you must park on a slope, turn the
steering wheel to point your vehicle
tires away from traffic flow, set the
parking brake, place the transmission
in park (P) and place wheel chocks in
front and back of the trailer wheels.

Note:

Chocks are not included with your

vehicle.

LAUNCHING OR RETRIEVING
A BOAT OR PERSONAL
WATERCRAFT

When backing down a ramp during boat
launching or retrieval:

Do not allow the static water level to
rise above the bottom edge of the rear
bumper.

Do not allow waves to break higher
than 6 in (15 cm) above the bottom
edge of the rear bumper.

Exceeding 6 in (15 cm) could allow water
to enter vehicle components, causing
internal damage to the components and
affecting driveability, emissions and
reliability.

Note:

Replace the rear axle lubricant

anytime the rear axle has been submerged
in water.

354

Towing a Trailer

Note:

Disconnect the trailer wiring

connector before backing the trailer into the
water.

Note:

Reconnect the trailer wiring

connector after removing the trailer from
the water.

TOWING WEIGHTS AND DIMENSIONS

RECOMMENDED TOWING WEIGHTS

Website

Market

https://www.fleet.ford.com/

towing-guides/

United States of America

https://www.fleet.ford.ca/towing-

guides/

Canada

355

Towing a Trailer

WHAT IS THE MAXIMUM LOADED
TRAILER WEIGHT

The maximum loaded trailer
weight is the highest possible
weight of a fully loaded trailer the
vehicle can tow.

CALCULATING THE MAXIMUM
LOADED TRAILER WEIGHT FOR
YOUR VEHICLE

1. Start with the gross combined

weight rating for your vehicle
model and axle ratio.

2. Subtract all of the following

that apply to your vehicle:

Vehicle curb weight.

Hitch hardware weight, for
example a draw bar, ball, locks
or weight distributing hardware.

Driver weight.

Passenger weight.

Payload, cargo and luggage
weight.

Aftermarket equipment weight.

This equals the maximum loaded
trailer weight for this combination.

Note:

The trailer tongue load is

considered part of the payload for
your vehicle. Reduce the total
payload by the final trailer tongue
weight.

Note:

Consult an authorized dealer

to determine the maximum trailer
weight allowed for your vehicle if
you are not sure.

356

Towing a Trailer

TOWING A TRAILER – TROUBLESHOOTING

TOWING A TRAILER – INFORMATION MESSAGES

Details

Message

The left-hand trailer turn lamp requires

service.

Trailer Left Turn Lamps Fault Check Lamps

The right-hand trailer turn lamp requires

service.

Trailer Right Turn Lamps Fault Check

Lamps

The trailer battery voltage is too low to

charge. If there is no trailer attached, the

vehicle battery voltage is low.

Trailer Battery Not Charging See Manual

The system detects a short created by the

trailer lamps. Inspect and repair the trailer

wiring, or have the system checked as soon

as possible.

Trailer Lighting Module Fault See Manual

The trailer stoplamps require service.

Trailer Stop Lamps Fault Check Lamps

Verify the trailer brake connections are

secure and that the aftermarket trailer

brake controller device is correctly installed.

Perform a trailer brake and trailer light

check if possible. If the message persists,

have your vehicle checked as soon as

possible.

Trailer brake system fault See manual

Perform a trailer brake and trailer light

check if possible. If the message persists,

have your vehicle checked as soon as

possible.

Trailer brake module fault

The trailer sway control detects trailer

sway. Reduce the vehicle's speed.

Trailer Sway Reduce Speed

Displays when one or more tires on the

trailer is above the recommended temper-

ature.

Trailer Tire Over Temperature

One or more tires on your trailer is below

the specified tire pressure.

Trailer Tire Low Specified:

357

Towing a Trailer

Details

Message

A trailer tire pressure sensor requires

service. If the warning stays on or continues

to come on, have the system checked as

soon as possible.

Trailer Tire Pressure Sensor Fault

The trailer tire pressure monitoring system

requires service. If the warning stays on or

continues to come on, have the system

checked as soon as possible.

Trailer Tire Pressure Monitor Fault

The system cannot detect the trailer tire

pressure monitoring system.

Trailer Tire Pressure Monitor Capability Not

Detected

The trailer tire pressure monitoring system

is not setup.

Trailer Tire Pressure Indication Not Setup

See Manual

358

Towing a Trailer

WHAT IS THE INTEGRATED
TRAILER BRAKE CONTROLLER

The trailer brake controller assists in
smooth and effective trailer braking based
on the towing vehicle’s brake pressure.

INTEGRATED TRAILER BRAKE
CONTROLLER PRECAUTIONS

WARNING: 

Use the integrated

trailer brake controller to properly adjust
the trailer brakes and check all
connections before towing a trailer.
Failure to follow this instruction could
result in the loss of control of your
vehicle, personal injury or death.

Only use the manual control lever for
proper adjustment of the gain during
trailer setup. Misuse, such as
application during trailer sway, could
cause instability of trailer or tow
vehicle.

Avoid towing in adverse weather
conditions. The trailer brake controller
does not provide anti-lock control of
the trailer wheels. Trailer wheels can
lock up on slippery surfaces, resulting
in reduced stability of trailer and tow
vehicle.

The trailer brake controller is only a
factory-installed or dealer-installed
item. Ford is not responsible for
warranty or performance of the
controller due to misuse or customer
installation.

Note:

Do not attempt removal of the trailer

brake controller without consulting the
Workshop Manual. Damage to the unit may
result.

Note:

Make sure to set the integrated trailer

brake controller gain to 0 if you are using an
aftermarket trailer brake controller.

USING THE INTEGRATED
TRAILER BRAKE CONTROLLER

1.

Make sure the trailer brakes are in good
working condition, functioning normally
and properly adjusted. See your trailer
dealer if necessary.

Note:

An authorized dealer can diagnose

the trailer brake controller to determine
exactly which trailer fault has occurred. Your
vehicle warranty does not cover issues with
your trailer.

2. Hook up the trailer and make the

electrical connections according to the
trailer manufacturer's instructions.

Note:

Select default mode if the trailer has

surge brakes, or no brakes at all. The system
has no effect on the braking performance
of the trailer in either of these cases.

Note:

If a trailer is connected by a four-pin

connector, the trailer braking function will
not be supported.

3. When you plug in a trailer with electric

or electric-over-hydraulic brakes, a
message confirming connection
appears in the information display.

4. Use the gain adjustment to find the

desired starting point. A gain setting of
6.0 is a good starting point for heavier
loads.

Note:

Use the following steps to adjust the

gain setting whenever road, weather and
trailer, or vehicle loading conditions, change
from when you initially set the gain.

5. In a traffic-free environment, tow the

trailer on a dry, level surface and
squeeze the manual control lever
completely.

359

Integrated Trailer Brake Controller

 (If Equipped)

6. If the trailer wheels lock up, indicated

by squealing tires, reduce the gain
setting. If the trailer wheels turn freely,
increase the gain setting. Repeat Steps
5 and 6 until the gain setting is at a
point just below trailer wheel lock-up.
If towing a heavier trailer, trailer wheel
lock-up may not be attainable even
with the maximum gain setting of 10.

Note:

Only perform this procedure at

speeds of approximately 20–25 mph
(30–40 km/h).

Note:

The trailer brake controller reduces

output at vehicle speeds below 11 mph
(18 km/h) so that trailer and vehicle braking
is not jerky or harsh. This feature is only
available when applying the brakes using
your vehicle's brake pedal, not the
controller.

Note:

Your vehicle's brake system and the

trailer brake system work independently of
each other. Changing the gain setting on the
controller does not affect the operation of
your vehicle's brakes whether you attach a
trailer or not.

Note:

With the proper electrical connection,

pressing your vehicle brake pedal or using
the manual control lever illuminates both
trailer and vehicle brake lamps.

Note:

When you switch the engine off, the

controller output is disabled and the display
and module shut down. The controller
module and display turn on when you switch
the ignition on.

Adjusting the Trailer Brake Gain

E333154

Increase or decrease the amount
of gain in set increments.

A

Slide the control to engage the
trailer brakes.

B

Note:

Adjust gain setting before using the

trailer brake controller for the first time.

Note:

The gain should be set to provide the

maximum trailer braking assistance while
making sure the trailer wheels do not lock
when using the brakes. Locked trailer wheels
may lead to trailer instability.

Note:

Setting adjustments are saved when

a trailer profile is selected.

ADJUSTING THE INTEGRATED
TRAILER BRAKE CONTROLLER
MODE

Select the correct integrated trailer brake
controller mode option using the
touchscreen.

Note:

Trailer brake gain settings are saved

to the active trailer profile.

360

Integrated Trailer Brake Controller

 (If Equipped)

Selecting the Trailer Brake Type

1.

Press 

Default

 for trailers with

electromagnetic drum brake systems
or press 

Electric over Hydraulic

 for

trailers with electrically actuated
hydraulic brake systems.

2. Press 

Save

.

Selecting the Trailer Brake Effort

1.

Select a setting for your trailer.

Note:

The default value is 

Low

 and is the

recommended setting for most trailers.
Select a different setting if your trailer's
brakes require more initial voltage, or you
prefer more aggressive trailer braking.

2. Press 

Save

.

INTEGRATED TRAILER BRAKE CONTROLLER –
TROUBLESHOOTING

INTEGRATED TRAILER BRAKE CONTROLLER – INFORMATION
MESSAGES

Action

Message

The system detects a correct trailer

connection during a given ignition cycle.

Trailer Connected

The system detects the trailer wiring

connection is disconnected, during a given

ignition cycle.

Trailer Disconnected

The system detects an electrical fault in

the trailer brake circuit. If this message

appears without a trailer attached, see your

authorized dealer. If a trailer is attached,

inspect and repair the trailer wiring.

Trailer Wiring Fault

Displays the current gain setting for the

trailer brake.

Trailer Brake Gain: {trailer gain value:#0.0}

Displays the current gain setting for the

trailer brake when you do not have a trailer

connected.

Trailer Brake Gain: {trailer gain value:#0.0}

No Trailer

361

Integrated Trailer Brake Controller

 (If Equipped)

INTEGRATED TRAILER BRAKE
CONTROLLER – FREQUENTLY
ASKED QUESTIONS

How do I determine if there is an
issue with the wiring on my
vehicle?

A message displays accompanied by
a single tone, when no trailer is
connected. This indicates that the issue
is between the trailer brake controller
and the 7-pin connector at the bumper.

How do I determine if there is an
issue with the wiring on my trailer?

A message only displays with a trailer
connected. Consult your trailer dealer
for assistance.

362

Integrated Trailer Brake Controller

 (If Equipped)

HOW DOES TRAILER SWAY
CONTROL WORK

The system applies the brakes to the
individual wheels and reduces engine
torque to aid vehicle stability.

If the trailer begins to sway, the stability
control lamp flashes and the message

Trailer Sway Reduce Speed

 appears in

the information display.

Stop your vehicle as soon as it is safe to
do so.  Check the vertical weight on the
tow ball and trailer load distribution.

TRAILER SWAY CONTROL
PRECAUTIONS

WARNING: 

Turning off trailer sway

control increases the risk of loss of
vehicle control, serious injury or death.
Ford does not recommend disabling this
feature except in situations where speed
reduction may be detrimental (such as
hill climbing), the driver has significant
trailer towing experience, and can control
trailer sway and maintain safe operation.

Note:

This feature only activates when

significant trailer sway occurs.

Note:

This feature does not prevent trailer

sway, but reduces it once it begins.

Note:

This feature cannot stop all trailers

from swaying.

Note:

In some cases, if vehicle speed is too

high, the system may activate multiple
times, gradually reducing vehicle speed.

SWITCHING TRAILER SWAY
CONTROL ON AND OFF -
VEHICLES WITH: 12 INCH
SCREEN

1.

Press 

Features

 on the touchscreen.

2. Press 

Towing

.

3. Switch 

Trailer Sway Control

 on or off.

The system turns on each time you start
your vehicle.

SWITCHING TRAILER SWAY
CONTROL ON AND OFF -
VEHICLES WITH: 15 INCH
SCREEN

1.

E246592

 Open the towing app using

the app launcher.  See 

Accessing

Apps

 (page 522).

2. Open the towing settings.

3. Switch 

Trailer Sway Control

 on or off.

The system turns on each time you start
your vehicle.

363

Trailer Sway Control

WHAT IS TRAILER BACKUP
ASSISTANCE

Trailer backup assistance utilizes the
control knob on the instrument panel to
help you steer a trailer. Turn the control
knob in the direction you want the trailer
to go and the system steers the vehicle.

HOW DOES TRAILER BACKUP
ASSISTANCE WORK

Trailer backup assistance uses a sticker to
detect the trailer angle relative to the
towing vehicle and provides instructions,
graphics and camera views on the
touchscreen.

TRAILER BACKUP
ASSISTANCE PRECAUTIONS

WARNING: 

Driving while distracted

can result in loss of vehicle control, crash
and injury. We strongly recommend that
you use extreme caution when using any
device that may take your focus off the
road. Your primary responsibility is the
safe operation of your vehicle. We
recommend against the use of any
hand-held device while driving and
encourage the use of voice-operated
systems when possible. Make sure you
are aware of all applicable local laws
that may affect the use of electronic
devices while driving.

WARNING: 

This system is an extra

driving aid. It does not replace your
attention and judgment, or the need to
apply the brakes. This system does NOT
automatically brake your vehicle. If you
fail to press the brake pedal when
necessary, you may collide with another
vehicle.

Note:

The system is not a substitute for

safe driving practices. Always be aware of
your vehicle and trailer combination, and
the surrounding environment.

Note:

The system does not detect or

prevent your vehicle or trailer from making
contact with obstacles in the surrounding
environment.

Note:

The front end of your vehicle swings

out when changing the direction of the
trailer.

Note:

In certain conditions, the trailer could

turn faster or the trailer angle could increase
more than anticipated. Always monitor the
clearance between the trailer and vehicle
and the surroundings.

SETTING UP THE TRAILER
BACKUP ASSISTANCE FOR A
CONVENTIONAL TRAILER

CONFIGURING THE TRAILER

You must configure a trailer in the system
to use the trailer reversing aids. This is a
one-time setup process per trailer and the
trailer information is saved in the system
for the next time you use that trailer.

The system only works with conventional
trailers. It does not work with other types
including fifth-wheel and gooseneck
trailers. The following illustration shows
examples of conventional trailers on the
left-hand side.

364

Trailer Backup Assistance

 (If Equipped)

E209766

Positioning the Trailer

Hitch the trailer to your vehicle and
connect the electrical wiring harness.
Check to make sure that the wiring is
working.  See 

Connecting a Trailer

 (page

348).

E247482

Park your vehicle and hitched trailer on a
level surface.

For best results, make sure that your trailer
rides level with the ground when you hitch
your vehicle.  See 

Connecting a Trailer

(page 348).

E247481

Make sure that the trailer and your vehicle
are in line with each other. You can do this
by putting the transmission in drive (D) and
pulling straight forward.

Configuring the Trailer in the
Touchscreen

E349261

1.

Press the button to switch the system
on.

2. Press 

Add Trailer

 on the touchscreen.

3. Follow the directions on the

touchscreen to enter the trailer name,
then proceed to the sticker setup.  See

Applying the Trailer Reversing Aid
Sticker

 (page 365).

APPLYING THE TRAILER
REVERSING AID STICKER

Place the sticker in an area visible by the
rear view camera. The entire sticker must
be within 4–19 in (10–48 cm) from the
center of the hitch ball, as shown in the
following illustration.

365

Trailer Backup Assistance

 (If Equipped)

E333148

Use the sticker placement card and a tape
measure to determine the appropriate area
to place the sticker. The sticker is in the
back cover pocket of your quick start guide.
Make sure the entire sticker is within the
green zone between the two arcs or
distance markers on the diagram, and is
also visible in the rear view camera display.

Once you have found the correct location,
place the sticker.

Note:

Make sure nothing can obstruct the

rear view camera's view of the sticker such
as a jack handle or wiring.

Note:

Position the sticker on a flat, dry and

clean horizontal surface. For best results,
apply the sticker when temperatures are
above 32°F (0°C).

Note:

Do not move stickers after placing

them. Do not re-use any stickers if removed.

Note:

You can purchase additional stickers

through your authorized dealer.

CALIBRATING THE SYSTEM

Calibrating the system requires driving
forward and turning left or right. Follow the
instructions on the touchscreen to
complete the calibration process.

E352329

Note:

To calibrate the system, you need an

area where you can safely drive forward and
turn left or right. An open parking lot is an
ideal place to perform the calibration.

Note:

Keep the steering wheel straight

when instructed to by the touchscreen. If
the steering wheel is in a turned position
during this instruction, the calibration
pauses.

Note:

During calibration, the system

determines the trailer length. The system
supports trailer lengths of 6–33 ft
(1.85–10.05 m) distance from the hitch
point to the center of the axle or axles. The
system is designed to work with drawbars
that have a license plate to hitch ball center
measurement of 9–18 in (23–46 cm) when
installed. Do not attempt to use drawbars
or trailers that have a length outside of this
range as the system performance degrades
and could cause improper system function.

Note:

The touchscreen shows if you are

going too slow or fast. Calibration pauses if
the speed is outside the required range of
2–9 mph (4–15 km/h).

366

Trailer Backup Assistance

 (If Equipped)

Note:

You need to complete at least a 90°

turn, and longer trailers could require a 180°
turn. Camera trailer tracking requires the
system to locate the hitch ball as well as
determine the trailer length. Some trailers
could require you to drive straight then turn
multiple times before calibration completes.
The touchscreen provides instructions and
notifies you when calibration completes.

Note:

For best results, do not calibrate the

system at night when calibrating.

SWITCHING TRAILER BACKUP
ASSISTANCE ON AND OFF

E349261

Press the button and use the touchscreen
to select the connected trailer.

Note:

A trailer must be configured to use

trailer backup assistance.  See 

Configuring

the Trailer

 (page 364).

Note:

If you use the steering wheel when

using trailer backup assistance, the system
turns off and a message displays in the
touchscreen.

Note:

If the trailer was connected just prior

to turning the system on, you may need to
drive forward to initialize the system. Follow
the instructions on the touchscreen to
activate the system.

USING THE TRAILER BACKUP
ASSISTANCE CONTROLLER -
VEHICLES WITH: 12 INCH
SCREEN

Use the control knob to steer the trailer.
Take your hands off the steering wheel and
turn the control knob instead. The control
knob acts as the steering control for the
trailer.

E349262

Turn and hold counterclockwise to make
the trailer go left.

E349263

367

Trailer Backup Assistance

 (If Equipped)

Turn and hold clockwise to make the trailer
go right.

E349264

Release the knob when the trailer is
moving in the direction you want.

Note:

The more you turn the knob, the

sharper the trailer turns.

Note:

Quickly turning and releasing the

knob results in a jerky movement of the
vehicle.

Note:

You may have to use the knob to

correct the trailer direction when attempting
to move the trailer straight back under some
conditions.

Note:

If you want the trailer to turn sharper

you can change the trailer angle limit.  See

Using the Trailer Backup Assistance
Views

 (page 369).

USING THE TRAILER BACKUP
ASSISTANCE CONTROLLER -
VEHICLES WITH: 15 INCH
SCREEN

Use the control knob to steer the trailer.
Take your hands off the steering wheel and
turn the control knob instead. The control
knob acts as the steering control for the
trailer.

E349262

Turn and hold counterclockwise to make
the trailer go left.

E349263

Turn and hold clockwise to make the trailer
go right.

E349264

Release the knob when the trailer is
moving in the direction you want.

368

Trailer Backup Assistance

 (If Equipped)

Note:

The more you turn the knob, the

sharper the trailer turns.

Note:

Quickly turning and releasing the

knob results in a jerky movement of the
vehicle.

Note:

You may have to use the knob to

correct the trailer direction when attempting
to move the trailer straight back under some
conditions.

Note:

If you want the trailer to turn sharper

you can change the trailer angle limit.  See

Using the Trailer Backup Assistance
Views

 (page 370).

USING THE TRAILER BACKUP
ASSISTANCE VIEWS -
VEHICLES WITH: 12 INCH
SCREEN

Up to three camera views could be
available when using trailer backup
assistance. Use the view that helps you the
most when reversing your vehicle and
trailer.

E310996

360° camera view. Shows a
360° view on the right-hand side
of the touchscreen with a rear

camera view on the left-hand side of the
touchscreen.

E310967

Rear view camera view. Shows
your trailer hitch or what is
directly behind your vehicle.

E310965

Trailer reverse guidance view.
Shows you a view of the sides of
your vehicle and the trailer. In

auto mode, this view moves as the trailer
moves so that you do not have to adjust
the camera as you turn. Left and right
arrows let you see other camera views.

E315644

Auto. Press to return to auto
view.

Note:

Auto mode is the default setting.

Hitch Angle Graphic

The hitch angle graphic shows a small
representation of your vehicle and trailer
with visual feedback to help you monitor
the trailer. The graphic shows two different
colored lines for the trailer hitch angle. A
black line shows you where your trailer is
in relation to your vehicle. The white line
represents the amount the trailer can turn
based on knob input.

The graphic shows a yellow and red zone
for the hitch angle to warn you of a high
angle condition that could require you to
pull forward to reduce the hitch angle. The
angle limits for each zone vary based on
the trailer length.

The yellow zone indicates you are
approaching the maximum controllable
trailer angle for the system. When the
trailer enters this zone, it is more difficult
to reduce the trailer turn when backing up.
It may be necessary to put your vehicle
back into drive (D) and pull forward to get
your vehicle and trailer back to an in-line
position.

The red zone indicates you have exceeded
the maximum controllable trailer angle for
the system. Immediately stop reversing.
Put your vehicle into drive (D) and pull
forward until the trailer is no longer in the
red zone.

Setting the 

Trailer Angle Limit

1.

Press 

Features

 on the touchscreen.

2. Press 

Towing

.

3. Press 

Manage trailers

.

4. Press the saved trailer you want to

change.

5. Press 

Pro Trailer Backup Assist

.

6. Press 

Trailer Angle Limit

.

7.

Press a setting.

369

Trailer Backup Assistance

 (If Equipped)

Normal Control Angle

Default setting. This provides a balanced
limit that returns from a turn to straight
backing with minimal change to the trailer
direction.

Max Control Angle

Increases the trailer angle limit close to the
maximum controllable angle to allow
sharper turns but also causes more change
in the trailer direction when straightening
out from a turn.

USING THE TRAILER BACKUP
ASSISTANCE VIEWS -
VEHICLES WITH: 15 INCH
SCREEN

Up to three camera views could be
available when using trailer backup
assistance. Use the view that helps you the
most when reversing your vehicle and
trailer.

E310996

360° camera view. Shows a
360° view on the right-hand side
of the touchscreen with a rear

camera view on the left-hand side of the
touchscreen.

E310967

Rear view camera view. Shows
your trailer hitch or what is
directly behind your vehicle.

E310965

Trailer reverse guidance view.
Shows you a view of the sides of
your vehicle and the trailer. In

auto mode, this view moves as the trailer
moves so that you do not have to adjust
the camera as you turn. Left and right
arrows let you see other camera views.

E315644

Auto. Press to return to auto
view.

Note:

Auto mode is the default setting.

Hitch Angle Graphic

The hitch angle graphic shows a small
representation of your vehicle and trailer
with visual feedback to help you monitor
the trailer. The graphic shows two different
colored lines for the trailer hitch angle. A
black line shows you where your trailer is
in relation to your vehicle. The white line
represents the amount the trailer can turn
based on knob input.

The graphic shows a yellow and red zone
for the hitch angle to warn you of a high
angle condition that could require you to
pull forward to reduce the hitch angle. The
angle limits for each zone vary based on
the trailer length.

The yellow zone indicates you are
approaching the maximum controllable
trailer angle for the system. When the
trailer enters this zone, it is more difficult
to reduce the trailer turn when backing up.
It may be necessary to put your vehicle
back into drive (D) and pull forward to get
your vehicle and trailer back to an in-line
position.

The red zone indicates you have exceeded
the maximum controllable trailer angle for
the system. Immediately stop reversing.
Put your vehicle into drive (D) and pull
forward until the trailer is no longer in the
red zone.

Setting the 

Trailer Angle Limit

1.

Access the vehicle drawer on the
touchscreen.

2. Press 

Towing

.

3. Press 

Settings

.

4. Press the saved trailer you want to

change.

5. Press 

Pro Trailer Backup Assist

.

6. Press 

Trailer Angle Limit

.

7.

Press a setting.

370

Trailer Backup Assistance

 (If Equipped)

Normal Control Angle

Default setting. This provides a balanced
limit that returns from a turn to straight
backing with minimal change to the trailer
direction.

Max Control Angle

Increases the trailer angle limit close to the
maximum controllable angle to allow
sharper turns but also causes more change
in the trailer direction when straightening
out from a turn.

371

Trailer Backup Assistance

 (If Equipped)

TRAILER BACKUP ASSISTANCE – TROUBLESHOOTING

TRAILER BACKUP ASSISTANCE – INFORMATION MESSAGES

Description

Message

Displays when the system turns on and is
initializing.

Detecting Trailer Please Wait…

A condition exists that prevents the system
from turning on. If the message continues
to display, visit your authorized dealer to
have your vehicle checked.

Pro Trailer Backup Assist™ System is Not
Available

The steering system needs to learn internal
parameters to fully enable the feature.
Drive your vehicle straight forward above
25 mph (40 km/h) for approximately 5
minutes.

Pro Trailer Backup Assist™ Driving Required
to Initialize Steering Press Knob to Exit

Displays when you reach the maximum
controllable trailer angle for the system.
Place your vehicle in drive (D) and pull
forward to get the truck and trailer back to
an in-line position.

Pro Trailer Backup Assist™ Stop now
Maximum trailer angle Press Knob to Exit

If this message consistently displays, you
may need to repeat the trailer calibration.
Delete the trailer from the system and
repeat the setup and calibration process.

Displays when you exceed the maximum
controllable trailer angle for the system.
Place your vehicle in drive (D) and pull
forward to get your vehicle and trailer back
to an in-line position, then activate the
system by selecting the connected trailer
and following the instructions on the
touchscreen.

Stop now. Deactivated by trailer angle.

If this message consistently displays, you
may need to repeat the trailer setup and
calibration. Delete the trailer from the
system and repeat the setup and calibra-
tion process.

Displays when the system can no longer
steer the vehicle and you must take over
steering.

Pro Trailer Backup Assist™ Stop Now Take
Control of Steering Wheel

372

Trailer Backup Assistance

 (If Equipped)

Description

Message

These messages display when the system
does not detect the trailer. Make sure the
rear camera is clean, and the sticker is
clearly visible in the camera image. You can
also move the trailer forward or backward
to change the trailer position and lighting
conditions
If these messages continue to display, visit
your authorized dealer to have your vehicle
checked.

Pro Trailer Backup Assist™ Trailer Not
Detected. Shift to Park Press Knob to Exit

Pro Trailer Backup Assist™ Trailer Not
Detected. Refer to Owner's Manual. Press
Knob to Exit

Display when the camera system cannot
detect the trailer and requires trailer
movement to enable trailer detection. Drive
forward above 2 mph (3 km/h) to initialize
the system.

Pro Trailer Backup Assist™ Trailer Not
Detected Pull Forward to Initialize Press
Knob to Exit

Displays when your vehicle is backing up
but the system is not activated. Select the
connected trailer on the touchscreen and
follow the instructions to activate the
system.
This message also displays when you back
up during the calibration process.

Pro Trailer Backup Assist™ Stop Now
System Not Active Press Knob to Exit

Displays when the system turns on and is
available to use.

Pro Trailer Backup Assist™ Backup Slowly
Turn Knob to Steer Press Knob to Exit

373

Trailer Backup Assistance

 (If Equipped)

TRAILER BACKUP ASSISTANCE
– FREQUENTLY ASKED
QUESTIONS

Why does the trailer not reverse
straight?

Verify the sticker is correctly applied.
Other factors such as the hitch
connection, road camber, road slope
and trailer suspension could influence
how straight the system can reverse
the trailer when the control knob is not
turned. You can compensate for the
trailer drifting to the right or left by
slowly turning the knob until the trailer
is following your desired path and
holding the knob in that position. Check
that the correct trailer is selected in the
touchscreen. Verify the sticker is
correctly applied and check that the
drawbar and the trailer dimensions are
within the allowed range. If the trailer
consistently does not reverse straight,
delete the trailer from the system and
repeat the setup process to calibrate
the trailer.

What does it mean if the system
remains on one message for an
extended time during calibration?

The camera could need to be cleaned,
the sticker could be blocked, the
drawbar could be outside the allowed
range of 9–18 in (23–46 cm) or you
could need to move to a different area
to change the lighting and background.
Verify the sticker is in the proper
location.  See 

Applying the Trailer

Reversing Aid Sticker

 (page 365).  You

can move to a different area or change
the direction you are driving or set up
the system at a different time of day.
Some trailers are not compatible with
the sticker and camera system.

What does it mean if the system
pauses during calibration?

There could be steering input or trailer
movement during the straight drive
portion of the calibration process.

What does it mean if the system
displays hold steering steady
during turn?

Part of the calibration process for the
sticker setup requires a steady turn. If
you are continually moving the steering
wheel during the turn, this delays the
calibration process. To enable the
calibration process, hold the steering
wheel at the same position when
turning.

What does it mean if the system
displays that it is not available?

There could be a sub-system that the
system uses that is not correctly
operating or there could be a battery
voltage issue. If the system continues
to display it is not available, visit your
authorized dealer to have your vehicle
checked.

What does it mean if the system
displays that driving is required to
initialize steering?

The steering system needs to learn
internal parameters to fully turn on the
feature. Drive your vehicle straight
forward above 25 mph (40 km/h) for
approximately 5 minutes. This could
also occur when your vehicle is new,
there is a battery voltage issue or if the
steering system has been serviced.

374

Trailer Backup Assistance

 (If Equipped)

What does it mean if the trailer is
at its maximum angle or the
system deactivated by trailer
angle?

You are at the maximum controllable
trailer angle for the system. Place your
vehicle in drive (D) and pull forward to
get the truck and trailer back to an
in-line position. If this message
consistently displays, this could
indicate the sticker is incorrectly
applied, the trailer needs to be
recalibrated or the drawbar or the
trailer dimensions are outside of the
supported range. The system is
designed to work with drawbars that
have a license plate to hitch ball center
measurement of 9–18 in (23–46 cm)
when installed. The system is designed
to work with trailers that have a hitch
point to center of the axle or axles
measurement of 6–33 ft
(1.85–10.05 m). Do not attempt to use
drawbars or trailers that have a length
outside of this range as the system
performance degrades and could
cause improper system function. Check
that the correct trailer is selected on
the touchscreen. Verify the sticker is
correctly applied and check that the
drawbar and the trailer dimensions are
within the allowed range. Then, delete
the trailer from the system and repeat
the setup process to calibrate the
trailer.

What does it mean when the
system tells you to take control of
the steering wheel?

The system is no longer steering the
vehicle and you must take over
steering. There are four reasons the
system could display this message. The
first reason the system could display
this message is that you have touched
the steering wheel when the system is
steering. The second reason the system

could display this message is that you
have exceeded the maximum speed
for the feature. The third reason the
system could display this message is
that the trailer is not detected. The final
reason the system could display this
message is that an internal condition
for system operation is not met that
requires your vehicle to return to
manual control of the steering.

What does it mean if the system
does not detect a trailer?

The system requires a clear view of the
sticker placed on the trailer. You must
keep the camera lens and sticker clean
for the system to correctly operate. If
the system cannot initially detect the
trailer, it could be necessary for you to
change the lighting conditions by
moving your vehicle and trailer or
waiting until the conditions change.
See 

Applying the Trailer Reversing

Aid Sticker

 (page 365).  Some trailers

are not compatible with the sticker and
camera system.

Note:

The system is designed to be used

with the same trailer connection every time
you choose the trailer from the touchscreen.
When using a different drawbar or a
different pinhole on drawbars with more
than one, connecting the drawbar to your
vehicle affects the trailer position and you
may need to repeat the trailer setup and
calibration process.

375

Trailer Backup Assistance

 (If Equipped)

WHAT IS TRAILER REVERSE
GUIDANCE

Trailer reverse guidance provides views
and graphics on the touchscreen to help
you steer your vehicle when you backup a
trailer.

HOW DOES TRAILER REVERSE
GUIDANCE WORK

Trailer reverse guidance uses a sticker to
detect the trailer angle relative to the
towing vehicle and provides instructions,
graphics and camera views on the
touchscreen.

TRAILER REVERSE GUIDANCE
PRECAUTIONS

WARNING: 

Driving while distracted

can result in loss of vehicle control, crash
and injury. We strongly recommend that
you use extreme caution when using any
device that may take your focus off the
road. Your primary responsibility is the
safe operation of your vehicle. We
recommend against the use of any
hand-held device while driving and
encourage the use of voice-operated
systems when possible. Make sure you
are aware of all applicable local laws
that may affect the use of electronic
devices while driving.

WARNING: 

This system is an extra

driving aid. It does not replace your
attention and judgment, or the need to
apply the brakes. This system does NOT
automatically brake your vehicle. If you
fail to press the brake pedal when
necessary, you may collide with another
vehicle.

Note:

The system is not a substitute for

safe driving practices. Always be aware of
your vehicle and trailer combination, and
the surrounding environment.

Note:

The system does not detect or

prevent your vehicle or trailer from making
contact with obstacles in the surrounding
environment.

Note:

The front end of your vehicle swings

out when changing the direction of the
trailer.

Note:

In certain conditions, the trailer could

turn faster or the trailer angle could increase
more than anticipated. Always monitor the
clearance between the trailer and vehicle
and the surroundings.

SETTING UP TRAILER
REVERSE GUIDANCE FOR A
CONVENTIONAL TRAILER

CONFIGURING THE TRAILER

You must configure a trailer in the system
to use trailer reverse guidance. This is a
one-time setup process and the trailer
information is saved in the system for the
next time you use that trailer.

The system only works with conventional
trailers. It does not work with other types
including fifth-wheel and gooseneck
trailers. The following illustration shows
examples of conventional trailers on the
left-hand side.

Note:

Trailer reverse guidance camera

views are available with no trailer setup.
However, complete functionality including
graphics and automatic view switching is
enabled by setup. Setup is required to
enable trailer backup assistance.

376

Trailer Reverse Guidance

 (If Equipped)

E209766

Positioning the Trailer

Hitch the trailer to your vehicle and
connect the electrical wiring harness.
Check to make sure that the wiring is
working.  See 

Connecting a Trailer

 (page

348).

E247482

Park your vehicle and hitched trailer on a
level surface.

For best results, make sure that your trailer
rides level with the ground when you hitch
your vehicle.  See 

Connecting a Trailer

(page 348).

E247481

Make sure that the trailer and your vehicle
are in line with each other. You can do this
by putting the transmission in drive (D) and
pulling straight forward.

Configuring the Trailer in the
Touchscreen

1.

Shift to reverse (R).

2. Press the camera view button.

3. Press the trailer view icon.

4. Press 

Add Trailer

.

5. Follow the directions on the

touchscreen to enter the trailer name,
then proceed to the sticker setup.  See

Applying the Trailer Reverse Aid
Sticker

 (page 377).

APPLYING THE TRAILER
REVERSE AID STICKER

Place the sticker in an area visible by the
rear view camera. The entire sticker must
be within 4–19 in (10–48 cm) from the
center of the hitch ball, as shown in the
following illustration.

E333148

377

Trailer Reverse Guidance

 (If Equipped)


Content      ..     9      10      11      12     ..