Ford Expedition (2024 year). Manual in english - page 10
 

  Index      Manuals     Ford Expedition (2024 year). Manual in english


Search            copyright infringement  


Content      ..     8      9      10      11     ..


Ford Expedition (2024 year). Manual in english - page 10


WHAT IS BLIND SPOT
INFORMATION SYSTEM

Blind spot information system detects
vehicles that may have entered the blind
spot zone.

HOW DOES BLIND SPOT
INFORMATION SYSTEM WORK

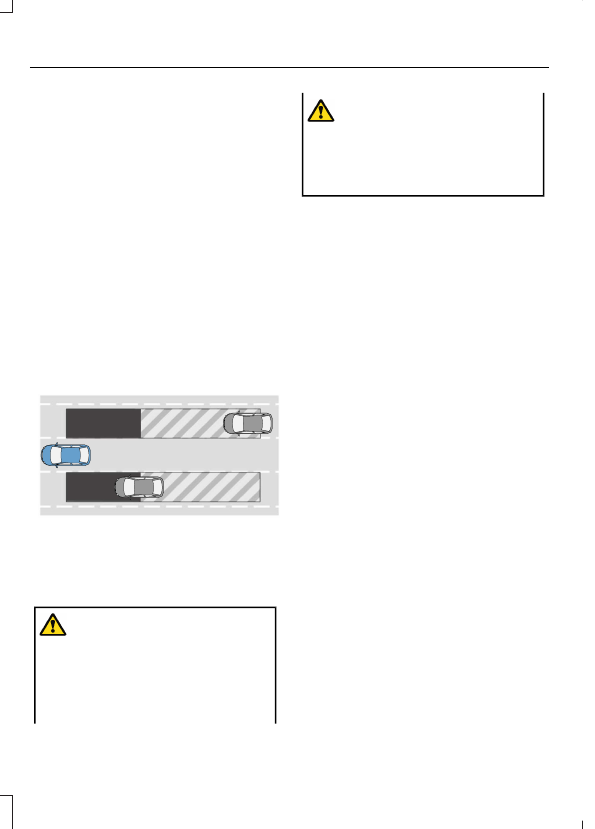
Blind spot information system uses
sensors on both sides of your vehicle,
detecting rearward from the exterior
mirrors to approximately 13 ft (4 m)
beyond the rear bumper. The detection
area extends to approximately 59 ft (18 m)
beyond the rear bumper when the vehicle
speed is greater than 30 mph (48 km/h)
to alert you of faster approaching vehicles.

E255695

BLIND SPOT INFORMATION
SYSTEM PRECAUTIONS

WARNING: 

Do not use the blind

spot information system as a
replacement for using the interior and
exterior mirrors or looking over your
shoulder before changing lanes. The
blind spot information system is not a
replacement for careful driving.

WARNING: 

The system may not

operate properly during severe weather
conditions, for example snow, ice, heavy
rain and spray. Always drive with due
care and attention. Failure to take care
may result in a crash.

Note:

 Blind spot information system does

not prevent contact with other vehicles. It
does not detect parked vehicles,
pedestrians, animals or other infrastructure.

BLIND SPOT INFORMATION
SYSTEM LIMITATIONS

Blind spot information system does not
operate in park (P) or reverse (R).

The system may not alert you if a vehicle
quickly passes through the detection zone
while overtaking.

Note:

For vehicles without the trailer

coverage feature, we recommend that you
switch the blind spot information system
off when you attach a trailer.

BLIND SPOT INFORMATION
SYSTEM REQUIREMENTS

Blind spot information system turns on
when all the following occur:

You start your vehicle.

You shift into drive (D).

The vehicle speed is greater than
6 mph (10 km/h).

314

Blind Spot Information System

SWITCHING BLIND SPOT
INFORMATION SYSTEM ON
AND OFF - VEHICLES WITH: 12
INCH SCREEN

To switch blind spot information system
on or off, use the touchscreen:

1.

Press 

Features

 on the touchscreen.

2. Press 

Driver Assistance

.

3. Press 

Blind Spot Information System

.

4. Switch the feature on or off.

When you switch blind spot information
system off, a warning lamp illuminates.
When you switch the system on or off, the
alert indicators flash twice.

Note:

The system remembers the last

setting when you start your vehicle.

SWITCHING BLIND SPOT
INFORMATION SYSTEM ON
AND OFF - VEHICLES WITH: 15
INCH SCREEN

To switch blind spot information system
on or off, use the touchscreen:

1.

Access the vehicle drawer.

2. Press 

SETTINGS

.

3. Press 

Driver Assistance

.

4. Switch 

Blind Spot Information

System

 on or off.

When you switch blind spot information
system off, a warning lamp illuminates.
When you switch the system on or off, the
alert indicators flash twice.

Note:

The system remembers the last

setting when you start your vehicle.

LOCATING THE BLIND SPOT
INFORMATION SYSTEM
SENSORS

E205199

The sensors are behind the rear fascia on
both sides of your vehicle.

Note:

Keep the sensors free from snow, ice

and large accumulations of dirt.

Note:

Do not cover the sensors with bumper

stickers, repair compound or other objects.

Note:

Bike and cargo racks could cause

false alerts due to obstruction of the sensor.
We recommend switching the feature off
when using a bike or cargo rack.

Note:

Blocked sensors may affect system

accuracy.

If the sensors become blocked, a message
appears in the instrument cluster display.
See 

Blind Spot Information System –

Information Messages

 (page 318).  The

alert indicators illuminate but the system
does not alert you.

315

Blind Spot Information System

BLIND SPOT INFORMATION
SYSTEM WITH TRAILER
COVERAGE

WHAT IS BLIND SPOT
INFORMATION SYSTEM WITH
TRAILER COVERAGE

E225007

Trailer coverage detection zone.

A.

Blind spot information system detects
vehicles that may have entered the blind
spot zone. The detection area is on both
sides your vehicle and trailer, extending
rearward from the exterior mirrors to the
end of your trailer.

BLIND SPOT INFORMATION
SYSTEM WITH TRAILER
COVERAGE LIMITATIONS

Trailer coverage only supports
conventional trailers.

Make sure the trailer width is less than or
equal to 8.5 ft (2.6 m) and the length is
less than 33 ft (10.1 m).

Some trailers could cause a slight change
in system performance:

Large box trailers, including v-nose or
horse trailers, could cause false alerts
to occur when driving next to
infrastructures or near parked cars. A
false alert could also occur while
making a 90° turn.

Trailers that have a width greater than
8.5 ft (2.6 m) at the front and have a
total length greater than 20 ft (6 m)
could cause delayed alerts when a
vehicle is passing at high speeds.

Box trailers that have a width greater
than 8.5 ft (2.6 m) at the front could
cause early alerts when you pass a
vehicle.

Clam shell or v-nose box trailers with
a width greater than 8.5 ft (2.6 m) at
the front could cause delayed alerts
when a vehicle traveling the same
speed as your vehicle merges lanes.

SETTING A TRAILER LENGTH

E225008

Trailer length.

A

Trailer width.

B

Trailer hitch ball.

C

You can set-up a trailer to work with the
blind spot information system through the
touchscreen by using the add trailer menu.

1.

Input the trailer name and trailer type,
conventional, gooseneck or fifth wheel,
then save to continue trailer setup.

316

Blind Spot Information System

Note:

The system only supports

conventional trailers.

2. Trailer width measurement. Measure

the width at the front of the trailer. It is
not measured at the widest point of
the trailer. The maximum width at the
front of the trailer the system can
support is 8.5 ft (2.6 m).

Note:

If the trailer is a bike rack or cargo

rack with electrical lighting, enter a length
of around 3 ft (1 m). Cross traffic alert
remains on for trailers with a length of 3 ft
(1 m) or less.

Note:

The system requires proper

measurement and measure entry to properly
function.

SELECTING A TRAILER

When you connect a trailer to your vehicle,
the trailer set up menu appears in the
touchscreen. This menu allows you to set
up a new trailer or choose from a
previously set up trailer. A warning
message appears and the system turns off
if you do not choose or add a new trailer.

Note:

The warning message may not

appear until your vehicle reaches 22 mph
(35 km/h).

BLIND SPOT INFORMATION
SYSTEM INDICATORS

E309137

E249861

E249861

When blind spot information
system detects a vehicle, an
alert indicator illuminates in the

exterior mirror on the side from which the
vehicle is approaching. If you turn the turn
signal on for that side of your vehicle, the
alert indicator flashes.

317

Blind Spot Information System

BLIND SPOT INFORMATION SYSTEM – TROUBLESHOOTING

BLIND SPOT INFORMATION SYSTEM – INFORMATION MESSAGES

Action

Message

A fault with the system has occurred.  Have

your vehicle checked as soon as possible.

Blind Spot System Fault

Something is blocking the sensors. Clean

the sensors.

Blind Spot Not Available Sensor Blocked

See Manual

The system automatically turns off and

displays this message when you connect a

trailer to your vehicle under any of the

following conditions:

- Your vehicle does not have blind spot

information system with trailer coverage.

- You switch the blind spot information

system off through the touchscreen.

- Your trailer exceeds the limits for the

system. See 

Setting a Trailer Length

(page 316).

Blind Spot Alert Deactivated Trailer

Attached

Note:

When connecting a trailer, the system

may detect the trailer and turn the system
OFF. If the system does not automatically
turn OFF, manually switch the blind spot
information system OFF. If your vehicle has
the blind spot information system with
trailer coverage, the system prompts you to
set up a trailer that allows the feature to
function, if your trailer meets the
requirements of the system.

318

Blind Spot Information System

WHAT IS CROSS TRAFFIC
ALERT

The system alerts you of vehicles
approaching from the sides behind your
vehicle when you shift into reverse (R).

HOW DOES CROSS TRAFFIC
ALERT WORK

Cross traffic alert detects vehicles that
approach at a speed between 4–37 mph
(6–60 km/h). Coverage decreases when
the sensors are partially, mostly or fully
obstructed.

E142440

The sensor on the left-hand side is only
partially obstructed and zone coverage on
the right-hand side is maximized.

E142441

Zone coverage also decreases when
parking at narrow angles. The sensor on
the left-hand side is mostly obstructed and
zone coverage on that side is severely
reduced.

Note:

 Slowly reversing helps increase the

coverage area and effectiveness.

CROSS TRAFFIC ALERT
PRECAUTIONS

WARNING: 

Do not use the cross

traffic alert system as a replacement for
using the interior and exterior mirrors or
looking over your shoulder before
reversing out of a parking space. The
cross traffic alert system is not a
replacement for careful driving.

WARNING: 

The system may not

operate properly during severe weather
conditions, for example snow, ice, heavy
rain and spray. Always drive with due
care and attention. Failure to take care
may result in a crash.

CROSS TRAFFIC ALERT
LIMITATIONS

The system may not correctly operate
when any of the following occur:

Something is blocking the sensors.

Adjacently parked vehicles or objects
are obstructing the sensors.

Vehicles approach at speeds less than
4 mph (6 km/h) or greater than 37 mph
(60 km/h).

Your vehicle speed is greater than
7 mph (12 km/h).

You reverse out of an angled parking
space.

319

Cross Traffic Alert

Cross Traffic Alert Limitations
with a Trailer Attached

The system remains on when you attach
a trailer to vehicles with blind spot
information system with trailer coverage
under the following conditions:

You connect a trailer.

The trailer is a bike rack or cargo rack
with a maximum length of 3 ft (1 m).

You set the trailer length to 3 ft (1 m)
in the instrument cluster display.

Note:

The system may not correctly operate

when towing a trailer. For vehicles with a
trailer tow module and tow bar approved
by the manufacturer, the system turns off
when you attach a trailer. For vehicles with
an aftermarket trailer tow module or tow
bar, we recommend that you switch the
system off when you attach a trailer.

SWITCHING CROSS TRAFFIC
ALERT ON AND OFF -
VEHICLES WITH: 12 INCH
SCREEN

To switch cross traffic alert on or off use
the touchscreen.

1.

Press 

Features

 on the touchscreen.

2. Press 

Driver Assistance

.

3. Switch 

Cross Traffic Alert

 on or off.

When you switch the system on or off, the
alert indicators flash twice.

Note:

The system switches on every time

you switch the ignition on.

SWITCHING CROSS TRAFFIC
ALERT ON AND OFF -
VEHICLES WITH: 15 INCH
SCREEN

To switch cross traffic alert on or off use
the touchscreen:

1.

Access the vehicle drawer.

2. Press 

SETTINGS

.

3. Press 

Driver Assistance

.

4. Switch 

Cross Traffic Alert

 on or off.

When you switch the system on or off, the
alert indicators flash twice.

Note:

The system turns on every time you

start your vehicle.

LOCATING THE CROSS
TRAFFIC ALERT SENSORS

E205199

The sensors are behind the rear fascia on
both sides of your vehicle.

Note:

Keep the sensors free from snow, ice

and large accumulations of dirt.

Note:

Do not cover the sensors with bumper

stickers, repair compound or other objects.

Note:

Blocked sensors may affect system

accuracy.

If something is blocking the sensors, a
message may appear in the information
display when you shift into reverse (R).

320

Cross Traffic Alert

Note:

Bike and cargo racks could cause

false alerts due to obstruction of the sensor.
We recommend switching the feature off
when using a bike or cargo rack.

CROSS TRAFFIC ALERT
INDICATORS

When the cross traffic alert detects an
approaching vehicle, a tone sounds, a
warning lamp illuminates in the relevant
exterior mirror and arrows appear in the
instrument cluster display to show from
which side the vehicle is approaching.

If the system malfunctions, a warning lamp
illuminates in the instrument cluster and
a message appears in the instrument
cluster display.  Have your vehicle checked
as soon as possible.

Note:

In some conditions, the system could

alert you, even when there is nothing in the
detection zone, for example a vehicle
passing further away from your vehicle.

CROSS TRAFFIC ALERT – TROUBLESHOOTING

CROSS TRAFFIC ALERT – INFORMATION MESSAGES

Action

Message

Displays instead of indication arrows when

the system detects a vehicle. Check for

approaching traffic.

Only available in vehicles with 8 inch

displays.

Cross Traffic Alert

Indicates blocked cross traffic alert system
sensors. Clean the sensors. If the message

continues to appear, have your vehicle

checked as soon as possible.

Cross Traffic Not Available Sensor Blocked

See Manual

The system has malfunctioned.

Have your vehicle checked as soon as

possible.

Cross Traffic System Fault

Displays if you attach a trailer to your

vehicle.

Cross Traffic Alert Deactivated Trailer

Attached

Note:

When connecting a trailer, the system

may detect the trailer and turn the system
OFF. If the system does not turn OFF
automatically, switch the cross traffic alert
system OFF manually.  See 

Switching

Cross Traffic Alert On and Off

 (page 320).

321

Cross Traffic Alert

WHAT IS PRE-COLLISION
ASSIST

Pre-collision assist detects and warns of
approaching hazards in the roadway. The
system provides multiple levels of
assistance to help avoid a collision if your
vehicle is rapidly approaching another
stationary vehicle, a vehicle traveling in the
same direction as yours, or a pedestrian or
cyclist within your driving path.

HOW DOES PRE-COLLISION
ASSIST WORK

The system warns the driver of potential
hazards by providing three levels of
assistance.

E156130

If your vehicle is rapidly approaching
potential hazards the system provides the
following levels of functionality:

1.

Alert.

2. Brake support.

3. Automatic emergency braking.

E329466

Alert

: When active, a flashing

visual warning appears and an
audible warning tone sounds.

Brake Support

: The system helps reduce

the impact speed by preparing the brakes
for rapid braking. The system does not
automatically apply the brakes. If you press
the brake pedal, the system may apply
additional braking up to maximum braking
force, even if you lightly press the brake
pedal.

Automatic Emergency Braking

:

Automatic emergency braking may
activate if the system determines that a
collision is imminent.

Note:

If the pre-collision assist alerts are

too frequent or disturbing, you can reduce
the alert sensitivity. Setting the low
sensitivity results in fewer and later
warnings of a potential forward collision.
The manufacturer recommends using the
high sensitivity setting where possible.

Note:

Automatic emergency braking

performance is not affected by the
sensitivity setting.

Each system has various levels of
detection capabilities.  See 

Pre-Collision

Assist Limitations

 (page 323).

PRE-COLLISION ASSIST
PRECAUTIONS

WARNING: 

You are responsible for

controlling your vehicle at all times. The
system is designed to be an aid and does
not relieve you of your responsibility to
drive with due care and attention. Failure
to follow this instruction could result in
the loss of control of your vehicle,
personal injury or death.

WARNING: 

The system does not

detect vehicles moving in a different
direction or animals. Apply the brakes
when necessary. Failure to follow this
instruction could result in the loss of
control of your vehicle, personal injury or
death.

WARNING: 

The system does not

operate during hard acceleration or
steering. Failure to take care may lead
to a crash or personal injury.

322

Pre-Collision Assist

WARNING: 

The system may

operate with reduced function during
cold and inclement weather conditions.
Snow, ice, rain, spray and fog can
adversely affect the system. Keep the
front camera and radar free of snow and
ice. Failure to follow this instruction may
result in the loss of control of your
vehicle, serious personal injury or death.

WARNING: 

Take additional care if

your vehicle is heavily loaded or you are
towing a trailer. These conditions could
result in reduced performance of this
system. Failure to follow this instruction
could result in the loss of control of your
vehicle, personal injury or death.

WARNING: 

The system cannot

help prevent all crashes. Do not rely on
this system to replace driver judgment
and the need to maintain a safe distance
and speed.

WARNING: 

In situations where the

vehicle camera has limited detection
capability, this may reduce system
performance. These situations include
but are not limited to direct or low
sunlight, vehicles at night without tail
lights, unconventional vehicle types,
pedestrians with complex backgrounds,
running pedestrians, partly obscured
pedestrians, or pedestrians that the
system cannot distinguish from a group.
Failure to take care may result in the loss
of control of your vehicle, serious
personal injury or death.

PRE-COLLISION ASSIST
LIMITATIONS

Pre-collision assist depends on the
detection ability of its camera and sensors.
Any obstructions or damage to these areas
can limit detection or prevent the system
from functioning.  See 

Locating the

Pre-Collision Assist Sensors

 (page 325).

The system is active at 3 mph (5 km/h)
and above.

Note:

The pre-collision assist system

automatically disables when you select
four-wheel drive low or manually disable
AdvanceTrac™.

Note:

Brake support and automatic

emergency braking are active at speeds up
to 80 mph (130 km/h). If your vehicle has a
radar sensor included with adaptive cruise
control, then brake support and automatic
emergency braking are active up to the
maximum speed of your vehicle.

Pedestrian Detection Limitations

Pedestrian detection is active at speeds
up to 50 mph (80 km/h).

Pedestrian detection operates optimally
when detected hazards are clearly
identifiable. System performance may
reduce in situations where pedestrians are
running, partly obscured, have a complex
background, or cannot be distinguished
from a group.

Cyclist Detection Limitations

Cyclist detection is active at speeds up to
50 mph (80 km/h).

Cyclist detection functions optimally when
detected hazards are clearly identifiable.
System performance may reduce in
situations where cyclists are fast-moving,
partly obscured, have a complex
background, or cannot be distinguished
from a group.

323

Pre-Collision Assist

Intersection Assist

 (If Equipped)

If your vehicle comes with a radar sensor
included in adaptive cruise control, the
pre-collision assist system may operate in
a scenario where you are turning across an
oncoming vehicle's path. Detection of
vehicles driving in an oncoming direction
is active if your vehicle is driving at speeds
up to 19 mph (30 km/h).

E309750

SWITCHING PRE-COLLISION
ASSIST ON AND OFF -
VEHICLES WITH: 12 INCH
SCREEN

To switch the system on or off, use the
touchscreen:

1.

Press 

Features

 on the touchscreen.

2. Press 

Driver Assistance

.

3. Press 

Pre-Collision Assist

.

4. Switch the feature on or off.

Adjusting the Pre-Collision Assist
Settings

You can adjust the following settings by
using the touchscreen controls in the
pre-collision assist menu:

Change alert and distance alert
sensitivity to one of three possible
settings.

Switch distance indication and alert on
or off.

If required, switch automatic
emergency braking on or off.

If required, switch the entire
pre-collision assist feature on or off.

If required, switch evasive steering
assist on or off.

Note:

Automatic emergency braking and

evasive steering turn on every time you start
your vehicle.

Note:

If your vehicle has a radar sensor, we

recommend that you switch the system off
if you install a snow plow or similar object
in such a way that it may block the radar
sensor. Your vehicle remembers the selected
setting across key cycles.

Note:

If you switch automatic emergency

braking off, evasive steering assist switches
off.

SWITCHING PRE-COLLISION
ASSIST ON AND OFF -
VEHICLES WITH: 15 INCH
SCREEN

1.

E386797

 Press the button on the

touchscreen.

2. Press 

Driver Assistance

.

3. Press 

Pre-Collision Assist

.

4. Switch the feature on or off.

324

Pre-Collision Assist

Adjusting the Pre-Collision Assist
Settings

You can adjust the following settings by
using the touchscreen controls in the
pre-collision assist menu:

Change alert and distance alert
sensitivity to one of three possible
settings.

Switch distance indication and alert on
or off.

If required, switch automatic
emergency braking on or off.

If required, switch the entire
pre-collision assist feature on or off.

If required, switch evasive steering
assist on or off.

Note:

Automatic emergency braking and

evasive steering assist automatically turn
on every time you start your vehicle.

Note:

If your vehicle has a radar sensor, we

recommend that you switch the system off
if you install a snow plow or similar object
in such a way that it may block the radar
sensor. Your vehicle remembers the selected
setting across key cycles.

Note:

If you switch automatic emergency

braking off, evasive steering assist switches
off.

LOCATING THE PRE-
COLLISION ASSIST SENSORS

E355942

Camera.

1.

Radar sensor (if equipped).

2.

If a message regarding a blocked sensor
or camera appears in the instrument
cluster display, something is obstructing
the radar or front windshield camera. The
radar sensor is behind the fascia in the
center of the lower grille. With a blocked
sensor or camera, the system may not
function, or performance may reduce.  See

Pre-Collision Assist – Information
Messages

 (page 331).

Note:

Proper system operation requires a

clear view of the road by the camera. Repair
any windshield damage in the area of the
camera's field of view.

Note:

If your vehicle has a radar sensor, and

something hits the front end of your vehicle
or damage occurs, the radar sensing zone
could change. This may cause missed or
false vehicle detections. Have your vehicle
serviced to have the radar checked for
proper coverage and operation.

325

Pre-Collision Assist

Note:

If your vehicle detects excessive heat

at the camera or a potential misalignment
condition, a message may display in the
instrument cluster display indicating
temporary sensor unavailability. When
operational conditions are correct, the
message disappears. For example, when
the ambient temperature around the sensor
decreases or the sensor successfully
recalibrates.

DISTANCE INDICATION

 (IF

EQUIPPED)

WHAT IS DISTANCE INDICATION

Distance indication displays the gap
between your vehicle and the vehicle
ahead of you.

SWITCHING DISTANCE
INDICATION ON AND OFF -

VEHICLES WITH: 12 INCH SCREEN

To switch the system on or off, use the
touchscreen:

1.

Press 

Features

 on the touchscreen.

2. Press 

Driver Assistance

.

3. Press 

Pre-Collision Assist

.

4. Switch 

Distance Indication

 on or off.

SWITCHING DISTANCE
INDICATION ON AND OFF -
VEHICLES WITH: 15 INCH SCREEN

To switch the system on or off:

1.

E386797

 Press the button on the

touchscreen.

2. Press 

Driver Assistance

.

3. Press 

Pre-Collision Assist

.

4. Switch 

Distance Indication

 on or off.

DISTANCE INDICATION
INDICATOR - VEHICLES WITH: 8
INCH SCREEN

The indicator displays the time gap
between your vehicle and vehicles ahead
of you. The area in front your vehicle
changes shape and color as the vehicle in
front of you gets closer or farther away.

Note:

The graphic does not display if you

switch on cruise control or adaptive cruise
control.

E374085

326

Pre-Collision Assist

Time Gap

Distance Gap

Distance Indic-

ator Color

System Sensit-

ivity

Vehicle Speed

Greater than 0.9

seconds.

Greater than
82 ft (25 m).

Gray.

Normal.

62 mph

(100 km/h).

0.6-0.9

seconds.

56–82 ft

(17–25 m).

Yellow.

Less than 0.6

seconds.

Less than 56 ft

(17 m).

Red.

327

Pre-Collision Assist

DISTANCE INDICATION
INDICATOR - VEHICLES WITH: 12
INCH SCREEN

The indicator displays the time gap
between your vehicle and vehicles ahead
of you. The area in front your vehicle
changes shape and color as the vehicle in
front of you gets closer or farther away.

Note:

The graphic does not display if you

switch on cruise control or adaptive cruise
control.

E354245

Time Gap

Distance Gap

Distance Indic-

ator Color

System Sensit-

ivity

Vehicle Speed

Greater than 0.9

seconds.

Greater than
82 ft (25 m).

Blue.

Normal.

62 mph

(100 km/h).

0.6-0.9

seconds.

56–82 ft

(17–25 m).

Yellow.

Less than 0.6

seconds.

Less than 56 ft

(17 m).

Red.

328

Pre-Collision Assist

DISTANCE ALERT

 (IF EQUIPPED)

WHAT IS DISTANCE ALERT

The system alerts you with a warning lamp
if the distance to the vehicle ahead is
small.

Note:

The warning lamp does not

illuminate if cruise control or adaptive cruise
control is active.

ADJUSTING THE SENSITIVITY OF
DISTANCE ALERT - VEHICLES
WITH: 12 INCH SCREEN

To adjust the sensitivity of the system, use
the touchscreen:

1.

Press 

Features

 on the touchscreen.

2. Press 

Driver Assistance

.

3. Press 

Pre-Collision Assist

.

4. Press 

Alert Sensitivity

.

5. Select a setting.

ADJUSTING THE SENSITIVITY OF
DISTANCE ALERT - VEHICLES
WITH: 15 INCH SCREEN

To adjust the sensitivity of the system:

1.

E386797

 Press the button on the

touchscreen.

2. Press 

Driver Assistance

.

3. Press 

Pre-Collision Assist

.

4. Press 

Alert Sensitivity

.

5. Select a setting.

AUTOMATIC EMERGENCY
BRAKING

WHAT IS AUTOMATIC
EMERGENCY BRAKING

Automatic emergency braking may
activate if the system determines that a
collision is imminent. The system may help
to reduce impact damage or avoid the
crash completely.

Automatic emergency braking is only
available up to certain speeds.  See

Pre-Collision Assist Limitations

 (page

323).

SWITCHING AUTOMATIC
EMERGENCY BRAKING ON AND
OFF - VEHICLES WITH: 12 INCH
SCREEN

To switch the system on or off, use the
touchscreen:

1.

Press 

Features

 on the touchscreen.

2. Press 

Driver Assistance

.

3. Press 

Pre-Collision Assist

.

4. Press 

Auto Emergency Braking

.

5. Switch the feature on or off.

SWITCHING AUTOMATIC
EMERGENCY BRAKING ON AND
OFF - VEHICLES WITH: 15 INCH
SCREEN

To switch the system on or off:

1.

E386797

 Press the button on the

touchscreen.

2. Press 

Driver Assistance

.

3. Press 

Pre-Collision Assist

.

4. Press 

Automatic Emergency Braking

.

329

Pre-Collision Assist

5. Switch the feature on or off.

EVASIVE STEERING ASSIST

 (IF

EQUIPPED)

WHAT IS EVASIVE STEERING
ASSIST

If your vehicle is rapidly approaching a road
user, evasive steering assist helps you steer
around the road user.

After you turn the steering wheel in an
attempt to avoid a crash with the road
user, the system applies additional steering
torque to help you steer around the road
user. After you pass the road user, the
system applies steering torque when you
turn the steering wheel to steer back into
the lane. The system deactivates after you
fully pass the road user.

Note:

Road users are defined as

pedestrians or bicyclists in your vehicle's
path or another stationary vehicle in the
same lane or a vehicle traveling in the same
lane in the same direction as you.  See

Pre-Collision Assist Precautions

 (page

322).

EVASIVE STEERING ASSIST
LIMITATIONS

Evasive steering assist only activates when
all the following occur:

Automatic emergency braking and
evasive steering assist are on.

The system detects a road user ahead
and starts to apply the brakes.

You significantly turn the steering
wheel to steer around a road user.

Note:

Evasive steering assist does not

automatically steer around a road user. If
you do not turn the steering wheel, evasive
steering assist does not activate.

Note:

Evasive steering assist does not

activate if the distance to the road user
ahead is too small and the system cannot
avoid a crash.

SWITCHING EVASIVE STEERING
ASSIST ON AND OFF - VEHICLES
WITH: 12 INCH SCREEN

To switch the system on or off, use the
touchscreen:

1.

Press 

Features

 on the touchscreen.

2. Press 

Driver Assistance

.

3. Press 

Pre-Collision Assist

.

4. Switch 

Evasive Steering

 on or off.

Note:

If you switch automatic emergency

braking off, evasive steering assist turns off.

Note:

Automatic emergency braking and

evasive steering assist turn on every time
you start your vehicle.

SWITCHING EVASIVE STEERING
ASSIST ON AND OFF - VEHICLES
WITH: 15 INCH SCREEN

To switch the system on or off:

1.

E386797

 Press the button on the

touchscreen.

2. Press 

Driver Assistance

.

3. Press 

Pre-Collision Assist

.

4. Switch 

Evasive Steering

 on or off.

Note:

If you switch automatic emergency

braking off, evasive steering assist turns off.

Note:

Automatic emergency braking and

evasive steering assist turn on every time
you start your vehicle.

330

Pre-Collision Assist

PRE-COLLISION ASSIST –
TROUBLESHOOTING

PRE-COLLISION ASSIST –
WARNING LAMPS

E335612

A telltale illuminates in the
instrument cluster display to
indicate if the system is disabled,

unavailable, or temporarily degraded due
to external environmental conditions.

Note:

No action is needed if the telltale

illuminates without a corresponding
information message.  See 

Pre-Collision

Assist Precautions

 (page 322).

PRE-COLLISION ASSIST – INFORMATION MESSAGES

Action

Message

You have a blocked sensor due to bad

weather, ice, mud or water in front of the

radar sensor. You can typically clean the

sensor to resolve.

Pre-Collision Assist Not Available Sensor

Blocked

A fault with the system has occurred. Have

your vehicle checked as soon as possible.

Pre-Collision Assist Not Available

331

Pre-Collision Assist

PRE-COLLISION ASSIST –
FREQUENTLY ASKED QUESTIONS

What should I do if the windshield
in front of the camera is dirty or
obstructed?

Clean the outside of the windshield in
front of the camera.

What if the windshield in front of
the camera is clean, but the
message remains in the
instrument cluster display?

Wait a short time. It could take several
minutes for the camera to detect that
there is no obstruction.

What should I do if the surface of
the radar in the grille is dirty or
obstructed?

Clean the grille surface in front of the
radar or remove the object causing the
obstruction.

What if the surface of the radar in
the grille is clean, but the message
remains in the instrument cluster
display?

Wait a short time. It could take several
minutes for the radar to detect that
there is no obstruction.

Can weather or road conditions
interfere with the radar signals?

Yes, weather such as heavy rain, spray
or fog as well as water, snow or ice on
the surface of the road can interfere
with the radar signals. In these
situations, the system temporarily
disables this feature. Pre-collision
assist reactivates a short time after the
weather conditions improve.

What if the radar is out of
alignment due to a front end
impact?

Have your vehicle serviced to have the
radar checked for proper coverage and
operation.

332

Pre-Collision Assist

WHAT IS SPEED SIGN
RECOGNITION

Speed sign recognition detects speed limit
signs to inform you of the current speed
limit. Detected speed signs appear in the
instrument cluster display.

HOW DOES SPEED SIGN
RECOGNITION WORK

Speed sign recognition uses the front
windshield camera to detect speed signs.

If your vehicle has speed sign recognition
with navigation, stored speed sign data
may influence the indicated speed limit
value.

SPEED SIGN RECOGNITION
PRECAUTIONS

WARNING: 

You are responsible for

controlling your vehicle at all times. The
system is designed to be an aid and does
not relieve you of your responsibility to
drive with due care and attention. Failure
to follow this instruction could result in
the loss of control of your vehicle,
personal injury or death.

WARNING: 

In cold and severe

weather conditions the system may not
function. Rain, snow and spray can all
limit sensor performance.

WARNING: 

The system may not

operate properly if the sensor is blocked.
Keep the windshield free from
obstruction.

Note:

Do not carry out windshield repairs

in the immediate area surrounding the
sensor.

Note:

If your vehicle has a suspension kit

not approved by Ford, the system may not
correctly function.

Note:

The system may not detect all speed

signs and may incorrectly read signs.

Note:

Always fit our original parts when

replacing headlamp bulbs. Other bulbs may
reduce system performance.

SPEED SIGN RECOGNITION
LIMITATIONS

Speed sign recognition may not operate
correctly due to:

Outdated map data.

Incorrect recognition of speed limits by
the sensor of signs on parallel roads or
exit ramps.

Missed recognition of faded, dirty, or
distorted signs.

SPEED SIGN RECOGNITION
INDICATORS

E317824

When the system detects a speed limit
sign, it appears in the instrument cluster
display.

Note:

Sign indicator image may vary based

on your vehicle's display type.

333

Speed Sign Recognition

 (If Equipped)

SETTING THE SPEED SIGN
RECOGNITION SPEED
WARNING - VEHICLES WITH:
12 INCH SCREEN

To set the speed warning, use the
touchscreen.

1.

Press 

Features

 on the touchscreen.

2. Press 

Driver Assistance

.

3. Press 

Speed Limit Assist

.

4. Switch the feature on or off.

SETTING THE SPEED SIGN
RECOGNITION SPEED
WARNING - VEHICLES WITH:
15 INCH SCREEN

To set the speed warning, use the
touchscreen.

1.

Access the vehicle drawer.

2. Press 

SETTINGS

.

3. Press 

Driver Assistance

.

4. Press 

Speed Limit Assist

.

5. Select to switch the feature on or off.

SETTING THE SPEED SIGN
RECOGNITION SPEED
TOLERANCE - VEHICLES WITH:
12 INCH SCREEN

To set the tolerance of the speed warning,
use the touchscreen.

1.

Press 

Features

 on the touchscreen.

2. Press 

Driver Assistance

.

3. Press 

Speed Limit Assist

.

4. Press 

Tolerance

.

5. Use the slider bar to select the required

level.

SETTING THE SPEED SIGN
RECOGNITION SPEED
TOLERANCE - VEHICLES WITH:
15 INCH SCREEN

To set the tolerance of the speed warning,
use the touchscreen.

1.

Access the vehicle drawer.

2. Press 

SETTINGS

.

3. Press 

Driver Assistance

.

4. Press 

Speed Limit Assist

.

5. Press 

Tolerance

.

6. Use the slider bar to select the required

level.

334

Speed Sign Recognition

 (If Equipped)

SPEED SIGN RECOGNITION – TROUBLESHOOTING

SPEED SIGN RECOGNITION – INFORMATION MESSAGES

Details

Message

The traffic sign data provided by the navig-
ation system is unavailable due to weak or
no signal. Wait for a short period of time for

the signal to improve. If the message

continues to appear, have the system

checked as soon as possible.

Traffic Sign Reduced Performance See

Manual

335

Speed Sign Recognition

 (If Equipped)

SPEED SIGN RECOGNITION –
FREQUENTLY ASKED QUESTIONS

Why does the speed limit change
without any sign on the road?

The speed limit changes due to the
speed limit data stored in the map
data.

Why does speed sign recognition
show a wrong speed limit?

The system shows a wrong speed limit
due to incorrect and outdated map
data or due to incorrect recognition of
the speed limits by the camera.

336

Speed Sign Recognition

 (If Equipped)

WHAT IS DRIVER ALERT

Driver alert alerts you if it determines that
you are becoming drowsy or if your driving
deteriorates.

HOW DOES DRIVER ALERT
WORK

Driver alert determines your alertness level
based on your driving behavior in relation
to the lane markings and other factors
using the front windshield camera.

E309385

DRIVER ALERT PRECAUTIONS

WARNING: 

You are responsible for

controlling your vehicle at all times. The
system is designed to be an aid and does
not relieve you of your responsibility to
drive with due care and attention. Failure
to follow this instruction could result in
the loss of control of your vehicle,
personal injury or death.

WARNING: 

Take regular rest

breaks if you feel tired. Do not wait for
the system to warn you.

WARNING: 

Certain driving styles

may result in the system warning you
even if you are not feeling tired.

WARNING: 

In cold and severe

weather conditions the system may not
function. Rain, snow and spray can all
limit sensor performance.

WARNING: 

The system will not

operate if the sensor cannot track the
road lane markings.

WARNING: 

If damage occurs in the

immediate area surrounding the sensor,
have your vehicle checked as soon as
possible.

WARNING: 

The system may not

correctly operate if your vehicle is fitted
with a suspension kit not approved by
us.

WARNING: 

The system may not

operate properly if the sensor is blocked.
Keep the windshield free from
obstruction.

Note:

If something is blocking the camera

or damaged the windshield, Driver Alert may
not function.

DRIVER ALERT LIMITATIONS

Driver alert may not function correctly if:

The sensor cannot track the road lane
markings.

Your vehicle's speed is less than
approximately 40 mph (65 km/h).

337

Driver Alert

SWITCHING DRIVER ALERT ON
AND OFF - VEHICLES WITH: 12
INCH SCREEN

1.

Press 

Features

 on the touchscreen.

2. Press 

Driver Assistance

.

3. Switch 

Driver Alert

 on or off.

Note:

The system remains on or off

depending on how it was last set.

Resetting Driver Alert

You can reset the system by either:

Switching your vehicle off and on.

Opening and closing the driver door
when your vehicle is stationary, and it
is safe to do so.

SWITCHING DRIVER ALERT ON
AND OFF - VEHICLES WITH:
15.5 INCH CENTER DISPLAY
SCREEN/15 INCH SCREEN

1.

E386797

 Press the button on the

touchscreen.

2. Press 

Driver Assistance

.

3. Switch 

Driver Alert

 on or off.

Note:

The system remains on or off

depending on how it was last set.

Resetting Driver Alert

You can reset the system by either:

Switching your vehicle off and on.

Stopping your vehicle and then opening
and closing the driver door.

DRIVER ALERT – TROUBLESHOOTING

DRIVER ALERT – INFORMATION MESSAGES

Action

Message

Stop and rest as soon as it is safe to do so.

Driver Alert Warning Rest Now

Take a rest soon.

Driver Alert Warning Rest Suggested

338

Driver Alert

LOAD CARRYING
PRECAUTIONS

Keep your loaded vehicle weight
within its design rating capability,
with or without a trailer. Properly
loading your vehicle provides
maximum return of vehicle design
performance. Before you load your
vehicle, become familiar with the
following terms for determining
your vehicle’s weight rating, with
or without a trailer, from the
vehicle’s Tire and Loading
Information label or Safety
Compliance Certification label.

WARNING: 

The

appropriate loading capacity of
your vehicle can be limited either
by volume capacity (how much
space is available) or by payload
capacity (how much weight the
vehicle should carry). Once you
have reached the maximum
payload of your vehicle, do not
add more cargo, even if there is
space available. Overloading or
improperly loading your vehicle
can contribute to loss of vehicle
control and vehicle rollover.

WARNING: 

Exceeding the

Safety Compliance Certification
label vehicle weight limits can
adversely affect the
performance and handling of
your vehicle, cause vehicle
damage and can result in the
loss of control of your vehicle,
serious personal injury or death.

WARNING: 

Do not use

replacement tires with lower
load carrying capacities than the
original tires because they may
lower your vehicle's GVWR and
GAWR limitations. Replacement
tires with a higher limit than the
original tires do not increase the
GVWR and GAWR limitations.

WARNING: 

Do not exceed

the GVWR or the GAWR
specified on the certification
label.

WARNING: 

Exceeding any

vehicle weight rating can
adversely affect the
performance and handling of
your vehicle, cause vehicle
damage and can result in the
loss of control of your vehicle,
serious personal injury or death.

WARNING: 

When loading

the roof racks, we recommend
you evenly distribute the load,
as well as maintain a low center
of gravity. Loaded vehicles, with
higher centers of gravity, may

339

Load Carrying

handle differently than unloaded
vehicles. Take extra precautions,
such as slower speeds and
increased stopping distance,
when driving a heavily loaded
vehicle.

The gross combined weight must
never exceed the Gross Combined
Weight Rating.

LOCATING THE SAFETY
COMPLIANCE CERTIFICATION
LABELS

Safety Compliance Certification Label
Example:

E198828

The Safety Compliance Certification label
is located on the door hinge pillar,
door-latch post, or the door edge that
meets the door-latch post, next to the
driver seating position.

WHAT IS THE GROSS AXLE
WEIGHT RATING

GAWR (Gross Axle Weight
Rating)

GAWR is the maximum allowable
weight that a single axle (front or
rear) can carry. These numbers
are on the Safety Compliance
Certification label.

WHAT IS THE GROSS VEHICLE
WEIGHT RATING

GVWR is the maximum allowable
weight of the fully loaded vehicle.
This includes all options,
equipment, passengers and cargo.
It appears on the Safety
Compliance Certification label.

WHAT IS THE GROSS
COMBINED WEIGHT RATING

Gross Combined Weight Rating
(GCWR) is the maximum
allowable weight of the vehicle
and the loaded trailer, including
all cargo and passengers, that the
vehicle can handle without risking
damage. (Important: The towing
vehicle’s braking system is rated
for operation at Gross Vehicle
Weight Rating, not at Gross
Combined Weight Rating.)
Separate functional brakes should
be used for safe control of towed
vehicles and for trailers where the

340

Load Carrying

Gross Combined Weight of the
towing vehicle plus the trailer
exceed the Gross Vehicle Weight
Rating of the towing vehicle.  See

Recommended Towing
Weights

 (page 355).

CALCULATING PAYLOAD

Tire and Loading Label Information
Example:

E198719

Payload is the combined weight
of cargo and passengers that your
vehicle is carrying. The maximum
payload for your vehicle appears
on the Tire and Loading label. The
label is either on the B-pillar or the
edge of the driver door. Vehicles

exported outside the US and
Canada may not have a tire and
loading label. Look for “The
combined weight of occupants
and cargo should never exceed
XXX kg or XXX lb” for maximum
payload. The payload listed on the
Tire and Loading Information label
is the maximum payload for your
vehicle as built by the assembly
plant. If you install any additional
equipment on your vehicle, you
must determine the new payload.
Subtract the weight of the
equipment from the payload listed
on the Tire and Loading label.
When towing, trailer tongue
weight or king pin weight is also
part of payload.

CALCULATING THE LOAD
LIMIT

Steps for determining the correct
load limit:

1. Locate the statement "The

combined weight of occupants
and cargo should never exceed
XXX kg or XXX lb." on your
vehicle’s placard.

2. Determine the combined

weight of the driver and
passengers that will be riding
in your vehicle.

3. Subtract the combined weight

of the driver and passengers
from XXX kg or XXX lb.

341

Load Carrying

4. The resulting figure equals the

available amount of cargo and
luggage load capacity. For
example, if the “XXX” amount
equals 1,400 lb. and there will
be five 150 lb. passengers in
your vehicle, the amount of
available cargo and luggage
load capacity is 650 lb.
(1400-750 (5 x 150) = 650 lb.)

5. Determine the combined

weight of luggage and cargo
being loaded on the vehicle.
That weight may not safely
exceed the available cargo and
luggage load capacity
calculated in Step 4.

6. If your vehicle will be towing a

trailer, load from your trailer
will be transferred to your

vehicle. Consult this manual to
determine how this reduces the
available cargo and luggage
load capacity of your vehicle.

Helpful examples for
calculating the available
amount of cargo and luggage
load capacity

Suppose your vehicle has a
1400-pound (635-kilogram) cargo
and luggage capacity. You decide
to go golfing. Is there enough load
capacity to carry you, four of your
friends and all the golf bags? You
and four friends average 220
pounds (99 kilograms) each and
the golf bags weigh approximately
30 pounds (13.5 kilograms) each.
The calculation would be: 1400 -
(5 x 220) - (5 x 30) = 1400 - 1100

- 150 = 150 pounds. Yes, you have
enough load capacity in your
vehicle to transport four friends
and your golf bags. In metric units,
the calculation would be: 635
kilograms - (5 x 99 kilograms) -
(5 x 13.5 kilograms) = 635 - 495 -
67.5 = 72.5 kilograms.

Suppose your vehicle has a
1400-pound (635-kilogram) cargo
and luggage capacity. You and
one of your friends decide to pick
up cement from the local home
improvement store to finish that
patio you have been planning for
the past two years. Measuring the
inside of the vehicle with the rear
seat folded down, you have room
for twelve 100-pound
(45-kilogram) bags of cement. Do

you have enough load capacity to
transport the cement to your
home? If you and your friend each
weigh 220 pounds (99 kilograms),
the calculation would be: 1400 -
(2 x 220) - (12 x 100) = 1400 - 440
- 1200 = - 240 pounds. No, you do
not have enough cargo capacity
to carry that much weight. In
metric units, the calculation would
be: 635 kilograms - (2 x 99
kilograms) - (12 x 45 kilograms) =
635 - 198 - 540 = -103 kilograms.
You will need to reduce the load
weight by at least 240 pounds
(104 kilograms). If you remove
three 100-pound (45-kilogram)
cement bags, then the load
calculation would be: 1400 - (2 x
220) - (9 x 100) = 1400 - 440 -
900 = 60 pounds. Now you have

342

Load Carrying

the load capacity to transport the
cement and your friend home. In
metric units, the calculation would
be: 635 kilograms - (2 x 99
kilograms) - (9 x 45 kilograms) =
635 - 198 - 405 = 32 kilograms.

The above calculations also
assume that the loads are
positioned in your vehicle in a
manner that does not overload
the front or the rear gross axle
weight rating specified for your
vehicle on the Safety Compliance
Certification label.

ROOF RACK

ROOF RACK PRECAUTIONS

WARNING: 

Read and follow the

manufacturer's instructions when you
are fitting a roof rack.

WARNING: 

When loading the roof

racks, we recommend you evenly
distribute the load, as well as maintain
a low center of gravity. Loaded vehicles,
with higher centers of gravity, may
handle differently than unloaded
vehicles. Take extra precautions, such
as slower speeds and increased stopping
distance, when driving a heavily loaded
vehicle.

Note:

If you use a roof rack, the fuel

consumption of your vehicle will be higher
and you may experience different driving
characteristics.

You must place loads directly on the
crossbars fitted to the roof rack side rails.

Make sure that you securely fasten the
load.  Check the tightness of the load
before driving and at each fuel stop.

ROOF RACK LOAD CAPACITIES

Maximum Recommended Load

Description

125 lb (56 kg)

Vehicles with a moonroof.

200 lb (90 kg)

Vehicles without a moonroof.

Note:

The maximum roof load is based on

evenly distributing the load on the crossbars.

Note:

When using a roof rack system, you

must subtract the weight of the roof rack
system from the maximum recommended
load to determine your actual maximum
cargo load. See the roof rack system
manufacturer for more information.

343

Load Carrying

LUGGAGE COMPARTMENT
PRECAUTIONS

WARNING: 

Make sure that you

properly secure objects in the luggage
compartment. Failure to follow this
instruction could result in personal injury
in the event of a sudden stop or crash.

WARNING: 

Do not place objects

on the luggage cover. Failure to follow
this instruction could result in personal
injury or death in the event of a sudden
stop or crash.

WARNING: 

The appropriate

loading capacity of your vehicle can be
limited either by volume capacity (how
much space is available) or by payload
capacity (how much weight the vehicle
should carry). Once you have reached
the maximum payload of your vehicle,
do not add more cargo, even if there is
space available. Overloading or
improperly loading your vehicle can
contribute to loss of vehicle control and
vehicle rollover.

WARNING: 

Make sure that you fully

close the liftgate to prevent exhaust
fumes from entering your vehicle. If you
are unable to fully close the liftgate,
open the air vents or the windows to
allow fresh air to enter your vehicle.
Failure to follow this instruction could
result in personal injury or death.

WARNING: 

Do not exceed the

maximum front and rear axle loads for
your vehicle.

Note:

 When loading long objects into your

vehicle, for example pipes, timber or
furniture, be careful not to damage the
interior trim.

INSTALLING AND REMOVING
THE LUGGAGE
COMPARTMENT CARGO NET

WARNING: 

This net is not designed

to restrain objects during a collision or
heavy braking.

E275127

1.

Fold down the hooks on the top of the
rear quarter trim panel.

E275126

2. Attach the loop end of the net to the

upper hook. Use one prong on the hook
for the net attachment.

344

Luggage Compartment

E275125

3. Attach the bottom of the net to the

lower anchor point.

E275124

4. Repeat this procedure on the other side

of your vehicle.

ADJUSTING THE LUGGAGE
COMPARTMENT LOAD FLOOR

Short Wheelbase Load Floor

E250821

Lift up on the handle to open the cover.

Note:

The board operates with friction

hinges. This allows you to put it in any
position between a 0° and a 90° angle.

E250823

To close, lower the cover.

Long Wheelbase Load Floor

The bi-folding load floor provides access
to two separate storage compartments.

E250822

Lift up on the handle and fold it back to
open the cover.

Note:

The board operates with friction

hinges. This allows you to put it in any
position between a 0° and a 90° angle.

E250824

345

Luggage Compartment


Content      ..     8      9      10      11     ..