Ford F-150 (2022 year). Manual in english - page 28
 

  Index      Manuals     Ford F-150 (2022 year). Manual in english


Search            copyright infringement  


Content      ..     26      27      28      29     ..


Ford F-150 (2022 year). Manual in english - page 28


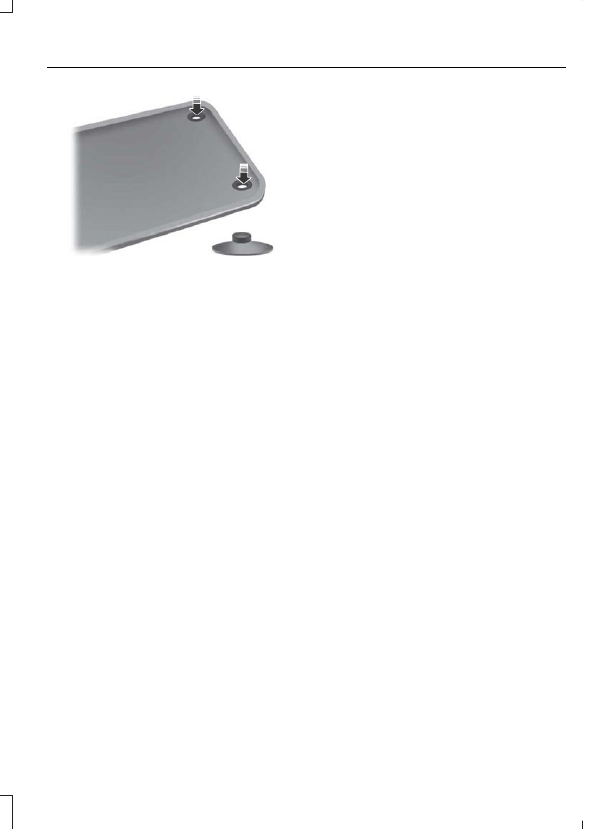
E142666

To install floor mats that have eyelets,
position the floor mat eyelet over the
retention post and press down to lock in
position. Repeat for all eyelets on the floor
mat.

To remove the floor mats, reverse the
installation procedure.

Note:

Regularly check the floor mats to

make sure they are secure.

457

Driving Hints

SNOW PLOWING
PRECAUTIONS

Your vehicle is not approved for snow
plowing. Never snow plow with your
vehicle.

458

Snow Plowing - Vehicles Without: Snow Plow Mode

SNOW PLOWING
PRECAUTIONS

WARNING: 

Modifying or adding

equipment to the front of your vehicle
could affect the performance of the
airbag system, increasing the risk of
injury. This includes the hood, bumper
system, frame, front body structure, tow
hooks, hood pins, push bar and
snowplows.

WARNING: 

Do not attempt to

service, repair, or modify the
supplementary restraint system or
associated components. Failure to
follow this instruction could result in
personal injury or death.

WARNING: 

All occupants of your

vehicle, including the driver, should
always properly wear their seatbelts,
even when an airbag supplemental
restraint system is provided. Failure to
properly wear your seatbelt could
seriously increase the risk of injury or
death.

WARNING: 

Do not spin the wheels

at over 34 mph (55 km/h). The tires may
fail and injure a passenger or bystander.

Note:

Look for an alterer’s label on your

vehicle from the snowplow installer
certifying that the installation meets all
applicable Federal Motor Vehicle Safety
Standards (FMVSS).

Note:

Federal and some local regulations

require additional exterior lamps for
snowplow-equipped vehicles. Contact an
authorized dealer for additional information.

Note:

Do not remove or defeat the tripping

mechanisms designed into the snow
removal equipment by its manufacturer.
Doing so could cause damage to your
vehicle and the snow removal equipment
as well as possible airbag deployment.

OPERATING YOUR VEHICLE
WITH A SNOWPLOW

Weight limits and guidelines for selecting
and installing the snowplow are in the Ford
Truck Body Builders Layout Book.   For
additional information, visit

www.fordbbas.com

.

A typical snowplow installation affects the
following:

Front gross axle weight rating.  See

What Is the Gross Axle Weight
Rating

 (page 389).

Gross vehicle weight rating.  See 

What

Is the Gross Vehicle Weight Rating

(page 389).

Braking and steering.

Front wheel toe. See the 

Ford

Workshop Manual

.

Headlight aim.  See 

Adjusting the

Headlamps

 (page 497).

Tire air pressure.  See 

Information on

the Tire Sidewall

 (page 520).

Note:

Do not exceed the front gross axle

weight rating or gross vehicle weight rating.

Note:

Your vehicle may require rear ballast

weight for proper braking and steering.

Your vehicle has a driver and passenger
airbag supplemental restraint system. The
supplemental restraint system activates
in certain frontal and offset frontal
collisions when the vehicle sustains
sufficient longitudinal deceleration.

459

Snow Plowing - Vehicles With: Snow Plow Mode

When operating your vehicle with a
snowplow:

Do not exceed 45 mph (72 km/h).

Your engine could run at a higher
temperature than normal.

If you are driving more than 15 mi
(24 km) at temperatures above
freezing, angle the plow blade
either full left or full right to provide
maximum airflow to the radiator.

If you are driving less than 15 mi
(24 km) at speeds up to 45 mph
(72 km/h) in cold weather, you do
not need to worry about blade
position to provide maximum
airflow.

Shift to 

4L

 when plowing in small areas

at speeds below 5 mph (8 km/h).

Shift to 

4H

 when plowing larger areas

or light snow at higher speeds above
5 mph (8 km/h).  Do not exceed
15 mph (24 km/h).

Do not shift the transmission from a
forward gear to reverse (R) until the
engine is at idle and the wheels have
stopped.

Note:

Careless or high-speed driving when

snowplowing, which results in significant
vehicle decelerations, can deploy the airbag.
Such driving also increases the risk of
accidents.

Note:

Drive your vehicle at least 500 mi

(800 km) before using your vehicle for
snowplowing.

Note:

Follow the severe duty schedule for

engine oil and transmission fluid change
intervals.  See 

Special Operating

Conditions Scheduled Maintenance

 (page

648).

SNOWPLOW MODE

WHAT IS SNOWPLOW MODE

Snowplow mode reduces vehicle electrical
load to allow the electrical system to have
sufficient power to support residential
snowplow use.

SWITCHING SNOWPLOW MODE
ON AND OFF

Vehicles receive a physical button in the
instrument panel or an option in the SYNC
menu to enable snowplow mode.

Snowplow mode does not remember the
setting when you switch your vehicle off.
You must re-enable the mode every time
you wish to use it.

The following features turn off and are
disabled in snowplow mode and cannot
be turned back on until snowplow mode
is switched off:

120 V inverter.

Fog lamps.

Heated and cooled front seats.

The body module also activates the
snowplow relay that provides power to
aftermarket snowplow controls.

Note:

The electrical system supports the

addition of a residential snowplow of up to
60 A continuous, and snowplow lights of
up to 20 A continuous using snowplow
mode. The system does not support
snowplow usage with additional electrical
aftermarket accessories.

Push Button

 (If Equipped)

Press the snowplow button on the
instrument panel to switch on snowplow
mode. The snowplow button illuminates
and a message displays.

460

Snow Plowing - Vehicles With: Snow Plow Mode

Press the snowplow button or switch off
the vehicle to switch off snowplow mode.

Using SYNC

 (If Equipped)

1.

Press 

Features

 on the touchscreen.

2. Press 

Snow Plow Mode

.

3. Switch 

Snow Plow Mode

 on or off.

461

Snow Plowing - Vehicles With: Snow Plow Mode

ROADSIDE ASSISTANCE

Vehicles Sold in the United States:
Getting Roadside Assistance

To fully assist you should you have a
vehicle concern, Ford Motor Company
offers a complimentary roadside
assistance program.  This program is
separate from the New Vehicle Limited
Warranty.

The service is available:

24 hours a day, seven days a week.

For the coverage period supplied with
your vehicle.

Roadside Assistance covers:

A flat tire change with a good spare
(except vehicles supplied with a tire
inflation kit).

Battery jump start.

Lock-out assistance (key replacement
cost is the customer's responsibility).

Fuel delivery — independent service
contractors, if not prohibited by state,
local or municipal law, shall deliver up
to 2 gal (8 L) of gasoline or 5 gal (20 L)
of diesel fuel to a disabled vehicle.
Roadside assistance limits fuel delivery
service to two no-charge occurrences
within a 12-month period.

Winch out — available within 100 ft
(30 m) of a paved or county
maintained road, no recoveries.

Towing — independent service
contractors, if not prohibited by state,
local or municipal law, shall tow Ford
eligible vehicles to an authorized dealer
within 35 mi (56 km) of the
disablement location or to the nearest
authorized dealer. If a member
requests a tow to an authorized dealer
that is more than 35 mi (56 km) from
the disablement location, the member
shall be responsible for any mileage
costs in excess of 35 mi (56 km).

Roadside Assistance includes up to
$200 for a towed trailer if the disabled
eligible vehicle requires service at the
nearest authorized dealer.  If the towing
vehicle is operational but the trailer is
not, then the trailer does not qualify for
any roadside services.

Vehicles Sold in the United States:
Using Roadside Assistance

Complete the roadside assistance
identification card and place it in your
wallet for quick reference.  This card is in
the Owner's Manual kit.

United States vehicle customers who
require Roadside Assistance, call
1-800-241-3673.

If you need to arrange roadside assistance
for yourself, Ford Motor Company
reimburses a reasonable amount for
towing to the nearest dealership within
35 mi (56 km). To obtain reimbursement
information, United States vehicle
customers call 1-800-241-3673.
Customers need to submit their original
receipts.

462

Crash and Breakdown Information

Vehicles Sold in Canada: Getting
Roadside Assistance

To fully assist you should you have a
vehicle concern, Ford Motor Company of
Canada, Limited offers a complimentary
roadside assistance program.  This
program is eligible within Canada or the
continental United States.

The service is available 24 hours a day,
seven days a week.

This program is separate from the New
Vehicle Limited Warranty, but the coverage
is concurrent with the powertrain coverage
period of your vehicle. Canadian roadside
coverage and benefits may differ from the
U.S. coverage.

If you require more information, please call
us in Canada at 1-800-665-2006, or visit
our website at 

www.ford.ca

.

HIGH VOLTAGE BATTERY
VEHICLE PRECAUTIONS -
HYBRID ELECTRIC VEHICLE
(HEV)

In the event of damage or fire involving an
electric vehicle or hybrid-electric vehicle:

Assume the high-voltage battery and
associated components are energized
and fully charged.

Physical damage to the vehicle or
high-voltage battery could result in
immediate or delayed release of toxic,
flammable gases and fire.

Crashes

A crash or impact significant enough to
require an emergency response for
conventional vehicles would also require
the same response for an electric or
hybrid-electric vehicle.

If Possible:
1.

Move your vehicle to a safe, nearby
location and remain on the scene.

2. Roll down the windows before you

switch your vehicle off.

3. Place your vehicle in park (P), apply

the parking brake, switch off the
vehicle, turn on the hazard flashers and
move the key at least 16 ft (5 m) away
from the vehicle.

Always:

Call emergency assistance if needed
and advise that an electric or
hybrid-electric vehicle is involved.

Avoid contact with leaking fluids and
gases, and remain out of the way of
oncoming traffic until emergency
responders arrive.

When emergency responders arrive,
tell them that the vehicle involved is an
electric vehicle or hybrid-electric
vehicle.

Fires

As with any vehicle, call emergency
assistance immediately if you see sparks,
smoke or flames coming from the vehicle.
Remain a safe distance from the vehicle
and try to stay clear of the smoke.

1.

Exit the vehicle immediately.

2. Advise emergency assistance that an

electric or hybrid-electric vehicle is
involved.

3. As with any vehicle fire, do not inhale

smoke, vapors or gas from the vehicle,
as they may be hazardous.

463

Crash and Breakdown Information

Post-Incident

1.

Do not store a severely damaged
vehicle with a lithium-ion battery inside
a structure or within 50 ft (15 m) of any
structure or vehicle.

2. Make sure that passenger and luggage

compartments remain ventilated.

3. As with any vehicle, call emergency

assistance immediately if you see
sparks, smoke or flames coming from
the vehicle.

SWITCHING THE HAZARD
FLASHERS ON AND OFF

The hazard flasher button is on
the instrument panel. Press the
button to switch the hazard

flashers on if your vehicle is creating a
safety hazard for other road users.

When you switch the hazard flashers on,
all front and rear direction indicators flash.

Note:

The hazard flashers operate when

the ignition is in any position, or if the key is
not in the ignition. The battery loses charge
and could have insufficient power to restart
your vehicle.

Press the button again to switch them off.

JUMP STARTING THE VEHICLE

JUMP STARTING PRECAUTIONS

WARNING: 

Batteries normally

produce explosive gases which can
cause personal injury. Therefore, do not
allow flames, sparks or lighted
substances to come near the battery.
When working near the battery, always
shield your face and protect your eyes.
Always provide correct ventilation.

WARNING: 

Keep batteries out of

reach of children. Batteries contain
sulfuric acid. Avoid contact with skin,
eyes or clothing. Shield your eyes when
working near the battery to protect
against possible splashing of acid
solution. In case of acid contact with skin
or eyes, flush immediately with water for
a minimum of 15 minutes and get prompt
medical attention. If acid is swallowed,
call a physician immediately.

WARNING: 

Use only adequately

sized cables with insulated clamps.

WARNING: 

Make sure that the

cables are clear of any moving parts and
fuel delivery system parts.

WARNING: 

Connect batteries with

only the same nominal voltage.

WARNING: 

If the engine is running

while the hood is open, stay clear of
moving engine components. Failure to
follow this warning could result in serious
personal injury or death.

Do not attempt to push-start an automatic
transmission vehicle. This could cause
transmission damage.

Do not disconnect the battery of the
disabled vehicle. This could damage your
vehicle's electrical system.

PREPARING THE VEHICLE

Use only a 12 volt supply to start your
vehicle.

Park the booster vehicle close to the hood
of the disabled vehicle, making sure the
two vehicles do not touch.

464

Crash and Breakdown Information

JUMP STARTING THE VEHICLE

Connecting the Jumper Cables

WARNING: 

Do not connect the

negative jumper cable to any other part
of your vehicle. Use the ground point.

Note:

If you are using a jump pack or

booster box, follow the manufacturer's
instructions.

E281345

1.

Pull the red rubber boot backward.
Connect the positive (+) jumper cable
to the positive (+) terminal of the
discharged battery.

2. Connect the other end of the positive

(+) jumper cable to the positive (+)
terminal of the booster vehicle battery.

3. Connect the negative (-) jumper cable

to the negative (-) terminal of the
booster vehicle battery.

4. Make the final connection of the

negative (-) jumper cable to an
exposed metal part of the disabled
vehicle's engine, as shown in the
following illustration, away from the
battery and fuel injection system, or
connect the negative (-) jumper cable
to a ground connection point if
available.

Note:

Do not use the hood latch as a

negative (-) connection point. This could
cause springs in the latch to burn and
prevent the hood from operating correctly.

E309115

Starting the Engine

1.

Start the engine of the booster vehicle
and moderately rev the engine, or
gently press the accelerator to keep
the engine speed between 2000 and
3000 RPM, as shown in your
tachometer.

2. Start the engine of the disabled vehicle.

3. Once you start the disabled vehicle, run

both vehicle engines for an additional
three minutes before disconnecting the
jumper cables.

465

Crash and Breakdown Information

Removing the Jumper Cables

Remove the jumper cables in the reverse
order that they were connected.

Note:

Do not switch the headlamps on

when disconnecting the cables. The peak
voltage could blow the bulbs.

POST-CRASH ALERT SYSTEM

WHAT IS THE POST-CRASH
ALERT SYSTEM

The system helps draw attention to your
vehicle in the event of a serious impact.

HOW DOES THE POST-CRASH
ALERT SYSTEM WORK

The system is designed to turn the hazard
flashers on and to intermittently sound the
horn in the event of a serious impact that
deploys an airbag or the seatbelt
pretensioners.

POST-CRASH ALERT SYSTEM
LIMITATIONS

Depending on applicable laws in the
country your vehicle was built for, the horn
does not sound in the event of a serious
impact.

SWITCHING THE POST-CRASH
ALERT SYSTEM OFF

Press the hazard flasher switch or the
unlock button on the remote control to
switch the system off.

Note:

The alert turns off when the vehicle

battery runs out of charge.

AUTOMATIC CRASH SHUTOFF

WHAT IS AUTOMATIC CRASH
SHUTOFF

The automatic crash shutoff is designed
to stop the fuel going to the engine in the
event of a moderate or severe crash.

Note:

Not every impact causes a shutoff.

AUTOMATIC CRASH SHUTOFF
PRECAUTIONS

WARNING: 

If your vehicle has been

involved in a crash, have the fuel system
checked. Failure to follow this instruction
could result in fire, personal injury or
death.

RE-ENABLING YOUR VEHICLE

1.

Switch the ignition off.

2. Attempt to start your vehicle.

3. Switch the ignition off.

4. Attempt to start your vehicle.

Note:

If your vehicle does not start after the

third attempt, have your vehicle checked as
soon as possible.

466

Crash and Breakdown Information

RECOVERY TOWING

ACCESSING THE FRONT TOWING
POINT

WARNING: 

Using recovery hooks

is dangerous and should only be done by
a person familiar with proper vehicle
recovery safety practices. Improper use
of recovery hooks may cause hook failure
or separation from the vehicle and could
result in serious injury or death.

WARNING: 

Slowly remove the

slack from the recovery strap prior to
pulling. Failure to do so can introduce
significantly higher loads which can
cause the recovery hooks to break off, or
the recovery strap to fail which can cause
serious injury or death.

WARNING: 

Never link two straps

together with a clevis pin. These heavy
metal objects could become projectiles
if the strap breaks and can cause serious
injury or death.

WARNING: 

Switch the ignition off

before removing the recovery hook.
Failure to do so could result in personal
injury.

WARNING: 

The recovery hook can

become hot. Let the recovery hook cool
down before removing it. Failure to do
so could result in personal injury.

Your vehicle has frame-mounted front
recovery hooks.

Note:

Do not apply a load to the recovery

hooks that is greater than the gross vehicle
weight rating of your vehicle.

Before using recovery hooks:

Make sure all attaching points are
secure and capable of withstanding
the applied load.

Do not use chains, cables or tow straps
with metal hook ends.

Only use recovery straps that have a
minimum breaking strength two to
three times the gross vehicle weight of
the stuck vehicle.

Make sure the recovery strap is in good
condition and free of visible cuts, tears
or damage.

Use a damper device such as a tarp,
heavy blanket or piece of carpet, and
place it over the recovery strap to help
absorb the energy in the event the
strap breaks.

Make sure the stuck vehicle is not
loaded heavier than its gross vehicle
weight rating specified on the
certification label.

Align the tow vehicle and stuck vehicle
in a straight line, within 10 degrees.

Keep bystanders to the sides of the
vehicle, at a distance of at least twice
the length of the recovery strap. This
helps avoid injury from the hazard of a
recovery hook or strap breaking, or a
vehicle lurching into their path.

467

Crash and Breakdown Information

TRANSPORTING THE VEHICLE

E143886

If you need to tow your vehicle, contact a
professional towing service or your
roadside assistance service provider.

Your manufacturer produces a towing
manual for all authorized tow truck
operators. Have your tow truck operator
refer to this manual for proper hook-up
and towing procedures.

We recommend the use of a wheel lift and
dollies or flatbed equipment to tow your
vehicle. Vehicle damage could occur if
towed incorrectly, or by any other means.

Front-wheel and rear-wheel drive vehicles
must have their designated drive wheels
off the ground regardless of towing
direction. Use tow dollies to prevent
damage to the transmission.

All-wheel or four-wheel drive vehicles
require that all wheels be off the ground
using a wheel lift and dollies or flatbed
equipment. This prevents damage to the
transmission and drive system.

468

Crash and Breakdown Information

TOWING YOUR VEHICLE
PRECAUTIONS

Use the following guidelines when towing
your vehicle. Failure to follow this
instruction could result in vehicle damage
not covered by the vehicle warranty.

Note:

Make sure you properly secure your

vehicle to the tow vehicle.

Note:

If you are unsure of the vehicle’s

configuration, contact an authorized dealer.

RECREATIONALLY TOWING
YOUR VEHICLE - 4X4

WARNING: 

Do not disconnect the

battery when recreationally towing your
vehicle. This prevents the transfer case
from shifting properly and could cause
the vehicle to roll, even if the
transmission is in park (P).

WARNING: 

Placing the transfer

case in its neutral position could cause
your vehicle to freely roll. Make sure you
press and hold the brake pedal and the
vehicle is in a secure, safe position when
you place the transfer case in its neutral
position.

Follow these guidelines if you have a need
for recreational towing. An example of
recreational towing would be towing your
vehicle behind a motorhome. These
guidelines are to make sure that you do
not damage the transmission.

You can only tow your vehicle with all
wheels on the ground by placing the
transfer case in its neutral position and
engaging the recreational tow feature.
Perform the following steps after
positioning your vehicle behind the tow
vehicle and properly securing them
together.

Note:

Put your climate control system in

recirculated air mode to prevent exhaust
fumes from entering your vehicle.

Note:

Failure to put the transfer case in its

neutral position can damage vehicle
components.

Note:

 You can check the towing status at

any time by opening the driver door or
turning the ignition to the accessory or on
position.

Neutral Tow Enabled Leave

Transmission in Neutral

 appears in the

instrument cluster display to confirm you
can recreationally tow your vehicle.

Note:

If your vehicle has an anti-theft

alarm, make sure you switch perimeter
sensing on when towing.  See 

Setting the

Alarm Security Level

 (page 133).

Switching 

Neutral Tow

 On

1.

Start your vehicle.

2. Press the 

2H

 button on the four-wheel

drive mode control.

3. Place your vehicle in temporary neutral

mode.  See 

Entering Temporary

Neutral Mode

 (page 264).

4. Switch your vehicle off by pressing the

push button ignition switch once or
turning the key as far toward the off
position as possible. A message
appears in the instrument cluster
display.

5. Switch your vehicle to accessory mode

by pressing the push button ignition
switch once without pressing the brake
pedal or by turning the key to the on
position.

469

Towing Your Vehicle

6. Press and hold the brake pedal.

7.

Using the instrument cluster controls
on the steering wheel, select 

Settings

.

8. Select 

Neutral Tow

.

9. Press and hold the 

OK

 button until a

confirmation message appears in the
information display.

Note:

 If completed successfully, the

information display shows 

Neutral Tow

Enabled Leave Transmission in Neutral

.

This indicates that your vehicle is safe to
tow with all wheels on the ground.

Note:

If you do not see a confirmation

message in the instrument cluster display,
you must perform the procedure again from
the beginning.

Note:

You may hear noise as the transfer

case shifts into its neutral position. This is
normal.

10.

Release the brake pedal.

11.

Leave the transmission in neutral (N)
and switch your vehicle off by
pressing the push button ignition
switch once without pressing the
brake pedal or turning the key as far
toward the off position.

Note:

Vehicles with keys do not turn to the

off position when the transmission is in
neutral (N). You must leave the key in the
ignition when towing. Use the keyless entry
keypad or an extra set of keys to lock and
unlock your vehicle.

Switching 

Neutral Tow

 Off

1.

With your vehicle properly secured to
the tow vehicle, press and hold the
brake pedal and start the engine.

2. Switch your vehicle off by pressing the

push button ignition switch once or
turning the key as far towards the off
position and release the brake pedal.

3. Place your vehicle in accessory mode

by pressing the push button ignition
switch once without pressing the brake
pedal or by turning the ignition key to
the on position.

4. Press and hold the brake pedal.

5. Shift into park (P).

6. Release the brake pedal.

Note:

If completed successfully, the

instrument cluster displays 

2H

 and 

Neutral

Tow Disabled

.

Note:

You must perform the switching

neutral tow on and switching neutral tow
off procedures again from the beginning if
the indicator light and message do not
display.

Note:

You may hear a noise as the transfer

case shifts out of its neutral position. This
is normal.

7.

Apply the parking brake, then
disconnect your vehicle from the tow
vehicle.

8. Release the parking brake, start the

engine, and shift into drive (D) to make
sure the transfer case is out of the
neutral tow position.

9. If the transfer case does not

successfully shift out of its neutral
position, set the parking brake. Have
your vehicle checked as soon as
possible.

Resolving the 

Shift Delayed Drive

Forward

 Message

1.

Press and hold the brake pedal.

2. Start your vehicle.

3. Shift into neutral (N).

4. With the vehicle running, shift into drive

(D) and let the vehicle roll forward up
to 3 ft (1 m).

470

Towing Your Vehicle

Note:

You may hear a noise as the transfer

case shifts out of its neutral position. This
is normal.

5. Make sure the instrument cluster

displays 

Neutral Tow Disabled

.

RECREATIONALLY TOWING
YOUR VEHICLE - 4X2

You cannot recreational tow your vehicle
with all wheels on the ground because
vehicle or transmission damage could
occur. You must recreational tow your
vehicle with all four wheels off the ground,
such as when using a car-hauling trailer.
Otherwise, you cannot recreational tow
your vehicle.

EMERGENCY TOWING

If your vehicle becomes inoperable without
access to wheel dollies or a vehicle
transport trailer, it can be flat-towed with
all wheels on the ground, regardless of the
powertrain and transmission configuration,
under the following conditions:

Your vehicle is facing forward for
towing in a forward direction.

Use the manual park release
procedure.  See 

Using Manual Park

Release

 (page 267).  Failure to do so

may result in damage to the
transmission.

Maximum speed is 35 mph (56 km/h).

Maximum distance is 50 mi (80 km).

TOWING YOUR VEHICLE – TROUBLESHOOTING

TOWING YOUR VEHICLE – INFORMATION MESSAGES

Description

Message

The transfer case is in the neutral position and your vehicle

is safe to tow with all four wheels on the ground.

Neutral Tow Enabled

Leave Transmission in

Neutral

There is a transfer case gear tooth blockage present. With

your vehicle on, shift the transmission into drive (D) and let

the vehicle roll forward, up to 3 ft (1 m).

Shift Delayed Drive

Forward

The transfer case is not in the neutral position and your vehicle

is not safe to tow with all four wheels on the ground.

Neutral Tow Disabled

471

Towing Your Vehicle

FUSE PRECAUTIONS

WARNING: 

Always disconnect the

battery before servicing high current
fuses.

WARNING: 

To reduce risk of

electrical shock, always replace the
cover to the power distribution box
before reconnecting the battery or
refilling fluid reservoirs.

WARNING: 

Always replace a fuse

with one that has the specified
amperage rating. Using a fuse with a
higher amperage rating can cause severe
wire damage and could start a fire.

UNDER HOOD FUSE BOX

LOCATING THE UNDER HOOD
FUSE BOX

E311329

ACCESSING THE UNDER HOOD
FUSE BOX

E322941

472

Fuses


Content      ..     26      27      28      29     ..