Ford F-150 (2022 year). Manual in english - page 27
 

  Index      Manuals     Ford F-150 (2022 year). Manual in english


Search            copyright infringement  


Content      ..     25      26      27      28     ..


Ford F-150 (2022 year). Manual in english - page 27


Note:

If the trailer was connected just prior

to turning the system on, you may need to
drive forward to initialize the system. Follow
the instructions on the touchscreen to
activate the system.

USING TRAILER REVERSE
GUIDANCE VIEWS

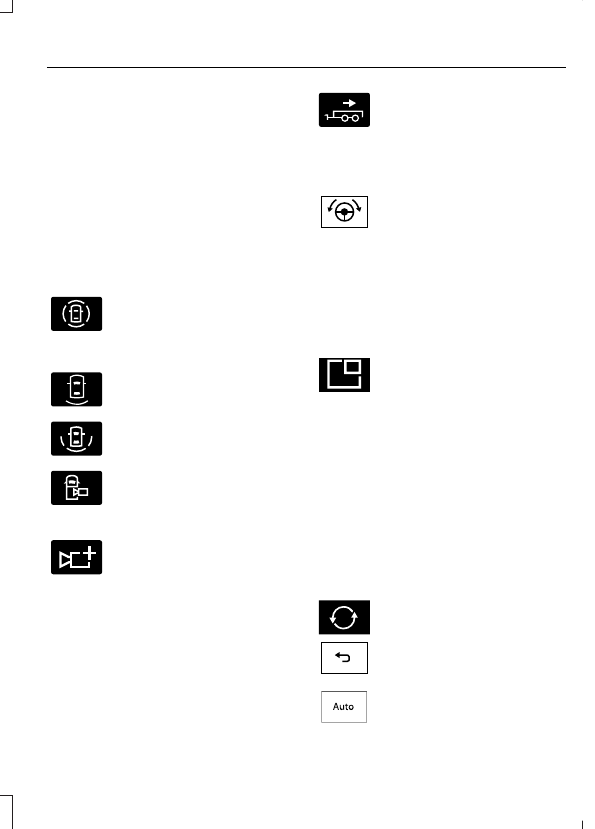
Up to seven camera views could be
available when using trailer reverse
guidance. Use the view that helps you the
most when reversing your vehicle and
trailer.

E310996

360° camera view. Shows a
360° view on the right-hand side
of the touchscreen with a rear

camera view on the left-hand side of the
touchscreen.

E310967

Rear view camera view. Shows
your trailer hitch or what is
directly behind your vehicle.

E310974

Rear split view camera view.
Shows a 180° degree view of
what is behind your vehicle.

E310995

Bed camera view. Shows the
truck bed.

Note:

This view also provides a

picture-in-picture view.

E311776

Trailer AUX camera view. Shows
a rear view camera image of
what is behind your trailer. You

need to separately purchase this camera
and have it installed.

Note:

This view also provides a

picture-in-picture view.

E310965

Trailer reverse guidance view.
Shows you a view of the sides of
your truck and the trailer. In auto

mode, this view moves as the trailer moves
so that you do not have to adjust the
camera as you turn. Left and right arrows
let you see other camera views.

E224484

Straight backup mode. Shows
which way to turn your steering
wheel to keep the trailer straight.

Use this view when you want to keep your
trailer completely in line with your truck.

Note:

This view also provides a

picture-in-picture view.

Note:

 It may be helpful to shift your vehicle

into drive (D), pull forward and straighten
out the vehicle and trailer before engaging
straight backup mode.

E351663

Picture-in-picture view. Shows
a main view and a secondary
view when in bed camera view,

trailer AUX camera view or straight backup
mode.

Note:

If you have a 8 in (20 cm)

touchscreen, picture-in-picture is off by
default. Press the picture-in-picture icon on
the touchscreen to switch picture-in-picture
view on and off.

Note:

If you have a 12 in (30 cm)

touchscreen, picture-in-picture is on by
default for bed camera view and trailer AUX
camera view and cannot be switched off.
Press the picture-in-picture icon on the
touchscreen to switch picture-in-picture
view on and off in straight backup mode.

E351662

Swap. Press to swap between
picture-in-picture views.

E224486

This takes you back to the 360°
camera system and out of the
trailer reverse guidance feature.

E315644

Auto. Press to return to auto
view.

441

Trailer Reverse Guidance

 (If Equipped)

Note:

Auto mode is the default setting.

Hitch Angle Graphic

The hitch angle graphic shows a small
representation of your truck and trailer with
visual feedback to help you monitor the
trailer. The graphic shows two different
colored lines for the trailer hitch angle. A
black line shows you where your trailer is
in relation to your vehicle. The white line
represents the amount the trailer can turn
based on steering wheel position.

The graphic shows a yellow and red zone
for the hitch angle to warn you of a high
angle condition that could require you to
pull forward to reduce the hitch angle. The
angle limits for each zone vary based on
the trailer length.

The yellow zone indicates you are
approaching the maximum controllable
trailer angle for the system. When the
trailer enters this zone, it is more difficult
to reduce the trailer turn when backing up.
It may be necessary to put your vehicle
back into drive (D) and pull forward to get
the truck and trailer back to an in-line
position.

The red zone indicates you have exceeded
the maximum controllable trailer angle for
the system. Immediately stop reversing.
Put your vehicle into drive (D) and pull
forward until the trailer is no longer in the
red zone.

442

Trailer Reverse Guidance

 (If Equipped)

TRAILER REVERSE GUIDANCE – TROUBLESHOOTING

TRAILER REVERSE GUIDANCE – INFORMATION MESSAGES

Description

Message

Displays when the system turns on and is
initializing.

Detecting Trailer Please Wait…

A condition exists that prevents the system
from turning on. If the message continues
to display, visit your authorized dealer to
have your vehicle checked.

Trailer Reverse Guidance System is Not
Available

The steering system needs to learn internal
parameters to fully enable the feature.
Drive your vehicle straight forward above
25 mph (40 km/h) for approximately 5
minutes.

Trailer Reverse Guidance Driving Required
to Initialize Steering Press OK to Exit

Displays when you exceed the maximum
controllable trailer angle for the system.
Place your vehicle in drive (D) and pull
forward to get your vehicle and trailer back
to an in-line position, then activate the
system by selecting the connected trailer
and following the instructions on the
touchscreen.

Stop now. Deactivated by trailer angle.

If this message consistently displays, you
may need to repeat the trailer setup and
calibration. Delete the trailer from the
system and repeat the setup and calibra-
tion process.

Displays when the system does not detect
the sensor. Check the sensor connection,
check that there is no damaged wiring
between the connector and sensor and
check that there is only one sensor
connected.

Trailer Reverse Guidance Sensor Not
Detected Refer to Owner's Manual Press
OK to Exit

If you do not want to use the sensor for this
trailer, delete the trailer in the touchscreen
then repeat the setup process with the
sticker.

443

Trailer Reverse Guidance

 (If Equipped)

Description

Message

Displays when the system does not detect
the trailer.
If your trailer is setup with a sticker, make
sure the rear camera is clean, and the
sticker is clearly visible in the camera image.
You can also move the trailer forward or
backward to change the trailer position and
lighting conditions.
If your trailer is setup with a sensor, check
that the sensor is correctly installed and
the trailer length is within the allowed
range.
If this message continues to display, visit
your authorized dealer to have your vehicle
checked.

Trailer Reverse Guidance Trailer Not
Detected. Refer to Owner's Manual. Press
OK to Exit

Displays when your vehicle has not moved
after the trailer sensor is connected or
extended operation below 1 mph (1 km/h).
Drive forward above 2 mph (3 km/h) to
initialize the system.

Trailer Reverse Guidance Trailer Not
Detected Pull Forward to Initialize Press
OK to Exit

444

Trailer Reverse Guidance

 (If Equipped)

TRAILER REVERSE GUIDANCE –
FREQUENTLY ASKED QUESTIONS

What does it mean if the system
does not detect a trailer that is
setup with a sticker?

The system could be having trouble
identifying the sticker. The system
requires a clear view of the sticker
placed on the trailer. You must keep
the camera lens and sticker clean for
the system to correctly operate. If the
system cannot initially detect the
trailer, it could be necessary for you to
change the lighting conditions by
moving your vehicle and trailer or
waiting until the conditions change.
See 

Applying the Trailer Reverse

Aid Sticker

 (page 438).  Deleting the

trailer and repeating the setup and
calibration could improve performance,
but some trailers are not compatible
with the sticker and camera system. If
the system consistently does not
detect the trailer with the sticker setup,
you may choose to setup the trailer
with a sensor.

Note:

The system is designed to be used

with the same trailer connection every time
you choose the trailer from the touchscreen.
When using a different drawbar or a
different pin hole on drawbars with more
than one, connecting the drawbar to your
vehicle affects the trailer position and you
may need to repeat the trailer setup and
calibration process.

Why does the trailer not reverse
straight?

The road conditions, such as road
camber and road slope, could affect
how straight the system can reverse.
You can compensate for the trailer
drifting to the right or left by slowly
turning the knob until the trailer is
following your desired path and then
holding the knob in that position.

Other factors, such as the hitch
connection or trailer suspension, could
affect how straight the system can
reverse the trailer. You can
compensate for the trailer drifting to
the right or left by slowly turning the
knob until the trailer is following your
desired path and then holding the knob
in that position.

The sensor could be incorrectly
installed. Make sure the sensor is
correctly installed.

What does it mean if the system
remains on one message for an
extended time during calibration
when setting up the system with
the sticker?

The camera could require cleaning.

You could have a blocked sticker. Verify
the sticker is in the proper location.  See

Applying the Trailer Reverse Aid
Sticker

 (page 438).

The drawbar could be outside of the
allowed range of 4–19 in (10–48 cm).

445

Trailer Reverse Guidance

 (If Equipped)

The system could have difficulties
recognizing the sticker based on
environmental factors. You could need
to move to a different area to change
the lighting and background or you
could need to change the direction you
are driving. You could also try setting
up the system at a different time of
day.

Some trailers are not compatible with
the sticker and camera system. If the
issue persists, set up the trailer with a
sensor purchased from your authorized
dealer.  See 

Trailer Sensor

Installation

 (page 439).

What does it mean if the system
pauses during calibration?

There could be steering input or trailer
movement during the straight drive
portion of the calibration process.

What does it mean if the system
displays hold steering steady
during turn?

Part of the calibration process for the
sticker setup requires a steady turn. If
you are continually moving the steering
wheel during the turn, this delays the
calibration process. To enable the
calibration process, hold the steering
wheel at the same position when
turning.

What does it mean if the system
displays that it is not available?

There could be a sub-system that the
system uses that is not correctly
operating. If the system continues to
display it is not available, visit your
authorized dealer to have your vehicle
checked.

There could be a battery voltage issue.
Make sure the battery is correctly
charged. If the system continues to
display it is not available, visit your
authorized dealer to have your vehicle
checked.

What does it mean if the system
displays that driving is required to
initialize steering?

The steering system needs to learn
internal parameters to fully turn on the
feature. Drive your vehicle straight
forward above 25 mph (40 km/h) for
approximately 5 minutes.

Your vehicle is new, there is a battery
voltage issue or you have serviced the
steering system.

What does it mean if the system
requires you to pull forward to
initialize?

This occurs when the vehicle has not
moved during the current key cycle
after you connect and select the trailer
in the touchscreen, or you operate the
system at speeds below 1 mph
(1 km/h) for an extended period of
time. Drive forward above 2 mph
(3 km/h) and the system indicates
when it initializes.

446

Trailer Reverse Guidance

 (If Equipped)

What does it mean if the trailer is
at its maximum angle or the
system deactivated by trailer
angle?

You are at the maximum controllable
trailer angle for the system. Place your
vehicle in drive (D) and pull forward to
get the truck and trailer back to an
in-line position.

The trailer could need to be
recalibrated. Check that the correct
trailer is selected in the touchscreen.
Verify the sensor is installed according
to the instructions included in the
sensor kit and check that the drawbar
and the trailer dimensions are within
the allowed range. Then, delete the
trailer from the system and repeat the
setup process to calibrate the trailer.

The drawbar or the trailer dimensions
are outside of the supported range. The
system is designed to work with
drawbars that have a license plate to
hitch ball center measurement of
9–18 in (23–46 cm) when installed.
The system is designed to work with
trailers that have a hitch point to center
of the axle or axles measurement of
6–33 ft (1.85–10.05 m). Do not
attempt to use drawbars or trailers that
have a length outside of this range as
the system performance degrades and
could cause improper system function.

The sensor could be incorrectly
installed. Make sure the sensor is
correctly installed.

What does it mean when the
system tells you to take control of
the steering wheel?

You have touched the steering wheel
when the system is steering. Avoid
touching the wheel during system
operation.

You have exceeded the maximum
speed for the feature. The system is no
longer steering the vehicle and you
must take over steering.

The system does not detect the trailer.
The system is no longer steering the
vehicle and you must take over
steering.

An internal condition for system
operation is not met that requires your
vehicle to return to manual control of
the steering.

How do I use a sticker if I have
previously setup a trailer with the

sensor?

Disconnect the sensor wiring and add
a new trailer to the system and follow
the instructions for setup with a sticker.
See 

Applying the Trailer Reverse

Aid Sticker

 (page 438).  If your vehicle

does not support the sticker option, the
touchscreen instructs you to install the
sensor again.

447

Trailer Reverse Guidance

 (If Equipped)

Why does the system not detect a
sensor?

There could be an issue with the
connection. Make sure that the 12-way
connector is fully inserted into the
12-way socket, that the red rubber seal
is not visible when the connector is fully
inserted and that the wiring harness
sensor connection is fully inserted at
the trailer sensor.

The wiring harness could be damaged.
Check for damaged wiring between the
12-way connector and the trailer
sensor.

There could be multiple sensors
connected to your vehicle. Make sure
only one sensor is connected at a time.

The sensor could be incorrectly
installed. Make sure the sensor is
installed on a vertical surface with the
arrows pointing straight up.

What does it mean if the system
remains on one message for an
extended time during calibration
when setting up the system with
the sensor?

The trailer length could be outside the
allowed range. The system is designed
to work with trailers that have a hitch
point to center of the axle or axles
measurement of 6–33 ft
(1.85–10.05 m).

The road surface could be too rough or
bumpy. Try calibrating the system on
a smoother road surface, such as an
open parking lot.

The sensor could be incorrectly
installed. Make sure the sensor is
installed on a vertical surface with the
arrows pointing straight up.

What does it mean if the system
does not detect a trailer when
configured with a sensor?

Verify that you properly connected the
sensor.  See 

Trailer Sensor

Installation

 (page 439).  Repeat

calibration on a different route if you
have verified sensor installation.

What if I want to use a sensor for
the trailer instead of a sticker?

Install the sensor and connect the
sensor wiring before adding the new
trailer to the system. You must connect
the sensor before you add the trailer.
If your vehicle did not come with a
sensor, you can purchase one from your
authorized dealer.

448

Trailer Reverse Guidance

 (If Equipped)

OFF-ROAD DRIVING

WHAT IS OFF-ROAD DRIVING

Off-road driving is driving your vehicle on
unsurfaced roads or trails, made from dirt,
rocks, sand and mud.

OFF-ROAD DRIVING
PRECAUTIONS - RAPTOR

WARNING: 

If you continue to drive

your vehicle when the engine is
overheating, the engine could stop
without warning. Failure to follow this
instruction could result in the loss of
control of your vehicle.

Before going off-road driving, consult with
all the appropriate government entities to
determine where you are legally allowed
to operate your vehicle and what permits
or registrations are required to do so.

Inspect your vehicle before and after any
off-road driving.

Familiarize yourself with the dimensions
of your vehicle including approach angles,
breakover angles, and ground clearance.

Also familiarize yourself with the features
of your vehicle. Some of these features
such as drive modes and cameras can
improve your off-road driving experience.

Secure loose objects inside your vehicle
and in the cargo area.

BASIC OFF-ROAD DRIVING
TECHNIQUES

Off-road Driving Hints

Before taking your vehicle off-roading, a
basic vehicle inspection should be done to
make sure that the vehicle is in top working
condition. It is always recommended that
at least two vehicles are used while
off-roading. The buddy system helps make
sure that help is close at hand should a
vehicle become stuck or damaged. It is also
wise to take supplies such as a first aid kit,
supply of water, tow strap, cell or satellite
phone with you any time an off-road
excursion is planned.

1.

Grip the steering wheel with thumbs
on the outside of the rim. This will
reduce the risk of injury due to abrupt
steering wheel motions that occur
when negotiating rough terrain.

2. Throttle, brake and steering inputs

should be made in a smooth and
controlled manner. Sudden inputs to
the controls can cause loss of traction
or upset the vehicle, especially while
on loose terrain or while crossing
obstacles such as rocks or logs.

3. Look ahead on your route noting

upcoming obstacles, or any other
factors which may indicate a change
in available traction, and adjust the
vehicle speed and route accordingly.

4. When driving off-road, if the front or

rear suspension is bottoming out
and/or excessive contact with the
skid-plates is encountered, reduce
vehicle speed to avoid potential
damage to the vehicle.

5. When with other vehicles, it is

recommended that communication is
used, and the lead vehicle notify other
vehicles of obstacles that could cause
potential vehicle damage.

449

Driving Hints

6. Always keep available ground

clearance in mind and pick a route that
minimizes the risk of catching the
underside of the vehicle on an obstacle.

7.

When negotiating low speed obstacles,
applying light brake pressure in
conjunction with the throttle will help
prevent the vehicle from jerking and
will allow you to negotiate the obstacle
in a more controlled manner. Using 4L
will also help with this.

8. Off-roading requires a high degree of

concentration. Even if your local law
does not prohibit alcohol use while
driving off-road, Ford strongly
recommends against drinking if you
plan to off-road.

Crossing Obstacles

Review the path ahead before
attempting to cross any obstacle. It is
best if the obstacle is reviewed from
outside the vehicle so that there is a
good understanding of terrain condition
both in front of and behind the
obstacle.

Approach obstacles slowly.

If a large obstacle such as a rock
cannot be avoided, choose a path that
places the rock directly under the tire
rather than the undercarriage of the
vehicle. This will help prevent damage
to the vehicle.

Ditches and washouts should be
crossed at a 45° angle, allowing each
wheel to independently cross the
obstacle.

Hill Climbing

WARNING: 

Extreme care should

be used when steering the vehicle in
reverse down a slope so as not to cause
the vehicle to swerve out of control.

Always attempt to climb a steep hill
along the fall line of the slope and not
diagonally.

If the vehicle is unable to make it up
the hill, DO NOT attempt to turn back
down the slope. Place the vehicle in
low range and slowly back down in
reverse.

When descending a steep slope, select
low gear and engage hill descent
control. Use the throttle and brake
pedals to control your descent speed.

Note:

Hill descent control is functional in

reverse and should be used in this situation.

BASIC OFF-ROAD DRIVING
TECHNIQUES - RAPTOR

Grip the steering wheel with your thumbs
on the outside of the rim. This reduces the
risk of injury due to abrupt steering wheel
motions that occur when negotiating rough
terrain.

If you are driving in a dusty area, be sure to
leave ample distance between your vehicle
and any other vehicles to allow for
adequate vision.

DRIVING OFF-ROAD - RAPTOR

Driving In Snow and Ice

WARNING: 

Do not become

overconfident in the ability of four-wheel
drive vehicles. Although a four-wheel
drive vehicle may accelerate better than
a two-wheel drive vehicle in low traction
situations, it won't stop any faster than
two-wheel drive vehicles. Always drive
at a safe speed.

Make sure you allow sufficient distance
between your vehicle and other vehicles
for stopping.

450

Driving Hints

Driving In Sand

When driving over sand, try to keep all four
wheels on the most solid area of the trail.

Driving In Mud

Be cautious of sudden changes in vehicle
speed or direction when you are driving in
mud.

After driving through mud, clean your
vehicle. Excess mud stuck on the wheels
and tires and rotating components can
cause an imbalance and result in damage.

Note:

The vehicle brakes are less effective

when wet or muddy.

Driving Over Rocks and Gravel

Never attempt to straddle a rock that is
large enough to strike your axles or
undercarriage.

Leave a generous gap between your
vehicle and other vehicles to minimize the
risk of damage. Avoid dust clouds as they
reduce visibility.

Climbing A Hill

WARNING: 

Extreme care should

be used when steering the vehicle in
reverse down a slope so as not to cause
the vehicle to swerve out of control.

Do not drive over the crest of a hill without
seeing what conditions are on the other
side. Do not drive in reverse over a hill
without the aid of an observer.

Note:

Avoid turning on steep slopes or hills.

A danger lies in losing traction, slipping
sideways and possible vehicle roll over.

Note:

Too much acceleration can cause

the tires to slip, spin or lose traction,
resulting in loss of vehicle control.

Driving Through Water

WARNING: 

Do not attempt to

cross a deep, fast flowing body of water.
Failure to follow this instruction could
result in the loss of control of your
vehicle, personal injury or death.

The key to a safe crossing is the water
depth, current and bottom of the water's
condition. On soft bottoms, the vehicle
sinks in, effectively increasing the water
level on the vehicle. Make sure to consider
this when determining the depth of water.

Determine the depth and speed of the
current before attempting a water crossing.

Be aware that obstacles and debris could
be beneath the water’s surface.

Note:

Cross flowing water at an angle

heading slightly upstream.

Note:

Tread lightly and avoid damage to

the environment.

Water can cause permanent damage that
may not be covered by your vehicle
warranty.  See 

Driving Through Water

Limitations

 (page 453).

Note:

Failure to follow the recommended

speeds can result in vehicle damage.

Muddy waters can reduce the cooling
system effectiveness by depositing debris
into the radiator.

High currents even in shallow water can
wash the dirt out from around your tires or
push your vehicle across slippery rocks or
surfaces.

Do not cross any body of water that is fast
flowing and rising.

451

Driving Hints

Vehicles used to traverse water should be
periodically inspected for signs of water
ingestion in all of the vehicle's fluids. If
water is found inside your vehicle fluids,
service your vehicle or see an authorized
dealer.

Avoid Getting High-Centered

Always keep available ground clearance
in mind and pick a route that minimizes the
risk of catching the underside of the vehicle
on an obstacle and getting high-centered.

Freeing A Stuck Vehicle

WARNING: 

Do not spin the wheels

at over 34 mph (55 km/h). The tires may
fail and injure a passenger or bystander.

Recovery hooks are mounted to the
vehicle's structure and are used to pull out
the vehicle from a surface or location when
stuck. Recover your vehicle using various
towing apparatus attached to your
recovery hook such as winch, open hook,
or strap.

Note:

Do not use recovery hooks to

recreationally tow your vehicle.  See

Recreationally Towing Your Vehicle

 (page

469).

Note:

 Do not rock your vehicle if the engine

is not at normal operating temperature as
damage to the transmission could occur.

Note:

Do not rock your vehicle for more

than a minute as damage to the
transmission and tires could occur or the
engine could overheat.

If you are unable to free your vehicle call
roadside assistance.  See 

Roadside

Assistance

 (page 462).

Crossing A Ravine, Gully, Ditch,
Washout Or Rut

Review the path ahead before attempting
to cross any obstacle.

Driving Over Logs

Review the path ahead before attempting
to cross any obstacle.

DRIVING YOUR VEHICLE AT HIGH
SPEEDS - RAPTOR

If you plan on using your vehicle for severe,
high speed off-road use, we recommend
the following:

Equipping your vehicle with the safety
equipment appropriate for off-road
recovery.

Using personal safety equipment,
including a certified helmet and
approved neck restraint device.

Doing a low speed reconnaissance run
in unfamiliar areas to become aware
of any obstacles that you could
encounter.

Your vehicle can incur damage if driven
beyond its capabilities. Skid plates, shock
guards and running boards are designed
to help limit damage to vital components
and exterior finishes, but cannot prevent
all damage if driven in extreme off-road
conditions. Damage to skid plates, shock
guards, running boards and exterior
finishes as well as bent, cracked or broken
body, frame and chassis components may
not be covered by warranty.

452

Driving Hints

DRIVING THROUGH WATER
LIMITATIONS - RAPTOR

Maximum Wading

Depth

Model

32 in (810 mm)

All.

When you are driving though water do not
exceed 4 mph (7 km/h).

WATER WADING

WARNING: 

Do not attempt to

cross a deep, fast flowing body of water.
Failure to follow this instruction could
result in the loss of control of your
vehicle, personal injury or death.

As the water depth increases, you must
reduce your vehicle speed to avoid
potential vehicle damage.

E310941

Always determine the depth before
attempting a water crossing. Never
drive through water that is higher than
the bottom of the wheel hubs.

Slowly proceed and avoid splashing
water any more than is necessary.

Be aware that obstacles and debris
may be beneath the water’s surface.

Keep the doors fully closed during the
water crossing.

After driving through water and as soon
as it is safe to do so check the brakes,
horn, lights, and steering wheel to
confirm those systems are functioning
properly.

Note:

Engine damage can occur if water

enters the air filter.

OFF-ROAD DRIVING AIDS -
RAPTOR

Selecting an Off-Road Drive Mode

Using the appropriate drive mode increases
your vehicle's control.  See 

Drive Mode

Control

 (page 350).

Using Four-Wheel Drive

Your vehicle has a four-wheel drive system
that offers various modes to help you
optimize traction on any off-road surface.
See 

Four-Wheel Drive

 (page 269).

Using the Cameras Off-Road

Use the 360 degree camera to enhance
your off-road experience.  See 

360 Degree

Camera

 (page 321).

Using the Rear Differential Lock

When engaged, the rear differential lock
provides additional traction to your vehicle
by forcing the two rear wheels to turn at
the same speed.

Note:

Rear differential lock is only available

when the vehicle is in 4H or 4L.  See

Electronic Locking Differential

 (page 279).

453

Driving Hints

Using Trail Control

Trail Control provides you the ability to
maneuver the vehicle without using the
throttle and brake pedals.

The system controls acceleration and
braking in difficult off-road environments,
which allows you to focus on steering.  See

Trail Control

 (page 303).

Trail Control Performance:

Manages wheel slip to maximize
traction.

Provides braking to maximize traction
in descents.

Using Trail One Pedal Drive

 (If

Equipped)

Trail one pedal drive allows you to
accelerate and brake using only the
accelerator pedal.

Use this when driving over large obstacles,
such as rocks or logs, to help maintain a
constant vehicle speed.

In 4H, the system offers lift pedal braking
and auto hill hold functionality.  See 

What

Is Trail One Pedal Drive

 (page 304).

Note:

Trail one pedal drive is only available

when the vehicle is in 4H or 4L.

AFTER DRIVING YOUR VEHICLE
OFF-ROAD

WARNING: 

After off-road use,

before returning to the road, check the
wheels and tires for damage. Off-road
use may cause damage to your wheels
and tires that can lead to tire failure, loss
of vehicle control, serious injury or death.

WARNING: 

Always re-inflate tires

to recommended tire pressures before
the vehicle is operated on-road. The
recommended pressure is located on the
tire label or safety certification label,
located on the B-pillar, inside the driver's
door.

Driving off-road places more stress on your
vehicle than most on-road driving. After
driving off-road check for damage to your
vehicle and, if necessary, have your vehicle
fixed as soon as possible.

Inspect the underbody of your vehicle by
checking tires, body structure, steering,
suspension, and exhaust system for
damage.

Check the radiator for mud and debris and
clean as needed.

Remove accumulations of plants or brush.
These things could be a fire hazard or hide
damage to the fuel lines, brake hoses, and
propeller shafts.

After extended operation in mud, sand,
water, or similar dirty conditions, inspect
the underbody and clean your vehicle as
soon as possible.

If you experience unusual vibration after
driving in mud, slush or similar conditions,
check the wheels for impacted material.
Impacted material can cause vibrations
while driving and wheel imbalance.
Remove the material to resolve the
problem.

454

Driving Hints

AFTER DRIVING YOUR VEHICLE
OFF-ROAD - RAPTOR

WARNING: 

After off-road use,

before returning to the road, check the
wheels and tires for damage. Off-road
use may cause damage to your wheels
and tires that can lead to tire failure, loss
of vehicle control, serious injury or death.

WARNING: 

Always re-inflate tires

to recommended tire pressures before
the vehicle is operated on-road. The
recommended pressure is located on the
tire label or safety certification label,
located on the B-pillar, inside the driver's
door.

Driving off-road places more stress on your
vehicle than most on-road driving. After
driving off-road, check for damage and, if
necessary, have your vehicle repaired by
an authorized dealer.

Inspect the underbody of your vehicle by
checking tires, body structure, steering,
suspension, and exhaust system for
damage.

Check the radiator for mud and debris and
clean as needed.

Remove accumulations of plants or brush.
These things could be a fire hazard or hide
damage to the fuel lines, brake hoses, and
propeller shafts.

After operation in mud, sand, water, or
similar dirty conditions, inspect the
underbody and clean your vehicle.

COLD WEATHER
PRECAUTIONS

The functional operation of some
components and systems can be affected
at temperatures below approximately
-13°F (-25°C).

DRIVING ON SNOW AND ICE

WARNING: 

If you are driving in

slippery conditions that require tire
chains or cables, then it is critical that
you drive cautiously. Keep speeds down,
allow for longer stopping distances and
avoid aggressive steering to reduce the
chances of a loss of vehicle control
which can lead to serious injury or death.
If the rear end of your vehicle slides while
cornering, steer in the direction of the
slide until you regain control of your
vehicle.

On ice and snow, you should drive more
slowly than usual. Your vehicle has a four
wheel anti-lock brake system, do not pump
the brake pedal. See 

Anti-Lock Braking

System Limitations

 (page 286).

BREAKING-IN

Your vehicle requires a break-in period. For
the first 1,000 mi (1,600 km), avoid driving
at high speeds, heavy braking, aggressive
shifting or using your vehicle to tow. During
this time, your vehicle may exhibit some
unusual driving characteristics.

DRIVING ECONOMICALLY

The following helps to improve fuel
consumption:

Drive smoothly, accelerate gently and
anticipate the road ahead to avoid
heavy braking.

Regularly check your tire pressures and
make sure that they are inflated to the
correct pressure.

Follow the recommended maintenance
schedule and carry out the
recommended checks.

455

Driving Hints

Plan your journey and check the traffic
before you set off. It is more efficient
to combine errands into a single trip
whenever possible.

Avoid idling the engine in cold weather
or for extended periods. Start the
engine only when you are ready to set
off.

Do not carry unnecessary weight in your
vehicle as extra weight wastes fuel.

Do not add unnecessary accessories
to the exterior of your vehicle, for
example running boards. If you use a
roof rack, remember to fold it down or
remove it when not in use.

Do not shift into neutral when you are
braking or when your vehicle is slowing
down.

Shut all windows when driving at high
speeds.

Switch off all electric systems when
not in use, for example air conditioning.
Make sure that you unplug any
accessories from the auxiliary power
points when not in use.

DRIVING IN SPECIAL
CONDITIONS

EMERGENCY MANEUVERS

In an unavoidable emergency where you
must make a sudden sharp maneuver, turn
the steering wheel only as rapidly and as
far as required to avoid the emergency.
Apply smooth pressure to the accelerator
pedal or brake pedal as needed. Avoid
abrupt steering, acceleration and braking
changes. Abrupt changes could increase
the risk of vehicle roll over, loss of vehicle
control and personal injury. If possible, use
any available road surfaces to bring your
vehicle under control.

FLOOR MATS

WARNING: 

Use a floor mat

designed to fit the footwell of your
vehicle that does not obstruct the pedal
area. Failure to follow this instruction
could result in the loss of control of your
vehicle, personal injury or death.

WARNING: 

Pedals that cannot

move freely can cause loss of vehicle
control and increase the risk of serious
personal injury.

WARNING: 

Secure the floor mat

to both retention devices so that it
cannot slip out of position and interfere
with the pedals. Failure to follow this
instruction could result in the loss of
control of your vehicle, personal injury or
death.

WARNING: 

Do not place additional

floor mats or any other covering on top
of the original floor mats. This could
result in the floor mat interfering with the
operation of the pedals. Failure to follow
this instruction could result in the loss of
control of your vehicle, personal injury or
death.

WARNING: 

Always make sure that

objects cannot fall into the driver foot
well while your vehicle is moving. Objects
that are loose can become trapped
under the pedals causing a loss of
vehicle control.

456

Driving Hints


Content      ..     25      26      27      28     ..