Ford F-150 (2022 year). Manual in english - page 26
 

  Index      Manuals     Ford F-150 (2022 year). Manual in english


Search            copyright infringement  


Content      ..     24      25      26      27     ..


Ford F-150 (2022 year). Manual in english - page 26


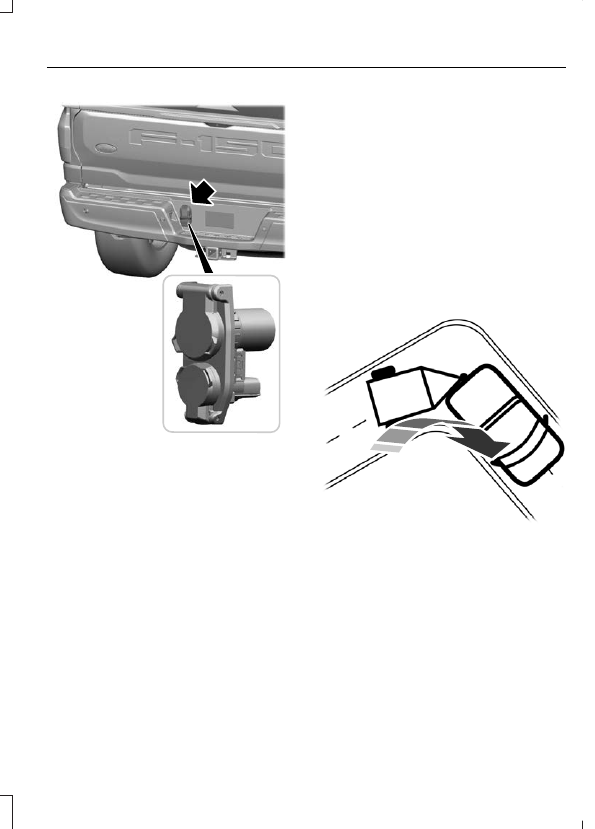
E359954

You need to purchase a sensor kit and 7/12
way connector to replace the 7/4 way
connector on your vehicle to setup the
system with a sensor. See your authorized
dealer.

Refer to the instructions included with your
trailer sensor for detailed information
regarding installation.

Note:

Make sure the arrows on the sensor

housing are facing up. Mount the sensor to
a vertical part of the trailer that pivots when
you turn your vehicle. Do not mount to a
stationary surface such as the truck side of
the trailer hitch.

Note:

To setup a trailer with a sensor, install

the sensor on the trailer and plug the
connector into the connector in your bumper
prior to configuring the trailer. Trailers that
were set up with a sensor still require the
sensor to function. To change a trailer to
use the sticker, delete the trailer in the
system and repeat the trailer setup with the
sticker.

CALIBRATING THE SYSTEM

Calibrating the system requires driving
forward and turning left or right. Follow the
instructions on the touchscreen to
complete the calibration process.

E352329

Note:

To calibrate the system, you need an

area where you can safely drive forward and
turn left or right. An open parking lot is an
ideal place to perform the calibration.

Note:

Keep the steering wheel straight

when instructed to by the touchscreen. If
the steering wheel is in a turned position
during this instruction, the calibration
pauses.

425

Trailer Backup Assistance

 (If Equipped)

Note:

During calibration, the system

determines the trailer length. The system
supports trailer lengths of 6–33 ft
(1.85–10.05 m) distance from the hitch
point to the center of the axle or axles. The
system is designed to work with drawbars
that have a license plate to hitch ball center
measurement of 9–18 in (23–46 cm) when
installed. Do not attempt to use drawbars
or trailers that have a length outside of this
range as the system performance degrades
and could cause improper system function.

Note:

The touchscreen shows if you are

going too slow or fast. Calibration pauses if
the speed is outside the required range of
2–9 mph (4–15 km/h).

Note:

You need to complete at least a 90°

turn, and longer trailers could require a 180°
turn. Camera trailer tracking requires the
system to locate the hitch ball as well as
determine the trailer length. Some trailers
could require you to drive straight then turn
multiple times before calibration completes.
The touchscreen provides instructions and
notifies you when calibration completes.

Note:

For best results, do not calibrate the

system at night when calibrating the system
with the sticker.

SWITCHING TRAILER BACKUP
ASSISTANCE ON AND OFF

E310335

Press the button and use the touchscreen
to select the connected trailer.

Note:

A trailer must be configured to use

trailer backup assistance.  See 

Configuring

the Trailer

 (page 437).

Note:

If you use the steering wheel when

using trailer backup assistance, the system
turns off and a message displays in the
touchscreen.

Note:

If the trailer was connected just prior

to turning the system on, you may need to
drive forward to initialize the system. Follow
the instructions on the touchscreen to
activate the system.

426

Trailer Backup Assistance

 (If Equipped)

USING THE TRAILER BACKUP
ASSISTANCE CONTROLLER

Use the control knob to steer the trailer.
Take your hands off the steering wheel and
turn the control knob instead. The control
knob acts as the steering control for the
trailer.

E313025

Turn and hold counterclockwise to make
the trailer go left.

E313026

Turn and hold clockwise to make the trailer
go right.

E313027

Release the knob when the trailer is
moving in the direction you want.

Note:

The more you turn the knob, the

sharper the trailer turns.

Note:

Quickly turning and releasing the

knob results in a jerky movement of the
vehicle.

Note:

You may have to use the knob to

correct the trailer direction when attempting
to move the trailer straight back under some
conditions.

USING THE TRAILER BACKUP
ASSISTANCE VIEWS

Up to seven camera views could be
available when using trailer backup
assistance. Use the view that helps you the
most when reversing your vehicle and
trailer.

Note:

The rear view camera view is

available on all vehicles with trailer backup
assistance. Additional views are available
on vehicles with trailer reverse guidance.

E310996

360° camera view. Shows a
360° view on the right-hand side
of the touchscreen with a rear

camera view on the left-hand side of the
touchscreen.

427

Trailer Backup Assistance

 (If Equipped)

E310967

Rear view camera view. Shows
your trailer hitch or what is
directly behind your vehicle.

E310974

Rear split view camera view.
Shows a 180° degree view of
what is behind your vehicle.

E310995

Bed camera view. Shows the
truck bed.

Note:

This view also provides a

picture-in-picture view.

E311776

Trailer AUX camera view. Shows
a rear view camera image of
what is behind your trailer. You

need to separately purchase this camera
and have it installed.

Note:

This view also provides a

picture-in-picture view.

E310965

Trailer reverse guidance view.
Shows you a view of the sides of
your truck and the trailer. In auto

mode, this view moves as the trailer moves
so that you do not have to adjust the
camera as you turn. Left and right arrows
let you see other camera views.

E351663

Picture-in-picture view. Shows
a main view and a secondary
view when in bed camera view

or trailer AUX camera view.

Note:

If you have a 8 in (20 cm)

touchscreen, picture-in-picture is off by
default. Press the picture-in-picture icon on
the touchscreen to switch picture-in-picture
view on and off.

Note:

If you have a 12 in (30 cm)

touchscreen, picture-in-picture is on by
default and you cannot switch it off.

E351662

Swap. Press to swap between
picture-in-picture views.

E315644

Auto. Press to return to auto
view.

Note:

Auto is the default setting.

Hitch Angle Graphic

The hitch angle graphic shows a small
representation of your truck and trailer with
visual feedback to help you monitor the
trailer. The graphic shows two different
colored lines for the trailer hitch angle. A
black line shows you where your trailer is
in relation to your vehicle. The white line
represents the amount the trailer can turn
based on knob input.

The graphic shows a yellow and red zone
for the hitch angle to warn you of a high
angle condition that could require you to
pull forward to reduce the hitch angle. The
angle limits for each zone vary based on
the trailer length.

The yellow zone indicates you are
approaching the maximum controllable
trailer angle for the system. When the
trailer enters this zone, it is more difficult
to reduce the trailer turn when backing up.
It may be necessary to put your vehicle
back into drive (D) and pull forward to get
the truck and trailer back to an in-line
position.

The red zone indicates you have exceeded
the maximum controllable trailer angle for
the system. Immediately stop reversing.
Put your vehicle into drive (D) and pull
forward until the trailer is no longer in the
red zone.

Setting the 

Trailer Angle Limit

1.

Press 

Features

 on the touchscreen.

2. Press 

Towing

.

3. Press 

Manage trailers

.

4. Press 

Pro Trailer Backup Assist

.

5. Press 

Trailer Angle Limit

.

6. Press a setting.

428

Trailer Backup Assistance

 (If Equipped)

Normal Control Angle

Default setting. This provides a balanced
limit that returns from a turn to straight
backing with minimal change to the trailer
direction.

Max Control Angle

Increases the trailer angle limit close to the
maximum controllable angle to allow
sharper turns but also causes more change
in the trailer direction when straightening
out from a turn.

429

Trailer Backup Assistance

 (If Equipped)

TRAILER BACKUP ASSISTANCE – TROUBLESHOOTING

TRAILER BACKUP ASSISTANCE – INFORMATION MESSAGES

Description

Message

Displays when the system turns on and is
initializing.

Detecting Trailer Please Wait…

A condition exists that prevents the system
from turning on. If the message continues
to display, visit your authorized dealer to
have your vehicle checked.

Pro Trailer Backup Assist™ System is Not
Available

The steering system needs to learn internal
parameters to fully enable the feature.
Drive your vehicle straight forward above
25 mph (40 km/h) for approximately 5
minutes.

Pro Trailer Backup Assist™ Driving Required
to Initialize Steering Press Knob to Exit

Displays when you reach the maximum
controllable trailer angle for the system.
Place your vehicle in drive (D) and pull
forward to get the truck and trailer back to
an in-line position.

Pro Trailer Backup Assist™ Stop now
Maximum trailer angle Press Knob to Exit

If this message consistently displays, you
may need to repeat the trailer calibration.
Delete the trailer from the system and
repeat the setup and calibration process.

Displays when you exceed the maximum
controllable trailer angle for the system.
Place your vehicle in drive (D) and pull
forward to get your vehicle and trailer back
to an in-line position, then activate the
system by selecting the connected trailer
and following the instructions on the
touchscreen.

Stop now. Deactivated by trailer angle.

If this message consistently displays, you
may need to repeat the trailer setup and
calibration. Delete the trailer from the
system and repeat the setup and calibra-
tion process.

Displays when the system can no longer
steer the vehicle and you must take over
steering.

Pro Trailer Backup Assist™ Stop Now Take
Control of Steering Wheel

430

Trailer Backup Assistance

 (If Equipped)

Description

Message

Displays when the system does not detect
the sensor. Check the sensor connection,
check that there is no damaged wiring
between the connector and sensor and
check that there is only one sensor
connected.
If you do not want to use the sensor for this
trailer, delete the trailer in the touchscreen
then repeat the setup process with the
sticker.

Pro Trailer Backup Assist™ Sensor Not
Detected Refer to Owner's Manual Press
Knob to Exit

These messages display when the system
does not detect the trailer.
If your trailer is setup with a sticker, make
sure the rear camera is clean, and the
sticker is clearly visible in the camera image.
You can also move the trailer forward or
backward to change the trailer position and
lighting conditions.
If your trailer is setup with a sensor, check
that the sensor is correctly installed and
the trailer length is within the allowed
range.
If these messages continue to display, visit
your authorized dealer to have your vehicle
checked.

Pro Trailer Backup Assist™ Trailer Not
Detected. Shift to Park Press Knob to Exit

Pro Trailer Backup Assist™ Trailer Not
Detected. Refer to Owner's Manual. Press
Knob to Exit

431

Trailer Backup Assistance

 (If Equipped)

Description

Message

If your trailer is setup with a sticker, this
message displays when the camera system
cannot detect the trailer and requires trailer
movement to enable trailer detection. Drive
forward above 2 mph (3 km/h) to initialize
the system.
If your trailer is setup with a sensor, this
message displays when your vehicle has
not moved after the trailer sensor is
connected or extended operation below
1 mph (1 km/h). Drive forward above 2 mph
(3 km/h) to initialize the system.

Pro Trailer Backup Assist™ Trailer Not
Detected Pull Forward to Initialize Press
Knob to Exit

Displays when your vehicle is backing up
but the system is not activated. Select the
connected trailer on the touchscreen and
follow the instructions to activate the
system.
This message also displays when you back
up during the calibration process.

Pro Trailer Backup Assist™ Stop Now
System Not Active Press Knob to Exit

Displays when the system turns on and is
available to use.

Pro Trailer Backup Assist™ Backup Slowly
Turn Knob to Steer Press Knob to Exit

432

Trailer Backup Assistance

 (If Equipped)

TRAILER BACKUP ASSISTANCE
– FREQUENTLY ASKED
QUESTIONS

What does it mean if the system
does not detect a trailer that is
setup with a sticker?

The system could be having trouble
identifying the sticker. The system
requires a clear view of the sticker
placed on the trailer. You must keep
the camera lens and sticker clean for
the system to correctly operate. If the
system cannot initially detect the
trailer, it could be necessary for you to
change the lighting conditions by
moving your vehicle and trailer or
waiting until the conditions change.
See 

Applying the Trailer Reversing

Aid Sticker

 (page 424).  Deleting the

trailer and repeating the setup and
calibration could improve performance,
but some trailers are not compatible
with the sticker and camera system. If
the system consistently does not
detect the trailer with the sticker setup,
you may choose to setup the trailer
with a sensor.

Note:

The system is designed to be used

with the same trailer connection every time
you choose the trailer from the touchscreen.
When using a different drawbar or a
different pin hole on drawbars with more
than one, connecting the drawbar to your
vehicle affects the trailer position and you
may need to repeat the trailer setup and
calibration process.

Why does the trailer not reverse
straight?

The road conditions, such as road
camber and road slope, could affect
how straight the system can reverse.
You can compensate for the trailer
drifting to the right or left by slowly
turning the knob until the trailer is
following your desired path and then
holding the knob in that position.

Other factors, such as the hitch
connection or trailer suspension, could
affect how straight the system can
reverse the trailer. You can
compensate for the trailer drifting to
the right or left by slowly turning the
knob until the trailer is following your
desired path and then holding the knob
in that position.

The sensor could be incorrectly
installed. Make sure the sensor is
correctly installed.

What does it mean if the system
remains on one message for an
extended time during calibration
when setting up the system with
the sticker?

The camera could require cleaning.

You could have a blocked sticker. Verify
the sticker is in the proper location.  See

Applying the Trailer Reversing Aid
Sticker

 (page 424).

The drawbar could be outside of the
allowed range of 4–19 in (10–48 cm).

433

Trailer Backup Assistance

 (If Equipped)

The system could have difficulties
recognizing the sticker based on
environmental factors. You could need
to move to a different area to change
the lighting and background or you
could need to change the direction you
are driving. You could also try setting
up the system at a different time of
day.

Some trailers are not compatible with
the sticker and camera system. If the
issue persists, set up the trailer with a
sensor purchased from your authorized
dealer.  See 

Trailer Sensor

Installation

 (page 424).

What does it mean if the system
pauses during calibration?

There could be steering input or trailer
movement during the straight drive
portion of the calibration process.

What does it mean if the system
displays hold steering steady
during turn?

Part of the calibration process for the
sticker setup requires a steady turn. If
you are continually moving the steering
wheel during the turn, this delays the
calibration process. To enable the
calibration process, hold the steering
wheel at the same position when
turning.

What does it mean if the system
displays that it is not available?

There could be a sub-system that the
system uses that is not correctly
operating. If the system continues to
display it is not available, visit your
authorized dealer to have your vehicle
checked.

There could be a battery voltage issue.
Make sure the battery is correctly
charged. If the system continues to
display it is not available, visit your
authorized dealer to have your vehicle
checked.

What does it mean if the system
displays that driving is required to
initialize steering?

The steering system needs to learn
internal parameters to fully turn on the
feature. Drive your vehicle straight
forward above 25 mph (40 km/h) for
approximately 5 minutes.

Your vehicle is new, there is a battery
voltage issue or you have serviced the
steering system.

What does it mean if the system
requires you to pull forward to
initialize?

This occurs when the vehicle has not
moved during the current key cycle
after you connect and select the trailer
in the touchscreen, or you operate the
system at speeds below 1 mph
(1 km/h) for an extended period of
time. Drive forward above 2 mph
(3 km/h) and the system indicates
when it initializes.

434

Trailer Backup Assistance

 (If Equipped)

What does it mean if the trailer is
at its maximum angle or the
system deactivated by trailer
angle?

You are at the maximum controllable
trailer angle for the system. Place your
vehicle in drive (D) and pull forward to
get the truck and trailer back to an
in-line position.

The trailer could need to be
recalibrated. Check that the correct
trailer is selected in the touchscreen.
Verify the sensor is installed according
to the instructions included in the
sensor kit and check that the drawbar
and the trailer dimensions are within
the allowed range. Then, delete the
trailer from the system and repeat the
setup process to calibrate the trailer.

The drawbar or the trailer dimensions
are outside of the supported range. The
system is designed to work with
drawbars that have a license plate to
hitch ball center measurement of
9–18 in (23–46 cm) when installed.
The system is designed to work with
trailers that have a hitch point to center
of the axle or axles measurement of
6–33 ft (1.85–10.05 m). Do not
attempt to use drawbars or trailers that
have a length outside of this range as
the system performance degrades and
could cause improper system function.

The sensor could be incorrectly
installed. Make sure the sensor is
correctly installed.

What does it mean when the
system tells you to take control of
the steering wheel?

You have touched the steering wheel
when the system is steering. Avoid
touching the wheel during system
operation.

You have exceeded the maximum
speed for the feature. The system is no
longer steering the vehicle and you
must take over steering.

The system does not detect the trailer.
The system is no longer steering the
vehicle and you must take over
steering.

An internal condition for system
operation is not met that requires your
vehicle to return to manual control of
the steering.

How do I use a sticker if I have
previously setup a trailer with the

sensor?

Disconnect the sensor wiring and add
a new trailer to the system and follow
the instructions for setup with a sticker.
See 

Applying the Trailer Reversing

Aid Sticker

 (page 424).  If your vehicle

does not support the sticker option, the
touchscreen instructs you to install the
sensor again.

435

Trailer Backup Assistance

 (If Equipped)

Why does the system not detect a
sensor?

There could be an issue with the
connection. Make sure that the 12-way
connector is fully inserted into the
12-way socket, that the red rubber seal
is not visible when the connector is fully
inserted and that the wiring harness
sensor connection is fully inserted at
the trailer sensor.

The wiring harness could be damaged.
Check for damaged wiring between the
12-way connector and the trailer
sensor.

There could be multiple sensors
connected to your vehicle. Make sure
only one sensor is connected at a time.

The sensor could be incorrectly
installed. Make sure the sensor is
installed on a vertical surface with the
arrows pointing straight up.

What does it mean if the system
remains on one message for an
extended time during calibration
when setting up the system with
the sensor?

The trailer length could be outside the
allowed range. The system is designed
to work with trailers that have a hitch
point to center of the axle or axles
measurement of 6–33 ft
(1.85–10.05 m).

The road surface could be too rough or
bumpy. Try calibrating the system on
a smoother road surface, such as an
open parking lot.

The sensor could be incorrectly
installed. Make sure the sensor is
installed on a vertical surface with the
arrows pointing straight up.

What does it mean if the system
does not detect a trailer when
configured with a sensor?

Verify that you properly connected the
sensor.  See 

Trailer Sensor

Installation

 (page 424).  Repeat

calibration on a different route if you
have verified sensor installation.

What if I want to use a sensor for
the trailer instead of a sticker?

Install the sensor and connect the
sensor wiring before adding the new
trailer to the system. You must connect
the sensor before you add the trailer.
If your vehicle did not come with a
sensor, you can purchase one from your
authorized dealer.

436

Trailer Backup Assistance

 (If Equipped)

WHAT IS TRAILER REVERSE
GUIDANCE

Trailer reverse guidance provides views
and graphics on the touchscreen to help
you steer your vehicle when you backup a
trailer.

HOW DOES TRAILER REVERSE
GUIDANCE WORK

Trailer reverse guidance uses a sticker or
sensor attached to the trailer to detect the
trailer angle relative to the towing vehicle
and provides instructions, graphics and
camera views on the touchscreen.

TRAILER REVERSE GUIDANCE
PRECAUTIONS

WARNING: 

Driving while distracted

can result in loss of vehicle control, crash
and injury. We strongly recommend that
you use extreme caution when using any
device that may take your focus off the
road. Your primary responsibility is the
safe operation of your vehicle. We
recommend against the use of any
hand-held device while driving and
encourage the use of voice-operated
systems when possible. Make sure you
are aware of all applicable local laws
that may affect the use of electronic
devices while driving.

WARNING: 

This system is an extra

driving aid. It does not replace your
attention and judgment, or the need to
apply the brakes. This system does NOT
automatically brake your vehicle. If you
fail to press the brake pedal when
necessary, you may collide with another
vehicle.

Note:

The system is not a substitute for

safe driving practices. Always be aware of
your vehicle and trailer combination, and
the surrounding environment.

Note:

The system does not detect or

prevent your vehicle or trailer from making
contact with obstacles in the surrounding
environment.

Note:

The front end of your vehicle swings

out when changing the direction of the
trailer.

Note:

In certain conditions, the trailer could

turn faster or the trailer angle could increase
more than anticipated. Always monitor the
clearance between the trailer and vehicle
and the surroundings.

SETTING UP TRAILER
REVERSE GUIDANCE FOR A
CONVENTIONAL TRAILER

CONFIGURING THE TRAILER

You must configure a trailer in the system
to use trailer reverse guidance. This is a
one-time setup process and the system
saves the trailer information for the next
time you use that trailer.

The system only works with conventional
trailers. It does not work with other types
including fifth-wheel and gooseneck. The
following illustration shows examples of
conventional trailers on the left-hand side.

Note:

Trailer reverse guidance camera

views are available without setting up a
trailer. However, complete functionality,
including images and automatic view
switching, is enabled by setup. Setup is
required to enable trailer backup assistance.

437

Trailer Reverse Guidance

 (If Equipped)

E209766

Positioning the Trailer

Hitch the trailer to your vehicle and
connect the electrical wiring harness.
Check to make sure that the wiring is
working.  See 

Connecting a Trailer

 (page

399).

E209759

Park your vehicle and hitched trailer on a
level surface.

For best results, make sure that your trailer
rides level with the ground when you hitch
your vehicle.  See 

Connecting a Trailer

(page 399).

E209760

Make sure that the trailer and your vehicle
are in line with each other. You can do this
by putting the transmission in drive (D) and
pulling straight forward.

Configuring the Trailer in the
Touchscreen

1.

Shift to reverse (R).

2. Press the camera view button.

3. Press the trailer view icon.

4. Press 

Add Trailer

.

5. Follow the directions on the

touchscreen to enter the trailer name
and trailer type, then proceed to the
sticker or sensor setup.

Note:

Your vehicle has two options for

trailer reverse guidance setup. The system
defaults to the camera based system.  See

Applying the Trailer Reverse Aid Sticker

(page 438).  You can also setup the system
with the trailer sensor that you can purchase
from your authorized dealer. You must
connect a sensor to your vehicle to setup
the system.  See 

Trailer Sensor

Installation

 (page 439).

Note:

If you configure the trailer and install

a sensor, the system saves the trailer with
that sensor information. If you want to use
this trailer with the sticker, you need to
delete the trailer from the system and
repeat the setup process.

APPLYING THE TRAILER
REVERSE AID STICKER

Place the sticker in an area visible by the
rear view camera. The entire sticker must
be within 4–19 in (10–48 cm) from the
center of the hitch ball, as shown in the
following illustration.

438

Trailer Reverse Guidance

 (If Equipped)

E333148

Use the supplied sticker placement card,
a tape measure and pen to carefully mark
the area to attach the sticker. The sticker
is in the back cover pocket of your quick
start guide. Make sure the entire sticker is
within the green zone between the two
arcs or distance markers on the diagram,
and is also visible in the rear view camera
display.

Once you have found the correct location,
place the sticker.

Note:

Make sure nothing can obstruct the

rear view camera's view of the sticker such
as a jack handle or wiring.

Note:

Position the sticker on a flat, dry and

clean horizontal surface. For best results,
apply the sticker when temperatures are
above 32°F (0°C).

Note:

Do not move stickers after placing

them. Do not re-use any stickers if removed.

Note:

You can purchase additional stickers

through your authorized dealer.

Note:

If you previously setup the trailer with

the trailer sensor, make sure it is not plugged
in before configuring the trailer and placing
the sticker.

TRAILER SENSOR INSTALLATION

E315959

E359954

You need to purchase a sensor kit and 7/12
way connector to replace the 7/4 way
connector on your vehicle to setup the
system with a sensor. See your authorized
dealer.

439

Trailer Reverse Guidance

 (If Equipped)

Refer to the instructions included with your
trailer sensor for detailed information
regarding installation.

Note:

Make sure the arrows on the sensor

housing are facing up. Mount the sensor to
a vertical part of the trailer that pivots when
you turn your vehicle. Do not mount to a
stationary surface such as the truck side of
the trailer hitch.

Note:

To setup a trailer with a sensor, install

the sensor on the trailer and plug the
connector into the connector in your bumper
prior to configuring the trailer. Trailers that
were set up with a sensor still require the
sensor to function. To change a trailer to
use the sticker, delete the trailer in the
system and repeat the trailer setup with the
sticker.

CALIBRATING THE SYSTEM

Calibrating the system requires driving
forward and turning left or right. Follow the
instructions on the touchscreen to
complete the calibration process.

E352329

Note:

To calibrate the system, you need an

area where you can safely drive forward and
turn left or right. An open parking lot is an
ideal place to perform the calibration.

Note:

Keep the steering wheel straight

when instructed to by the touchscreen. If
the steering wheel is in a turned position
during this instruction, the calibration
pauses.

Note:

During calibration, the system

determines the trailer length. The system
supports trailer lengths of 6–33 ft
(1.85–10.05 m) distance from the hitch
point to the center of the axle or axles. The
system is designed to work with drawbars
that have a license plate to hitch ball center
measurement of 9–18 in (23–46 cm) when
installed. Do not attempt to use drawbars
or trailers that have a length outside of this
range as the system performance degrades
and could cause improper system function.

Note:

The touchscreen shows if you are

going too slow or fast. Calibration pauses if
the speed is outside the required range of
2–9 mph (4–15 km/h).

Note:

You need to complete at least a 90°

turn, and longer trailers could require a 180°
turn. Camera trailer tracking requires the
system to locate the hitch ball as well as
determine the trailer length. Some trailers
could require you to drive straight then turn
multiple times before calibration completes.
The touchscreen provides instructions and
notifies you when calibration completes.

Note:

For best results, do not calibrate the

system at night when calibrating the system
with the sticker.

SWITCHING TRAILER
REVERSE GUIDANCE ON AND
OFF

Shift into reverse (R), press the rear
camera button to expand the menu, press
the trailer icon and use the touchscreen to
select the connected trailer.

440

Trailer Reverse Guidance

 (If Equipped)


Content      ..     24      25      26      27     ..