Ford Transit (2022 year). Manual in english - page 8
 

  Index      Manuals     Ford Transit (2022 year). Manual in english


Search            copyright infringement  


Content      ..     6      7      8      9     ..


Ford Transit (2022 year). Manual in english - page 8


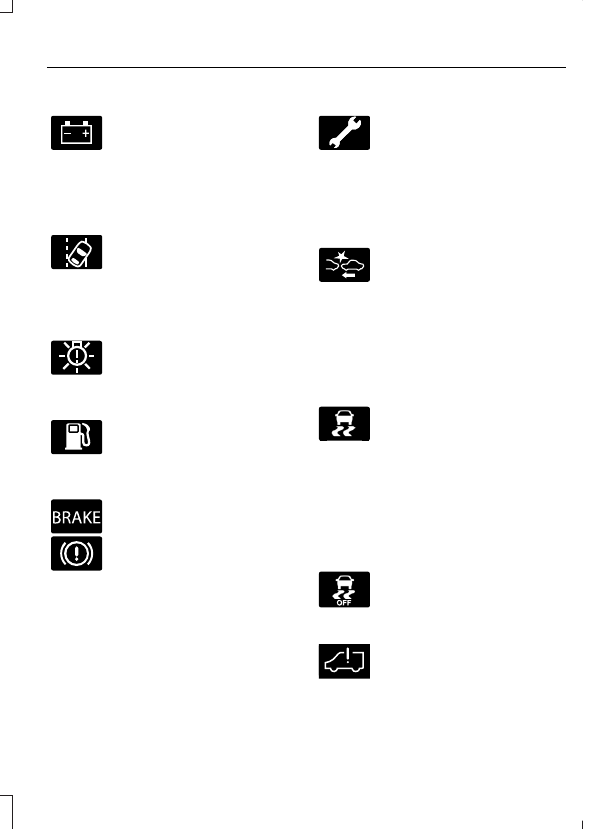
Ignition Warning Lamp

It illuminates when you switch
the ignition on.  If it illuminates
when the engine is running this

indicates a malfunction.  Have your vehicle
checked as soon as possible.

Lane Keeping System Warning
Lamp

It could illuminate when you
switch the system off. If it
illuminates when you are driving,

this indicates a malfunction. Have your
vehicle checked as soon as possible.

Low Beam Warning

E181350

Illuminates when the low beam
headlamp bulb is not functioning
properly.

Low Fuel Level Warning Lamp

  If it illuminates when you are
driving, refuel as soon as
possible.

Parking Brake Warning Lamp

E270480

It illuminates when you engage
the parking brake and the
ignition is on.  If it illuminates
when your vehicle is moving,
make sure the parking brake is
disengaged.  If the parking brake

is disengaged, this indicates low brake fluid
level or a brake system fault.  Have your
vehicle checked as soon as possible.

Powertrain Warning Lamp

If it illuminates when the engine
is running this indicates a
malfunction.  If it flashes when

you are driving, immediately reduce the
vehicle speed.  Avoid heavy acceleration
and deceleration and have your vehicle
checked as soon as possible.

Pre-Collision Assist Warning Lamp

It illuminates if your vehicle
rapidly approaches another
vehicle, to warn you of the risk of

a crash with the vehicle in front of you.  It
could illuminate red if the distance to the
vehicle ahead is small.  It illuminates
amber when you switch the system off or
if the system is not available.

Stability Control and Traction
Control Indicator

E138639

Flashes during operation.

If it does not illuminate when you
switch the ignition on, or remains

on when the engine is running, this
indicates a malfunction.  Have your vehicle
checked as soon as possible.

Note:

The system is designed to turn off if

it detects a malfunction.

Stability Control And Traction
Control Off Warning Lamp

E130458

  It illuminates when you switch
the system off.

Stop Safely Warning Lamp

E359753

It illuminates if an electrical
component requires service or a
failure that causes your vehicle

to shutdown or enter into a limited
operating mode.

133

Instrument Cluster

Tire Pressure Monitoring System
Warning Lamp

It illuminates if the tire pressure
in one or more tires is below the
correct tire pressure.  If it does

not illuminate when you switch the ignition
on, or flashes when the engine is running,
this indicates a malfunction.  Have your
vehicle checked as soon as possible.

WHAT ARE THE INSTRUMENT
CLUSTER INDICATORS

Indicators notify you of various features
that are active on your vehicle.

INSTRUMENT CLUSTER
INDICATORS

Adaptive Cruise Control Indicator

E144524

It illuminates when you switch
the system on.  It illuminates
white when the system is in

standby mode.  It illuminates green when
you set the adaptive cruise speed.

Auto-Start-Stop Indicators

E146361

It illuminates green when the
engine stops.  It flashes amber
and a message appears when
you need to take action.  It
illuminates gray with a
strikethrough when the system

is not available.

Automatic High Beam Control On
Indicator

It illuminates to confirm when
the system is ready to assist.

Blind Spot Information System
Indicator

E249861

E249861

When the system detects a
vehicle, the indicator illuminates
in the exterior mirror on the side

the approaching vehicle is coming from. If
you turn the direction indicator on for that
side of your vehicle, the indicator flashes.

Cross Traffic Alert Indicator

E268294

When the system detects an
approaching vehicle a tone
sounds, the indicator illuminates

in the relevant exterior mirror and arrows
appear in the information display to show
which side the approaching vehicle is
coming from.

Cruise Control Indicator

E71340

It illuminates when you switch
the system on.

Direction Indicator

Direction indicator. It flashes
when you switch the direction
indicators on.

Eco Mode Indicator

E267164

It illuminates when the drive
mode is selected.

Efficient Drive Mode Indicator

E308186

It indicates that you have to
slowly decelerate.

Front Fog Lamp Indicator

It illuminates when you switch
the front fog lamps on.

134

Instrument Cluster

Hazard Flasher Indicator

It flashes when you switch the
hazard flashers on.

High Beam Headlamp Indicator

It illuminates when you switch
the high beam headlamps on.

Lamps On Iindicator

It illuminates when you switch
the low beam headlamps or the
side and rear lamps on.

Lane Keeping Aid Indicator

E251020

It illuminates in the information
display when you switch the
system on and Aid Mode or Alert

and Aid Mode are selected.

Lane Keeping Alert Indicator

It illuminates in the information
display when you switch the
system on and Alert Mode is

selected.

Malfunction Indicator Lamp

  If it illuminates when the engine
is running this indicates a
malfunction.  If it flashes, engine

misfire may be occurring.  Increased
exhaust gas temperatures could damage
the diesel particulate filter or other vehicle
components.  Avoid heavy acceleration
and deceleration and have your vehicle
checked as soon as possible.

Mud/Ruts Mode Indicator

E296606

It illuminates when the drive
mode is selected.

Ready to Drive Indicator

E224090

Illuminates when you have
switched on your vehicle and it
is ready to drive. A corresponding

message may appear stating ready to
drive.

Slippery Mode Indicator

E269320

It illuminates when the drive
mode is selected.

Stability Control And Traction
Control Indicator

E252028

It flashes during operation.  If it
does not illuminate when you
switch the ignition on, or remains

on when the engine is running, this
indicates a malfunction.  Have your vehicle
checked as soon as possible.

Tow/Haul Mode Indicator

E246592

It illuminates when the drive
mode is selected.

Vehicle Plugged In Indicator

E228962

It illuminates when your vehicle
is plugged in.

135

Instrument Cluster

USING THE INSTRUMENT
CLUSTER DISPLAY CONTROLS

E257718

E250032

Return button.

A

OK button.

B

Menu button.

C

Return Button

Use the return button to go back or to exit.

OK

 Button

Use the 

OK

 button to make a selection.

You can also use it to scroll through a
menu.

Menu button

Use the menu button on the main screen
to display the submenu.

INSTRUMENT CLUSTER
DISPLAY MAIN MENU

Menu Item

Trip 1

 or 

Trip 2

MyView

Driver Assist.

Navigation

Audio

Phone

Settings

CUSTOMIZING THE
INSTRUMENT CLUSTER
DISPLAY

1.

Using the information display controls
on the steering wheel, select 

MyView

.

2. Select a screen.

3. Press the 

OK

 button.

PERSONALIZED SETTINGS

CHANGING THE INSTRUMENT

CLUSTER DISPLAY LANGUAGE

1.

Using the instrument cluster display
controls on the steering wheel, select

Settings

.

2. Select 

Display

.

3. Select 

Language

.

4. Choose your applicable setting.

136

Instrument Cluster Display - 3.5L Duratec/3.5L Ecoboost™

CHANGING THE MEASURE UNIT

1.

Using the instrument cluster display
controls on the steering wheel, select

Settings

.

2. Select 

Display

.

3. Select 

Measurement Unit

.

4. Choose your applicable setting.

CHANGING THE TEMPERATURE
UNIT

1.

Using the instrument cluster display
controls on the steering wheel, select

Settings

.

2. Select 

Display

.

3. Select 

Temperature Unit

.

4. Choose your applicable setting.

CHANGING THE TIRE PRESSURE
UNIT

1.

Using the instrument cluster display
controls on the steering wheel, select

Settings

.

2. Select 

Display

.

3. Select 

Tire Pressure

.

4. Choose your applicable setting.

SWITCHING THE INSTRUMENT
CLUSTER DISPLAY AUDIBLE
WARNINGS ON AND OFF

1.

Using the instrument cluster display
controls on the steering wheel, select

Settings

.

2. Select 

Vehicle

.

3. Select 

Chimes

.

4. Choose your applicable setting.

FUEL ECONOMY DISPLAY

An instant fuel economy gauge is provided
along with average fuel economy. Average
fuel economy is continuously averaged
since the last reset.

Note:

Press and hold the 

OK

 button on the

controls on the steering wheel to reset your
average fuel economy.

137

Instrument Cluster Display - 3.5L Duratec/3.5L Ecoboost™

USING THE INSTRUMENT
CLUSTER DISPLAY CONTROLS

E357559

E250032

Return button.

A

OK button.

B

Menu button.

C

Return Button

Use the return button to go back or to exit.

OK

 Button

Use the 

OK

 button to make a selection.

You can also use it to scroll through a
menu.

Menu button

Use the menu button on the main screen
to display the submenu.

INSTRUMENT CLUSTER
DISPLAY MAIN MENU

Menu Item

Trip 1

 or 

Trip 2

MyView

Driver Assist.

Navigation

Audio

Phone

Settings

CUSTOMIZING THE
INSTRUMENT CLUSTER
DISPLAY

1.

Using the information display controls
on the steering wheel, select 

MyView

.

2. Select a screen.

3. Press the 

OK

 button.

PERSONALIZED SETTINGS

CHANGING THE INSTRUMENT

CLUSTER DISPLAY LANGUAGE

1.

Using the instrument cluster display
controls on the steering wheel, select

Settings

.

2. Select 

Display

.

3. Select 

Language

.

4. Choose your applicable setting.

138

Instrument Cluster Display - Electric Motor

CHANGING THE MEASURE UNIT

1.

Using the instrument cluster display
controls on the steering wheel, select

Settings

.

2. Select 

Display

.

3. Select 

Measurement Unit

.

4. Choose your applicable setting.

CHANGING THE TEMPERATURE
UNIT

1.

Using the instrument cluster display
controls on the steering wheel, select

Settings

.

2. Select 

Display

.

3. Select 

Temperature Unit

.

4. Choose your applicable setting.

CHANGING THE TIRE PRESSURE
UNIT

1.

Using the instrument cluster display
controls on the steering wheel, select

Settings

.

2. Select 

Display

.

3. Select 

Tire Pressure

.

4. Choose your applicable setting.

SWITCHING THE INSTRUMENT
CLUSTER DISPLAY AUDIBLE
WARNINGS ON AND OFF

1.

Using the instrument cluster display
controls on the steering wheel, select

Settings

.

2. Select 

Vehicle

.

3. Select 

Chimes

.

4. Choose your applicable setting.

WHAT IS THE TRIP SUMMARY

Displays the trip summary when you switch
off your vehicle. The values are cumulative
since you last started your vehicle.

VEHICLE CHARGING STATUS

The vehicle charge status displays when
you switch off your vehicle and when you
switch on your vehicle when plugged in.
Charging status includes the charge start
or charge end time as appropriate. You can
modify your charge settings though the
touchscreen.

139

Instrument Cluster Display - Electric Motor

ACCESSING THE TRIP
COMPUTER

1.

Navigate to the trip screen.

2. Press the menu button.

3. Select 

Trip 1

 or 

Trip 2

.

RESETTING THE TRIP
COMPUTER

1.

Navigate to the trip screen.

2. Press the menu button.

3. Select 

Trip 1

 or 

Trip 2

.

4. Press and hold the 

OK

 button for a few

seconds.

RESETTING THE INDIVIDUAL
TRIP VALUES

1.

Navigate to the trip screen.

2. Press the menu button.

3. Select 

Trip 1

 or 

Trip 2

.

4. Select 

Reset Individual Values

.

5. Select the value to reset.

6. Press and hold the 

OK

 button for a few

seconds.

CONFIGURING THE TRIP
COMPUTER

1.

Navigate to the trip screen.

2. Press the menu button.

3. Select 

Trip 1

 or 

Trip 2

.

4. Select 

Configure View

.

5. Select the value to display.

6. Press the 

OK

 button.

TRIP DATA

Trip data includes distance, time and
energy economy. Better energy economy,
meaning greater efficiency or lower
consumption, results in increased driving
range.

How Is My Driving

Display’s scores for trip driving behavior.
Higher scores result in better energy
economy.

Acceleration – Light to moderate
acceleration improves your score.

Braking – We recommend slow and
steady braking.

Speed – Maintain reasonable vehicle
speeds for best scores.

E352790

You can view additional trip data
by pressing the icon on your
touchscreen.

140

Trip Computer

WHAT IS REMOTE START

The system allows you to remotely start
your vehicle and therefore to heat or cool
the interior to a predetermined
temperature.

REMOTE START LIMITATIONS
- 3.5L DURATEC/3.5L
ECOBOOST™

Remote start does not work if:

The alarm horn is sounding.

The hood is open.

The transmission is not in park (P).

Remote start is not enabled.

The ignition is on.

Note:

Do not use remote start if your fuel

level is low.

REMOTE START LIMITATIONS
- ELECTRIC MOTOR

Remote start does not work if:

The alarm horn is sounding.

The hood is open.

The transmission is not in park (P).

Remote start is not enabled.

The vehicle is switched on.

The vehicle battery is below the
minimum operating voltage.

ENABLING REMOTE START

1.

Using the information display controls
on the steering wheel, select 

Settings

.

2. Select 

Vehicle Settings

.

3. Select 

Remote Start

.

4. Switch 

System

 on.

Note:

To use remote start, make sure that

the modem is enabled.  See 

Enabling and

Disabling the Modem

 (page 466).

REMOTELY STARTING AND
STOPPING THE VEHICLE - 3.5L
DURATEC/3.5L ECOBOOST™

WARNING: 

Do not start the engine

in a closed garage or in other enclosed
areas. Exhaust fumes are toxic. Always
open the garage door before you start
the engine. Failure to follow this
instruction could result in personal injury
or death.

Use the FordPass App to start the vehicle.

Note:

The turn signal lamps flash twice.

Note:

The parking lamps turn on when the

vehicle is running.

Note:

The horn sounds if the system fails

to start.

Note:

All other vehicle systems remain off

when you have remotely started the vehicle.

Note:

You may have to wait a short period

of time before remotely starting the vehicle
after the vehicle stops running.

Note:

The vehicle remains secured when

you have remotely started it. A valid key
must be inside your vehicle to switch the
ignition on and drive your vehicle.

Note:

A maximum of two remote starts are

allowed. After that you need to turn the
ignition on and off before you can use
remote start again.

Use the FordPass App to switch the vehicle
off.

141

Remote Start

REMOTELY STARTING AND
STOPPING THE VEHICLE -
ELECTRIC MOTOR

Use the FordPass App to start the vehicle.

Note:

The turn signal lamps flash twice.

Note:

The parking lamps turn on when the

vehicle is running.

Note:

The horn sounds if the system fails

to start.

Note:

All other vehicle systems remain off

when you have remotely started the vehicle.

Note:

You may have to wait a short period

of time before remotely starting the vehicle
after the vehicle stops running.

Note:

The vehicle remains secured when

you have remotely started it. A valid key
must be inside your vehicle to switch the
vehicle on and drive your vehicle.

Note:

A maximum of two remote starts, or

one remote start with an extention are
allowed. To reset the restart procedure
switch the vehicle on, then off.

Note:

If your vehicle is plugged in during

remote start it uses energy from your
charging source.

Use the FordPass App to switch the vehicle
off.

EXTENDING THE REMOTE
START DURATION

Use your FordPass App to extend the
remote start duration.

If the duration is set to 15 minutes, the
duration extends by another 15 minutes.
This provides a total of 30 minutes.

Note:

Remote start can only be extended

once.

REMOTE START SETTINGS

Climate Control Settings

1.

Using the information display controls
on the steering wheel, select 

Settings

.

2. Select 

Vehicle Settings

.

3. Select 

Remote Start

.

4. Select 

Climate Control

.

5. Select 

Auto

 or 

Last Settings

.

Note:

If you select 

Auto

, the system

attempts to heat or cool the interior to 72°F
(22°C).

Note:

If you select 

Last Settings

, the

system remembers the last used settings.

Note:

You cannot adjust the climate control

settings when you have remotely started
the vehicle.

Note:

When you switch the ignition on, the

climate control system returns to the last
used settings.

Heated Seat Settings

1.

Using the information display controls
on the steering wheel, select 

Settings

.

2. Select 

Vehicle Settings

.

3. Select 

Remote Start

.

4. Select 

Seats

.

5. Select 

Auto

 or 

Off

.

Note:

If you switch the heated seat settings

to 

Auto

, the heated seats turn on during

cold weather.

Note:

You cannot adjust the heated seat

settings when you have remotely started
the vehicle.

Setting the Remote Start Duration

You can set a duration for Remote Start
to run.

1.

Using the information display controls
on the steering wheel, select 

Settings

.

142

Remote Start

2. Select 

Vehicle Settings

.

3. Select 

Remote Start

.

4. Select 

Duration

.

143

Remote Start

SWITCHING CLIMATE
CONTROL ON AND OFF

E265283

Press the button to activate the
selection screen.

Press the button.

SWITCHING RECIRCULATED
AIR ON AND OFF

E265283

Press the button to activate the
selection screen.

Press the button to recirculate
air currently in the passenger
compartment.

Note:

Recirculated air may turn off

automatically, or prevent you from switching
on in all air flow modes except MAX A/C to
reduce the risk of fogging. Recirculation may
also turn on and off automatically in various
air distribution control combinations to
improve heating or cooling efficiency.

SWITCHING AIR
CONDITIONING ON AND OFF

Press the button.

Note:

Under certain conditions, the air

conditioning compressor could continue to
operate after you switch air conditioning off.

SWITCHING DEFROST ON AND
OFF

E265283

Press the button to activate the
selection screen.

Press the button on the
touchscreen to switch the
windshield air vents on.

E244097

Make sure that the instrument
panel air vents are switched off.

Make sure that the footwell air
vents are switched off.

SWITCHING MAXIMUM
DEFROST ON AND OFF

Press the button on the
touchscreen.

Air flows through the windshield air vents,
and the blower motor adjusts to the
highest speed.

You can also use this setting to defog and
clear the windshield of a thin covering of
ice.

Note:

You can also press the button on the

instrument panel to switch the maximum
defrost on or off.

Note:

To prevent window fogging, you

cannot select recirculated air when
maximum defrost is on.

Note:

The heated rear window and air

conditioning also turn on when you select
maximum defrost.

SWITCHING MAXIMUM
COOLING ON AND OFF

E265283

Press the button to activate the
selection screen.

Press the button.

Note:

When you switch maximum cooling

off, air conditioning remains on.

144

Climate Control - Vehicles With: Automatic Temperature

Control

Note:

In certain conditions, for example,

cold weather, maximum cooling may not
activate or could run slow when switched
on. This helps reduce power consumption
from the battery.

SWITCHING THE ELECTRIC
HEATER ON AND OFF -
ELECTRIC MOTOR

E355760

Press the button to switch the
electric heater on or off.

Note:

The default setting is on.

Note:

Disabling the system helps maximize

your driving range.

Note:

The system does not work in some

climate control modes.

Note:

This button does not switch off the

climate control system.

Note:

In certain conditions, for example

warm weather, the system could not
activate or could run with reduced
performance when switched on.

SWITCHING THE HEATED
REAR WINDOW ON AND OFF -
VEHICLES WITH: HEATED
REAR WINDOW

Press the button to clear the rear
window of thin ice and fog.  The
heated rear window turns off

after a short period of time.

Note:

Do not use harsh chemicals, razor

blades or other sharp objects to clean or
remove decals from the inside of the heated
rear window as this could cause damage to
the heated rear window grid lines not
covered by the vehicle Warranty.

Note:

The engine must be running or your

vehicle must be ready to drive to switch the
system on.

SETTING THE BLOWER MOTOR
SPEED

Press the button to set the
blower motor speed.

E328451

Slide the control to set the
blower motor speed.

Note:

 You can press 

+

 or 

-

 to set the blower

motor speed.

SWITCHING THE HEATED
MIRRORS ON AND OFF -
VEHICLES WITHOUT: HEATED
REAR WINDOW

E266189

Press the button to clear the
heated mirror of thin ice and fog.
The system turns off after a

short period of time.

Note:

Do not remove ice from the mirrors

with a scraper or adjust the mirror glass
when it is frozen in place.

Note:

 Do not clean the mirror housing or

glass with harsh abrasives, fuel or other
petroleum-based cleaning products.  The
vehicle warranty may not cover damage
caused to the mirror housing or glass.

Note:

The engine must be running or your

vehicle must be ready to drive to switch the
system on.

145

Climate Control - Vehicles With: Automatic Temperature

Control

SWITCHING THE HEATED
MIRRORS ON AND OFF -
VEHICLES WITH: HEATED
REAR WINDOW

When you switch the heated rear window
on, the heated exterior mirrors turn on.

Note:

Do not remove ice from the mirrors

with a scraper or adjust the mirror glass
when it is frozen in place.

Note:

Do not clean the mirror housing or

glass with harsh abrasives, fuel or other
petroleum-based cleaning products. The
vehicle warranty may not cover damage
caused to the mirror housing or glass.

Note:

The engine must be running or your

vehicle must be ready to drive to switch the
system on.

SETTING THE TEMPERATURE

Press the temperature control to access
the temperature settings.

E328451

Slide the control to set the
temperature.

Note:

 You can press 

+

 or 

-

 to set the

temperature.

DIRECTING THE FLOW OF AIR

Directing Air to the Windshield Air
Vents

E265283

Press the button to activate the
selection screen.

Press the button on the
touchscreen.

Directing Air to the Instrument
Panel Air Vents

E265283

Press the button to activate the
selection screen.

E244097

Press the button on the
touchscreen.

Directing Air to the Footwell Air
Vents

E265283

Press the button to activate the
selection screen.

Press the button on the
touchscreen.

AUTO MODE

SWITCHING AUTO MODE ON AND
OFF

Press the button to switch auto
mode on. Repeatedly press the
button to adjust auto mode.

Adjust the blower motor control or air
distribution control to switch auto mode
off.

AUTO MODE INDICATORS

The indicators are on the Auto Mode
button.

146

Climate Control - Vehicles With: Automatic Temperature

Control

Description

Auto Mode Indicator

Status

The blower motor speed is reduced. Use this setting to
minimize the amount of noise from the blower motor. This
setting increases the time taken to cool the interior.

One indicator illumin-
ated.

The blower motor speed is moderate.

Two indicators illumin-
ated.

The blower motor speed is increased. Use this setting to
reduce the time taken to cool the interior. This setting
increases the amount of noise from the blower motor.

Three indicators illumin-
ated.

CLIMATE CONTROL HINTS -
3.5L DURATEC/3.5L
ECOBOOST™

General Hints

Prolonged use of recirculated air may
cause the windows to fog up.

You may feel a small amount of air
from the footwell air vents regardless
of the air distribution setting.

To reduce humidity build-up inside your
vehicle, do not drive with the system
switched off or with recirculated air
always switched on.

Do not place objects under the front
seats as this may interfere with the
airflow to the rear seats.

Remove any snow, ice or leaves from
the air intake area at the base of the
windshield.

To improve the time to reach a
comfortable temperature in hot
weather, drive with the windows open
until you feel cold air through the air
vents.

Automatic Climate Control

Adjusting the settings when your
vehicle interior is extremely hot or cold
is not necessary. Automatic mode is
best recommended to maintain set
temperature.

The system adjusts to heat or cool the
interior to the temperature you select
as quickly as possible.

For the system to function efficiently,
the instrument panel and side air vents
should be fully open.

If you press 

AUTO

 during cold outside

temperatures, the system directs air
flow to the windshield and side window
air vents.In addition, the blower motor
may run at a slower speed until the
engine warms up.

If you press 

AUTO

 during hot

temperatures and the inside of the
vehicle is hot, the system uses
recirculated air to maximize interior
cooling. Blower motor speed may also
reduce until the air cools.

Quickly Heating the Interior

1.

Press 

AUTO

.

2. Adjust the temperature function to the

setting you prefer.

147

Climate Control - Vehicles With: Automatic Temperature

Control

Recommended Settings for
Heating

1.

Press 

AUTO

.

2. Adjust the temperature function to the

setting you prefer. Use 72°F (22°C) as
a starting point, then adjust the setting
as necessary.

Quickly Cooling the Interior

1.

Press 

MAX A/C

.

2. Drive with the windows open for a short

period of time.

Recommended Settings for
Cooling

1.

Press 

AUTO

.

2. Adjust the temperature function to the

setting you prefer. Use 72°F (22°C) as
a starting point, then adjust the setting
as necessary.

Defogging the Side Windows in
Cold Weather

1.

Press and release defrost or maximum
defrost.

2. Adjust the temperature control to the

setting you prefer. Use 72°F (22°C) as
a starting point, then adjust the setting
as necessary.

CLIMATE CONTROL HINTS -
ELECTRIC MOTOR

General Hints

Use of the climate system will reduce
your vehicles driving range. Conserve
battery charge by using climate control
features when necessary.

Prolonged use of recirculated air may
cause the windows to fog up.

You may feel a small amount of air
from the footwell air vents regardless
of the air distribution setting.

To reduce humidity build-up inside your
vehicle, do not drive with the system
switched off or with recirculated air
always switched on.

Remove any snow, ice or leaves from
the air intake area at the base of the
windshield.

To improve the time to reach a
comfortable temperature in hot
weather, drive with the windows open
until you feel cold air through the air
vents.

Automatic Climate Control

Adjusting the settings when your
vehicle interior is extremely hot or cold
is not necessary. Automatic mode is
best recommended to maintain set
temperature.

The system adjusts to heat or cool the
interior to the temperature you select
as quickly as possible.

For the system to function efficiently,
the instrument panel and side air vents
should be fully open.

If you press 

AUTO

 during cold outside

temperatures, the system directs air
flow to the windshield and side window
air vents. The blower motor speed may
reduce until the air warms.

If you press 

AUTO

 during hot

temperatures and the inside of the
vehicle is hot, the system uses
recirculated air to maximize interior
cooling. Blower motor speed may also
reduce until the air cools.

Quickly Heating the Interior

1.

Press 

AUTO

.

2. Adjust the temperature function to the

setting you prefer.

148

Climate Control - Vehicles With: Automatic Temperature

Control


Content      ..     6      7      8      9     ..