Ford Transit (2022 year). Manual in english - page 6
 

  Index      Manuals     Ford Transit (2022 year). Manual in english


Search            copyright infringement  


Content      ..     4      5      6      7     ..


Ford Transit (2022 year). Manual in english - page 6


WHAT IS KEYLESS ENTRY

The system allows you to lock and unlock
your vehicle without taking the passive key
out of your pocket or purse.

KEYLESS ENTRY LIMITATIONS

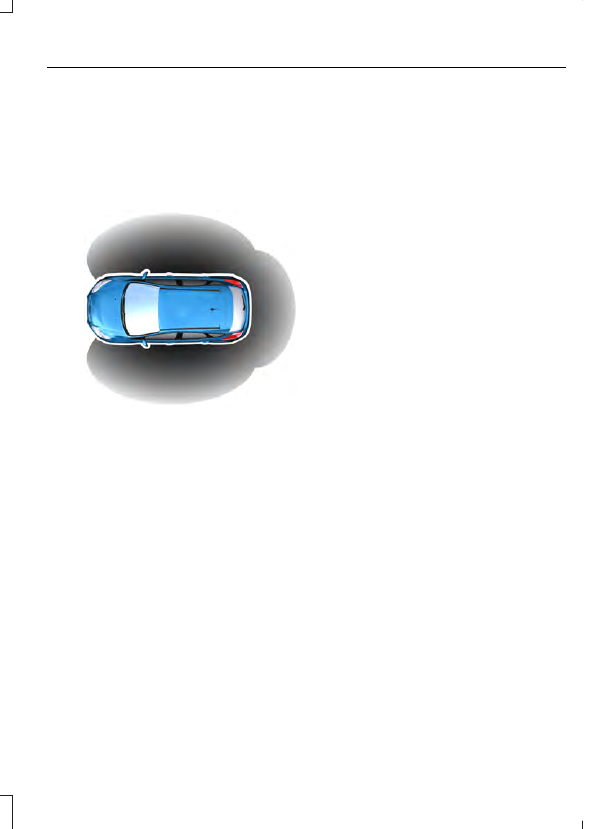
E78276

A valid passive key must be within one of
the three external detection ranges. These
are approximately 5 ft (1.5 m) from the
front door handles and the liftgate.

The system could not function if:

The passive key remains stationary for
about a minute.

The vehicle battery has no charge.

The passive key battery has no charge.

The passive key frequencies are
jammed.

The passive key is too close to metal
objects or electronic devices, for
example keys or a cell phone.

KEYLESS ENTRY SETTINGS

Switching Keyless Entry On and
Off

1.

Using the instrument cluster controls
on the steering wheel, select 

Settings

.

2. Select 

Vehicle Settings

.

3. Select 

Locks

.

4. Switch 

Intelligent Access

 on or off.

Reprogramming the Unlocking
Function

You can program the unlocking function
so that only the driver door unlocks when
you touch the unlock sensor on the exterior
door handle.

If you program the unlocking function so
that only the driver door unlocks, the
following occurs:

If you open the driver door first, all
other doors remain locked.  You can
unlock all of the other doors from inside
your vehicle using the power door lock
control on the driver door. You can
unlock individual doors by pulling the
interior door handles on those doors.

If you open any other door first, all
other doors and the liftgate unlock.

You can change between the unlocking
modes in the information display.

1.

Using the instrument cluster controls
on the steering wheel, select 

Settings

.

2. Select 

Vehicle Settings

.

3. Select 

Locks

.

4. Select 

Remote Unlock

.

5. Select 

All Doors

 or 

Driver's Door

.

101

Keyless Entry

USING KEYLESS ENTRY

Unlocking the Doors

Unlock sensors are on the back of the
exterior front door handles.

E357642

Touch the unlock sensor to unlock your
vehicle and disarm the alarm.  The
direction indicators flash.  Do not touch the
lock sensor on the outer surface of the door
handle.

Keep the door handle clean to make sure
the system correctly operates.

After unlocking the doors with the unlock
sensor, there is a brief delay before you can
lock your vehicle.  When the delay period
is over, you can lock the doors again,
provided the passive key is within the
respective detection range.

Locking the Doors

Lock sensors are on the top of the exterior
front door handles.

E357643

Touch a lock sensor once to lock your
vehicle and arm the alarm. The direction
indicators flash.

Keep the door handle clean to make sure
the system correctly operates.

Note:

Your vehicle does not automatically

lock. If you do not touch a lock sensor your
vehicle remains unlocked.

After locking the doors with the lock
sensor, there is a brief delay before you can
unlock your vehicle.  This delay lets you
pull the handle to make sure your vehicle
is locked.  When the delay period is over,
you can unlock the doors again, provided
the passive key is within the respective
detection range.

KEYLESS ENTRY –
TROUBLESHOOTING

KEYLESS ENTRY – FREQUENTLY
ASKED QUESTIONS

Why does the keyless entry system not
function?

If the system does not function it may
be limited.  See 

Keyless Entry

Limitations

 (page 101).  If the system

still does not function use the remote
control or the key blade to lock and
unlock your vehicle.

Why can I not lock my vehicle?

If you electronically lock your vehicle
with a rear door open, the system
searches for a passive key inside your
vehicle after you close the last door. If
the system detects a key, all doors
unlock indicating that a key is inside.
Your vehicle locks if another passive
key is within the detection range after
you close the last door.

Why does the passive key not work?

The system deactivates passive keys
left inside your vehicle when you lock
it. You cannot switch the ignition on
using a deactivated passive key. Press
the unlock button on the remote
control to reactivate a passive key.

102

Keyless Entry

WHAT IS THE KEYLESS ENTRY
KEYPAD

The keyless entry keypad allows you to
lock and unlock your vehicle using the
keypad under the driver door window.

KEYLESS ENTRY KEYPAD
LIMITATIONS

The system may not function if:

The vehicle battery has no charge.

LOCATING THE KEYLESS
ENTRY KEYPAD

E307685

The keypad is under the driver door
window. It may illuminate when you press
a button.

KEYLESS ENTRY KEYPAD
MASTER ACCESS CODE

The master access code is a factory-set
five-digit entry code. You can operate the
keypad with the master access code at
any time.

KEYLESS ENTRY KEYPAD
PERSONAL ACCESS CODES

Reprogramming the Unlocking
Function

You can program the unlocking function
so that only the driver door, or cabin door
unlocks.

Note:

Depending on the locking

mechanism, you can program the unlocking
function to unlock the driver door or the
cabin doors.

Press and hold the unlock and lock buttons
on the remote control simultaneously for
at least four seconds with the ignition off.
The direction indicators flash twice to
confirm the change.

To return to the original unlocking function,
repeat the process.

You can also change between the
unlocking modes in the instrument cluster
display.

1.

Using the information display controls
on the steering wheel, select 

Settings

.

2. Select 

Vehicle Settings

.

3. Select 

Locks

.

4. Select 

Remote Unlock

.

5. Select 

All Doors

 or 

Driver's Door

.

Creating Personal Access Codes

1.

Enter the master access code.

Note:

You can find the master access code

on the owner's wallet card or at an
authorised dealer.

2. Within five seconds press and hold the

1·2 button for one second.

Note:

A red light flashes twice.

3. Enter your personal access code.

103

Keyless Entry Keypad

Note:

Your personal access code must be

a five-digit code. You must enter each
number within five seconds of each other.

The doors unlock, lock and then unlock and
the red light flashes twice to confirm that
a personal access code has been created.

Clearing All Personal Access
Codes

1.

Enter the master access code.

2. Within five seconds press and hold the

1·2 button for five seconds.

USING THE KEYLESS ENTRY
KEYPAD

Unlocking the Doors

Enter the master access code or your
personal access code to unlock the driver
door or cabin door, then press the 3·4
button within five seconds to unlock all
doors.

Note:

If you program the unlocking function

so that all doors unlock, you do not have to
press the 3·4 button.  See 

Reprogramming

the Unlocking Function

 (page 91).

The interior lamps illuminate to confirm
that the doors have been unlocked.

Note:

Depending on the locking

mechanism, you can program the unlocking
function to unlock the driver door or the
cabin doors.

Unlocking the Rear Cargo Doors

Enter the master access code or your
personal access code, then press the 5·6
button within five seconds.

Locking the Doors

Press and hold the 7·8 and 9·0 buttons at
the same time with the driver door, or cabin
door closed.

Note:

Depending on the locking

mechanism, you can program the unlocking
function to unlock the driver door or the
cabin doors.

KEYLESS ENTRY KEYPAD –
TROUBLESHOOTING

KEYLESS ENTRY KEYPAD –
FREQUENTLY ASKED QUESTIONS

Why does the keypad not accept the
access code?

If you enter the access code too fast
on the keypad, the unlock function
may not work. Slowly re-enter the
access code.

Why does the keypad not function?

The keypad goes into an anti-scan
mode if you enter a wrong code seven
times. The anti-scan mode disables
the keypad for one minute and the red
light flashes.

104

Keyless Entry Keypad

PASSIVE ANTI-THEFT
SYSTEM

WHAT IS THE PASSIVE ANTI-
THEFT SYSTEM

The passive anti-theft system prevents
someone from starting the vehicle with an
incorrectly coded key.

Note:

The system is not compatible with

non-Ford aftermarket remote start systems.

Note:

Do not leave a duplicate coded key

in your vehicle. Always take the keys and
lock all doors when leaving your vehicle.

ARMING THE PASSIVE ANTI-
THEFT SYSTEM

The passive anti-theft system arms your
vehicle after a short period of time when
you switch the power off.

DISARMING THE PASSIVE ANTI-
THEFT SYSTEM

The passive anti-theft system disarms
when you switch the power on with a
correctly coded key.

Note:

You could have difficulty starting the

vehicle if you have metallic objects,
electronic devices or a second coded key on
the same key chain.

ANTI-THEFT ALARM SYSTEM

WHAT IS THE ANTI-THEFT ALARM
SYSTEM

The Anti-Theft Alarm System warns you
of an unauthorized entry to your vehicle.

HOW DOES THE ANTI-THEFT
ALARM SYSTEM WORK

When armed, the anti-theft alarm is
triggered in any of the following ways:

If someone opens a door, the liftgate
or the hood without a correctly coded
key or remote control.

If you turn the power on without a
correctly coded key.

If the interior sensors detect movement
inside your vehicle.

If the inclination sensors detect an
attempt to raise your vehicle.

If someone disconnects the vehicle
battery or the battery backup alarm.

If the anti-theft alarm is triggered, the
alarm horn sounds for 30 seconds and the
direction indicators flash for 5 minutes.

Any further attempts to carry out one of
the above sounds the alarm again.

WHAT IS THE PERIMETER ALARM

The perimeter alarm is designed to detect
unauthorized access to your vehicle.

WHAT ARE THE INTERIOR
SENSORS

The interior sensors are designed to detect
any movement inside your vehicle.

The interior sensors are in the overhead
console.

Note:

Do not cover the interior sensors.

WHAT ARE THE INCLINATION
SENSORS

The inclination sensor is designed to detect
an attempt to raise your vehicle, for
example to remove a wheel or to tow it
away.

105

Security

WHAT IS THE BATTERY BACKUP
ALARM

The battery backup alarm is an additional
alarm sounder that has its own battery. It
can detect if the vehicle battery is
disconnected to overcome the alarm
system.

ARMING THE ANTI-THEFT ALARM
SYSTEM

The alarm is ready to arm when your
vehicle is switched off.

Lock your vehicle with your remote control
to arm the alarm.

DISARMING THE ANTI-THEFT
ALARM SYSTEM

Disarm the alarm by performing any of the
following actions:

Unlock the doors or luggage
compartment with the remote control.

Switch your vehicle on or start your
vehicle.

ANTI-THEFT ALARM SYSTEM
SETTINGS

WHAT ARE THE ALARM SECURITY
LEVELS

You can select two levels of alarm security,
full guard and reduced guard.

Full Guard

Full guard is the standard setting.

In full guard, all equipped sensors are on
when you arm the alarm.

Note:

Do not arm the alarm with full guard

if passengers, animals or other moving
objects are inside your vehicle.

Reduced Guard

In reduced guard, only the perimeter
sensors are on when you arm the alarm.

Note:

The alarm security level will switch

back to full guard once the power is turned
on.

SETTING THE ALARM SECURITY
LEVEL - VEHICLES WITH: SYNC 4

1.

Press 

Settings

 on the touchscreen.

2. Press 

Vehicle Settings

.

3. Press 

Alarm System

.

4. Press 

Motion Sensors

.

5. Press a setting.

SETTING THE ALARM SECURITY
LEVEL - VEHICLES WITH: SYNC 3
LITE, VEHICLES WITHOUT: SYNC

1.

Using the instrument cluster display
controls on the steering wheel, select

Settings

.

2. Select 

Vehicle Settings

.

3. Select 

Alarm system

.

4. Select 

Alarm Settings

.

5. Select a setting and press the 

OK

button.

WHAT IS ASK ON EXIT

You can choose which level of security you
require after you switch the ignition off.

106

Security

After you switch the ignition off, use the information display controls on the
steering wheel to select the following:

Action

Menu Item

Press the toggle button upward or downward to choose your
required setting.  Press the 

OK

 button.

Full guard

Reduced guard

Note:

If you do not choose a setting, the

system defaults to full guard.

SWITCHING ASK ON EXIT ON AND
OFF - VEHICLES WITH: SYNC 3
LITE, VEHICLES WITHOUT: SYNC

1.

Using the instrument cluster display
controls on the steering wheel, select

Settings

.

2. Select 

Vehicle Settings

.

3. Select 

Alarm system

.

4. Select 

Ask on Exit

.

5. Switch 

Ask on Exit

 on or off.

SWITCHING ASK ON EXIT ON AND
OFF - VEHICLES WITH: SYNC 4

1.

Press 

Settings

 on the touchscreen.

2. Press 

Vehicle Settings

.

3. Press 

Alarm System

.

4. Switch 

Ask on Exit

 on or off.

SECURITY – TROUBLESHOOTING

SECURITY – INFORMATION MESSAGES

Action

Message

The system has not detected a correctly coded key.

No Key Detected

The system has malfunctioned. Have your vehicle checked
as soon as possible.

Starting System Fault

Displays when the alarm has been triggered due to unauthor-
ized entry.

Vehicle Alarm To Stop
Alarm, Start Vehicle.

Alarm Announcement

107

Security

SECURITY – FREQUENTLY ASKED
QUESTIONS

What should I do if there is any
potential alarm problem with my
vehicle?

Take all remote controls to an
authorized dealer if there is any
potential alarm problem with your
vehicle.

What should I do if the vehicle is unable
to start with a correctly coded key?

Have your vehicle checked as soon as
possible.

108

Security

POWER RUNNING BOARD
PRECAUTIONS

WARNING: 

In extreme climates,

excessive ice buildup may occur, causing
the running boards not to deploy. Make
sure that the running boards have
deployed, and have finished moving
before attempting to step on them. The
running boards will resume normal
function once the blockage is cleared.

WARNING: 

Switch off the running

boards before jacking or placing any
object under your vehicle. Never place
your hand between the extended running
board and your vehicle. A moving running
board may cause injury.

Do not use the running boards, front and
rear hinge assemblies, running board
motors, or the running board underbody
mounts to lift your vehicle when jacking.
Use proper jacking points.

The running boards could move slower in
cold temperatures.

POWER RUNNING BOARD
SETTINGS

1.

Using the instrument cluster display
controls on the steering wheel, select

Settings

.

2. Select 

Vehicle Settings

.

3. Select 

Power Steps

.

4. Select a setting.

Power Running Board Settings

Off

The power running boards remain stowed,
regardless of door position.

Auto

The power running boards deploy when
you open the door and stow when you
close the door.

Out

The power running boards remain
deployed, regardless of door position.

DEPLOYING AND STOWING
THE POWER RUNNING
BOARDS

The power running boards deploy when
you open the door and stow when you
close the door.

Note:

The power running boards reverse

direction and move to the end of travel if
they encounter an object when moving.

POWER RUNNING BOARDS –
TROUBLESHOOTING

POWER RUNNING BOARDS –
FREQUENTLY ASKED QUESTIONS

Why is there unwanted noise coming
from my power running boards?

The power running board mechanism
could trap debris such as mud, dirt,
snow, ice and salt. If this happens, set
the running boards to the deployed
position. Then, wash the system, in
particular the front and rear hinge
arms, with a high-pressure car wash
wand.

109

Power Running Boards

ADJUSTING THE STEERING
WHEEL

WARNING: 

Do not adjust the

steering wheel when your vehicle is
moving.

Note:

Make sure that you are sitting in the

correct position.  See 

Sitting in the Correct

Position

 (page 154).

1

2

2

E95178

1.

Unlock the steering column.

2. Adjust the steering wheel to the desired

position.

3

E95179

3. Lock the steering column.

LOCKING THE STEERING
WHEEL

1.

Remove the key from the ignition.

2. Slightly rotate the steering wheel to

engage the lock.

Unlocking the Steering Wheel

WARNING: 

Always check that the

steering is unlocked before attempting
to move your vehicle.

1.

Insert the key in the ignition.

2. Turn the key to position 

I

.

Note:

You may have to slightly rotate the

steering wheel to assist unlocking it.

110

Steering Wheel

WIPERS

WIPER PRECAUTIONS

Fully defrost the windshield before you
switch the windshield wipers on.

Make sure that you switch the windshield
wipers off before entering a car wash.

If streaks or smears appear on the
windshield, clean the windshield and the
wiper blades.  See 

Checking the Wiper

Blades

 (page 112).  If that does not resolve

the issue, install new wiper blades.  See

Replacing the Front Wiper Blades

 (page

112).

Do not operate the wipers on a dry
windshield. This may scratch the glass or
damage the wiper blades. Always use the
windshield washers before wiping a dry
windshield.

When your vehicle speed increases, the
interval between intermittent wipes may
decrease.

SWITCHING WINDSHIELD WIPERS
ON AND OFF

E197525

Single wipe.

A

Intermittent wipe.

B

Normal wipe.

C

High-speed wipe.

D

AUTOWIPERS

WHAT ARE AUTOWIPERS

Autowipers turns on and controls the
speed and frequency of the windshield
wipers.

AUTOWIPERS SETTINGS

1.

Using the instrument cluster display
controls on the steering wheel, select

Settings

.

2. Select 

Vehicle Settings

.

3. Select 

Wipers

.

4. Switch 

Rain Sensing

 on or off.

ADJUSTING THE SENSITIVITY OF
THE RAIN SENSOR

E197526

High sensitivity.

A

Autowipers on.

B

Low sensitivity.

C

Use the rotary control to adjust the
sensitivity of the autowipers.

111

Wipers and Washers

Note:

Keep the outside of the windshield

clean. The rain sensor is very sensitive and
the wipers may operate if dirt, mist or
insects hit the windshield.

CHECKING THE WIPER
BLADES

E142463

Run the tip of your fingers over the edge of
the blade to check for roughness.

REPLACING THE FRONT
WIPER BLADES

E72899

1.

Lift the wiper arm. Press the wiper
blade locking button.

Note:

Do not hold the wiper blade when

lifting the wiper arm.

2. Remove the wiper blade

Note:

Make sure that the wiper arm does

not spring back against the glass when the
wiper blade is not attached.

3. To install, reverse the removal

procedure.

Note:

Make sure that the wiper blade locks

into place.

WASHERS

WASHER PRECAUTIONS

Do not operate the washers when the
washer reservoir is empty. This could cause
the washer pump to overheat.

USING THE WINDSHIELD WASHER

E197528

Pull the lever toward you to operate the
windshield washer.

Note:

A courtesy wipe occurs a short time

after the wipers stop to clear any remaining
washer fluid when switched on.  See

Switching the Courtesy Wipe On and Off

(page 112).

SWITCHING THE COURTESY WIPE
ON AND OFF

1.

Using the instrument cluster display
controls on the steering wheel, select

Settings

.

2. Select 

Vehicle Settings

.

3. Select 

Wipers

.

4. Switch 

Courtesy Wipe

 on or off.

112

Wipers and Washers

ADDING WASHER FLUID

1.

Remove the washer fluid reservoir cap.

2. Add washer fluid that meets our

specification.  See 

Washer Fluid

Specification

 (page 462).

3. Install the washer fluid reservoir cap.

Note:

The reservoir supplies the front and

rear washer systems.

WIPERS AND WASHERS –
TROUBLESHOOTING

WIPERS AND WASHERS –
WARNING LAMPS

E132353

Illuminates when the windshield
washer fluid is low.

WIPERS AND WASHERS –
FREQUENTLY ASKED QUESTIONS

Why are there streaks and smears on
the windshield?

The wiper blades could be dirty, worn
or damaged. Check the wiper blades.
See 

Checking the Wiper Blades

(page 112).  If the wiper blades are dirty,
clean them with washer fluid or water
applied with a soft sponge or cloth. If
the wiper blades are worn or damaged,
install new ones.  See 

Replacing the

Front Wiper Blades

 (page 112).

113

Wipers and Washers

EXTERIOR LIGHTING
CONTROL

E245649

A

D

C

B

Lamps off.

A

Parking lamps, instrument panel
lamps and license plate lamps.

B

Headlamps.

C

Autolamps.  See 

What Are

Autolamps

 (page 115).

D

Rotate the control to make a selection.

HEADLAMPS

USING THE HIGH BEAM
HEADLAMPS

E354013

Push the lever away from you to
switch the high beams on.

Push the lever forward again or pull the
lever toward you to switch the high beams
off.

Slightly pull the lever toward you and
release it to flash the headlamps.

HEADLAMP INDICATORS

Lamps On

Illuminates when you switch the
low beam headlamps or the
parking lamps on.

Headlamp High Beam

Illuminates when you switch the
high beam headlamps on.

114

Exterior Lighting

HEADLAMPS –
TROUBLESHOOTING

HEADLAMPS – FREQUENTLY
ASKED QUESTIONS

Why is there condensation in the
headlamps?

Headlamps have vents to
accommodate normal changes in air
pressure. Condensation can be a
natural by-product of this design.
When moist air enters the lamp
assembly through the vents, there is a
possibility that condensation can
occur when the temperature is cold.
When normal condensation occurs, a
fine mist can form on the interior of the
lens. The fine mist eventually clears
and exits through the vents during
normal operation.

How much condensation is
acceptable?

The presence of a fine mist, for
example no streaks, drip marks or
large droplets. A fine mist covers less
than 50% of the lens.

How long may it take for the
acceptable condensation to be
cleared?

Clearing time may take as long as 48
hours under dry weather conditions.

How much condensation is
unacceptable?

A water puddle inside the lamp.
Streaks, drip marks or large droplets
present on the interior of the lens.

What should I do if unacceptable
condensation is present?

Have your vehicle checked as soon as
possible.

Why do my headlamps turn off when I
have them switched on when I switch
my vehicle off?

The battery saver turns the headlamps
off after a short period of time after
you switch your vehicle off.

AUTOLAMPS

WHAT ARE AUTOLAMPS

WARNING: 

The system does not

relieve you of your responsibility to drive
with due care and attention. You may
need to override the system if it does not
turn the headlamps on in low visibility
conditions, for example daytime fog.

Autolamps turn the headlamps on in low
light situations or when the windshield
wipers operate.

AUTOLAMP SETTINGS

1.

Using the instrument cluster display
controls on the steering wheel, select

Settings

.

2. Select 

Vehicle Settings

.

3. Select 

Lighting

.

4. Select 

Autolamp Delay

.

5. Select a setting and press the 

OK

button.

115

Exterior Lighting

EXTERIOR LAMPS

SWITCHING THE TURN SIGNAL
LAMPS ON AND OFF

E162681

Push the lever up or down to
switch the turn signal lamps on.

Set the lever to the middle position to
switch the turn signal lamps off.

Note:

Tap the lever up or down to make the

turn signal lamps flash three times.

HOW DO CORNERING LAMPS
WORK

The cornering lamps illuminate the inside
of a corner when you are turning the
steering wheel or when you switch the turn
signal lamps on.

E327599

Headlamp beam.

A

Cornering lamp beam.

B

SWITCHING THE DAYTIME
RUNNING LAMPS ON AND OFF -
VEHICLES WITH: DAYTIME
RUNNING LAMPS (DRL)

WARNING: 

The daytime running

lamps system does not activate the rear
lamps and may not provide adequate
lighting during low visibility driving
conditions. Make sure you switch the
headlamps on, as appropriate, during all
low visibility conditions. Failure to do so
may result in a crash.

Daytime running lamps are always on
unless you switch on the headlamps or
your vehicle is in park (P).

116

Exterior Lighting


Content      ..     4      5      6      7     ..