Ford Mustang (2022 year). Manual in english - page 5
 

  Index      Manuals     Ford Mustang (2022 year). Manual in english


Search            copyright infringement  


Content      ..     3      4      5      6     ..


Ford Mustang (2022 year). Manual in english - page 5


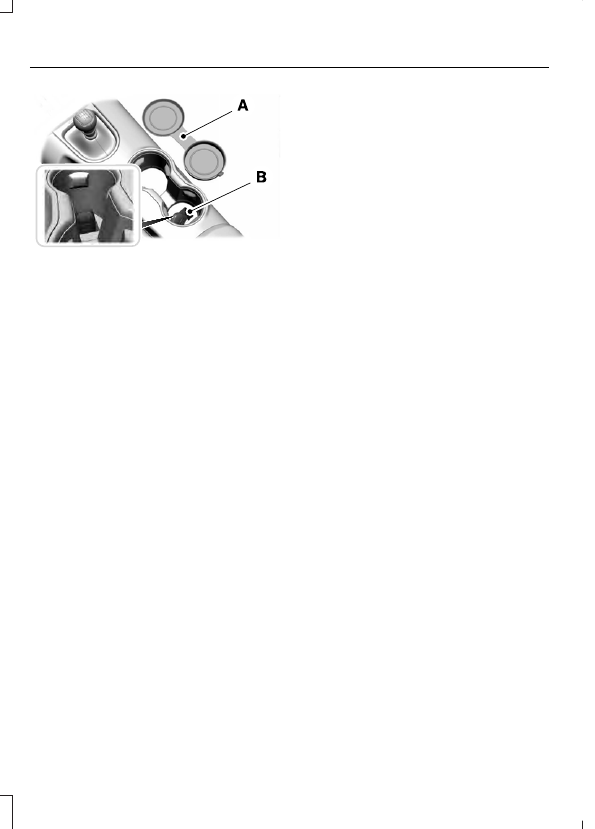
E174956

1.

Remove the rubber covering (A) from
the cupholder. Place the first
programmed key in the backup slot (B)
at the bottom of the cupholder, then
press the push button ignition switch.

2. Wait five seconds and then press the

push button ignition switch again.

3. Remove the intelligent access key.

4. Within 10 seconds, place a second

programmed intelligent access key in
the backup slot. Press the push button
ignition switch.

5. Wait five seconds and then press the

push button ignition switch again.

6. Remove the intelligent access key.

7.

Place the unprogrammed intelligent
access key in the backup slot and press
the push button ignition switch.

Programming is now complete. Verify the
remote control functions operate and your
vehicle starts with the new intelligent
access key.

If programming was not successful, wait
10 seconds and repeat Steps 1 through 7.
If you are still unsuccessful, take your
vehicle to your authorized dealer.

ANTI-THEFT ALARM

 (IF EQUIPPED)

The system will warn you of an
unauthorized entry to your vehicle.

It will be triggered if any door, the luggage
compartment or the hood is opened
without using the key or remote control.

The direction indicators will flash and the
horn will sound if unauthorized entry is
attempted while the alarm is armed.

Take all remote controls to an authorized
dealer if there is a potential alarm problem
with your vehicle.

Arming the Alarm

The alarm is ready to arm when there is
not a key in your vehicle.

Electronically lock your vehicle to arm the
alarm.

Disarming the Alarm

Disarm the alarm by any of the following
actions:

Unlock the doors or luggage
compartment with the remote control.

Switch your vehicle on or start your
vehicle.

Use a key in the driver door to unlock
your vehicle, then switch your vehicle
on within 12 seconds.

Note:

Pressing the panic button on the

remote control will stop the horn and signal
indicators, but will not disarm the system.

74

Security

ADJUSTING THE STEERING
WHEEL

WARNING: 

Do not adjust the

steering wheel when your vehicle is
moving.

Note:

Make sure that you sit in the correct

position.  See 

Sitting in the Correct

Position

 (page 134).

E176634

1.

Unlock the steering column.

2. Adjust the steering wheel to the desired

position.

E176635

3. Lock the steering column.

AUDIO CONTROL

E286906

You can operate the following
functions with the control:

E265304

Press 

-

 to decrease volume level.

Press 

+

 to increase volume level.

E268549

Press to silence the current
media.

E265045

Press to access the previous
media selection.

E265044

Press to access the next media
selection.

VOICE CONTROL

The controls are on the steering wheel.

E142599

Press and release to activate
voice recognition.

75

Steering Wheel

CRUISE CONTROL - VEHICLES
WITH: CRUISE CONTROL

E174594

See 

Switching Cruise Control On and

Off

 (page 185).

CRUISE CONTROL - VEHICLES
WITH: ADAPTIVE CRUISE
CONTROL

E177068

See 

Using Adaptive Cruise Control

(page 186).

INFORMATION DISPLAY
CONTROL - VEHICLES WITH:
SYNC

E174595

See 

Information Displays

 (page 99).

INFORMATION DISPLAY
CONTROL - VEHICLES WITH:
SYNC 3

E248474

76

Steering Wheel

Quick Action Menus

E248531

See 

Information Displays

 (page 99).

HORN

E270945

Press on the center of the
steering wheel near the horn icon
to activate the horn.

SWITCHING THE HEATED
STEERING WHEEL ON AND OFF

(IF EQUIPPED)

Touch the button to switch the
heated steering wheel on and
off.

Note:

You can use the heated steering

wheel only when the engine is running.

Note:

The system uses a sensor and is

designed to control the temperature of the
steering wheel and to prevent it from
overheating.

Note:

In warm temperatures, the steering

wheel quickly reaches its maximum
temperature and the system reduces the
current to the heating element. This could
cause you to think that the system has
stopped working but it has not. This is
normal.

77

Steering Wheel

WINDSHIELD WIPERS

Note:

Fully defrost the windshield before

you switch the windshield wipers on.

Note:

Make sure you switch the windshield

wipers off before entering a car wash.

Note:

 If streaks or smears appear on the

windshield, clean the windshield and the
wiper blades.  If that does not resolve the
issue, install new wiper blades.

Note:

 Do not operate the wipers on a dry

windshield.  This may scratch the glass,
damage the wiper blades or cause the wiper
motor to burn out.  Always use the
windshield washers before wiping a dry
windshield.

E173728

Single wipe.

A

Intermittent wipe.

B

Normal wipe.

C

High speed wipe.

D

Intermittent Wipe

E173729

Shortest wipe interval.

A

Intermittent wipe.

B

Longest wipe interval.

C

Use the rotary control to adjust the
intermittent wipe interval.

Speed Dependent Wipers

When your vehicle speed increases, the
interval between wipes decreases.

AUTOWIPERS

 (IF EQUIPPED)

Note:

Fully defrost the windshield before

you switch the windshield wipers on.

Note:

Make sure you switch the windshield

wipers off before entering a car wash.

Note:

 If streaks or smears appear on the

windshield, clean the windshield and the
wiper blades.  If that does not resolve the
issue, install new wiper blades.

Note:

If you switch autolamps and

autowipers on, the headlamps turn on when
the windshield wipers continuously operate.

Wet or winter driving conditions with ice,
snow or salty road mist can cause
inconsistent and unexpected wiping or
smearing.

78

Wipers and Washers

The feature uses a rain sensor that is in the
area around the interior mirror. The rain
sensor monitors the amount of moisture
on the windshield and turns on the wipers.
It adjusts the wiper speed by the amount
of moisture that the sensor detects on the
windshield. You can switch this feature on
and off in the information display.  See

Information Displays

 (page 99).

E173730

Highest sensitivity.

A

On.

B

Lowest sensitivity.

C

Use the rotary control to adjust the
sensitivity of the autowipers.  When you
select low sensitivity, the wipers operate
when the sensor detects a large amount
of water on the windshield.  When you
select high sensitivity, the wipers operate
when the sensor detects a small amount
of water on the windshield.

Keep the outside of the windshield clean.
The rain sensor is very sensitive and the
wipers may operate if dirt, mist or insects
hit the windshield.

In these conditions, you can do the
following:

Lower the sensitivity of the autowipers
to reduce the amount of smearing on
the windshield.

Switch to normal or high-speed wipe.

Switch autowipers off.

WINDSHIELD WASHERS

Note:

Do not operate the washers when

the washer reservoir is empty. This may
cause the washer pump to overheat.

E173731

To operate the washers and spray the
windshield, pull the lever toward you.

79

Wipers and Washers

GENERAL INFORMATION

Condensation in the Exterior Front
Lamps and Rear Lamps

Exterior front lamps and rear lamps have
vents to accommodate normal changes
in air pressure.

Condensation can be a natural by-product
of this design. When moist air enters the
lamp assembly through the vents, there is
a possibility that condensation can occur
when the temperature is cold. When
normal condensation occurs, a fine mist
can form on the interior of the lens. The
fine mist eventually clears and exits
through the vents during normal operation.

Clearing time may take as long as 48 hours
under dry weather conditions.

Examples of acceptable condensation are:

The presence of a fine mist (no streaks,
drip marks or large droplets).

A fine mist covers less than 50% of the
lens.

Examples of unacceptable condensation
are:

A water puddle inside the lamp.

Streaks, drip marks or large droplets
present on the interior of the lens.

If you see any unacceptable condensation,
have your vehicle checked by an authorized
dealer.

LIGHTING CONTROL

E142449

Lamps off.

A

Parking lamps, instrument panel
lamps, license plate lamps and
tail lamps.

B

Headlamps.

C

Headlamp High Beam

E162679

Push the lever away from you to
switch the high beam on.

Push the lever forward again or pull the
lever toward you to switch the high beams
off.

80

Lighting

Flashing the Headlamp High Beam

E162680

Slightly pull the lever toward you and
release it to flash the headlamps.

AUTOLAMPS

WARNING: 

The system does not

relieve you of your responsibility to drive
with due care and attention. You may
need to override the system if it does not
turn the headlamps on in low visibility
conditions, for example daytime fog.

Autolamps turn the headlamps on in low
light situations or when the wipers operate.

Switch the lighting control to the
autolamps position.

The headlamps remain on for a period of
time after you switch the ignition off. Use
the information display controls to adjust
the period of time that the headlamps
remain on.

Note:

 If you switch the autolamps on, you

cannot switch the high beams on until the
system turns the low beams on.

Windshield Wiper Activated
Headlamps

When you switch the autolamps on, the
headlamps turn on within 10 seconds of
switching the wipers on. They turn off
approximately 60 seconds after you switch
the windshield wipers off.

The headlamps do not turn on with the
wipers:

During a single wipe.

When using the windshield washers.

If the wipers are in intermittent mode.

Note:

If you switch the autolamps and the

autowipers on, the headlamps turn on when
the windshield wipers continuously operate.

INSTRUMENT LIGHTING
DIMMER

The instrument lighting dimmer buttons
are on the lighting control.

E291299

E291298

Repeatedly press one of the
buttons to adjust the brightness.

HEADLAMP EXIT DELAY

After you switch the ignition off, you can
switch the headlamps on by pulling the
direction indicator lever toward you. You
will hear a short tone. The headlamps will
switch off automatically after three
minutes with any door open or 30 seconds
after the last door has been closed. You
can cancel this feature by pulling the
direction indicator lever toward you again
or switching the ignition on.

81

Lighting

DAYTIME RUNNING LAMPS -
VEHICLES WITH:
CONFIGURABLE DAYTIME
RUNNING LAMPS

WARNING: 

The daytime running

lamps system does not activate the rear
lamps and may not provide adequate
lighting during low visibility driving
conditions. Make sure you switch the
headlamps on, as appropriate, during all
low visibility conditions. Failure to do so
may result in a crash.

Switch the daytime running lamps on or
off using the information display.  See

General Information

 (page 109).

The daytime running lamps turn on when:
1.

The lamps are on in the information
display.

2. You switch the ignition on.
3. The transmission is not in park (P) for

vehicles with automatic transmissions
or you release the parking brake for
vehicles with manual transmissions.

4. The lighting control is in the autolamps

position.

5. The headlamps are off.

The other lighting control switch positions
do not turn on the daytime running lamps.

If the daytime running lamps are off in the
information display, the lamps stay off in
all switch positions.

DAYTIME RUNNING LAMPS -
VEHICLES WITH: DAYTIME
RUNNING LAMPS (DRL)

WARNING: 

The daytime running

lamps system does not activate the rear
lamps and may not provide adequate
lighting during low visibility driving
conditions. Make sure you switch the
headlamps on, as appropriate, during all
low visibility conditions. Failure to do so
may result in a crash.

The system turns the lamps on in daylight
conditions.

To switch the system on, switch the
lighting control to any position except
headlamps.

FRONT FOG LAMPS

 (IF EQUIPPED)

Switching the Front Fog Lamps On
or Off

Only switch the front fog lamps on during
reduced visibility.

You can switch the front fog lamps on if
any of the following occur:

You set the lighting control to the
parking lamps position.

You set the lighting control to the
headlamps position.

You set the lighting control to the
autolamps position and the headlamps
are on.

The front fog lamp button is on the lighting
control.

Press the button to switch the
front fog lamps on or off.

82

Lighting

Note:

The brightness of the daytime running

lamps may decrease when the front fog
lamps are switched on.

Front Fog Lamp Indicator

It illuminates when you switch
the front fog lamps on.

DIRECTION INDICATORS

E162681

Push the lever up or down to use the
direction indicators.

Note:

Tap the lever up or down to make the

direction indicators flash three times to
indicate a lane change.

WELCOME LIGHTING

The projection lights are on the bottom of
the exterior mirror housings. They project
an image onto the ground a short distance
from your vehicle when welcome lighting
or lighted entry turns on.

Note:

Moisture, frost and ice build-up or

other types of contamination on the surface
of the light lens can cause non-permanent
distortion or reduced brightness of the
image. Do not use abrasive materials to
clean the lens.

Note:

For vehicles with manual

transmission, you may need to engage the
parking brake for this feature to operate.

INTERIOR LAMPS

The lamps turn on under the following
conditions:

You open any door.

You press a remote control button.

You press a map lamp button.

Map Lamps

E175199

Left-hand side map lamp.

A

Right-hand side map lamp.

B

Press the button to switch the lamps on
or off.

AMBIENT LIGHTING

 (IF EQUIPPED)

Adjust the ambient lighting in the
information display.  See 

General

Information

 (page 99).

83

Lighting

WHAT IS AUTOMATIC HIGH
BEAM CONTROL

The system turns on high beams if it is dark
enough and no other traffic is present. If it
detects an approaching vehicle’s
headlamps or tail lamps, or street lighting
ahead, the system turns the high beams
off. Low beams remain on.

A camera sensor, centrally mounted
behind the windshield of your vehicle,
continuously monitors conditions to turn
the high beams on and off.

SWITCHING AUTOMATIC HIGH
BEAM CONTROL ON AND OFF

Switch the system on or off using the
information display.  See 

General

Information

 (page 99).

Activating the Automatic High
Beam Control

Switch the lighting control to the
autolamps position to activate.
See 

Autolamps

 (page 81).

Note:

Automatic high beams are not

available when you do not turn on
autolamps.

When active, the high beams turn on if all
of the following occur:

The ambient light level is low enough.

There is no traffic in front of your
vehicle.

The vehicle speed is greater than
approximately 32 mph (52 km/h).

When active, the high beams turn off if any
of the following occur:

The ambient light level is high enough
that it does not require high beams.

The system detects an approaching
vehicle's headlamps or tail lamps.

The system detects severe rain, snow
or fog.

The camera is blocked.

The vehicle speed falls below
approximately 27 mph (44 km/h).

Note:

The deactivation speed is lower on

curves.

Note:

There could be a delay in high beam

reactivation in certain curvy road situations.

Note:

If you have a blocked sensor, the

system may not operate properly. Keep the
windshield free from obstruction or damage.

Note:

The system may not operate properly

in cold or inclement conditions. You can
switch on the high beams by overriding the
system.

Note:

If the system detects a blockage, for

example bird droppings, bug splatter, snow
or ice, the system goes into low beam mode
until you clear the blockage. If you have a
blocked camera, a message may appear in
the information display.

Note:

Using much larger tires or equipping

vehicle accessories such as snowplows can
modify your vehicle's ride height and
degrade automatic high beam control
performance.

AUTOMATIC HIGH BEAM
CONTROL INDICATORS

The indicator illuminates to
confirm when the system is
ready to assist.

84

Automatic High Beam Control

 (If Equipped)

OVERRIDING AUTOMATIC
HIGH BEAM CONTROL

WARNING: 

The system does not

relieve you of your responsibility to drive
with due care and attention. You may
need to override the system if it does not
turn the high beams on or off.

WARNING: 

You may need to

override the system when approaching
other road users.

WARNING: 

You may need to

override the system during inclement
weather.

E162679

Push the lever away from you to switch
between high beam and low beam.

85

Automatic High Beam Control

 (If Equipped)

POWER WINDOWS

WARNING: 

Do not leave children

unattended in your vehicle and do not
let them play with the power windows.
Failure to follow this instruction could
result in personal injury.

WARNING: 

When closing the

power windows, verify they are free of
obstruction and make sure that children
and pets are not in the proximity of the
window openings.

E180087

Note:

 You may hear a pulsing noise when

just one of the windows is open.  Lower the
opposite window slightly to reduce this
noise.

Note:

Use the singular control (if equipped)

to open both rear windows.

Press the control to open the window.

Lift the control to close the window.

One-Touch Down

Press the switch fully and release it.  Press
again or lift it to stop the window.

One-Touch Up

Lift the switch fully and release it.  Press
again or lift it to stop the window.

Bounce-Back

The window will automatically stop and
reverse some distance if it detects an
obstacle while closing.

Overriding the Bounce-Back Feature

WARNING: 

When you override the

bounce-back feature the window will
not reverse if it detects an obstacle. Take
care when closing the windows to avoid
personal injury or damage to your
vehicle.

Pull up the window switch and hold within
two seconds of the window reaching the
bounce-back position. The window will
travel up with no bounce-back protection.
The window will stop if you release the
switch before the window is fully closed.

Accessory Delay

The window switches remain operational
for several minutes when you switch the
ignition off or until you open either front
door.

GLOBAL OPENING

You can use the remote control to open
the windows with the ignition off.

Note:

You can enable or disable this feature

in the information display, or see an
authorized dealer.  See 

General

Information

 (page 99).

Note:

To operate this feature, accessory

delay must not be active.

86

Windows and Mirrors

Opening the Windows

You can open the windows for a short time
after you unlock your vehicle with the
remote control. After you unlock your
vehicle, press and hold the remote control
unlock button to open the windows.
Release the button once movement starts.
Press the lock or unlock button to stop
movement.

EXTERIOR MIRRORS

Power Exterior Mirrors

WARNING: 

Do not adjust the

mirrors when your vehicle is moving. This
could result in the loss of control of your
vehicle, serious personal injury or death.

E176804

Left-hand mirror

A

Adjustment control

B

Right-hand mirror

C

To adjust a mirror:

1.

Select the mirror you want to adjust.
The control will illuminate.

2. Adjust the position of the mirror.

3. Press the mirror switch again.

Fold-Away Exterior Mirrors

Push the mirror toward the door window
glass.  Make sure that you fully engage the
mirror in its support when returning it to its
original position.

Heated Exterior Mirrors

 (If Equipped)

See 

Heated Rear Window

 (page 132).

Memory Mirrors

 (If Equipped)

You can save and recall the mirror
positions through the memory function.
See 

Power Seats

 (page 137).

Signal Indicator Mirrors

 (If Equipped)

The outer portion of the appropriate mirror
housing will blink when you switch on the
turn signal.

Projection Lights

 (If Equipped)

The lights are on the bottom of the mirror
housings. See 

Welcome Lighting

 (page

83).

Integrated Blind Spot Mirrors

 (If

Equipped)

WARNING: 

Objects in the mirror

are closer than they appear.

Blind spot mirrors have an integrated
convex mirror built into the upper outboard
corner of the exterior mirrors. They can
increase your visibility along the side of
your vehicle.

Check the main mirror first before a lane
change, then check the blind spot mirror.
If the blind spot mirror does not show any
vehicles in its viewing area and the traffic
in the adjacent lane is at a safe distance,
signal that you intend to change lanes.
Glance over your shoulder to verify traffic
is clear and carefully change lanes.

87

Windows and Mirrors

A

B

C

E138665

The image of the approaching vehicle is
small and near the inboard edge of the
main mirror when it is at a distance. The
image becomes larger and begins to move
outboard across the main mirror as the
vehicle approaches (A). The image will
transition from the main mirror and begin
to appear in the blind spot mirror as the
vehicle approaches (B). The vehicle will
transition to your peripheral field of view
as it leaves the blind spot mirror (C).

Blind Spot Monitor

 (If Equipped)

See 

Blind Spot Information System

(page 198).

INTERIOR MIRROR

WARNING: 

Do not adjust the

mirrors when your vehicle is moving. This
could result in the loss of control of your
vehicle, serious personal injury or death.

Note:

Do not clean the housing or glass of

any mirror with harsh abrasives, fuel or other
petroleum or ammonia-based cleaning
products.

You can adjust the interior mirror to your
preference. Some mirrors also have a
second pivot point. This lets you move the
mirror head up or down and from side to
side.

Auto-Dimming Mirror

Note:

 Do not block the sensors on the front

and back of the mirror.  A rear center
passenger or raised rear center head
restraint may also block light from reaching
the sensor.

The mirror dims to reduce the effect of
bright light from behind. It returns to
normal when the bright light from behind
is no longer present or if you shift into
reverse (R).

SUN VISORS

E138666

88

Windows and Mirrors

Rotate the sun visor toward the side
window and extend it rearward for extra
shade.

Illuminated Vanity Mirror

E162197

Lift the cover to switch the lamp on.

89

Windows and Mirrors


Content      ..     3      4      5      6     ..