Mercury Villager (2002 year). Manual - part 10


  Index      Mercury     Mercury Villager (2002 year) - manual in english


Search            copyright infringement  


Content      ..     8      9      10      11     ..


Mercury Villager (2002 year). Manual - part 10


When installing a child safety seat:
• Review and follow the information

presented in the Air Bag
Supplemental Restraint System
section in this chapter.

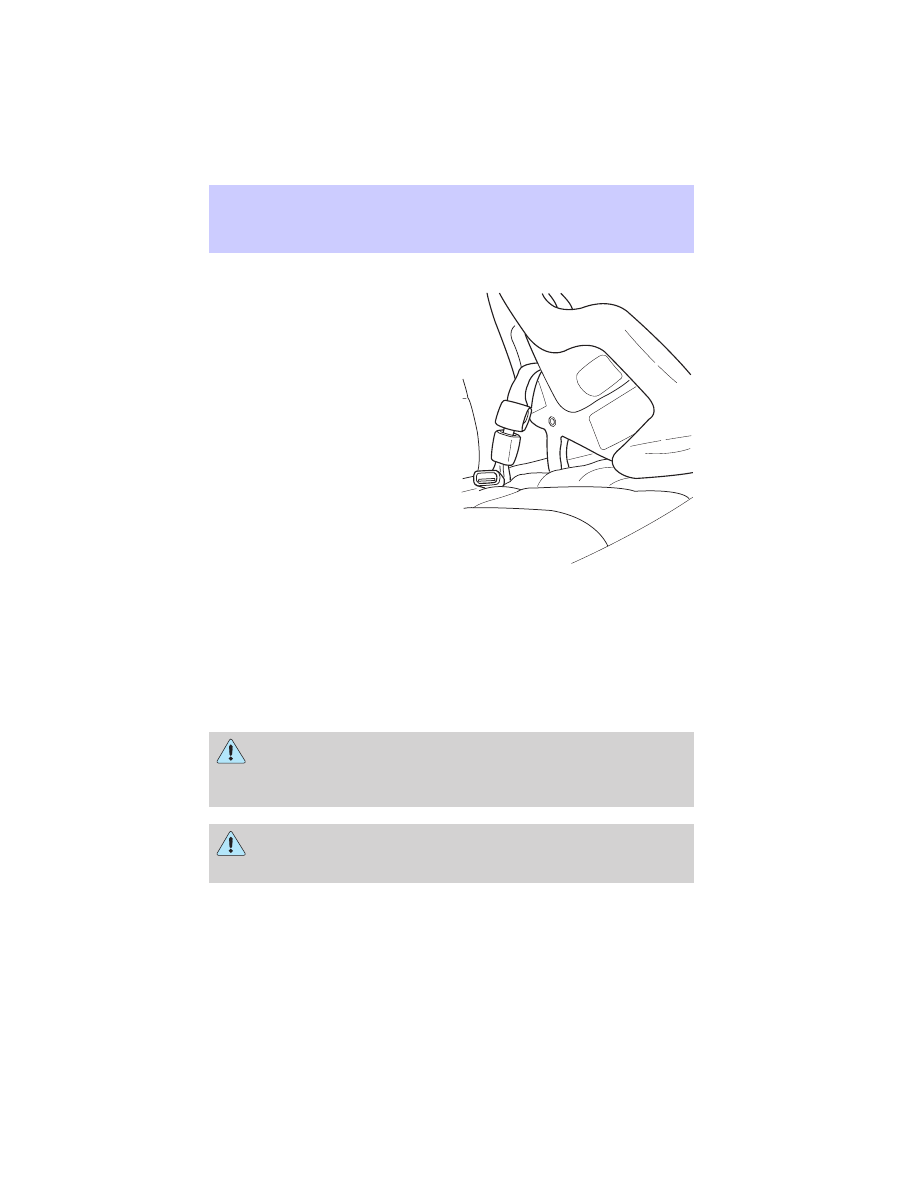
• Use the correct safety belt buckle

for that seating position.

• Insert the belt tongue into the

proper buckle until you hear a
snap and feel it latch. Make sure
the tongue is securely fastened in
the buckle.

• Keep the buckle release button

pointing up and away from the
safety seat, with the tongue
between the child seat and the
release button, to prevent
accidental unbuckling.

• Place seat back in upright position.
• Put the safety belt in the automatic locking mode. Refer to Automatic

locking mode (passenger side front and outboard rear seating
positions).

Ford recommends the use of a child safety seat having a top tether
strap. Install the child safety seat in a seating position which is capable
of providing a tether anchorage. For more information on top tether
straps, refer to Attaching safety seats with tether straps.

Carefully follow all of the manufacturer’s instructions included
with the safety seat you put in your vehicle. If you do not install

and use the safety seat properly, the child may be injured in a sudden
stop or collision.

To properly use child safety tethers in the 3rd row seat position,
remove the parcel shelf and tether child safety seat to the tether

anchor located on the bottom back side of the 3rd row seat.

Seating and Safety Restraints

145

-------------------------------------------------------------------------------------------------------------------------------------------------------------

Installing child safety seats in combination lap and shoulder belt
seating positions

Air bags can kill or injure a child in a child seat. NEVER place a
rear-facing child seat in front of an active air bag. If you must

use a forward-facing child seat in the front seat, move the seat all the
way back.

1. Position the child safety seat in a
seat with a combination lap and
shoulder belt.

Children 12 and under should be properly restrained in the rear
seat whenever possible.

2. Pull down on the shoulder belt
and then grasp the shoulder belt
and lap belt together.

Seating and Safety Restraints

146

-------------------------------------------------------------------------------------------------------------------------------------------------------------

3. While holding the shoulder and
lap belt portions together, route the
tongue through the child seat
according to the child seat
manufacturer’s instructions. Be sure
the belt webbing is not twisted.

4. Insert the belt tongue into the
proper buckle (the buckle closest to
the direction the tongue is coming
from) for that seating position until
you hear a snap and feel the latch
engage. Make sure the tongue is
latched securely by pulling on it.

5. To put the retractor in the
automatic locking mode, grasp the
shoulder portion of the belt and pull
downward until all of the belt is
pulled out and a click is heard.

6. Allow the belt to retract. The belt will click as it retracts to indicate it
is in the automatic locking mode.

Seating and Safety Restraints

147

-------------------------------------------------------------------------------------------------------------------------------------------------------------

7. Pull the lap belt portion across
the child seat toward the buckle and
pull up on the shoulder belt while
pushing down with your knee on the
child seat.

8. Allow the safety belt to retract to
remove any slack in the belt.

9. Before placing the child in the
seat, forcibly tilt the seat forward
and back to make sure the seat is
securely held in place. To check
this, grab the seat at the belt path
and attempt to move it side to side
and forward and back. There should
be no more than one inch of
movement for proper installation.

10. Try to pull the belt out of the retractor to make sure the retractor is
in the automatic locking mode (you should not be able to pull more belt
out). If the retractor is not locked, unbuckle the belt and repeat steps
two through nine.

Check to make sure the child seat is properly secured before each use.

Installing child safety seats in the lap belt seating positions

1. Lengthen the lap belt. To lengthen the belt, hold the tongue so that its
bottom is perpendicular to the direction of webbing while sliding the
tongue up the webbing.

2. Place the child safety seat in the center seating position.

3. Route the tongue and webbing through the child seat according to the
child seat manufacturer’s instructions.

4. Insert the belt tongue into the proper buckle for the center seating
position until you hear a snap and feel it latch. Make sure the tongue is
securely fastened to the buckle by pulling on tongue.

Seating and Safety Restraints

148

-------------------------------------------------------------------------------------------------------------------------------------------------------------

5. Push down on the child seat while pulling on the loose end of the lap
belt webbing to tighten the belt.

6. Before placing the child into the child seat, forcibly tilt the child seat
from side to side and in forward direction to make sure that the seat is
securely held in place. To check this, grab the seat at the belt path and
attempt to move it side to side and forward and back. There should be
no more than one inch of movement for proper installation.

Attaching safety seats with tether straps

Children should be placed in the rear in an appropriate child
safety seat that is properly secured to the vehicle.

Most new forward-facing child safety seats include a tether strap which
goes over the back of the seat and hooks to an anchoring point. Tether
straps are available as an accessory for many older safety seats. Contact
the manufacturer of your child seat for information about ordering a
tether strap.

Tether strap anchors have been
provided in your vehicle. The left
side of the figure is the front of the
vehicle.

Seating and Safety Restraints

149

-------------------------------------------------------------------------------------------------------------------------------------------------------------

Second row seats

1. Position the child safety seat on the seat cushion.

2. Route the child safety seat tether
strap over the back of the seat,
under the head restraint, and
between the head restraint posts. If
the top of the child seat hits the
head restraint, try raising the head
restraint to allow the child seat to
fit further rearward.

3. Grasp the tether strap and
position it to the seat frame.

Seating and Safety Restraints

150

-------------------------------------------------------------------------------------------------------------------------------------------------------------

4. Rotate the tether strap.

5. Clip the tether strap to the seat
tether slot bracket at the lower rear
portion of the seatback.

If the tether strap is clipped
incorrectly (as shown) the child
safety seat may not be retained
properly in the event of a
collision.

Seating and Safety Restraints

151

-------------------------------------------------------------------------------------------------------------------------------------------------------------

6. Rotate the tether strap clip.

7. Refer to the instructions in this
section under Installing child
safety seats in combination lap
and shoulder belt seating
positions 
to secure the child safety
seat.

8. Tighten the child safety seat
tether strap according to the
manufacturer’s instructions.

Third row seats

The third row seat child tether anchors are located on the bottom back
side of the seat. Refer to Second row seats listed previously for
installation instructions.

Seating and Safety Restraints

152

-------------------------------------------------------------------------------------------------------------------------------------------------------------

Attaching safety seats with LATCH (Lower Anchors and Tethers for
CHildren) attachments for child seat anchors

Some child safety seats have two rigid or webbing mounted attachments
that connect to two anchors at certain seating positions in your vehicle.
This type of child seat eliminates the need to use seat belts to attach the
child seat. For forward-facing child seats, the tether strap must also be
attached to the proper tether anchor. See Attaching safety seats with
tether straps 
in this chapter.

Your vehicle has LATCH anchors for child seat installation at the seating
positions marked with the child seat symbol:

The anchors on both sides of the
center of seat are provided only for
child seats at the outboard seats,
and are further apart than the pairs
of lower anchors for child seat
installation at other seats. A child
seat with rigid LATCH attachments
cannot be installed at the center
seat. A child seat with LATCH
attachments on belt webbing can be
used at the center 3rd row seat
unless a child seat at an outboard
rear seat is attached to one of these
lower anchors. Install a child seat
onto the lower anchors at the center
rear seat ONLY IF the child restraint
manufacturer recommends that the child seat can be installed to anchors
that are spaced up to 400 mm (15 in) apart.

Never attach two LATCH child safety seats to the same anchor.
In a crash, one anchor may not be strong enough to hold two

child safety seat attachments and may break, causing serious injury or
death.

Seating and Safety Restraints

153

-------------------------------------------------------------------------------------------------------------------------------------------------------------

The lower anchors for child seat
installation are located at the rear
section of the rear seat between the
cushion and seat back. The LATCH
anchors are below the locator
symbols on the seat back.

Follow the child seat manufacturer’s instructions to properly install a
child seat with LATCH attachments.

Attach LATCH lower attachments of the child seat only to the
anchors shown.

If you install a child seat with rigid LATCH attachments, do not tighten
the tether strap enough to lift the child seat off the vehicle seat cushion
when the child is seated in it. Keep the tether strap just snug without
lifting the front of the child seat. Keeping the child seat just touching the
vehicle seat gives the best protection in a severe crash.

Each time you use the safety seat, check that the seat is properly
attached to the lower anchors and tether anchor. Try to tilt the child
seat from side to side. Also try to tug the seat forward. Check to see if
the anchors hold the seat in place.

If the safety seat is not anchored properly, the risk of a child
being injured in a crash greatly increases.

Seating and Safety Restraints

154

-------------------------------------------------------------------------------------------------------------------------------------------------------------

STARTING

Positions of the ignition

1. OFF/LOCK, shuts off the engine
and all accessories/locks the steering
wheel, gearshift lever and allows key
removal.

2. ACC, allows the electrical
accessories such as the radio to
operate while the engine is not
running.

3. ON, all electrical circuits
operational. Warning lights
illuminated. Key position when driving.

4. START, cranks the engine. Release the key as soon as the engine
starts.

Preparing to start your vehicle

Engine starting is controlled by the powertrain control system. This
system meets all Canadian Interference-Causing Equipment standard
requirements regulating the impulse electrical field strength of radio
noise.

When starting a fuel-injected engine, avoid pressing the accelerator
before or during starting. Only use the accelerator when you have
difficulty starting the engine. For more information on starting the
vehicle, refer to Starting the engine in this chapter.

Extended idling at high engine speeds can produce very high
temperatures in the engine and exhaust system, creating the risk

of fire or other damage.

Do not park, idle, or drive your vehicle in dry grass or other dry
ground cover. The emission system heats up the engine

compartment and exhaust system, which can start a fire.

Do not start your vehicle in a closed garage or in other enclosed
areas. Exhaust fumes can be toxic. Always open the garage door

before you start the engine. See Guarding against exhaust fumes in
this chapter for more instructions.

4

3

2

1

Driving

155

-------------------------------------------------------------------------------------------------------------------------------------------------------------

If you smell exhaust fumes inside your vehicle, have your dealer
inspect your vehicle immediately. Do not drive if you smell

exhaust fumes.

Important safety precautions

A computer system controls the engine’s idle revolutions per minute
(RPM). When the engine starts, the idle RPM runs higher than normal in
order to warm the engine. If the engine idle speed does not slow down
automatically, have the vehicle checked. Do not allow the vehicle to idle
for more than 10 minutes at the higher engine RPM.

Before starting the vehicle:

1. Make sure all vehicle occupants have buckled their safety belts. For
more information on safety belts and their proper usage, refer to the
Seating and safety restraints chapter.

2. Make sure the headlamps and vehicle accessories are off.

3. Make sure the parking brake is
set.

4. Make sure the gearshift is in P
(Park).

5. Turn the key to 3 (ON) without
turning the key to 4 (START).

If there is difficulty in turning the
key, firmly rotate the steering wheel
left and right until the key turns
freely. This condition may occur
when:
• front wheels are turned
• front wheel is against the curb

PUSH

TO

RELEASE

P

R N D 2 1

4

3

2

1

Driving

156

-------------------------------------------------------------------------------------------------------------------------------------------------------------

• steering wheel is turned when getting in or out of the vehicle

Make sure the corresponding lights illuminate or illuminate briefly. If a
light fails to illuminate, have the vehicle serviced.
• If the driver’s safety belt is fastened, the

light may not illuminate.

Starting the engine
Note: 
Whenever you start your vehicle, release the key as soon as the
engine starts. Excessive cranking could damage the starter.

1. Turn the key to 4 (START)
without pressing the accelerator
pedal and release as soon as the
engine starts. The key will return to
3 (ON).

2. If the temperature is above –12°C
(10°F) and the engine does not
start within five seconds on the first
try, turn the key to OFF, wait 10
seconds and try again.
3. If the temperature is below -12° C (10° F) and the engine does not
start in 15 seconds on the first try, turn the key OFF and wait 10

km/h

0

10

20

30

40

50 60

70

80

90

100

MPH

TRIP A

RPM x 1000

20

40

60

80 100

120

140

160

0

1

2

3

4

5

6

7

8

F

H

C

E

CRUISE      SET

P

R N D 2

P

1

SERVICE

ENGINE

SOON

ABS

AIR

BAG

ABS

O/D

OFF

OUTSIDE TEMP

INST ECONOMY
AVG. ECONOMY

TO EMPTY

P

R N D 2 1

FUEL DOOR

UNLEADED FUEL ONLY

CRUISE

MPH

km/h

km

F

E

H

C

1/2

O

R

M

A

L

0

1

2

3

4

5

6

7

8

P

!

BRAKE

X 1000
RPM

TRIP 1 

TRIP 2 

˚F ˚C
MILES/BAL
L/100 km

4

3

2

1

Driving

157

-------------------------------------------------------------------------------------------------------------------------------------------------------------

seconds and try again. If the engine does not start in two attempts, Press
the accelerator pedal all the way to floor and hold. Turn the key to
START position.

4. When the engine starts, release the key, then release the accelerator
pedal gradually as the engine speeds up.

5. After idling for a few seconds, apply the brake, shift into gear and
drive.

Guarding against exhaust fumes

Although odorless and colorless, carbon monoxide is present in exhaust
fumes. Take precautions to avoid its dangerous effects.

If you ever smell exhaust fumes of any kind inside your vehicle,
have your dealer inspect and fix your vehicle immediately. Do

not drive if you smell exhaust fumes. These fumes are harmful and
could kill you.

Have the exhaust and body ventilation systems checked whenever:
• the vehicle is raised for service.

• the sound of the exhaust system changes.

• the vehicle has been damaged in a collision.

WARNING: Engine exhaust, some of its constituents, and
certain vehicle components contain or emit chemicals known to

the State of California to cause cancer and birth defects or other
reproductive harm. In addition, certain fluids contained in vehicles and
certain products of component wear contain or emit chemicals known
to the State of California to cause cancer and birth defects or other
reproductive harm.

Important ventilating information
If the engine is idling while the vehicle is stopped in an open area for
long periods of time, open the windows at least 2.5 cm (one inch).
Adjust the heating or air conditioning to bring in fresh air.
Improve vehicle ventilation by keeping all air inlet vents clear of snow,
leaves and other debris.

BRAKES
Your service brakes are self-adjusting. Refer to the scheduled
maintenance guide for scheduled maintenance.

Driving

158

-------------------------------------------------------------------------------------------------------------------------------------------------------------

Occasional brake noise is normal and often does not indicate a
performance concern with the vehicle’s brake system. In normal
operation, automotive brake systems may emit occasional or intermittent
squeal or groan noises when the brakes are applied. Such noises are
usually heard during the first few brake applications in the morning;
however, they may be heard at any time while braking and can be
aggravated by environmental conditions such as cold, heat, moisture,
road dust, salt or mud. If a “metal-to-metal,” “continuous grinding” or
“continuous squeal” sound is present while braking, the brake linings
may be worn-out and should be inspected by a qualified service
technician.

If you are driving down a long or steep hill, shift to a lower gear.
Do not apply your brakes continuously, as they may overheat

and become less effective.

Anti-lock brake system (ABS) (if equipped)

On vehicles equipped with an anti-lock braking system (ABS), a noise
from the hydraulic pump motor and pulsation in the pedal may be
observed during ABS braking events. Pedal pulsation coupled with noise
while braking under panic conditions or on loose gravel, bumps, wet or
snowy roads is normal and indicates proper functioning of the vehicle’s
anti-lock brake system. The ABS performs a self-check after you start
the engine and begin to drive away. A brief mechanical noise may be
heard during this test. This is normal. If a malfunction is found, the ABS
warning light will come on. If the vehicle has continuous vibration or
shudder in the steering wheel while braking, the vehicle should be
inspected by a qualified service technician.

The ABS operates by detecting the
onset of wheel lockup during brake
applications and compensates for
this tendency. The wheels are
prevented from locking even when
the brakes are firmly applied. The
accompanying illustration depicts
the advantage of an ABS equipped
vehicle (on bottom) to a non-ABS
equipped vehicle (on top) during hard braking with loss of front braking
traction.

Driving

159

-------------------------------------------------------------------------------------------------------------------------------------------------------------

ABS warning lamp

ABS

The

ABS

warning lamp in the instrument cluster momentarily illuminates

when the ignition is turned to the ON position. If the light does not
illuminate momentarily at start up, remains on or continues to flash, the
ABS needs to be serviced.

With the ABS light on, the anti-lock
brake system is disabled and normal
braking is still effective unless the
brake warning light also remains
illuminated with parking brake
released. (If your brake warning lamp illuminates, have your vehicle
serviced immediately.)

Using ABS
• In an emergency or when maximum efficiency from the four-wheel

ABS is required, apply continuous force on the brake. The four wheel
ABS will be activated immediately, thus allowing you to retain full
steering control of your vehicle and, providing there is sufficient
space, will enable you to avoid obstacles and bring the vehicle to a
controlled stop.

• The anti-lock system does not reduce stopping distance. Always leave

enough room between your vehicle and the vehicle in front of you to
stop.

• We recommend that you familiarize yourself with this braking

technique. However, avoid taking any unnecessary risks.

Parking brake

Apply the parking brake whenever
the vehicle is parked. To set the
parking brake, press the parking
brake pedal down until the pedal
stops.

P

!

BRAKE

PUSH

TO

RELEASE

Driving

160

-------------------------------------------------------------------------------------------------------------------------------------------------------------


Content      ..     8      9      10      11     ..