Fiat Ulysse (2022 year). Manual in english - page 4
 

  Index      Manuals     Fiat Ulysse (2022 year). Manual in english


Search            copyright infringement  


Content      ..     2      3      4      5     ..


Fiat Ulysse (2022 year). Manual in english - page 4


52

Ease of use and comfort

►  Lock the vehicle from the outside.

If the mirrors are folded using control 

A

they will not unfold when the vehicle is 

unlocked.

Electric unfolding 

The door mirrors are unfolded electrically when 
the vehicle is unlocked using the remote control 
or key. Unless folding was selected with control 

A

, pull the control in the central position towards 

the rear again.

Folding/unfolding when locking/unlocking 
the vehicle can be deactivated. Contact a 

Fiat Dealership or a qualified workshop.

If necessary, the mirrors can be folded 
manually.

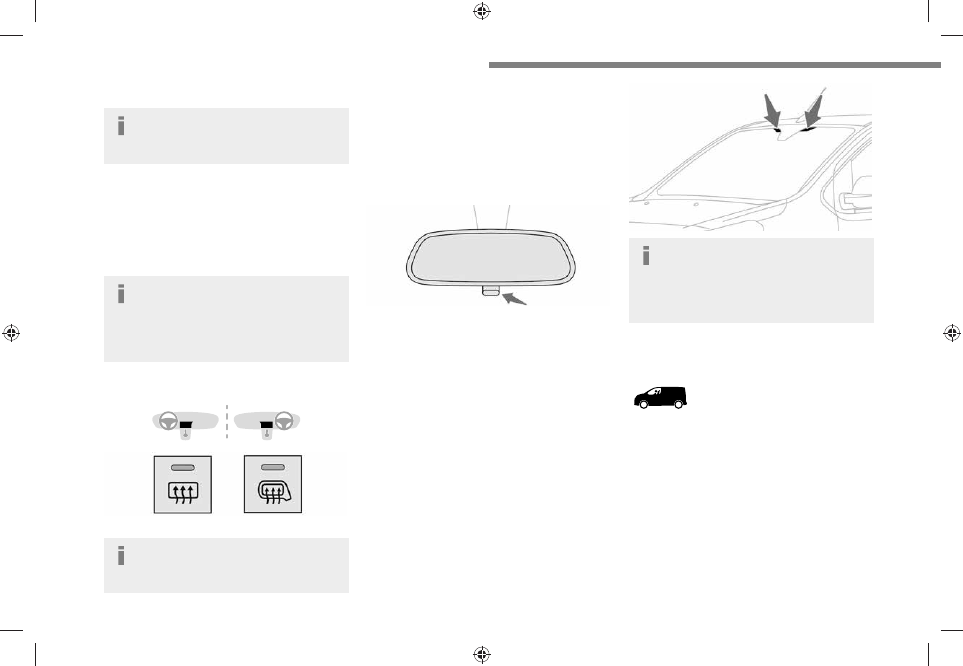
Heated mirrors


►  Press one of these buttons.

For more information on 

Rear screen 

demisting/de-icing

, refer to the 

corresponding section.

Rear view mirror

Equipped with an anti-dazzle system, which 
darkens the mirror glass and reduces the 
nuisance to the driver caused by the sun, 
headlamps of other vehicles, etc.

Day/night position


►  Pull the lever to change to the anti-dazzle 

"night” position.

►  Push the lever to change to the normal "day" 

position.

Windscreen zone for toll 
badge

Depending on the version, the vehicle can be 
equiped with a athermic windscreen type.
For a best functionnement of the toll badge 
system, it is necessary to place the toll badge on 
the zone of windscreen provided for the purpose 
symbolised with of black dotteds around of the 
interior rear view mirror base.


For the version without athermic 
windscreen, to limit the obstruction of you 

field of vision through the windscreen, we 

recommend you to place the toll badge in the 
upper part of the windscreen.

Moduwork


The cushion of the bench seat's outer seat can 
be folded up against the backrest to create a 
loading area inside the cab. 

A removable flap on the partition can be 

removed to allow long objects to be loaded.


14/02/2022   15:33:12

-------------------------------------------------------------------------------------------------------------------------------------------------------------

53

Ease of use and comfort

3


Once the removable flap has been 

removed, you can load long objects 

under the outer seat.

Removable flap (type 1)

Removing the flap


►  While holding the flap with one hand, turn the 

control at the top of the flap with the other hand 

to release it.

►  Lower the flap to remove it from its housing.

►  Stow it behind the driver’s seat, clipping it into 

the attachment lugs.

►  Turn the control at the top of the flap to 

secure it.

Refitting the flap


►  Tilt the flap, with the yellow hinges pointing 

downwards.

►  Insert the hinges into their housing then press 

down fully (to avoid vibrations).

►  With one hand lift the flap to close it, then 

with the other hand turn the control at the top of 

the flap to secure it.

Removable flap (type 2)


►  To open or close the flap, slide it to the left 

or right.

The flap is kept in the closed or open position 

with magnets located at each end position.

Folding seat cushion

Raising the seat cushion


►  With one hand, firmly pull the strap forwards 

to unlock the seat cushion. 

►  A strut lifts the seat cushoin against the 

backrest. 

14/02/2022   15:33:12

-------------------------------------------------------------------------------------------------------------------------------------------------------------

54

Ease of use and comfort

Never

 put your hand underneath the seat 

cushion to guide it upwards, as your 

fingers may become trapped.

Always use only the strap.

When the outer seat is raised and the 

flap is removed, you must install the 

anti-slip net.
Refer to the 

Anti-slip net

 section.

Lowering the seat cushion


►  Remove the anti-slip net.

►  To reposition the seat cushion, press firmly 

on the top of the seat with one hand to lower the 
seat cushion until it locks into the seat position.

Ensure that there are no objects or feet 
obstructing the anchorage points or 

preventing the assembly from locking 
properly.

Anti-slip net

Installing the net


►  Put the first fastener into the upper cut-out 

1

located beneath the folded seat cushion. Keep 
the fastener pressed against the structure, then 

14/02/2022   15:33:13

-------------------------------------------------------------------------------------------------------------------------------------------------------------

55

Ease of use and comfort

3

turn it a quarter turn (in a clockwise direction) to 
lock it.

►  Put the second fastener into the lower cut-out 

2

, located on the seat base. Keep the fastener 

pressed against the structure, then turn it a 
quarter turn (in a clockwise direction) to lock it.


►  Secure the first hook to the ring 

3

 located in 

the glove box.

►  Secure the second hook to the ring 

4

 located 

on the floor.

Removing the net

►  Release the hooks from the rings 

4

 and 

3

.

►  Remove the lower fastener 

2

 then the upper 

fastener 

1

, turning them by a quarter turn 

backwards to unlock them.

Make sure that the size, shape and 
volume of the loads carried are 

compatible with the highway code and safety 

regulations and do not impair the driver’s field 

of vision.
All loads must be appropriately secured 
to prevent or minimise displacement and 
prevent injury.

Install the anti-slip net (supplied with the 
vehicle) every time that the seat is raised and 

the partition flap removed.

Never use the net for any other purposes.
Regularly check the condition of the anti-
slip net. As soon as signs of wear or tear 
appear, contact a Fiat Dealership to have it 
replaced by an anti-slip net that meets the 

specifications required by Fiat for the vehicle.

Always fit the removable flap back into place 

when you are not carrying any long loads.

"Rotating writing table"

If fitted to your vehicle, the central seat cushion 

of the bench seat can be tilted to form a pivoting 
writing table, thus creating a mobile desk (with 
the vehicle stationary).

►  Pull the handle located at the top of the 

backrest cushion.


Never use the table while the vehicle is 
being driven.

In the event of sudden braking or impact, any 
objects on the table might become dangerous 
projectiles that could cause injury.

14/02/2022   15:33:13

-------------------------------------------------------------------------------------------------------------------------------------------------------------

56

Ease of use and comfort

Central seat cushion 

storage


Precautions for the seats 
and bench seats

Do not remove a head restraint without storing it 
and securing it to a support.
Ensure that the passengers can always access 
the seat belts and fasten them easily.
A passenger must not take their seat without 
adjusting the seat's head restraint correctly and 
adjusting and fastening their seat belt.

Ensure that no object or passenger feet 
could obstruct the anchorage points or 

prevent the correct latching of the assembly.

If removing and storing seats and bench 
seats out of the vehicle, ensure that they 

are placed in a clean area, so as to avoid 

introducing any foreign bodies into the 
mechanisms.

The seats and bench seats are not 
designed for any other use than in the 

vehicle. They are equipped with mechanisms 
and features that may be damaged if used 
improperly or if dropped.

Loading luggage or objects 

behind the row 3 seat and 

bench seat


If you want to load luggage onto the backrests in 
row 3 while in the table position, the backrests in 
row 2 must also be in the table position.


When driving, it is prohibited to have a 
passenger:
–  in rows 2 and 3, in the outer right-hand seat, if 
the bench seat is in the fully folded position,
–  in the centre seat if the outer right-hand seat is 
in the fully folded position,
–  in row 3 if the backrest in front (row 2) is in the 
table position,
–  in row 3 if the seat/bench seat in front (row 2) 
is in the fully folded position.

14/02/2022   15:33:13

-------------------------------------------------------------------------------------------------------------------------------------------------------------

57

Ease of use and comfort

3

Fixed one-piece bench 
seat

Combi

Business

The different equipment and settings described 

hereafter vary according to the version and the 

configuration of your vehicle.


The bench seat has a one-piece backrest that 

may be fixed or foldable (table position).

For more information on the 

Seat belts

refer to the corresponding section.

Access to row 3


►  Using the handle, release the rear feet then 

tip the seat forward.

►  To return the seat, tip the bench towards the 

rear until the feet lock into place..

It is not necessary to fold the backrest 
(table position) to tip the bench seat for 

access to row 3.

Folding the backrest to the 

table position

►  Put the head restraints in the low position.


►  From the rear, lower the handle to release the 

backrest.

►  From the front, raise the handle to release 

the backrest.

►  Fold the backrest onto the cushion.

►  To return the backrest to its normal position, 

raise the handle and pull the backrest up.

Do not leave objects (such as a bag or 
toys) on the cushion when folding the 

backrest.

Tilting

►  If your vehicle has the facility, place the 

backrest in the table position.


►  Using the handle, release the rear feet then 

tip the seat forward.

►  To return the seat, tip the bench towards the 

rear until the feet lock into place..

14/02/2022   15:33:13

-------------------------------------------------------------------------------------------------------------------------------------------------------------

58

Ease of use and comfort

Removing

►  If the vehicle is so equipped, place the 

backrest in the table position.

►  Tip the bench seat.


►  Release the front feet using the handles.

►  Disengage the bench seat from its 

anchorages.

►  Remove the bench seat.

Refitting

►  Check that there is no object obstructing the 

anchorages and preventing the feet locking into 
place.


►  Engage the front feet in the anchorages on 

the floor (as shown above).


►  Lock the front feet using the handles.

►  Tip the bench seat backwards until the rear 

feet lock into place.

Be careful of passengers' feet when 
tipping.


►  If the vehicle is so equipped, pull the control 

and raise the backrest (from the rear, lower the 
handle).

Check that the seat has correctly locked 

on the floor when returned to the seating 

position.

Fixed rear seat and bench 
seat

Combi

Business

The different equipment and settings described 

hereafter vary according to the version and the 

configuration of your vehicle.


The seat has a backrest that may be fixed or 

foldable (table position).
The bench seat has a one-piece backrest that 

may be fixed or foldable (table position).

For more information on the 

Seat belts

refer to the corresponding section.

14/02/2022   15:33:14

-------------------------------------------------------------------------------------------------------------------------------------------------------------

59

Ease of use and comfort

3

Access to row 3

(example for an individual seat)


►  Using the handle, release the rear feet then 

tip the seat forward.

►  To return the seat to the normal position, tip 

the seat backwards until the rear feet engage in 
their anchorages.

It is not necessary to fold the backrest 
(table position) to tip the bench seat and 

so access row 3.

Folding the backrest into 

the table position

►  Place the head restraints in the low position.


►  From the rear, lower the lever to release the 

backrest.

►  From the front, raise the lever to release the 

backrest.

►  Fold the backrest onto the seat cushion.

►  To return the backrest to the normal position, 

raise the lever and pull the backrest up (from the 
rear, lower the lever).

Do not leave objects (such as a bag or 
toys) on the seat cushion when folding 

the backrest.

Tilting

(example of an individual seat)

►  If your vehicle has the facility, place the 

backrest in the table position.


►  Using the handle, release the rear feet then 

tip the seat forward.

►  To return the seat to the normal position, 

unfold the seat backwards until the rear feet 
engage in their anchorages.

Removing

(example of an individual seat)

►  Tip the seat.


►  Release the front feet using the handles.

►  Disengage the seat from its anchorages.

14/02/2022   15:33:14

-------------------------------------------------------------------------------------------------------------------------------------------------------------

60

Ease of use and comfort

►  Remove the seat through the side door for 

row 2 or from the rear for row 3.

Refitting

(example of an individual seat)

►  Check that there is no object obstructing the 

anchorage points and preventing the feet locking 
correctly into place.


►  Engage the front feet in the anchorage points 

on the floor (as shown above).


►  Lock the front feet using the levers.

►  Tilt the seat towards the rear until the rear 

feet lock into place.
Be careful of passengers' feet during the 
manoeuvre.


►  If fitted to your vehicle, pull the control and 

raise the backrest (from the rear, lower the 
lever).

Check that the seat has correctly 
engaged in its anchorage points on the 

floor when returned to the sitting position.

Rear seat and bench seat 
on rails

Feel

Shine

Business Lounge

The different equipment and settings described 

hereafter vary according to the version and the 

configuration of your vehicle.


The individual seat is always on the right and the 
bench seat on the left (facing forward).
The seat has an independent backrest and the 
bench seat has two independent backrests.

For more information on the 

Seat belts

refer to the corresponding section.

Adjusting the angle of the 

backrest

The reclining backrest can be adjusted to several 
positions.


►  To recline the backrest, pull the control 

upwards (from the rear, lower the handle).

14/02/2022   15:33:14

-------------------------------------------------------------------------------------------------------------------------------------------------------------

61

Ease of use and comfort

3

►  Release the control when the desired position 

is reached.

Moving forward or backward

(example for an individual seat)


Two controls are provided for moving the seat 
forward and backward:

►  From the rear, pull the strap without going 

beyond the point of resistance and push the seat 
forward or pull it backward.

►  From the front, raise the control and slide the 

seat forward or backward.

Moving the seat along the 

full length of the rail


►  Slide the seat by pulling on the front control 

or rear strap.

Folding the backrest to the 

table position

(example for an individual seat)

►  Put the head restraints in the low position.


►  From the rear, lower the handle to release the 

backrest.

►  From the front, raise the handle to release 

the backrest.

►  Fold the backrest onto the cushion.

Do not leave objects (such as a bag or 
toys) on the cushion when folding the 

backrest.

Removing

(example of an individual seat)

►  Move the seat forward for access to the 

strap.

►  Fold the backrest to the table position


►  From the rear, pull the strap fully to release 

the anchorages and tip the seat forwards to 
place it in the vertical position.

►  Remove the seat through the side door for 

row 2 or through the rear for row 3.

14/02/2022   15:33:14

-------------------------------------------------------------------------------------------------------------------------------------------------------------

62

Ease of use and comfort

Refitting


Before refitting the seat or bench seat in 

the vehicle, pull the strap fully to ensure 

that the latching mechanism has engaged.


Do not use the strap to lift the seat or 
bench seat.

(example of an individual seat)

►  Check that nothing is obstructing the rails.


►  Place the front part of the guides on the rails.

►  Tip the seat to align the rear of the guides in 

the rails.

►  Slide the seat forwards or backwards until it 

engages in the notches.

►  Raise the backrest.

Check that the seat has correctly locked 

on the floor when returned to the seating 

position.

Individual rear seat(s) on 
rails

Shine

Business Lounge

The different equipment and settings described 

hereafter vary according to the version and the 

configuration of your vehicle.


The individual seat is fitted with a three-point 

inertia reel seat belt.
It can be placed facing 

forwards

 or facing 

rearwards

.

If there is an individual seat facing 
rearwards in row 2, ensure that the seat 

in row 1 (driver or passenger) is not set too 
far back, in order to avoid contact between 
the two seats.

This could cause significant wear of the parts 

which are in contact.

For more information on the 

Seat belts

refer to the corresponding section.

Armrest(s)

The armrest has notches.


14/02/2022   15:33:14

-------------------------------------------------------------------------------------------------------------------------------------------------------------

63

Ease of use and comfort

3


►  Pull the armrest fully up.

►  Lower it fully.

►  Raise the armrest to the desired notched 

position.

Adjusting the angle of the 

backrest

The backrest can be adjusted to several 
positions.


►  To recline the backrest, pull the control 

upwards (from the rear, lower the handle).

►  Release the control when the desired position 

is reached.

Moving forward or backward


Two controls are provided for moving the seat 
forward and backward:

►  From the rear, pull the strap without going 

beyond the point of resistance and push the seat 
forward or pull it backward.

►  From the front, raise the control and slide the 

seat forward or backward.

Folding the backrest to the 

table position


Ensure that nothing (examples: bag, 
case, toy, folding and sliding table) is 

interfering with the operation to fold the 
backrest.

►  Put the head restraints in the low position.


►  From the rear, lower the handle to release the 

backrest.

►  From the front, raise the handle to release 

the backrest.

►  Fold the backrest onto the cushion.

Removing

►  Move the seat forwards for access to the 

strap.

►  Fold the backrest to the table position.


►  From the rear, pull the strap beyond the point 

of resistance to release the anchorages and 

14/02/2022   15:33:15

-------------------------------------------------------------------------------------------------------------------------------------------------------------

64

Ease of use and comfort

tip the seat forwards to place it in the vertical 
position.

►  Remove the seat through the side door for 

row 2 or through the rear for row 3.

Changing the direction of 

the seat


When the seat is removed, your can rotate it by 
180°.

Refitting


Before refitting the seat in the vehicle, 

pull the strap fully to ensure that the 

latching mechanism has engaged.


Do not use the strap to lift the seat. 

►  Check that nothing is obstructing the rails.


►  Fit the front part on the rails.

►  Tip the seat to align the rear of the guides in 

the rails.

►  Slide the seat forwards or backwards until it 

engages in the notches.

►  Raise the backrest.

Check that the seat has correctly locked 

on the floor when returned to the seating 

position.

Fixed crew cab


The crew cab is made up of a fixed bench seat, 

seat belts, storage compartments (depending 
on equipment) and side windows. It is separated 
from the 

loading area

 by a high-strength 

partition.

Rear bench seat

This ergonomic bench seat has three seats.

14/02/2022   15:33:15

-------------------------------------------------------------------------------------------------------------------------------------------------------------

65

Ease of use and comfort

3

The two outer seats are fitted with ISOFIX 

mountings.

For more information on the 

ISOFIX 

mountings

, refer to the corresponding 

section.

Storage compartment


If applicable, a storage compartment is available 
at the front, underneath the bench seat.

Under seat cushion storage 

wells


If the vehicle is so equipped, they are located 
underneath the centre and outer left-hand seats.
To gain access to it from the cab, tip the required 
seat forwards.


Depending on the country of sale, the wells can 
be dismantled and removed through the rear so 
that bulky objects can be stowed underneath the 
bench seat.

Do not attach anything to the cab fixing 

structure.

Do not exceed the number of passengers 

indicated on the registration certificate.

In the rear, the 

loading area

 is intended for 

carrying goods only.
You are advised to place the goods or heavy 
objects as far forwards as possible in the 

loading area

 (towards the cab) and secure 

them by means of straps using the stowing 

rings on the floor.

The rear seat belt frames are not designed to 
secure the load being carried.

14/02/2022   15:33:15

-------------------------------------------------------------------------------------------------------------------------------------------------------------

66

Ease of use and comfort

Folding crew cab


The crew cab has a folding bench seat, seat 
belts and side windows. It is separated from 
the 

loading area

 by the bench seat by a high-

strength grille.

Folded position


►  With just one hand, pull one of the straps 

A


upwards to fold the bench seat.

►  Using handle 

B

, guide the movement of the 

bench seat until it locks in the folded position.

Bench seat position


►  To put the bench seat back in place, pull the 

strap 

C

 to unlock the bench seat, then release 

the strap.

►  Then, using only the handle 

B

, guide the 

descent of the backrest to tip the assembly until 
it locks in the bench seat position.

Never put your hand underneath the 
bench seat to guide it downwards, as you 

could get your fingers trapped.

Ensure there are no objects or feet beneath 
the bench seat or obstructing the anchorage 
system, preventing the assembly from being 
correctly locked.

Do not attach anything to the cab fixing 

structure.

Do not exceed the number of passengers 

indicated on the registration certificate.

In the rear, the load space is intended for 
carrying goods only.
It is recommended to place goods or heavy 
objects as far forwards as possible in the load 
space (towards the cab) and secure them by 
means of straps using the stowing rings on 

the floor.

The rear seat belt frames are not designed to 
secure the load being carried.

14/02/2022   15:33:15

-------------------------------------------------------------------------------------------------------------------------------------------------------------

67

Ease of use and comfort

3

Interior fittings

Mats

Fitting


When fitting it on the driver's side, only use the 

mountings present on the carpet.
The other mats are simply laid over the carpet.

Removing/refitting

►  To remove it on the driver's side, move 

the seat as far back as possible and give the 
fasteners a quarter turn.


►  To refit it, position the mat and replace the 

fasteners, giving them a quarter turn.

►  Check that the mat is secured correctly.

To avoid any risk of jamming the pedals:
–  Only use mats which are suited to the 

fixings already present in the vehicle; these 

fixings must be used.

–  Never fit one mat on top of another.

The use of mats not approved by Fiat may 
interfere with access to the pedals and hinder 
the operation of the cruise control/speed 
limiter.
The approved mats have two fasteners 
located underneath the seat.

In row 2 and row 3


Use the Velcro straps to attach the transverse 
mat in row 2 with the longitudinal mats in rows 
2 and 3.

Glove box

It houses the front passenger airbag deactivation 
switch and can hold a bottle of water, the 
vehicle's handbook pack, etc.

Never drive with the glove box (if 
equipped) open when a passenger is 

sitting at the front. It may cause injury during 
sharp deceleration.

Storage compartment

This can hold a bottle of water, the vehicle's 
documentation, etc.


►  To open the storage compartment, press the 

left-hand end of the control and guide the lid to 
its open position notch.
If your vehicle is so equipped, it is lit when the lid 
is opened.

When driving

, keep the storage 

compartment closed. Otherwise, there is 

14/02/2022   15:33:16

-------------------------------------------------------------------------------------------------------------------------------------------------------------


Content      ..     2      3      4      5     ..