Fiat 500X (2022 year). Manual in english - page 3
 

  Index      Manuals     Fiat 500X (2022 year). Manual in english


Search            copyright infringement  


Content      ..     1      2      3      4      ..


Fiat 500X (2022 year). Manual in english - page 3


GETTING TO KNOW YOUR VEHICLE

39

Push the driver or passenger light switch to 

operate the reading lamps individually.
NOTE:

Before exiting the vehicle, make sure that the 

interior lights are turned off. This will prevent the 

battery from discharging once the doors are 

closed.

If a light is left on it will automatically be turned 

off after approximately 15 minutes after the 

ignition is in the OFF position.

Dome Light Timing

The dome light will automatically illuminate when 

the doors are unlocked, the doors are opened or 

after the doors are closed.
Timing Entering The Vehicle
The dome lights illuminate in the following ways:

When the doors are unlocked, the dome light 

will illuminate for approximately 27 seconds.

When one of the doors is opened, the dome light 

will illuminate for approximately three minutes.

When the doors are closed, the dome light will 

automatically shut off after approximately 

27 seconds.

NOTE:

The timing stops once the ignition is placed in the 

ON/RUN position.

The dome light will turn off under any of the 

following conditions:

The dome light is disabled when the ignition is 

placed in the ON/RUN position.

The dome lights will turn off automatically when 

the doors are locked.

The dome lights will automatically turn off after 

approximately 15 minutes of inactivity to 

preserve the battery.

Timing Exiting The Vehicle
The dome light will illuminate under the following 

conditions when the ignition is placed in the OFF 

position:

The dome light will illuminate for 27 seconds 

after the key is removed from the vehicle.

The opening of one of the doors (approximately 

three minutes).

After closing a door (approximately 27 seconds).

The dome light timing is disabled when the doors 

are locked.

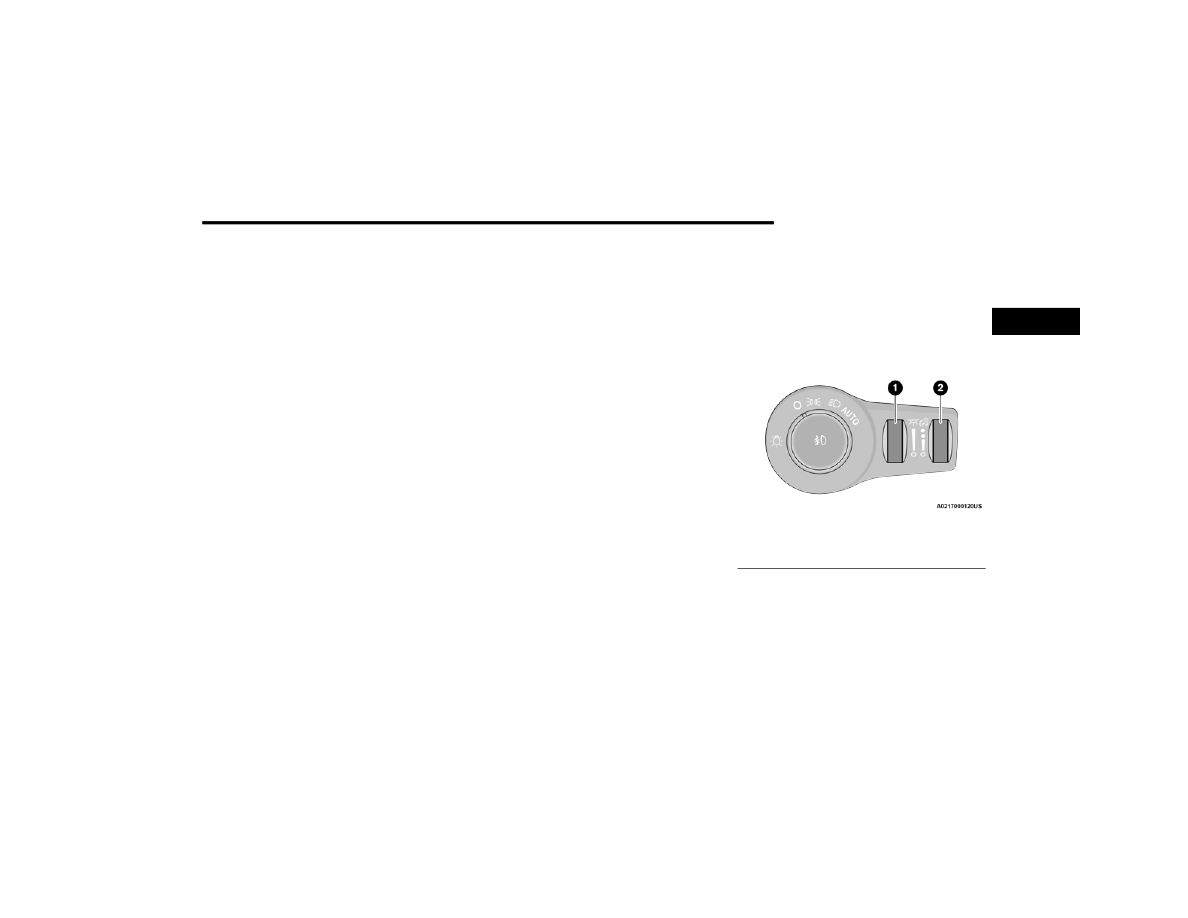
Dimmer Controls 

Rotate the ambient dimmer control upward or 

downward to increase or decrease the brightness 

of the ambient light located in the overhead 

console, lower instrument panel lights, and cubby 

bin lights.

With the parking lights or headlights on, rotate the 

instrument panel dimmer control upward or 

downward to increase or decrease the brightness 

of the instrument panel. At the top detent of the 

instrument panel dimmer, all the interior lights will 

also illuminate. At the bottom most setting of the 

thumb wheel, all the interior lights will be turned to 

their lowest dimmable setting.

Headlight Switch

1 — Ambient Light Control (If Equipped)
2 — Instrument Panel Dimmer

2

-------------------------------------------------------------------------------------------------------------------------------------------------------------

40

GETTING TO KNOW YOUR VEHICLE


Rear Dome Light — If Equipped

Push the switch on the rear dome light once to turn 

the light on, the light will remain on at all times. 

Push the switch a second time to turn the light off, 

the light will remain off until a door is opened.

Rear Dome Light On/Off Switch

Retractable Roof Lights

For vehicles equipped with a retractable roof, there 

are two interior lights located below the grab 

handles of the rear doors.
The lights come on by opening any of the doors.

C

ARGO

 A

REA

 L

IGHTS

An interior light is located on the left side panel in 

the cargo area.
This light automatically turns on/off when the 

liftgate is opened and closed, regardless of the 

position of the ignition.

NOTE:

In order to preserve the life of the battery, the light 

will turn off after 15 minutes.

WINDSHIELD WIPERS AND WASHERS  

The windshield wiper/washer controls are located 

on the lever on the right side of the steering 

column. The front wipers are operated by rotating 

a switch, located on the end of the lever.

Windshield Wiper Lever

W

INDSHIELD

 W

IPER

 O

PERATION


Rotate the windshield wiper knob to one of the first 

two detent positions for intermittent settings, the 

third detent for low wiper operation and the fourth 

for high wiper operation.
Windshield Washers
To use the washer, pull the lever toward you and 

hold. If the lever is pulled while in the intermittent 

setting, the wipers will turn on and operate for 

several wipe cycles after the lever is released, and 

then resume the intermittent interval previously 

selected.
If the lever is pulled while the wipers are in the off 

position, the wipers will operate for several wipe 

cycles, then turn off.

1 — Push Forward For Rear Washer
2 — Rotate For Rear Wiper Operation
3 — Rotate For Front Wiper Operation
4 — Pull For Front Washer
5 — Push Up For Mist

CAUTION!

Always remove any buildup of snow that 

prevents the windshield wiper blades from 

returning to the “park” position. If the windshield 

wiper switch is turned off, and the blades cannot 

return to the “park” position, damage to the 

wiper motor may occur.

-------------------------------------------------------------------------------------------------------------------------------------------------------------

GETTING TO KNOW YOUR VEHICLE

41

Mist
Push the lever upward to the Mist position and 

release for a single wiping cycle.
NOTE:

The Mist feature does not activate the washer 

pump; therefore, no washer fluid will be sprayed on 

the windshield. The wash function must be used in 

order to spray the windshield with washer fluid.
For information on wiper care and replacement, 

see  

Ú

page 245.

R

AIN

 S

ENSING

 W

IPERS

 — I

F

 E

QUIPPED


This feature senses moisture on the windshield 

and automatically activates the wipers. Rotate the 

end of the multifunction lever to one of two detent 

positions for intermittent settings to activate this 

feature.
NOTE:

If the windshield wiper lever is rotated from the O 

(off) position to the first intermittent setting or from 

the first intermittent setting to the second inter

-

mittent setting, the wipers will perform an imme

-

diate wipe cycle to clean the windshield.

Rain Sensor Location

The sensitivity of the system can be adjusted with 

the windshield wiper lever. Wiper delay position 

one is the least sensitive, and wiper delay position 

two is the most sensitive. Place the wiper switch in 

the O (off) position when not using the system.
NOTE:

The Rain Sensing feature will not operate when 

the wiper switch is in the low or high-speed posi

-

tion.

The Rain Sensing feature may not function prop

-

erly when ice or dried salt water is present on 

the windshield.

Use of Rain-X or products containing wax or sili

-

cone may reduce Rain Sensing performance.

The Rain Sensing feature can be turned on and 

off through Uconnect Settings  

Ú

page 123.

The Rain Sensing system has protection features 

for the wiper blades and arms, and will not operate 

under the following conditions:

Low Ambient Temperature — When the ignition 

is first placed in the ON/RUN position, the Rain 

Sensing system will not operate until the wiper 

switch is moved, vehicle speed is greater than 

0 mph (0 km/h), or the outside temperature is 

greater than 32°F (0°C).

Transmission In NEUTRAL Position — When the 

ignition is in the ON/RUN position, and the auto

-

matic transmission is in the NEUTRAL position, 

the Rain Sensing system will not operate until 

the wiper switch is moved, vehicle speed is 

greater than 3 mph (5 km/h), or the gear 

selector is moved out of the NEUTRAL position.

Remote Start Mode Inhibit — On vehicles 

equipped with the Remote Start system, Rain 

Sensing wipers are not operational when the 

vehicle is in the Remote Start mode. Once the 

operator is in the vehicle and has placed the 

ignition switch in the ON/RUN position, rain 

sensing wiper operation can resume, if it has 

been selected, and no other inhibit conditions 

exist.

Rain Sensing Wipers — Inhibition — When the 

user changes the ignition position from OFF to 

ON/RUN with the windshield wiper lever already 

WARNING!

Sudden loss of visibility through the windshield 

could lead to a collision. You might not see other 

vehicles or other obstacles. To avoid sudden 

icing of the windshield during freezing weather, 

warm the windshield with the defroster before 

and during windshield washer use.

2

-------------------------------------------------------------------------------------------------------------------------------------------------------------

42

GETTING TO KNOW YOUR VEHICLE


(Continued)

in the intermittent position, no wipe cycle is 

performed for safety reasons. This temporary 

inhibition avoids accidental activations of the 

wiping (e.g. during the hand washing of the 

windshield, blocking the blades in ice/snow 

conditions).

The user can activate the Rain Sensing Wipers in 

three ways:

Moving the lever from the O (off) position to the 

intermittent positions.

One Mist command actuation.

The vehicle speed exceeds 3 mph (5 km/h) and 

the rain sensor detects the presence of rain.

R

EAR

 W

INDOW

 W

IPER

/W

ASHER


The rear wiper/washer controls are located on the 

windshield wiper lever on the right side of the 

steering column. The rear wiper/washer is 

operated by rotating a switch, located at the 

middle of the lever.
NOTE:

If the front wiper is moving and the vehicle is 

shifted in REVERSE, the rear wiper will perform one 

round up to clean the rear window.

Rotate the center portion of the lever 

upward to the first detent for intermittent 

operation and to the second detent for 

continuous rear wiper operation.

To use the washer, push the lever 

forward and hold while spray is desired. If 

the lever is pushed while in the 

intermittent setting, the wiper will turn on 

and operate for several wipe cycles after the end of 

the lever is released, and then resume the 

intermittent interval previously selected.
NOTE:

As a protective measure, the pump will stop if the 

switch is held for more than 30 seconds. Once the 

lever is released, the pump will resume normal 

operation.
If the lever is pushed while the wiper is in the off 

position, the wiper will operate for several wipe 

cycles, then turn off.
If the rear wiper is operating when the ignition is 

placed in the OFF position, the wiper will 

automatically return to the “park” position.

W

INDSHIELD

 W

IPER

 D

E

-I

CER

 — 

I

F

 E

QUIPPED

Your vehicle may be equipped with a Windshield 

Wiper De-Icer feature that may be activated under 

the following conditions:

Activation By Rear Defrost — The Windshield 

Wiper De-Icer will be activated automatically 

when the rear defrost is turned on and the 

ambient temperature is below 40°F (4.4°C).

Activation By Remote Start Operation — When 

Remote Start is active and the outside ambient 

temperature is less than 40°F (4.4°C), the 

Windshield Wiper De-Icer will activate. Exiting 

Remote Start will resume its previous operation. 

If the Windshield Wiper De-Icer was active, the 

timer and operation will continue.

CAUTION!

Failure to follow these cautions can cause 

damage to the heating elements:

Use care when washing the inside of the rear 

window. Do not use abrasive window cleaners 

on the interior surface of the window. Use a 

soft cloth and a mild washing solution, wiping 

parallel to the heating elements. Labels can 

be peeled off after soaking with warm water.

Do not use scrapers, sharp instruments, or 

abrasive window cleaners on the interior 

surface of the window.

Keep all objects a safe distance from the 

window.

CAUTION!

-------------------------------------------------------------------------------------------------------------------------------------------------------------

GETTING TO KNOW YOUR VEHICLE

43

CLIMATE CONTROLS 

The Climate Control system allows you to regulate 

the temperature, air flow, and direction of air 

circulating throughout the vehicle. The controls are 

located on the touchscreen (if equipped) and on 

the instrument panel below the radio.

A

UTOMATIC

 C

LIMATE

 C

ONTROL


D

ESCRIPTIONS

 A

ND

 F

UNCTIONS

Automatic Climate Controls

MAX A/C Setting

MAX A/C sets the system for maximum 

cooling performance. Rotate the driver 

temperature control adjust knob 

counterclockwise for MAX A/C. Both 

driver and passenger temperature displays will 

show MAX A/C LO. In MAX A/C, the blower speed 

and mode position can be adjusted to desired user 

settings. Pressing other settings will cause the 

MAX A/C operation to switch to the selected setting 

and MAX A/C to exit.

A/C Button

Push the A/C Control button to change 

the current setting. The A/C indicator 

illuminates when A/C is on. Pushing the 

AUTO control button will cause the A/C 

operation to change to AUTO mode and the A/C 

indicator will turn off.
The Air Conditioning (A/C) button allows the 

operator to manually activate or deactivate the air 

conditioning system. When the air conditioning 

system is turned on, cool dehumidified air will flow 

through the outlets into the cabin. For improved 

fuel economy, press the A/C button to turn off the 

air conditioning and manually adjust the blower 

and airflow mode settings. Also, make sure to 

select only Panel, Bi-Level, or Floor modes.
NOTE:

If your air conditioning performance seems lower 

than expected, check the front of the A/C 

condenser (located in front of the radiator), for an 

accumulation of dirt or insects. Clean with a gentle 

water spray from the front of the radiator and 

through the condenser.

SYNC Button

Push the Sync button to toggle the Sync 

feature on/off. The Sync indicator 

illuminates when Sync is on. Sync 

synchronizes the passenger temperature 

setting with the driver temperature setting. 

Changing the passenger temperature setting while 

in Sync mode will automatically exit this feature 

and return to the separate management of air 

temperatures in the two zones.

Recirculation Button

Press and release this button to change 

the system between Recirculation mode 

and outside air mode. The Recirculation 

indicator illuminates when Recirculation 

is on. Recirculation can be used when outside 

conditions such as smoke, odors, dust, or high 

humidity are present. Recirculation can be used in 

all modes. Recirculation may be unavailable if 

conditions exist that could create fogging on the 

inside of the windshield. Continuous use of the 

Recirculation mode may make the inside air stuffy 

and window fogging may occur. Extended use of 

this mode is not recommended. Recirculation 

mode may automatically adjust to optimize 

customer experience for warming, cooling, 

dehumidification, etc.

2

-------------------------------------------------------------------------------------------------------------------------------------------------------------

44

GETTING TO KNOW YOUR VEHICLE


In cold weather, use of Recirculation mode may 

lead to excessive window fogging. The 

Recirculation feature may be unavailable if 

conditions exist that could create fogging on the 

inside of the windshield.

AUTO Button

Set your desired temperature and press 

AUTO. AUTO will achieve and maintain 

your desired temperature by 

automatically adjusting the blower speed 

and air distribution. AUTO mode is highly 

recommended for efficiency. Air Conditioning (A/C) 

may be active during AUTO operation to improve 

performance. Push the button on the faceplate to 

turn AUTO on. The AUTO indicator illuminates when 

AUTO is on. Toggling this function will cause the 

system to switch between manual mode and 

automatic mode  

Ú

page 48.

MAX Defrost Button

Push the MAX Defrost button to change 

the current airflow setting to Defrost 

mode. The MAX Defrost indicator 

illuminates when MAX Defrost is on. 

Performing this function will cause the automatic 

climate controls to change to manual mode. The 

blower speed increases to full (all LEDs on) when 

MAX Defrost mode is selected, the air conditioning 

compressor is turned on (LED on), both driver and 

passenger temperature controls are set to (HI), 

defrost mode is selected (LED on), rear defroster is 

turned on (LED on) and the air recirculation is 

turned off (LED off). If the MAX Defrost mode is 

turned off, the climate system will return to the 

previous setting.

Rear Defrost Button

Push the Rear Defrost button to turn on 

the rear window defroster and the heated 

outside mirrors (if equipped). The Rear 

Defrost indicator illuminates when the 

rear window defroster is on. The rear window 

defroster automatically turns off after 20 minutes.

Driver And Passenger Temperature Knobs

The passenger temperature knob provides the 

passenger with independent temperature control. 

The driver temperature knob provides the driver 

with independent temperature control. Rotate the 

adjustment knob to set the desired temperature.

Rotating the temperature knob clockwise 

increases the temperature.

Rotating the temperature knob 

counterclockwise decreases the 

temperature.

The set temperature is shown on the display.
Turning the temperature knob completely in one 

direction or the other activates the HI (maximum 

heating) or LO (maximum cooling) functions shown 

in the display, respectively. Rotate the driver 

temperature knob fully counterclockwise for 

maximum A/C (LO).
To deactivate these functions, turn the 

temperature knob to the desired temperature.
NOTE:

Rotating the passenger temperature control knob 

while in Sync mode will automatically exit Sync.

CAUTION!

Failure to follow these cautions can cause 

damage to the heating elements:

Use care when washing the inside of the rear 

window. Do not use abrasive window cleaners 

on the interior surface of the window. Use a 

soft cloth and a mild washing solution, wiping 

parallel to the heating elements. Labels can 

be peeled off after soaking with warm water.

Do not use scrapers, sharp instruments, or 

abrasive window cleaners on the interior 

surface of the window.

Keep all objects a safe distance from the 

window.

-------------------------------------------------------------------------------------------------------------------------------------------------------------

GETTING TO KNOW YOUR VEHICLE

45

Blower Control Knob

Blower Control is used to regulate the 

amount of air forced through the Climate 

Control system. Adjusting the blower will 

cause automatic mode to switch to 

manual operation. The speeds can be selected by 

rotating the Blower Control adjustment knob.

Mode Control

Select Mode by pressing one of the Mode 

buttons to change the airflow distribution 

mode. The airflow distribution mode can 

be adjusted so air comes from the 

instrument panel outlets, floor outlets, defrost 

outlets and demist outlets.

Front Defrost Button

Push and release the button on the 

faceplate to change the current airflow 

setting to Defrost mode. The Front 

Defrost indicator illuminates when Front 

Defrost is on. Air comes from the windshield and 

side window demist outlets. When the defrost 

button is selected, the blower level may increase. 

Use Defrost mode with maximum temperature 

settings for best windshield and side window 

defrosting and defogging. When toggling the front 

defrost mode button, the Climate Control system 

will return to the previous setting.

Panel Mode

Air comes from the outlets in the 

instrument panel. Each of these outlets 

can be individually adjusted to direct the 

flow of air. The air vanes of the center 

outlets and outboard outlets can be moved up and 

down or side to side to regulate airflow direction. 

There is a shut-off wheel located below the air 

vanes to shut-off or adjust the amount of airflow 

from these outlets.

Floor Mode

Air comes from the floor outlets. A slight 

amount of air is directed through the 

defrost and side window demister 

outlets.

Bi-Level Mode

Bi-Level Mode is obtained by pressing 

both the Panel Mode button and the 

Floor Mode button, activating them both. 

Air comes from the instrument panel 

outlets and floor outlets. A slight amount of air is 

directed through the defrost and side window 

demister outlets.
NOTE:

Bi-Level Mode is designed under comfort condi

-

tions to provide cooler air out of the panel outlets 

and warmer air from the floor outlets.

Mix Mode

Mix Mode is obtained by pressing both 

the Windshield Mode button and the 

Floor Mode button, activating them both. 

Air is directed through the floor, defrost, 

and side window demister outlets. This setting 

works best in cold or snowy conditions that require 

extra heat to the windshield. This setting is good 

for maintaining comfort while reducing moisture 

on the windshield.

Hi-Level Mode

Hi-Level Mode is obtained by pushing the 

Defrost Mode button and the Panel Mode 

button. Air comes from the instrument 

panel outlets and the defrost outlets. A 

slight amount of air is directed through the side 

window demister outlets.

Tri-Level Mode

Tri-Level Mode is obtained by pressing 

the Defrost Mode button, the Panel Mode 

button, and the Floor Mode button. Air 

comes from the instrument panel 

outlets, the defrost outlets, and floor outlets. A 

slight amount of air is directed through the side 

window demister outlets.

2

-------------------------------------------------------------------------------------------------------------------------------------------------------------

46

GETTING TO KNOW YOUR VEHICLE


Climate Control Power Button

Press and release the Climate Control 

Power button to turn the Climate Control 

on/off.

M

ANUAL

 C

LIMATE

 C

ONTROL


D

ESCRIPTIONS

 A

ND

 F

UNCTIONS

Manual Climate Controls

MAX A/C Setting

Set the temperature control knob to the 

MAX A/C setting to change the current 

setting to the coldest output of air. 

Moving the temperature control knob 

away from the MAX A/C setting causes the MAX 

A/C operation to exit.

A/C Button

Push the A/C button to engage the Air 

Conditioning (A/C). The A/C indicator 

illuminates when A/C is on.

NOTE:

For Manual Climate Controls, if the system is in 

Mix, Floor or Defrost Mode, the A/C can be 

turned off, but the A/C system shall remain 

active to prevent fogging of the windows.

If fog or mist appears on the windshield or side 

glass, select Defrost mode, and increase blower 

speed if needed.

If your air conditioning performance seems 

lower than expected, check the front of the A/C 

condenser (located in front of the radiator), for 

an accumulation of dirt or insects. Clean with a 

gentle water spray from the front of the radiator 

and through the condenser.

Recirculation Button

Push the Recirculation button to change 

the system between recirculation mode 

and outside air mode. The Recirculation 

indicator and the A/C indicator illuminate 

when the Recirculation button is pressed. 

Recirculation can be used when outside 

conditions, such as smoke, odors, dust, or 

humidity are present. Recirculation can be used in 

all modes except for Defrost. Recirculation may be 

unavailable if conditions exist that could create 

fogging on the inside of the windshield. The A/C 

can be deselected manually without disturbing the 

mode control selection. Continuous use of the 

Recirculation mode may make the inside air stuffy 

and window fogging may occur. Extended use of 

this mode is not recommended.
On systems with Manual Climate Controls, if 

equipped, the Recirculation mode is not allowed in 

Defrost mode to improve window clearing 

operation. Recirculation is disabled automatically 

if this mode is selected. Attempting to use 

Recirculation while in this mode causes the LED in 

the control button to blink and then turns off.

Front Defrost Setting

Turn the mode control knob to the Front 

Defrost mode setting. Air comes from the 

windshield and side window demist 

outlets. When the defrost button is 

selected, the blower level may increase. Use 

Defrost mode with maximum temperature settings 

for best windshield and side window defrosting 

and defogging.

Rear Defrost Button

Push and release the Rear Defrost 

Control button to turn on the rear window 

defroster and the heated outside mirrors 

(if equipped). The Rear Defrost indicator 

-------------------------------------------------------------------------------------------------------------------------------------------------------------

GETTING TO KNOW YOUR VEHICLE

47

illuminates when the rear window defroster is on. 

The rear window defroster automatically turns off 

after 20 minutes.

Temperature Control

Temperature Control regulates the temperature of 

the air forced through the climate system.

The temperature increases as you turn 

the temperature control knob clockwise.

The temperature decreases as you turn 

the temperature control knob 

counterclockwise.

Blower Control

Blower Control regulates the amount of 

air forced through the climate control 

system. There are seven blower speeds 

available. The blower speed increases as 

you turn the blower control knob clockwise from 

the lowest blower setting. The blower speed 

decreases as you turn the blower control knob 

counterclockwise.

Mode Control

Turn the mode control knob to adjust 

airflow distribution. The airflow 

distribution mode can be adjusted so air 

comes from the instrument panel 

outlets, floor outlets, defrost outlets and demist 

outlets.

Panel Mode

Air comes from the outlets in the 

instrument panel. Each of these outlets 

can be individually adjusted to direct the 

flow of air. The air vanes of the center 

outlets and outboard outlets can be moved up and 

down or side to side to regulate airflow direction. 

There is a shut-off wheel located below the air 

vanes to shut-off or adjust the amount of airflow 

from these outlets.

Bi-Level Mode

Air comes from the instrument panel 

outlets and floor outlets. A slight amount 

of air is directed through the defrost and 

side window demister outlets.

NOTE:

Bi-Level mode is designed under comfort condi

-

tions to provide cooler air out of the panel outlets 

and warmer air from the floor outlets.

Floor Mode

Air comes from the floor outlets. A slight 

amount of air is directed through the 

defrost and side window demister 

outlets.

Mix Mode

Air comes from the floor, defrost, and 

side window demister outlets. This 

setting works best in cold or snowy 

conditions that require extra heat to the 

windshield. This setting is good for maintaining 

comfort while reducing moisture on the 

windshield.

CAUTION!

Failure to follow these cautions can cause 

damage to the heating elements:

Use care when washing the inside of the rear 

window. Do not use abrasive window cleaners 

on the interior surface of the window. Use a 

soft cloth and a mild washing solution, wiping 

parallel to the heating elements. Labels can 

be peeled off after soaking with warm water.

Do not use scrapers, sharp instruments, or 

abrasive window cleaners on the interior 

surface of the window.

Keep all objects a safe distance from the 

window.

2

-------------------------------------------------------------------------------------------------------------------------------------------------------------

48

GETTING TO KNOW YOUR VEHICLE


Climate Control OFF

To turn the Climate Controls off, turn the 

blower control knob to the OFF (O) 

position.

A

UTOMATIC

 T

EMPERATURE

 C

ONTROL


(ATC) 

Automatic Operation

1. Push the AUTO button on the front ATC panel 

and the word “AUTO” will illuminate in the 

front ATC display, along with two 

temperatures for the driver and front 

passenger. The system will then automat

-

ically regulate the amount of airflow.

2. Adjust the temperature you would like the 

system to maintain, by adjusting the driver, 

and passenger temperatures. Once the 

desired temperature is displayed, the system 

will achieve and automatically maintain that 

comfort level.

3. When the system is set up for your comfort 

level, it is not necessary to change the 

settings. You will experience the greatest 

efficiency by simply allowing the system to 

function automatically.

NOTE:

It is not necessary to move the temperature 

settings. The system automatically adjusts the 

temperature, mode, and fan speed to provide 

comfort as quickly as possible.
To provide you with maximum comfort in the 

automatic mode, during cold start-ups, the blower 

fan will remain on low until the engine warms up. 

The fan will engage immediately if the Defrost 

mode is selected, or by changing the front blower 

knob setting.

Manual Operation Override

This system offers a full complement of manual 

override features. The AUTO symbol in the front 

ATC display will be turned off when the system is 

being used in the manual mode.

C

LIMATE

 V

OICE

 R

ECOGNITION

Adjust vehicle temperatures hands-free and keep 

everyone comfortable while you keep moving 

ahead. (If vehicle is equipped with climate control.)
Push the VR button  . After the beep, say one of 

the following commands:

“Set the driver temperature to 70 degrees”

“Set the passenger temperature to 70 degrees”

Did You Know: Voice Command for Climate may 

only be used to adjust the interior temperature of 

your vehicle. Voice Command will not work to 

adjust the heated seats or steering wheel if 

equipped.

O

PERATING

 T

IPS


Refer to the chart at the end of this section for 

suggested control settings for various weather 

conditions.

Summer Operation

The engine cooling system must be protected with 

a high-quality antifreeze coolant to provide proper 

corrosion protection and to protect against engine 

overheating. OAT coolant (conforming to 

MS.90032) is recommended.

Winter Operation

To ensure the best possible heater and defroster 

performance, make sure the engine cooling 

system is functioning properly and the proper 

amount, type, and concentration of coolant is 

used. Use of the Air Recirculation mode during 

Winter months is not recommended, because it 

may cause window fogging.

-------------------------------------------------------------------------------------------------------------------------------------------------------------

GETTING TO KNOW YOUR VEHICLE

49

Vacation/Storage  

For information on maintaining the Climate Control 

system when the vehicle is being stored for an 

extended period of time, see  

Ú

page 286.

Window Fogging 

Vehicle windows tend to fog on the inside in mild, 

rainy, and/or humid weather. To clear the 

windows, select Defrost or Mix mode and increase 

the front blower speed. Do not use the 

Recirculation mode without A/C for long periods, 

as fogging may occur.

Outside Air Intake

Make sure the air intake, located directly in front of 

the windshield, is free of obstructions, such as 

leaves. Leaves collected in the air intake may 

reduce airflow, and if they enter the air distribution 

box, they could plug the water drains. In Winter 

months, make sure the air intake is clear of ice, 

slush, and snow.

Cabin Air Filter  

The Climate Control system filters out dust and 

pollen from the air. Contact an authorized dealer to 

service your cabin air filter, and to have it replaced 

when needed.

System Maintenance

In Winter, the Climate Control system must be 

turned on at least once a month for approximately 

10 minutes.
Have the system inspected at an authorized dealer 

before the Summer.
NOTE:

The system uses R-1234yf (refrigerant) which does 

not pollute the environment in the event of acci

-

dental leakage. Under no circumstances is the use 

of R-134a (refrigerant) allowed.

Rapid Window Demisting (MAX-Defrost 

Function)

Push the MAX-defrost button to activate (LED on) 

the windshield and side window demisting 

function.
The Climate Control system carries out the 

following operations:

Turns on the air conditioning compressor when 

environmental conditions are suitable

Turns air recirculation off

Sets blower fan to the maximum speed and 

displays the fan speed (Blower Control Indicator 

LED illuminated)

Directs air flow to windshield and front side 

window diffusers

Activates the heated rear window defrost

Activates the heated windshield (if equipped)

When the function is activated, the AUTO button 

LED turns off. With the function activated, the only 

possible manual adjustments are pushing the A/C 

control button, adjusting the fan speed and turning 

the heated rear window off.
When the Recirculation Control or AUTO buttons 

are pushed, the Climate Control system will 

deactivate the Front Defrost (MAX-DEF) function.
Selecting the footwell/windshield or only 

windshield distribution activates the Climate 

Control system compressor and the air 

recirculation is set to outside air intake.
This logic guarantees optimum visibility at the 

windows. Max-defrost is also available in manual 

mode.

2

-------------------------------------------------------------------------------------------------------------------------------------------------------------

50

GETTING TO KNOW YOUR VEHICLE


Climate Control System Compressor

Push the A/C Control button to activate/deactivate 

the compressor (activation is indicated by the LED 

on the button turning on).
The system remembers that the compressor has 

been turned off, even after the engine has 

stopped.
Pushing the A/C button will stop AUTO mode (AUTO 

LED will turn off). To restore automatic control of 

compressor, push the AUTO button again.
NOTE:

With the compressor off, air cannot be introduced 

to the passenger compartment with a temperature 

lower than the outside temperature. Under certain 

environmental conditions, windows could fog 

rapidly since the air is not dehumidified.

Operating Tips Chart

INTERIOR STORAGE AND EQUIPMENT

S

TORAGE

Glove Compartments

The glove compartments are located on the 

passenger side of the instrument panel.

Glove Compartments

To open the upper compartment, push in the 

button located on the bottom side of the upper 

door. The door will automatically open.
To close the upper compartment, push downward 

on the door's surface to latch the door closed.
To open the lower glove compartment, pull 

outward on the latch and lower the glove 

compartment door.
NOTE:

Do not insert objects in the glove compartments 

that will not allow the compartment to fully 

close.

The glove compartments should be completely 

closed while the vehicle is in motion.

WEATHER

CONTROL SETTINGS

Hot Weather And 

Vehicle Interior Is Very 

Hot

Set the mode control to 

 (Panel Mode),   

(MAX A/C) on, and 

blower on high. Roll 

down the windows for a 

minute to flush out the 

hot air. Adjust the 

controls as needed to 

achieve comfort.

Warm Weather

Turn   (A/C) on and 

set the mode control to 

 (Panel Mode).

Cool Sunny

Operate in   (Bi-Level 

Mode).

Cool & Humid 

Conditions

Set the mode control to 

 (Mix Mode) and 

turn   (A/C) on to 

keep windows clear.

Cold Weather

Set the mode control to 

 (Floor Mode). If 

windshield fogging 

starts to occur, move 

the control to   (Mix 

Mode).

WEATHER

CONTROL SETTINGS

1 — Upper Glove Compartment Release Button
2 — Lower Glove Compartment Release Handle

-------------------------------------------------------------------------------------------------------------------------------------------------------------

GETTING TO KNOW YOUR VEHICLE

51

Front Armrest   

The front armrest is located between the front 

seats.
If your vehicle is equipped with an adjustable 

armrest, the armrest can be adjusted by moving it 

in the direction indicated by the arrows.

Front Armrest Handle

Storage Compartment

Push the storage handle and lift up the armrest to 

access the storage compartment.

USB/M

EDIA

 P

LAYER

 C

ONTROL


Located below the heating ventilation and air 

conditioning controls is the front USB ports.

Front USB Ports

This feature allows an external device to be 

plugged into the USB port.

NOTE:

Charge unsupported devices with the Charge Only 

USB ports. If an unsupported device is plugged into 

a Media USB port, a message will display on the 

touchscreen that the device is not supported by 

the system.
Rear Center Console USB Port
A third, charge only USB port is located on the back 

of the center console.

Rear Center Console USB Port — If Equipped

NOTE:

Depending on vehicle configuration, the USB port 

may be charge only or media file capable.

WARNING!

Do not operate this vehicle with a console 

compartment lid in the open position. Driving 

with the console compartment lid open may 

result in injury in a collision.

2

-------------------------------------------------------------------------------------------------------------------------------------------------------------

52

GETTING TO KNOW YOUR VEHICLE


P

OWER

 O

UTLETS


There is one 12 Volt (13 Amp) power outlet in this 

vehicle, located under the climate controls. This 

power outlet can power mobile phones, electronics 

and other low power devices.
This power outlet is located in front of the gear 

selector.

12 Volt Power Outlet

NOTE:

The power outlet can be changed to “battery” 

powered at all times by switching the power outlet 

Engine Compartment Fuses/Distribution Unit fuse 

from location F84 to F23.

NOTE:

Do not exceed the maximum power of 

160 Watts (13 Amps) at 12 Volts. If the 

160 Watt (13 Amp) power rating is exceeded, 

the fuse protecting the system will need to be 

replaced.

Power outlets are designed for accessory plugs 

only. Do not insert any other object in the power 

outlet as this will damage the outlet and blow 

the fuse. Improper use of the power outlet can 

cause damage not covered by your new vehicle 

warranty.

Power Outlet Fuse Location:
F84 Fuse 20A Yellow Instrument Panel Power 

Outlet.

C

IGAR

 L

IGHTER

 — I

F

 E

QUIPPED


The cigar lighter is located on the instrument 

panel, below the climate controls. To activate the 

cigar lighter, push and release the knob. After a 

few seconds the knob automatically returns to its 

initial position, and the cigar lighter is ready for 

use.

NOTE:

Always check that the cigar lighter is switched 

off.

Do not connect devices with power higher than 

180 W to the socket. Do not damage the socket 

by using unsuitable adapters.

A

SHTRAY

 — I

F

 E

QUIPPED

NOTE:

Ashtrays can be purchased at an authorized dealer 

through Mopar® parts.
The ashtray is a plastic container that can be 

placed into one of the cup holders.

Ashtray Location

WARNING!

When the cigar lighter is in use it becomes very 

hot. To avoid serious injury, handle the cigar 

lighter with care. Always check that the cigar 

lighter has turned off.

-------------------------------------------------------------------------------------------------------------------------------------------------------------

GETTING TO KNOW YOUR VEHICLE

53

G

RAB

 H

ANDLES

The grab handles are located immediately above 

the doors. The rear handles are equipped with 

hooks for dress hangers.

Rear Grab Handle Assembly

WINDOWS

P

OWER

 W

INDOW

 C

ONTROLS

The window controls on the driver's door control all 

the door windows.

Power Window Switches

The passenger door windows can also be operated 

by using the single window controls on the 

passenger door trim panel. The window controls 

will operate only when the ignition is in the ON/

RUN position.
NOTE:

The power window switches will remain active for 

up to three minutes after the ignition is placed in 

the OFF position. Opening either front door will 

cancel this feature.

Automatic Window Features 

Auto-Down Feature
The driver and front passenger door power window 

switches have an Auto-Down feature. Push the 

window switch down for a short period of time, 

then release, and the window will go down 

automatically.
To stop the window from going all the way down 

during the Auto-Down operation, pull up or push 

down on the switch briefly when the window has 

reached the desired position.

1 — Grab Handle
2 — Hook

WARNING!

Never leave children unattended in a vehicle, 

and do not let children play with power windows. 

Do not leave the key fob in or near the vehicle, or 

in a location accessible to children, and do not 

leave the Keyless Enter ‘n Go™ Ignition in the 

ON/RUN position. Occupants, particularly 

unattended children, can become entrapped by 

the windows while operating the power window 

switches. Such entrapment may result in serious 

injury or death.

2

-------------------------------------------------------------------------------------------------------------------------------------------------------------

54

GETTING TO KNOW YOUR VEHICLE


Auto-Up Feature With Anti-Pinch Protection
Lift the window switch up for a short period of time 

and release; the window will go up automatically.
To stop the window from going all the way up 

during the Auto-Up operation, pull up or push down 

on the switch briefly.
To close the window part way, lift the window 

switch briefly and release it when you want the 

window to stop.
If the window runs into any obstacle during 

auto-closure, it will reverse direction and then go 

back down. Remove the obstacle and use the 

window switch again to close the window.
NOTE:

Any impact due to rough road conditions may 

trigger the auto-reverse function unexpectedly 

during auto-closure. If this happens, pull the switch 

lightly and hold to close the window manually.

Reset Auto-Up

Should the Auto-Up feature be interrupted and 

stop working, the feature will need to be reset. To 

reset Auto-Up:
1. Pull the window switch up to close the window 

completely and continue to hold the switch up 

for an additional two seconds after the 

window is closed.

2. Push the window switch down firmly to open 

the window completely and continue to hold 

the switch down for an additional two seconds 

after the window is fully open.

NOTE:

All doors must be closed before beginning the 

Auto-Up reset procedure.

Window Lockout Switch

The window lockout switch on the driver's door trim 

panel allows you to disable the window controls on 

the rear passenger doors. To disable the window 

controls, push and release the window lockout 

button (the indicator light on the switch will turn 

on). To enable the window controls, push and 

release the window lockout switch again (the 

indicator light on the switch will turn off).

Window Lockout Switch

Wind Buffeting 

Wind buffeting can be described as the perception 

of pressure on the ears or a helicopter-type sound 

in the ears. Your vehicle may exhibit wind buffeting 

with the windows down, or the sunroof (if 

equipped) in certain open or partially open 

positions. This is a normal occurrence and can be 

minimized. If the buffeting occurs with the rear 

windows open, open the front and rear windows 

together to minimize the buffeting. If the buffeting 

occurs with the sunroof open, adjust the sunroof 

opening to minimize the buffeting or open any 

window.

WARNING!

There is no auto-reverse protection when the 

window is almost closed. To avoid personal 

injury be sure to clear your arms, hands, fingers 

and all objects from the window path before 

closing.

-------------------------------------------------------------------------------------------------------------------------------------------------------------


Content      ..     1      2      3      4      ..