Fiat 500e (2018 year). Manual - part 9


  Index      Fiat     Fiat 500e (2018 year) - manual in english


Search            


Content      ..     7      8      9      10     ..


Fiat 500e (2018 year). Manual - part 9


If the answer to any of these questions was “no,” then the
child still needs to use a booster seat in this vehicle. If the
child is using the lap/shoulder belt, check seat belt fit
periodically and make sure the seat belt buckle is latched.
A child’s squirming or slouching can move the belt out of
position. If the shoulder belt contacts the face or neck,
move the child closer to the center of the vehicle, or use a
booster seat to position the seat belt on the child correctly.

WARNING!

Never allow a child to put the shoulder belt under an
arm or behind their back. In a crash, the shoulder belt
will not protect a child properly, which may result in
serious injury or death. A child must always wear both
the lap and shoulder portions of the seat belt correctly.

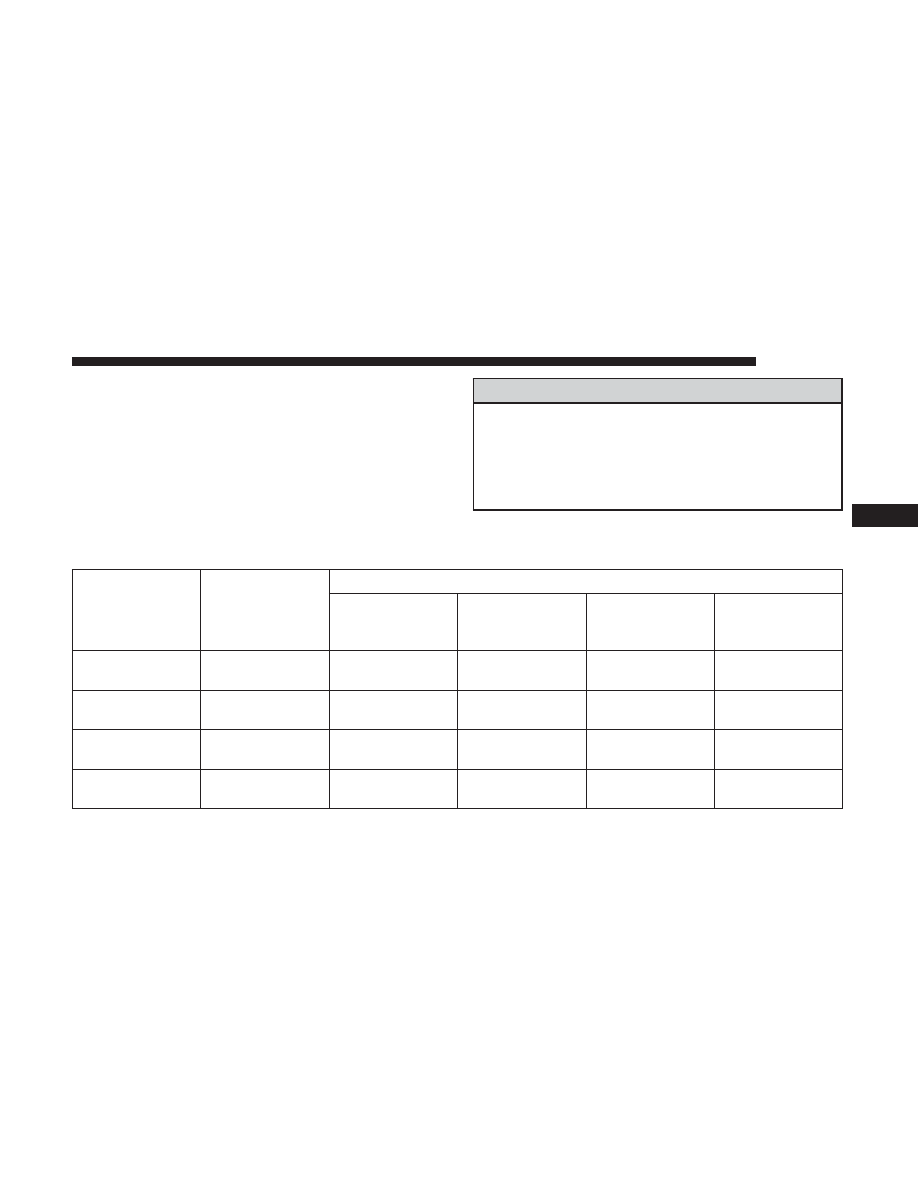
Recommendations For Attaching Child Restraints

Restraint Type

Combined

Weight of the

Child + Child

Restraint

Use Any Attachment Method Shown With An “X” Below

LATCH – Lower

Anchors Only

Seat Belt Only

LATCH – Lower

Anchors + Top

Tether Anchor

Seat Belt + Top

Tether Anchor

Rear-Facing

Child Restraint

Up to 65 lbs

(29.5 kg)

X

X

Rear-Facing

Child Restraint

More than 65 lbs

(29.5 kg)

X

Forward-Facing

Child Restraint

Up to 65 lbs

(29.5 kg)

X

X

Forward-Facing

Child Restraint

More than 65 lbs

(29.5 kg)

X

5

SAFETY

137

-------------------------------------------------------------------------------------------------------------------------------------------------------------

Lower Anchors And Tethers For CHildren (LATCH)
Restraint System

Your vehicle is equipped with the child restraint anchorage
system called LATCH, which stands for Lower Anchors and
Tethers for CHildren. The LATCH system has three vehicle
anchor points for installing LATCH-equipped child seats.
There are two lower anchorages located at the back of the seat
cushion where it meets the seatback and one top tether
anchorage located behind the seating position. These anchor-
ages are used to install LATCH-equipped child seats without
using the vehicle’s seat belts. Some seating positions may have
a top tether anchorage but no lower anchorages. In these

seating positions, the seat belt must be used with the top tether
anchorage to install the child restraint. Please see the following
table for more information.

LATCH Positions For Installing Child Restraints In
This Vehicle

LATCH Label

LATCH Positions

Lower Anchorage Symbol (2 Anchorages Per Seating Position)
Top Tether Anchorage Symbol

138

SAFETY

-------------------------------------------------------------------------------------------------------------------------------------------------------------

Frequently Asked Questions About Installing Child Restraints With LATCH

What is the weight limit

(child’s weight + weight of

the child restraint) for us-

ing the LATCH anchorage

system to attach the child

restraint?

65 lbs

(29.5 kg)

Use the LATCH anchorage system until the combined weight of the
child and the child restraint is 65 lbs (29.5 kg). Use the seat belt and

tether anchor instead of the LATCH anchorage system once the com-

bined weight is more than 65 lbs (29.5 kg).

Can the LATCH anchor-

ages and the seat belt be

used together to attach a

rear-facing or forward-

facing child restraint?

No

Do not use the seat belt when you use the LATCH anchorage system to

attach a rear-facing or forward-facing child restraint.

Booster seats may be attached to the LATCH anchorages if allowed by

the booster seat manufacturer. See your booster seat owner’s manual for

more information.

Can two child restraints be

attached using a common

lower LATCH anchorage?

No

Never “share” a LATCH anchorage with two or more child restraints. If

the center position does not have dedicated LATCH lower anchorages,

use the seat belt to install a child seat in the center position next to a

child seat using the LATCH anchorages in an outboard position.

Can the rear-facing child

restraint touch the back of

the front passenger seat?

Yes

The child seat may touch the back of the front passenger seat if the

child restraint manufacturer also allows contact. See your child restraint

owner’s manual for more information.

Can the head restraints be

removed?

Yes

Head restraints are removable in all seating positions.

5

SAFETY

139

-------------------------------------------------------------------------------------------------------------------------------------------------------------

Locating The LATCH Anchorages

The lower anchorages are round bars that are

found at the rear of the seat cushion where it
meets the seatback, below the anchorage sym-
bols on the seatback. They are just visible when

you lean into the rear seat to install the child restraint. You
will easily feel them if you run your finger along the gap
between the seatback and seat cushion.

Locating The Upper Tether Anchorages

There are tether strap anchorages behind each
rear seating position located on the back of the
seat.

LATCH-compatible child restraint systems will be
equipped with a rigid bar or a flexible strap on each side.
Each will have a hook or connector to attach to the lower
anchorage and a way to tighten the connection to the
anchorage. Forward-facing child restraints and some rear-
facing child restraints will also be equipped with a tether

LATCH Lower Anchorages

Rear Seat Tether Strap Mounting

140

SAFETY

-------------------------------------------------------------------------------------------------------------------------------------------------------------

strap. The tether strap will have a hook at the end to attach
to the top tether anchorage and a way to tighten the strap
after it is attached to the anchorage.

Center Seat LATCH

WARNING!

This vehicle does not have a center seating position.
Do not use the center lower LATCH anchorages to
install a child seat in the center of the back seat.

Always follow the directions of the child restraint manu-
facturer when installing your child restraint. Not all child
restraint systems will be installed as described here.

To Install A LATCH-Compatible Child Restraint

If the selected seating position has a Switchable Automatic
Locking Retractor (ALR) seat belt, stow the seat belt,
following the instructions below. See the section “Installing
Child Restraints Using the Vehicle Seat Belt” to check what
type of seat belt each seating position has.

1. Loosen the adjusters on the lower straps and on the

tether strap of the child seat so that you can more easily
attach the hooks or connectors to the vehicle anchor-
ages.

2. Place the child seat between the lower anchorages for

that seating position. For some second row seats, you
may need to recline the seat and / or raise the head
restraint to get a better fit. If the rear seat can be moved
forward and rearward in the vehicle, you may wish to
move it to its rear-most position to make room for the
child seat. You may also move the front seat forward to
allow more room for the child seat.

3. Attach the lower hooks or connectors of the child

restraint to the lower anchorages in the selected seating
position.

4. If the child restraint has a tether strap, connect it to the

top tether anchorage. See the section “Installing Child
Restraints Using the Top Tether Anchorage” for direc-
tions to attach a tether anchor.

5. Tighten all of the straps as you push the child restraint

rearward and downward into the seat. Remove slack in
the straps according to the child restraint manufactur-
er’s instructions.

6. Test that the child restraint is installed tightly by pulling

back and forth on the child seat at the belt path. It
should not move more than 1 inch (25.4 mm) in any
direction.

5

SAFETY

141

-------------------------------------------------------------------------------------------------------------------------------------------------------------

How To Stow An Unused Switchable-ALR (ALR)
Seat Belt:

When using the LATCH attaching system to install a child
restraint, stow all ALR seat belts that are not being used by
other occupants or being used to secure child restraints. An
unused belt could injure a child if they play with it and
accidentally lock the seat belt retractor. Before installing a
child restraint using the LATCH system, buckle the seat
belt behind the child restraint and out of the child’s reach.
If the buckled seat belt interferes with the child restraint
installation, instead of buckling it behind the child re-
straint, route the seat belt through the child restraint belt
path and then buckle it. Do not lock the seat belt. Remind
all children in the vehicle that the seat belts are not toys and
that they should not play with them.

WARNING!

• Improper installation of a child restraint to the

LATCH anchorages can lead to failure of the re-
straint. The child could be badly injured or killed.
Follow the child restraint manufacturer’s directions
exactly when installing an infant or child restraint.

(Continued)

WARNING! (Continued)

• Child restraint anchorages are designed to withstand

only those loads imposed by correctly-fitted child
restraints. Under no circumstances are they to be
used for adult seat belts, harnesses, or for attaching
other items or equipment to the vehicle.

Installing Child Restraints Using The Vehicle Seat
Belt

Child restraint systems are designed to be secured in
vehicle seats by lap belts or the lap belt portion of a
lap/shoulder belt.

WARNING!

• Improper installation or failure to properly secure a

child restraint can lead to failure of the restraint. The
child could be badly injured or killed.

• Follow the child restraint manufacturer’s directions

exactly when installing an infant or child restraint.

142

SAFETY

-------------------------------------------------------------------------------------------------------------------------------------------------------------

The seat belts in the passenger seating positions are
equipped with a Switchable Automatic Locking Retractor
(ALR) that is designed to keep the lap portion of the seat
belt tight around the child restraint so that it is not
necessary to use a locking clip. The ALR retractor can be
“switched” into a locked mode by pulling all of the
webbing out of the retractor and then letting the webbing
retract back into the retractor. If it is locked, the ALR will
make a clicking noise while the webbing is pulled back into
the retractor. Refer to the “Automatic Locking Mode”
description in “Switchable Automatic Locking Retractors
(ALR)” under “Occupant Restraint Systems” for additional
information on ALR.

Please see the table below and the following sections for
more information.

Lap/Shoulder Belt Systems For Installing Child
Restraints In This Vehicle

Automatic Locking Retractor (ALR) Locations

• ALR = Switchable Automatic Locking Retractor

Top Tether Anchorage Symbol

5

SAFETY

143

-------------------------------------------------------------------------------------------------------------------------------------------------------------

Frequently Asked Questions About Installing Child Restraints With Seat Belts

What is the weight limit (child’s weight +

weight of the child restraint) for using the

Tether Anchor with the seat belt to attach a

forward facing child restraint?

Weight limit of the

Child Restraint

Always use the tether anchor when using the

seat belt to install a forward facing child re-

straint, up to the recommended weight limit

of the child restraint.

Can the rear-facing child restraint touch the

back of the front passenger seat?

Yes

Contact between the front passenger seat and

the child restraint is allowed, if the child re-

straint manufacturer also allows contact.

Can the head restraints be removed?

Yes

Yes, all may be removed.

Can the buckle stalk be twisted to tighten the

seat belt against the belt path of the child

restraint?

No

Do not twist the buckle stalk in a seating po-

sition with an ALR retractor.

Installing A Child Restraint With A Switchable
Automatic Locking Retractor (ALR):

Child restraint systems are designed to be secured in
vehicle seats by lap belts or the lap belt portion of a
lap/shoulder belt.

WARNING!

• Improper installation or failure to properly secure a

child restraint can lead to failure of the restraint. The
child could be badly injured or killed.

• Follow the child restraint manufacturer’s directions

exactly when installing an infant or child restraint.

144

SAFETY

-------------------------------------------------------------------------------------------------------------------------------------------------------------

1. Place the child seat in the center of the seating position.

For some second row seats, you may need to recline the
seat and/or raise the head restraint to get a better fit. If
the rear seat can be moved forward and rearward in the
vehicle, you may wish to move it to its rear-most
position to make room for the child seat. You may also
move the front seat forward to allow more room for the
child seat.

2. Pull enough of the seat belt webbing from the retractor

to pass it through the belt path of the child restraint. Do
not twist the belt webbing in the belt path.

3. Slide the latch plate into the buckle until you hear a

“click.”

4. Pull on the webbing to make the lap portion tight

against the child seat.

5. To lock the seat belt, pull down on the shoulder part of

the belt until you have pulled all the seat belt webbing
out of the retractor. Then, allow the webbing to retract
back into the retractor. As the webbing retracts, you will
hear a clicking sound. This means the seat belt is now in
the Automatic Locking mode.

6. Try to pull the webbing out of the retractor. If it is

locked, you should not be able to pull out any webbing.
If the retractor is not locked, repeat step 5.

7. Finally, pull up on any excess webbing to tighten the lap

portion around the child restraint while you push the
child restraint rearward and downward into the vehicle
seat.

8. If the child restraint has a top tether strap and the

seating position has a top tether anchorage, connect the
tether strap to the anchorage and tighten the tether
strap. See the section “Installing Child Restraints Using
the Top Tether Anchorage” for directions to attach a
tether anchor.

9. Test that the child restraint is installed tightly by pulling

back and forth on the child seat at the belt path. It
should not move more than 1 inch (25.4 mm) in any
direction.

Any seat belt system will loosen with time, so check the
belt occasionally, and pull it tight if necessary.

5

SAFETY

145

-------------------------------------------------------------------------------------------------------------------------------------------------------------

Installing Child Restraints Using The Top Tether
Anchorage

WARNING!

Do not attach a tether strap for a rear-facing car seat to
any location in front of the car seat, including the seat
frame or a tether anchorage. Only attach the tether
strap of a rear-facing car seat to the tether anchorage
that is approved for that seating position, located
behind the top of the vehicle seat. See the section
“Lower Anchors and Tethers for CHildren (LATCH)
Restraint System” for the location of approved tether
anchorages in your vehicle.

1. Look behind the seating position where you plan to

install the child restraint to find the tether anchorage.
You may need to move the seat forward to provide
better access to the tether anchorage. If there is no top
tether anchorage for that seating position, move the
child restraint to another position in the vehicle if one is
available.

2. Route the tether strap to provide the most direct path for

the strap between the anchor and the child seat. If your
vehicle is equipped with adjustable rear head restraints,
raise the head restraint, and where possible, route the
tether strap under the head restraint and between the
two posts. If not possible, lower the head restraint and
pass the tether strap around the outboard side of the
head restraint.

3. Attach the tether strap hook of the child restraint to the

top tether anchorage as shown in the diagram.

146

SAFETY

-------------------------------------------------------------------------------------------------------------------------------------------------------------

4. Remove slack in the tether strap according to the child

restraint manufacturer’s instructions.

WARNING!

• An incorrectly anchored tether strap could lead to

increased head motion and possible injury to the
child. Use only the anchorage position directly be-
hind the child seat to secure a child restraint top
tether strap.

(Continued)

WARNING! (Continued)

• If your vehicle is equipped with a split rear seat,

make sure the tether strap does not slip into the
opening between the seatbacks as you remove slack
in the strap.

Transporting Pets

Air Bags deploying in the front seat could harm your pet.
An unrestrained pet will be thrown about and possibly
injured, or injure a passenger during panic braking or in a
collision.

Pets should be restrained in the rear seat in pet harnesses or
pet carriers that are secured by seat belts.

Rear Seat Tether Strap Mounting

5

SAFETY

147

-------------------------------------------------------------------------------------------------------------------------------------------------------------

SAFETY TIPS

Transporting Passengers

NEVER TRANSPORT PASSENGERS IN THE CARGO
AREA.

WARNING!

• Do not leave children or animals inside parked

vehicles in hot weather. Interior heat build-up may
cause serious injury or death.

• It is extremely dangerous to ride in a cargo area,

inside or outside of a vehicle. In a collision, people
riding in these areas are more likely to be seriously
injured or killed.

• Do not allow people to ride in any area of your

vehicle that is not equipped with seats and seat belts.

• Be sure everyone in your vehicle is in a seat and

using a seat belt properly.

Safety Checks You Should Make Inside The Vehicle

Seat Belts

Inspect the seat belt system periodically, checking for cuts,
frays, and loose parts. Damaged parts must be replaced
immediately. Do not disassemble or modify the system.

Front seat belt assemblies must be replaced after a collision.
Rear seat belt assemblies must be replaced after a collision
if they have been damaged (i.e., bent retractor, torn web-
bing, etc.). If there is any question regarding seat belt or
retractor condition, replace the seat belt.

Air Bag Warning Light

The Air Bag warning light

will turn on for four to

eight seconds as a bulb check when the ignition switch
is first turned to ON/RUN. If the light is either not on
during starting, stays on, or turns on while driving,
have the system inspected at your authorized dealer as
soon as possible. After the bulb check, this light will
illuminate with a single chime when a fault with the Air
Bag System has been detected. It will stay on until the
fault is removed. If the light comes on intermittently or
remains on while driving, have your authorized dealer
service the vehicle immediately. Refer to “Occupant
Restraint Systems” in “Safety” for further information.

Defroster

Check operation by selecting the defrost mode and place the
blower control on high speed. You should be able to feel the air
directed against the windshield. See your authorized dealer
for service if your defroster is inoperable.

148

SAFETY

-------------------------------------------------------------------------------------------------------------------------------------------------------------

Floor Mat Safety Information

Always use floor mats designed to fit your vehicle. Only use a
floor mat that does not interfere with the operation of the
accelerator, brake or clutch pedals. Only use a floor mat that is
securely attached using the floor mat fasteners so it cannot slip
out of position and interfere with the accelerator, brake or clutch
pedals or impair safe operation of your vehicle in other ways.

WARNING!

An improperly attached, damaged, folded, or stacked
floor mat, or damaged floor mat fasteners may cause
your floor mat to interfere with the accelerator, brake,
or clutch pedals and cause a loss of vehicle control. To
prevent SERIOUS INJURY or DEATH:
• ALWAYS securely attach

your floor mat using the

floor mat fasteners. DO NOT install your floor mat
upside down or turn your floor mat over. Lightly pull
to confirm mat is secured using the floor mat fasten-
ers on a regular basis.

• ALWAYS REMOVE THE EXISTING FLOOR MAT

FROM THE VEHICLE

before installing any other

floor mat. NEVER install or stack an additional floor
mat on top of an existing floor mat.

(Continued)

WARNING! (Continued)

• ONLY install floor mats designed to fit your vehicle.

NEVER install a floor mat that cannot be properly
attached and secured to your vehicle. If a floor mat
needs to be replaced, only use a FCA approved floor
mat for the specific make, model, and year of your
vehicle.

• ONLY use the driver’s side floor mat on the driver’s

side floor area. To check for interference, with the
vehicle properly parked with the engine off, fully
depress the accelerator, the brake, and the clutch
pedal (if present) to check for interference. If your
floor mat interferes with the operation of any pedal,
or is not secure to the floor, remove the floor mat
from the vehicle and place the floor mat in your
trunk.

• ONLY use the passenger’s side floor mat on the

passenger’s side floor area.

• ALWAYS make sure objects cannot fall or slide into

the driver’s side floor area when the vehicle is
moving. Objects can become trapped under accelera-
tor, brake, or clutch pedals and could cause a loss of
vehicle control.

(Continued)

5

SAFETY

149

-------------------------------------------------------------------------------------------------------------------------------------------------------------

WARNING! (Continued)

• NEVER place any objects under the floor mat (e.g.,

towels, keys, etc.). These objects could change the
position of the floor mat and may cause interference
with the accelerator, brake, or clutch pedals.

• If the vehicle carpet has been removed and re-

installed, always properly attach carpet to the floor
and check the floor mat fasteners are secure to the
vehicle carpet. Fully depress each pedal to check for
interference with the accelerator, brake, or clutch
pedals then re-install the floor mats.

• It is recommended to only use mild soap and water

to clean your floor mats. After cleaning, always check
your floor mat has been properly installed and is
secured to your vehicle using the floor mat fasteners
by lightly pulling mat.

Periodic Safety Checks You Should Make Outside
The Vehicle

Tires

Examine tires for excessive tread wear and uneven wear
patterns. Check for stones, nails, glass, or other objects
lodged in the tread or sidewall. Inspect the tread for cuts
and cracks. Inspect sidewalls for cuts, cracks, and bulges.
Check the wheel nuts for tightness. Check the tires (includ-
ing spare) for proper cold inflation pressure.

Lights

Have someone observe the operation of brake lights and
exterior lights while you work the controls. Check turn
signal and high beam indicator lights on the instrument
panel.

Door Latches

Check for proper closing, latching, and locking.

Fluid Leaks

Check area under vehicle after overnight parking for
coolant or other fluid leaks. If fluid leaks are suspected, the
cause should be located and corrected immediately.

150

SAFETY

-------------------------------------------------------------------------------------------------------------------------------------------------------------

STARTING AND OPERATING

CONTENTS

䡵 STARTING PROCEDURES . . . . . . . . . . . . . . . . .153

▫ Single-Speed Transmission . . . . . . . . . . . . . . . .153
▫ Normal Starting . . . . . . . . . . . . . . . . . . . . . . . .153

䡵 PARKING BRAKE . . . . . . . . . . . . . . . . . . . . . . .154
䡵 SINGLE–SPEED TRANSMISSION . . . . . . . . . . . .155

▫ Key Ignition Park Interlock . . . . . . . . . . . . . . . .157
▫ Gear Ranges . . . . . . . . . . . . . . . . . . . . . . . . . .157
▫ Auto Park . . . . . . . . . . . . . . . . . . . . . . . . . . . .159

䡵 POWER STEERING . . . . . . . . . . . . . . . . . . . . . .160
䡵 SPEED CONTROL . . . . . . . . . . . . . . . . . . . . . . .161

▫ To Activate . . . . . . . . . . . . . . . . . . . . . . . . . . .162
▫ To Set A Desired Speed. . . . . . . . . . . . . . . . . . .162
▫ To Vary The Speed Setting . . . . . . . . . . . . . . . .162
▫ To Accelerate For Passing . . . . . . . . . . . . . . . . .163

▫ To Resume Speed . . . . . . . . . . . . . . . . . . . . . .164
▫ To Deactivate . . . . . . . . . . . . . . . . . . . . . . . . .164

䡵 REAR PARK ASSIST . . . . . . . . . . . . . . . . . . . . . .164

▫ Rear Park Assist Sensors . . . . . . . . . . . . . . . . . .164
▫ Rear Park Assist Audible Alerts. . . . . . . . . . . . .164
▫ Failure Indications . . . . . . . . . . . . . . . . . . . . . .165
▫ Cleaning The Rear Park Assist System . . . . . . . .166
▫ Park Assist System Usage Precautions . . . . . . . .166

䡵 PARKVIEW REAR BACK UP CAMERA . . . . . . . .167
䡵 VEHICLE LOADING . . . . . . . . . . . . . . . . . . . . .169

▫ Certification Label . . . . . . . . . . . . . . . . . . . . . .169

䡵 TRAILER TOWING . . . . . . . . . . . . . . . . . . . . . .171
䡵 RECREATIONAL TOWING (BEHIND

MOTORHOME, ETC.) . . . . . . . . . . . . . . . . . . . .171

6

-------------------------------------------------------------------------------------------------------------------------------------------------------------

-------------------------------------------------------------------------------------------------------------------------------------------------------------


Content      ..     7      8      9      10     ..