HM484Q Engine. Manual - part 18


  Index      FAW     HM484Q Engine (Haima 7) - service manual


Search            


Content   ..  16  17  18  19   ..


HM484Q Engine. Manual - part 18


Flywheel and clutch 

63 

replacement. 

Remove the oil seal by use of a screwdriver wrapped with protective cloth. 


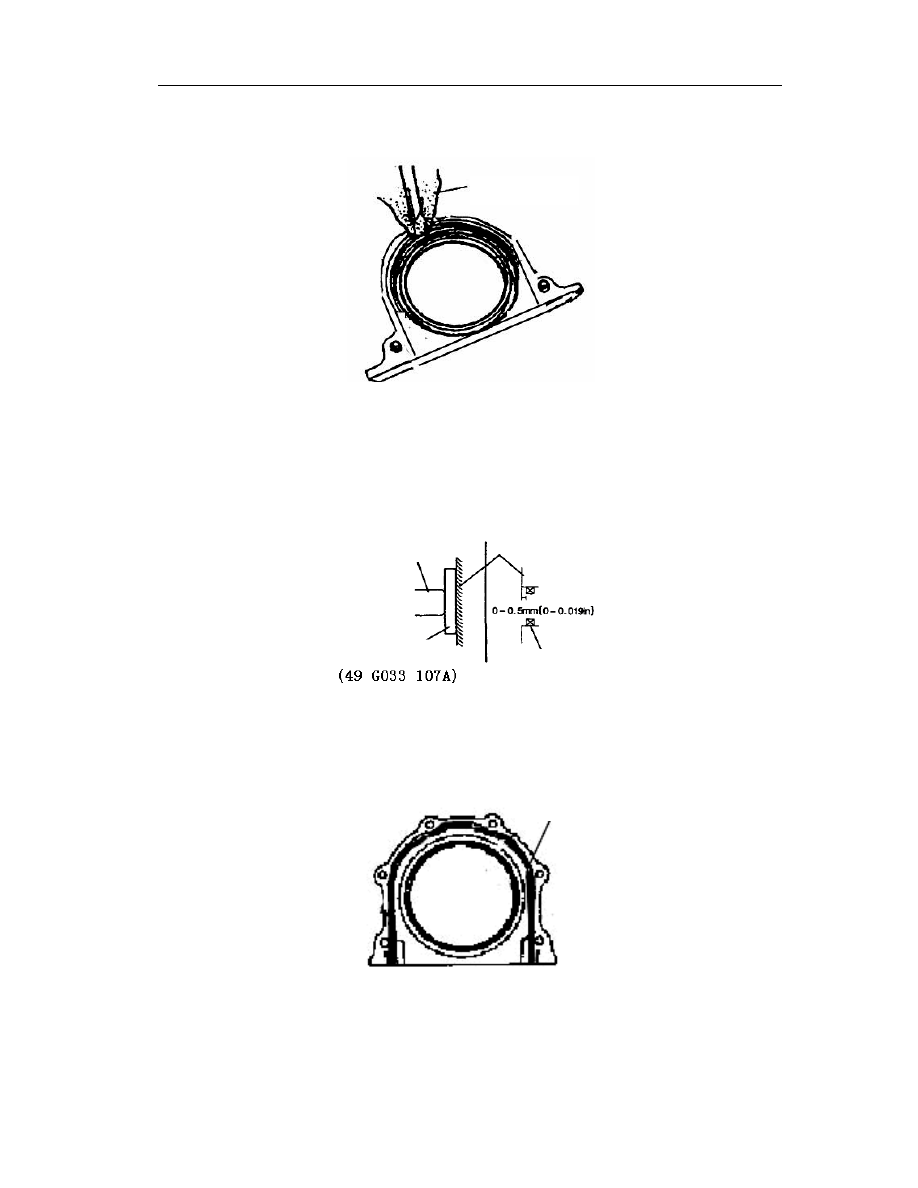
Assembly instructions of rear oil seal  

1.  Add clean oil on the oil seal. 

2.  Fit the oil seal with hands. 

3.  Use a special tool and hammer to press in the seal. 


Press depth: 0~0.5mm{0~0.019in} 


Assembly instructions of crankshaft rear cover 

1.  As shown in Fig., smear evenly the sealant in the groove of crankshaft rear cover. 


Sealant diameter: 

Φ1.5~2.5mm{0.06~0.10in} 


2.  Fit the crankshaft rear cover. 

Assembly instructions of flywheel 

1.  Fit the flywheel on the crankshaft. 

Protective cloth 

Hammer 

Rear cover 

Rear oil seal 

Dustproof cover installer 

Sealant coating 

Flywheel and clutch 

64 

2.  Prior to the installation, clean the bolt threads and hole. As shown in the following Fig., 

smear evenly the sealant on the threads. 

Attention 

l  It is unnecessary to smear sealant when a new bolt is used 


3.  Pre-tighten manually the flywheel bolt. 

4.  Fit the special tools on the flywheel (as shown in Fig.). 

5.  Gradually tighten the flywheel bolt according to criss cross order (as shown in Fig.). 


Assembly instructions of pilot bearing 

Attention 

l  Fit the pilot bearing as per the following instructions. 

Mounting depth of pilot bearing: 0~0.4mm{0~0.115in} 


Use as special tool (as shown in Fig.) to install a new pilot bearing. 

It is necessary to smear sealant 

when the bolt is reused. 

Gear ring fixture component 

Flywheel 

Guide bearing 

Flywheel and clutch 

65 


Assembly instructions of clutch disc plate 

Use as special tool (as shown in Fig.) to hold the position of clutch disc plate. 


Assembly instructions of clutch compressing disc 

1.  Use a special tool to jam the flywheel and localize the clutch (as shown in Fig.). 

2.  Evenly tighten the bolts according to criss cross order (as shown in Fig.) 


Check of clutch compressing disc 

1.  Measure the wear of diaphragm spring. 

l  If the standard exceeded, the clutch compressing disc shall be replaced. 


Depth: 

≤0.6mm {0.024in} 

Sleeve mounting device 

Clutch disc positioning tool 

Gear ring fixture component 

Handle 

Clutch disc positioning tool 
 

Flywheel and clutch 

66 


2.  Use as knife straight edge and feeler to measure the flatness of press disc. 

l  If the standard exceeded, the clutch assembly shall be replaced. 


Max. clearance: 0.05mm {0.0019in} 


3.  Fit the dial gauge on the cylinder block, turn the flywheel to check the radius run-out of 

diaphragm spring. 

l  If the standard exceeded, the clutch compressing disc shall be replaced. 


Radical run-out: 

≤0.6mm {0.024in} 


Content   ..  16  17  18  19   ..