Dodge Stratus (2006 year). Manual - part 14


  Index      Dodge     Dodge Stratus (2006 year) - manual in english


Search            copyright infringement  


Content      ..     12      13      14      15     ..


Dodge Stratus (2006 year). Manual - part 14


NOTE:

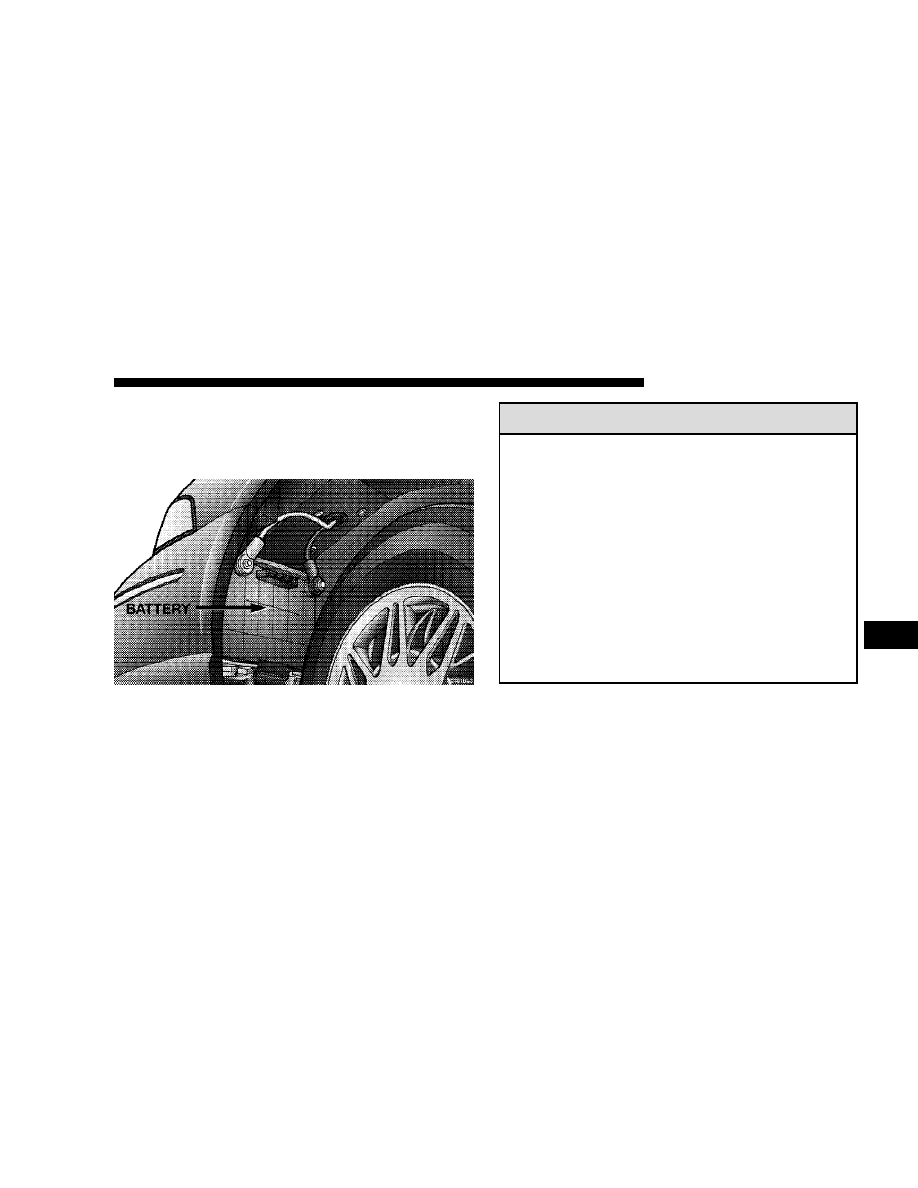
The battery is stored in a compartment behind

the left front fender and is accessible without removing
the tire and wheel. Remote battery terminals are located
in the engine compartment for jump starting.

To access the battery, turn the steering wheel fully to the
right and remove the inner fender shield.

WARNING!

Battery posts, terminals and related accessories con-
tain lead and lead compounds. Wash hands after
handling. Battery fluid is a corrosive acid solution
and can burn or even blind you. Don’t allow battery
fluid to contact your eyes, skin or clothing. Don’t
lean over a battery when attaching clamps. If acid
splashes in eyes or on skin, flush the area immedi-
ately with large amounts of water. Battery gas is
flammable and explosive. Keep flame or sparks
away from the battery. Don’t use a booster battery or
any other booster source with an output greater than
12 volts. Don’t allow cable clamps to touch each
other.

Battery Location

MAINTAINING YOUR VEHICLE

217

7

-------------------------------------------------------------------------------------------------------------------------------------------------------------

CAUTION!

It is essential when replacing the cables on the
battery that the positive cable is attached to the
positive post and the negative cable is attached to the
negative post. Battery posts are marked positive (+)
and negative (-) and identified on the battery case.
Cable clamps should be tight on the terminal posts
and free of corrosion. Apply grease to posts and
clamps after tightening. If a “fast charger” is used
while the battery is in the vehicle, disconnect both
vehicle battery cables before connecting the charger
to battery. Do not use a “fast charger” to provide
starting voltage as battery damage can result.

Air Conditioner

Check the air conditioning system at the start of the
warm weather season.

NOTE:

If your air conditioning performance seems

lower than expected, check the front of the A/C con-
denser for an accumulation of dirt or insects. Clean with
a gentle water spray from behind the radiator and

through the condenser as required. Fabric front fascia
protectors may reduce air flow to the condenser, reducing
air conditioning performance.

WARNING!

• Use only refrigerants and compressor lubricants

approved by the manufacturer for your air condi-
tioning system. Some unapproved refrigerants are
flammable and can explode, injuring you. Other
unapproved refrigerants or lubricants can cause
the system to fail, requiring costly repairs. Refer
to Section 3 of the Warranty Information book for
further warranty information.

• The air conditioning system contains refrigerant

under high pressure. To avoid risk of personal
injury or damage to the system, adding refrigerant
or any repair requiring lines to be disconnected
should be done by an experienced repairman.

218

MAINTAINING YOUR VEHICLE

-------------------------------------------------------------------------------------------------------------------------------------------------------------

Refrigerant Recovery and Recycling
R-134a Air Conditioning Refrigerant is a hydrofluorocar-
bon (HFC) that is endorsed by the Environmental Pro-
tection Agency and is an ozone-saving product. How-
ever, the manufacturer recommends that air conditioning
service be performed by dealers or other service facilities
using recovery and recycling equipment.

NOTE:

Use only manufacturer approved A/C System

Sealers, Stop Leak Products, Seal Conditioners, Compres-
sor Oil, or Refrigerants.

Power Steering — Fluid Check

Checking the power steering fluid level at a defined
service interval is not required. The fluid should only be
checked if a leak is suspected, abnormal noises are
apparent, and/or the system is not functioning as antici-
pated. Coordinate inspection efforts through a certified
DaimlerChrysler Dealership.

Before removing the reservoir cap, wipe the outside of
the cap and reservoir so that no dirt can fall into the
reservoir.

WARNING!

Fluid level should be checked on a level surface and
with the engine off to prevent injury from moving
parts and to insure accurate fluid level reading. Do
not overfill. Use only manufacturer recommended
power steering fluid, refer to Fluids, Lubricants and
Genuine Parts for correct fluid type.

Power Steering Fluid Reservoir

MAINTAINING YOUR VEHICLE

219

7

-------------------------------------------------------------------------------------------------------------------------------------------------------------

Fluid level should be maintained at the proper level
indicated on the side of the reservoir. If necessary, add
fluid to restore the proper indicated level. With a clean
cloth, wipe any spilled fluid from all surfaces. Refer to
Fluids, Lubricants, and Genuine Parts for correct fluid
type.

Suspension Ball Joints

There are two upper front and rear suspension ball joints.
Inspect these ball joints whenever under vehicle service is
done. If the seals are damaged, the ball joint should be
replaced.

Body Mechanism Lubrication

Locks and all body pivot points, including such items as
seat tracks, doors, liftgate and hood hinges, should be
lubricated periodically to assure quiet, easy operation
and to protect against rust and wear. Prior to the appli-
cation of any lubricant, the parts concerned should be
wiped clean to remove dust and grit; after lubricating
excess oil and grease should be removed. Particular
attention should also be given to hood latching compo-
nents to insure proper function. When performing other

underhood services, the hood latch, release mechanism
and safety catch should be cleaned and lubricated.

Hood Latch
When performing other under hood services, the hood
latch release mechanism and safety catch should be
inspected, cleaned, and lubricated.

It is important to maintain proper lubrication to insure
that the hood mechanisms work properly and safely.
Multi-Purpose Lubricant, NLGI Grade 2, should be ap-
plied sparingly to all pivot and sliding contact areas.

External Lock Cylinders
Lubricate the external lock cylinders twice a year, prefer-
ably in the fall and spring. Apply a small amount of
lubricant, such as Mopar Lock Cylinder Lubricant or
equivalent directly into the lock cylinder (avoid excess
lubricant). Insert the key into the lock cylinder and rotate
from the unlocked to the locked position; without adding
more lubricant. Repeat this procedure three or four times.
Wipe all the lubricant off the key with a clean cloth, to
avoid soiling clothing.

220

MAINTAINING YOUR VEHICLE

-------------------------------------------------------------------------------------------------------------------------------------------------------------

If you use a lubricant that cannot be dispensed directly
into the lock cylinder, apply a small amount of the
lubricant to the key. Insert the key into the lock cylinder,
then proceed as described above, to distribute the lubri-
cant within the lock cylinder. Pay attention to trunk
hinges, especially during cold weather, to ensure ease of
trunk operation.

Other Body Mechanisms
The following body mechanisms should be inspected
and, if necessary, all pivot and sliding contact areas of
these components should be lubricated with the lubricant
specified as follows:

Engine Oil

• Door hinges
• Hood hinges
• Trunk hinges

Smooth White Body Lubricant - Such as Mopar
Spray White Lube or equivalent:

• Hood hinge springs and links
• Lock cylinders
• Parking brake mechanism
• Trunk latches
• Ash tray

Windshield Wiper Blades

Clean the rubber edges of the wiper blades and the
windshield periodically with a sponge or soft cloth and a
mild non abrasive cleaner. This will remove accumula-
tions of salt or road film.

Operation of the wipers on dry glass for long periods
may cause deterioration of the wiper blades. Always use
washer fluid when using the wipers to remove salt or dirt
from a dry windshield. Avoid using the wiper blades to
remove frost or ice from the windshield. Keep the blade
rubber out of contact with petroleum products such as
engine oil, gasoline, etc.

MAINTAINING YOUR VEHICLE

221

7

-------------------------------------------------------------------------------------------------------------------------------------------------------------

Windshield Wiper Blade Replacement

• Lift the wiper arm away from the glass.
• Push the release tab and slide the wiper blade assem-

bly away from the wiper arm. Gently place the wiper
arm on the windshield.

• Install the new blade assembly onto the wiper arm tip

until it locks in place.

Windshield Washers

The fluid reservoir in the engine compartment should be
checked for fluid level at regular intervals. Fill the
reservoir with windshield antifreeze (not radiator anti-
freeze) rated not to freeze at -25°F (-31°C). Operate the
system for a few seconds to flush out the residual water.

WARNING!

Commercially available windshield washer solvents
are flammable. They could ignite and burn you. Care
must be exercised when filling or working around
the washer solution.

Washer Fluid Reservoir

222

MAINTAINING YOUR VEHICLE

-------------------------------------------------------------------------------------------------------------------------------------------------------------

Exhaust System

The best protection against carbon monoxide entry into
the vehicle body is a properly maintained engine exhaust
system.

If you notice a change in the sound of the exhaust system;
or if exhaust fumes can be detected inside the vehicle; or
when the underside or rear of the vehicle is damaged;
have a competent mechanic inspect the complete exhaust
system and adjacent body areas for broken, damaged,
deteriorated, or mispositioned parts. Open seams or
loose connections could permit exhaust fumes to seep
into the passenger compartment. In addition, inspect the
exhaust system each time the vehicle is raised for lubri-
cation or oil change. Replace as required.

WARNING!

Exhaust gases can injure or kill. They contain carbon
monoxide (CO) which is colorless and odorless.
Breathing it can make you unconscious and can
eventually poison you. To avoid breathing CO, fol-
low the preceding safety tips.

Cooling System

WARNING!

• When working near the radiator cooling fan, dis-

connect the fan motor lead or turn the ignition
switch to the OFF position. The fan is controlled
by both the temperature of the engine cooling
system and the pressure in the air conditioning
system and can start at any time the ignition
switch is in the ON position.

• You or others can be badly burned by hot coolant

or steam from your radiator. If you see or hear
steam coming from under the hood, don’t open
the hood until the radiator has had time to cool.
Never try to open a cooling system pressure cap
when the radiator is hot.

Coolant Checks
Check engine coolant (antifreeze) protection every 12
months (before the onset of freezing weather, where
applicable). If coolant is dirty or rusty in appearance, the

MAINTAINING YOUR VEHICLE

223

7

-------------------------------------------------------------------------------------------------------------------------------------------------------------

system should be drained, flushed and refilled with fresh
coolant. Check the front of the radiator for any accumu-
lation of bugs, leaves, etc. If dirty, clean by gently
spraying water from a garden hose vertically down the
face of the condenser.

Check the coolant recovery bottle tubing for brittle rub-
ber, cracking, tears, cuts and tightness of the connection
at the bottle and radiator. Inspect the entire system for
leaks.

Cooling System — Drain, Flush and Refill
At the intervals shown on the Maintenance Schedules,
the system should be drained, flushed and refilled.

If the solution is dirty or contains a considerable amount
of sediment, clean and flush with a reliable cooling
system cleaner. Follow with a thorough rinsing to remove
all deposits and chemicals. Properly dispose of old
antifreeze solution.

Selection Of Coolant
Use only the manufacturer’s recommended coolant, refer
to Fluids, Lubricants and Genuine Parts for correct
coolant type.

CAUTION!

Mixing of coolants other than specified HOAT en-
gine coolants, may result in engine damage and may
decrease corrosion protection. If a non-HOAT cool-
ant is introduced into the cooling system in an
emergency, it should be replaced with the specified
coolant as soon as possible.

Do not use plain water alone or alcohol base engine
coolant (antifreeze) products. Do not use additional
rust inhibitors or antirust products, as they may not
be compatible with the radiator engine coolant and
may plug the radiator.

This vehicle has not been designed for use with
Propylene Glycol based coolants. Use of Propylene
Glycol based coolants is not recommended.

Adding Coolant
Your vehicle has been built with an improved engine
coolant that allows extended maintenance intervals. This
coolant can be used up to 5 Years or 100,000 miles before

224

MAINTAINING YOUR VEHICLE

-------------------------------------------------------------------------------------------------------------------------------------------------------------

replacement. To prevent reducing this extended mainte-
nance period, it is important that you use the same
coolant throughout the life of your vehicle. Please review
these recommendations for using Hybrid Organic Addi-
tive Technology (HOAT) coolant.

When adding coolant, a minimum solution of 50% rec-
ommended Mopar Antifreeze/ Coolant 5 Year/100,000
Mile Formula HOAT (Hybrid Organic Additive Technol-
ogy), or equivalent, in water should be used. Use higher
concentrations (not to exceed 70%) if temperatures below

⫺34°F (⫺37°C ) are anticipated.

Use only high purity water such as distilled or deionized
water when mixing the water/engine coolant solution.
The use of lower quality water will reduce the amount of
corrosion protection in the engine cooling system.

Please note that it is the owner’s responsibility to main-
tain the proper level of protection against freezing ac-
cording to the temperatures occurring in the area where
the vehicle is operated.

NOTE:

Mixing coolant types will decrease the life of the

engine coolant and will require more frequent coolant
changes.

Cooling System Pressure Cap
The cap must be fully tightened to prevent loss of
coolant, and to insure that coolant will return to the
radiator from the coolant recovery bottle.

The cap should be inspected and cleaned if there is any
accumulation of foreign material on the sealing surfaces.

MAINTAINING YOUR VEHICLE

225

7

-------------------------------------------------------------------------------------------------------------------------------------------------------------

WARNING!

• The warning words “DO NOT OPEN HOT” on

the cooling system pressure cap are a safety pre-
caution. Never add coolant when the engine is
overheated. Do not loosen or remove the cap to
cool an overheated engine. Heat causes pressure
to build up in the cooling system. To prevent
scalding or injury, do not remove the pressure cap
while the system is hot or under pressure.

• Do not use a pressure cap other than the one

specified for your vehicle. Personal injury or
engine damage may result.

Disposal of Used Engine Coolant
Used ethylene glycol based engine coolant is a regulated
substance requiring proper disposal. Check with your
local authorities to determine the disposal rules for your
community. To prevent ingestion by animals or children
do not store ethylene glycol based engine coolant in open
containers or allow it to remain in puddles on the

ground. If ingested by a child, contact a physician
immediately. Clean up any ground spills immediately.

Coolant Level
The coolant bottle provides a quick visual method for
determining that the coolant level is adequate. With the
engine off and cold, the level of the coolant in the bottle
should be between the ranges indicated on the bottle.

The radiator normally remains completely full, so there is
no need to remove the radiator cap unless checking for
coolant freeze point or replacing coolant. Advise your
service attendant of this. As long as the engine operating
temperature is satisfactory, the coolant bottle need only
be checked once a month. Heater performance may also
be adversely affected by low coolant levels.

When additional coolant is needed to maintain the
proper level, it should be added to the coolant bottle. Do
not overfill. Special procedures are required when filling
the engine cooling system of the 2.7L Engine. See your
authorized dealer for details.

226

MAINTAINING YOUR VEHICLE

-------------------------------------------------------------------------------------------------------------------------------------------------------------

Points To Remember

NOTE:

When the vehicle is stopped after a few miles (a

few kilometers) of operation, you may observe vapor
coming from the front of the engine compartment. This is
normally a result of moisture from rain, snow, or high
humidity accumulating on the radiator and being vapor-
ized when the thermostat opens, allowing hot coolant to
enter the radiator.

If an examination of your engine compartment shows no
evidence of radiator or hose leaks, the vehicle may be
safely driven. The vapor will soon dissipate.

• Do not overfill the coolant recovery bottle.
• Check coolant freeze point in the radiator and in the

coolant recovery bottle. If antifreeze needs to be
added, contents of coolant recovery bottle must also be
protected against freezing.

• If frequent coolant additions are required, or if the

level in the coolant recovery bottle does not drop when
the engine cools, the cooling system should be pres-
sure tested for leaks.

• Maintain coolant concentration at 50% HOAT engine

coolant (minimum) and distilled water for proper
corrosion protection of your engine which contains
aluminum components.

• Make sure that the radiator and coolant recovery

bottle overflow hoses are not kinked or obstructed.

• Keep the front of the radiator clean. If your vehicle is

equipped with air conditioning, keep the front of the
condenser clean, also.

• Do not change the thermostat for summer or winter

operation. If replacement is ever necessary, install
ONLY the correct type thermostat. Other designs may
result in unsatisfactory coolant performance, poor gas
mileage, and increased emissions.

Hoses and Vacuum/Vapor Harnesses

Inspect surfaces of hoses and nylon tubing for evidence
of heat and mechanical damage. Hard or soft spots,
brittle rubber, cracking, checking, tears, cuts, abrasions,
and excessive swelling indicate deterioration of the rub-
ber.

MAINTAINING YOUR VEHICLE

227

7

-------------------------------------------------------------------------------------------------------------------------------------------------------------

Pay particular attention to those hoses nearest to high
heat sources such as the exhaust manifold. Inspect hose
routing to be sure hoses do not touch any heat source or
moving component that may cause heat damage or
mechanical wear.

Insure nylon tubing in these areas has not melted or
collapsed. Inspect all hose connections such as clamps
and couplings to make sure they are secure and no leaks
are present. Components should be replaced immedi-
ately if there is any evidence of degradation that could
cause failure.

Brakes

In order to assure brake system performance, all brake
system components should be inspected periodically.
Suggested service intervals can be found in section 8.

WARNING!

Riding the brakes can lead to brake failure and
possibly an accident. Driving with your foot resting
or riding on the brake pedal can result in abnormally
high brake temperatures, excessive lining wear, and
possible brake damage. You may not have your full
braking capacity in an emergency.

Brake and Power Steering System Hoses
When servicing the vehicle for scheduled maintenance,
inspect surface of hoses and nylon tubing for evidence of
heat and mechanical damage. Hard and brittle rubber,
cracking, checking, tears, cuts, abrasion, and excessive
swelling suggest deterioration of the rubber. Particular
attention should be made to examining those hose sur-
faces nearest to high heat sources, such as the exhaust
manifold.

Inspect all hose clamps and couplings to make sure they
are secure and no leaks are present.

228

MAINTAINING YOUR VEHICLE

-------------------------------------------------------------------------------------------------------------------------------------------------------------

Insure nylon tubing in these areas has not melted or
collapsed.

NOTE:

Often, fluids such as oil, power steering fluid,

and brake fluid are used during assembly plant opera-
tions to ease the assembly of hoses to couplings. There-
fore, oil wetness at the hose-coupling area is not neces-
sarily an indication of leakage. Actual dripping of hot
fluid when systems are under pressure (during vehicle
operation) should be noted before hose is replaced based
on leakage.

NOTE:

Inspection of brake hoses should be done

whenever the brake system is serviced and every engine
oil change.

WARNING!

Worn brake hoses can burst and cause brake failure.
You could have an accident. If you see any signs of
cracking, scuffing, or worn spots, have the brake
hoses replaced immediately.

Master Cylinder
The fluid level in the master cylinder should be checked
when performing under hood services, or immediately if
the brake system warning lamp shows system failure.

Be sure to clean the top of the master cylinder area before
removing the cap. If necessary, fill brake fluid reservoir to
the top of the fill mark chevron. With disc brakes, fluid
level can be expected to fall as the brake pads wear.
However, low fluid level may be caused by a leak and a
checkup may be needed.

Brake Fluid Reservoir

MAINTAINING YOUR VEHICLE

229

7

-------------------------------------------------------------------------------------------------------------------------------------------------------------

Use only manufacturer’s recommended brake fluid, refer
to Fluids, Lubricants and Genuine Parts for correct fluid
type.

WARNING!

Use of a brake fluid that has a lower initial boiling
point than MOPAR DOT 3 Brake Fluid or that is
unidentified as to DOT FMVSS specification may
result in sudden brake failure during hard or pro-
longed braking. You could have an accident.

WARNING!

Overfilling the brake fluid reservoir can result in
spilling brake fluid on hot engine parts and the
brake fluid catching fire.

Use only brake fluid that has been in a tightly closed
container to avoid contamination from foreign matter.

Do not allow petroleum base fluid to contaminate the
brake fluid as seal damage will result!

Fuel System Hoses

Electronic Fuel Injection high pressure fuel systems are
designed with hoses and clamps which have unique
material characteristics to provide adequate sealing and
resist attack by deteriorated gasoline.

You are urged to use only manufacturer specified hoses
and clamps, or their equivalent in material and specifi-
cation, in any fuel system servicing. It is mandatory to
replace all clamps that have been loosened or removed
during service. Care should be taken in installing new
clamps to insure they are properly torqued.

Automatic Transmission

Your front wheel drive vehicle has a transmission and
differential assembly contained within a single housing.
This is referred to as a “Transaxle.”

230

MAINTAINING YOUR VEHICLE

-------------------------------------------------------------------------------------------------------------------------------------------------------------

Selection of Lubricant
It is important that the proper lubricant is used in the
transmission to assure optimum transmission perfor-
mance. Use only manufacturers recommended transmis-
sion fluid, refer to Fluids, Lubricants and Genuine Parts
for correct fluid type. It is important that the transmission
fluid be maintained at the prescribed level using the
recommended fluid.

CAUTION!

Using a transmission fluid other than the manufac-
turers recommended fluid may cause deterioration
in transmission shift quality and/or torque converter
shudder. Using a transmission fluid other than the
manufacturers recommended fluid will result in
more frequent fluid and filter changes. Refer to
Fluids, Lubricants and Genuine Parts for correct
fluid type.

Procedure For Checking Fluid Level
The fluid level in the automatic transaxle should be
checked whenever the vehicle is serviced. Operation with
an improper fluid level will greatly reduce the life of the
transaxle and of the fluid.

To properly check the automatic transaxle fluid level, the
following procedure must be used:

• The vehicle must be on level ground.
• The engine should be running at curb idle speed for a

minimum of 60 seconds.

• Fully apply parking brake.
• Place the gear selector momentarily in each gear

position ending with the lever in P (PARK).

• Wipe the dipstick clean and reinsert until seated.

Remove dipstick and note reading.

• If the fluid is cold (80°F / 27°C), the reading should be

in the cross hatched area marked “COLD” (between
the lower two holes in the dipstick).

MAINTAINING YOUR VEHICLE

231

7

-------------------------------------------------------------------------------------------------------------------------------------------------------------

• If the fluid is hot (180°F / 82°C), the reading should be

in the cross hatched area marked ”HOT” (between the
upper two holes in the dipstick).

• If the fluid level shows low, add sufficient transmis-

sion fluid to bring to the proper level.

CAUTION!

Do not overfill. Dirt and water in the transaxle can
cause serious damage. To prevent dirt and water
from entering the transaxle after checking or replen-
ishing fluid, make certain that the dipstick cap is
seated properly.

Fluid and Filter Changes
Automatic transmission fluid and filter should be
changed as follows:

Maintenance schedule “A”

— No change necessary.

Maintenance schedule “B”

— Every 60,000 miles (96 000

km) change fluid and filter under the following condi-
tions:

• Police, taxi, limousine, commercial type operation, or

trailer towing where the vehicle is driven regularly for
more than 45 minutes of continuous operation.

NOTE:

Refer to Section 8 of this manual for mainte-

nance schedules.

If the transaxle is disassembled for any reason, the fluid
and filter should be changed.

Special Additives
The manufacture strongly recommends against the addi-
tion of any additives to the transaxle. The only exception
to this policy is the use of special dyes to aid in detecting
fluid leaks. The use of transmission sealers should be
avoided as they may adversely affect seals.

Fluid Level Check
Check the fluid level by removing the fill plug. The fluid
level should be between the bottom of the fill hole and a
point not more than 4.0 mm below the bottom of the hole.
Add fluid, if necessary, to maintain the proper level.

232

MAINTAINING YOUR VEHICLE

-------------------------------------------------------------------------------------------------------------------------------------------------------------


Content      ..     12      13      14      15     ..