Citroën C-Elysée (2022 year). Manual in english - page 4
 

  Index      Manuals     Citroën C-Elysée (2022 year). Manual in english


Search            copyright infringement  


Content      ..     2      3      4      5     ..


Citroën C-Elysée (2022 year). Manual in english - page 4


50

Safety

IL-SU

Seat suitable for the installation of an 

I

sofix 

S

emi-

U

niversal seat which is either:

–  "rearward facing" fitted with a top tether 

or a support leg,

–  "forward facing" fitted with a support 

leg.

For advice on securing of the upper strap, 

refer to the "ISOFIX mountings" section.

X

Seat which is not suitable for the 

installation of an ISOFIX seat of the size 

category indicated.

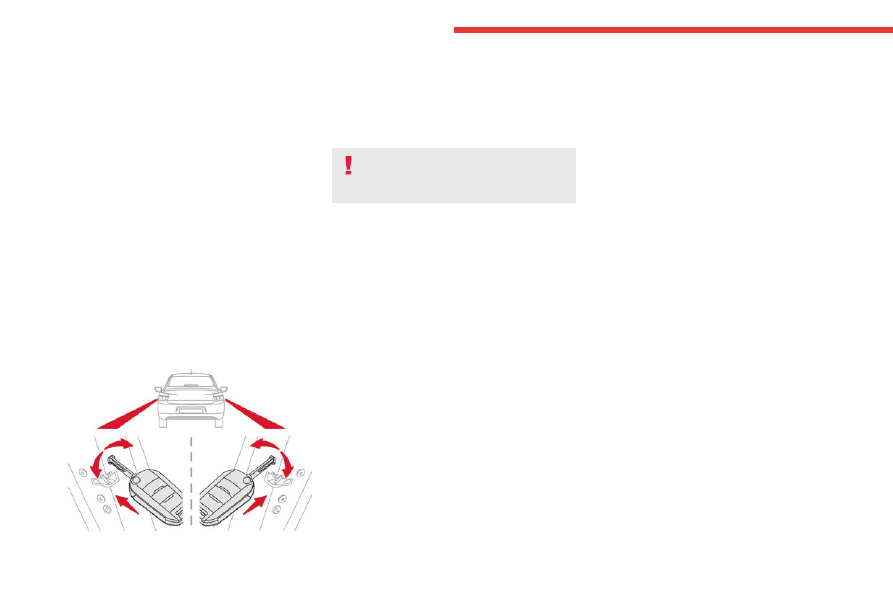
Manual child lock

The system prevents a rear door from being 

opened using its interior handle.

The control is located on the edge of each rear 

door.

Activation/Deactivation


►  To activate the child lock, turn the built-in key 

in the 

red

 control as far as possible:

•  To the right on the left-hand rear door.

•  To the left on the right-hand rear door.

►  To deactivate the child lock, turn the key in 

the opposite direction.

Do not confuse the child lock control, 

which is red, with the back-up locking 

control, which is black.

-------------------------------------------------------------------------------------------------------------------------------------------------------------

51

Driving

6

Driving recommendations

►  Observe the driving regulations and remain 

vigilant whatever the traffic conditions.

►  Monitor your environment and keep your 

hands on the wheel to be able to react to 

anything that may happen any time.

►  Drive smoothly, anticipate the need for 

braking and maintain a longer safety distance, 

especially in bad weather.

►  Stop the vehicle before performing operations 

that require sustained attention (e.g. settings).

►  During long trips, take a break every 2 hours.

Important!

Never leave the engine running in a 

closed space without sufficient 

ventilation.

 Internal combustion engines emit 

toxic exhaust gases such as carbon 

monoxide. Danger of poisoning and death!

In very severe wintry conditions 

(temperature below -23°C), let the engine 

run for 4 minutes before moving off, to ensure 

the correct operation and durability of the 

mechanical components of your vehicle 

(engine and gearbox).

Never drive with the parking brake 

applied

. Risk of overheating and 

damaging the braking system!

Never park the vehicle and never 

leave the engine running on a 

flammable surface (e.g. dry grass, dead 

leaves).

The vehicle exhaust system is very 

hot, even several minutes after the engine 

stops. Risk of fire!

Never drive on surfaces covered with 

vegetation (e.g. tall grass, 

accumulated dead leaves, crops, debris) 

such as a field, a country lane overgrown 

with bushes or a grassy verge.

This vegetation could come into contact with 

the vehicle's exhaust system or other systems 

which are very hot. Risk of fire!

Make sure you do not leave any item in 

the passenger compartment which could 

act like a magnifying glass under the effect of 

the sun's rays and cause a fire. Risk of fire or 

damage to interior surfaces!

Never leave the vehicle unattended, 

with the engine running

. If you have to 

leave your vehicle with the engine running, 

apply the parking brake and put the automatic 

gearbox into position 

N

 or 

P

.

Never leave children inside the vehicle 

unsupervised

.

On flooded roads

We strongly advise against driving on flooded 

roads, as this could cause serious damage to the 

engine or gearbox, as well as to your vehicle's 

electrical systems.


If the vehicle absolutely must drive through a 

flooded section of road:

►  Check that the depth of the water does not 

exceed 15 cm, taking account of waves that 

might be generated by other users.

►  Deactivate the Stop & Start function.

►  Drive as slowly as possible without stalling. In 

all cases, do not exceed 6 mph (10 km/h).

►  Do not stop and do not switch off the engine.

On leaving the flooded road, as soon as safety 

conditions allow, make several light brake 

applications to dry the brake discs and pads.

If in doubt about the state of your vehicle, 

contact a CITROËN dealer or a qualified 

workshop.

-------------------------------------------------------------------------------------------------------------------------------------------------------------

52

Driving

Towing

Driving with a trailer places greater 

demands on the towing vehicle and 

particular care must be taken.

Do not exceed the maximum towable 

weights.

At altitude:

 reduce the maximum load by 

10% per 1,000 metres of altitude; the lower 

air density at high altitudes decreases engine 

performance.

New vehicle:

 do not tow a trailer until the 

vehicle has driven at least 620 miles 

(1,000 kilometres).

If the outside temperature is high, let the 

engine idle for 1 to 2 minutes after the 

vehicle comes to a stop, to help it to cool.

Before setting off

Nose weight

►  Distribute the load in the trailer so that the 

heaviest items are located as close as possible 

to the axle, and the nose weight (at the point 

where it joins your vehicle) approaches the 

maximum permitted, without exceeding it.

Tyres

►  Check the tyre pressures of the towing 

vehicle and of the trailer, observing the 

recommended pressures.

Lighting

►  Check the electrical signalling on the trailer 

and the headlamp beam height of your vehicle.

If a genuine CITROËN towing device is 

used, the rear parking sensors will be 

deactivated automatically to avoid activating 

the audible signal.

When driving

Cooling

Towing a trailer uphill causes the coolant 

temperature to increase. The maximum towable 

load depends on the gradient and the exterior 

temperature. The fan’s cooling capacity does not 

increase with engine speed.

►  Reduce speed and lower the engine speed to 

limit the amount of heating produced.

►  Pay constant attention to the coolant 

temperature.

If this warning lamp and the 

STOP


warning lamp come on, stop the vehicle 

and switch off the engine as soon as possible.

Brakes

Using the engine brake is recommended to limit 

the overheating of the brakes. Braking distances 

are increased when towing a trailer.

Side wind

Bear in mind that the vehicle will be more 

susceptible to wind when towing.

Anti-theft protection

Electronic immobiliser

The remote control contains an electronic chip 

which has a special code. When the ignition is 

switched on, this code must be recognised in 

order for starting to be possible.

A few seconds after switching off the ignition, 

this system locks the engine control system, 

therefore preventing the engine from being 

started in the event of a break-in.

In the event of a fault, you are informed 

by illumination of this warning lamp, an 

audible signal and a message on the screen.

The vehicle will not start; contact a CITROËN 

dealer as soon as possible.

-------------------------------------------------------------------------------------------------------------------------------------------------------------

53

Driving

6

Starting-switching off the 

engine

Key ignition switch


It has 3 positions:

1. Stop

Inserting/removing the key, steering column 

locked.

2. Ignition on

Steering column unlocked, ignition on, 

preheating (Diesel), switching the engine on.

3. Starting

Avoid attaching heavy objects to the key 

or the remote control. This would weigh 

down on its shaft in the ignition switch and 

could cause a malfunction.

Ignition on position

It allows the use of the vehicle's electric 

equipment or the charging of accessories.

Once the state of charge of the battery drops to 

the reserve level, the system switches to energy 

economy mode. The power supply is cut off 

automatically to preserve the remaining battery 

charge.

Avoid attaching heavy objects to the key 

or the remote control, which would weigh 

down on its blade in the ignition switch and 

could cause a malfunction.

Starting the engine

With the parking brake applied:

►  With a 

manual gearbox

, place the gear lever 

in neutral then fully depress the clutch pedal.

►  With an 

automatic gearbox

, place the gear 

selector in mode 

N

 or 

P

 then depress the brake 

pedal.

►  Insert the key into the ignition switch; the 

system recognises the code.

►  Unlock the steering column by simultaneously 

turning the steering wheel and the key.

In certain cases, you may need to apply 

significant force to move the steering 

wheel (e.g. wheels turned to full lock).

►  With a 

petrol engine

, operate the starter 

motor by turning the key to position 

3

 without 

pressing the accelerator pedal, until the engine 

starts. Once the engine has started, release the 

key and allow it to return to position 

2

.

Petrol engines

After a cold start, preheating the catalytic 

converter can cause noticeable engine 

vibrations, for anything up to 2 minutes 

(accelerated idle speed).

►  With a 

Diesel engine

, turn the key to position 

2

, to activate the engine preheating system.

Wait until this warning lamp goes off on 

the instrument panel, then turn the key to 

position 

3

 without pressing the accelerator pedal, 

to operate the starter motor. Once the engine 

has started, release the key and allow it to return 

to position 

2

.

In wintry conditions, the warning lamp 

may stay on for a longer period. When 

the engine is hot, the warning lamp does not 

come on.

In mild conditions, do not leave the engine 

to warm up while stationary, but move off 

straight away and drive at moderate speed.

If the engine does not start straight away, 

switch off the ignition. Wait a few 

seconds before operating the starter motor 

again. If the engine does not start after a few 

attempts, do not keep trying - risk of 

damaging the starter motor and the engine!

Contact a CITROËN dealer or a qualified 

workshop.

-------------------------------------------------------------------------------------------------------------------------------------------------------------

54

Driving

Switching off the engine

►  Immobilise the vehicle.

►  With the engine at idle, turn the key to 

position 

1

.

►  Remove the key from the ignition switch.

►  To lock the steering column, turn the steering 

wheel until it locks.

To facilitate unlocking of the steering 

column, it is recommended that the 

wheels be returned to the straight ahead 

position before switching off the engine.

Never switch off the ignition before the 

complete immobilisation of the vehicle. 

With the engine off, the braking and steering 

assistance systems are also cut off - risk of 

loss of control of the vehicle!

Check that the parking brake is correctly 

applied, particularly on sloping ground.

When leaving the vehicle, keep the key in 

your possession and lock the vehicle.

Energy economy mode

After the engine has stopped (position 

1. Stop

), 

for a maximum combined duration of 30 minutes, 

you can still use functions such as the audio and 

telematics system, courtesy lamps or dipped 

beam headlamps.

For more information on 

Energy 

economy mode

, refer to the 

corresponding section.

Key left in

When the driver's door is opened, a 

message is displayed, accompanied by an 

audible signal, if the key has been left in the 

ignition switch in position 

1

.

If the key has been left in the ignition switch 

in position 

2

, the ignition will be switched off 

automatically after one hour.

To switch the ignition back on, turn the key to 

position 

1

, then back to position 

2

.

Parking brake

Release


►  Pull the parking brake lever up slightly, press 

the release button, then lower the lever fully.

When driving the vehicle, if this warning 

lamp and the 

STOP

 warning lamp come 

on, accompanied by an audible signal and the 

display of a message, this means that the 

parking brake is still applied or has not been fully 

released.

Application

►  Pull the parking brake lever up to immobilise 

the vehicle.

When parking on a slope, turn the 

wheels against the kerb, apply the 

parking brake, engage a gear and switch off 

the ignition.

Hill start assist

(Depending on engine.)

This system keeps the vehicle briefly stationary 

(for approximately 2 seconds) when making a hill 

start, while you transfer your foot from the brake 

pedal to the accelerator pedal.

The system is only active when:

–  The vehicle is completely stationary, with your 

foot on the brake pedal.

–  Certain slope conditions are met.

–  The driver’s door is closed.

Do not leave the vehicle while it is being 

held temporarily by hill start assist.

If someone needs to get out of the vehicle 

with the engine running, apply the parking 

brake manually. Then check that the parking 

brake indicator lamp is on fixed on the 

instrument panel.

-------------------------------------------------------------------------------------------------------------------------------------------------------------

55

Driving

6

The hill start assist function cannot be 

deactivated. However, using the parking 

brake to immobilise the vehicle interrupts its 

operation.

Operation


Facing uphill, with the vehicle stationary, 

the vehicle is held for a short time when the 

driver releases the brake pedal:

–  If first gear or neutral is engaged on a manual 

gearbox.

–  If mode 

D

 or 

M

 is selected on an automatic 

gearbox.


Facing downhill, with the vehicle stationary 

and reverse gear engaged, the vehicle is held 

for a short time when the driver releases the 

brake pedal.

Malfunction

If the event of a malfunction, these 

warning lamps light up on the 

instrument panel, accompanied by the display of 

a message.

Have it checked by a CITROËN dealer or a 

qualified workshop.

5-speed manual gearbox

Engaging reverse gear


►  With the clutch pedal fully depressed, you 

must place the gear lever in neutral.

►  Move the gear lever to the right, then pull it 

back.

Only engage reverse gear when the 

vehicle is stationary with the engine at 

idle.

As a safety precaution and to facilitate 

engine starting:

–  always select neutral,

–  depress the clutch pedal.

6-speed manual gearbox

Engaging 5

th

 or 6

th

 gear

►  Move the gear selector fully to the right to 

engage 5

th

 or 6

th

 gear.

Failure to follow this instruction could 

cause permanent damage to the gearbox 

(inadvertent engagement of 3

rd

 or 4

th

 gear).

Engaging reverse gear


►  Raise the ring under the knob and move the 

gear selector to the left, then forwards.

Only engage reverse gear when the 

vehicle is stationary with the engine at 

idle.

-------------------------------------------------------------------------------------------------------------------------------------------------------------

56

Driving

As a safety precaution and to facilitate 

engine starting:

►  Always select neutral.

►  Press the clutch pedal.

6-speed automatic 

gearbox

6-speed automatic gearbox which offers a choice 

between the comfort of automatic operation or 

manual gear changing.

Two driving modes are available:

– 

Automatic

 operation for electronic 

management of the gears by the gearbox:

•  With the 

Sport

 programme for a more 

dynamic driving style.

•  Or the 

Snow

 programme to improve driving 

in the event of poor grip.*

– 

Manual

 operation for sequential changing of 

the gears by the driver.

* Snow programme: depending on the country of sale.

Gear selector module

1.

Gear selector

2.

Sport

 programme

3.

Snow

 programme

P.

Park

–  Vehicle immobilised, parking brake 

applied or released.

–  Engine starting.

R.

Reverse

–  Reversing manoeuvres, vehicle 

stationary, engine at idle.

N.

Neutral

–  Vehicle immobilised, parking brake 

applied.

–  Engine starting.

D.

Automatic operation

M. +/-

Manual operation

►  To shift up/down through the gears, 

push the control backwards/forwards.

Information displayed on 

the instrument panel

When a position is selected in the grid with the 

gear selector, the corresponding indicator lamp 

lights up on the instrument panel.

P.

Park

R.

Reverse

N.

Neutral

D.

Drive (automatic operation)

S.

Sport

 programme

T

.

Snow

 programme

1...6.

Gear engaged during manual operation

-.

Instruction not accepted during manual 

operation

Foot on the brake

►  Depress the brake pedal when this 

warning lamp is displayed on the 

instrument panel (e.g. when starting the engine).

Starting the vehicle

►  With your foot on the brake pedal, 

select position 

P

 or 

N

.

►  Start the engine.

If the conditions are not met, you will hear an 

audible signal, accompanied by the display of a 

message.

►  With the engine running, depress the brake 

pedal.

-------------------------------------------------------------------------------------------------------------------------------------------------------------

57

Driving

6

►  Release the parking brake.

►  Select position 

R

D

 or 

M

.

►  Gradually release the brake pedal.

The vehicle moves off immediately.

If position 

N

 is selected inadvertently 

while driving, allow the engine to return 

to idle, then select position 

D

 to accelerate.

When the engine is running at idle with 

the brakes released, if position 

R

D

 or 

M


is selected, the vehicle moves off even 

without the accelerator being pressed.

Never leave children unattended in the 

vehicle when the engine is running.

When carrying out maintenance with the 

engine running, apply the parking brake and 

select position 

P

.

Automatic operation

►  Select position 

D

 for 

automatic

 changing of 

the six gears.

The gearbox then operates in auto-adaptive 

mode, without any intervention on the part of the 

driver. It continuously selects the most suitable 

gear according to the driving style, the road 

profile and the load in the vehicle.

For maximum acceleration without touching the 

selector, press the accelerator fully down (kick-

down). The gearbox changes down automatically 

or holds the gear selected until the maximum 

engine speed is reached.

When braking, the gearbox changes down 

automatically to provide effective engine braking.

If you release the accelerator sharply, the 

gearbox will not shift to a higher gear for safety 

reasons.

Never select position 

N

 while the vehicle 

is moving.

Never select positions 

P

 or 

R

 unless the 

vehicle is completely stationary.

Creeping (moving without using the 

accelerator)

This function facilitates manoeuvring of the 

vehicle at low speed (when parking, in traffic 

jams, etc.).

When the engine is at idle, with the parking 

brake released and gear position 

D

M

 or 

R


selected, the 

vehicle begins to creep forward


as soon as you take your foot off the brake pedal 

(even without pressing the accelerator).

As a safety precaution, never leave the 

vehicle with the engine running and the 

doors closed.

"Sport" and "Snow" 

programmes

These two special programmes supplement 

automatic operation in specific conditions of use.

"Sport"

►  Press this button once the engine has 

started.

"

S

"appears on the instrument panel.

The gearbox automatically favours a dynamic 

driving style.

"Snow"

►  Press this button once the engine has 

started.


"

T

" appears on the instrument panel. 

The gearbox adapts to driving on slippery roads.

This programme improves starting and traction 

when grip is poor.

Manual operation

To limit fuel consumption during an 

extended standstill with the engine 

running (for example, in a traffic jam), set the 

gear selector to 

N

 and apply the parking 

brake.

►  Selecting position 

M

 enables sequential 

shifting between the six gears.

►  To shift up/down through the gears, push the 

control forwards/backwards.

The gearbox only changes gear if the vehicle 

speed and engine speed conditions allow; 

otherwise, the rules for automatic operation are 

temporarily applied.

D

 disappears, and the gears engaged appear in 

succession on the instrument panel.

-------------------------------------------------------------------------------------------------------------------------------------------------------------

58

Driving

If the engine speed is too low or too high, the 

selected gear flashes for a few seconds, then the 

gear actually engaged is shown.

It is possible to change from position 

D

 to 

position 

M

 at any time.

When the vehicle is stationary or moving very 

slowly, the gearbox selects gear 

1

 automatically.

The 

Sport

 and 

Snow

 programmes are inactive 

in manual operation.

This symbol is displayed if a gear is not 

engaged correctly (gear selector between 

two positions).

Switching off the vehicle

Before switching off the engine, it is possible to 

engage position 

P

 or 

N

 to place the gearbox in 

neutral.

In both cases, apply the parking brake to 

immobilise the vehicle.

If the gear selector is not in position 

P

when the driver's door is opened or 

approximately 45 seconds after the ignition is 

switched off, an audible signal sounds and a 

message appears.

►  Return the gear selector to 

P

; the audible 

signal stops and the message disappears.

Malfunction

In the event of a malfunction, this warning 

lamp comes on accompanied by an 

audible signal and a message is displayed, when 

the ignition is switched on.

In this case, the gearbox goes into back-up 

mode and is locked in 3

rd

 gear. You may feel a 

significant jolt (without risk to the gearbox) when 

changing from 

P

 to 

R

 and from 

N

 to 

R

.

Do not exceed 62 mph (100 km/h), local speed 

restrictions permitting.

Have it checked by a CITROËN dealer or a 

qualified workshop.

There is a risk of damaging the gearbox:

–  If the accelerator and brake pedals are 

depressed simultaneously.

–  In the event of a battery failure, forcing the 

selector from position 

P

 to another position.

Gear shift indicator

(Depending on engine)

This system is designed to reduce fuel 

consumption by recommending the most suitable 

gear.

Operation

Depending on the driving situation and 

the vehicle's equipment, the system may 

recommend skipping one or more gears.

Gear engagement recommendations are 

not to be considered mandatory. Indeed, the 

configuration of the road, the traffic density and 

safety remain determining factors when choosing 

the best gear. Therefore, the driver remains 

responsible for deciding whether or not to follow 

the system’s advice.

The system cannot be deactivated.

With an automatic gearbox, the system is 

only active in manual operation.

The information appears on the 

instrument panel, in the form of an arrow 

and the recommended gear.

The system adapts the gear change 

instructions according to the driving 

conditions (e.g. slope, load) and driving style 

(e.g. power demand, acceleration, braking).

The system never suggests:

–  engaging first gear.

–  engaging reverse gear.

Stop & Start

The Stop & Start function puts the engine 

temporarily into standby - STOP mode - during 

phases when the vehicle is stationary (e.g. red 

lights, traffic jams). The engine automatically 

restarts - START mode - as soon as the driver 

indicates the intention of moving off again.

Primarily designed for urban use, the function 

is intended to reduce fuel consumption and 

exhaust emissions as well as the noise level 

when stationary.

The function does not affect the functionalities of 

the vehicle, in particular the braking.

-------------------------------------------------------------------------------------------------------------------------------------------------------------

59

Driving

6

Deactivation/Reactivation

The function is 

activated

 by default when the 

ignition is switched on.

To deactivate/reactivate the function:

With the dashboard button


►  Press the button.

A message on the instrument panel confirms the 

change of status.

When the function is deactivated, the orange 

indicator lamp is lit; if the engine was in standby, 

it restarts immediately.

With the touch screen button

The settings are changed via the 

Driving

/

Vehicle

 touch screen 

menu.

A message on the instrument panel confirms the 

change of status.

When the function is deactivated, if the engine 

was in standby, it restarts immediately.

Associated indicator lamp

Function activated: engine on standby 

(STOP mode).

Opening the bonnet

Before doing anything under the bonnet, 

deactivate the Stop & Start system to avoid 

any risk of injury caused by the engine 

restarting automatically.

Driving on flooded roads

Before entering into a flooded area, it is 

strongly recommended that you deactivate 

the Stop & Start system.

For more information on 

Driving 

recommendations

, particularly on flooded 

roads, refer to the corresponding section.

Operation

Main conditions for operation

–  The driver’s door must be closed.

–  The driver's seat belt must be fastened.

–  The level of charge in the battery must be 

sufficient.

–  The temperature of the engine must be within 

its nominal operating range.

–  The outside temperature must be between 

0°C and 35°C.

Putting the engine into standby 

(STOP mode)

The engine automatically enters standby mode 

as soon as the driver indicates their intention to 

stop:

With a 

manual gearbox

: at speeds below 12 

mph (20 km/h) or with the vehicle stationary 

(depending on engine), with the gear lever in 

neutral and the clutch pedal released.

With an 

automatic gearbox

: with the brake 

pedal depressed or the gear selector in 

position 

N

, with the vehicle stationary.

Time counter

A time counter adds up the time spent in standby 

during the journey. It is reset to zero every time 

the ignition is switched on.

Special cases

The engine will not go into standby if the 

conditions for operation are not met and in the 

following cases:

–  Vehicle has not exceeded 6 mph (10 km/h) 

since the last engine start.

–  Needed to maintain a comfortable temperature 

in the passenger compartment.

–  Demisting active.

–  Braking assistance being used.

In these cases, this indicator lamp flashes 

for a few seconds, then goes off.

-------------------------------------------------------------------------------------------------------------------------------------------------------------

60

Driving

After the engine has restarted, STOP 

mode is not available until the vehicle 

has reached a speed of 5 mph (8 km/h).

During parking manoeuvres, STOP mode 

is not available for a few seconds after 

coming out of reverse gear or turning the 

steering wheel.

Restarting the engine (START mode)

The engine automatically restarts as soon as the 

driver indicates the intention of moving off again:

With a manual gearbox

: with the clutch pedal 

fully depressed.

With an automatic gearbox:

–  With the selector in mode 

D

 or 

M

: with the 

brake pedal released.

–  With the selector in mode 

N

 and the brake 

pedal released: with the selector at 

D

 or 

M

.

–  With the selector in mode 

P

 and the brake 

pedal depressed: with the selector at 

R

N

D


or 

M

.

–  With reverse gear engaged.

Special cases

The engine will restart automatically if the 

conditions for operation are met again and in the 

following case:

–  Some specific conditions (braking assistance, 

air conditioning setting, etc.).

In these cases, this indicator lamp flashes 

for a few seconds, then goes off.

Malfunctions

In the event of a system malfunction, the 

warning lamp in this button flashes for a 

moment, then illuminates continuously.

Have it checked by a CITROËN dealer or a 

qualified workshop.

The vehicle stalls in STOP mode

All of the instrument panel warning lamps come 

on if there is a fault.

►  Switch off the ignition then start the engine 

again.

12 V battery

The Stop & Start system requires a 

12 V battery of specific technology and 

specification.

All work must be carried out only by a 

CITROËN dealer or a qualified workshop

Tyre under-inflation 

detection

This system alerts the driver if one or more tyres 

suffer a drop in pressure.

The alert is raised when the vehicle is moving, 

not when stationary.

It compares the information given by the wheel 

speed sensors with 

reference values, which 

must be reinitialised every time the tyre 

pressures are adjusted or a wheel changed

.

It takes into account the last values stored 

during the reinitialisation request. It is therefore 

essential that the tyre pressure is correct during 

the operation. This operation is the driver’s 

responsibility.

The tyre under-inflation detection cannot, 

in any circumstances, replace the need 

for vigilance on the part of the driver.

This system does not avoid the need to 

regularly check the tyre pressures (including 

the spare wheel), especially before a long 

journey.

Driving with under-inflated tyres, particularly 

in adverse conditions (heavy load, high 

speed, long journey):

–  worsens road-holding.

–  lengthens braking distances.

–  causes premature wear of the tyres.

–  increases energy consumption.

The inflation pressures defined for the 

vehicle can be found on the tyre pressure 

label.

For more information on the 

Identification 

markings

, refer to the corresponding section.

Checking tyre pressures

This check should be done monthly 

when the tyres are "cold" (vehicle stopped for 

1 hour or after a journey of less than 6 miles 

(10 km) at moderate speeds).

-------------------------------------------------------------------------------------------------------------------------------------------------------------

61

Driving

6

Otherwise, add 0.3 bar to the pressures 

shown on the label.

Snow chains

The system does not have to be 

reinitialised after fitting or removing snow 

chains.

Under-inflation alert

This is signalled by the fixed illumination 

of this warning lamp, accompanied by an 

audible signal and the display of a message.

►  Reduce speed immediately, avoid excessive 

steering movements and avoid sudden braking.

►  Stop the vehicle as soon as it is safe to do 

so.

The loss of pressure detected may not 

always cause visible deformation of the 

tyre.

Do not rely on just a visual check.

►  Using a compressor, such as the one in 

the temporary puncture repair kit, check the 

pressures of all four tyres when cold.

►  If it is not possible to carry out this check 

immediately, drive carefully at reduced speed.

►  In the event of a puncture, use the 

temporary puncture repair kit or the spare wheel 

(depending on equipment).

Driving too slowly may not ensure 

optimum monitoring.

The alert is not immediately triggered in the 

event of a sudden loss of pressure or tyre 

blow-out. This is because analysis of the 

values read by the wheel's speed sensors 

can take several minutes.

The alert may be delayed at speeds below 

25 mph (40 km/h), or when adopting a sporty 

driving mode.

The alert is kept active until the system is 

reinitialised.

Reinitialisation

►  The system must be reinitialised after any 

adjustment to the pressure of one or more tyres, 

and after changing one or more wheels.

Before reinitialising the system, make 

sure that the pressures of the four tyres 

are correct for the conditions of use of the 

vehicle and conform to the values written on 

the tyre pressure label.

Check the pressures of the four tyres before 

performing the reinitialisation.

The system does not advise if a pressure is 

incorrect at the time of reinitialisation.

Without audio system

►  Open the glove box.


►  Hold this button down.

Reinitialisation is confirmed by a low-pitched 

audible signal.

A high-pitched audible signal indicates that the 

reinitialisation has not been carried out.

The new pressure parameters saved are treated 

as reference values by the system.

With audio system

►  Press the 

MENU

 button for access to the 

main menu.

►  Press the "

7

" or "

8

" button to select the 

"

Personalisation-configuration

" menu and 

confirm by pressing the central button.

►  Press the "

7

" or "

8

" button to select the 

"

Define the vehicle parameters

" menu and 

confirm by pressing the central button.

►  Press the "

7

" or "

8

" button to select the 

"

Driving assistance

" category and confirm by 

pressing the central button.

-------------------------------------------------------------------------------------------------------------------------------------------------------------

62

Driving

►  Press the "

7

" or "

8

" button to select "

Tyre 

pressures"

, then "

Reinitialisation

", then 

confirm by pressing the central button.

A message confirms the reinitialisation.

With touch screen

The request to reinitialise the 

system is made in the 

Driving

/

Vehicle

 menu.

Malfunction

In the event of a malfunction, 

these warning lamps light up on 

the instrument panel.

A message appears, accompanied by an audible 

signal.

In this case, the tyre under-inflation monitoring 

function is no longer performed.

Have it checked by a CITROËN dealer or a 

qualified workshop.

Non-standard or 'space-saver' spare 

wheel

The use of this type of spare wheel may 

suspend tyre pressure monitoring.

In this case, the malfunction warning lamp 

comes on and disappears once the wheel 

has been replaced by one of uniform size (the 

same as the others), the pressure readjusted 

and the reinitialisation carried out.

Driving and manoeuvring 

aids - General 

recommendations

Driving and manoeuvring aids cannot, in 

any circumstances, replace the need for 

vigilance on the part of the driver.

The driver must comply with the Highway 

Code, must remain in control of the vehicle in 

all circumstances and must be able to retake 

control of it at all times. The driver must adapt 

the speed to climatic conditions, traffic and 

the state of the road.

It is the driver's responsibility to constantly 

monitor traffic conditions, assess the distance 

and relative speed of other vehicles, and 

anticipate their manoeuvres before using the 

direction indicator and changing lanes.

These systems do not make it possible to 

exceed the laws of physics.

Driving aids

You should hold the steering wheel with 

both hands, always use the door and interior 

mirrors, always leave your feet close to the 

pedals and take a break every 2 hours.

Manoeuvring aids

The driver must always check the 

surroundings of the vehicle before and during 

the whole manoeuvre, in particular using the 

mirrors.

Other cameras

The images from the camera(s) 

displayed on the touch screen or on the 

instrument panel may be distorted by the 

terrain.

In the presence of areas in shade, or in 

conditions of bright sunlight or inadequate 

lighting, the image may be darkened and with 

lower contrast.

Obstacles may appear further away than they 

actually are.

Sensors

The operation of the sensors, as well as 

any associated functions, may be disrupted 

by noise pollution such as that emitted by 

noisy vehicles and machinery (e.g. lorries, 

pneumatic drills), by the accumulation of 

snow or dead leaves on the road or in the 

event of damaged bumpers and mirrors.

When reverse gear is engaged, an audible 

signal (long beep) indicates that the sensors 

may be dirty.

A front or rear impact to the vehicle can 

upset the sensors’ settings, which is not 

always detected by the system: distance 

measurements may be distorted.

-------------------------------------------------------------------------------------------------------------------------------------------------------------

63

Driving

6

The sensors do not systematically detect 

obstacles that are too low (pavements, studs) 

or too thin (trees, posts, wire fences).

Certain obstacles located in the sensors’ blind 

spots may not be detected or may no longer 

be detected during the manoeuvre.

Certain materials (fabrics) absorb sound 

waves: pedestrians may not be detected.

Maintenance

Clean the bumpers and door mirrors and 

the field of vision of the cameras regularly.

When washing your vehicle at high pressure, 

direct the spray from at least 30 cm away 

from the radar, sensors and cameras.

Mats/Pedal trims

The use of mats or pedal trims not 

approved by CITROËN may interfere with 

the operation of the speed limiter or cruise 

control.

To avoid any risk of jamming the pedals:

–  Ensure that the mat is secured correctly.

–  Never fit one mat on top of another.

Units of speed

Ensure that the units of speed displayed 

on the instrument panel (mph or km/h) are 

those for the country you are driving in.

If this is not the case, when the vehicle is 

stationary, set the display to the required 

units of speed so that it complies with what is 

authorised locally.

In case of doubt, contact a CITROËN dealer 

or a qualified workshop.

Speed limiter

For more information, refer to the 

General recommendations on the use 

of driving and manoeuvring aids

.

This system prevents the vehicle from 

exceeding the speed programmed by the 

driver (speed setting).

The speed limiter is switched on manually.

The minimum speed setting is 19 mph (30 km/h).

The speed setting remains in the system 

memory when the ignition is switched off.

Steering-mounted control


1.

ON (

LIMIT

 position)/OFF (position 

0

)

2.

Reduce the speed setting

3.

Increase the speed setting

4.

Pause/resume speed limiter with the speed 

setting previously stored

Displays in the instrument 

panel


5.

Speed limiter on/off indication

6.

Speed limiter mode selection indication

7.

Programmed speed value

Switching on/Pausing

►  Turn thumbwheel 

1

 to the "

LIMIT

" position 

to select speed limiter mode; the function is 

paused.

►  If the speed limit setting is suitable (most 

recent speed setting programmed in the system), 

press button 

4-II

 to switch the speed limiter on.

-------------------------------------------------------------------------------------------------------------------------------------------------------------

64

Driving

►  Pressing 

4-II

 again temporarily pauses the 

function (pause).

Adjusting the limit speed 

setting

You do not have to switch the speed limiter on in 

order to set the speed.

To modify the limit speed setting based on the 

vehicle’s current speed:

►  For steps of +/- 1 mph (1 km/h), briefly 

press 

2-SET-

 or 

3-SET+

 repeatedly.

►  For steps of +/- 5 mph (5 km/h), press and 

hold 

2-SET-

 or 

3-SET+

.

Temporarily exceeding the 

speed setting

►  Fully depress the accelerator pedal.

The speed limiter is temporarily deactivated and 

the displayed speed setting flashes.

►  Release the accelerator pedal to return to 

below the speed setting.

When exceeding the speed is not due to the 

driver's action (e.g. in case of a steep slope), an 

audible signal is triggered immediately.

On a steep descent or in the event of 

sharp acceleration, the speed limiter will 

not be able to prevent the vehicle from 

exceeding the speed setting.

If necessary, apply the brakes to control your 

vehicle’s speed.

When the vehicle speed returns to the speed 

setting level, the speed limiter operates again: 

the speed setting display becomes fixed again.

Switching off

►  Turn the thumbwheel 

1

 to the "

OFF

" position: 

speed limiter information is no longer displayed.

Malfunction

In the event of a malfunction, dashes are 

displayed flashing and then fixed instead of the 

speed setting.

Have it checked by a CITROËN dealer or a 

qualified workshop.

Cruise control - 

Specific 

recommendations

The cruise control function does not 

guarantee compliance with the maximum 

authorised speed and the safety distance 

between vehicles, the driver remains 

responsible for their driving.

In the interest of public safety, only use cruise 

control if the traffic conditions enable vehicles 

to drive at a steady speed and maintain an 

adequate safety distance.

Remain vigilant while cruise control is 

activated.

 If you press and hold one of the 

speed setting modification buttons, your 

vehicle may change speed very abruptly.

When 

descending a steep hill

, the cruise 

control system cannot prevent the vehicle 

from exceeding the set speed. Brake if 

necessary to control the vehicle speed.

On 

steep climbs

 or when towing, the set 

speed may not be reached or maintained.

Exceeding the programmed speed 

setting

You can 

temporarily

 exceed the speed 

setting by pressing the accelerator pedal (the 

programmed speed flashes).

To return to the speed setting, release the 

accelerator pedal (when the set speed is 

reached again, the displayed speed stops 

flashing).

Operating limits

Never use the system in the following 

situations:

–  In an urban area with the risk of 

pedestrians crossing the road.

–  In heavy traffic (except versions with the 

Stop & Go function).

–  On winding or steep roads.

–  On slippery or flooded roads.

–  In poor weather conditions.

–  In the event of restricted visibility for the 

driver.

–  Driving on a speed circuit.

–  Driving on a rolling road.

-------------------------------------------------------------------------------------------------------------------------------------------------------------

65

Driving

6

–  When using a ‘space-saver’ type spare 

wheel.

–  When using snow chains, non-slip covers 

or studded tyres.

Cruise control

For more information, refer to the 

General recommendations on the use 

of driving and manoeuvring aids

 and the 

Specific recommendations on cruise 

control

.

This system automatically maintains the 

vehicle’s speed at the value programmed 

by the driver (speed setting), without the use of 

the accelerator pedal.

Cruise control is switched on manually.

It requires a minimum vehicle speed of 25 mph 

(40 km/h).

With a manual gearbox, fourth gear must be 

engaged.

With an automatic gearbox, mode 

D

 or second 

gear or higher in mode 

M

 must be engaged.

Cruise control remains active after 

changing gear on engines fitted with a 

manual gearbox and the Stop & Start 

function.

Switching off the ignition cancels any 

speed setting.

Steering-mounted control


1.

ON (

CRUISE

 position)/OFF (position 

0

)

2.

Activate cruise control at the current speed/

decrease speed setting

3.

Activate cruise control at the current speed/

increase speed setting

4.

Pause/resume cruise control with the speed 

setting previously saved

Information displayed on 

the instrument panel


5.

Cruise control pause/resume

6.

Cruise control mode selection

7.

Speed setting value

Switching on/pausing

►  Turn thumbwheel 

1

 to the "

CRUISE

" position 

to select cruise control mode; the function is 

paused.

►  Press button 

2-SET-

 or 

3-SET+

 to activate 

cruise control and save a speed setting when 

the vehicle has reached the desired speed; the 

vehicle’s current speed is saved as the speed 

setting.

►  Release the accelerator pedal.

►  Pressing button 

4-II

 temporarily pauses the 

function (pause).

►  Pressing button 

4-II

 again resumes operation 

of the cruise control (ON).

-------------------------------------------------------------------------------------------------------------------------------------------------------------


Content      ..     2      3      4      5     ..