Citroën C-Elysée (2022 year). Manual in english - page 3
 

  Index      Manuals     Citroën C-Elysée (2022 year). Manual in english


Search            copyright infringement  


Content      ..     1      2      3      4      ..


Citroën C-Elysée (2022 year). Manual in english - page 3


34

Lighting and visibility

If the driver's door is opened, a temporary 

audible signal warns the driver that the lamps 

are on.

The lamps, with the exception of the 

sidelamps, switch off automatically after a 

maximum duration of 30 minutes to avoid 

draining the battery.

They will go off automatically after a period 

of time that depends on the level of charge in 

the battery (entering energy economy mode).

In some weather conditions (e.g. low 

temperature or humidity), misting on the 

internal surface of the glass of the headlamps 

and rear lamps is normal, and will disappear 

after the lamps have been on for a few 

minutes.

Never look too closely at the light beam 

of LED technology lamps - risk of serious 

eye injury!


Travelling abroad

Vehicles equipped with halogen 

headlamps:

If planning to use your vehicle in a country 

that drives on the other side of the road, the 

dipped beam headlamps must be adjusted to 

avoid dazzling oncoming drivers. Contact a 

CITROËN dealer or a qualified workshop.

Daytime running lamps/

Sidelamps

(Depending on version)

These LED lamps at the front of the vehicle light 

up automatically when the engine starts.

They perform the following functions:

–  Daytime running lamps (lighting control stalk 

at position "

0

" with adequate ambient light).

In daytime running lamps mode, the 

diodes are brighter.

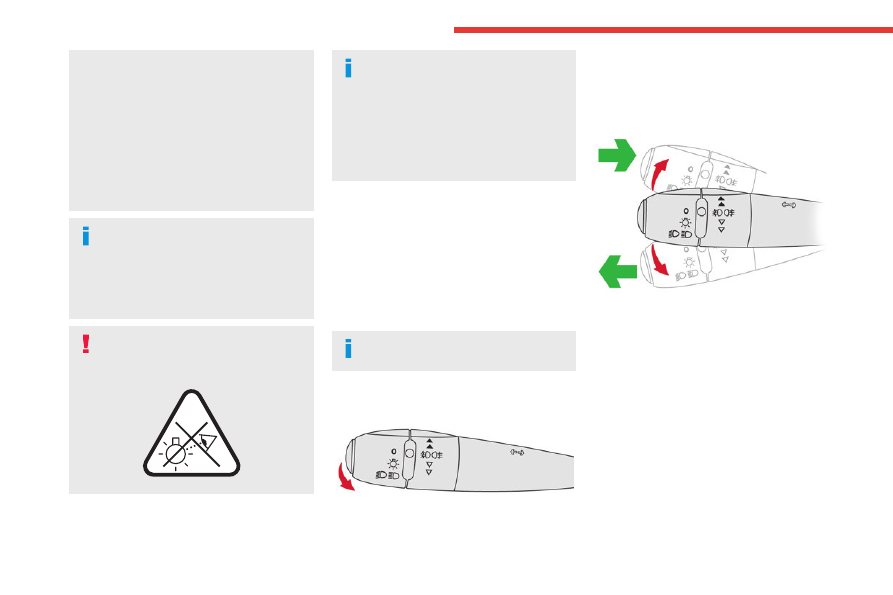
Guide-me-home lighting


►  With the ignition off, pull the lighting control 

stalk toward you ("headlamp flash") to activate/

deactivate the function.

Manual guide-me-home lighting goes off 

automatically after a period of time.

Direction indicators


►  Left or right: lower or raise the lighting control 

stalk, beyond the point of resistance.

Three flashes

►  Press briefly upwards or downwards, without 

going beyond the point of resistance; the 

direction indicators will flash 3 times.

-------------------------------------------------------------------------------------------------------------------------------------------------------------

35

Lighting and visibility

4

Headlamp beam height 

adjustment


To avoid causing a nuisance to other road users, 

the height of the headlamp beams should be 

adjusted according to the load in the vehicle.

0. (Initial adjustment)

Driver only or driver + front passenger

-.

Driver + front passenger + rear passengers

1.

Driver + front passenger + rear passengers + 

load in the boot

-.

Driver + front passenger + rear passengers + 

load in the boot

2.

Driver only + maximum authorised load in 

the boot

Wiper control stalk

Before operating the wipers in wintry 

conditions, clear any snow, ice or frost 

from the windscreen and around the wiper 

arms and blades.

Do not operate the wipers on a dry 

windscreen. In extremely hot or cold 

weather, check that the wiper blades are not 

stuck to the windscreen before operating the 

wipers.

After using an automatic car wash, you 

may temporarily notice abnormal noises 

and poorer wiping performance.  You do not 

need to replace the wiper blades.

Front wipers


Raise or lower the control to the desired position 

to change the wiping speed.

Fast wiping (heavy rain). 

Normal wiping (moderate rain). 

Intermittent wiping (proportional to the 

speed of the vehicle).

Off.


Single wipe (press down and release). 

Windscreen wash

►  Pull the wiper control stalk towards you and 

hold.

The screenwash then the windscreen wipers 

operate for a pre-determined time.

The screenwash jets are not adjustable. 

Do not handle them (risk of damage).

To avoid damaging the wiper blades, do 

not operate the screenwash if the 

screenwash reservoir is empty.

Only operate the screenwash if there is no 

risk of the fluid freezing on the windscreen 

and hindering visibility. During the winter 

period, use "very cold climate" rated products.

Never top up with water.

Special position of the 

windscreen wipers

This maintenance position is used while cleaning 

or replacing the wiper blades. It can also be 

-------------------------------------------------------------------------------------------------------------------------------------------------------------

36

Lighting and visibility

useful, in wintry weather (ice, snow), to release 

the wiper blades from the windscreen.

To maintain the effectiveness of the flat 

wiper blades, it is advisable to:

–  handle them with care.

–  clean them regularly using soapy water.

–  avoid using them to hold cardboard on the 

windscreen.

–  replace them at the first signs of wear.

Before removing a windscreen wiper blade


Operating the wiper control stalk immediately 

after switching off the ignition will place the wiper 

blades in a vertical position.

►  Proceed with the desired operation or the 

replacement of the wiper blades.

After refitting a windscreen wiper blade

►  To return the wiper blades to their initial 

position after the operation, switch on the ignition 

and operate the wiper control stalk.

Changing a wiper blade

Removing/Refitting at the front


►  Carry out these wiper blade replacement 

operations from the driver's side.

►  Starting with the wiper blade farthest from 

you, hold each arm by the rigid section and raise 

it as far as possible.

Take care not to hold the arms at the jet 

locations.

Do not touch the wiper blades - risk of 

irreparable deformation.

Do not release them while moving them. Risk 

of damaging the windscreen!

►  Clean the windscreen using screenwash 

fluid.

Do not apply "Rain X" type water-

repellent products.

►  Unclip the worn wiper blade closest to you 

and remove it.

►  Install the new wiper blade and clip it to the 

arm.

►  Repeat the procedure for the other wiper 

blade.

►  Starting with the wiper blade closest to you, 

once again hold each arm by the rigid section, 

then guide it carefully onto the windscreen.

-------------------------------------------------------------------------------------------------------------------------------------------------------------

37

Safety

5

General safety 

recommendations

Do not remove the labels attached in 

different places on your vehicle. They 

include safety warnings as well as 

identification information for the vehicle.

For all work on your vehicle, use a 

qualified workshop that has the technical 

information, skills and equipment required, all 

of which a CITROËN dealer is able to 

provide.

Depending on country regulations, 

certain safety equipment may be 

mandatory: high visibility safety vests, 

warning triangles, breathalysers, spare bulbs, 

spare fuses, fire extinguisher, first aid kit, mud 

flaps at the rear of the vehicle, etc.

Installing electrical accessories:

–  The fitting of electrical equipment or 

accessories not approved by CITROËN may 

cause excessive current consumption and 

faults and failures with the electrical system 

of your vehicle. Contact a CITROËN dealer 

for information on the range of approved 

accessories.

–  As a safety measure, access to the 

diagnostic socket, used for the vehicle's 

electronic systems, is reserved strictly for 

CITROËN dealers or qualified workshops, 

equipped with the special tools required (risk 

of malfunctions of the vehicle's electronic 

systems that could cause breakdowns or 

serious accidents). The Manufacturer cannot 

be held responsible if this advice is not 

followed.

–  Any modification or adaptation not intended 

or authorised by CITROËN or carried out 

without meeting the technical requirements 

defined by the Manufacturer will result in the 

suspension of the commercial warranty.

Installation of accessory radio 

communication transmitters

Before installing a radio communication 

transmitter with an external aerial, you must 

without fail contact a CITROËN dealer for 

the specification of transmitters which can 

be fitted (frequency, maximum power, aerial 

position, specific installation requirements), 

in line with the Vehicle Electromagnetic 

Compatibility Directive (2004/104/EC).

Declarations of conformity for radio 

equipment

The relevant certificates are available on the 

brand website:

http://service.citroen.com/ACddb/

Hazard warning lamps


►  Pressing this red button causes all the 

direction indicators to flash.

They can work with the ignition switched off.

Automatic operation of 

hazard warning lamps

When braking in an emergency, depending on 

the rate of deceleration, the hazard warning 

lamps come on automatically. They switch off 

automatically when you next accelerate.

They can be switched off by pressing the button.

-------------------------------------------------------------------------------------------------------------------------------------------------------------

38

Safety

Horn


►  Press the central part of the steering wheel.

Electronic stability control 

(ESC)

The electronic stability control programme 

includes the following systems:

–  Anti-lock braking system (ABS) and Electronic 

brake force distribution (EBFD).

–  Emergency braking assistance (EBA).

–  Anti-slip regulation (ASR).

–  Dynamic stability control (DSC).

Anti-lock braking system 

(ABS)/Electronic brake force 

distribution (EBFD)

These systems enhance the vehicle’s stability 

and handling during braking, and enable greater 

control while cornering, particularly on poor or 

slippery road surfaces.

ABS prevents wheel locking in the event of 

emergency braking.

Electronic brake force distribution (EBFD) 

manages overall braking pressure on each 

individual wheel.

► 

When braking in an emergency, depress 

the pedal very firmly and maintain this 

pressure.

Normal operation of the ABS may make 

itself felt by slight vibrations of the brake 

pedal.

The fixed illumination of this warning lamp 

signals that there is a fault with the ABS.

The vehicle retains conventional braking. Drive 

carefully at a moderate speed.

Have it checked by a CITROËN dealer or a 

qualified workshop.

This warning lamp, when lit together with 

the 

STOP

 and ABS warning lamps, 

accompanied by a message and an audible 

signal, indicates an EBFD malfunction.

You must stop the vehicle.

Stop as soon as it is safe to do so and switch off 

the ignition.

Contact a CITROËN dealer or a qualified 

workshop.

When changing wheels (tyres and rims), 

ensure that these are approved for your 

vehicle.

After an impact

Have it checked by a CITROËN dealer or 

a qualified workshop.

Emergency braking 

assistance (EBA)

This system reduces the emergency stopping 

distance, by optimising the braking pressure.

It is triggered in relation to the speed at which 

the brake pedal is depressed. The effect of this 

is a reduction in the resistance of the pedal and 

an increase in braking efficiency.

Anti-slip regulation (ASR) 

/ Dynamic stability control 

(DSC)

Anti-slip regulation (or traction control) optimises 

traction by using engine braking and by applying 

the brakes on the driving wheels to avoid one 

or more wheels spinning. It also enhances the 

vehicle's directional stability.

If there is a difference between the vehicle’s 

trajectory and the path desired by the driver, the 

dynamic stability control system automatically 

uses engine braking and the brakes on one or 

more wheels to return the vehicle to the desired 

path, within the limits of the laws of physics.

These systems are activated automatically every 

time the vehicle is started.

These systems are activated in the event 

of a problem with grip or trajectory 

-------------------------------------------------------------------------------------------------------------------------------------------------------------

39

Safety

5

(confirmed by this warning lamp flashing on the 

instrument panel).

Deactivation / Reactivation

In exceptional conditions (starting a vehicle 

which is bogged down, stuck in snow, on soft 

ground, etc.), it may be advisable to deactivate 

the ASR system, so that the wheels can turn 

freely and regain grip.

Reactivate the system as soon as the level of 

grip permits.


►  Press this button to deactivate / reactivate the 

function.

The button indicator lamp is on when the 

function is deactivated.

Deactivation is confirmed by the 

illumination of this indicator lamp in the 

instrument panel.

The ASR system is reactivated automatically 

every time the ignition is switched back on or 

from 31 mph (50 km/h).

Below 31 mph (50 km/h), you can reactivate it 

manually.

Malfunction

In the event of a malfunction, this warning 

lamp lights up on the instrument panel, 

accompanied by the display of a message and 

an audible signal.

Have it checked by a CITROËN dealer or a 

qualified workshop.

ASR/DSC

These systems enhance safety during 

normal driving, but should not encourage 

the driver to take extra risks or drive at high 

speed.

It is in conditions of reduced grip (rain, snow, 

ice) that the risk of loss of grip increases. It 

is therefore important for your safety to keep 

these systems activated in all conditions, and 

particularly in difficult conditions.

Correct operation of these systems depends 

on compliance with the manufacturer's 

recommendations relating to the wheels 

(tyres and rims), braking and electronic 

components, as well as the assembly and 

repair procedures provided by CITROËN 

dealers.

In order to ensure that these systems remain 

effective in wintry conditions, the use of snow 

or all-season tyres is recommended. All four 

wheels must be fitted with tyres approved for 

your vehicle.

All tyre specifications are listed on the 

tyre/paint label. For more information 

on 

Identification markings

, refer to the 

corresponding section.

Seat belts

Front seat belts

The front seat belts are fitted with a pyrotechnic 

pretensioning system and a force limiting 

system.

This system improves safety in the front seats in 

the event of a front or side impact. 

Depending on the severity of the impact, the 

pyrotechnic pretensioning system instantly 

tightens the seat belts against the body of the 

occupants.

The pyrotechnic pretensioning seat belts are 

enabled when the ignition is on.

The force limiter reduces the pressure of the 

seat belt on the chest of the occupant, thus 

improving their protection.

-------------------------------------------------------------------------------------------------------------------------------------------------------------

40

Safety

Rear seat belts


Each of the rear seats has a three-point seat belt 

with inertia reel.

Fastening


►  Pull the strap, then insert the tongue into the 

buckle.

►  Check that the seat belt is fastened correctly 

by pulling on the strap.

Unfastening

►  Press the red button on the buckle.

►  Guide the seat belt as it is reeled in.

Seat belt not fastened/

unfastened alerts


1.

Front left seat belt warning lamp

2.

Front right seat belt warning lamp

3.

Rear left seat belt warning lamp

4.

Rear centre seat belt warning lamp

5.

Rear right seat belt warning lamp

Not fastened at the front

When the ignition is switched on, the warning 

lamp and the corresponding indicator lamps light 

up if the driver and/or the front passenger have 

not fastened their seat belts.

At a speed greater than 12 mph (20 km/h), 

these warning lamps flash, accompanied by an 

increasing audible signal for approximately two 

minutes. After two minutes, these warning lamps 

remain on as long as the front seatbelts are not 

fastened.

Not fastened at the rear

When the ignition is switched on and with the 

engine running or the vehicle moving at a speed 

below 12 mph (20 km/h), the warning lamp and 

the corresponding indicator lamps light up for 

1 minute, if one or more rear seat belts are not 

fastened.

Unfastened

After the ignition is switched on, the warning 

lamp and the corresponding indicator lamps light 

up if the driver and/or one or more passengers 

unfasten their seat belts.

At a speed greater than 12 mph (20 km/h), these 

warning lamps flash, accompanied by an audible 

signal for approximately two minutes. After this 

time, these warning lamps remain on as long as 

the seatbelts are not refastened.

Advice

The driver must ensure that passengers 

use the seat belts correctly and that they 

are all fastened before setting off.

Wherever seated in the vehicle, you must 

always fasten the seat belt, even for short 

journeys.

Do not invert the seat belt buckles, as they 

will not fulfil their role properly.

To ensure the proper functioning of the belt 

buckles, make sure that there are no foreign 

bodies present (e.g. a coin) before fastening.

-------------------------------------------------------------------------------------------------------------------------------------------------------------

41

Safety

5

Before and after use, ensure that the seat belt 

is reeled in correctly.

After folding or moving a seat or rear bench 

seat, ensure that the seat belt is positioned 

and reeled in correctly.

Installation

The lower part of the strap must be 

positioned as low as possible over the pelvis.

The upper part must be positioned in the 

hollow of the shoulder.

At the front, adjusting the position of the 

seat belt may require the seat height to be 

adjusted.

In order to be effective, a seat belt must:

–  be tightened as close to the body as 

possible.

–  be pulled in front of you with a smooth 

movement, checking that it is not twisted.

–  must only be used to secure one person.

–  not show signs of tearing or fraying.

–  not be changed or modified, in order to 

avoid affecting its performance.

Recommendations for children

Use a suitable child seat if the passenger 

is less than 12 years old or shorter than 1.5 

metres.

Never use the same seat belt to secure more 

than one child.

Never carry a child on your lap.

For more information on 

Child seats

, refer to 

the corresponding section.

Maintenance

In accordance with current safety 

regulations, for all work on your vehicle's 

seat belts, contact a qualified workshop with 

the skills and equipment needed, which a 

CITROËN dealer is able to provide.

Have the seat belts checked regularly by a 

CITROËN dealer or a qualified workshop, 

particularly if the straps show signs of 

damage.

Clean the seat belt straps with soapy water or 

a textile cleaning product, sold by CITROËN 

dealers.

Airbags

General information

This system is designed to improve the safety 

of the occupants of the front seats and the rear 

outer seats in the event of a violent collision. The 

airbags supplement the action of the seat belts 

equipped with a force limiting system.

Electronic detectors record and analyse the 

front and side impacts sustained in the impact 

detection zones:

–  In the event of violent impact, the airbags 

deploy instantly and help better protect the 

occupants of the vehicle; immediately after the 

impact, the airbags deflate rapidly in order not 

to hinder the visibility or the possible exit of the 

occupants.

–  In the event of a slight impact, a rear impact 

and under certain rollover conditions, the airbags 

may not deploy; only the seat belt helps to 

protect you in these situations.

The seriousness of the impact depends on the 

nature of the obstacle and the speed of the 

vehicle at the moment of collision.

The airbags do not operate when the 

ignition is switched off.

This equipment will only deploy once. If a 

second impact occurs (during the same or a 

subsequent accident), the airbag will not be 

deployed again.

Impact detection zones

A.

Front impact zone

B.

Side impact zone

When one or more airbags are deployed, 

the detonation of the pyrotechnic charge 

-------------------------------------------------------------------------------------------------------------------------------------------------------------

42

Safety

incorporated in the system makes a noise and 

releases a small quantity of smoke.

This smoke is not harmful, but sensitive 

individuals may experience irritation.

The detonation noise associated with the 

deployment of one or more airbags may result 

in a slight loss of hearing for a short time.

Front airbags


This system protects the driver and front 

passenger in the event of a serious front impact, 

limiting the risk of head and chest injury.

The driver's airbag is fitted in the centre of the 

steering wheel; the front passenger airbag is 

fitted in the dashboard above the glove box.

Deployment

They are deployed, except for the front 

passenger airbag if it is deactivated*, in the 

event of a violent front impact applied to all or 

part of front impact zone 

A

.

The front airbag inflates between the chest and 

head of the front occupant of the vehicle and 

the steering wheel, on the driver's side, and the 

* For more information on Deactivating the front passenger airbag, refer to the corresponding section.

dashboard, on the passenger's side, to cushion 

their forward movement.

Lateral airbags


This system protects the driver and front 

passenger in the event of a serious side impact, 

limiting the risk of injury to the chest, between 

the hip and the shoulder.

Each lateral airbag is fitted in the seat backrest 

frame, on the door side.

Deployment

The lateral airbags are deployed on one side in 

the event of a serious side impact applied to all 

or part of the side impact zone 

B

.

The lateral airbag inflates between the chest of 

the vehicle's occupant and the corresponding 

door panel.

Malfunction

In the event of a malfunction, this warning 

lamp lights up on the instrument panel. 

Contact a CITROËN dealer or a qualified 

workshop to have the system checked.

The airbags may not be deployed in the event of 

a serious impact.

In the event of a minor impact or bump at 

the side of the vehicle or if the vehicle 

rolls over, the airbags may not be deployed.

In the event of a rear or front collision, none of 

the lateral airbags are deployed.

Advice

For the airbags to be fully effective, 

observe the safety recommendations 

below.

Adopt a normal and upright sitting position.

Fasten your seat belt and position it correctly.

Do not place anything between the occupants 

and the airbags (e.g. child, animal, object), do 

not fix or attach anything near or in the path of 

the airbags, as this could cause injuries when 

they are deployed.

Never modify the original definition of the 

vehicle, particularly in the area directly around 

the airbags.

Even if all of the precautions mentioned are 

observed, a risk of injury or of minor burns to 

-------------------------------------------------------------------------------------------------------------------------------------------------------------

43

Safety

5

the head, chest or arms cannot be ruled out 

when an airbag is deployed. The bag inflates 

almost instantly (within a few milliseconds) 

then deflates within the same time, 

discharging the hot gas via openings provided 

for this purpose.

After an accident or if the vehicle has been 

stolen, have the airbag systems checked.

All work must be carried out only by a 

CITROËN dealer or a qualified workshop

Front airbags

Do not drive holding the steering wheel 

by its spokes or resting your hands on the 

centre part of the wheel.

Passengers must not place their feet on the 

dashboard.

Do not smoke as deployment of the airbags 

can cause burns or the risk of injury from a 

cigarette or pipe.

Never remove or pierce the steering wheel or 

hit it violently.

Do not fix or attach anything to the steering 

wheel or dashboard, as this could cause 

injuries when the airbags are deployed.

Lateral airbags

Use only approved seat covers 

compatible with the deployment of these 

airbags. For information on the range of seat 

covers suitable for your vehicle, contact a 

CITROËN dealer.

Do not fix or attach anything to the seat 

backrests (e.g. clothing) as this could cause 

injuries to the chest or arm when the airbag is 

deployed.

Do not sit with the upper part of the body any 

nearer to the door than necessary.

The vehicle's front door panels include side 

impact sensors.

A damaged door or any unauthorised or 

incorrectly executed work (modification or 

repair) on the front doors or their interior trim 

could compromise the operation of these 

sensors - risk of malfunction of the lateral 

airbags!

All work must be carried out only by a 

CITROËN dealer or a qualified workshop

Child seats

The regulations on carrying children are 

specific to each country. Refer to the 

legislation in force in your country.

For maximum safety, please observe the 

following recommendations:

–  In accordance with European regulations, 

all children under the age of 12 or less than 

1.5 metres tall must travel in approved child 

seats suited to their weight

, on seats fitted with 

a seat belt or ISOFIX mountings.

– 

Statistically, the safest seats in your 

vehicle for carrying children are the rear 

seats.

– 

Children weighing less than 9 kg must 

travel in the "rearward facing" position, 

whether in the front or rear of the vehicle.

It is recommended

 that children travel 

on the 

rear seats

 of the vehicle:

– "

rearward facing

" up to the age of 3,

– "

forward facing

" over the age of 3.

Make sure that the seat belt is correctly 

positioned and tightened.

For child seats with a support leg, ensure that 

the support leg is in firm and steady contact 

with the floor.

An incorrectly installed child seat in a 

vehicle compromises the child's safety in 

the event of an accident.

Ensure that there is no seat belt or seat belt 

buckle under the child seat, as this could 

destabilise it.

Remember to fasten the seat belts or the 

child seat harness keeping the slack relative 

to the child's body to a minimum, even for 

short journeys.

When installing a child seat using the seat 

belt, ensure that the seat belt is tightened 

correctly on the child seat and that it secures 

the child seat firmly on the vehicle seat. If 

-------------------------------------------------------------------------------------------------------------------------------------------------------------

44

Safety

the passenger seat is adjustable, move it 

forwards if necessary.

Remove the head restraint before 

installing a child seat with a backrest on a 

passenger seat.

Ensure that the head restraint is stored or 

attached securely to prevent it from being 

thrown around the vehicle in the event of 

sharp braking. Refit the head restraint once 

the child seat has been removed.

Installing a booster seat

The chest part of the seat belt must be 

positioned on the child's shoulder without 

touching the neck.

Ensure that the lap part of the seat belt 

passes correctly over the child's thighs.

Use a booster seat with a backrest, equipped 

with a belt guide at shoulder level.

Additional protections

To prevent accidental opening of the 

doors and rear windows, use the "Child lock".

Take care not to open the rear windows by 

more than one third.

To protect young children from the sun's rays, 

fit side blinds on the rear windows.

As a safety measure, do not leave:

–  A child alone and unsupervised inside a 

vehicle.

–  A child or an animal in a vehicle which is 

exposed to the sun, with the windows closed.

–  The keys within reach of children inside the 

vehicle.

Child seat at the rear

Forward-facing or rearward-facing


►  Move the vehicle's front seat forward and 

straighten the backrest so that the legs of the 

child in the forward-facing or rearward-facing 

child seat itself do not touch the vehicle's front 

seat.

►  Check that the backrest of the forward-facing 

child seat is as close as possible to the backrest 

of the vehicle's rear seat, and ideally in contact 

with it.

Centre rear seat

A child seat with a support leg must never be 

installed on the 

centre rear passenger seat

.

Child seat at the front


►  Adjust the front passenger seat to the 

intermediate longitudinal position

with the 

backrest straightened

.

"Forward facing"


You must leave the front passenger 

airbag active.

"Rearward facing"


-------------------------------------------------------------------------------------------------------------------------------------------------------------

45

Safety

5

The front passenger airbag must be 

deactivated before installing a rearward 

facing child seat. Otherwise, 

the child risks 

being seriously injured or killed if the 

airbag is deployed

.


Warning label - Front passenger airbag


You must comply with the following instruction, 

as reminded by the warning label on both sides 

of the passenger sun visor:

NEVER use a rearward facing child restraint 

on a seat protected by an ACTIVE AIRBAG in 

front of it, DEATH or SERIOUS INJURY to the 

CHILD can occur.

Deactivating the front 

passenger airbag


Passenger airbag OFF

To ensure the safety of the child, the front 

passenger airbag MUST be deactivated 

when a "rearward facing" child seat is 

installed on the front passenger seat. 

Otherwise, the child risks being seriously 

injured or killed in the event of deployment of 

the airbag.

Vehicles not equipped with a 

deactivation/reactivation control

Installing a "rearward facing" child seat on 

the front passenger seat is strictly prohibited 

- risk of death or serious injury in the event of 

airbag deployment!

Deactivating/Reactivating the front 

passenger airbag

For vehicles on which it is fitted, the switch is 

located inside the glove box.


With the ignition off:

►  To deactivate the airbag, turn the key in the 

switch to the "

OFF

" position. 

►  To reactivate it, turn the key to the "

ON

position.

When the ignition is switched on:

This warning lamp comes on and remains 

lit to signal deactivation.

Or

This warning lamp comes on for about 1 

minute to signal activation.

Recommended child seats

Range of child seats secured using a 

three-

point seat belt

.

-------------------------------------------------------------------------------------------------------------------------------------------------------------

46

Safety

Group 0+: from birth to 13 kg


L1

"RÖMER Baby-Safe Plus"

Installed in the "rearward facing" position.

Groups 2 and 3: from 15 to 36 kg


Groups 2 and 3: from 15 to 36 kg

L5

"RÖMER KIDFIX XP"

Can be fitted to the vehicle's ISOFIX 

mountings.

The child is restrained by the seat belt.

Only suitable for installation on the side rear 

seats.

The head restraint on the vehicle seat must 

be removed.

Installing a child seat attached with the seat belt

In accordance with European regulations, this table indicates the options for installing child seats secured using a seat belt and universally approved 

(a)


according to the weight of the child and the seating position in the vehicle.

Weight of the child/ indicative age

Seat

Under 13 kg

(groups 0 

(b)

 and 0+)

Up to about 1 year

9-18 kg

(group 1)

1 to 3 years approx

15-25 kg

(group 2)

3 to 6 years approx

22-36 kg

(group 3)

6 to 10 years approx

Front passenger seat 

without height adjuster 

(c) (e)


U

U

U

U

Rear side seats 

(d)


U

U

U

U

Centre rear seat


X

X

X

X

-------------------------------------------------------------------------------------------------------------------------------------------------------------

47

Safety

5

(a)

Universal child seat: child seat which can be 

installed in all vehicles using the seat belt.

(b)

Group 0: birth to 10 kg. Carrycots and 

car beds cannot be installed in the front 

passenger seat.

(c)

Refer to the current legislation in your 

country before putting your child in this seat.

(d)

When installing a child seat on a rear seat 

in a rearward or forward-facing position, 

move the front seat forward then adjust 

the backrest to an upright position to allow 

enough room for the child seat and the 

child's legs.

(e)

When a rearward facing child seat is 

installed on the 

front passenger seat

, it 

is essential to deactivate the passenger’s 

airbag. Otherwise, 

the child would risk 

being seriously injured or killed if the 

airbag were deployed

. When a forward 

facing child seat is installed on the 

front 

passenger seat

, the passenger's airbag 

must remain activated.

U

Seat suitable for the installation of a 

child seat secured using a seat belt and 

universally approved, rearward facing and/or 

forward facing.

X

Seat position not suitable for installation of a 

child seat for the weight class indicated.

Remove and stow the head restraint 

before installing a child seat with 

backrest on a passenger seat. Refit the head 

restraint once the child seat has been 

removed.

"ISOFIX" mountings

The seats shown below are fitted with ISOFIX 

compliant mountings:


The mountings comprise three rings for each 

seat, indicated by a marking:

–  Two rings 

A

, located between the vehicle seat 

backrest and cushion.


The 2 latches on 

ISOFIX child seats

 are 

secured to them.

–  One ring 

B

, located under a cover on the back 

of the top of the seat backrest, called the 

TOP 

TETHER 

 for attaching seats fitted with an upper 

strap. It is indicated by a marking.


This system prevents the child seat from tipping 

forwards in the event of a front impact.

This ISOFIX mounting system provides fast, 

reliable and safe fitting of the child seat in the 

vehicle.

To secure the child seat to the 

TOP TETHER

:

►  Pass the strap of the child seat over the 

centre of the vehicle's seat backrest.

►  Lift the TOP TETHER cover.

►  Secure the upper strap hook to ring 

B

.

►  Tighten the upper strap.

When fitting an ISOFIX child seat to the 

left-hand rear seat of the bench seat, 

before fitting the seat, first move the centre 

rear seat belt towards the middle of the 

vehicle, so as to avoid the seat interfering 

with the operation of the seat belt.

-------------------------------------------------------------------------------------------------------------------------------------------------------------

48

Safety

An incorrectly installed child seat in a 

vehicle compromises the child's safety in 

the event of an accident.

Strictly observe the fitting instructions 

provided in the user guide supplied with the 

child seat.

For information about the options for 

fitting ISOFIX child seats in your vehicle, 

refer to the summary table.

Recommended ISOFIX child 

seats

Also consult the user guide from the child 

seat’s manufacturer to find out how to 

install and remove the seat.

"RÖMER Baby-Safe and its ISOFIX base"

(size category: 

E

)

Group 0+: from birth to 13 kg


Installed "rearward facing" using an ISOFIX 

base which is attached to rings 

A

.

The base has a support leg, height-

adjustable, which rests on the vehicle's floor.

This child seat can also be secured with a 

seat belt. In this case, only the shell is used 

and attached to the vehicle seat using the 

three-point seat belt.

"

RÖMER Duo Plus ISOFIX

"

(size category: 

B1

)

Group 1: from 9 to 18 kg


Suitable for forward-facing installation only.

Attached to rings 

A

 and ring 

B

, referred to as 

TOP TETHER, using an upper strap.

Three seat body angles: sitting, reclining, 

lying down.

This child seat can also be used in seat 

positions not equipped with ISOFIX 

mountings. In this case, it must be secured to 

the vehicle's seat by the three-point seat belt. 

Adjust the front seat of the vehicle so that the 

child's feet do not touch the backrest.

-------------------------------------------------------------------------------------------------------------------------------------------------------------

49

Safety

5

Summary table of locations for ISOFIX child seats

In line with European regulations, this table indicates the options for installing ISOFIX child seats on seats in the vehicle fitted with ISOFIX mountings.

In the case of universal and semi-universal ISOFIX child seats, the ISOFIX size category, determined by a letter from 

A

 to 

G

, is indicated on the child seat 

next to the ISOFIX logo.

Weight of the child

/ indicative age

Less than 10 kg (group 0)

Up to about 6 months

Less than 10 kg (group 0)

Less than 13 kg (group 0+)

Up to about 1 year

Type of ISOFIX child seat

Carry-cot

*

rearward facing

ISOFIX size category

F

G

C

D

E

ISOFIX child seats universal and semi-

universal which can be installed on the 

rear outer seats

X

IL-SU

Weight of the child

/ indicative age

From 9 to 18 kg (group 1)

From about 1 to 3 years

Type of ISOFIX child seat

rearward facing

forward facing

ISOFIX size category

C

D

A

B

B1

B2

B3

ISOFIX child seats universal and semi-

universal which can be installed on the 

rear outer seats

IL-SU

IUF

IL-SU

* Carry-cots and car beds cannot be installed in the front passenger seat.

IUF

Seat suitable for the installation of an 

I

sofix 

U

niversal seat, "

F

orward facing", 

secured using the top tether.

-------------------------------------------------------------------------------------------------------------------------------------------------------------


Content      ..     1      2      3      4      ..