Citroën C-Elysée (2022 year). Manual in english - page 2
 

  Index      Manuals     Citroën C-Elysée (2022 year). Manual in english


Search            copyright infringement  


Content      ..      1      2      3      ..


Citroën C-Elysée (2022 year). Manual in english - page 2


18

Access

Locking the vehicle


Normal locking

►  Press the locking button.

The locking, and the activation of the alarm 

depending on version, is confirmed by the 

lighting of the direction indicators.

An access (door or boot) that is not 

properly closed prevents locking of the 

vehicle. However, if the vehicle is fitted with 

an alarm, it will be activated after 45 seconds.

If the vehicle is unlocked but the doors or boot 

are not subsequently opened, the vehicle 

will automatically lock itself again after about 

30 seconds. If the vehicle is fitted with an 

alarm, it will be reactivated automatically.

Locating your vehicle

This function allows you to identify your vehicle 

from a distance, particularly in poor light. Your 

vehicle must be locked.

►  Press the closed padlock button on 

the remote control.

This will switch on the courtesy lights and the 

direction indicators will flash for a few seconds.

Advice

Remote control

The remote control is a sensitive, high-

frequency device; avoid handling it in your 

pocket, due to the risk of unintentionally 

unlocking the vehicle.

Avoid pressing the remote control buttons 

while out of range of the vehicle, due to 

the risk of rendering the remote control 

inoperative. It would then be necessary to 

reset it.

The remote control does not work when the 

key is in the ignition switch, even when the 

ignition is switched off.

Anti-theft protection

Do not modify the electronic vehicle 

immobiliser, as this might result in 

malfunctions.

Locking the vehicle

Driving with the doors locked could make 

it more difficult for the emergency services 

to enter the passenger compartment in an 

emergency.

As a safety precaution, remove the key from 

the ignition when leaving the vehicle, even for 

a short time.

Purchasing a second-hand vehicle

Have the key codes memorised by a 

CITROËN dealer, to ensure that the keys in 

your possession are the only ones able to 

start the vehicle.

Central locking


Manual

►  Press this button to lock/unlock the vehicle 

(doors and boot) from inside the passenger 

compartment. 

Central locking does not take place if any 

of the doors are open.

When locking from the outside

When the vehicle is locked from the 

outside, the button is deactivated.

►  After normal locking, pull one of the 

interior door controls to unlock the vehicle.

-------------------------------------------------------------------------------------------------------------------------------------------------------------

19

Access

2

Automatic (anti-intrusion 

security)

The doors and boot lock automatically while 

driving (speed above 6 mph (10 km/h)).

To deactivate/reactivate this function (activated 

by default):

►  Press the button until an audible signal is 

heard and/or a message appears on the screen.

Back-up procedures

Lost keys, remote control

Go to a CITROËN dealer with the vehicle's 

registration certificate, your personal 

identification documents and if possible, the label 

bearing the key code.

The CITROËN dealer will be able to retrieve the 

key code and the transponder code, enabling a 

new key to be ordered.

Complete unlocking/locking 

of the vehicle with the key

Use this procedure in the following situations:

–  Remote control battery discharged.

–  Remote control malfunction.

–  Vehicle battery discharged.

–  Vehicle in an area subject to strong 

electromagnetic interference.

In the first case, change the remote control 

battery.

In the second case, reinitialise the remote 

control.

Refer to the corresponding sections.

Driver's door

Insert the key in the door lock to lock or unlock 

the door.

Passenger doors

►  On the rear doors, check that the child lock 

is not on.


►  Remove the black cap on the edge of the 

door, using the key.

►  Insert the key into the opening without forcing 

and then turn the assembly.

►  Remove the key and refit the cap.

In the event of a fault with the central 

locking system, it is essential to 

disconnect the battery to lock the boot and so 

ensure complete locking of the vehicle.

Changing the battery

If the battery is flat, this warning lamp 

comes on, accompanied by an audible 

signal and the display of a message.

Battery type: CR2032/3 volts.


►  Unclip the cover by inserting a small 

screwdriver in the slot and lift the cover.

►  Remove the flat battery from its housing.

►  Put the new battery in place, respecting the 

polarity. Start by inserting it into the contacts 

located in the corner, then clip the cover onto 

the unit.

►  Reinitialise the remote control.

For more information on 

Reinitialising the 

remote control

, refer to the corresponding 

section.

Do not throw remote control batteries 

away, as they contain metals that are 

harmful to the environment. Take them to an 

approved disposal point.

-------------------------------------------------------------------------------------------------------------------------------------------------------------

20

Access

This equipment contains a button type 

battery.

Do not swallow the battery. Risk of chemical 

burns!

Swallowing the battery can cause serious 

internal burning in only 2 hours and can be 

fatal.

If batteries have been swallowed or inserted 

into a part of the body, seek immediate 

medical advice.

Keep new and used batteries out of the reach 

of children.

If the battery compartment does not close 

properly, stop using the product and keep it 

out of the reach of children.

Risk of explosion if the battery is 

replaced with an incorrect type!

Replace the battery with the same type.

Risk of explosion or leaking of 

inflammable liquid or gas!

Do not use in/store in/place in an environment 

where the temperature is extremely high or 

where the pressure is extremely low due to 

very high altitude.

Do not try to burn, crush or cut a used battery.

Reinitialising the remote 

control

Following replacement of the battery or in 

the event of a fault, it may be necessary to 

reinitialise the remote control.


►  Switch the ignition off.

►  Turn the key to position 

2 (Ignition on)

.

►  Immediately press the closed padlock button 

for a few seconds.

►  Switch off the ignition and remove the key 

from the ignition switch.

The remote control is now fully operational 

again.

Doors

Opening

From outside

►  After unlocking the vehicle using the remote 

control or the key, pull the door handle.

From inside

►  Pull the interior opening control of a door; this 

unlocks the vehicle completely.

The interior opening control on a rear 

door does not work if the child lock is on.

For more information on the 

Child Lock

, refer 

to the corresponding section.

Boot

Opening

Releasing the boot from the inside


-------------------------------------------------------------------------------------------------------------------------------------------------------------

21

Access

2

►  Press the boot opening button located on the 

left of the dashboard.

The boot lid is released and opens slightly.

Opening the boot

►  Raise the boot lid to its fully open position.

Closing

►  Lower the boot lid using one of the interior 

grab handles.

►  Then press the boot to close it.

In the event of a malfunction or if you 

experience difficulty opening or closing 

the tailgate, have it checked by a CITROËN 

dealer or a qualified workshop without delay, 

to avoid the issue deteriorating and prevent 

any risk of the tailgate dropping, potentially 

causing serious injury.

Back-up release

System for mechanically unlocking the boot in 

the event of a battery or central locking fault.

Unlocking

►  Fold the rear seats to gain access to the lock 

from inside the boot.


►  Insert a small screwdriver into hole 

A

 of the 

lock to unlock the boot.

►  Move the latch to the left.

Alarm


System which protects and provides a deterrent 

against theft and break-ins. It provides perimeter 

protection and an self-protection function.

Perimeter protection

The system checks for opening of the vehicle.

The alarm is triggered if anyone tries to open a 

door, the boot, the bonnet...

Self-protection function

The system checks for the putting out of 

service of its components.

The alarm is triggered if the battery, the 

central control or the siren wiring are put out 

of service or damaged.

For all work on the alarm system, contact 

a CITROËN dealer or a qualified 

workshop.

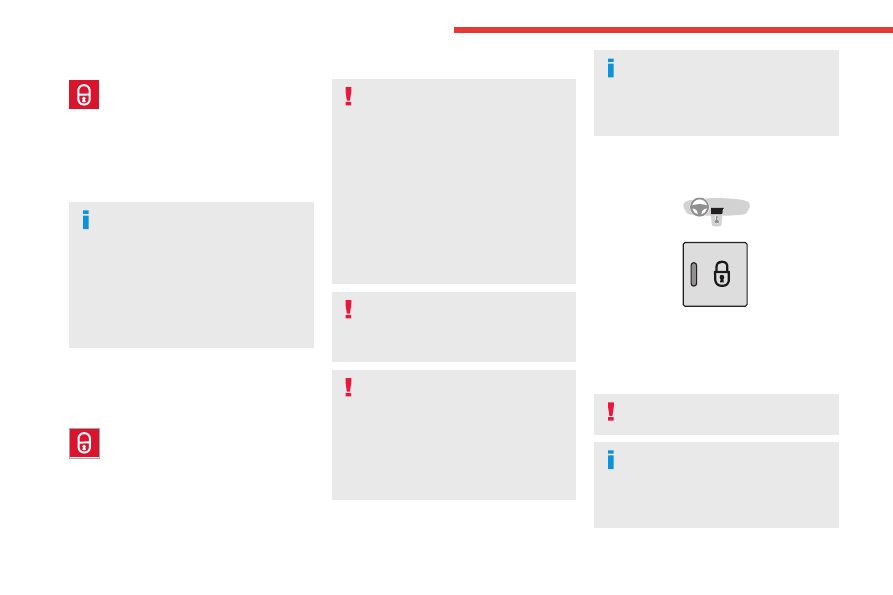
Locking the vehicle with 

alarm

Activation

►  Turn the vehicle off and exit.

►  Press the locking button on the remote 

control.

The alarm is activated: an indicator light 

in the switch panel to the left of the 

steering wheel flashes once per second.

The perimeter protection is activated 5 seconds 

after pressing the locking button on the remote 

control.

If an opening (door, boot...) is not closed fully, the 

vehicle is not locked but the alarm is activated.

Deactivation

►  Press the unlocking button on the 

remote control.

-------------------------------------------------------------------------------------------------------------------------------------------------------------

22

Access

The alarm is deactivated: the indicator 

lamp goes off.

Triggering of the alarm

This is indicated by sounding of the siren and 

flashing of the direction indicators for thirty 

seconds.

When the vehicle is unlocked using the 

remote control, rapid flashing of the 

indicator lamp informs you that the alarm was 

triggered during your absence. Upon ignition, 

this flashing stops immediately.

Locking the vehicle without 

activating the alarm

►  Lock the vehicle using the key.

Failure of the remote control

To deactivate the monitoring functions:

►  Unlock the vehicle using the key.

►  Open the door; this sets off the alarm.

►  Switch on the ignition; this stops the alarm.

Malfunction

When the ignition is switched on, the fixed 

lighting of the red indicator lamp in the button 

indicates a system malfunction.

Have it checked by a CITROËN dealer or a 

qualified workshop.

Electric windows


Model with front window controls


Model with front and rear window controls

1.

Left-hand front

2.

Right-hand front

3.

Right-hand rear

4.

Left-hand rear

5.

Deactivating the rear electric window 

controls.

Deactivating the rear controls for the 

rear electric windows

For your children's safety, press control 

5


to deactivate the controls for the rear 

electric windows, irrespective of their positions.

The red indicator lamp in the button comes on.

The rear electric windows can still be controlled 

using the driver's controls.

-------------------------------------------------------------------------------------------------------------------------------------------------------------

23

Ease of use and comfort

3

Correct driving position

For safety reasons, adjustments must 

only be made when the vehicle is 

stationary.

Before taking to the road and to make the most 

of the ergonomic layout of the instruments and 

controls, carry out these adjustments in the 

following order:

–  head restraint height.

–  seat backrest angle.

–  seat cushion height.

–  longitudinal seat position.

–  steering wheel height.

–  rear view mirror and door mirrors.


Once these adjustments have been 

made, check that the instrument panel 

can be viewed correctly from your driving 

position.

Front head restraints

Adjusting the height


Upwards:

►  Pull the head restraint up to the desired 

position; you can feel the head restraint clicking 

into position.

Downwards:

►  Press lug 

A

 to lower the head restraint.

The head restraint is correctly adjusted 

when its upper edge is level with the top 

of the occupant's head.

Removing a head restraint

►  Pull the head restraint fully up.

►  Press lug 

A

 to release the head restraint and 

raise it fully.

►  Stow the head restraint securely.

Refitting a head restraint

►  Insert the head restraint rods into the guides 

in the corresponding seat backrest.

►  Push the head restraint fully down.

►  Press the lug 

A

 to release the head restraint 

and push it down.

►  Adjust the height of the head restraint.

Never drive with the head restraints 

removed; they should be in place and 

adjusted for the occupant of the seat.

Front seats

Longitudinal


►  Raise the control bar and slide the seat 

forwards or backwards.

►  Release the control bar to lock the seat in 

position on one of the notches.

Before moving the seat backwards, 

ensure that there is no person or object 

that might prevent the full travel of the seat.

There is a risk of trapping or pinching 

passengers if present in the rear seats or of 

-------------------------------------------------------------------------------------------------------------------------------------------------------------

24

Ease of use and comfort

jamming the seat if large objects are placed 

on the floor behind the seat.

Tilting the backrest


►  Push the control backwards to adjust the 

backrest.

Height

(driver only)


►  Pull the control upwards to raise or push it 

downwards to lower, until you obtain the position 

required.

Rear bench seat

Bench seat with fixed one-piece cushion and 

split folding backrest (2/3-1/3) with adjustable 

head restraints.

The rear seat cushion remains fixed. To 

increase the boot loading volume, tilt the 

bench seat backrest.

Folding the backrests

Manoeuvring the backrests should only 

be done when the vehicle is stationary.

First steps:


►  Lower the head restraints.

►  If necessary, move the front seats forward.

►  Check that no person or object might interfere 

with the folding of the backrests (e.g. clothing, 

luggage).

►  Position the corresponding seat belt against 

the backrest and fasten it.


►  Pull the strap 

1

 firmly to release the backrest.

►  Guide the backrest 

2

 down to the horizontal 

position.

Repositioning the backrests


►  Put the backrest 

2

 in the upright position and 

push it firmly to latch it home.

►  Unbuckle and reposition the seat belt on the 

side of the backrest.

-------------------------------------------------------------------------------------------------------------------------------------------------------------

25

Ease of use and comfort

3

Please note: an incorrectly latched 

backrest compromises the safety of 

passengers in the event of sudden braking or 

an accident.

When repositioning the seat backrest, take 

care not to trap the seat belts.

The contents of the boot may be thrown 

forwards - risk of serious injury!

Adjustable head restraints

These have just one position for use (up) and 

one position for storage (down).

They can be removed and are interchangeable 

side to side.

To remove a head restraint:


►  Pull it upwards as far as possible.

►  Press on lug 

A

.

Never drive with the headrests removed; 

they must be fitted and correctly 

adjusted.

Steering wheel 

adjustment


►  When stationary, lower the control to release 

the steering wheel.

►  Adjust the height and reach to suit your 

driving position.

►  Pull the control to lock the steering wheel.

For safety reasons, these adjustments 

must only be carried out with the vehicle 

stationary.

Mirrors

Door mirrors

As a safety measure, the mirrors should 

be adjusted to reduce the "blind spots".

The objects that you see in the mirrors are 

in fact closer than they appear. Take this 

into account in order to correctly judge the 

distance of vehicles approaching from behind.

Manual adjustment


►  Move the adjustment lever in any of the four 

directions to position the mirror.

When the vehicle is parked, the door mirrors can 

be folded in manually.

If the mirror unit has popped out of its initial 

position, with the vehicle stationary, push it back 

into place manually or use the electric folding 

control.

There is no risk of breakage, even in frosty 

weather.

-------------------------------------------------------------------------------------------------------------------------------------------------------------

26

Ease of use and comfort

Electric adjustment


►  Turn control 

A

 to the right or to the left to 

select the corresponding mirror.

►  Move the control in any of the four directions 

to adjust.

►  Return the control to the central position.

Manual folding

You can manually fold the mirrors (parking 

obstruction, narrow garage, etc.)

►  Turn the mirror towards the vehicle. 

Demisting/Defrosting

The demisting/defrosting of the door 

mirrors works with the demisting/

defrosting of the rear screen.

For more information on 

Demisting/Defrosting 

the rear screen and/or the door mirrors

, refer 

to the corresponding section.

Interior rear view mirror

Equipped with an anti-dazzle system, which 

darkens the mirror glass and reduces the 

nuisance to the driver caused by the sun, 

headlamps of other vehicles, etc.

Day/night position


►  Pull the lever to change to the anti-dazzle 

"night” position.

►  Push the lever to change to the normal "day" 

position.

Adjustment

►  Set the mirror to the normal "day" position.

Heating and Ventilation

Advice

Using the ventilation and air 

conditioning system

►  To ensure that air is distributed evenly, 

keep the external air intake grilles at the base 

of the windscreen, the nozzles, the vents, the 

air outlets and the air extractor in the boot 

free from obstructions.

►  Do not cover the sunshine sensor located 

on the dashboard; this sensor is used to 

regulate the automatic air conditioning 

system.

►  Operate the air conditioning system for at 

least 5 to 10 minutes once or twice a month to 

keep it in good working order.

►  If the system does not produce cold air, 

switch it off and contact a CITROËN dealer or 

a qualified workshop.

When towing a large load on a steep gradient 

in high temperatures, switching off the air 

conditioning increases the available engine 

power, enhancing the towing capacity.

Avoid driving for too long with the 

ventilation off or with prolonged operation 

of interior air recirculation. Risk of misting and 

deterioration of the air quality!

If the interior temperature is very high 

after the vehicle has stood for a long 

time in the sunshine, air the passenger 

compartment for a few moments.

Put the air flow control at a setting high 

enough to quickly change the air in the 

passenger compartment.

Condensation created by the air 

conditioning results in a discharge of 

-------------------------------------------------------------------------------------------------------------------------------------------------------------

27

Ease of use and comfort

3

water underneath the vehicle. This is perfectly 

normal.

Servicing the ventilation and air 

conditioning system

►  Ensure that the passenger compartment 

filter is in good condition and have the filter 

elements replaced regularly.

We recommend using a composite passenger 

compartment filter. Its specific active additive 

helps protect against polluting gases and bad 

smells.

►  To ensure correct operation of the 

air conditioning system, have it checked 

according to the recommendations in the 

Manufacturer’s service schedule.

Stop & Start

The heating and air conditioning systems 

only operate when the engine is running.

Temporarily deactivate the Stop & Start 

system to maintain a comfortable temperature 

in the passenger compartment.

For more information on the 

Stop & 

Start

 system, refer to the corresponding 

section.

Air conditioning, manual 

(without display screen)

This system operates only with the engine 

running.


1.

Temperature

2.

Air flow

3.

Air distribution

4.

Air intake / Air recirculation

5.

Air conditioning

Temperature

►  Turn the dial 

1

 from blue (cold) to red (hot) to 

adjust the temperature to your liking.

Air flow

►  Turn the dial 

2

 to obtain a comfortable air 

flow.

Deactivation

If you put the air flow control in the 

0

 position, the 

temperature is no longer controlled.

A slight flow of air can still be felt, resulting from 

the forward movement of the vehicle.

Air distribution

Windscreen and side windows. 

Windscreen, side windows and footwells. 

Footwells. 

Central and side air vents, footwells. 

Central and side air vents. 

The air distribution can be adapted by placing 

the dial 

3

 to an intermediate notch or by closing 

the air vents.

Air intake/Air recirculation

Recirculation of the interior air isolates the 

passenger compartment from exterior odours 

and fumes.

Return to exterior air intake as soon as possible 

to avoid deterioration of the air quality and the 

formation of mist.

►  Move manual control 

4

 to the left for 

the "Recirculation of interior air" position.

►  Move manual control 

4

 to the right to 

return to the "Exterior air intake" position.

Air conditioning

The air conditioning is designed to operate 

efficiently in all seasons, with the windows 

closed.

It allows you:

-------------------------------------------------------------------------------------------------------------------------------------------------------------

28

Ease of use and comfort

–  in summer, to lower the temperature,

–  increase the effectiveness of the demisting in 

winter, above 3°C.

Switching on

►  Press button 

5

 to activate/deactivate the air 

conditioning.

The control lights up when the system is 

activated.

The air conditioning does not operate 

when the air flow adjustment dial is in 

position "

0

".

Faster cool air

When the air conditioning is activated, to obtain 

cool air more quickly, you can use recirculation 

of the interior air for a few moments.

►  Move manual control 

4

 to the left for 

the "Recirculation of interior air" position.

►  Then, move manual control 

4

 to the 

right to return to the "Exterior air intake" 

position.

Switching off

►  Press button 

5

 again, the associated indicator 

lamp goes off.

Switching the system off could result in 

discomfort (humidity, misting).

Electronic air conditioning 

(with display screen)

This system only operates with the engine 

running.


1.

Temperature.

2.

Air flow.

3.

Air distribution.

4.

Air intake/Air recirculation.

5.

Air conditioning.

6.

Faster air conditioning.

Air intake/Air recirculation

Recirculation of the interior air isolates the 

passenger compartment from exterior odours 

and fumes.

Avoid the prolonged use of interior air 

recirculation (risk of misting and 

deterioration of air quality).

►  Press button 

4

 to cut off the intake of exterior 

air and recirculate the interior air.

►  Press button 

4

 again to allow the intake of 

exterior air.

The activation of recirculation of the interior air is 

confirmed by the lighting of the indicator lamp on 

the display.

Temperature

►  Press buttons 

1

 (red for hot and blue for cold) 

to adjust the temperature to your requirements.

The temperature bars come on or go off 

progressively on the display.

Air conditioning

On/Off

►  Press button 

5

 to activate/deactivate the air 

conditioning.

Its indicator lamp illuminates on the display when 

the system is active.

Faster air conditioning

This button activates rapid cooling of the air in 

the passenger compartment.

On/Off

►  Press button 

6

 to activate/deactivate the 

rapid air conditioning.

Its indicator lamp illuminates on the display when 

the system is active.

Air distribution

►  Press button 

3

 successively to direct the air 

flow towards:

-------------------------------------------------------------------------------------------------------------------------------------------------------------

29

Ease of use and comfort

3

•  windscreen and side windows (demisting or 

defrosting),

•  the windscreen, side windows and air vents,

•  the windscreen, side windows, air vents and 

footwells,

•  the windscreen, side windows and footwells,

•  the footwells,

•  the air vents and footwells,

•  the air vents.

Air flow

►  Press one of the buttons 

2

 to increase/

decrease the air flow.

The air flow bars light up/go off gradually.

Deactivating the system

►  Press the "small fan" button 

2

 until all the 

bars in the display are off.

This action deactivates all functions of the air 

conditioning system.

Temperature is no longer regulated. A slight flow 

of air can still be felt, resulting from the forward 

movement of the vehicle.

Pressing the "small fan" button 

2

 again 

reactivates the system.

Avoid driving for long periods with the 

system deactivated (risk of misting and 

deterioration of air quality).

Front demist - defrost

These markings on the control panel 

indicate the control positions for rapid 

demisting or defrosting of the windscreen and 

side windows.

With the manual air 

conditioning system 

(without screen)

►  Put the temperature and air flow 

controls to the dedicated marked position.

►  Put the air intake control to the 

"Exterior air intake" position (manual 

control moved to the right).

►  Put the air distribution control to the 

"Windscreen" position.

►  Switch on the air conditioning by 

pressing the appropriate button; the 

lighting of the associated control comes on.

With the electronic air 

conditioning system (with 

screen)

►  Press this button to activate/deactivate 

the system.

The lighting of the indicator lamp in the button 

indicates that the system is activated.

With Stop & Start, when demisting has 

been activated, STOP mode is not 

available.

Heated windscreen base

(Depending on country of sale.)


In cold conditions, the heated rear window switch 

also allows the lower windscreen to be heated, 

so as to free the wiper blades when frozen to the 

glass by frost or snow.

The function is active when the ambient 

temperature is below 0°C.

Switching on/off


-------------------------------------------------------------------------------------------------------------------------------------------------------------

30

Ease of use and comfort

►  With the engine running, press this button to 

activate/deactivate the function.

Demisting/de-icing the 

rear screen and/or the 

door mirrors


►  Press this button to switch on/off rear screen 

and door mirror demisting/de-icing (depending 

on version).

The indicator lamp in the button comes 

on

 when 

the function is 

activated

.

Demisting/de-icing switches off automatically to 

prevent excessive power consumption.

Switch off demisting/de-icing as soon 

as you no longer consider it necessary, 

as decreased power consumption in turn 

reduces energy consumption.

Demisting/de-icing only operates with the 

engine running.

Interior fittings

Sun visor

The passenger's sun visor is fitted with a vanity 

mirror with concealing flap and a card holder (or 

ticket holder).

Glove box

Depending on version, it may have a lid. In this 

case:

►  To open the glove box, pull the handle 

towards you.

It contains the front passenger airbag 

deactivation switch.

Never drive with the glove box open 

when a passenger is at the front. It may 

cause injury during sharp deceleration!

Removable ashtray


►  Raise the cover to open the ashtray.

►  To empty it, with the cover raised, pull the 

ashtray upward.

To avoid any problem of interference or 

risk of overturning, do not place the 

ashtray near the gear lever.

Front armrest

It includes a storage space.

-------------------------------------------------------------------------------------------------------------------------------------------------------------

31

Ease of use and comfort

3

Storage compartments


►  For access to the closed storage box, lift the 

lever to open the lid.


►  To access the open storage under the 

armrest, lift the armrest fully backward.

USB socket


A USB port is located on the central console.

It allows the connection of portable devices or 

USB memory sticks.

It reads the audio files and sends them to your 

audio system to be played through the vehicle's 

speakers.

You can manage these files using the audio 

system control panel and display them in the 

screen.

When the USB port is used, the portable device 

charges automatically.

While charging, a message is displayed if the 

current drawn by the portable device exceeds 

the power rating of the vehicle's port.

Cigarette lighter/12 V 

accessory socket(s)


►  To use the cigarette lighter, press it in and 

wait a few seconds until it pops out automatically.

►  To use a 12 V accessory (max. power: 

120 W), remove the cigarette lighter and connect 

a suitable adaptor.

You can use this socket to connect a telephone 

charger, a bottle warmer, etc.

After use, put the cigarette lighter back into place 

straight away.

The connection of an electrical device 

not approved by CITROËN, such as a 

USB charger, may adversely affect the 

operation of vehicle electrical systems, 

causing faults such as poor radio reception or 

interference with displays in the screens.

-------------------------------------------------------------------------------------------------------------------------------------------------------------

32

Ease of use and comfort

Courtesy lamps

1.

Courtesy lamps

2.

Front reading lamps

Front and rear courtesy 

lamps

In this position, the courtesy lamp comes 

on gradually:

–  when the vehicle is unlocked.

–  when the key is removed from the ignition 

switch.

–  when a door is opened.

–  when the remote control locking button is 

activated, in order to locate the vehicle.

It switches off gradually:

–  when the vehicle is locked.

–  when the ignition is switched on.

–  30 seconds after the last door is closed.

Permanently off.


Permanent lighting. 

In "Permanent lighting" mode, the lighting time 

varies according to the circumstances:

–  With the ignition off, approximately 10 minutes.

–  In energy saving mode, approximately 30 

seconds.

–  With the engine running, unlimited.

Reading lamps

►  With the ignition on, operate the 

corresponding switch.

Do not place anything against the 

courtesy lamps.

-------------------------------------------------------------------------------------------------------------------------------------------------------------

33

Lighting and visibility

4

Exterior lighting control 

stalk

Main lighting


Lamps off (ignition off)/

Daytime running lamps (engine running)

Sidelamps only 

Dipped or main beam headlamps 

Headlamp dipping


►  Pull the lighting control stalk to switch 

between dipped and main beam headlamps.

In lamps off and sidelamps modes, pull the 

lighting control stalk to switch the main beam 

headlamps on directly ("headlamp flash").

Display

Illumination of the corresponding indicator 

lamp on the instrument panel confirms that the 

selected lighting is on.

A fault with a lamp is signalled by the 

permanent illumination of this warning 

lamp, accompanied by the display of a message 

and an audible signal.

Rear foglamp

They only work if the dipped or main 

beam headlamps are on.


►  Rotate the ring forwards/backwards to turn 

it on/off.

Front foglamps/Rear 

foglamp

They operate with the dipped or main 

beam headlamps on.


►  Rotate the ring forwards:

•  once to switch on the front foglamps,

•  a second time to switch on the rear foglamp.

►  Turn in the opposite direction to switch off.

►  Rotate the ring backwards to switch the 

foglamps off; the sidelamps will then switch off.

Switching on the foglamps is prohibited 

in clear weather or in rain, both day and 

night. In these situations, the power of their 

beams may dazzle other drivers. They must 

only be used in fog or falling snow (rules may 

vary depending on country).

Do not forget to switch off the foglamps when 

they are no longer necessary.

Switching off of the lighting when the 

ignition is switched off 

When the ignition is switched off, all of the 

lamps turn off immediately, except for the 

dipped beam headlamps if automatic guide-

me-home lighting is activated.

Switching on the lamps after 

switching off the ignition

To reactivate the lighting control, rotate the 

ring to the "

0

" position - lamps off, then to the 

desired position.

-------------------------------------------------------------------------------------------------------------------------------------------------------------


Content      ..      1      2      3      ..