Citroën C4 (2022 year). Manual in english - page 4
 

  Index      Manuals     Citroën C4 (2022 year). Manual in english


Search            copyright infringement  


Content      ..     2      3      4      5     ..


Citroën C4 (2022 year). Manual in english - page 4


50

Ease of use and comfort

Automatic Visibility 

programme

For more information on button 

5

, refer to the 

Front Demisting/Defrosting

” section.

Ventilation with the ignition 

on

When the ignition is switched on, you can use 

the ventilation system to adjust the air flow 

settings and the air distribution in the passenger 

compartment, for a period which depends on the 

battery charge.

This function does not operate the air 

conditioning.

Interior air recirculation

The intake of exterior air prevents the formation 

of mist on the windscreen and side windows.

Recirculating the interior air isolates the 

passenger compartment from outside odours 

and fumes and allows the desired passenger 

compartment temperature to be achieved more 

rapidly.

►  Press this button to activate/deactivate 

the function (confirmed by the 

illumination/extinction of the indicator lamp).

This function is activated automatically 

when reverse gear is engaged.

Front demisting 

- defrosting

With manual air 

conditioning

►  Adjust the temperature to maximum (red).

►  Adjust the air flow to maximum.

►  Press this button to activate the air 

distribution to the "Windscreen" position; 

its indicator lamp comes on.

►  Check that the recirculation of interior air is 

deactivated; its indicator lamp must be off.

►  Switch on the air conditioning by pressing the 

"

A/C

" button; its indicator lamp comes on.

With automatic dual-zone 

air conditioning

Automatic Visibility programme

This mode allows the windscreen and side 

windows to be demisted or defrosted as quickly 

as possible.

►  Press this button to activate/deactivate 

the mode (confirmed by the illumination/

extinction of the indicator lamp).

The programme automatically manages the air 

conditioning (depending on version), air flow 

and air intake, and provides optimum distribution 

towards the windscreen and side windows.

It is possible to manually change the air flow 

without deactivating the automatic Visibility 

programme.

With Stop & Start, when demisting has 

been activated, STOP mode is not 

available.

In wintry conditions, before moving off, 

remove all snow or ice on the windscreen 

near the camera.

Otherwise, the operation of the equipment 

using the camera may be affected.

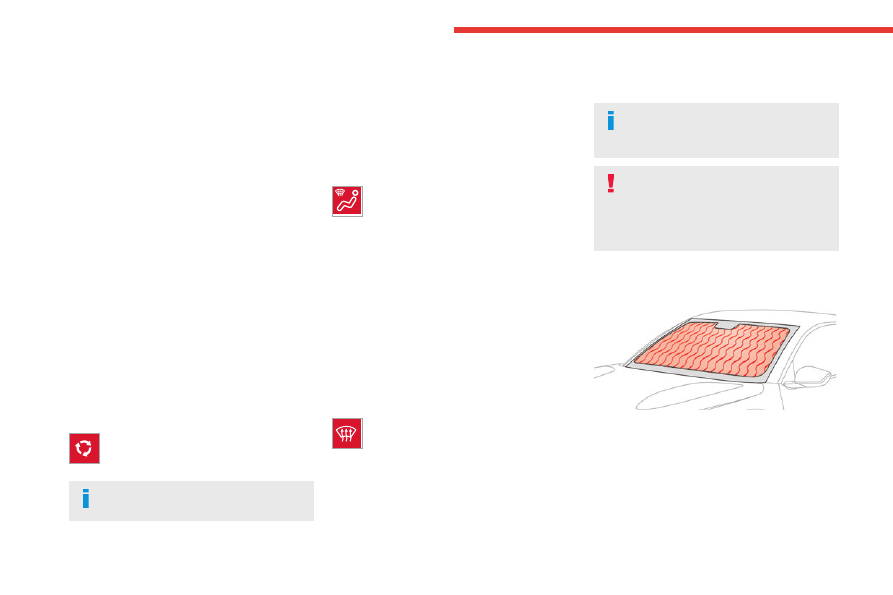
Heated windscreen


In cold weather, this function heats the entire 

windscreen and complements the Automatic 

Visibility programme to speed up the evacuation 

of elements that interfere with visibility (e.g. dew, 

mist, frost, snow), located on either side of the 

windscreen.

It can be used both before setting off and while 

driving.

-------------------------------------------------------------------------------------------------------------------------------------------------------------

51

Ease of use and comfort

3

Switching on/off


►  With the engine running, press this button to 

activate/deactivate the function (confirmed by an 

indicator lamp).

The period of operation depends on the outside 

temperature.

The function switches off automatically to 

prevent excessive power consumption.

Rear screen demisting/

defrosting

This demisting/de-icing only works with the 

engine running.

It also demists/de-ices the door mirrors.

►  Press this button to activate/deactivate 

the function (confirmed by the indicator 

lamp coming on/switching off).

The function can be activated whatever the 

outside temperature may be.

The period of operation depends on the outside 

temperature.

Demisting/defrosting therefore switches 

off automatically to prevent an excessive 

consumption of electrical current.

Temperature conditioning 

(Electric)

This function allows you to programme the 

temperature in the passenger compartment to 

reach a pre-defined, non-modifiable temperature 

(approx. 21°C) before you enter the vehicle, on 

the days and at the times of your choice.

This function is available when the vehicle is 

connected or not connected.

Programming

With 10-inch touch screen

In the 

Climate

 > 

OPTIONS

 menu:

Select 

Temperature conditioning

►  Press 

+

 to add a programme.

►  Select the time of entry into the vehicle and 

the desired days. Press 

OK

.

►  Press 

ON

 to activate this programme.

The temperature pre-conditioning sequence 

begins approximately 45 minutes before the 

programmed time when the vehicle is connected 

(20 minutes when it is not connected) and is 

maintained for 10 minutes after.

You can set multiple programmes.

Each one is saved in the system.

To optimise the driving range, we recommend 

starting a programme while the vehicle is 

connected.

Programming can also be carried out 

from a smartphone using the 

MyCitroën 

App

 application.

For more information on 

Remote functions

refer to the corresponding section.

The fan noise that occurs during 

temperature pre-conditioning is perfectly 

normal.

Operating conditions

–  The function is only activated when the 

ignition is switched off

 and the 

vehicle 

locked

.

–  When the vehicle is not connected, the 

function is only activated if the battery charge 

level is greater than 50%.

–  When the vehicle is not connected and a 

recurring programme is active (e.g. from Monday 

to Friday), if two temperature pre-conditioning 

sequences are run without the vehicle being 

used, the programme will be deactivated.

-------------------------------------------------------------------------------------------------------------------------------------------------------------

52

Ease of use and comfort

Interior fittings


1.

Sun visor

2.

Smart Pad Support Citroën

3.

Dashboard drawer

4.

Glove box

5.

Wireless smartphone charger

USB sockets (type A/type C)

6.

Storage compartment

12 V socket

7.

Storage compartment with cup holders

8.

Centre armrest with storage compartment

9.

Door pockets

10.

USB sockets

Heated rear seats

Make sure you do not leave any item in 

the passenger compartment which could 

act like a magnifying glass under the effect of 

the sun's rays and cause a fire - risk of fire or 

damage to interior surfaces!

Sun visor

►  With the 

ignition on, raise the concealing 

flap; depending on the version, the mirror is 

illuminated automatically.

This sun visor is also equipped with a ticket 

holder.

Glove box

►  To open the 

glove box, lift the handle.

With the ignition on, the glove box is lit when 

open.

Never drive with the glove box open 

when a passenger is at the front. It may 

cause injury during sharp deceleration!

Dashboard drawer

►  To open the drawer, press the handle and 

pull.

Never drive with the drawer open and a 

passenger in the front seat - risk of injury 

during sharp deceleration!

Smart Pad Support Citroën

This allows you to place a mobile device, such 

as a smartphone or touch screen tablet, into a 

dedicated holder (sold separately).

►  Press the bracket to make it pop out.

►  Open the clamp on the back of the holder to 

insert the mobile device.

Remove the mobile device before 

stowing the bracket.

USB sockets

These symbols determine the type of use of a 

USB socket:

Power supply and recharging. 

Likewise, plus exchange of multimedia 

data with the audio system.


USB sockets allow the connection of a portable 

device.

The USB socket located at the 

front on the left-hand side also 

allows a smartphone to be connected by Android 

-------------------------------------------------------------------------------------------------------------------------------------------------------------

53

Ease of use and comfort

3

Auto

®

 or CarPlay

®

, enabling certain smartphone 

applications to be used on the touch screen.

For best results, use a cable made or approved 

by the device manufacturer.

These applications can be managed using the 

steering-mounted controls or the audio system 

controls.

When the USB socket is used, the 

portable device charges automatically.

While charging, a message is displayed if the 

power drawn by the portable device exceeds 

the current supplied by the vehicle.

For more information about how to use this 

equipment, refer to the sections describing 

the audio and telematics systems.

12 V accessory socket


►  Plug in a 12 V accessory (with a maximum 

rated power of 120 W) using a suitable adapter.

Observe the maximum power rating to 

avoid damaging the accessory.

The connection of an electrical device 

not approved by CITROËN, such as a 

USB charger, may adversely affect the 

operation of vehicle electrical systems, 

causing faults such as poor radio reception or 

interference with displays in the screens.

Wireless smartphone 

charger


This system allows wireless charging of a 

portable device such as a smartphone, using the 

magnetic induction principle, in accordance with 

the Qi 1.1 standard.

The portable device to be charged must be 

compatible with the Qi standard, either by design 

or by using a compatible holder or shell.

A mat can also be used provided that it is 

approved by the Manufacturer.

The charging area is identified by the Qi symbol.

The charger works with the engine running and 

with the Stop & Start system in STOP mode.

Charging is managed by the smartphone.

With the Keyless Entry and Start system, the 

charger’s operation may be briefly disrupted 

when a door is opened or the ignition is switched 

off.

Charging

►  With the charging area clear, place a device 

in its centre.


When the portable device is detected, the 

charger’s indicator lamp lights up green. It 

remains lit for the whole time that the battery is 

being charged.

The system is not designed to charge 

multiple devices simultaneously.

Do not leave metal objects (e.g. coins, 

keys, vehicle remote control) in the 

charging area while a device is being charged 

- Risk of overheating or interrupting the 

charging!

When using applications for a long time 

in combination with wireless charging, 

some smartphones may switch to thermal 

safety and cause some functions to stop.

-------------------------------------------------------------------------------------------------------------------------------------------------------------

54

Ease of use and comfort

Checking operation

The state of the indicator lamp allows the 

operation of the charger to be monitored.

State of the 

indicator lamp

Meaning

Off

Engine switched off.

No compatible devices 

detected.

Charging complete.

Fixed green

Compatible portable 

device detected.

Charging.

Flashing orange

Foreign object detected in 

the charging zone.

Portable device not well 

centred in the charging 

zone.

Fixed orange

Malfunction of the 

portable device's battery 

meter.

Device battery 

temperature too high.

Charger malfunction.


If the indicator lamp is fixed orange:

–  remove the device, then place it back in the 

centre of the charging zone.

or

–  remove the device and try again in a quarter 

of an hour.

If the problem persists, have the system checked 

by a CITROËN dealer or a qualified workshop.

CITROËN Hi-Fi system

(Depending on version)


The vehicle is equipped with a high-fidelity 

acoustic system.

8 speakers offer the pleasure of pure and 

detailed sound inside the vehicle:

–  2 tweeters and 2 woofers in the front

–  2 full range speakers in the rear

–  1 speaker in the central area of the dashboard

–  1 subwoofer under the trunk carpet

Mats

Fitting


When fitting it 

on the driver's side, only use 

the mountings present on the carpet (a "click" 

indicates proper locking).

The other mats are simply laid over the carpet.

Removing/refitting

►  To 

remove it on the driver's side, move the 

seat backwards and unclip the fasteners.

►  To refit it, position the mat and secure it by 

pressing down.

►  Check that the mat is secured correctly.

To avoid any risk of jamming the pedals:

–  Only use mats which are suited to the 

fixings already present in the vehicle; these 

fixings must be used.

–  Never fit one mat on top of another.

The use of mats not approved by CITROËN 

may interfere with access to the pedals and 

hinder the operation of the cruise control/

speed limiter.

-------------------------------------------------------------------------------------------------------------------------------------------------------------

55

Ease of use and comfort

3

The approved mats have two fasteners 

located underneath the seat.

Courtesy lamps

1.

Front courtesy lamp

2.

Front reading lamps

3.

Rear courtesy lamp

4.

Rear reading lamps

Front and rear courtesy 

lamps

In this position, the courtesy lamp comes 

on gradually:

–  when the vehicle is unlocked.

–  when the key is removed from the ignition 

switch.

–  when a door is opened.

–  when the remote control locking button is 

activated, in order to locate the vehicle.

It switches off gradually:

–  when the vehicle is locked.

–  when the ignition is switched on.

–  30 seconds after the last door is closed.

Permanently off.


Permanent lighting. 

In "Permanent lighting" mode, the lighting time 

varies according to the circumstances:

–  With the ignition off, approximately 10 minutes.

–  In energy saving mode, approximately 30 

seconds.

–  With the engine running, unlimited.

When the front courtesy lamp is in the 

"Permanent lighting" position, the rear 

courtesy lamp also comes on, unless it is in 

the "Permanently off" position.

To switch off the rear courtesy lamp, put it in 

the "Permanently off" position.

Reading lamps

►  With the 

ignition on, operate the 

corresponding switch.

Do not place anything against the 

courtesy lamps.

Interior ambient lighting

The interior ambient lighting casts soft lighting in 

the passenger compartment, both day and night.

Activation/deactivation and adjustment of 

the brightness are set via the 

Driving/

Vehicle

 touch screen menu.

Boot fittings


1.

Boot lamp

2.

Stowing rings

3.

Side storage boxes

4.

Boot carpet or 2-position boot floor

5.

Storage well

The stowing rings are designed to secure 

luggage using different types of retaining 

nets.

These retaining nets are available as an 

accessory.

For more information, contact a CITROËN 

dealer or a qualified workshop.

-------------------------------------------------------------------------------------------------------------------------------------------------------------

56

Ease of use and comfort

2-position boot floor

This two-

position floor allows the boot volume to 

be optimised using the lateral stops located on 

the sides:

–  High position (

100 kg max

.): to obtain a flat 

floor up to the front seats, when the rear seats 

are folded down.

–  Low position (

150 kg max

.): maximum boot 

volume.

On certain versions, the adjustable boot 

floor cannot be fitted in the low position.

To change the height:

►  Lift and pull the floor towards you using its 

central handle, then use the lateral stops to 

move it.

►  Push the floor all the way forwards to place it 

in the desired position.


To keep it in the inclined position:

►  From the high position, lift the floor towards 

the boot.

►  Take it past the retractable stops, then rest 

the floor on these stops.

Storage well


►  Lift the boot floor as far as possible, then lift 

the carpet to access the storage well.

Depending on version, it includes:

–  A temporary puncture repair kit with the tool 

kit.

–  A spare wheel with the tool kit.

–  The traction battery charging cable (Electric).

Boot lamp

It comes on automatically when the boot is 

opened and goes off automatically when the 

boot is closed.

The lighting time varies according to the 

circumstances:

–  When the ignition is off, approximately 10 

minutes.

–  In energy saving mode, approximately 30 

seconds.

–  With the engine running, unlimited.

-------------------------------------------------------------------------------------------------------------------------------------------------------------

57

Lighting and visibility

4

Lighting control stalk

Main lighting


Automatic illumination of lamps/daytime 

running lamps

Sidelamps only 

Dipped or main beam headlamps 

Headlamp dipping


►  Pull the lighting control stalk to switch 

between dipped and main beam headlamps.

In "

AUTO

" and sidelamps mode, pull the lighting 

control stalk to switch the main beam headlamps 

on directly ("headlamp flash").

Display

Illumination of the corresponding indicator 

lamp on the instrument panel confirms that the 

selected lighting is on.

A fault with a lamp is signalled by the 

permanent illumination of this warning 

lamp, accompanied by the display of a message 

and an audible signal.

Rear foglamp

It only works if the dipped or main beam 

headlamps are on.


►  Rotate the ring forwards/backwards to turn 

it on/off.

When the lighting is switched off automatically 

("

AUTO

" position) the foglamp and the 

sidelamps remain on.

Front foglamps/Rear 

foglamp

They operate with the sidelamps, dipped 

or main beam headlamps on.


►  Rotate the ring forwards:

•  once to switch on the front foglamps,

•  a second time to switch on the rear foglamp.

►  Turn in the opposite direction to switch off.

If the lighting is switched off automatically 

("

AUTO

" position) or the dipped beam 

headlamps are switched off manually, the 

foglamps and sidelamps remain on.

►  Rotate the ring backwards to switch the 

foglamps off; the sidelamps will then switch off.

Switching on the foglamps is prohibited 

in clear weather or in rain, both day and 

night. In these situations, the power of their 

beams may dazzle other drivers. They must 

only be used in fog or falling snow (rules may 

vary depending on country).

Do not forget to switch off the foglamps when 

they are no longer necessary.

Switching off of the lighting when the 

ignition is switched off 

When the ignition is switched off, all of the 

lamps turn off immediately, except for the 

sidelamps and the dipped beam headlamps 

if automatic guide-me-home lighting is 

activated.

-------------------------------------------------------------------------------------------------------------------------------------------------------------

58

Lighting and visibility

Switching on the lamps after 

switching off the ignition

To reactivate the lighting control, rotate the 

ring to the "

AUTO

" position, then to the 

desired position.

If the driver's door is opened, a temporary 

audible signal warns the driver that the lamps 

are on.

They will go off automatically after a period 

of time that depends on the level of charge in 

the battery (entering energy economy mode).

In some weather conditions (e.g. low 

temperature or humidity), misting on the 

internal surface of the glass of the headlamps 

and rear lamps is normal, and will disappear 

after the lamps have been on for a few 

minutes.

Never look too closely at the light beam 

of LED technology lamps - risk of serious 

eye injury!


Travelling abroad

If planning to use your vehicle in a 

country that drives on the other side of the 

road, the dipped beam headlamps must be 

adjusted to avoid dazzling oncoming drivers. 

Contact a CITROËN dealer or a qualified 

workshop.

Daytime running lamps/

Sidelamps

These LED lamps at the front and rear of the 

vehicle light up automatically when the engine 

starts.

They perform the following functions:

–  Daytime running lamps (lighting control stalk 

at position 

"AUTO

" with adequate ambient light).

–  Sidelamps (lighting control stalk at position 

"

AUTO

" with low ambient light or "Sidelamps 

only" or "Dipped/main beam headlamps").

Direction indicators


►  Left or right: lower or raise the lighting control 

stalk, beyond the point of resistance.

If you keep the direction indicators on for 

more than 20 seconds, the volume of the 

audible signal will increase if the speed is 

above 50 mph (80 km/h).

Three flashes

►  Press briefly upwards or downwards, without 

going beyond the point of resistance; the 

direction indicators will flash 3 times.

Parking lamps

(Depending on version)

Vehicle side marking by lighting the sidelamps 

on the traffic side only.

►  Within one minute after switching off the 

ignition, operate the lighting control stalk 

-------------------------------------------------------------------------------------------------------------------------------------------------------------

59

Lighting and visibility

4

upwards or downwards, depending on the side 

of the traffic (e.g. when parking on the right, push 

the lighting control stalk down to light up on the 

left).

This is confirmed by an audible signal and the 

lighting of the corresponding direction indicator 

lamp on the instrument panel.

►  To switch off the parking lamps, return the 

lighting control stalk to the central position.

Automatic illumination of 

lamps

With the lighting control stalk in the “

AUTO

” 

position and if a low level of exterior brightness 

is detected by the rain/sunshine sensor, the 

sidelamps and dipped beam headlamps are 

switched on automatically, without any action on 

the part of the driver. They may also come on if 

rain is detected, at the same time as automatic 

operation of the windscreen wipers.

As soon as the brightness returns to a sufficient 

level or after the windscreen wipers are switched 

off, the lamps are switched off automatically.

Malfunction

In the event of a malfunction of the rain/

sunshine sensor, the vehicle’s lamps 

come on and this warning lamp is displayed on 

the instrument panel, accompanied by an 

audible signal and/or the display of a message.

Have it checked by a CITROËN dealer or a 

qualified workshop.

Do not cover the rain/sunshine sensor 

located at the top centre of the 

windscreen behind the interior rear view 

mirror; the associated functions would no 

longer be controlled.

In fog or snow, the rain/sunshine sensor 

may detect sufficient light. For this 

reason, the lighting will not come on 

automatically.

The inner surface of the windscreen may 

become misted up and affect the proper 

operation of the rain/sunshine sensor.

In humid and cold weather, demist the 

windscreen regularly.

Headlamp beam height 

adjustment


To avoid dazzling other road users, the height 

of these headlamp beams must be adjusted 

according to the load in the vehicle.

0

(Initial setting)

Driver only or driver + front passenger

1

5 people

2

5 people + load in the boot

3

Driver only + load in the boot

4 5 6

Not used

Guide-me-home and 

welcome lighting

Guide-me-home lighting

Automatic

With the ring of the lighting control stalk in the 

"

AUTO

" position and when the light is poor, the 

sidelamps and dipped beam headlamps come 

on automatically when the ignition is switched 

off.

You can activate/deactivate this function 

and adjust the guide-me-home lighting 

duration in the 

Driving

/

Vehicle

 touch screen 

menu.

-------------------------------------------------------------------------------------------------------------------------------------------------------------

60

Lighting and visibility

Manual


►  With the ignition off, pull the lighting control 

stalk toward you ("headlamp flash") to activate/

deactivate the function.

Manual guide-me-home lighting goes off 

automatically after a period of time.

Welcome lighting

When the vehicle is unlocked, if the ambient 

light is low and the "Automatic illumination of 

headlamps" function is activated, this system 

automatically turns on certain exterior lamps 

as well as certain lamps in the passenger 

compartment.

You can activate/deactivate this function 

and adjust the welcome lighting duration 

in the 

Driving

 / 

Vehicle

 touch screen tablet 

menu.

Door mirror spotlamps

These spotlamps facilitate access to the vehicle 

by lighting the ground near the front doors.

When the front courtesy lamp switch is in 

this position, the spotlamps come on 

automatically:

–  when the vehicle is unlocked.

–  when a door is opened.

–  when a request to locate the vehicle is 

received from the remote control.

Whatever the position of the front courtesy lamp 

switch, they also come on with the welcome 

lighting and guide-me-home lighting functions.

They go off automatically after 30 seconds.

Automatic lighting 

systems - General 

recommendations

The automatic lighting systems use a detection 

camera, located at the top of the windscreen.

Operating limits

The system may be disrupted or not work 

correctly:

–  When visibility conditions are poor 

(e.g. snowfall, heavy rain).

–  If the windscreen is dirty, misted-up or 

masked (e.g. sticker) in front of the camera.

–  If the vehicle is facing highly reflective signs 

or safety barrier reflectors.

The system is not able to detect:

–  Road users that do not have their own 

lighting, such as pedestrians.

–  Vehicles with hidden lighting (e.g. travelling 

behind a safety barrier on the motorway).

–  Vehicles at the top or bottom of a steep 

slope, on winding roads, on crossroads.

Maintenance

Clean the windscreen regularly, 

particularly the area in front of the camera.

The internal surface of the windscreen can 

also become misted around the camera. 

In humid and cold weather, demist the 

windscreen regularly.

Do not allow snow to accumulate on the 

bonnet or roof of the vehicle as this could 

obstruct the camera.

Automatic headlamp 

dipping

For more information, refer to the 

General recommendations for 

automatic lighting systems

.

With the ring of the lighting control stalk in the 

"

AUTO

" position and the function activated on 

the touch screen, this system automatically 

switches between dipped and main beam 

headlamps, according to lighting and traffic 

conditions, using a camera located at the top of 

the windscreen.


-------------------------------------------------------------------------------------------------------------------------------------------------------------

61

Lighting and visibility

4


This system is a driving aid.

The driver remains responsible for 

the vehicle's lighting, its correct use in the 

prevailing light, visibility and traffic conditions, 

and for compliance with driving and vehicle 

regulations.

The system becomes operational when 

the vehicle exceeds 16 mph (25 km/h).

When the speed falls below 9 mph (15 km/h), 

the function is no longer operational.

Activation/Deactivation

It is set via the 

Driving / Vehicle

 touch 

screen menu.

The state of the system stays in the memory 

when switching off the ignition.

Operation

If the ambient light level is very low and traffic 

conditions permit:

–  The main beam headlamps 

come on automatically. These 

indicator lamps light up on the instrument panel.

If the ambient light level is sufficient and/or the 

traffic conditions do not allow the main beam 

headlamps to be lit:

–  The dipped beam headlamps 

remain lit. These indicator lamps 

light up on the instrument panel.

The function is deactivated if the foglamps 

are switched on or if the system detects poor 

visibility conditions (e.g. fog, heavy rain, 

snowfall).

When the foglamps are switched off or when the 

visibility conditions become favourable again, the 

function is automatically reactivated.

This indicator lamp goes out when the 

function is deactivated.

Pause

If the situation requires a change of headlamp 

beam, the driver can take over at any time.

►  Switch the headlamps manually between 

dipped and main beam to pause the function.

If the "AUTO" and "Dipped beam" indicator 

lamps were on, the system changes to main 

beam.

If the "AUTO" and "Main beam" indicator lamps 

were on, the system changes to dipped beam.

►  To reactivate the function, once again switch 

the headlamps manually between dipped and 

main beam.

Malfunction

If a malfunction occurs with the system or 

the camera, this warning lamp lights up 

on the instrument panel, accompanied by an 

audible signal and a message.

Have it checked by a CITROËN dealer or a 

qualified workshop.

Cornering lighting

This system makes use of the beam from a front 

foglamp to illuminate the inside of a bend, when 

the main or dipped beam headlamps are on and 

the vehicle speed is below 25 mph (40 km/h) 

(urban driving, winding road, junctions, parking 

manoeuvres).


Without/With cornering lighting

-------------------------------------------------------------------------------------------------------------------------------------------------------------

62

Lighting and visibility

Activation / Deactivation

It is set via the 

Driving / Vehicle

 touch 

screen menu.

Switching on/off

This system starts:

–  when the corresponding direction indicator is 

switched on.

or

–  from a certain angle of rotation of the steering 

wheel.

It becomes inactive:

–  below a certain angle of rotation of the 

steering wheel.

–  above approximately 25 mph (40 km/h).

–  when reverse gear is engaged.

Wiper control stalk

Before operating the wipers in wintry 

conditions, clear any snow, ice or frost 

from the windscreen and around the wiper 

arms and blades.

Do not operate the wipers on a dry 

windscreen. In extremely hot or cold 

weather, check that the wiper blades are not 

stuck to the windscreen before operating the 

wipers.

After using an automatic car wash, you 

may temporarily notice abnormal noises 

and poorer wiping performance.  You do not 

need to replace the wiper blades.

With intermittent wipers


With automatic Wipers


Windscreen wipers

►  To select the wiping speed: raise or lower the 

stalk to the desired position.

Fast wiping (heavy rain) 

Normal wiping (moderate rain) 

Intermittent wipers 

or

Automatic wipers 

Switching off


Manual 

In position 

1

 or 

2

, the wiping frequency is 

automatically reduced when the speed of 

the vehicle drops below 3 mph (5 km/h).

When the speed is above 6 mph (10 km/h) 

again, the wiping frequency returns to the 

original frequency (fast or normal).

Single wipe

►  Press and release the control stalk or briefly 

pull the control stalk towards you.

Windscreen wash

►  Pull the wiper control stalk towards you and 

hold.

A final wiping cycle is performed when 

screenwashing ends.

With automatic air conditioning, any 

action on the screenwash control results 

in temporary closure of the air intake to 

protect the passenger compartment from any 

odour.

-------------------------------------------------------------------------------------------------------------------------------------------------------------

63

Lighting and visibility

4

To avoid damaging the wiper blades, do 

not operate the screenwash if the 

screenwash reservoir is empty.

Only operate the screenwash if there is no 

risk of the fluid freezing on the windscreen 

and hindering visibility. During the winter 

period, use "very cold climate" rated products.

Never top up with water.

Front intermittent wiping

In Intermittent mode, the driver can adjust the 

wiping frequency by turning the ring to one of the 

5 available positions.


The first (upper) position corresponds to the 

longest time interval between 2 wipes for light 

rain.

The last (lower) position corresponds to the 

shortest time interval between 2 wipes for heavy 

rain.

A rotation of the ring from a higher position to a 

lower position triggers a confirmation wiping.

After the ignition has been switched off 

for more than 1 minute with the wiper 

control stalk in the 

INT

1

 or 

2

 position, when 

the ignition is switched on again:

–  the system works as soon as the vehicle 

exceeds 6 mph (10 km/h), if the outside 

temperature is below +3°C.

–  the system works immediately, if the 

outside temperature is above +3°C.

Automatic windscreen 

wipers

In 

AUTO

 mode, the front wipers work 

automatically and adapt to the intensity of 

precipitation depending on the sensitivity of the 

sensor selected.

The rainfall detection function uses a rain/

sunshine sensor located at the top centre of the 

windscreen, behind the rear view mirror.

In certain weather conditions (e.g. fog, 

frost, snow, projections on salty roads), 

the driver may have to return to manual 

wiping.

Switching on/off

To switch on:

►  Put the wiper control stalk in the 

AUTO


position.

►  Turn the ring to adjust the sensitivity of the 

sensor.

A wiping cycle, accompanied by the display of 

a message, confirms that the request has been 

taken into account.

►  To switch off, put the wiper control stalk in 

another position or in the 

0

 position.

Adjusting the sensitivity


The first position (upper) corresponds to the 

lowest sensitivity of the sensor.

The last position (lower) corresponds to the 

highest sensitivity of the sensor.

The higher the sensitivity, the faster the system 

reacts and increases the wiping frequency.

A rotation of the ring from a higher position to a 

lower position triggers a confirmation wiping.

After the ignition has been switched off 

for more than 1 minute with the wiper 

control stalk in the 

AUTO

 position, when the 

ignition is switched on again:

–  the system works, depending on the 

volume of rain detected, as soon as the 

vehicle exceeds 6 mph (10 km/h), if the 

outside temperature is below +3°C.

–  the system works immediately, depending 

on the volume of rain detected, if the outside 

temperature is above +3°C.

-------------------------------------------------------------------------------------------------------------------------------------------------------------

64

Lighting and visibility

Do not cover the rain/sunshine sensor.

When using an automatic car wash, 

switch off the automatic wipers and the 

ignition.

In winter, wait until the windscreen is 

completely clear of ice before activating the 

automatic wipers.

Malfunction

If a fault occurs with the automatic wipers, the 

wipers operate in intermittent mode.

Have it checked by a CITROËN dealer or a 

qualified workshop.

Special position of the 

windscreen wipers

This maintenance position is used while cleaning 

or replacing the wiper blades. It can also be 

useful, in wintry weather (ice, snow), to release 

the wiper blades from the windscreen.

To maintain the effectiveness of the flat 

wiper blades, it is advisable to:

–  handle them with care.

–  clean them regularly using soapy water.

–  avoid using them to hold cardboard on the 

windscreen.

–  replace them at the first signs of wear.

Before removing a windscreen wiper blade


Operating the wiper control stalk immediately 

after switching off the ignition will place the wiper 

blades in a vertical position.

►  Proceed with the desired operation or the 

replacement of the wiper blades.

After refitting a windscreen wiper blade

►  To return the wiper blades to their initial 

position after the operation, switch on the ignition 

and operate the wiper control stalk.

Changing a wiper blade

Removing/Refitting at the front


►  Carry out these wiper blade replacement 

operations from the driver's side.

►  Starting with the wiper blade farthest from 

you, hold each arm by the rigid section and raise 

it as far as possible.

Do not touch the wiper blades - risk of 

irreparable deformation.

Do not release them while moving them. Risk 

of damaging the windscreen!

►  Clean the windscreen using screenwash 

fluid.

Do not apply "Rain X" type water-

repellent products.

►  Unclip the worn wiper blade closest to you 

and remove it.

-------------------------------------------------------------------------------------------------------------------------------------------------------------

65

Lighting and visibility

4

►  Install the new wiper blade and clip it to the 

arm.

►  Repeat the procedure for the other wiper 

blade.

►  Starting with the wiper blade closest to you, 

once again hold each arm by the rigid section, 

then guide it carefully onto the windscreen.

-------------------------------------------------------------------------------------------------------------------------------------------------------------


Content      ..     2      3      4      5     ..