Citroën C4 (2022 year). Manual in english - page 2
 

  Index      Manuals     Citroën C4 (2022 year). Manual in english


Search            copyright infringement  


Content      ..      1      2      3      ..


Citroën C4 (2022 year). Manual in english - page 2


18

Instruments

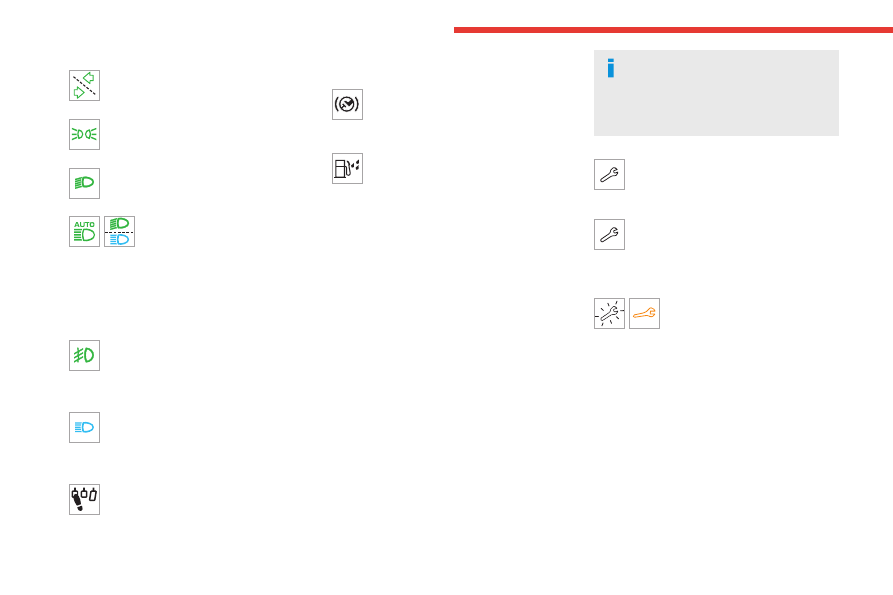
Direction indicators

Flashing with audible signal.

The direction indicators are on.

Sidelamps

Fixed.

The lamps are on.

Dipped beam headlamps

Fixed.

The lamps are on.

Automatic headlamp dipping

Fixed.

The function has been activated 

via the touch screen (

Driving

/

Vehicle

 menu).

The lighting control stalk is in the "AUTO" 

position.

For more information, refer to the 

Lighting and 

visibility

 section.

Front foglamps

Fixed.

The front foglamps are on.

Blue warning/indicator lamps
Main beam headlamps

Fixed.

The lamps are on.

Black/white warning lamps
Foot on the clutch (Petrol or Diesel)

Fixed.

Stop & Start: the change to START mode 

is rejected because the clutch pedal is not fully 

depressed.

Fully depress the clutch pedal.

Foot on the brake

Fixed.

Insufficient or no pressure on the brake 

pedal.

Fuel filter (Diesel)

Fixed.

The Diesel fuel filter contains water.

Carry out (2) without delay. Risk of damaging the 

fuel injection system!

Indicators

Service indicator

The servicing information is expressed in terms 

of distance (miles or kilometres) and time 

(months or days).

The alert is given at whichever of these two 

terms is reached first.

The servicing information is displayed in the 

instrument panel. Depending on the version of 

the vehicle:

–  The distance recorder display line indicates 

the distance remaining before the next service 

is due, or the distance travelled since it was due 

preceded by the "-" sign.

–  An alert message indicates the distance 

remaining, as well as the period before the next 

service is due or how long it is overdue.

The value indicated is calculated 

according to the distance covered and 

the time elapsed since the last service.

The alert may also be triggered close to a 

due date.

Service spanner

On temporarily when the ignition is 

switched on.

Between 620 and 1,860 miles (1,000 and 3,000 

km) remain before the next service is due.

Fixed, when the ignition is switched on.

The next service is due in less than 620 

miles (1,000 km).

Have your vehicle serviced very soon.

Service spanner flashing

Flashing then fixed, when the 

ignition is switched on.

(With BlueHDi Diesel engines, associated with 

the Service warning lamp.)

The servicing interval has been exceeded.

Have your vehicle serviced as soon as possible.

Resetting the service indicator

The service indicator must be reset after each 

service.

If you have serviced your vehicle yourself:

►  Switch the ignition off.

-------------------------------------------------------------------------------------------------------------------------------------------------------------

19

Instruments

1


►  Press and hold the button located on the end 

of the lighting control stalk.

►  Switch on the ignition without starting the 

engine; a temporary display window appears and 

a countdown begins.

►  When the display indicates =0, release the 

lighting control stalk button; the spanner symbol 

disappears.

If you disconnect the battery following 

this operation, lock the vehicle and wait 

at least 5 minutes for the reset to be 

registered.

Reminder of the servicing information

You can view the servicing information by 

pressing the "

Check

" button in the 

Driving/Vehicle

 touch screen menu.

Engine oil level indicator

(Depending on version)

On versions fitted with an electric gauge, the 

engine oil level status is displayed on the 

instrument panel for a few seconds when 

the ignition is switched on, after the servicing 

information.

The level read will only be correct if the 

vehicle is on level ground and the engine 

has been off for more than 30 minutes.

Oil level correct

This is indicated by the display of "

OIL OK

" or by 

the message "

Oil level correct

" (depending on 

the instrument panel).

Low oil level

This is indicated by the display of "

OIL

" or by 

the message "

Oil level incorrect

" (depending 

on the instrument panel), accompanied by the 

lighting of the Service warning lamp and an 

audible signal.

If a low oil level is confirmed by a check using 

the dipstick, the level must be topped up to avoid 

damage to the engine.

For more information on 

Checking levels

, refer 

to the corresponding section.

Oil gauge malfunction

This is indicated by the display of "

OIL_ _

or by the message "

Oil level measurement 

invalid

" (depending on the instrument panel), 

accompanied by the lighting of the Service 

warning lamp and an audible signal.

Contact a CITROËN dealer or a qualified 

workshop.

In the event of a malfunction of the 

electric gauge, the oil level is no longer 

monitored.

If the system is faulty, you must check the 

engine oil level using the manual dipstick 

located in the engine compartment.

For more information on 

Checking levels

refer to the corresponding section.

Coolant temperature 

indicator

Depending on the type of instrument panel, this 

information is only available in the instrument 

panel's customisable area.


With the engine running:

–  In zone 

A

, the temperature is correct.

–  In zone 

B

, the temperature is too high. 

The associated warning lamp and the 

STOP

 warning lamp light up in red on the 

instrument panel, accompanied by the display of 

a message and an audible signal.

You must stop the vehicle as soon as it is 

safe to do so.

Wait a few minutes before switching off the 

engine.

-------------------------------------------------------------------------------------------------------------------------------------------------------------

20

Instruments

After switching off the ignition, carefully 

open the bonnet and check the coolant 

level.

For more information on 

Checking 

levels

, refer to the corresponding 

section.

AdBlue

®

 range indicators 

(BlueHDi)

The Diesel BlueHDi engines are equipped with 

a system that associates the SCR (Selective 

Catalytic Reduction) emissions control system 

and the Diesel particle filter (DPF) for the 

treatment of exhaust gases. They cannot 

function without AdBlue

®

 fluid.

When the level of AdBlue

®

 falls below the 

reserve level (between 1,500 and 0 miles (2,400 

and 0 km)), a warning lamp lights up when 

the ignition is switched on and an estimate 

of the distance that can be travelled before 

engine starting is prevented is displayed in the 

instrument panel.

The engine starting prevention system 

required by regulations is activated 

automatically once the AdBlue

®

 tank is empty. 

It is then no longer possible to start the 

engine until the minimum level of AdBlue

®

 has 

been topped up.

Manual display of driving range

While the driving range is greater than 

1,500 miles (2,400 km), it is not displayed 

automatically.

You can view the range information by 

pressing the "

Check

" button in 

the 

Driving/Vehicle

 touch screen menu.

Actions required related to a lack of 

AdBlue

®

The following warning lamps light up when the 

quantity of AdBlue

®

 is below the reserve level: 

driving range of 1,500 miles (2,400 km).

Together with the warning lamps, messages 

regularly remind you of the need to top up to 

avoid engine starting being prevented. Refer to 

the 

Warning and indicator lamps

 section for 

details of the messages displayed.

For more information on 

AdBlue

®


(BlueHDi)

 and in particular on topping 

up, refer to the corresponding section.

Warning/

indicator 

lamps on

Action

Remaining 

range


Top up.

Between 

1,500 miles 

and 500 

miles (2,400 

km and 800 

km)


Top up as 

soon as 

possible.

Between 

500 miles 

and 62 

miles (800 

km and 

100 km)


A top-up is 

vital

, there is 

a risk that the 

engine will 

be prevented 

from starting.

Between 62 

miles and 0 

miles (100 

km and 0 

km)


To be able 

to restart the 

engine, add at 

least 5 litres of 

AdBlue

®

 to the 

tank.

0 miles (km)

-------------------------------------------------------------------------------------------------------------------------------------------------------------

21

Instruments

1

Malfunction of the SCR emissions 

control system

Malfunction detection


If a malfunction is detected, 

these warning lamps come 

on, accompanied by an 

audible signal and the 

display of an "

Emissions 

control fault

" message.

The alert is triggered while driving when the 

fault is detected for the first time, and thereafter 

when switching on the ignition for subsequent 

journeys, for as long as the cause of the fault 

persists.

If the fault is temporary, the alert 

disappears during the next journey, after 

self-diagnostic checks of the SCR emissions 

control system.

Malfunction confirmed during the 

permitted driving phase (between 685 

miles and 0 miles (1,100 km and 0 km))

If the fault indication is still displayed 

permanently after 31 miles (50 km) of driving, the 

fault in the SCR system is confirmed.

The AdBlue warning lamp flashes and 

a message is displayed ("

Emissions 

control fault: starting prevented in X miles 

(kms)

"), indicating the driving range in miles or 

kilometres.

While driving, the message is displayed every 30 

seconds. The alert is repeated when switching 

on the ignition.

You can continue driving for up to 685 miles 

(1,100 km) before the 

engine starting 

prevention

 system is triggered.

Have it checked by a CITROËN dealer or 

a qualified workshop.

Starting prevented

Every time the ignition is switched on, the 

message "

Emissions control fault: Starting 

prevented

" is displayed.

To restart the engine

Contact a CITROËN dealer or a qualified 

workshop.

Power indicator (Electric)


CHARGE

Traction battery charging during deceleration 

and braking.

ECO

Moderate energy consumption and optimised 

driving range.

POWER

Energy consumption by the drive train during 

acceleration.

Charge level indicator 

(Electric)


The traction battery's actual charge level and 

the remaining range are displayed continuously 

when the vehicle is started.

With the ignition off, opening the driver's 

door activates the indicator.

Associated warning lamps

Two successive alert levels indicate that the 

energy available has dropped to a low level:

1st level: Reserve

The state of charge of the traction battery 

is low.

Fixed, accompanied by an audible signal.

►  View the remaining range on the instrument 

panel.

►  Put the vehicle on charge as soon as 

possible.

2nd level: Critical

The state of charge of the traction battery 

is critical.

Fixed, together with the reserve warning lamp, 

accompanied by an audible signal.

►  You must put the vehicle on charge.

-------------------------------------------------------------------------------------------------------------------------------------------------------------

22

Instruments

The remaining range is no longer 

calculated. The drive train power 

gradually decreases.

The heating and air conditioning are switched 

off (even if the thermal comfort consumption 

indicator is not at the "

ECO

" level). 

Flow indicator (Electric)

The flow indicator displays the energy flows in 

the vehicle in real time.

It is available in the "

Personal 1

"/"

Personal 2

display modes of the instrument panel.

For more information on the 

Display modes

refer to the corresponding section.


The indicator changes colour depending on how 

energy from the traction battery is being used:

Blue: energy consumption

Green: energy recovery

This indicator does not represent the 

battery's actual level of charge.

Thermal comfort 

consumption indicator 

(Electric)

(Depending on version)

It is available in the "

Personal 1

"/"

Personal 2

display modes of the instrument panel.

For more information on the 

Display modes

refer to the corresponding section.


The gauge shows the consumption of the 

traction battery's electrical energy by the thermal 

comfort devices in the passenger compartment.

The devices in question are the heating and air 

conditioning systems.

This equipment can be used:

–  If the vehicle is not plugged in, when the 

READY

 lamp is lit.

–  If the vehicle is plugged in, when the ignition is 

switched on ("Lounge" mode).

Selecting 

ECO

 mode limits the performance of 

some of this equipment. The thermal comfort 

consumption indicator then moves into the 

"

ECO

" zone.

To quickly heat or cool the passenger 

compartment, feel free to temporarily 

select the maximum heating or cooling 

setting.

When the heating is on maximum, the gauge 

on the thermal comfort consumption indicator 

is in the 

MAX

 zone. When the air conditioning 

is on maximum, it stays in the 

ECO

 zone.

Excessive use of thermal comfort equipment, 

particularly at low speed, can significantly 

decrease the vehicle's range.

Remember to optimise equipment settings 

upon achieving the desired level of comfort, 

and adjust them if necessary whenever you 

start the vehicle.

After an extended period without using the 

heating, you may notice a slight odour during 

the first few minutes of use.

Manual test

This function allows you to check certain 

indicators and display the alerts log.

It can be accessed via the "

Check

" button 

in the 

Driving/Vehicle

 touch screen 

menu.

Depending on version, the following information 

is displayed on the instrument panel:

–  Engine oil level.

–  Next service due.

–  Tyre pressures.

–  Driving range associated with the AdBlue

®

 and 

the SCR system (BlueHDi Diesel).

–  Current alerts.

-------------------------------------------------------------------------------------------------------------------------------------------------------------

23

Instruments

1

This information is also displayed 

automatically every time the ignition is 

switched on.

Total distance recorder

The total distance recorder measures the total 

distance travelled by the vehicle since its initial 

registration.

With the ignition on, the total distance is 

displayed at all times. It remains displayed for 

30 seconds after switching off the ignition. It is 

displayed when the driver's door is opened, and 

when the vehicle is locked or unlocked.

When travelling abroad, you may have to 

change the distance units (km or miles): 

the road speed must be displayed in the local 

country’s official unit (km/h or mph).

The unit is changed via the screen 

configuration menu, with the vehicle 

stationary.

Lighting dimmer

This system allows the brightness of the 

instruments and controls to be adjusted manually 

to suit the ambient light level.

With BLUETOOTH touch 

screen audio system

►  Press on the 

Settings

 menu. 

►  Select "

Display

". 

►  Adjust the brightness by 

pressing the buttons.

You can also switch off the screen:

►  Select "

Turn off screen

". 

The screen goes off completely.

►  Press the screen again (anywhere on its 

surface) to activate it.

With MyCitroën Play

 / 

►  Press 

Settings

 from the 

status bar or from the menus 

buttons.

 / 

►  Select "

Brightness

" or 

"

Screen configuration

", 

depending on equipment.

►  Adjust the instrument panel and 

screen brightness by using the arrows or 

moving the slider.

 / 

►  Press this button to save and 

exit, depending on equipment.

You can also switch off the screen:

 / 

►  Press 

Settings

 from the 

status bar or from the menus 

buttons.

►  Select "

Turn off screen

" or "

Dark

", 

depending on equipment.

The screen goes off completely.

►  Press the screen again (anywhere on its 

surface) to turn it on.

With CITROËN Connect Nav

With the lamps switched on:

►  Press this button to select the 

Settings

 menu.

►  Select "

OPTIONS

".

►  Select "

Screen configuration

". 

►  Select the "

Brightness

” tab.

►  Adjust the instrument panel and 

screen brightness by using the arrows or 

moving the slider.

►  Press this button to save and exit.


You can also switch off the screen:

►  Press this button to select the 

Settings

 menu.

►  Select "

Turn off screen

". 

The screen goes off completely.

►  Press the screen again (anywhere on its 

surface) to turn it on.

Trip computer

Displays information related to the current trip 

(range, fuel consumption, average speed, etc.).

-------------------------------------------------------------------------------------------------------------------------------------------------------------

24

Instruments

Data displayed on the 

instrument panel


►  Pressing the button located on the end of the 

wiper control stalk displays the following tabs in 

turn:

–  Current information:

•  Driving range (Petrol or Diesel).

•  Current fuel consumption.

•  Stop & Start time counter (Petrol or Diesel).

–  Trips "

1

" then "

2

":

•  Average speed.

•  Average fuel consumption.

•  Distance travelled.

Trip reset

► 

When the desired trip is displayed, 

press the button on the end of the wiper 

control stalk for more than 2 seconds.

Trips "

1

" and "

2

" are independent and are used 

in the same way.

Definitions

Range

(miles or km)

Distance that can still be travelled with the 

fuel remaining in the tank (based on the 

average fuel consumption over the last few miles 

(kilometres) travelled).

This value may vary following a change in driving 

style or terrain, leading to a significant change in 

current fuel consumption.

When the range falls below 19 miles (30 km), 

dashes are displayed.

After filling with at least 5 litres of fuel, the range 

is recalculated and is displayed if it exceeds 62 

miles (100 km).

Dashes appearing permanently in place of 

numbers while driving indicates a malfunction.

Contact a CITROËN dealer or a qualified 

workshop.

Current consumption

(mpg or l/100 km or km/l)

(miles/kWh or kWh/100 km or km/kWh) (Electric)

/

Calculated during the last few 

seconds.

This function is only displayed at speeds above 

19 mph (30 km/h) (Petrol or Diesel).

Average consumption

(mpg or l/100 km or km/l)

(miles/kWh or kWh/100 km or km/kWh) (Electric)

/

Calculated since the last trip 

computer reset.

Average speed

(mph or km/h)

Calculated since the last trip computer 

reset.

Distance travelled

(miles or km)

Calculated since the last trip computer 

reset.

Stop & Start time counter

(minutes/seconds or hours/minutes) 

If your vehicle is fitted with the Stop & Start 

function, a time counter calculates the time spent 

in STOP mode during a journey.

The time counter is reset each time the ignition is 

switched on.

Touch screen 

BLUETOOTH audio 

system


-------------------------------------------------------------------------------------------------------------------------------------------------------------

25

Instruments

1

This system gives access to the following 

elements:

–  Audio system and telephone controls and 

display of related information.

–  Vehicle function and equipment setting menus.

For safety reasons, always stop the 

vehicle before performing operations 

that require sustained attention.

Some functions are not accessible while 

driving.

Recommendations

Do not use pointed objects on the touch screen.

Do not touch the touch screen with wet hands.

Use a soft, clean cloth to clean the touch screen.

Main controls

With the ignition off: system start-up

With the engine running: mute

Volume adjustment 

Access to menus 

Return to the previous screen or confirm


After a few moments with no action on 

the second page, the first page is 

displayed automatically.

Menus

Radio


Media


Telephone


Driving

Activation, deactivation and settings for 

certain functions.

Settings

Main system settings.

For more information about the menus, 

refer to the sections describing the audio 

and telematics systems.

10-inch touch screen


This system gives access to the following 

elements:

–  Permanent display of the time and outside 

temperature (a blue warning lamp appears if 

there is a risk of ice).

–  Heating/air conditioning system controls 

(depending on version).

–  Vehicle functions and equipment setting 

menus.

–  Audio system and telephone controls and 

display of related information.

–  Display of visual manoeuvring aid functions 

(visual parking sensor information, Park Assist, 

etc.).

–  Internet services and display of related 

information.

–  Navigation system controls and 

display of related information (depending on 

version).

For safety reasons, always stop the 

vehicle before performing operations 

that require sustained attention.

Some functions are not accessible while 

driving.

Recommendations

This screen is of the capacitive type.

–  Do not use pointed objects on the touch 

screen.

–  Do not touch the touch screen with wet hands.

–  Use a soft, clean cloth to clean the touch 

screen.

Principles

Use this button to access the menus, then 

press the buttons that appear on the 

touch screen.

-------------------------------------------------------------------------------------------------------------------------------------------------------------

26

Instruments

Use this button for direct access to the 

Driving/Vehicle

 menu.

Some menus may display across two pages: 

press the "

OPTIONS

" button to access the 

second page.

After a few moments with no action on 

the second page, the first page is 

displayed automatically.

To deactivate/activate a function, select "

OFF

or "

ON

".

Configuring a function


Access to additional information on the 

function

Confirm


Return to the previous page or confirm


Audio system on/off

Volume adjustment/mute

Menus

Press the 

touch screen with three fingers 

to show all of the menu buttons.

For more information about the menus, 

refer to the sections describing the audio 

and telematics systems.

Radio/Media


Climate

Settings for temperature, air flow, etc.

For more information on 

Manual air 

conditioning

 and 

Dual-zone automatic air 

conditioning

, refer to the corresponding 

sections.

Navigation

 (Depending on equipment) 

Driving or Vehicle

 (Depending on 

equipment)

Activation, deactivation and settings for certain 

functions.

The functions are organised in 2 tabs: "

Driving 

functions

" and "

Vehicle settings

".

Telephone


Applications

Access to certain configurable equipment.

Settings

Main settings for the audio system, touch 

screen and digital instrument panel.

Information banner(s)

Certain information is displayed permanently in 

the touch screen banner(s).

–  Outside temperature (a blue warning lamp 

appears if there is a risk of ice).

–  Access to the 

Settings

 for the touch screen 

and the digital instrument panel (date/time, 

languages, units, etc.).

–  Notifications.

–  Reminder of the air conditioning information, 

and direct access to the corresponding menu.

– Time.

Energy menu (Electric)

It can be accessed directly by pressing 

the button located on the centre console.

The pages available vary depending on the 

audio equipment.

Flow

The page displays a real-time representation of 

the electric drive train’s operation.


1.

Active driving mode

2.

Electric motor

3.

Estimated traction battery charge level

4.

Energy flows

The energy flows have a specific colour for each 

type of driving:

A.

Blue: energy consumption

B.

Green: energy recovery

Statistics

This page shows electrical energy consumption 

statistics.


-------------------------------------------------------------------------------------------------------------------------------------------------------------

27

Instruments

1


–  Blue bar chart: directly consumed energy 

supplied by the traction battery.

–  Green bar chart: energy recovered during 

deceleration and braking, used to recharge the 

battery.

The average result for the current trip is stated in 

kWh/100 km.

►  You can change the displayed time scale by 

pressing the 

-

 or 

+

 buttons.

A current trip is any trip of more than 20 

minutes without switching off the ignition.

Charging

This page allows you to programme deferred 

charging.

For more information on 

Charging the traction 

battery (Electric)

, refer to the corresponding 

section.

Remotely-operable 

functions (Electric)


The following functions are 

available from the 

MyCitroën 

App

 application, which is 

accessible from a smartphone:

– Managing the traction battery charging 

(deferred charging).

–  Managing the temperature pre-conditioning.

–  Viewing the state of charge and range of the 

vehicle.

Installation procedure

►  Download the 

MyCitroën App

 app from the 

appropriate online store for your smartphone.

►  Create an account.

►  Enter the vehicle’s VIN (code beginning with 

"VF" on the vehicle registration certificate).

For more information on 

Identification 

markings

, refer to the corresponding section.

Network coverage

In order to be able to use the various 

remotely operable features, ensure that your 

vehicle is located in an area covered by the 

mobile network.

A lack of network coverage may prevent 

communication with the vehicle (for example, 

if it is in an underground car park). In such 

cases, the application will display a message 

indicating that the connection with the vehicle 

could not be established.

-------------------------------------------------------------------------------------------------------------------------------------------------------------

28

Access

Electronic key with 

remote control function 

and built-in key

Remote control function


The remote control can be used for the following 

remote functions, depending on version:

–  Unlocking/Locking/Deadlocking the vehicle.

–  Remote operation of lighting.

–  Folding/Unfolding the door mirrors.

–  Activating/Deactivating the alarm.

–  Locating the vehicle.

–  Opening/Closing the windows.

–  Closing the sunroof.

–  Activating the vehicle’s electronic immobiliser.

Back-up procedures allow the vehicle to be 

locked/unlocked in the event of a failure of the 

remote control, the central locking, the battery, 

etc. For more information on the 

Back-up 

procedures

, refer to the corresponding section.

Built-in key

The key built into the remote control can be 

used for the following operations, depending on 

version:

–  Locking/Unlocking the vehicle.

–  Activation/Deactivation of the manual child 

lock.

–  Activation/Deactivation of the front passenger 

airbag.

–  Back-up Unlocking/Locking of the doors.

–  Switching on the ignition and starting/switching 

off the engine.

Without Keyless Entry and Start


►  To unfold or fold the key, press the button.

With Keyless Entry and Start


►  To eject the key or put it back in place, pull 

and hold the button.

Once the built-in key is ejected, always 

keep it with you to be able to carry out 

the corresponding back-up procedures.

Unlocking the vehicle


Selective unlocking is configured in the 

Driving

/

Vehicle

 touch screen menu.

Complete unlocking

►  Press the unlocking button.

Selective unlocking

Driver’s door and fuel filler/charging flap

►  Press the unlocking button.

►  Press it 

again

 to unlock the other doors and 

the boot.

The charging nozzle can be unplugged on the 

second press.

Complete or selective unlocking, and alarm 

deactivation (depending on version), is confirmed 

by the flashing of the direction indicators.

Depending on version, the door mirrors unfold.

Locking the vehicle


-------------------------------------------------------------------------------------------------------------------------------------------------------------

29

Access

2

Normal locking

►  Press the locking button.

The locking, and the activation of the alarm 

depending on version, is confirmed by the 

lighting of the direction indicators.

Depending on version, the door mirrors fold.

An access (door or boot) that is not 

properly closed prevents locking of the 

vehicle. However, if the vehicle is fitted with 

an alarm, it will be activated after 45 seconds.

If the vehicle is unlocked but the doors or boot 

are not subsequently opened, the vehicle 

will automatically lock itself again after about 

30 seconds. If the vehicle is fitted with an 

alarm, it will be reactivated automatically.

Deadlocking

Deadlocking renders the interior door 

controls inoperative. It also disables the 

central locking button.

The horn remains operational.

Never leave anyone inside the vehicle 

when it is deadlocked.

►  Press the locking button.

►  Press the locking button again within 3 

seconds to deadlock the vehicle (confirmed by 

the temporary lighting of the direction indicators).

For the vehicles equipped with the Proximity 

Keyless Entry and Start system, a double 

audible signal indicates that the vehicle is not 

deadlocked.

Opening / Closing the 

windows

Opening the windows

►  Press the unlocking button for more 

than 3 seconds.

Depending on version, the windows stop when 

the button is released or by pressing the button 

a second time.

Closing the windows and sunroof 

(depending on version)

►  Press the locking button for more than 

3 seconds.

Depending on version, the windows and the 

sunroof stop when the button is released or by 

pressing the button a second time.

Ensure that no person or object could 

prevent the correct closing of the 

windows and sunroof.

If, on versions with alarm, you want to 

leave the windows and/or sunroof partially 

open, you must first deactivate the interior 

volumetric alarm protection.

For more information on the 

Alarm

, refer to 

the corresponding section.

Remote lighting of the 

lamps

►  Press this button. The sidelamps, 

dipped beam headlamps, number plate 

lamps and door mirror spotlamps come on for 30 

seconds.

Pressing again before the end of the timed 

period switches off the lamps immediately.

Advice

Remote control

The remote control is a sensitive, high-

frequency device; avoid handling it in your 

pocket, due to the risk of unintentionally 

unlocking the vehicle.

Avoid pressing the remote control buttons 

while out of range of the vehicle, due to 

the risk of rendering the remote control 

inoperative. It would then be necessary to 

reset it.

The remote control does not work when the 

key is in the ignition switch, even when the 

ignition is switched off.

Anti-theft protection

Do not modify the electronic vehicle 

immobiliser, as this might result in 

malfunctions.

For vehicles with a key ignition switch, 

remember to remove the key and turn the 

steering wheel to engage the steering lock.

-------------------------------------------------------------------------------------------------------------------------------------------------------------

30

Access

Locking the vehicle

Driving with the doors locked could make 

it more difficult for the emergency services 

to enter the passenger compartment in an 

emergency.

As a safety precaution, remove the key from 

the ignition or take the electronic key with you 

when leaving the vehicle, even for a short 

time.

Purchasing a second-hand vehicle

Have the key codes memorised by a 

CITROËN dealer, to ensure that the keys in 

your possession are the only ones able to 

start the vehicle.

Proximity Keyless Entry 

and Start

This is a Keyless Entry and Start system.

It enables automatic vehicle locking/unlocking 

simply by detecting the electronic key.

As long as the driver has the electronic key 

on their person, the vehicle unlocks as they 

approach and locks when they walk away.

If the electronic key is present in an area 

between 2 and 7 m from the vehicle for more 

than 30 minutes, the system is deactivated to 

preserve the battery.

Key recognition zones:


Zone A

: welcome lighting on approaching 

the vehicle (between 3 and 5 metres from the 

vehicle).

Zone B

: automatic locking on leaving the vehicle 

(about 2 metres from the vehicle).

Zone C

: automatic unlocking on approaching 

the vehicle (between 1 and 2 metres from the 

vehicle).

The automatic functions are configured 

via the 

Driving

/

Vehicle

 touch screen 

menu.

Unlocking the vehicle


Selective unlocking is configured via the 

Driving

/

Vehicle

 touch screen menu.

Selective unlocking is deactivated by default.

Complete unlocking

The vehicle (doors and boot) unlocks:

►  Either automatically as the driver approaches 

in zone 

C

, if the automatic functions are 

activated.

►  Or by gently pressing the driver's door 

handle.

Unlocking, and alarm deactivation (depending 

on version), is confirmed by the flashing of the 

direction indicators.

Depending on version, the door mirrors unfold.

If the electronic key remains around the 

vehicle (zones 

A

B

 or 

C

) for more than 

15 minutes without action, the automatic 

functions are deactivated. To unlock or lock 

the vehicle, use the remote control or press 

the driver's door handle.

If using the door handle does not lock/unlock 

the vehicle, bring the electronic key closer 

and repeat the desired action.

Selective unlocking

Driver’s door and fuel/charging flap

They unlock:

►  Either automatically when approaching the 

driver’s door, if the automatic functions are 

activated.

-------------------------------------------------------------------------------------------------------------------------------------------------------------

31

Access

2

►  Or by gently pressing the driver's door 

handle.

►  Once inside the vehicle, to unlock all 

accesses, press the central locking button or pull 

the opening control on any door.

Locking the vehicle

Normal locking


With the doors and boot closed, the vehicle 

locks:

►  Either automatically, upon leaving zone 

B

, if 

the automatic functions are activated.

►  Or by gently pressing the driver's door 

handle.

Locking is confirmed by the lighting of the 

direction indicators, and by a double audible 

signal when the vehicle is locked upon walking 

away.

The alarm does not activate when 

locking automatically from a distance (the 

direction indicators do not light up).

It is not possible to lock the vehicle if the 

electronic key is left inside the vehicle.

Deadlocking

Deadlocking renders the interior door 

controls inoperative. It also deactivates 

the central locking button.

The horn remains operational.

Never leave anyone inside the vehicle 

when it is deadlocked.


►  Gently press the driver's door handle to lock 

the vehicle.

►  Press it again within 3 seconds to deadlock 

the vehicle (confirmed by the temporary lighting 

of the direction indicators).

A double audible signal indicates that the vehicle 

is not deadlocked.

Advice

If one of the doors or the boot is still open 

or if the electronic key for the Keyless 

Entry and Start  system has been left inside 

the vehicle, central locking will not take place.

If the vehicle is unlocked but the doors or 

boot are not subsequently opened, the 

vehicle will automatically lock itself again after 

about 30 seconds. If the vehicle is fitted with 

an alarm, it will be reactivated automatically.

The automatic door mirror folding/

unfolding function is configured via the 

touch screen's 

Driving

/

Vehicle

 menu.

As a safety measure, never leave the 

vehicle, even for a short time, without 

taking the Keyless Entry and Start system’s 

electronic key with you.

Be aware of the risk of theft of the vehicle if 

the key is present in one of the defined areas 

while the vehicle is unlocked.

In order to preserve the battery in the 

electronic key and the vehicle's battery:

–  The unlocking on approach function 

(zone 

C

) automatically switches to hibernation 

mode after several days (approximately one 

week) without being used. To unlock the 

vehicle, use the remote control or press on 

one of the door handles. The next time the 

vehicle is started, the automatic unlocking 

and locking functions will be reactivated.

–  If the welcome lighting is triggered 

several times in succession without the 

vehicle subsequently being started, it will be 

deactivated.

–  All "hands-free" functions switch to 

hibernation mode after 21 days without being 

used. To restore these functions, unlock the 

vehicle using the remote control and start the 

engine.

-------------------------------------------------------------------------------------------------------------------------------------------------------------

32

Access

Electrical interference

The electronic key may not work if it is 

close to an electronic device (e.g. mobile 

telephone (switched on or on standby), laptop 

computer, strong magnetic fields). If this 

occurs, move the electronic key away from 

the electronic device.

Central locking


Manual

►  Press this button to lock/unlock the vehicle 

(doors and boot) from inside the passenger 

compartment. 

Central locking does not take place if any 

of the doors are open.

When locking/deadlocking from the 

outside

When the vehicle is locked or deadlocked 

from the outside, the indicator lamp flashes 

and the button is deactivated.

►  After normal locking, pull one of the 

interior door controls to unlock the vehicle.

►  After deadlocking, you must use the 

remote control or the Keyless Entry and Start 

system to unlock the vehicle.

Automatic (anti-intrusion 

security)

The doors and boot lock automatically while 

driving (speed above 6 mph (10 km/h)).

To deactivate/reactivate this function (activated 

by default):

►  Press the button until a confirmation 

message appears.

Transporting long or voluminous 

objects

Press the central locking control to drive 

with the boot open and the doors locked. 

Otherwise, every time the speed of the 

vehicle exceeds 6 mph (10 km/h), the sound 

of the locks rebounding will be heard and an 

alert will be displayed.

Back-up procedures

Lost keys, remote control, 

electronic key

Go to a CITROËN dealer with the vehicle's 

registration certificate, your personal 

identification documents and if possible, the label 

bearing the key code.

The CITROËN dealer will be able to retrieve the 

key code and the transponder code, enabling a 

new key to be ordered.

Complete unlocking/locking 

of the vehicle with the key

Use this procedure in the following situations:

–  Remote control battery discharged.

–  Remote control malfunction.

–  Vehicle battery discharged.

–  Vehicle in an area subject to strong 

electromagnetic interference.

In the first case, change the remote control 

battery.

In the second case, reinitialise the remote 

control.

Refer to the corresponding sections.


►  Insert the key in the door lock.

►  Turn the key towards the front or the rear to 

unlock or lock the vehicle.

-------------------------------------------------------------------------------------------------------------------------------------------------------------

33

Access

2

If the vehicle is fitted with an alarm, it will 

not be activated when locking with the 

key.

If the alarm is activated, the siren sounds 

when the door is opened; switch on the 

ignition to stop it.

Central locking not 

functioning

Use these procedures in the following cases:

–  Central locking malfunction.

–  Battery disconnected or discharged.

In the event of a malfunction of the 

central locking system, the battery must 

be disconnected to ensure that the vehicle is 

locked fully.

Front left-hand door

►  Insert the key into the lock and turn it towards 

the front or rear of the vehicle to lock and unlock 

the door.

Other doors

Unlocking

►  Pull the interior door opening control.

Locking


►  Open the doors.

►  For the rear doors, check that the child lock 

is not on.

Refer to the corresponding section.

►  Gently insert the key into the latch located in 

the door lock, then turn the latch an eighth of a 

turn towards the outside of the door.

►  Close the doors and check from the outside 

that the vehicle is locked.

Changing the battery

If the battery is flat, this warning lamp 

comes on, accompanied by an audible 

signal and the display of a message.

Battery type: CR2032/3 volts.
Without Keyless Entry and Start


With Keyless Entry and Start


►  Unclip the cover by inserting a small 

screwdriver in the slot and lift the cover.

►  Remove the flat battery from its housing.

►  Put the new battery in place, respecting the 

polarity. Start by inserting it into the contacts 

-------------------------------------------------------------------------------------------------------------------------------------------------------------


Content      ..      1      2      3      ..