Citroën C5 Aircross (2022 year). Manual in english - page 4
 

  Index      Manuals     Citroën C5 Aircross (2022 year). Manual in english


Search            copyright infringement  


Content      ..     2      3      4      5     ..


Citroën C5 Aircross (2022 year). Manual in english - page 4


50

Ease of use and comfort

removed; the head restraints should be in 

place and in the high position.

Longitudinal adjustment

Seat operations must only be done with 

the vehicle stationary.

Each seat can be adjusted individually.


►  Raise the control and slide the seat forwards 

or backwards.

Once the backrest is folded, it is no 

longer possible to slide the seat.

Backrest angle

Several adjustment positions are possible.


►  Move the seat forward.

►  Pull the strap forward, then tilt the backrest to 

the desired position.

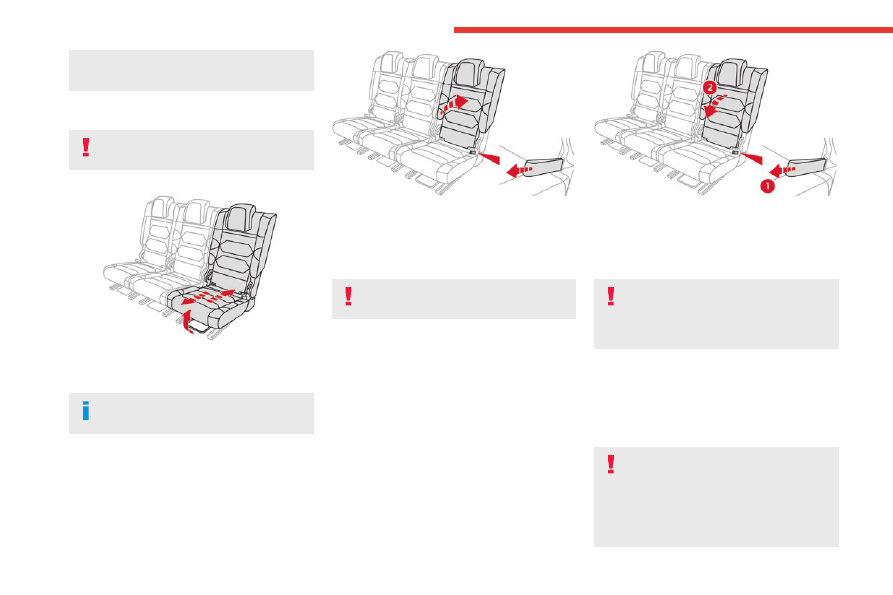
Folding the backrests

Manoeuvring the backrests should only 

be done when the vehicle is stationary.

First steps:

►  Lower the head restraints.

►  If necessary, move the front seats forward.

►  Check that no person or object might interfere 

with the folding of the backrests (e.g. clothing, 

luggage).

►  Check that the outer seat belts are properly 

tensioned along the pillars, the central belt is 

stowed and the tongues of the three belts are 

correctly in the stowed position.


►  Pull the strap 

1

 firmly to release the backrest.

►  Guide the backrest 

2

 down to the horizontal 

position.

Repositioning the backrests

Before raising the backrest of the outer 

seats to the normal position, remember 

to retrieve the seat belt and hold it during the 

operation.

►  Put the backrest 

2

 in the upright position and 

push it firmly to latch it home.

►  Check that the release strap 

1

 has correctly 

returned to its position.

►  Ensure that the outer seat belts were not 

trapped during the operation.

Please note: an incorrectly latched 

backrest compromises the safety of 

passengers in the event of sudden braking or 

an accident.

The contents of the boot may be thrown 

forwards - risk of serious injury!

-------------------------------------------------------------------------------------------------------------------------------------------------------------

51

Ease of use and comfort

3

Heating and Ventilation

Air intake

The air circulating in the passenger compartment 

is filtered and originates either from the 

exterior, via the grille located at the base of the 

windscreen, or from the inside in air recirculation 

mode.

Controls

The controls are accessible in the 

Climate

 touch 

screen menu and are also grouped together on 

the centre console panel.

Air distribution


1.

Windscreen demisting/de-icing vents

2.

Front side window demisting/de-icing vents

3.

Adjustable and closable side air vents

4.

Adjustable and closable central air vents

5.

Air outlets to the front footwells

6.

Air outlets to the rear footwells

7.

Adjustable and closable air vents, with blower 

(depending on version)

Advice

Using the ventilation and air 

conditioning system

►  To ensure that air is distributed evenly, 

keep the external air intake grilles at the base 

of the windscreen, the nozzles, the vents, the 

air outlets and the air extractor in the boot 

free from obstructions.

►  Do not cover the sunshine sensor located 

on the dashboard; this sensor is used to 

regulate the automatic air conditioning 

system.

►  Operate the air conditioning system for at 

least 5 to 10 minutes once or twice a month to 

keep it in good working order.

►  If the system does not produce cold air, 

switch it off and contact a CITROËN dealer or 

a qualified workshop.

When towing a large load on a steep gradient 

in high temperatures, switching off the air 

conditioning increases the available engine 

power, enhancing the towing capacity.

Avoid driving for too long with the 

ventilation off or with prolonged operation 

of interior air recirculation. Risk of misting and 

deterioration of the air quality!

If the interior temperature is very high 

after the vehicle has stood for a long 

time in the sunshine, air the passenger 

compartment for a few moments.

Put the air flow control at a setting high 

enough to quickly change the air in the 

passenger compartment.

Condensation created by the air 

conditioning results in a discharge of 

water underneath the vehicle. This is perfectly 

normal.

Servicing the ventilation and air 

conditioning system

►  Ensure that the passenger compartment 

filter is in good condition and have the filter 

elements replaced regularly.

We recommend using a composite passenger 

compartment filter. Its specific active additive 

helps protect against polluting gases and bad 

smells.

►  To ensure correct operation of the 

air conditioning system, have it checked 

according to the recommendations in the 

Manufacturer’s service schedule.

Stop & Start

The heating and air conditioning systems 

only operate when the engine is running.

-------------------------------------------------------------------------------------------------------------------------------------------------------------

52

Ease of use and comfort

Temporarily deactivate the Stop & Start 

system to maintain a comfortable temperature 

in the passenger compartment.

For more information on the 

Stop & 

Start

 system, refer to the corresponding 

section.

Manual air conditioning


Press the 

Climate

 menu button located 

under the touch screen to display the 

system controls page.


1.

Automatic Visibility programme.

2.

Recirculation of interior air.

3.

Rear screen demisting/de-icing.

4.

System switch-off.

5.

Air flow adjustment.

6.

Temperature adjustment.

7.

Air distribution adjustment.

8.

Air conditioning on/off.

9.

Maximum air conditioning.

The air conditioning system only operates with 

the engine running.

Temperature adjustment

►  Press one of the arrows 

6

 to decrease (blue) 

or increase (red) the value.

The value indicated corresponds to a level of 

comfort and not to a precise temperature.

For maximum cooling or heating of the 

passenger compartment, press the 

temperature setting button down or up until 

LO

 or 

HI

 is displayed.

Air flow 

adjustment

►  Press one of the buttons 

5

 to increase (

+

) or 

decrease (

-

) the speed of the ventilation fan.

The air flow symbol (a fan) is filled in 

progressively as the speed of the fan is 

increased.

By reducing the air flow to a minimum, you are 

stopping ventilation.

Avoid driving for too long without 

ventilation - risk of condensation and 

deterioration of air quality!

Air distribution adjustment

You can vary the air distribution in the passenger 

compartment using the three buttons 

7

.

Windscreen and side windows. 

Central and side air vents. 

Footwells. 

Each press on a button activates or deactivates 

the function. The indicator lamp is on when the 

button is activated. For a uniform distribution 

of air in the passenger compartment, the three 

buttons can be activated simultaneously.

Automatic visibility 

programme

For more information on the button 

1

 "

Automatic 

Visibility Programme

", refer to the section 

"

Front Demisting/Defrosting

".

Air conditioning on/off

The air conditioning system is designed to 

operate effectively in all seasons, with the 

windows closed:

–  It lowers the temperature in summer.

–  It increases the effectiveness of the demisting, 

in winter, above 3°C.

►  Press button 

8

 to activate/deactivate the air 

conditioning system.

When the system is activated, the indicator lamp 

comes on.

-------------------------------------------------------------------------------------------------------------------------------------------------------------

53

Ease of use and comfort

3

Air conditioning does not operate when 

the air flow is deactivated.

To obtain cool air more quickly, enable interior 

air recirculation for a brief period. Then return 

to the intake of exterior air.

Switching off the air conditioning may result in 

some discomfort (humidity or misting).

Dual-zone automatic air 

conditioning


Press the 

Climate

 menu button located 

under the touch screen to display the 

system controls page.


1.

Automatic Visibility programme.

2.

Recirculation of interior air.

3.

Rear screen demisting/de-icing.

4.

System switch-off.

5.

Air flow adjustment.

6.

Temperature adjustment.

7.

Air distribution adjustment.

8.

Air conditioning on/off.

9.

Maximum air conditioning.

10.

Activation of the Automatic Comfort 

programme.

11.

Access to the secondary page.

12.

Passenger compartment pre-conditioning 

(depending on version).

13.

Selection of setting for the Automatic 

Comfort programme (Soft/Normal/Fast).

14.

Mono-zone/Dual-zone.

15.

"AQS" (Air Quality System) function 

(depending on version).

This air conditioning system operates with 

the engine running, but the ventilation and its 

controls are available with just the ignition on.

Operation of the air conditioning and regulation 

of temperature, air flow and air distribution in the 

passenger compartment are automatic.

Temperature adjustment

The driver and front passenger can each set the 

temperature independently of one another.

►  Press one of the buttons 

6

 to decrease (blue) 

or increase (red) the value.

The value indicated corresponds to a level of 

comfort and not to a precise temperature.

It is recommended that you avoid a difference of 

more than 3 in the settings for left and right.

For maximum cooling or heating of the 

passenger compartment, press the 

temperature setting button down or up until 

LO

 or 

HI

 is displayed.

Automatic comfort 

programme

►  Press button 

10

 "

AUTO

" to activate automatic 

mode of the air conditioning system.

When the indicator lamp in the button is on, the 

air conditioning system operates automatically: 

the system manages the temperature, air 

flow and air distribution in the passenger 

compartment in an optimum way according to 

the comfort level you have selected.

It is possible to adjust the intensity of the 

automatic comfort programme by choosing one 

-------------------------------------------------------------------------------------------------------------------------------------------------------------

54

Ease of use and comfort

of the settings offered in the secondary page, 

accessible from button 

11

 "

OPTIONS

".

To change the current setting, shown by 

illumination of the corresponding indicator lamp, 

press button 

13

 repeatedly until the desired 

mode is displayed:

"

Soft

": provides soft and quiet operation by 

limiting air flow.

"

Normal

": offers the best compromise between 

a comfortable temperature and quiet operation 

(default setting).

"

Fast

": provides strong and effective air flow.

Use the "

Normal

" or "

Fast

" modes to ensure the 

comfort of passengers in the rear seats.

This setting is associated with automatic mode 

only. However, on deactivation of 

AUTO

 mode, 

the indicator lamp for the last setting remains on.

Changing the setting does not reactivate 

AUTO


mode if this was deactivated.

In cold weather with the engine cold, the 

air flow is increased gradually until the 

comfort setting has been reached, in order to 

limit the delivery of cold air into the passenger 

compartment.

On entering the vehicle, if the interior 

temperature is much colder or warmer than 

the comfort setting requested, there is no 

need to alter the value displayed to more 

quickly reach the required level of comfort. 

The system automatically corrects the 

temperature difference as quickly as possible.

Automatic visibility 

programme

For more information on the button 

1

 "

Automatic 

Visibility Programme

", refer to the section 

"

Front Demisting/Defrosting

".

"Air Quality System" (AQS) 

function

Using a pollution sensor, this function 

automatically activates recirculation of the 

interior air once a certain level of polluting 

substances in the exterior air is detected.

When the air quality returns to a satisfactory 

level, recirculation of interior air is automatically 

deactivated.

This function is not designed to detect 

unpleasant odours.

Recirculation is automatically activated when the 

windscreen wash is used or when reverse gear 

is engaged.

The function does not operate if the exterior 

temperature is below 5 °C, to avoid the risk of 

misting of the windscreen and side windows.

To activate or deactivate the function, go to the 

secondary page by using button 

11

 "

OPTIONS

", 

then press button 

15

.

Manual control

You can manually adjust one or more of these 

functions, while retaining automatic control of the 

other functions by the system:

–  air flow, button 

5

,

–  air distribution, button 

7

,

As soon as you change a setting, the indicator 

lamp for the button 

10

 "

AUTO

" goes out.

►  Press button 

10

 again to reactivate the 

automatic comfort programme.

Air flow adjustment

►  Press one of the buttons 

5

 to increase (

+

) or 

decrease (

-

) the fan speed.

The air flow symbol (a fan) is filled in 

progressively as the speed of the fan is 

increased.

By reducing the air flow to minimum, you are 

stopping ventilation.

"

OFF

" is displayed alongside the fan.

Avoid driving for too long without 

ventilation - risk of condensation and 

deterioration of air quality!

Air distribution adjustment

You can vary the air distribution in the passenger 

compartment using the three buttons 

7

.

Windscreen and side windows. 

Central and side air vents. 

Footwells. 

Each press on a button activates or deactivates 

the function. The indicator lamp is on when the 

button is activated. For a uniform distribution 

-------------------------------------------------------------------------------------------------------------------------------------------------------------

55

Ease of use and comfort

3

of air in the passenger compartment, the three 

buttons can be activated simultaneously.

In 

AUTO

 mode, the indicator lamps in all three 

buttons 

7

 are off.

Air conditioning on/off

The air conditioning system is designed to 

operate effectively in all seasons, with the 

windows closed:

–  It lowers the temperature in summer.

–  It increases the effectiveness of the demisting, 

in winter, above 3°C.

►  Press button 

8

 to activate/deactivate the air 

conditioning system.

When the system is activated, the indicator lamp 

comes on.

Air conditioning does not operate when 

the air flow is deactivated.

To obtain cool air more quickly, enable interior 

air recirculation for a brief period. Then return 

to the intake of exterior air.

Switching off the air conditioning may result in 

some discomfort (humidity or misting).

Mono-zone/Dual-zone

The passenger temperature setting can be linked 

to the driver's setting (mono-zone function).

It is available in the secondary page by pressing 

button 

11

 "

OPTIONS

".

►  Press button 

14

 to activate the "

MONO

function; its status is displayed as "

ON

".

The function is automatically deactivated if the 

passenger uses their temperature adjustment 

buttons (dual-zone function).

Ventilation with the ignition 

on

When the ignition is switched on, you can use 

the ventilation system to adjust the air flow 

5


and air distribution 

7

 settings in the passenger 

compartment, for a period which depends on the 

battery charge.

This function does not allow the operation of the 

air conditioning system.

Interior air recirculation

The intake of exterior air prevents the formation 

of mist on the windscreen and side windows.

Recirculating the interior air isolates the 

passenger compartment from outside odours 

and fumes and allows the desired passenger 

compartment temperature to be achieved more 

rapidly.

►  Press this button to activate/deactivate 

the function (confirmed by the 

illumination/extinction of the indicator lamp).

The function is activated automatically 

when reverse gear is engaged.

Maximum air conditioning

This function automatically adjusts the 

temperature setting to the lowest possible, the 

air distribution towards the central and side air 

vents, the air flow to maximum and, if necessary, 

activates interior air recirculation.

►  Press this button to activate/deactivate 

the function (confirmed by the 

illumination/extinction of the indicator lamp).

Once the function is deactivated, the system 

returns to the previous settings.

Switching the system off

►  Press this button.


Its indicator lamp comes on and all of the other 

indicator lamps for the system go off.

This action deactivates all of the functions of the 

air conditioning system.

The temperature is no longer regulated. A slight 

flow of air can still be felt, due to the forward 

movement of the vehicle.

-------------------------------------------------------------------------------------------------------------------------------------------------------------

56

Ease of use and comfort

Front demisting 

- defrosting

Automatic Visibility 

programme

This mode allows the windscreen and side 

windows to be demisted or defrosted as quickly 

as possible.

►  Press this button to activate/deactivate 

the mode (confirmed by the illumination/

extinction of the indicator lamp).

The programme automatically manages the air 

conditioning (depending on version), air flow 

and air intake, and provides optimum distribution 

towards the windscreen and side windows.

It is possible to manually change the air flow 

without deactivating the automatic Visibility 

programme.

With Stop & Start, when demisting has 

been activated, STOP mode is not 

available.

In wintry conditions, before moving off, it 

is essential to remove any snow or ice 

from the windscreen around the camera.

Otherwise, the operation of the equipment 

using the camera may be affected.

Heated windscreen


In cold weather, this system heats the bottom of 

the windscreen, as well as the area alongside 

the left-hand windscreen pillar.

Without changing the settings for the air 

conditioning system, it allows faster release 

of the windscreen wiper blades when they 

are frozen to the windscreen and helps avoid 

the accumulation of snow resulting from the 

operation of the windscreen wipers.

Switching on/off


►  With the engine running, press this button to 

activate/deactivate the function (confirmed by an 

indicator lamp).

The function is activated when the outside 

temperature drops below 0°C. It is deactivated 

automatically when the engine is switched off.

Rear screen 

demisting/defrosting

This demisting/de-icing only works with the 

engine running.

Depending on version, it also demists/de-ices 

the door mirrors.

►  Press this button to activate/deactivate 

the function (confirmed by the indicator 

lamp coming on/switching off).

Demisting/defrosting switches off automatically 

to prevent an excessive consumption of 

electrical current.

Switch off demisting/defrosting when 

you no longer need it; reducing 

electrical consumption in turn decreases 

energy consumption.

-------------------------------------------------------------------------------------------------------------------------------------------------------------

57

Ease of use and comfort

3

Temperature 

pre-conditioning 

(Rechargeable hybrid)

This function allows you to programme the 

temperature in the passenger compartment to 

reach a pre-defined, non-modifiable temperature 

(approx. 21°C) before you enter the vehicle, on 

the days and at the times of your choice.

This function is available when the vehicle is 

connected or not connected.

Programming

(With CITROËN Connect Nav)

In the 

Climate

 > 

OPTIONS

 menu:

Select 

Temperature conditioning

►  Press 

+

 to add a programme.

►  Select the time of entry into the vehicle and 

the desired days. Press 

OK

.

►  Press 

ON

 to activate this programming.

The pre-conditioning sequence begins 

approximately 45 minutes before the 

programmed time when the vehicle is connected 

(20 minutes when it is not connected) and is 

maintained for 10 minutes after.


This indicator lamp comes on fixed when 

a temperature pre-conditioning cycle is 

programmed. It flashes when temperature pre-

conditioning is in progress.

You can set multiple programmes.

Each one is saved in the system.

To optimise the driving range, we recommend 

starting a programme while the vehicle is 

connected.

Programming can also be carried out 

from a smartphone using the 

MyCitroën 

App

 application.

With CITROËN Connect Radio, programming 

can only be carried out from a smartphone using 

the application.

For more information on 

Remote functions

refer to the corresponding section.

The fan noise that occurs during 

temperature pre-conditioning is perfectly 

normal.

Operating conditions

–  The function is only activated when the 

ignition is switched off

 and the 

vehicle 

locked

.

–  When the vehicle is not connected, the 

function is only activated if the battery charge 

level is greater than 20%.

–  When the vehicle is not connected and a 

recurring programme is active (e.g. from Monday 

to Friday), if two temperature pre-conditioning 

sequences are run without the vehicle being 

used, the programme will be deactivated.

Front fittings


1.

Grab handle

2.

Sun visor

3.

Storage compartment below the steering 

wheel

Card holder

4.

Illuminated glove box

-------------------------------------------------------------------------------------------------------------------------------------------------------------

58

Ease of use and comfort

5.

Door pockets

6.

USB sockets

Cigarette lighter/12 V accessory socket 

(120 W).

7.

Storage compartment

8.

Storage compartment or Wireless charger

9.

Cup holder

10.

Front armrest with storage

11.

USB charger socket

Make sure you do not leave any item in 

the passenger compartment which could 

act like a magnifying glass under the effect of 

the sun's rays and cause a fire - risk of fire or 

damage to interior surfaces!

Sun visor

►  With the ignition 

on, raise the concealing 

flap; depending on the version, the mirror is 

illuminated automatically.

This sun visor is also equipped with a ticket 

holder.

Glove box

►  To open the glove 

box, lift the handle.

With the ignition on, the glove box is lit when 

open.

It houses the front passenger airbag deactivation 

switch.

Never drive with the glove box open 

when a passenger is at the front. It may 

cause injury during sharp deceleration!

Cigarette lighter/12 V 

accessory socket(s)


►  To use the cigarette lighter, press it in and 

wait a few seconds until it pops out automatically.

►  To use a 12 V accessory (max. power: 

120 W), remove the cigarette lighter and connect 

a suitable adaptor.

You can use this socket to connect a telephone 

charger, a bottle warmer, etc.

After use, put the cigarette lighter back into place 

straight away.

The connection of an electrical device 

not approved by CITROËN, such as a 

USB charger, may adversely affect the 

operation of vehicle electrical systems, 

causing faults such as poor radio reception or 

interference with displays in the screens.

USB sockets


USB sockets allow the connection of a portable 

device.

The USB socket on the left-hand 

side (chrome plated) also allows a 

smartphone to be connected by Android Auto

®

 or 

CarPlay

®

, enabling certain smartphone 

applications to be used on the touch screen. 

For best results, use a cable made or approved 

by the device manufacturer.

These applications can be managed using the 

steering-mounted controls or the audio system 

controls.

When the USB socket is used, the 

portable device charges automatically.

While charging, a message is displayed if the 

power drawn by the portable device exceeds 

the current supplied by the vehicle.

For more information about how to use this 

equipment, refer to the sections describing 

the audio and telematics systems.

-------------------------------------------------------------------------------------------------------------------------------------------------------------

59

Ease of use and comfort

3

Wireless smartphone 

charger


This system allows wireless charging of a 

portable device such as a smartphone, using the 

magnetic induction principle, in accordance with 

the Qi 1.1 standard.

The portable device to be charged must be 

compatible with the Qi standard, either by design 

or by using a compatible holder or shell.

A mat can also be used provided that it is 

approved by the Manufacturer.

The charging area is identified by the Qi symbol.

The charger works with the engine running and 

with the Stop & Start system in STOP mode.

Charging is managed by the smartphone.

With the Keyless Entry and Start system, the 

charger’s operation may be briefly disrupted 

when a door is opened or the ignition is switched 

off.

Charging

►  With the charging area clear, place a device 

in its centre.


When the portable device is detected, the 

charger’s indicator lamp lights up green. It 

remains lit for the whole time that the battery is 

being charged.

The system is not designed to charge 

multiple devices simultaneously.

Do not leave metal objects (e.g. coins, 

keys, vehicle remote control) in the 

charging area while a device is being charged 

- Risk of overheating or interrupting the 

charging!

When using applications for a long time 

in combination with wireless charging, 

some smartphones may switch to thermal 

safety and cause some functions to stop.

Checking operation

The state of the indicator lamp allows the 

operation of the charger to be monitored.

State of the 

indicator lamp

Meaning

Off

Engine switched off.

No compatible devices 

detected.

Charging complete.

Fixed green

Compatible portable 

device detected.

Charging.

Flashing orange

Foreign object detected in 

the charging zone.

Portable device not well 

centred in the charging 

zone.

Fixed orange

Malfunction of the 

portable device's battery 

meter.

Device battery 

temperature too high.

Charger malfunction.


If the indicator lamp is fixed orange:

–  remove the device, then place it back in the 

centre of the charging zone.

or

–  remove the device and try again in a quarter 

of an hour.

If the problem persists, have the system checked 

by a CITROËN dealer or a qualified workshop.

-------------------------------------------------------------------------------------------------------------------------------------------------------------

60

Ease of use and comfort

Front armrest

It includes a refrigerated storage space 

(depending on version) and is illuminated when 

the cover is opened.

Opening


►  Press the lever 

beneath the cover.

The cover opens in two parts.

Storage


The small removable tray can be installed in 

front of or behind the storage space.

A ventilation nozzle circulates fresh air.

Closing


►  Fold back the two parts of the cover.

Mats

Fitting


When fitting it on the 

driver's side, only use 

the mountings present on the carpet (a "click" 

indicates proper locking).

The other mats are simply laid over the carpet.

Removing/refitting

►  To remove it 

on the driver's side, move the 

seat backwards and unclip the fasteners.

►  To refit it, position the mat and secure it by 

pressing down.

►  Check that the mat is secured correctly.

To avoid any risk of jamming the pedals:

–  Only use mats which are suited to the 

fixings already present in the vehicle; these 

fixings must be used.

–  Never fit one mat on top of another.

The use of mats not approved by CITROËN 

may interfere with access to the pedals and 

hinder the operation of the cruise control/

speed limiter.

The approved mats have two fasteners 

located underneath the seat.

-------------------------------------------------------------------------------------------------------------------------------------------------------------

61

Ease of use and comfort

3

Courtesy lamps

1.

Front courtesy lamp

2.

Front reading lamps

3.

Rear courtesy lamp

4.

Rear reading lamps

Front and rear courtesy 

lamps

In this position, the courtesy lamp comes 

on gradually:

–  when the vehicle is unlocked.

–  when the key is removed from the ignition 

switch.

–  when a door is opened.

–  when the remote control locking button is 

activated, in order to locate the vehicle.

It switches off gradually:

–  when the vehicle is locked.

–  when the ignition is switched on.

–  30 seconds after the last door is closed.

Permanently off.


Permanent lighting. 

In "Permanent lighting" mode, the lighting time 

varies according to the circumstances:

–  With the ignition off, approximately 10 minutes.

–  In energy saving mode, approximately 30 

seconds.

–  With the engine running, unlimited.

When the front courtesy lamp is in the 

"Permanent lighting" position, the rear 

courtesy lamp also comes on, unless it is in 

the "Permanently off" position.

To switch off the rear courtesy lamp, put it in 

the "Permanently off" position.

Reading lamps

►  With the ignition 

on, operate the 

corresponding switch.

Take care not to place anything in 

contact with the courtesy lamps.

Interior ambient lighting

Soft passenger compartment lighting improves 

visibility inside the vehicle in low-light conditions.

You can activate/deactivate this function, 

adjust the brightness and select a colour 

in the 

Driving/Vehicle

 touch screen menu.

Boot fittings

1.

Load space cover

2.

12 V accessory socket (120 W)

3.

Boot lamp

4.

Removable rear seat crossmember (to 

increase the volume of the boot).

5.

Stowing rings

6.

Adjustable boot floor (2-position)

Folding boot carpet (Rechargeable hybrid)

7.

Storage wells/Tool box under the floor

-------------------------------------------------------------------------------------------------------------------------------------------------------------

62

Ease of use and comfort

The stowing rings are designed to secure 

luggage using different types of retaining 

nets.

These retaining nets are available as an 

accessory.

For more information, contact a CITROËN 

dealer or a qualified workshop.

Load space cover

It is in two parts:

– a 

fixed part with an open storage space,

–  a movable part which rises when the boot is 

opened, with an open storage space.


To remove the load space cover:

►  unhook the two cords 

1

,

►  gently lift the movable part 

2

, then unclip it on 

both sides 

3

,

►  unclip the fixed part on each side 

4

, then 

remove the load space cover.

When sharp deceleration occurs, objects 

placed on the load space cover can turn 

into projectiles.

12 V accessory socket

►  To connect a 12 V 

accessory (maximum 

power: 120 W), lift the cover and plug in a 

suitable adaptor.

►  Switch on the ignition.

The connection of an electrical device 

not approved by CITROËN, such as a 

USB charger, may adversely affect the 

operation of vehicle electrical systems, 

causing faults such as poor radio reception or 

interference with displays in the screens.

High load retaining net


This removable net allows the entire loading 

volume up to the roof to be used:

–  behind the front seats (1

st

 row) when the rear 

seats are folded down.

–  behind the rear seats (2

nd

 row) when the load 

space cover is removed.

It protects the occupants in case of 

sudden braking.

-------------------------------------------------------------------------------------------------------------------------------------------------------------

63

Ease of use and comfort

3

Behind the front seats


►  Fold down the rear seats.

►  Insert the ends of the bar, one after the other, 

into the fixing points in the roof.

►  Attach the net’s straps to the upper anchoring 

points, located in the housing of the Top Tether 

fixings.

►  Pull on the straps to stretch the net.

Behind the rear seats


►  Remove the load space cover.

►  Insert the ends of the bar, one after the other, 

into the fixing points of the roof.

►  Attach the straps of the net to the lower rings, 

located on each side trim of the boot.

►  Pull on the straps to stretch the net.

2-position boot floor

Depending on equipment,

 this two-position floor 

allows the boot volume to be optimised using the 

lateral stops located on the sides:

–  High position (

100 kg max.

): to obtain a flat 

floor up to the front seats, when the rear seats 

are folded down.

–  Low position (

150 kg max.

): maximum boot 

volume.


To change the height:

►  Lift and pull the floor towards you using its 

central handle, then use the lateral stops to 

move it.

►  Push the floor fully forwards to place it in the 

desired position.

Ensure that the boot is empty before 

moving the boot floor.


To increase the boot volume with the floor in the 

low position:

►  Pull the rear seat crossmember up vertically 

to the level of the markings.

►  To put it back in place, push it as far as it will 

go until it engages.

-------------------------------------------------------------------------------------------------------------------------------------------------------------

64

Ease of use and comfort

Storage well


►  Lift the boot floor 

as far as possible or lift the 

folding boot carpet (depending on version) to 

access the storage well.

Depending on version, it includes:

–  A temporary puncture repair kit with the tool 

kit.

–  A spare wheel with the tool kit.

–  The traction battery charging cable 

(Rechargeable hybrid).

Boot lamp

It comes on automatically when the boot is 

opened and goes off automatically when the 

boot is closed.

The lighting time varies according to the 

circumstances:

–  When the ignition is off, approximately 10 

minutes.

–  In energy saving mode, approximately 30 

seconds.

–  With the engine running, unlimited.

-------------------------------------------------------------------------------------------------------------------------------------------------------------

65

Lighting and visibility

4

Lighting control stalk

Main lighting


Automatic illumination of lamps/daytime 

running lamps

Sidelamps only 

Dipped or main beam headlamps 

Headlamp dipping


►  Pull the stalk to switch between dipped and 

main beam headlamps.

Displays

Illumination of the corresponding indicator 

lamp on the instrument panel confirms that the 

selected lighting is on.

A fault with a lamp is signalled by the 

permanent illumination of this warning 

lamp, accompanied by the display of a message 

and an audible signal.

Rear foglamps

They only work if the dipped or main 

beam headlamps are on.


►  Rotate the ring forwards/backwards to turn 

them on/off.

When the lighting is switched off automatically 

("

AUTO

" position) the foglamps and the dipped 

beam headlamps remain on.

Front foglamps/Rear 

foglamps

They operate with the sidelamps, dipped 

or main beam headlamps on.


►  Rotate the ring forwards:

•  once to switch on the front foglamps,

•  a second time to switch on the rear 

foglamps.

►  Turn in the opposite direction to switch off.

If the lighting is switched off automatically 

("

AUTO

" position) or the dipped beam 

headlamps are switched off manually, the 

foglamps and sidelamps remain on.

►  Rotate the ring backwards to switch the 

foglamps off; the sidelamps will then switch off.

Switching on the foglamps is prohibited 

in clear weather or in rain, both day and 

night. In these situations, the power of their 

beams may dazzle other drivers. They must 

only be used in fog or falling snow (rules may 

vary depending on country).

Do not forget to switch off the foglamps when 

they are no longer necessary.

Switching on the lamps after 

switching off the ignition

To reactivate the lighting control, rotate the 

ring to the "

AUTO

" position, then to the 

desired position.

-------------------------------------------------------------------------------------------------------------------------------------------------------------


Content      ..     2      3      4      5     ..