Citroën C5 X (2022 year). Manual in english - page 9
 

  Index      Manuals     Citroën C5 X (2022 year). Manual in english


Search            copyright infringement  


Content      ..     7      8      9      10     ..


Citroën C5 X (2022 year). Manual in english - page 9


130

Driving

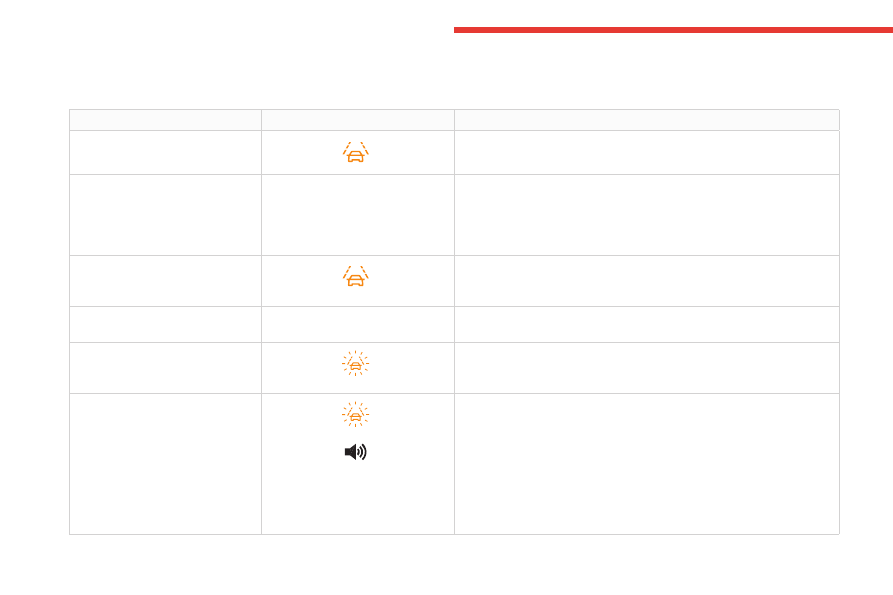
Driving situations and related alerts

The table below describes the alerts and messages displayed in different driving situations.

The actual order of display of these alerts may be different.

Function status

Indicator lamp

Comments

OFF


Function deactivated.

ON

None.

System active, conditions not met:

–  Speed below 40 mph (65 km/h).

–  No lane marking recognised.

–  Operation of ESC system triggered.

–  "Sporty" driving.

ON


Automatic deactivation/standby of the function (e.g. detection of a trailer, 

use of the "space-saver" type spare wheel supplied with the vehicle, 

malfunction).

ON

None.

Lane marking detected.

Speed above 40 mph (65 km/h).

ON


The system corrects the trajectory on the side where the risk of 

unintentional crossing is detected. The driver's hands are on the steering 

wheel.

ON


"

Hold the steering wheel

" or 

"

Stay in lane

" (depending on 

version).

–  If, while correcting the trajectory, the system determines that the 

correction will not be enough and that a solid line will be crossed: the 

driver is warned that they must provide additional trajectory adjustment.

–  If the steering wheel is not held properly, an audible warning sounds, 

accompanied by a message, until the trajectory correction is completed or 

the driver has grasped the steering wheel correctly.

The duration of audible warnings will increase if multiple corrections are 

performed in quick succession. The warning will become continuous, 

persisting until the driver responds.

-------------------------------------------------------------------------------------------------------------------------------------------------------------

131

Driving

6

Operating limits

The system goes into standby automatically in 

the following cases:

–  ESC deactivated or operation triggered.

–  Speed below 40 mph (65 km/h) or greater 

than 112 mph (180 km/h),

–  Electrical connection of a trailer.

–  Use of a"space-saver" spare wheel detected 

(as detection is not immediate, deactivation of 

the system is recommended).

–  Dynamic driving style detected, pressure on 

the brake or accelerator pedal.

–  Driving over lane markings.

–  Activation of the direction indicators.

–  Crossing the inside line on a bend.

–  Driving on a tight bend.

–  Inactivity by the driver detected during 

correction.

–  Narrow lane detected.

The following situations may interfere 

with the operation of the system or 

prevent it from working:

–  Insufficient contrast between the road 

surface and the side of the road (e.g. shade).

–  Lane markings worn, hidden (snow, mud) 

or multiple (roadworks, etc.),

–  Running close to the vehicle in front (the 

lane markings may not be detected).

–  Roads that are narrow, winding.

Risk of undesirable operation

The system should be deactivated in the 

following situations:

–  When changing a wheel or working near a 

wheel.

–  Towing or with a bicycle carrier on a towing 

device, especially with trailer not plugged in or 

not approved.

–  Road in poor condition, unstable or with very 

poor grip (risk of aquaplaning, snow, ice).

–  Adverse weather conditions.

–  Driving on racing circuits.

–  Driving on a rolling road.

Deactivation/Activation

By default, the system is automatically activated 

at every engine start.

It is configured in the 

ADAS

 touch screen 

application.

or

Direct access to the 

Shortcuts for driving aids

.

Deactivation is confirmed by the 

illumination of this indicator lamp on the 

instrument panel.

Malfunction

In the event of a malfunction, 

these warning lamps light up on 

the instrument panel, accompanied by the 

display of a message and an audible signal.

Have it checked by a CITROËN dealer or a 

qualified workshop.

Long-distance blind spot 

monitoring

For more information, refer to the 

General recommendations on the use 

of driving and manoeuvring aids

.


This system warns the driver of vehicles 

approaching rapidly from the rear in adjacent 

lanes (up to around 75 m) and of the presence of 

a vehicle in the blind spots of their vehicle, using 

corner radars located in the rear bumper.

This system takes into account vehicles 

such as cars, lorries and motorcycles by 

monitoring the blind spots or areas hidden 

from the driver's field of vision.


-------------------------------------------------------------------------------------------------------------------------------------------------------------

132

Driving


A warning lamp appears in the door mirror on the 

side in question:

– 

fixed

, immediately when another vehicle is in 

the blind spot or is approaching in an adjacent 

lane.

– 

flashing

, after about 1 second when the 

direction indicator is used.

Activation/Deactivation

It is configured in the 

ADAS

 touch screen 

application.

When starting the vehicle, the warning lamp 

comes on in each mirror to indicate that the 

system is activated.

The status of the system is memorised when the 

ignition is switched off.

The system is automatically deactivated 

when towing with a towing device 

approved by CITROËN.

Operating conditions

–  All vehicles are moving in the same direction 

and in adjacent lanes.

–  When overtaking a vehicle, the speed 

difference is less than 9 mph (15 km/h).

–  Traffic is flowing normally.

–  When overtaking a vehicle over a certain 

period of time, the vehicle being overtaken 

remains in the blind spot.

Operating limits

No alert is triggered in the following conditions:

–  presence of stationary objects (e.g. parked 

vehicles, safety rails, lampposts, signs).

–  vehicles travelling in the opposite direction.

–  if the rear bumper is damaged.

It is possible that warnings are not given, 

are given too late or seem unjustified. 

This system does not replace the need for 

vigilance on the part of the driver. Always 

check in the mirrors and look over your 

shoulders before changing lanes to avoid an 

accident. 

If the rear bumper is to be repainted, contact 

a dealer or a qualified workshop; certain types 

of paint could interfere with the operation of 

the radars.

Malfunction

If the event of a malfunction, this warning 

lamp comes on in the instrument panel, 

accompanied by the display of a message.

Have it checked by a CITROËN dealer or a 

qualified workshop.

The system may be temporarily disturbed 

by certain weather conditions (e.g. heavy 

rain, hail or extreme temperature changes).

In particular, driving on a wet road or going 

from a dry to a wet area can cause false 

alerts (e.g. presence of a cloud of water 

droplets in the blind spot interpreted as a 

vehicle).

In bad or wintry weather, ensure that the 

sensors are not covered by mud, ice or snow.

Take care not to cover the warning zone in 

the door mirrors, or the detection zones on 

the rear bumper with adhesive labels or other 

objects; they may hamper correct operation of 

the system.

Parking sensors

For more information, refer to the 

General recommendations on the use 

of driving and manoeuvring aids

.


-------------------------------------------------------------------------------------------------------------------------------------------------------------

133

Driving

6

This system detects and signals the proximity of 

obstacles (e.g. pedestrian, vehicle, tree, barrier) 

using sensors located in the bumper.

Rear parking sensors

►  Engage reverse gear to start 

the system 

(confirmed by an audible signal).

The system is switched off when reverse gear is 

disengaged.

Audible assistance


The system signals the presence of obstacles 

which are both within the sensors’ detection zone 

and in the vehicle path defined by the direction of 

the steering wheel.


Depending on version, in the example shown, 

only the obstacles present in the shaded area 

will be signalled by the audible assistance.

The proximity information is given by an 

intermittent audible signal, the frequency of 

which increases as the vehicle approaches the 

obstacle.

When the distance between the vehicle and 

the obstacle becomes less than about thirty 

centimetres, the audible signal becomes 

continuous.

The sound emitted by the speaker (right or 

left) indicates the side on which the obstacle is 

located.

Adjusting the audible signal

Pressing this button in the touch 

screen opens the window for 

adjusting the volume of the audible signal.

Visual assistance


This supplements the audible signal, without 

taking account of the vehicle's trajectory, by 

displaying bars on the screen that represent the 

distance between the obstacle and the vehicle 

(white: more distant, orange: close, red: very 

close).

When the obstacle is very close, the "Danger" 

symbol is displayed on the screen.

Front parking sensors

Supplementing the rear parking sensors, the 

front parking sensors are triggered when an 

obstacle is detected in front and the speed of the 

vehicle is below 6 mph (10 km/h).

Front parking sensor operation is suspended if 

the vehicle stops for more than three seconds in 

forward gear, if an obstacle is no longer detected 

or the vehicle speed exceeds 6 mph (10 km/h).

The sound emitted by the speaker (front 

or rear) locates the obstacle relative to 

the vehicle, whether in front of or behind it on 

its path.

Deactivation/Activation

It is configured in the 

ADAS

 touch screen 

application.

If the function is deactivated, this indicator 

lamp lights up on the instrument panel.

The system status is saved when the ignition is 

switched off.


-------------------------------------------------------------------------------------------------------------------------------------------------------------

134

Driving

The rear parking sensors are deactivated 

automatically if a trailer or bicycle carrier 

is connected to a towing device installed in 

accordance with the Manufacturer's 

recommendations.

In this case, the outline of a trailer is displayed 

at the rear of the image of the vehicle.

When starting the vehicle, the graphic 

and audible aids are only available after 

the touch screen has started up.

Operating limits

If the boot is heavily loaded, the vehicle may tilt, 

affecting distance measurements.

Malfunction

In the event of a malfunction when 

changing into reverse gear, these 

warning lamps light up on the instrument panel, 

accompanied by the display of a message and 

an audible signal (short beep).

Have it checked by a CITROËN dealer or a 

qualified workshop.

Top Rear Vision

For more information, refer to the 

General recommendations on the use 

of driving and manoeuvring aids

.

When reverse gear is engaged, with the engine 

running, this system displays views of the 

vehicle's close surroundings on the touch screen 

using a camera located at the rear of the vehicle.


The screen is divided into 3 parts with a side 

menu, a contextual view and a view from above 

the vehicle in its close surroundings.

The parking sensors supplement the information 

in the view from above the vehicle.

Different contextual views are available:

–  Automatic zoom view.

–  Standard view.

–  Panoramic view.

Depending on the context, the system chooses 

the best view to display (standard or automatic 

zoom).

The view type can be changed at any time 

during the manoeuvre.

The system status is not saved when the ignition 

is switched off.

Operating principle


Using the camera, the vehicle's close 

surroundings are recorded during low speed 

manoeuvres.

An image from above the vehicle in its close 

surroundings is created in real time (on the side 

of the screen), as the vehicle progresses.

This view makes it easier to align the vehicle 

when parking and to perceive nearby obstacles. 

It is automatically deleted if the vehicle remains 

stationary for too long.

Configuration

In the side menu, this menu allows you to 

carry out the following operations:

–  volume adjustment of the audible signal.

–  brightness adjustment.

–  contrast adjustment.

–  activation/deactivation of camera washing 

(depending on version).

Activation/Deactivation

To activate the camera, engage reverse gear.

-------------------------------------------------------------------------------------------------------------------------------------------------------------

135

Driving

6

The system is deactivated:

–  when changing out of reverse gear.

–  by pressing the cross in the top left-hand 

corner of the touch screen.

Automatic zoom view


The rear camera records the surroundings 

during the manoeuvre to create a rear view from 

above the vehicle in its close surroundings, 

making it possible to manoeuvre the vehicle 

around the surrounding obstacles.

Using the sensors located on the rear bumper, 

the automatic zoom view is displayed when 

approaching an obstacle at the red line (less 

than 30 cm) during the manoeuvre.

This view is only available automatically.

Obstacles may appear further away than 

they actually are.

It is important to monitor the sides of the 

vehicle during the manoeuvre, using the 

mirrors.

Parking sensors also provide additional 

information about the area around the vehicle.

Standard view


The area behind the vehicle is displayed on the 

screen.

The blue lines 

1

 represent the width of your 

vehicle, with the mirrors unfolded; their direction 

changes according to the position of the steering 

wheel.

The red line 

2

 represents a distance of 30 cm 

from the rear bumper; the two blue lines 

3

 and 

4


represent 1 m and 2 m, respectively.

This view is available automatically or by 

selection in the side menu.

Panoramic view


The panoramic view allows you to leave, in 

reverse, a parking space by anticipating the 

arrival of vehicles, pedestrians or cyclists.

This view is not recommended for carrying out a 

complete manoeuvre.

This view is only available by selection in the 

side menu.

360 vision

For more information, refer to the 

General recommendations on the use 

of driving and manoeuvring aids

.

This system allows you to view your vehicle's 

close surroundings on the touch screen using 

cameras, located at the front and rear of the 

vehicle, as well as under the door mirrors.


The screen is divided into 4 parts with two side 

menus, a contextual view and a view from above 

the vehicle in its close surroundings.

The parking sensors supplement the information 

in the view from above the vehicle.

Depending on the view angle chosen in the 

left-hand side menu, the system provides 

specific visual assistance in particular driving 

conditions such as entering a blind intersection 

or manoeuvring in areas with reduced visibility.

-------------------------------------------------------------------------------------------------------------------------------------------------------------

136

Driving

Different contextual views are available for the 

rear or for the front:

–  Automatic zoom view.

–  Standard view.

–  Panoramic view.

Depending on the context, the system chooses 

the best view to display (standard or automatic 

zoom).

The view type can be changed at any time 

during the manoeuvre.

The system status is not saved when the ignition 

is switched off.

Operating principle

Reconstituted view

The cameras are activated and a reconstruction 

of a view from above your vehicle in its close 

surroundings is displayed on the touch screen.

Live view


The front, rear and side views automatically 

appear in the view from above the vehicle.

It is also possible to display any view directly by 

selecting the corresponding zone.

The front view can be selected in forward gear 

up to 10 mph (16 km/h).

Installing the very cold climate screen 

can alter the image transmitted by the 

front camera.

Configuration

In the side menu, this menu allows you to 

carry out the following operations:

–  volume adjustment of the audible signal.

–  brightness adjustment.

–  contrast adjustment.

–  activation/deactivation of camera washing 

(depending on version).

Activation/Deactivation

Automatic

With the rear camera, engine running and 

vehicle stationary, rear vision is displayed 

automatically if reverse gear is engaged.

With the front camera, engine running and speed 

below 10 mph (16 km/h), front vision is displayed 

automatically if a gear is engaged.

Manual

►  In the 

ADAS

 touch screen application, 

select 

Functions>Panoramic camera

.

The system is deactivated:

–  automatically for the rear, when changing out 

of reverse gear.

–  automatically for the front, above 

approximately 10 mph (16 km/h).

–  by pressing the cross in the top left-hand 

corner of the touch screen.

Automatic zoom view


The front or rear camera records the 

surroundings during the manoeuvre to create 

a front or rear view from above the vehicle in 

its close surroundings, making it possible to 

manoeuvre the vehicle around the surrounding 

obstacles.

Using the sensors located on the front or 

rear bumper, the automatic zoom view is 

displayed when approaching an obstacle at the 

red line (less than 30 cm) during the manoeuvre.

This view is only available automatically.

Depending on version, it can be activated/

deactivated in the 

ADAS

 touch screen 

application.

Obstacles may appear further away than 

they actually are.

It is important to monitor the sides of the 

vehicle during the manoeuvre, using the 

mirrors.

Parking sensors also provide additional 

information about the area around the vehicle.

-------------------------------------------------------------------------------------------------------------------------------------------------------------

137

Driving

6

Standard view


Depending on the context, the area behind or in 

front of your vehicle is displayed on the screen.

The blue lines (at the rear)/orange lines (at the 

front) 

1

 represent the width of your vehicle, with 

the mirrors unfolded; their direction changes 

according to the position of the steering wheel.

The red line 

2

 represents a distance of 30 cm 

from the rear or front bumper; the two blue lines 

(at the rear)/orange lines (at the front) 

3

 and 

4

 represent 1 m and 2 m respectively.

This view is available automatically or by 

selection in the left-hand side menu.

Panoramic view


The rear or front panoramic view allows you to 

leave a parking space by anticipating the arrival 

of vehicles, pedestrians or cyclists.

This view is not recommended for carrying out a 

complete manoeuvre.

This view is only available by selection in the left-

hand side menu.

Side views

The left-hand/right-hand side view allows you to 

view the surroundings of each side of the vehicle 

(e.g. pavement, low wall, other vehicle parked 

next to it).


►  Select the relevant view in the view from 

above the vehicle.

The selected area turns yellow and the side view 

appears in the middle of the screen.

This view is not recommended for carrying out a 

complete manoeuvre.

Rear traffic alert

For more information, refer to the 

General recommendations on the use 

of driving and manoeuvring aids

.


When engaging reverse gear with the engine 

running, or when reversing at up to 6 mph 

(10 km/h), this system warns of approaching 

obstacles (e.g. pedestrian, cyclist, vehicle, truck, 

motorcycle) in the rear blind spots of the vehicle, 

using the radars installed in the bumper.

The system detects obstacles moving at more 

than 2 mph (3 km/h) at a maximum distance of 

40 m.

The system operates in addition to the Parking 

sensors, Top Rear Vision or 360 vision functions 

(depending on version).

For more information about the 

Parking 

sensors

Top Rear Vision

 or 

360 vision


functions, refer to the corresponding sections.

The driver must monitor their 

surroundings before and during the 

whole manoeuvre. Drive slowly and carefully 

in reverse gear in case of reduced or no 

visibility.

-------------------------------------------------------------------------------------------------------------------------------------------------------------

138

Driving

Operating principle


When an approaching obstacle is detected, the 

symbol 

1

 or 

2

 flashes on the touch screen, in the 

Parking sensors view or in the various contextual 

views of the Top Rear Vision or 360 vision 

functions (depending on version).

The symbol is complemented by an audible 

signal when the vehicle is reversing.

An obstacle is approaching in the 

blind spot on the rear right-hand/

left-hand side or on both sides of the vehicle.

In the event of a malfunction of these visual 

display functions or of the touch screen, or if the 

driver deactivates the views from these functions 

on the touch screen, detection of an approaching 

obstacle is still indicated by the audible signal 

when the vehicle is reversing.

Activation/Deactivation

It is configured in the 

ADAS

 touch screen 

application.

The system's status is saved when the ignition is 

switched off.

Operating limits

The system may not work in the following cases:

–  Towing a trailer.

–  Using a bicycle carrier on a towing device.

–  Extreme temperature changes.

–  Damaged rear bumper.

–  Accumulation or projection of external 

elements (e.g. mud, frost, snow), stickers 

application.

It is possible that warnings are not given, 

are given too late or seem unjustified. 

Consequently, always stay in control of your 

vehicle and be prepared to react at any time 

to avoid an accident.

In the event of repainting the rear 

bumper, consult the CITROËN dealer or 

a qualified workshop; certain types of paint 

could interfere with the operation of the 

radars.

Malfunction

In the event of a malfunction when 

engaging reverse gear, during reversing 

or when the driver attempts to activate the 

system, this warning lamp lights up on the 

instrument panel, accompanied by the display of 

a message and an audible signal.

Have it checked by a CITROËN dealer or a 

qualified workshop.

-------------------------------------------------------------------------------------------------------------------------------------------------------------


WITH TOTAL QUARTZ LUBRICANTS

FILL UP WITH 

CONFIDENCE

For more than 50 years, TOTAL and CITROËN 

have shared common values: excellence, creativity 

and technological innovation.
It is in this same spirit that TOTAL has developed 

a range of TOTAL QUARTZ lubricants adapted for 

engines in CITROËN vehicles, making them ever 

more fuel efficient and environmentally friendly.
TOTAL and CITROËN test the reliability and the 

performance of their products under extreme 

motorsport conditions.
Choose TOTAL QUARTZ lubricants when 

servicing your vehicle; they are your assurance 

of optimum engine life and performance.


prefers


-------------------------------------------------------------------------------------------------------------------------------------------------------------

140

Practical information

Compatibility of fuels


Petrol fuels conforming to the EN228 standard 

containing up to 5% and 10% ethanol 

respectively.

The only petrol fuel additives authorised 

for use are those that meet the B715001 

standard.

Travelling abroad

Certain fuels could damage your vehicle’s 

engine.

In certain countries, the use of a particular 

fuel may be required (specific octane rating, 

specific trade name, etc.) to ensure correct 

operation of the engine.

For all additional information, consult a dealer.

Refuelling

Fuel tank capacity: approximately 53 litres 

(Petrol) or 40 litres (Rechargeable hybrid).

Reserve level: approximately 6 litres.

Low fuel level

When the low fuel level is reached, this 

warning lamp lights up on the instrument 

panel, accompanied by the display of a message 

and an audible signal. When it first comes on, 

about 6 litres

 of fuel remain.

Until sufficient fuel is added, this warning lamp 

appears every time the ignition is switched on, 

accompanied by the message and the audible 

signal. When driving, this message and audible 

signal are repeated with increasing frequency as 

the fuel level drops towards 

0

.

You must refuel as soon as possible to avoid 

running out of fuel.

A small arrow by the warning lamp 

indicates on which side of the vehicle the 

fuel filler flap is located.

Stop & Start

Never refuel with the engine in STOP 

mode; you must switch off the ignition.

Refuelling

Any addition of fuel must be in quantities of at 

least 10 litres, in order to be registered by the 

fuel gauge.

Opening the filler flap may create a noise caused 

by an inrush of air. This vacuum is entirely 

normal, resulting from the sealing of the fuel 

system.

The filler cap is built into the filler flap or must be 

unscrewed (depending on version).

To refuel in complete safety:

► 

You must switch off the engine.


►  To open the filler flap, press the flap opening 

button or press the rear edge of the filler flap 

(depending on version).

Rechargeable hybrid vehicles

After pressing the button, it may take a 

few minutes for the filler flap to open.

If the flap becomes stuck, press and hold the 

button for more than 3 seconds.

►  Take care to select the pump that delivers the 

correct fuel type for the vehicle's engine (see a 

reminder label on the inside of the filler flap).


►  Turn the filler cap to the left, remove it 

and place it on its support on the filler flap 

(depending on version).

►  Insert the filler nozzle and push it in as far as 

possible before starting to refuel (to minimise the 

risk of splashing).

-------------------------------------------------------------------------------------------------------------------------------------------------------------

141

Practical information

7

►  Fill the tank.

Do not continue past the 3

rd

 cut-off of the 

nozzle; as this may cause malfunctions.

►  Put the filler cap back in place and turn it to 

the right (depending on version).

►  Push the filler flap to close it.

The vehicle is fitted with a catalytic converter, 

which helps to reduce the level of harmful 

emissions in the exhaust gases.

For petrol engines, you must use unleaded 

fuel.

The filler neck is narrower, allowing only 

unleaded petrol nozzles to be inserted.

If you have put in the wrong fuel for 

the vehicle, you must have the fuel 

tank drained and filled with the correct fuel 

before starting the engine.

Rechargeable hybrid 

system

Electrical system

The electrical circuit of the rechargeable hybrid 

system is identified by orange cables and its 

components are marked with this symbol:


The rechargeable hybrid engine's system 

uses a voltage of between 240 V and 

400 V. This system may be hot both when the 

ignition is on and after switching it off. 

Observe the warning messages on the labels, 

especially in the charging flap.

High voltage system voltage is 

dangerous and can cause burns or other 

injuries or even fatal electric shock.

Since damage to high voltage components is 

not visible, CITROËN recommends that you:

–  Never touch the components, damaged 

or not, and never let your jewelry or other 

metallic objects come into contact with these 

components.

–  Never work on the orange high voltage 

cables or on any other high voltage 

component marked with the Electric risk label. 

Any intervention on the high voltage system 

must be carried out by qualified persons in 

workshops qualified and approved to carry 

out this type of work.

–  Never damage, modify or remove the 

orange high voltage cables or disconnect 

them from the high voltage network.

–  Never open, modify or remove the cover of 

the traction battery.

–  Never work with cutting and forming 

tools or heat sources near high voltage 

components and cables.

In case of low level of fluid in the cooling 

tank, the refilling shall only be performed in a 

qualified and trained workshop to verify that 

the leakage is not in the traction battery.

Any intervention on the high voltage system 

must be carried out by qualified persons in 

workshops qualified and approved to carry 

out this type of work.

Damage to the vehicle or the traction battery 

could result in the leakage of toxic gases or 

fluids either immediately or later. CITROËN 

recommends that you:

–  Always inform the fire and emergency 

services in the event of an incident, warning 

that the vehicle is equipped with a traction 

battery.

–  Never touch the liquids leaking from the 

traction battery.

–  Do not inhale the gases emitted by the 

traction battery which are toxic.

–  Move away from the vehicle in the event of 

incident or accident, the gases emitted being 

flammable and could cause a fire.


-------------------------------------------------------------------------------------------------------------------------------------------------------------

142

Practical information


This label is intended solely for use by 

firefighters and maintenance services in 

the event of any work on the vehicle.

No other person must touch the device shown 

on this label.

In the event of an accident or impact 

to the vehicle’s underbody

In these situations, the electrical circuit or the 

traction battery can be seriously damaged.

Stop as soon as it is safe to do so and switch 

off the ignition.

Contact a CITROËN dealer or a qualified 

workshop.

When washing

Before washing the vehicle, always 

check that the charging flap is closed 

correctly.

Never wash the vehicle while the battery is 

on charge.

High-pressure washing

To avoid damaging the electrical 

components, it is expressly prohibited to 

use high-pressure washing in the engine 

compartment or under the body.

Do not use a pressure greater than 80 bar 

when washing the bodywork.

Never allow water or dust to enter the 

connector or charging nozzle - risk of 

electrocution or fire!

Never connect / disconnect the charging 

nozzle or cable with wet hands - risk of 

electrocution!

Traction battery

The Li-ion (Lithium-ion) traction battery stores 

the electrical energy needed to propel the 

vehicle.

It is located in the boot.

The traction battery's range varies depending 

on the type of driving, the route, the use of 

thermal comfort equipment and the ageing of its 

components.

The traction battery ageing depends on 

several factors, such as climatic 

conditions and the distance travelled.

To preserve the mileage of your vehicle 

and the durability of your traction battery, 

CITROËN recommends that you:

–  Do not fully charge the battery of your 

electric vehicle daily (charge the traction 

battery below 80% as often as possible).

–  Do not completely discharge the battery.

–  Do not store the vehicle for a long period 

of non-use (more than 12 hours) when the 

traction battery has a low or high charge level. 

Prefer a charge level between 20 and 40%.

–  Limit the use of fast charging.

–  Do not expose the vehicle to temperatures 

below -30°C and above +60°C for more than 

24 hours.

–  Avoid charging the vehicle at negative 

temperatures (except if the vehicle ran more 

than 20 minutes) or above +30°C.

–  Do not use the vehicle's traction battery as 

a generator of energy.

–  Do not use a generator to recharge your 

vehicle's traction battery.

In the event of damage to the traction 

battery

It is strictly prohibited to work on the vehicle 

yourself.

Do not touch liquids coming from the battery, 

and in the event of skin contact with these 

products, wash abundantly with water and 

contact a doctor as soon as possible.

Contact a CITROËN dealer or a qualified 

workshop to have the system checked.

Disposal of the traction battery

The traction battery is designed for the life of the 

vehicle if the recommendations of CITROËN are 

followed.

-------------------------------------------------------------------------------------------------------------------------------------------------------------

143

Practical information

7

If it becomes necessary to replace the battery, 

contact the CITROËN dealer for instructions on 

its disposal. Improper disposal carries the risk of 

severe burns, electric shock, and damage to the 

environment.

In accordance with regulations, CITROËN 

ensures a second life or recycling of this 

component in collaboration with qualified 

operators.

Charging flap

The charging flap is located on the rear left-hand 

side of the vehicle.


1.

Deferred charging activation button

2.

Indicator lamp confirming that the nozzle is 

locked into the charging connector.

Fixed red: nozzle correctly positioned and 

locked.

Flashing red: nozzle incorrectly positioned or 

locking not possible.

3.

Charging connector

4.

Light guides


Status of light 

guides

Meaning

Fixed white

Welcome lighting when flap 

is opened

Fixed blue

Deferred charging

Flashing green

Charging

Fixed green

Charging complete

Fixed red

Malfunction

In case of impact, even light, against the 

charging flap, do not use it.

Do not dismantle or modify the charging 

connector - risk of electrocution and/or fire!

Contact a CITROËN dealer or a qualified 

workshop.

Charging cables, sockets 

and chargers

The traction battery can be charged using 

several types of cables.

The charging cable supplied with the vehicle is 

compatible with the electrical installations of the 

country of sale. If you are travelling abroad, refer 

to the following tables to check the compatibility 

of local electrical installations with the charging 

cable.

Contact a CITROËN dealer or a qualified 

workshop to obtain the appropriate charging 

cable(s).

Identification labels on charging 

sockets/connectors

Identification labels are affixed to the vehicle, 

charging cable and charger to inform the user 

about which device needs to be used.


The meaning of each identification label is as 

follows:

-------------------------------------------------------------------------------------------------------------------------------------------------------------

144

Practical information

Identification label

Location

Configuration

Power type/Voltage range


C


Charging connector (vehicle side)

TYPE 2

AC

< 480 Vrms


C


Charging socket (charger side)

TYPE 2

AC

< 480 Vrms

Types of charging

Cable type

Compatibility

Specifications

Mode 2 charging cable with integrated control 

unit


Identification label 

C

 on the charging connector 

(vehicle side). 

Conventional electrical socket 

A


(depending on country). 


Charge limited to a maximum of 8 A.

"Green'Up" type socket 

B


Charge limited to a maximum of 16 A.

-------------------------------------------------------------------------------------------------------------------------------------------------------------

145

Practical information

7

Cable type

Compatibility

Specifications

Mode 3 charging cable


Identification labels 

C

 on the charging connector 

(vehicle side) and 

D

 on the socket (charger side). 

Accelerated charging unit socket 

A


Charge limited to a maximum of 32 A.

Wallbox accelerated charging unit 

B


The estimated charging time is indicated 

on the instrument panel when the vehicle 

is connected. It may vary depending on 

various factors such as the outside 

temperature or the quality of the electrical 

grid. 

If the outside temperature is below -10°C, it 

is recommended to connect the vehicle as 

soon as possible as the charging time may 

increase significantly. The battery may not 

fully charge.

Domestic charging cable (mode 2)

It is essential to avoid damaging the 

cable and to keep it intact. 

In the event of damage, do not use it and 

contact a CITROËN dealer or a qualified 

workshop to replace it.

Accelerated charging unit (mode 3)

Do not dismantle or modify the 

accelerated charging unit - risk of 

electrocution and/or fire!

To find out how it is used, please refer to the 

accelerated charging unit's user instructions.

Control unit (mode 2)


POWER

-------------------------------------------------------------------------------------------------------------------------------------------------------------


Content      ..     7      8      9      10     ..