Citroën Jumpy-Dispatch (2022 year). Manual in english - page 6
 

  Index      Manuals     Citroën Jumpy-Dispatch (2022 year). Manual in english


Search            copyright infringement  


Content      ..     4      5      6      7     ..


Citroën Jumpy-Dispatch (2022 year). Manual in english - page 6


82

Ease of use and comfort

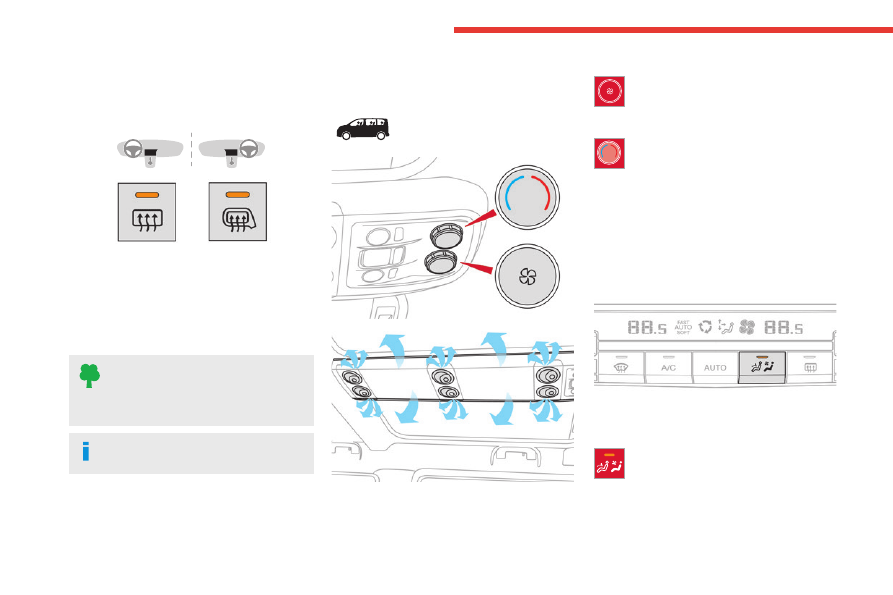
Demisting/de-icing the 

rear screen and/or the 

door mirrors


►  Press one of these buttons to switch on/off 

rear screen and door mirror demisting/de-icing 

(depending on version).

The indicator lamp in the button comes 

on

 when 

the function is 

activated

.

Demisting/de-icing switches off automatically to 

prevent excessive power consumption.

Switch off demisting/de-icing as soon 

as you no longer consider it necessary, 

as decreased power consumption in turn 

reduces energy consumption.

Demisting/de-icing only operates with the 

engine running.

Rear heating - air 

conditioning


If your vehicle is fitted with a rear air conditioning 

unit located in the roof, this system distributes 

conditioned and heated air via a distribution rail 

and individual outlets.

Air flow

►  Turn the dial to increase or decrease 

the air flow.

Comfort temperature

–  Turn the thumbwheel from blue (cold) 

to red (hot) to modulate the temperature 

to your liking.

This control simultaneously adjusts the 

temperature and the location of the air delivery:

–  blue: the air is delivered mainly at roof level,

–  red: the air is delivered mainly by the vent 

located in row 3 on the right.

Activation/Deactivation


Depending on version, this button is accessible 

at the front, from the dual-zone automatic air 

conditioning control panel.

►  Press this button to activate/deactivate 

the operation of the rear controls.

-------------------------------------------------------------------------------------------------------------------------------------------------------------

83

Ease of use and comfort

3

Additional heating/

ventilation system

Only available for Diesel vehicles.


Heating

This is an additional and separate system which 

heats the passenger compartment and improves 

defrosting performance.

This indicator lamp is lit while the system 

is programmed or set in operation 

remotely via the remote control.

It flashes during the whole duration of the 

heating and goes off at the end of the heating 

cycle or when stopped using the remote control.

Ventilation

This system allows ventilation of the passenger 

compartment with exterior air to improve the 

temperature experienced on entering the vehicle 

in summer.

Programming

With a MyCitroën Drive, use the remote control 

to start/stop the additional heating.

With a Bluetooth

®

 audio system or a MyCitroën 

Play, use the remote control to start/stop the 

additional heating and/or adjust the pre-heating 

times.

With Bluetooth

®

 audio system


►  Press the 

MENU

 button to access the 

main menu. 

►  Select "

Pre-heat. / Pre-ventil.

".

►  Select "

Activation

" and, if necessary, for 

programming, 

“Parameters

".

►  Select "

Heating

" to heat the engine and 

passenger compartment or "

Ventilation

" to 

ventilate the passenger compartment.


►  Select:

•  the first clock to set/save the time at which 

the pre-heating temperature will be reached,

•  the second clock to set/save a second time 

at which the pre-heating temperature will be 

reached,

Using these two clocks and depending 

on the season you can, for example, 

select one or the other start time.

A message on the screen confirms your 

choice.

With MyCitroën Play

Press 

Connect-App

 to display the main 

page.

Then press "

Programmable heating/

ventilation

".

►  Select the "

Status

" tab to activate/deactivate 

the system.

►  Select the "

Other settings

" tab to choose 

the "

Heating

" mode, to heat the engine and 

passenger compartment, or "

Ventilation

" to 

ventilate the passenger compartment.

►  Then set/save the time at which the 

preheating temperature will be reached for each 

selection.

Press this button to save. 

With MyCitroën Drive

In the 

Applications > Car Apps

 menu: 

►  Select 

Temperature conditioning

►  Press the 

Status

 tab to activate/deactivate 

the system.

►  Press the 

Settings

 tab to select 

Heating


mode to heat the engine and passenger 

-------------------------------------------------------------------------------------------------------------------------------------------------------------

84

Ease of use and comfort

compartment or 

Ventilation

 to ventilate the 

passenger compartment.

►  Then programme/save the activation time for 

each selection.

►  Press 

OK

 to confirm.

You must allow at least 60 minutes 

between programming operations.

Depending on the outside temperature, a 

certain amount of pre-conditioning time is 

necessary in order to reach the programmed 

temperature by the stored activation time.

This pre-conditioning time lasts up to 45 min.

Long-range remote control

This enables you to switch the heating in 

the passenger compartment on or off from a 

distance.

The remote control has a range of about 0.6 

miles (1 km) in open country.


On

►  Pressing and holding this button starts 

the heating immediately (confirmed by the 

green indicator lamp coming on briefly).

Switching off

►  Pressing and holding this button stops 

the heating immediately (confirmed by the 

temporary illumination of the red indicator lamp).

The indicator lamp in the remote control flashes 

for about 2 seconds if the vehicle has not 

received the signal.

Then repeat the command after having changed 

location.

Changing the battery

The indicator lamp in the remote control will 

change to orange if the battery charge is low.

If the indicator lamp is not on, the battery is 

discharged.


►  Use a coin to unscrew the cap and replace 

the battery.

Do not throw remote control batteries 

away, as they contain metals that are 

harmful to the environment. Take them to an 

approved disposal point.

If the system is switched on using the 

long-range remote control, the maximum 

heating duration is around 45 min.

The ventilation is activated provided that 

the battery is sufficiently charged. 

The heating is activated provided that: 

–  the battery charge and the fuel level are 

sufficient,

–  the engine has been started since the 

previous heating cycle,

–  60 minutes have elapsed between two 

heating requests.

Programmable heating is supplied by the 

vehicle fuel tank. Before use, make sure 

that you have sufficient fuel. If the fuel tank is 

on reserve, you are strongly recommended 

not to programme the heating.

-------------------------------------------------------------------------------------------------------------------------------------------------------------

85

Ease of use and comfort

3

The additional heating must always be 

switched off while refuelling to avoid any risk 

of fire or explosion.

To avoid the risk of poisoning or 

asphyxia, the programmable heating 

must not be used, even for short periods, in a 

closed environment such as a garage or 

workshop which is not equipped with an 

exhaust gas extraction system.

Do not park the vehicle on a flammable 

surface (dry grass, dead leaves, paper, etc.) 

- Risk of fire!

Glazed surfaces such as the rear screen 

or windscreen can become very hot in 

places.

Never put objects on these surfaces; never 

touch these surfaces - Risk of burns!

Independent additional 

heating

Depending on the country of sale, this is an 

additional and independent system which heats 

the hot water circuit of the Diesel engine to 

improve comfort and to raise the temperature 

of the cold engine. It improves demisting and 

defrosting performance. With the engine idling 

or the vehicle stationary, it is normal to notice a 

high-pitched whistling and some emissions of 

smoke or odour.

The temperature near the heating system must 

not exceed 120°C. A higher temperature (e.g. in 

a paint oven) could damage the components of 

electronic circuits.

The additional heating is supplied by the 

vehicle's fuel tank. Make sure that the low fuel 

warning lamp is not on.

To avoid the risks of poisoning or 

suffocation, the additional heating must 

not be used, even for short periods, in a 

closed environment such as a garage or 

workshop which is not equipped with an 

exhaust gas extraction system.

Do not park the vehicle on a flammable 

surface (for example: dry grass, fallen 

leaves, paper, etc.) - risk of fire!

Have the additional heating checked at 

least once a year, at the beginning of 

winter.

For maintenance and repairs, you must only 

contact a CITROËN dealer or a qualified 

workshop.

Temperature pre-

conditioning (Electric)

This function allows you to programme the 

temperature in the passenger compartment to 

reach a pre-defined, non-modifiable temperature 

(approx. 21°C) before you enter the vehicle, on 

the days and at the times of your choice.

This function is available when the vehicle is 

connected or not connected.

Programming

With Bluetooth

®

 audio system

Temperature pre-conditioning is not available 

with the Bluetooth

®

 audio system.

With the MyCitroën Play or MyCitroën 

Drive system

Programming can be carried out from a 

smartphone using the 

MyCitroën App


application.

For more information on 

Remote functions

refer to the corresponding section.

With MyCitroën Drive system

In the 

Applications

 menu: 

Press "

Car Apps

" to display the applications 

home page.

Select 

Temperature conditioning

►  Press 

+

 to add a programme.

-------------------------------------------------------------------------------------------------------------------------------------------------------------

86

Ease of use and comfort

►  Select the time of entry into the vehicle and 

the desired days. Press 

OK

.

►  Press 

ON

 to activate this programme.

The temperature pre-conditioning sequence 

begins approximately 45 minutes before the 

programmed time when the vehicle is connected 

(20 minutes when it is not connected) and is 

maintained for 10 minutes after.

You can set multiple programmes.

Each one is saved in the system.

To optimise the driving range, we recommend 

starting a programme while the vehicle is 

connected.

The fan noise that occurs during 

temperature pre-conditioning is perfectly 

normal.

Operating conditions

–  The function is only activated when the 

ignition is switched off

 and the 

vehicle 

locked

.

–  When the vehicle is not connected, the 

function is only activated if the battery charge 

level is greater than 50%.

–  When the vehicle is not connected and a 

recurring programme is active (e.g. from Monday 

to Friday), if two temperature pre-conditioning 

sequences are run without the vehicle being 

used, the programme will be deactivated.

Courtesy lamp(s)

Front: comes on when one of the front or 

rear doors is opened (sliding side door 

and depending on equipment, left-hand 

side-hinged door or tailgate).

Rear or row 2 and row 3: comes on when one of 

the rear doors is opened (sliding side door and 

depending on equipment, left-hand side-hinged 

door or tailgate).

Always lit, ignition on. 

Always off.


Front


Rear


-------------------------------------------------------------------------------------------------------------------------------------------------------------

87

Ease of use and comfort

3


Automatic switching on/off

The front courtesy lamp comes on when the key 

is removed from the ignition switch.

All courtesy lamps come on when the vehicle is 

unlocked, when one of the corresponding doors 

is opened and when locating the vehicle using 

the remote control. 

They fade to off after the ignition is switched on 

and when the vehicle is locked.

Take care not to allow objects to come 

into contact with the courtesy lamp.

Individual reading lamp


If fitted to the vehicle, these are switched 

on and off by means of a manual switch.

With the ignition on, operate the corresponding 

switch.

Take care not to put anything in contact 

with the courtesy lamp.

-------------------------------------------------------------------------------------------------------------------------------------------------------------

88

Lighting and visibility

Lighting control stalk

Main lighting


Lamps off (ignition off)/

Daytime running lamps (engine running)

Automatic illumination of lamps/daytime 

running lamps

Sidelamps only 

Dipped or main beam headlamps 

Headlamp dipping


►  Pull the lighting control stalk to switch 

between dipped and main beam headlamps.

In lamps off and sidelamps modes, pull the 

lighting control stalk to switch the main beam 

headlamps on directly ("headlamp flash").

Operation of the selected lighting is 

confirmed by the illumination of the 

corresponding indicator lamp.

Without AUTO lighting


With AUTO lighting


Foglamps

Rear foglamp

It only works if the sidelamps are on. 


►  Rotate the ring forwards/backwards to turn 

it on/off.

When the lighting is switched off automatically 

(with AUTO model), the foglamp and the dipped 

beam headlamps will remain on.

Front foglamps/Rear foglamps

They operate with the sidelamps, dipped 

or main beam headlamps on.


►  Rotate the ring forwards:

•  once to switch on the front foglamps,

•  a second time to switch on the rear 

foglamps.

►  Turn in the opposite direction to switch off.

If the lighting is switched off automatically (with 

AUTO model) or the dipped beam headlamps 

are switched off manually, the foglamps and 

sidelamps remain on.

►  Rotate the ring backwards to switch the 

foglamps off; the sidelamps will then switch off.

-------------------------------------------------------------------------------------------------------------------------------------------------------------

89

Lighting and visibility

4

Switching on the foglamps is prohibited 

in clear weather or in rain, both day and 

night. In these situations, the power of their 

beams may dazzle other drivers. They must 

only be used in fog or falling snow (rules may 

vary depending on country).

Do not forget to switch off the foglamps when 

they are no longer necessary.

Switching on the lamps after 

switching off the ignition

To reactivate the lighting control, rotate the 

ring to the "

0

" position - lamps off, then to the 

desired position.

If the driver's door is opened, a temporary 

audible signal warns the driver that the lamps 

are on.

They will go off automatically after a period 

of time that depends on the level of charge in 

the battery (entering energy economy mode).

Switching off of the lighting when the 

ignition is switched off 

When the ignition is switched off, all of the 

lamps turn off immediately, except for the 

dipped beam headlamps if automatic guide-

me-home lighting is activated.

In some weather conditions (e.g. low 

temperature or humidity), misting on the 

internal surface of the glass of the headlamps 

and rear lamps is normal, and will disappear 

after the lamps have been on for a few 

minutes.

Travelling abroad

If planning to use your vehicle in a 

country that drives on the other side of the 

road, the dipped beam headlamps must be 

adjusted to avoid dazzling oncoming drivers. 

Contact a CITROËN dealer or a qualified 

workshop.

Direction indicators


►  Left or right: lower or raise the lighting control 

stalk, beyond the point of resistance.

If you keep the direction indicators on for 

more than 20 seconds, the volume of the 

audible signal will increase if the speed is 

above 50 mph (80 km/h).

Three flashes

►  Press briefly upwards or downwards, without 

going beyond the point of resistance; the 

direction indicators will flash 3 times.

Daytime running lamps/

Sidelamps


If the vehicle is so equipped, they come on 

automatically when the engine is started, when 

the lighting control stalk is in position "

0

" or 

"

AUTO

".

Automatic headlamp 

illumination

When a low level of ambient light is detected 

by a sunshine sensor, the number plate 

lamps, sidelamps and dipped beam headlamps 

are switched on automatically, without any action 

on the part of the driver. They can also come 

-------------------------------------------------------------------------------------------------------------------------------------------------------------

90

Lighting and visibility

on if rain is detected, at the same time as the 

automatic rain sensitive wipers.

As soon as the brightness returns to a sufficient 

level or after the windscreen wipers are switched 

off, the lamps are switched off automatically.

Malfunction

In the event of a malfunction of the rain/sunshine 

sensor, the vehicle’s lamps come on and this 

warning lamp is displayed on the instrument 

panel, accompanied by an audible signal and/or 

the display of a message.

Have it checked by a CITROËN dealer or a 

qualified workshop.

Do not cover the rain/sunshine sensor 

located at the top centre of the 

windscreen behind the interior rear view 

mirror; the associated functions would no 

longer be controlled.

In fog or snow, the rain/sunshine sensor 

may detect sufficient light. For this 

reason, the lighting will not come on 

automatically.

The inner surface of the windscreen may 

become misted up and affect the proper 

operation of the rain/sunshine sensor.

In humid and cold weather, demist the 

windscreen regularly.

Guide-me-home and 

welcome lighting

Guide-me-home lighting

Manual


►  With the ignition off, pull the lighting control 

stalk toward you ("headlamp flash") to activate/

deactivate the function.

Manual guide-me-home lighting goes off 

automatically after a period of time.

Automatic

With the "Automatic illumination of lamps" 

function activated (lighting control stalk in the 

"

AUTO

" position) and when the light is poor, the 

dipped beam headlamps come on automatically 

when the ignition is switched off.

With the ring in the "

AUTO

" position and when 

the light is poor, the dipped beam headlamps 

come on automatically when the ignition is 

switched off.

With audio system or touch screen

The activation, deactivation and 

duration of guide-me-home lighting 

are set in the vehicle configuration menu.

Exterior welcome lighting

The remote operation of the lighting makes your 

approach to the vehicle easier in poor light. It 

is activated when the lighting control is in the 

"

AUTO

" position and the level of light detected 

by the sunshine sensor is low.

Switching on

Press this button on the remote control or 

on one of the front door handles with the 

"Keyless Entry and Start" system.

The dipped beam headlamps and sidelamps 

come on; your vehicle is also unlocked.

Switching off

The exterior welcome lighting switches off 

automatically after a set time, when the ignition 

is switched on or on locking the vehicle.

Programming

With audio system or touch screen

The activation, deactivation and 

duration of the welcome lighting 

can be set via the vehicle configuration menu.

-------------------------------------------------------------------------------------------------------------------------------------------------------------

91

Lighting and visibility

4

Automatic headlamp 

dipping

For more information, refer to the 

General recommendations for 

automatic lighting systems

.

With the ring of the lighting control stalk in the 

"

AUTO

" position and the function activated on 

the touch screen, this system automatically 

switches between dipped and main beam 

headlamps, according to lighting and traffic 

conditions, using a camera located at the top of 

the windscreen.


This system is a driving aid.

The driver remains responsible for 

the vehicle's lighting, its correct use in the 

prevailing light, visibility and traffic conditions, 

and for compliance with driving and vehicle 

regulations.

The system becomes operational when 

the vehicle exceeds 16 mph (25 km/h).

When the speed falls below 9 mph (15 km/h), 

the function is no longer operational.

Activation/Deactivation

With audio system


►  To activate or deactivate the system, press 

this button.

The indicator lamp in the button is 

on

 when the 

function is 

activated

.

With touch screen

The settings are adjusted via the vehicle 

configuration menu.

►  Then put the lighting control stalk ring in the 

"AUTO" or "Dipped/main beam position".

Pause

If the situation requires a change of headlamp 

beam, the driver can take over at any time.

►  A "headlamp flash" pauses the 

function and the lighting system switches 

to "automatic illumination of lamps" mode:

–  If the "AUTO" and "Dipped beam" indicator 

lamps were on, the system changes to main 

beam.

–  If the "AUTO" and "Main beam" 

indicator lamps were on, the system changes to 

dipped beam.

►  To reactivate the function, once again switch 

the headlamps manually between dipped and 

main beam.

Flashing the headlamps does not 

deactivate the system.

The state of the system is stored when the 

ignition is switched off.

The system may be disrupted or not work 

correctly:

–  When visibility conditions are poor 

(snowfall, heavy rain, etc.).

–  If the windscreen in front of the camera is 

dirty, misted or obscured (for example, by a 

sticker).

–  If the vehicle is facing highly reflective 

signs.

When the system detects thick fog, it 

temporarily deactivates the function.

The system is not able to detect:

–  Road users that do not have their own 

lighting, such as pedestrians.

-------------------------------------------------------------------------------------------------------------------------------------------------------------

92

Lighting and visibility

–  Vehicles whose lighting is obscured (for 

example, vehicles driving behind a safety 

barrier on a motorway).

–  Vehicles at the top or bottom of a steep 

slope, on winding roads, on crossroads.

Clean the windscreen regularly, 

particularly the area in front of the 

camera.

The internal surface of the windscreen can 

also become misted around the camera. 

In humid and cold weather, demist the 

windscreen regularly.

Do not allow snow to accumulate on the 

bonnet or roof of the vehicle as this could 

obstruct the detection camera.

Headlamp beam height 

adjustment


To avoid inconvenience to other road users, 

the height of the halogen headlamps must be 

adjusted according to the load in the vehicle.


0

Empty (initial setting)

1

Partial load

2

Medium load

3

Maximum authorised load

4 5 6

Not used


0

1 or 2 people in the front seats (initial 

setting)

1

5 people

2

6 to 9 people

3

Driver + maximum authorised load

4 5 6

Not used

Interior ambient lighting


The dimmed passenger compartment lighting 

improves visibility inside the vehicle when the 

light is poor.

Switching on

At night, the front roof lighting and panoramic 

roof lighting (if fitted to your vehicle) comes on 

automatically when the sidelamps are switched 

on.

The ambient lighting switches off automatically 

when the sidelamps are switched off.

Programming

With audio system or touch screen

The activation, deactivation and 

the choice of brightness of the 

ambience lighting can be set via the vehicle 

configuration menu.

Wiper control stalk

Before operating the wipers in wintry 

conditions, clear any snow, ice or frost 

from the windscreen and around the wiper 

arms and blades.

Do not operate the wipers on a dry 

windscreen. In extremely hot or cold 

weather, check that the wiper blades are not 

stuck to the windscreen before operating the 

wipers.

After using an automatic car wash, you 

may temporarily notice abnormal noises 

and poorer wiping performance.  You do not 

need to replace the wiper blades.

-------------------------------------------------------------------------------------------------------------------------------------------------------------

93

Lighting and visibility

4

Without AUTO wiping


With AUTO wiping


Windscreen wipers

►  To select the wiping speed: raise or lower the 

stalk to the desired position.

Fast wiping (heavy rain) 

Normal wiping (moderate rain) 

Intermittent wiping (proportional to the 

vehicle’s speed)

Switching off


Single wipe (press down and release). 

or

Automatic wiping 

Refer to the corresponding section.

After the ignition has been switched off, 

the wipers may move slightly at the foot 

of the windscreen.

If the ignition has been switched off with 

the windscreen wipers active, you must 

operate the control stalk again to reactivate 

wiping when the ignition is switched on again 

(unless the ignition was off for less than 

a minute).

Windscreen wash

►  Pull the wiper control stalk towards you and 

hold.

The screenwash then the windscreen wipers 

operate for a pre-determined time.

With automatic air conditioning, any 

action on the screenwash control results 

in temporary closure of the air intake to 

protect the passenger compartment from any 

odour.

To avoid damaging the wiper blades, do 

not operate the screenwash if the 

screenwash reservoir is empty.

Only operate the screenwash if there is no 

risk of the fluid freezing on the windscreen 

and hindering visibility. During the winter 

period, use "very cold climate" rated products.

Never top up with water.

Low 

screenwash fluid level

When the low level of the reservoir is 

reached, this warning lamp lights up on 

the instrument panel, accompanied by an 

audible signal and a message.

It comes on when the ignition is switched on, 

or every time the stalk is operated, until the 

reservoir is refilled.

Refill the screenwash reservoir (or have it 

refilled) the next time you stop.

Automatic windscreen 

wipers

In 

AUTO

 mode, the windscreen wipers operate 

automatically and adapt to the intensity of the 

rainfall.

Detection is via a rain/brightness sensor, located 

at the top centre of the windscreen behind the 

rear view mirror.

Switching on


-------------------------------------------------------------------------------------------------------------------------------------------------------------

94

Lighting and visibility

►  Give a short downwards push to the control 

stalk.

A wiping cycle confirms that the instruction has 

been accepted.

This indicator lamp lights up on the 

instrument panel, accompanied by a 

message.

Switching off

►  Give the control stalk another brief push 

downwards or set the control stalk to another 

position (

Int

1

 or 

2

).

This indicator lamp goes off on the 

instrument panel, accompanied by a 

message.

If the ignition has been off for more than 

one minute, the automatic wipers must 

be reactivated by pushing the control stalk 

downwards.

Malfunction

If a fault occurs with the automatic wipers, the 

wipers operate in intermittent mode.

Have it checked by a CITROËN dealer or a 

qualified workshop.

Do not cover the rain/sunshine sensor.

When using an automatic car wash, 

switch off the automatic wipers and the 

ignition.

In winter, wait until the windscreen is 

completely clear of ice before activating the 

automatic wipers.

Rear wiper


Off.


Intermittent wipe. 

Wash-wipe (set duration). 

Reverse gear

When reverse gear is engaged, if the windscreen 

wipers are operating, the rear wiper will come 

into operation automatically (activated by 

default).

Activation/Deactivation

With audio system or touch screen

The system's settings are adjusted 

via the vehicle configuration menu.

This function is activated by default. 

In the event of accumulation of snow or 

hard frost or if a bicycle carrier is fitted to 

the tailgate, deactivate the automatic rear 

wiper via the vehicle configuration menu.

Rear screenwash

►  Turn the ring as far as it will go and hold it in 

position.

The screenwash and the wiper operate for as 

long as the ring remains turned.

A final wiping cycle is performed when screen 

washing ends.

Special position of the 

windscreen wipers

This maintenance position is used while cleaning 

or replacing the wiper blades. It can also be 

useful, in wintry weather (ice, snow), to release 

the wiper blades from the windscreen.

To maintain the effectiveness of the flat 

wiper blades, it is advisable to:

–  handle them with care.

–  clean them regularly using soapy water.

–  avoid using them to hold cardboard on the 

windscreen.

–  replace them at the first signs of wear.

-------------------------------------------------------------------------------------------------------------------------------------------------------------

95

Lighting and visibility

4

Before removing a windscreen wiper blade


Operating the wiper control stalk immediately 

after switching off the ignition will place the wiper 

blades in a vertical position.

►  Proceed with the desired operation or the 

replacement of the wiper blades.

After refitting a windscreen wiper blade

►  To return the wiper blades to their initial 

position after the operation, switch on the ignition 

and operate the wiper control stalk.

Changing a wiper blade

Removing/Refitting at the front


►  Carry out these wiper blade replacement 

operations from the driver's side.

►  Starting with the wiper blade farthest from 

you, hold each arm by the rigid section and raise 

it as far as possible.

Do not touch the wiper blades - risk of 

irreparable deformation.

Do not release them while moving them. Risk 

of damaging the windscreen!

►  Clean the windscreen using screenwash 

fluid.

Do not apply "Rain X" type water-

repellent products.

►  Unclip the worn wiper blade closest to you 

and remove it.

►  Install the new wiper blade and clip it to the 

arm.

►  Repeat the procedure for the other wiper 

blade.

►  Starting with the wiper blade closest to you, 

once again hold each arm by the rigid section, 

then guide it carefully onto the windscreen.

Removing/refitting at the rear

►  Hold the arm by the rigid section and raise it 

as far as possible.

►  Clean the rear screen using screenwash 

fluid.

►  Unclip the worn wiper blade and remove it.

►  Install the new wiper blade and clip it to the 

arm.

►  Once again hold the arm by the rigid section, 

then guide it carefully onto the rear screen.

-------------------------------------------------------------------------------------------------------------------------------------------------------------

96

Safety

General safety 

recommendations

Do not remove the labels attached in 

different places on your vehicle. They 

include safety warnings as well as 

identification information for the vehicle.

For all work on your vehicle, use a 

qualified workshop that has the technical 

information, skills and equipment required, all 

of which a CITROËN dealer is able to 

provide.

Depending on country regulations, 

certain safety equipment may be 

mandatory: high visibility safety vests, 

warning triangles, breathalysers, spare bulbs, 

spare fuses, fire extinguisher, first aid kit, mud 

flaps at the rear of the vehicle, etc.

Installing electrical accessories:

–  The fitting of electrical equipment or 

accessories not approved by CITROËN may 

cause excessive current consumption and 

faults and failures with the electrical system 

of your vehicle. Contact a CITROËN dealer 

for information on the range of approved 

accessories.

–  As a safety measure, access to the 

diagnostic socket, used for the vehicle's 

electronic systems, is reserved strictly for 

CITROËN dealers or qualified workshops, 

equipped with the special tools required (risk 

of malfunctions of the vehicle's electronic 

systems that could cause breakdowns or 

serious accidents). The Manufacturer cannot 

be held responsible if this advice is not 

followed.

–  Any modification or adaptation not intended 

or authorised by CITROËN or carried out 

without meeting the technical requirements 

defined by the Manufacturer will result in the 

suspension of the commercial warranty.

Installation of accessory radio 

communication transmitters

Before installing a radio communication 

transmitter with an external aerial, you must 

without fail contact a CITROËN dealer for 

the specification of transmitters which can 

be fitted (frequency, maximum power, aerial 

position, specific installation requirements), 

in line with the Vehicle Electromagnetic 

Compatibility Directive (2004/104/EC).

Declarations of conformity for radio 

equipment

The relevant certificates are available on the 

brand website:

http://service.citroen.com/ACddb/

Hazard warning lamps


►  Pressing this red button causes all the 

direction indicators to flash.

They can work with the ignition switched off.

Automatic operation of 

hazard warning lamps

When braking in an emergency, depending on 

the rate of deceleration, the hazard warning 

lamps come on automatically. They switch off 

automatically when you next accelerate.

They can be switched off by pressing the button.

-------------------------------------------------------------------------------------------------------------------------------------------------------------

97

Safety

5

Emergency or assistance 

call


1.

Localised Emergency Call

2.

Localised Assistance Call

eCall (SOS)

Your vehicle may be fitted with the eCall (SOS) 

system either as standard or as an option.

The eCall (SOS) system provides direct access 

to the emergency services and is built directly 

into the vehicle.

According to the country of sale, the eCall (SOS) 

system corresponds to the systems PE112, 

ERAGLONASS, 999, etc.

The eCall (SOS) system is activated by default.

►  In an emergency, press button 

1

 for more 

than 2 seconds.

* In accordance with the general conditions of use of the service, available from dealers and subject to technological and technical limitations.

** Depending on the geographic coverage of the "eCall (SOS)" and "ASSISTANCE" systems. 

The list of countries covered and the telematic services provided is available from dealers or on the website for your country.

The lit indicator lamp and a voice message 

confirm that the call has been made to the 

emergency services*.

The eCall (SOS) system immediately locates 

your vehicle and puts you in contact with the 

appropriate emergency services**.

►  Pressing again immediately cancels the 

request.

The indicator lamp flashes while the vehicle 

data is being sent, and then remains lit when 

communication is established.

If an impact is detected by the airbag 

control unit, an emergency call is made 

automatically, irrespective of the deployment 

of any airbags.

This system is a public service and is 

free of charge.

Operation of the system

–  Upon switching on the ignition, the indicator 

lamp lights up red, then green, and then goes 

out: the system is operating correctly.

–  The indicator lamp flashes red: replace the 

back-up battery.

–  The indicator lamp is fixed red: system 

malfunction. The emergency and assistance call 

services may not work.

–  If the indicator lamp does not come on when 

the ignition is switched on, this also means that 

there is a system malfunction.

If the problem persists, contact a qualified 

workshop as soon as possible.

A system fault does not prevent the 

vehicle from being driven.

Data processing

All processing of personal information 

by the "Localised Emergency Call" system 

(PE112) complies with the framework for 

protection of personal information established 

by Regulation 2016/679 (GDPR) and 

Directive 2002/58/EC of the European 

Parliament and the Council, and in particular, 

seeks to protect the vital interests of the 

data subject, in accordance with Article 6.1, 

paragraph d) of Regulation 2016/679.

Personal information processing is strictly 

limited to the management of the "Localised 

Emergency Call" system used with the “112” 

European single emergency call number.

The "Localised Emergency Call" system is 

able to collect and process only the following 

-------------------------------------------------------------------------------------------------------------------------------------------------------------


Content      ..     4      5      6      7     ..