Citroën Jumpy-Dispatch (2022 year). Manual in english - page 5
 

  Index      Manuals     Citroën Jumpy-Dispatch (2022 year). Manual in english


Search            copyright infringement  


Content      ..     3      4      5      6     ..


Citroën Jumpy-Dispatch (2022 year). Manual in english - page 5


66

Ease of use and comfort

The two outer seats are fitted with ISOFIX 

mountings.

For more information on the 

ISOFIX 

mountings

, refer to the corresponding 

section.

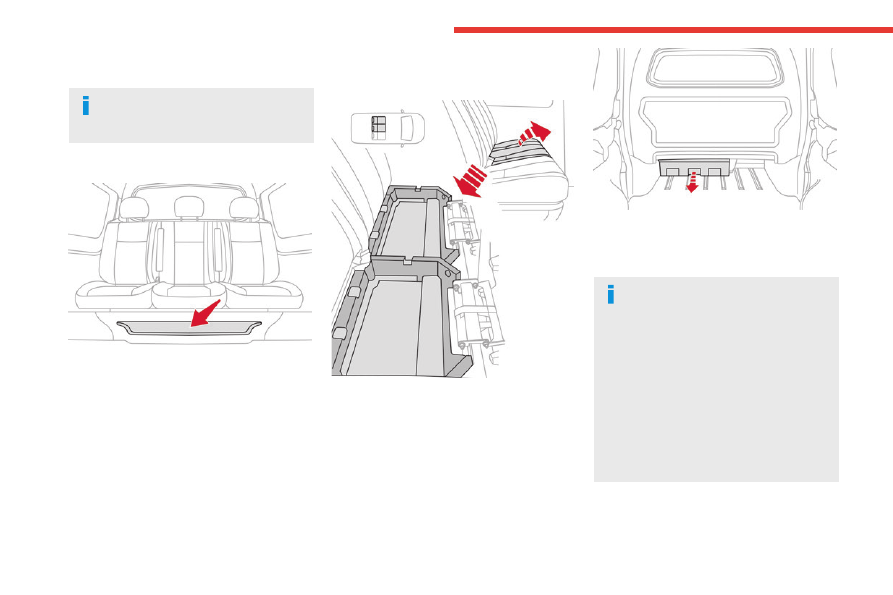
Storage compartment


If applicable, a storage compartment is available 

at the front, underneath the bench seat.

Under seat cushion storage 

wells


If the vehicle is so equipped, they are located 

underneath the centre and outer left-hand seats.

To gain access to it from the cab, tip the required 

seat forwards.


Depending on the country of sale, the wells can 

be dismantled and removed through the rear so 

that bulky objects can be stowed underneath the 

bench seat.

Do not attach anything to the cab fixing 

structure.

Do not exceed the number of passengers 

indicated on the registration certificate.

In the rear, the 

loading area

 is intended for 

carrying goods only.

You are advised to place the goods or heavy 

objects as far forwards as possible in the 

loading area

 (towards the cab) and secure 

them by means of straps using the stowing 

rings on the floor.

The rear seat belt frames are not designed to 

secure the load being carried.

-------------------------------------------------------------------------------------------------------------------------------------------------------------

67

Ease of use and comfort

3

Folding crew cab


The crew cab has a folding bench seat, seat 

belts and side windows. It is separated from 

the 

loading area

 by the bench seat by a high-

strength grille.

Folded position


►  With just one hand, pull one of the straps 

A


upwards to fold the bench seat.

►  Using handle 

B

, guide the movement of the 

bench seat until it locks in the folded position.

Bench seat position


►  To put the bench seat back in place, pull the 

strap 

C

 to unlock the bench seat, then release 

the strap.

►  Then, using only the handle 

B

, guide the 

descent of the backrest to tip the assembly until 

it locks in the bench seat position.

Never put your hand underneath the 

bench seat to guide it downwards, as you 

could get your fingers trapped.

Ensure there are no objects or feet beneath 

the bench seat or obstructing the anchorage 

system, preventing the assembly from being 

correctly locked.

Do not attach anything to the cab fixing 

structure.

Do not exceed the number of passengers 

indicated on the registration certificate.

In the rear, the load space is intended for 

carrying goods only.

It is recommended to place goods or heavy 

objects as far forwards as possible in the load 

space (towards the cab) and secure them by 

means of straps using the stowing rings on 

the floor.

The rear seat belt frames are not designed to 

secure the load being carried.

-------------------------------------------------------------------------------------------------------------------------------------------------------------

68

Ease of use and comfort

Interior fittings

Mats

Fitting


When fitting it on the driver's side, only use the 

mountings present on the carpet.

The other mats are simply laid over the carpet.

Removing/refitting

►  To remove it on the driver's side, move 

the seat as far back as possible and give the 

fasteners a quarter turn.


►  To refit it, position the mat and replace the 

fasteners, giving them a quarter turn.

►  Check that the mat is secured correctly.

To avoid any risk of jamming the pedals:

–  Only use mats which are suited to the 

fixings already present in the vehicle; these 

fixings must be used.

–  Never fit one mat on top of another.

The use of mats not approved by CITROËN 

may interfere with access to the pedals and 

hinder the operation of the cruise control/

speed limiter.

The approved mats have two fasteners 

located underneath the seat.

In row 2 and row 3


Use the Velcro straps to attach the transverse 

mat in row 2 with the longitudinal mats in rows 

2 and 3.

Glove box

It houses the front passenger airbag deactivation 

switch and can hold a bottle of water, the 

vehicle's handbook pack, etc.

Never drive with the glove box (if 

equipped) open when a passenger is 

sitting at the front. It may cause injury during 

sharp deceleration.

Storage compartment

This can hold a bottle of water, the vehicle's 

documentation, etc.


►  To open the storage compartment, press the 

left-hand end of the control and guide the lid to 

its open position notch.

If your vehicle is so equipped, it is lit when the lid 

is opened.

When driving

, keep the storage 

compartment closed. Otherwise, there is 

-------------------------------------------------------------------------------------------------------------------------------------------------------------

69

Ease of use and comfort

3

a risk of injury in the event of an accident or 

sudden braking.

Front door storage pockets

Liquids carried in an open vessel (e.g. a 

cup or mug) could be spilt, presenting a 

risk of damage on contact with the controls in 

the dashboard and centre console. Be 

careful.

Upper glove box

This is located in the dashboard, behind the 

steering wheel.


Press the control to open the lid (depending on 

version) then guide it to its fully open position.

To close it, guide the lid then press the centre 

gently.

Any liquid which could spill risks causing 

an electrical short circuit and therefore a 

potential fire.

"Aircraft" type tables


Fitted to the back of each front seat.


►  To use the table, lower it fully until it locks in 

the low position.

►  To stow it, raise the table to the high position, 

passing the point of resistance.

On the passenger side, do not forget to 

fold the table up before placing the seat 

in the "table" position.

Do not place hard or heavy objects on 

the table. They could become dangerous 

projectiles in the event of emergency braking 

or impact.

For more information on the 

Front seats

and in particular placing the backrest in 

the "table" position, refer to the corresponding 

section.

12 V socket(s)

Depending on version.


-------------------------------------------------------------------------------------------------------------------------------------------------------------

70

Ease of use and comfort


►  To connect a 12 V accessory (maximum 

power: 120 Watts), lift the cover and plug in a 

suitable adapter.

Observe the maximum power rating to 

avoid damaging the accessory.

The connection of an electrical device 

not approved by CITROËN, such as a 

USB charger, may adversely affect the 

operation of vehicle electrical systems, 

causing faults such as poor radio reception or 

interference with displays in the screens.

USB socket


The socket can be used to connect a portable 

device or a USB memory stick.

The socket reads audio files that are sent to your 

audio system to be played through the vehicle's 

speakers.

These files can be managed using the steering-

mounted controls or those on the audio system.

The USB socket also allows a 

smartphone to be connected by 

Android Auto

®

 or CarPlay

®

, enabling certain 

smartphone applications to be used on the touch 

screen.

For best results, use a cable made or approved 

by the device manufacturer.

These applications can be managed using the 

steering-mounted controls or the audio system 

controls.

When the USB socket is used, the 

portable device charges automatically.

While charging, a message is displayed if the 

power drawn by the portable device exceeds 

the current supplied by the vehicle.

For more information about how to use this 

equipment, refer to the sections describing 

the audio and telematics systems.

220 V socket


Depending on version, a 220 V/50 Hz socket 

(maximum power: 120 W) is located underneath 

the front right-hand seat and therefore 

accessible from row 2.

This socket works with the engine running, as 

well as in STOP mode of Stop & Start. 


►  Lift the cover.

►  Check that the indicator lamp is on green.

►  Connect your multimedia or other electrical 

device (telephone charger, laptop computer, 

CD-DVD player, bottle warmer, etc.).

In the event of a malfunction, the 

green indicator lamp flashes.

Have it checked by a CITROËN dealer or a 

qualified workshop.

Connect only one device to the socket at 

a time (do not use an extension lead or 

multi-socket) and only connect devices with 

Class II insulation (indicated on the device).

Do not use devices with metallic cases.

-------------------------------------------------------------------------------------------------------------------------------------------------------------

71

Ease of use and comfort

3

If the power consumption becomes too 

high and when required by the vehicle's 

electrical system (particular weather 

conditions, electrical overload, etc.), the 

power supply to the socket will be cut off; the 

green indicator lamp goes off

Load space cover


►  To remove it, lift it up.

►  To install it, insert the guides into their 

housings.

In the event of sudden deceleration, 

objects placed on the load space cover 

can turn into projectiles.

Loading area fittings

Stowing rings


Use the stowing rings on the rear floor to secure 

loads.

As a safety precaution in case of sharp braking, 

we recommend placing heavy objects as far 

forwards as possible (i.e. near the cab).

We recommend immobilising the load by firmly 

securing it using the stowing rings present on 

the floor.

Load retaining partition


On the floor, behind the front seats, a vertical 

partition protects the driver and front passengers 

against the risk of load movement.

-------------------------------------------------------------------------------------------------------------------------------------------------------------

72

Ease of use and comfort

Steel or glazed partitions separate the loading 

area from the cab.

Recommendations on 

loading

The weight of the load must comply with 

the Gross Train Weight (GTW).

For more information on 

Engine technical 

data and towed loads

, refer to the 

corresponding section.

If you are using a carrying system (roof 

bars/roof rack), comply with the 

maximum loads associated with this system.

For more information on 

Roof bars/Roof 

rack

, refer to the corresponding section.

Make sure that the size, shape and 

volume of the loads carried are 

compatible with the highway code and safety 

regulations and do not impair the driver’s field 

of vision.

The load must be evenly distributed in 

the loading area so as not to interfere 

with driving the vehicle.

Place the load close to the side wall panels, 

or push it against the side wall panels 

between the wheel arches.

However, it is recommended that heavy 

objects are placed as close to the cab as 

possible as a precaution in case of sharp 

braking.

Firmly secure all parts of the load using 

the stowing rings on the floor of the 

loading area.

For more information on the 

Interior fittings


and in particular on the stowing rings, refer to 

the corresponding section.

To avoid the risk of injury or accident, the 

load must be made stable so that it 

cannot slide, tip over, fall or be projected. To 

do this, use only retaining straps that conform 

to current standards (DIN, for example).

For more information on putting straps in 

place, refer to the manufacturer’s user guide.

To prevent the load from sliding, there must 

not be any empty spaces between the load 

items and the vehicle wall panels.

As well as the straps, optimise the stability 

of the load with stable handling equipment 

(wedges, rigid blocks of wood or padding).

When washing your vehicle, never clean 

the inside directly using a water jet.

Seating area fittings


High load retaining net

This allows the use of the entire loading capacity, 

up to the roof:

–  behind the front seats in row 1, when the rear 

seats (and bench seats) in rows 2 and 3 are 

folded or removed,

–  behind the rear seats (and bench seats) in row 

2, when the rear seats (and bench seats) in row 

3 are folded or removed.

Upper fixings


►  Unclip the anchorage cover in the roof on 

each side.

Lower fixings (behind row 1)

If your vehicle has 

fixed

 one-piece bench seats 

or seats and bench seats:


-------------------------------------------------------------------------------------------------------------------------------------------------------------

73

Ease of use and comfort

3


►  On each side in row 2, insert the fixings in the 

floor anchorages (as shown above).

If your vehicle has seats and bench seats or 

individual seats on 

rails

:


►  On each side in row 2, insert the fixings in the 

floor anchorages then turn them a quarter turn to 

lock them in place (as shown above).

Place them as close as possible to the end of 

the rail.

Lower fixings (behind row 2)


►  Use the stowing rings.

Fit the net

Unclip the upper fixing covers and secure the 

lower fixings (as previously described).

►  Fold (table position) the seats and bench 

seats in rows 2 and 3 (according to equipment).

►  Close the rear heating and air conditioning 

vents (depending on the equipment you have).

►  Unroll the high load retaining net.

►  Position the net upper fixings in the 

corresponding anchorages in the roof (first one 

side, then the other).

►  Fully extend the straps.

►  On each side, attach the bottom fixings of the 

net to the lower anchorages (behind row 1) or in 

the stowing rings (behind row 2).

►  Tension the straps to extend the net.

►  Check that the net is attached securely and 

properly extended.

Never use the ISOFIX ring provided for 

fixing the strap of a child seat with Top 

Tether.

Rear windows in row 2

If fitted to your vehicle, the side windows in row 2 

can be opened.


While driving, the windows must be closed or 

secured at one of the notches.

►  Squeeze the two controls then move the 

window sideways.

For more information on the 

Child lock 

on rear windows

, refer to the 

corresponding section.

Side blinds

Fitted to the windows in row 2, these protect the 

passenger compartment from the sun's rays.


-------------------------------------------------------------------------------------------------------------------------------------------------------------

74

Ease of use and comfort


►  Pull the tab 

A

 and attach the blind to the hook 

B

.

Always guide the blind slowly, using the 

tab, when raising or lowering it.

Panoramic sunroof


This is fitted with two manual and independent 

blinds, which improve thermal and acoustic 

comfort.

Blinds
Opening/Closing


►  Take one of the blinds by its grip and push it 

back or pull it forwards to the desired position.

Retractable sliding table

Shine

Business Lounge


The table has a central storage space covered 

by a lid. When deployed, this device becomes 

a table with two table tops on which you can 

place objects. The central part has two cup/

can holders and can also be used to hold small 

objects (e.g. credit card, pen).

The assembly is mounted on a runner allowing it 

to be positioned either in row 2 or row 3. 

Storage


►  Slide back the cover for access to 11 litres of 

storage space.

-------------------------------------------------------------------------------------------------------------------------------------------------------------

75

Ease of use and comfort

3

The storage space can only support a 

maximum weight of 3 kg; do not exceed 

this maximum load in use.

Moving forward or backward


►  Lift the control (without going beyond the 

point of resistance) and slide the assembly 

forwards or backwards.

►  Release the control when it is in the desired 

position.

►  Check that the table is secured on the runner. 

If this is not the case, move the assembly slightly 

to the next notch on the runner.

You can move the table in both the open 

and stowed position. However, to ensure 

safety, it is advised that you handle the 

assembly in the stowed position.

For the table to run smoothly, ensure that 

no objects are blocking the space used 

by the runner on the floor.

Before manoeuvring the table, check that 

there is nothing on the table.

Unfolding


►  Operate the control on the top and pull the 

table assembly up until it clicks into place.

►  Pull each table top fully up then pivot them on 

each side into the horizontal position.

Folding

►  Raise each table top, going beyond the point 

of resistance, to the vertical position.

►  Push each table top down into its housing 

until it clicks into place. 


►  Push the control then tip the table assembly 

downward until it clicks into place.

Before stowing the table tops, check that 

they are clear. Before tipping the 

assembly down, check that the two table tops 

have clicked home in the low position and that 

there is nothing in the cup holder area (such 

as a can or pen).

Cup holders

Two cups or cans and small objects (such as 

a credit card, portable ashtray or pen) can be 

carried in the middle of the unfolded table.

Liquids carried in an open vessel (a cup 

or mug) could be spilt, presenting a risk. 

Be careful.

Never use the table in this position while the 

vehicle is being driven.

-------------------------------------------------------------------------------------------------------------------------------------------------------------

76

Ease of use and comfort

Removal


►  Raise the control fully to release the 

anchorages and tip the table assembly forward. 

►  Remove the table assembly through the 

sliding door in row 2.

Check that there is nothing in the space 

around the runner on the floor, so that 

the table disengages cleanly.

Changing the direction


With the table removed, you can turn it 180°.

Remove a seat to make this easier. 

Refitting

►  Check that there is no object obstructing the 

runner and preventing proper locking.


►  Check that the control is in the upper position 

(locking mechanism armed). If not, lift this control 

fully to arm the mechanism.

►  Place the front of the table on the runner.

►  Taking care not to interfere with the control, 

tip the assembly towards the rear until you hear 

it lock into place.

►  Check that the assembly is fully locked into 

the runner. If not, slide the assembly gently along 

the runner until it meets the next notch.

Check that the table is fully locked into 

the runner - risk of injury in the event of 

an accident or sudden braking.

►  Release the control until the guide locks into 

the runner.

Be careful of passengers' feet when 

manoeuvring the assembly.

Storage off the runner

If removing the table from the vehicle for 

storage, ensure that it is placed in a 

clean area, in order to avoid introducing any 

foreign bodies into the mechanisms.

The table must be placed outside the vehicle, 

on a flat and level surface, resting on the 

guide so as not to damage visible parts.

Caution, when out of the vehicle, the 

table leans to the right or left when 

placed on a surface.

-------------------------------------------------------------------------------------------------------------------------------------------------------------

77

Ease of use and comfort

3


Incorrect use of the table can cause 

serious injury.

Never use the table in the open or deployed 

position while the vehicle is in motion. In the 

event of sudden braking, any object placed on 

the table can become a projectile.

Ensure that the table is correctly stowed in 

the low position before setting off.

Never use the table tops as seats or lean on 

them.

A label attached to the side of the table 

serves as a reminder of this.

Never place hot objects such as 

saucepans or frying pans on the table 

- risk of damaging the surface and starting a 

fire!

When the table is deployed, each table 

top can support a maximum of 10 kg. If 

you exceed the maximum weight limit, you 

risk damaging part or all of the table.

Never lift the table when it is between 

individual seats; you risk damaging the table 

tops.


Before moving the table or an individual 

seat forwards or backwards, make sure 

that the seat's backrest is upright and the 

table is stowed.


When stowing the table tops, never place 

your hand inside the slide area - risk of 

trapping your fingers! Use the handle 

provided.

Heating and Ventilation

Advice

Using the ventilation and air 

conditioning system

►  To ensure that air is distributed evenly, 

keep the external air intake grilles at the base 

of the windscreen, the nozzles, the vents, the 

air outlets and the air extractor in the boot 

free from obstructions.

►  Do not cover the sunshine sensor located 

on the dashboard; this sensor is used to 

regulate the automatic air conditioning 

system.

►  Operate the air conditioning system for at 

least 5 to 10 minutes once or twice a month to 

keep it in good working order.

►  If the system does not produce cold air, 

switch it off and contact a CITROËN dealer or 

a qualified workshop.

-------------------------------------------------------------------------------------------------------------------------------------------------------------

78

Ease of use and comfort

When towing a large load on a steep gradient 

in high temperatures, switching off the air 

conditioning increases the available engine 

power, enhancing the towing capacity.

Avoid driving for too long with the 

ventilation off or with prolonged operation 

of interior air recirculation. Risk of misting and 

deterioration of the air quality!

If the interior temperature is very high 

after the vehicle has stood for a long 

time in the sunshine, air the passenger 

compartment for a few moments.

Put the air flow control at a setting high 

enough to quickly change the air in the 

passenger compartment.

Condensation created by the air 

conditioning results in a discharge of 

water underneath the vehicle. This is perfectly 

normal.

Servicing the ventilation and air 

conditioning system

►  Ensure that the passenger compartment 

filter is in good condition and have the filter 

elements replaced regularly.

We recommend using a composite passenger 

compartment filter. Its specific active additive 

helps protect against polluting gases and bad 

smells.

►  To ensure correct operation of the 

air conditioning system, have it checked 

according to the recommendations in the 

Manufacturer’s service schedule.


Contains R134A fluorinated 

greenhouse gases

Depending on version and country of sale, the 

air conditioning system may contain R134A 

fluorinated greenhouse gases. Gas capacity 

0.5 kg (+/- 0.025 kg), GWP index 1430 (CO

equivalent: 0.715 t).

Stop & Start

The heating and air conditioning systems 

only work when the engine is running.

Temporarily deactivate the Stop & Start 

system to maintain a comfortable temperature 

in the passenger compartment.

For more information on 

Stop & Start

, refer 

to the corresponding section.

ECO driving mode

Selecting this mode reduces electrical 

energy consumption, but restricts the 

performance of the heating and air 

conditioning systems, although it does not 

deactivate them.

Heating


Manual air conditioning

The air conditioning system only operates with 

the engine running.


1.

Temperature.

2.

Air flow.

3.

Air distribution.

4.

Interior air recirculation.

5.

Air conditioning on/off.

Air flow

►  Turn the thumbwheel 

2

 to obtain a 

comfortable air flow.

If you set the air flow control to the 

minimum

 position (off), the temperature 

in the vehicle will no longer be controlled. A 

slight air flow can still be felt however, 

resulting from the forward movement of the 

vehicle.

-------------------------------------------------------------------------------------------------------------------------------------------------------------

79

Ease of use and comfort

3

Temperature

►  Turn the thumbwheel 

1

 from "

LO

" (cold) 

to "

HI

" (hot) to adjust the temperature to your 

requirements.

Air distribution

►  Pressing button 

3

 successively directs the air 

flow towards:

–  windscreen, side windows and footwells, 

– footwells,

–  central vents, side vents and footwells,

–  windscreen, side windows, central vents, side 

vents and footwells,

–  central and side vents, 

–  windscreen and side windows (demisting or 

defrosting).

Air conditioning

With the engine running, the air conditioning is 

designed to operate effectively in all seasons, 

with the windows closed.

It enables you to:

–  lower the temperature in summer,

–  enhance the effectiveness of the demisting 

function in winter, above 3°C.

On/Off

►  Press button 

5

 to activate/deactivate the air 

conditioning system.

When the air conditioning is in operation, to 

cool the air more quickly, you can use interior 

air recirculation for a few moments by pressing 

button 

4

. Then restore the intake of exterior air.

The air conditioning does not operate 

when the air flow adjustment is set to off.

Switching the system off could result in 

discomfort (humidity, misting).

Dual-zone automatic air 

conditioning


1.

Temperature.

2.

Air flow.

3.

Air distribution.

4.

Recirculation of interior air.

5.

Air conditioning on/off.

6.

Automatic comfort mode.

7.

Visibility programme.

8.

“Mono” function or Rear heating and air 

conditioning on/off (depending on version).

Automatic comfort mode

►  Press the "

AUTO

" button 

6

 to toggle the 

mode.

The active mode appears in the display screen, 

as described below:

Ensures soft, quiet operation by limiting 

air flow.

Offers the best compromise between a 

comfortable temperature and quiet 

operation.

Provides dynamic, effective air flow.


When the engine is cold, the air flow will 

only increase to its optimum level 

gradually, to avoid distributing too much cold 

air.

In cold weather, it prioritises the distribution of 

warm air to the windscreen, the side windows 

and the footwells only.

Manual mode

It is possible to make a different choice from that 

offered by the system by changing a setting. 

The other functions will still be automatically 

managed. 

The "

AUTO

” symbol disappears if you change a 

setting.

Deactivating the system

►  Press button 

2

 "

-

" until the fan symbol 

disappears.

This action switches off all of the functions of the 

system.

Temperature is no longer controlled. A slight air 

flow can still be felt, however, resulting from the 

forward movement of the vehicle.

-------------------------------------------------------------------------------------------------------------------------------------------------------------

80

Ease of use and comfort

►  Press button 

2

 "

+

" to switch the system on 

again.

Temperature

The driver and front passenger can each set the 

temperature to suit their preferences.

The value shown on the display is a level 

of comfort, not a temperature in Celsius or 

Fahrenheit.

►  Push button 

1

 down to decrease the value or 

up to increase it. 

A setting of around 21 provides optimum 

comfort. Depending on your 

requirements, a setting between 18 and 24 is 

normal.

In addition, we recommend avoiding left/right 

setting differences of more than 3.

On entering the vehicle, if the interior 

temperature is significantly colder or 

warmer than the comfort value setting, there 

is no need to alter the value displayed in 

order to reach the required level of comfort. 

The system compensates automatically and 

corrects the temperature difference as quickly 

as possible.

For maximum cooling or heating of the 

passenger compartment, it is possible to 

exceed the minimum value 14 or the 

maximum value 28.

►  Push button 

1

 down until 

"LO"

 is 

displayed or up until 

"HI"

 is displayed.

"Mono" function

The comfort setting for the passenger's side 

can be indexed to the driver's comfort setting 

(mono-zone).


►  Press the corresponding button 

8

 to activate/

deactivate the function.

The indicator lamp in the button is on when the 

function is activated.

The function is deactivated automatically if a 

passenger uses the temperature control.

Rear heating - air 

conditioning


►  Press the corresponding button 

8

 to activate/

deactivate the function.

For more information, refer to the 

Rear 

heating - air conditioning

 section.

Visibility programme

►  Press the "

visibility

" button 

7

 to demist or 

de-ice the windscreen and side windows more 

quickly. 

The system automatically manages the air 

conditioning, air flow and air intake, and provides 

optimum distribution towards the windscreen and 

side windows.

►  Press the "

visibility

" button 

7

 again to stop 

the programme.

Or

►  Press the "

AUTO

" button 

6

 to return to the 

automatic comfort programme.

Air conditioning

With the engine running, the air conditioning is 

designed to operate effectively in all seasons, 

with the windows closed.

It is used to:

–  lower the temperature in summer,

–  increase the effectiveness of the demisting in 

winter, above 3°C.

On/Off

►  Press button 

5

 to activate/deactivate the air 

conditioning system.

When the air conditioning is in operation, to 

cool the air more quickly, you can use interior 

air recirculation for a few moments by pressing 

button 

4

. Then restore the intake of exterior air.

The air conditioning does not operate 

when the air flow adjustment is set to off.

-------------------------------------------------------------------------------------------------------------------------------------------------------------

81

Ease of use and comfort

3

Switching the system off could result in 

discomfort (humidity, misting).

Air distribution

►  Pressing button 

3

 successively directs the air 

flow towards:

–  windscreen, side windows and footwells, 

– footwells,

–  central vents, side vents and footwells,

–  windscreen, side windows, central vents, side 

vents and footwells,

–  central and side vents, 

–  windscreen and side windows (demisting or 

defrosting).

Air flow

►  Press the buttons 

2

 to increase/decrease the 

air flow.

The air flow symbol (a fan) appears. It is filled in 

or emptied gradually, according to the value set.

Interior air recirculation

The intake of exterior air prevents the formation 

of mist on the windscreen and side windows.

Recirculating the interior air isolates the 

passenger compartment from outside odours 

and fumes and allows the desired passenger 

compartment temperature to be achieved more 

rapidly.

►  Press this button to activate/deactivate 

the function (confirmed by the 

illumination/extinction of the indicator lamp).

Front demisting 

- defrosting

These markings on the control panel 

indicate the positioning of the controls for 

rapid demisting or defrosting of the windscreen 

and side windows.

Heating or manual air 

conditioning


►  Set the air flow, temperature and air 

distribution controls to the appropriately marked 

positions.

►  For air conditioning, press this button; 

its indicator lamp comes on.

Dual-zone automatic air 

conditioning


►  Press this button to demist or defrost 

the windscreen and side windows more 

quickly.

The system automatically manages the air 

conditioning, air flow and air intake, and provides 

optimum distribution towards the windscreen and 

side windows.

►  To turn it off, press this button 

again or press "

AUTO"

.

The system restarts with the values in use before 

it was deactivated.

-------------------------------------------------------------------------------------------------------------------------------------------------------------


Content      ..     3      4      5      6     ..